With inventory management, we can use the locations to see where the inventory is. For some trading companies, this is good enough but some would like to be more specific in where the items are in the warehouse.
For this, we can use the Warehouse Management Systems (WMS) functionality in Microsoft Dynamics NAV. WMS enables us to specify zones and bins within each location.
Another feature in warehouse management is the possibility of combining sales shipments and purchase receipts in warehouse documents. Using these documents, warehouse employees can pick or put away for more than one order at the same time resulting in a more efficient way of doing logistics.
Warehouse management can be used and implemented from very simple to highly advanced. To demonstrate the application design of WMS in Microsoft Dynamics NAV, we will discuss the following five possible levels of implementation. For each level, we will show the table and posting models.
- Bin Code: Using this field in the sales and purchase document enables the system to start creating warehouse entries.
- Warehouse Receipt and Shipment: This allows us to combine sales shipments and purchase receipts in one warehouse document. We cannot use the Pick and Put-Away activities.
- Warehouse Put-Away and Pick: For each purchase receipt or sales shipment, we can create a Put-Away or Pick journal.
- Warehouse Receipt and Shipment + Use Put-away Worksheet: This allows us to implement a real two-step warehouse process and receive the items on a staging location and creating put-away documents to move the items to their storage location in the warehouse.
- Directed Put-Away and Pick: This is the full option of WMS functionality in Microsoft Dynamics NAV. We use Receipts, Shipments, Put-aways, and Picks. Microsoft Dynamics NAV will suggest the Bin Codes. We can also use Zones, Cross Docking, and so on.
The setup options in the Location table (14) enable or disable the WMS options in Microsoft Dynamics NAV. This is done on the Warehouse tab, as shown in the following screenshot. Each level requires a special combination of settings.

Let's have a look at the different levels:
- Level 1: Enable Bin Mandatory
- Level 2: Enable Require Receive, Require Shipment, and Bin Mandatory
- Level 3: Enable Require Put-away, Require Pick, and Bin Mandatory
- Level 4: Enable Require Receive, Shipment, Require Put-away, Require Pick, Bin Mandatory, and Use Put-away Worksheet
- Level 5: Enable Require Receive, Require Shipment, Require Put-away, Require Pick, Bin Mandatory, and Directed Put-away and Pick

The starting level of implementing WMS is using the Bin table. This is done by enabling the Bin Mandatory field on the location. The Bin Code field is available in all the necessary tables, such as Purchase Line, Sales Line, and Item Journal Line.
When the Bin Code is used, codeunit Item Jnl.-Post Line (22) will create a Warehouse Journal Line and start the Whse. Jnl.-Register Line Codeunit (7301). This will result in the creation of Warehouse Entries (7312) and a Bin Content (7302).
We will create a new location, ORANGE, with a bin of BIN1. The location uses the Bin Mandatory option, as shown in the following screenshot:
Bin Mandatory
In a new purchase order, we can now select this new Bin Code and post a receipt. The system now creates a new record in the Bin Content table, which enables us to see the created Warehouse Entries.

Whenever a Bin is used for the first time, Microsoft Dynamics NAV will create a Bin Content record. A Bin Content record is neither master data nor a ledger entry or document. It is a special kind of table in the philosophy of Microsoft Dynamics NAV.
The C/AL code for the Bin Content handling can be found in codeunit Whse. Jnl.-Register Line (7301). To see which Bins are used for an item at any moment, we can open the Bin Content from the Item Card, as shown in the following screenshot:

The warehouse entries can be displayed by clicking on the Quantity (Base) field.
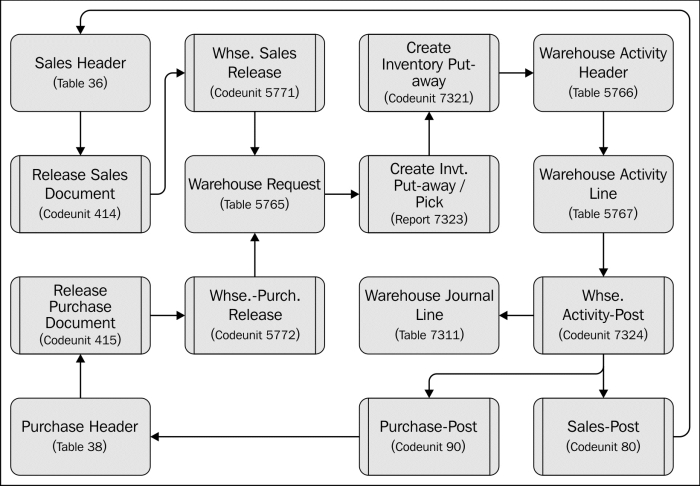
When we enable Require Receive and Require Shipment in the location, we can start using the warehouse receipt and shipment documents. These documents allow us to receive or ship multiple purchase or sales orders in one document.
Let's have a look at how this is done in the application:
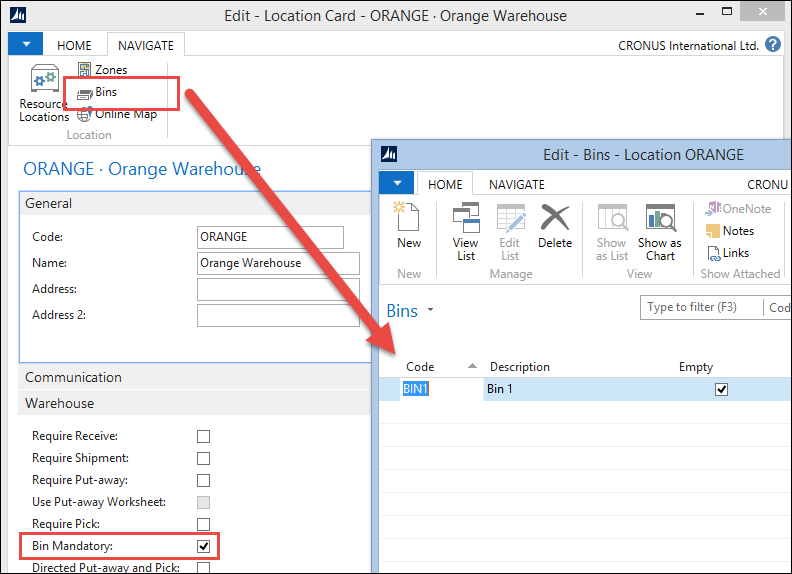
All warehouse documents start with a record Warehouse Request table (5765). These records are created when a sales or purchase document is released.
The warehouse receipt or shipment can be created in the following three ways:
- Using the Create Whse. Receipt or Create Whse. Shipment option from the purchase and sales order
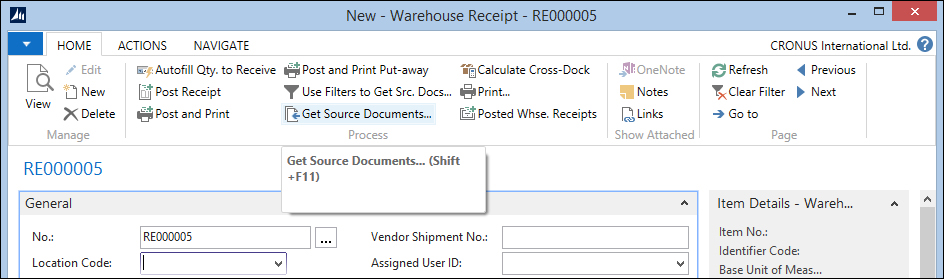
- Using the Get Source Documents report (5723)
- Using the Get Source Documents option on the Warehouse Receipt or Shipment Card
The first two options will create a new warehouse document for each sales or purchase document. The latter allows us to combine orders in one warehouse document.
Using only the warehouse receipt and shipment document is basically just adding one layer on top of the sales and purchase document. The posting routines Whse. Post Shipment (5763) and Whse. Post Receipt (5760), do not actually post something to the warehouse; they just write back the Bin code to the Sales Line and Purchase Line table. Technically, this uses the same C/AL code as level 1.
We can see how this is done by looking at the InitSourceDocumentLines function of, for example, Codeunit Whse. Post Receipt (5760):
InitSourceDocumentLines
WhseRcptLine2.COPY(WhseRcptLine);
WITH WhseRcptLine2 DO BEGIN
  CASE "Source Type" OF
    DATABASE::"Purchase Line":
      BEGIN
        PurchLine.SETRANGE("Document Type","Source Subtype");
        PurchLine.SETRANGE("Document No.","Source No.");
        IF PurchLine.FIND('-') THEN
          REPEAT
              ...
              IF PurchLine."Bin Code" <> "Bin Code" THEN BEGIN
                PurchLine."Bin Code" := "Bin Code";
                ModifyLine := TRUE;
              END;
              ...
            IF ModifyLine THEN
              PurchLine.MODIFY;
When the source tables are updated, the system creates a normal purchase receipt or sales shipment using codeunits sales-post (80) and Purch. Post (90).
Instead of creating a warehouse receipt or shipment, we can also directly create a Put-away or Pick from the sales or purchase order.
To enable this, we need to activate the Require Put-away and Require Pick options on the Location Card.
The warehouse request record is exactly the same as in level 2, but instead of creating a warehouse receipt or shipment, the system directly creates a warehouse activity header and line.
The warehouse activity header and line table are the internal Microsoft Dynamics NAV warehouse documents. There are five types of warehouse activity documents, they are as follows:
- Put-away: This document is used to move items from the receipt bin to a put-away bin. The document is generated from a warehouse receipt.
- Pick: This document is used to move items from a storage bin to a shipment bin. The document is generated from a warehouse shipment.
- Movement: This is an internal document that is used to move items internally in the warehouse.
- Invt. Put-away: This document is used to receive items and put them directly into the warehouse on their permanent bin. The document is created from a warehouse request.
- Invt. Pick: This document is used to ship items directly from the warehouse in one step. The document is created from a warehouse request.
When only using the Require Put-away and Require Pick option on a location, document types Invt. Put-Away and Invt. Pick are used. This will also make sure that the purchase order and sales order will be processed by starting codeunit sales-post (80) and Purch. Post (90).
Both level 2 and level 3 setup options are one-step warehouse implementations. When receiving an item, we must provide the storage bin where the item will be stored until it is sold. There is no additional step.
Using the warehouse receipt and shipment documents allows us to combine sales and purchase documents on one warehouse document. This cannot be done using direct Put-away and Pick. Using direct Put-away and Pick, we can split one sales line or purchase line into multiple bins. This cannot be done using warehouse receipt and shipment documents.
The reason for this is the way the warehouse entries are created. Level 2 uses the Bin field in the Item Journal Line to create the warehouse entries.
Using level 3, the warehouse entries are created using codeunit Whse.-Activity-Post (7324). The Bin code is not written back into the sales line or purchase line. This means we also cannot use the Bin code field in the purchase receipt and sales shipment documents.
Most warehouses use a two-step receipt and shipment process. The first step is receiving the items on a receipt location, which is often close to the unloading docks. Then, the items are stored in their warehouse location until they are required for the production or sales process. This is step 2.
To enable this two-step process, we can combine level 2 and 3 by using the options Require Receive, Shipment, Put-away and Pick + Bin Mandatory + Use Put-away worksheet in the Location Card.
This allows us to first perform the warehouse receipt and shipment as discussed in level 2. When we process this document, it will not only post the sales order and purchase order but it will also generate a record in the Whse. Put-away Request table (7324).
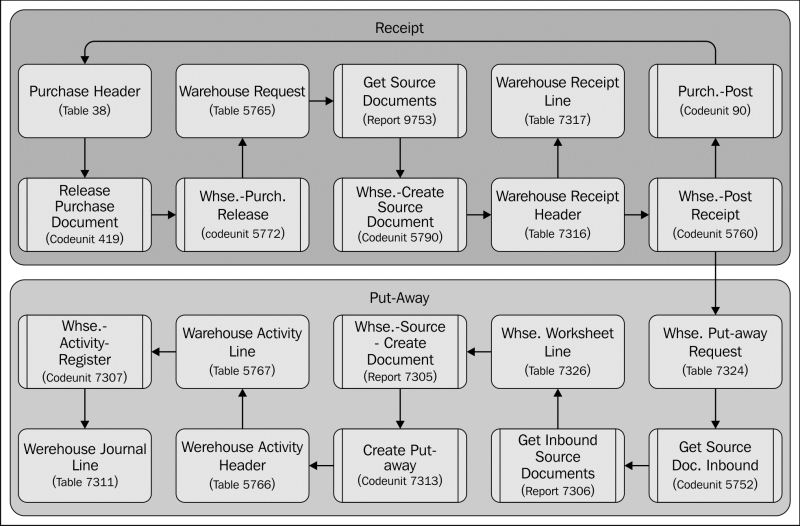
When the whse. put-away request is processed using the warehouse worksheet, it will result in a warehouse activity header and line. In this context, the system will use the Put-away and pick document type that we discussed in the previous section about level 3.
Technically, the documents for level 3 and level 4 are equal, but there are the following two differences:
- In a two-step warehouse setup, the items are already in a warehouse entry. This means we have to move them. This results in two new warehouse entries but also two lines in the warehouse document.
- The two-step warehouse documents are not posted but registered. This means that the system will only create warehouse entries and no longer updates the sales and purchase documents.
Combining warehouse receipts and shipments with put-aways and picks completes the table and posting diagram of WMS in Microsoft Dynamics NAV. But there are additional options to enrich the functionality.
One of these options is directed put-away and pick. When this option is activated, the system can and will help us in finding the correct bins for each warehouse activity.
Let's start with defining zones and default bins. A zone is a group of bins. Usually, they are located near each other physically but more importantly, they share some properties.
For each zone, we need to specify if it is allowed to receive, ship, put-away, and pick. This is done in the Bin Type list.
When defining the bins, it is recommended to use a logical name such as R-01-001 for Receipt row one shelf one:
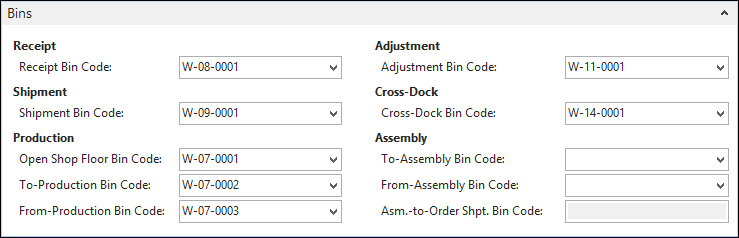
The default bins are set up in the Location Card on the Bin tab. These bins can always be changed on each document.
The bin calculation is done for the put-away documents using templates. This template defines the rules for finding the correct bin to store the items:

The find options are stored in the put-away template line table (7308); they are as follows:
- Find Fixed Bin: The system will try to find a bin, which is fixed. A fixed bin is usually reserved for a specific item.
- Find Floating Bin: This will try to find the first available bin.
- Find Same Item: This will filter on an available bin that already contains this item.
- Find Unit of Measure Match: This option can be used if parts of the warehouse are designed to handle a specific kind of carrier such as Euro or US pallet.
- Find Bin w. Less than Min. Qty: Use this option to find bins that are not fully used. If this option is not used with the Find Same Item, it might result in two items in the same bin.
- Find Empty Bin: This option will make sure we find an empty bin.
The C/AL code that handles the bin calculation is located in codeunit create put-away (7313). Let's have a look:
Code()
IF Location."Directed Put-away and Pick" THEN BEGIN
  BinType.CreateBinTypeFilter(BinTypeFilter,2);
  REPEAT
    QtyToPutAwayBase := RemQtyToPutAwayBase;
    IF NOT (PutAwayTemplLine."Find Empty Bin" OR
      PutAwayTemplLine."Find Floating Bin") OR
      PutAwayTemplLine."Find Fixed Bin" OR
      PutAwayTemplLine."Find Same Item" OR
      PutAwayTemplLine."Find Unit of Measure Match" OR
      PutAwayTemplLine."Find Bin w. Less than Min. Qty"
    THEN BEGIN
        //Calc Availability per Bin Content
        IF FindBinContent("Location Code","Item No.",
          "Variant Code",WarehouseClassCode)
        THEN
          REPEAT
            ...
          UNTIL (BinContent.NEXT(-1) = 0) OR EverythingHandled
      END ELSE BEGIN

        //Calc Availability per Bin
        IF FindBin("Location Code",WarehouseClassCode) THEN
          REPEAT
            IF Bin.Code <> "Bin Code" THEN BEGIN
              ...
            END;
          UNTIL (Bin.NEXT(-1) = 0) OR EverythingHandled
      END
    UNTIL (PutAwayTemplLine.NEXT = 0) OR EverythingHandled;
For each record in the put-away template line table, the system will try to find a bin. This means that if the rules of the first template line fail, it will use the second template line and so forth.
The two options Find Empty Bin and Find Floating Bin eliminate using the others. If these are true, the system will call the FindBin function. For the other options, it will use the FindBinContent function.
Since there are many ways to set up WMS in Microsoft Dynamics NAV, it is very important to make the correct decisions at the start of the implementation. Moving the system from one strategy to another is quite a challenge.
It is therefore very important to discuss all possibilities and compare them to the way your company works.
Customizing and changing WMS should be done very carefully since the data flow is very complex, especially for Microsoft Dynamics NAV standards.