Similar to production orders in the standard application, the processes in our logistics application are status-driven rather than transaction-driven. This is why this part of the application does not have a journal with entries. The tables can have archived copies but they are not part of a normal registering or posting routine.
If we look at the structure of the logistics application, we can see that the typical posting transactions are missing. The application uses a status-driven workflow based on events that are defined in the triggers of the tables.

The logistics shipment and shipment details have a lot of similarity with the shipments from the warehouse. We have chosen to move them into new tables for the following reasons:
- Security: In Microsoft dynamics NAV, the table level is most important for security. If we share this table, it would be impossible to set up users to have access to logistics and not to the warehouse or vice versa.
- Locking: If two departments use the same table for different purposes, they will most likely have a different locking mechanism. For example, in logistics, shipments are bound to the route object. The warehouse shipments are bound to other shipment documents. Filtering the same table in main processes in different ways will significantly increase the probability of blocks and deadlocks.
- Table size: The storage documents are registered shortly after they are created. Most documents are deleted and moved to registered tables on the same day that they are created. Logistics shipments have a longer life cycle. It takes longer to take the products from our warehouse to the customer and during this process, many things can go wrong because of outside events. The transport tables may be periodically cleaned up like manufacturing or jobs in the standard Microsoft Dynamics NAV product.
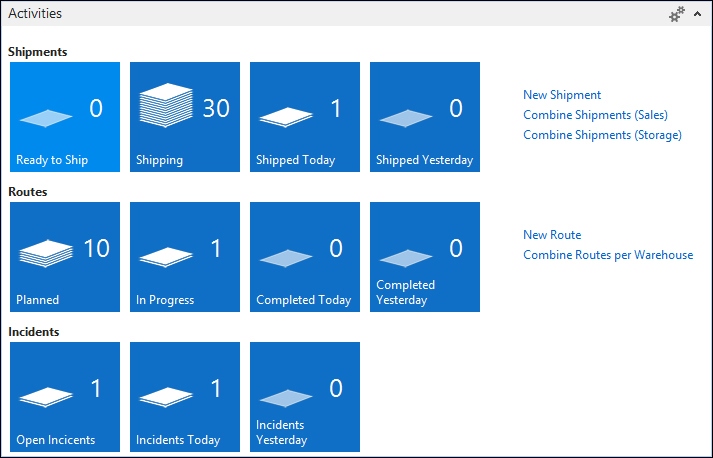
To start the logistics process, we can create some shipments manually but the application also provides an interface to the sales shipments and warehouse shipments.
Let's start the Combine Shipments (Sales) option from Activities on the Logistics Role Center to generate some data to work with.
Logistics shipments are products moving from one physical address to another physical address.
In our example, the shipments are created from our warehouse to the customer but a shipment can also be from another address to a customer. Tracking the status of a shipment is very important for the planners. A shipment starts with the Ready to Ship status as soon as all mandatory fields are checked.
When the shipments are combined into routes, the shipment moves to shipping and the status is changed to Shipping. During this stage, the products are picked up from the warehouse. When this happens, the Pickup Date Time is populated. This is done from the route.
After delivery, the Delivery Date Time is populated and the status is set to Shipped.

The planners can follow the shipments from their Role Centers in a workflow.
Shipments are combined into a route. For the planners to make a product planning, it is very important that the shipment details are correct. The length, width, height, and weight of the products determine whether they can fit in a truck, ship, airplane, or train.
Our example add-on system has a report to combine shipments into a route. The shipments in a route will be combined into stops if they have the same address information.
Combined shipping is done in the Shipment To Route & Warehouse (123456701) report. The shipments are grouped per warehouse. For each warehouse, a new route is created.
For each shipment, the system creates a route stop. The stops have different types, Pickup, Delivery, Pickup Group, and Delivery Group. Each shipment then gets a Pickup and Delivery stop:
Shipment - OnAfterGetRecord()

IF Route.Description <> Warehouse.Name THEN BEGIN
  Route."No." := '';
  Route.Description := Warehouse.Name;
  Route."Shipment Date" := WORKDATE;
  Route.Status := Route.Status::Planned;

  Route."Bill-to Customer No." := "Bill-to Customer No.";
  Route."Bill-to Name" := "Bill-to Name";

  Route.INSERT(TRUE);
  i := 0;
END;

i := i + 10000;

RouteStop."Route No." := Route."No.";
RouteStop."Line No." := i;
RouteStop.Type := RouteStop.Type::Pickup;
RouteStop.VALIDATE("Shipment No.", "No.");
RouteStop.INSERT;

i := i + 10000;

RouteStop."Route No." := Route."No.";
RouteStop."Line No." := i;
RouteStop.Type := RouteStop.Type::Delivery;
RouteStop.VALIDATE("Shipment No.", "No.");
RouteStop.INSERT;
After the routes are created and the shipments are assigned to a stop, a grouping and optimizing algorithm is started. This is codeunit Route Optimizer (123456700).
The algorithm in our example is designed to find the optimal route to deliver the products to the addresses by calculating the distance of each address from the warehouse. The route starts from the address that is closest to our warehouse and ends at the address that is the farthest away.
This is just an example of a simple algorithm. Each company will have its own algorithm that needs to be implemented:
RouteStopPickup.SETRANGE("Route No.", Route."No.");
RouteStopPickup.SETRANGE(Type, RouteStopPickup.Type::Pickup);
RouteStopPickup.FINDFIRST;

RouteStopDelivery.SETRANGE("Route No.", Route."No.");
RouteStopDelivery.SETRANGE(Type, RouteStopDelivery.Type::Delivery);
RouteStopDelivery.FINDSET;
REPEAT
  Window.UPDATE(2, RouteStopDelivery."Shipment No.");

  IF NOT Optimizer.GET(RouteStopDelivery.Name) THEN BEGIN
    CLEAR(BingMapMgt);
    BingMapMgt.CalculateRoute('', RouteStopPickup.Latitude, RouteStopPickup.Longitude,'', RouteStopDelivery.Latitude,
      RouteStopDelivery.Longitude, Optimizer."Distance (Distance)",Optimizer."Activity Time", Optimize::Distance);

    Optimizer.Name := RouteStopDelivery.Name;
    Optimizer.Latitude := RouteStopDelivery.Latitude;
    Optimizer.Longitude := RouteStopDelivery.Longitude;
    Optimizer.INSERT;
  END;

UNTIL RouteStopDelivery.NEXT = 0;
The calculation of the distance is done by calling a web service from Bing Maps. This is explained in Chapter 9, Interfacing.
Each distance is stored as a record into the Optimizer table, which is a helper table. This table is a temporary variable in this codeunit.
Temporary tables have multiple benefits that make them interesting to use. As they are not stored in the database, they have much better performance compared to real tables. This also has a benefit for concurrency since there can be no locking.
Tip
Temporary tables are free to use. They are not checked in the license file when used. To create and modify the definition, a valid license is still required. The video at https://www.youtube.com/watch?v=QHn5oEOJv0Q shows how to use temporary datasets.
After generating the distances, all Pickup shipments are combined into one stop by assigning them all to the same Sequence No. value:
RouteStopGroup.INIT;
RouteStopGroup."Route No." := Route."No.";
RouteStopGroup."Line No." := 10;
RouteStopGroup.Type := RouteStopGroup.Type::"Pickup Group";
RouteStopGroup."Sequence No." := 10;
RouteStopGroup.Name := RouteStopPickup.Name;
RouteStopGroup.INSERT;

RouteStopPickup.MODIFYALL("Sequence No.", 10);
By sorting the distance helper table on distance, we can easily assign the correct Sequence No. to the delivery stops. For each Sequence No. value, we will also generate a group record in the stop table:
Optimizer.SETCURRENTKEY("Distance (Distance)");
Optimizer.ASCENDING(FALSE);
Optimizer.FIND('-'),
REPEAT
  RouteStopGroup.INIT;
  RouteStopGroup."Route No." := Route."No.";
  RouteStopGroup."Line No." := Sequence;
  RouteStopGroup.Type :=
    RouteStopGroup.Type::"Delivery Group";
  RouteStopGroup."Sequence No." := Sequence;
  RouteStopGroup.Name := Optimizer.Name;
  RouteStopGroup.INSERT;

  RouteStopDelivery.SETRANGE(Name, Optimizer.Name);
  RouteStopDelivery.MODIFYALL("Sequence No.", Sequence);

  Sequence := Sequence + 10;
  IF (xLongitude <> Optimizer.Longitude) OR
    (xLatitude <> Optimizer.Latitude)
  THEN BEGIN
    IF xLongitude + xLatitude <> 0 THEN BEGIN
      CLEAR(BingMapMgt);
      BingMapMgt.CalculateRoute('', xLatitude, xLongitude,'',
        Optimizer.Latitude, Optimizer.Longitude,
        RouteStopGroup.Distance, RouteStopGroup.Time,
        Optimize::Distance);
      RouteStopGroup.MODIFY;
    END;
    xLongitude := Optimizer.Longitude;
    xLatitude := Optimizer.Latitude;
  END;
UNTIL Optimizer.NEXT = 0;
After optimizing the route, it should look something like what is shown in the following screenshot. We pick up two shipments at the warehouse and drive them to two addresses in the country.

During the route, the planner needs to follow up with the driver. This will result in the status update of the shipment.
In our solution, the planner should populate the Date Time Completed field. This field is automatically updated in the shipment using a flow field.
A special status for a shipment is an incident. If, for any reason, we cannot deliver the shipment, it should be taken back to the warehouse and shipped again. Based on the reason of the incident, we might need to invoice extra services.
The incident can be on a stop group or on an individual shipment and can have status Undeliverable, Closed, or Other. The planner can add extra comments.

The other shipments that do not have incidents get the new status, while the incidents move to another place on the Role Center.