So now we have discussed interface types, interface technologies, and the built-in interfaces in Microsoft Dynamics NAV.
Let's design and develop a new business to business interface. We will use the objects from Chapter 7, Storage and Logistics, to create the interface.
One of our customers wants to e-mail the shipments from now on instead of faxing. The e-mail will contain an Excel file in a predefined format.
Let's bring back the data model we designed for the logistics part of the solution in Chapter 7, Storage and Logistics.

The process starts in the registration table. From a registration, we generate shipments and shipments are combined into a Route with stops.
So we need to move the data from the Excel sheet to the registration table.
When a customer delivers us an Excel sheet with information, it seldom happens that they exactly use the same fields as our table. Therefore, we need to create a mapping. Each field in the Excel sheet needs to be mapped to a field and missing fields need to be identified and discussed.
The Excel Sheet we get from the customer looks like this:

Let's try to map this information to our Logistics Registration Worksheet table, as follows:
|
Field number |
Field name |
Data type |
Length |
Mapped field |
|---|---|---|---|---|
|
1 |
Registration Batch |
Code |
10 |
- |
|
2 |
Line No. |
Integer |
- | |
|
6 |
Shipment Date |
Date |
Date | |
|
8 |
Product No. |
Code |
20 |
Goods Code |
|
10 |
Description |
Text |
50 |
Description |
|
12 |
Unit of Measure |
Text |
10 |
- |
|
16 |
Quantity |
Decimal |
Pallets | |
|
20 |
Length |
Decimal |
Length | |
|
21 |
Width |
Decimal |
Width | |
|
22 |
Height |
Decimal |
Height | |
|
31 |
Gross Weight |
Decimal |
- | |
|
32 |
Net Weight |
Decimal |
Weight | |
|
36 |
Units per Parcel |
Decimal |
- | |
|
37 |
Unit Volume |
Decimal |
- | |
|
53 |
Ship-to Name |
Text |
50 |
Delivery At |
|
55 |
Ship-to Address |
Text |
50 |
Address |
|
57 |
Ship-to City |
Text |
30 |
City |
|
58 |
Ship-to Contact |
Text |
50 |
- |
|
59 |
Ship-to Post Code |
Code |
20 |
Postal Code |
|
60 |
Ship-to County |
Text |
30 |
- |
|
61 |
Ship-to Country/Region Code |
Code |
10 |
- |
Most of the fields in the Excel sheet can be mapped to a field in our table.
Some fields that are needed in NAV are not populated by the Excel sheet. For some fields this is okay, for example, the Registration Batch and Line No. fields are determined by the import.
Some other fields are more difficult. Unit of Measure, Gross Weight, Units per Parcel, and Unit Volume are left blank in the Excel sheet, but they are all needed in NAV.
For these fields, we need to come to an agreement with the customer. They need to either specify these fields or tell us whether they have default values. Let's look at our gaps and fill them in:
- Unit of Measure: For this customer it is always "PALLET"
- Volume: This can be calculated using
Length x Width x Height - Gross Weight: We agree that this is equal to net weight
- Units per Parcel: This is always 1
Reading the external data into the database is just one step in creating a reliable interface.
But what happens if the customer contacts us and says, "We sent you a file with 10 lines and the shipment document shows 9 lines". When we check our database the shipment does show 9 lines, but there is no way to check whether we imported the original 10 lines. At this stage, the imported Registration lines are deleted and the shipments are generated.
If this happens, we need traceability. In a well-designed interface, we should always create a table that exactly matches the imported data. This allows us to first check whether everything matches.
The data from this table can be processed but should not be deleted from the database and periodically cleaned up. This allows us to check whether things go wrong.
We will demonstrate this in a more advanced example.
The implementation of our storage and logistics add-on requires a real-time interface with a Radio Frequency application. The RF scanners are used for the pick process. The RF application uses its own database system with tables we should populate and read afterwards.

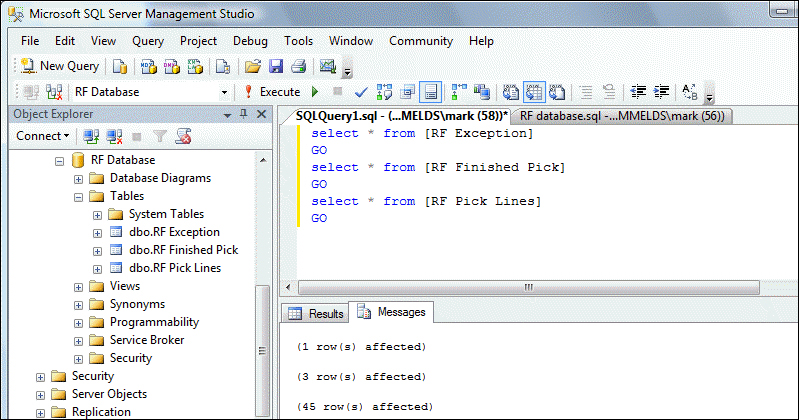
The RF application has three tables. Our interface needs to export data to the Pick Lines table, and it needs to import data from the two remaining tables, Finished Picks and Exceptions.
This is an import and export interface that will use data pushing for the Pick Lines and data pulling for the Finished Picks and Exceptions. The interface will be timer-driven. Every minute we will poll for new data.
For this interface, we will use a combination of technologies that we discussed in this chapter. The main technology is DotNet interoperability.
In this interface, we will enable two types of logging. The first log will be to duplicate the RF tables in Microsoft Dynamics NAV and use them as a buffer. A second log will be maintained where we will save a copy of all T-SQL statements we generate. This will enable us to see what we generated if something goes wrong.
Let's look at the design of the interface we will be developing for this project:

The interface will be controlled from an Application Server. Each minute it will execute a codeunit that checks whether there are new Storage Lines that need to be exported. These lines will first be moved to the RF Pick Lines buffer table and then moved to the RF database using ADO and T-SQL. New Finished Picks and Exceptions from the RF database will be moved to Microsoft Dynamics NAV using the same technology and can then be processed.
To run the interface, we have created three codeunits and a table. The SQL Statement table is used to log each interface session.

The RF NAS Timer (123.456.730) codeunit is started from the NASHandler function in codeunit ApplicationManagement. It uses an indefinite loop.

Let's look at the C/AL code that is required to make this work:
OnRun()

RFInt.CreateConnectionString;
RFLoop(600000);

RFLoop(MilisecondsBetweenPolls : Integer)
WHILE TRUE DO BEGIN
  IF NOT CODEUNIT.RUN(CODEUNIT::"RF Helper") THEN
    ParseError;
  COMMIT;
  MaxMilisecondsSleep := 10000;
  FOR Count := 1 TO MilisecondsBetweenPolls DIV MaxMilisecondsSleep DO
    SLEEP(MaxMilisecondsSleep);
  SLEEP(MilisecondsBetweenPolls MOD MaxMilisecondsSleep);
END;

ParseError()
SELECTLATESTVERSION;
RFIntSetup.GET;
SynchID := RFIntSetup."Synchronization ID";

SQLStat.INIT;
SQLStat."SQL Statement 1" := 'ERROR : ' + GETLASTERRORTEXT;

SQLStat.Bold := TRUE;
SQLStat.SessionID := SynchID;
SQLStat.Type := SQLStat.Type::Error;
SQLStat.INSERT(TRUE);
COMMIT;
The SLEEP function is used to make sure the interface only runs each minute. By breaking the SLEEP function into smaller intervals it is possible to stop the Windows Service that executes this C/AL code in between the SLEEP command.
The RF Helper (123.456.732) codeunit is a wrapper codeunit that is used for error catching and maintaining readability.
During each run of the interface we create a new SQL Statement ID, which we can filter on to trace any errors:
OnRun()
SELECTLATESTVERSION;
RFIntSetup.GET;
RFIntSetup."Synchronisation ID" := RFIntSetup."Synchronisation ID" + 1;
RFIntSetup.MODIFY;
SynchID := RFIntSetup."Synchronisation ID";

SQLStat.INIT;
SQLStat."SQL Statement 1" :=
  '-SYNCHRONISATION STARTED- ID = ' + FORMAT(SynchID) + ' -';
SQLStat.Bold := TRUE;
SQLStat.SessionID := SynchID;
SQLStat.Type := SQLStat.Type::StartStop;
SQLStat.INSERT(TRUE);

COMMIT;

CLEAR(RFInterface);
RFInterface.SetSynchID(SynchID);

StorageLn.LOCKTABLE;
IF StorageLn.FINDSET THEN REPEAT
  RFInterface.CreatePickLines(StorageLn);
UNTIL StorageLn.NEXT = 0;

COMMIT;

CLEAR(RFInterface);
RFInterface.SetSynchID(SynchID);
RFInterface.ReadFinishedPicks;

COMMIT;

CLEAR(RFInterface);
RFInterface.SetSynchID(SynchID);
RFInterface.ReadExceptions;

COMMIT;

SQLStat.INIT;
SQLStat."SQL Statement 1" :=
  '-SYNCHRONISATION STOPPED- ID = ' + FORMAT(SynchID) + ' -';
SQLStat.Bold := TRUE;
SQLStat.SessionID := SynchID;
SQLStat.Type := SQLStat.Type::StartStop;
SQLStat.INSERT(TRUE);

COMMIT;
Then the three interface functions are triggered to synchronize the three required tables.
After each command we execute the COMMIT statement. This will make sure that everything in the database is stored up to that point. This is necessary since the ADO statements we create are outside our transaction. If our interface run rolls back, it might synchronize data that is already synchronized.
The RF Interface (123.456.731). Here, the actual ADO synchronization is done in this codeunit. This codeunit is SingleInstance. This will keep the ADO connection alive during the NAS session:
CreateConnectionString()
IF ConnActive THEN EXIT;


RFIntSetup.GET;
Database := RFIntSetup."Database Name";
Server := RFIntSetup."Server Name";

ConnString := 'Data Source=' + Server + ';' + 'Initial Catalog=' + Database + ';Trusted_Connection=True;';

SaveReadSQL('Connection ' + ConnString + ' opened on ' + FORMAT(CURRENTDATETIME),TRUE,0,0,0, ''),

SQLCon := SQLCon.SqlConnection(ConnString);

SQLCon.Open;
ConnActive := TRUE;

CloseConnectionString()
SQLCon.Close;

SaveReadSQL('Connection closed on ' + FORMAT(CURRENTDATETIME),TRUE,0,0,1, ''),

CLEAR(SQLReader);
CLEAR(SQLCommand);
CLEAR(SQLCon);
ConnActive := FALSE;
For the interface we use three DotNet variables.
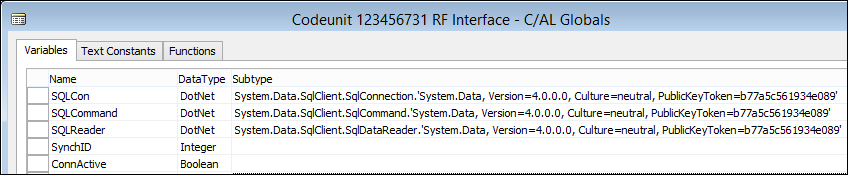
Let's have a look at the three DotNet variables in more detail:
The RF application needs data from the Storage Line table. We first create a mapping to the RF application as we did with the Excel interface earlier in this chapter.
This mapping is saved in a buffer table for traceability:
CreatePickLines()
CreateConnectionString;

SaveReadSQL('CreatePickLines',TRUE, 1, 8388608, 3, ''),

PickID := COPYSTR(StorageLn."Document No." + FORMAT(StorageLn."Line No."), 1, 20);

SaveReadSQL('Pick Document : '+PickID,TRUE,3,16711680,7,''),

WITH RFPickLines DO BEGIN
  "Pick Code" := PickID;
  Quantity := StorageLn.Quantity;
  "Terminal ID" := 1;
  "Display 1" := StorageLn.Description;
  "Display 2" := 'Warehouse ' + StorageLn."Warehouse Code";
  "Display 3" := 'Region ' + StorageLn."Region Code";
  "Display 4" := 'Shelf ' + StorageLn."Shelf No.";
  INSERT;
  SQLStatement := 'INSERT INTO [RF Pick Lines]' +
                  '([Pick Code],'+
                   '[Quantity],'+
                   '[Terminal ID],'+
                   '[Display 1],'+
                   '[Display 2],'+
                   '[Display 3],'+
                   '[Display 4])'+
                   'VALUES('+
                   Quote + PickID + Quote      +','+
                   FORMAT(Quantity)            +','+
                   '1'                         +','+
                   Quote + "Display 1" + Quote +','+
                   Quote + "Display 2" + Quote +','+
                   Quote + "Display 3" + Quote +','+
                   Quote + "Display 4" + Quote + ')';
END;

ExecuteSQL(SQLStatement);

StorageLn.Exported := CURRENTDATETIME;
StorageLn.MODIFY;
The actual data is moved to the RF database using an INSERT command.
When reading data from the RF database, we also send a T-SQL SELECT query for the data. We use the SQLReader.Read to browse through the records that are in the result set.
For each record in the result set, we create a record in our buffer table, which we then can use to update the information in the Storage Lines.
When reading data we do not want to import the same data twice. To avoid this, we need to store a unique identifier in a table that enables us to remember where we left in the last run:
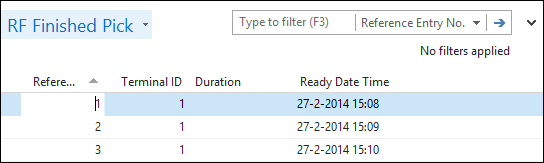
ReadFinishedPicks()
CreateConnectionString;

SaveReadSQL('ReadFinishedPicks',TRUE, 1, 8388608, 3, ''),

RFIntSetup.GET;
LastSync := RFIntSetup."Last Finished Pick";


SQLCommand := SQLCon.CreateCommand();
SQLCommand.CommandText := SaveReadSQL('SELECT ' +
              '[Reference Entry No],' +
              '[Terminal ID],' +
              '[Duration],' +
              '[Ready Date Time]' +
    ' FROM [RF Finished Pick] WHERE [Reference Entry No] > ' +
      LastSync,FALSE,2,0,2, ''));

WHILE SQLReader.Read() DO BEGIN
  RFFinishedPick.INIT;
  RFFinishedPick."Reference Entry No." :=
    ReadInteger('Reference Entry No'),
  RFFinishedPick."Terminal ID" := ReadInteger('Terminal ID'),
  RFFinishedPick.Duration := ReadInteger('Duration'),
  RFFinishedPick."Ready Date Time" :=
    ReadDateTime('Ready Date Time'),
  RFFinishedPick.INSERT;
END;

RFIntSetup."Last Finished Pick" := Quote + FORMAT(RFFinishedPick."Reference Entry No.") + Quote;
RFIntSetup.MODIFY;

AdoRecordSet.Close;
In our example, this unique identifier is Reference Entry No.
Although much of the logging is done using the buffer tables, we also want to store the general process of the interface each time it runs. This is done using the SQL Statement table. Both the SQL Statements as well as the other events are stored there.
By using the COMMIT functionality, we can exactly see where it stopped by looking at the last record in this table. We can solve the problem that caused the interface to stop and restart the interface without losing data.
Let's test the interface we have just designed and developed. In order to do this, we need to have records in the Storage Line table and the RF database needs to exist somewhere.
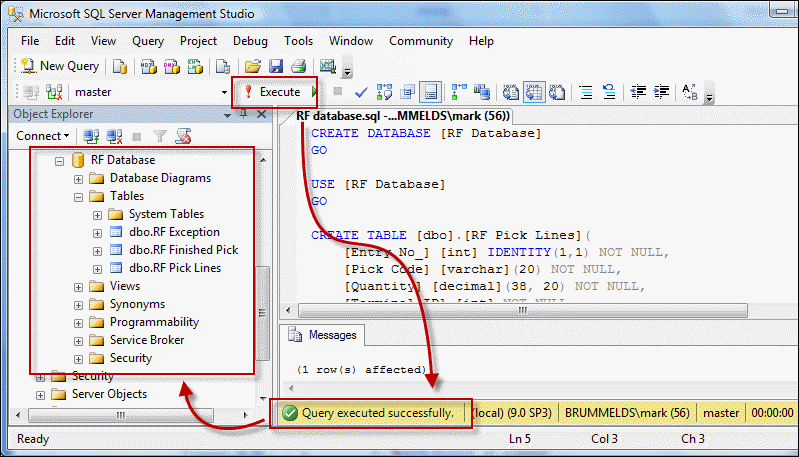
To test the objects we have created for this solution, the RF database should exist on your system. This database can be created using a T-SQL script and should be executed on a Microsoft SQL Server machine.
Open the script in SQL Server Management Studio and click on Execute.
Even though the C/AL code can run in the Windows client, we will run the test in the classic client. The reason for this is that the interface will run in the NAS, which will execute the C/AL code the same way as the classic client. Another reason to use the classic client is that this is the interface for the DBA to perform all their tasks.
To start a test run, open page RF Interface Setup (123.456.780) from the Object Designer.
Make sure that the Database and Server are correct. The server should be the SQL Server instance where the SQL Script was executed.
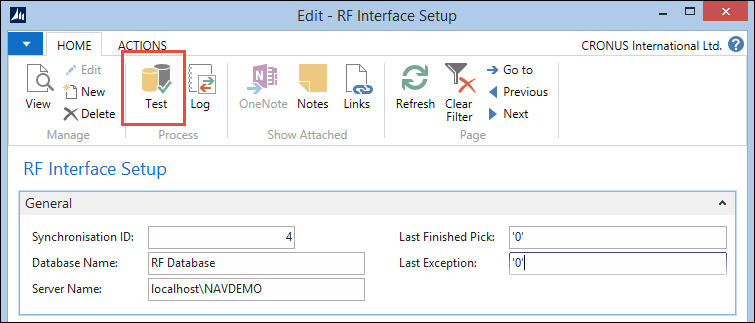
To start a test run, click on the Test button.
If everything went well, the results should show both in the log and in the buffer tables and the RF database. Let's check them all.
The SQL Statement log can be opened by either pushing the Log button on the RF Interface Setup form or opening the SQL Statements (123.456.781) form from the Object Designer.
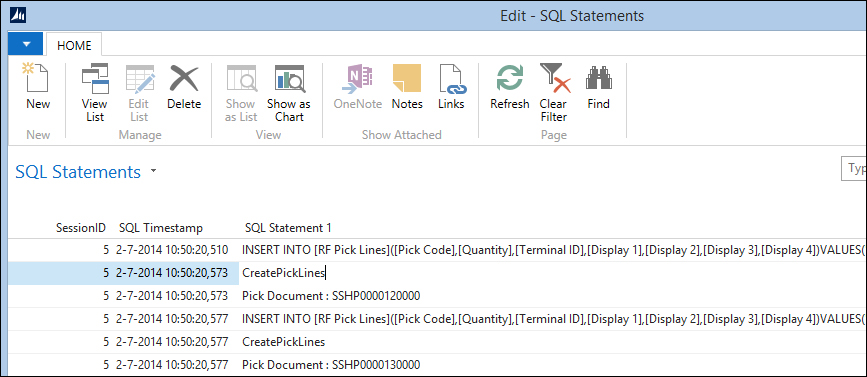
SQL statements
The information on the form shows us exactly what the interface did during this run.