
Chapter 2: Introducing Amazon SageMaker Studio
As we just learned in Chapter 1, Machine Learning and Its Life Cycle in the Cloud, an ML life cycle is complex and iterative. Steps can be quite manual even though most things are done with coding. Having the right tool for an ML project is essential for you to be successful in delivering ML models for production in the cloud. With this chapter, you are in the right place! Amazon SageMaker Studio is a purpose-built ML Integrated Development Environment (IDE) that offers features covering an end-to-end ML life cycle to make developers' and data scientists' jobs easy in the AWS Cloud.
In this chapter, we will cover the following:
- Introducing SageMaker Studio and its components
- Setting up SageMaker Studio
- Walking through the SageMaker Studio UI
- Demystifying SageMaker Studio notebooks, instances, and kernels
- Using the SageMaker Python SDK
Technical requirements
For this chapter, you will need to have an AWS account. If you don't have one, please revisit the Setting up AWS environment section in Chapter 1, Machine Learning and Its Life Cycle in the Cloud.
Introducing SageMaker Studio and its components
Amazon SageMaker is an ML service from AWS that has features dedicated to each phase of an ML life cycle that we discussed in Chapter 1, Machine Learning and Its Life Cycle in the Cloud. Amazon SageMaker Studio is an ML IDE designed for end-to-end ML development with Amazon SageMaker. You can access Amazon SageMaker features using the SageMaker Studio IDE or using the SageMaker Python SDK, as we will discuss in the Using SageMaker Python SDK section. The following chart provides an overview:
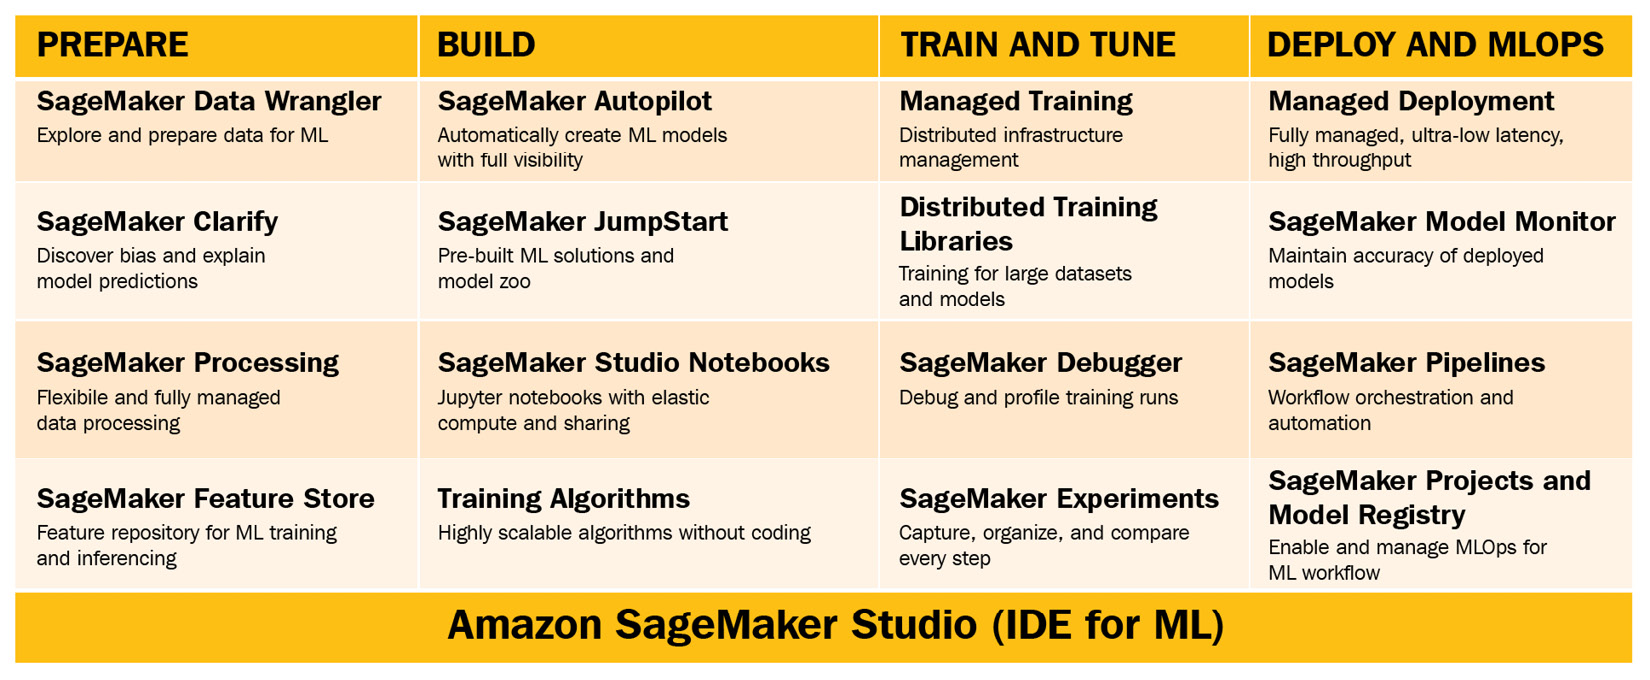
Figure 2.1 – Amazon SageMaker Studio overview – four pillars represent the four stages in the ML life cycle
This chart highlights the SageMaker components that are covered in the book. Let's first walk through at a high level for each component in the ML life cycle stages in this chapter. Then, I will provide pointers to the later chapters.
Prepare
Amazon SageMaker Studio helps data scientists and developers build high-quality datasets for ML quickly. You can use the following features to explore, process, transform, aggregate data, and store processed data or ML features in a central repository.
SageMaker Data Wrangler
Amazon SageMaker Data Wrangler helps developers explore and build a dataset for ML in a fast, easy, and repeatable manner. SageMaker Data Wrangler puts the data preparation workflow – importing from various cloud storage and data warehouses, aggregating multiple tables, understanding data bias and target leakage, and exploring data patterns with visualization – in one easy-to-use graphical interface where you can simply point and click to create a repeatable and portable data recipe. The easy-to-use graphical interface is exclusively in SageMaker Studio. SageMaker Data Wrangler has over 300 built-in data transformations so that you do not need to re-invent the wheel for typical data processing steps in ML. Besides built-in transformation, SageMaker Data Wrangler also supports custom transformation written in Python, SQL, and PySpark to enrich your data engineering steps. We will dive deeper into SageMaker Data Wrangler in Chapter 3, Data Preparation with SageMaker Data Wrangler.
SageMaker Clarify
Amazon SageMaker Clarify helps developers discover underlying bias in the training data and explain feature importance from a model prediction. Data bias is an imbalance in the training data across different groups and categories, such as age and education level, that is introduced to the training data due to a sampling error or other intricate reasons. Data bias is often neglected until a trained model makes incorrect or unfair predictions against a certain group. It is well understood that a model will learn what is present in the data, including any bias, and will replicate that bias in its inferences. It is more critical than ever to be able to discover the inherent biases in the data early and take action to address them. SageMaker Clarify computes various metrics to measure the bias in the data so that you do not have to be an expert in the science of ML bias. SageMaker Clarify integrates with Amazon SageMaker Data Wrangler so you can detect bias in the preparation phase. SageMaker Clarify also integrates with Amazon SageMaker Experiments and Amazon SageMaker Model Monitor so that you can identify bias and feature importance in a trained model and inference data in production. We will learn more about SageMaker Clarify in Chapter 6, Detecting ML Bias and Explaining Models with SageMaker Clarify.
SageMaker Processing
Amazon SageMaker Processing is a feature that runs your scripts and containers in SageMaker's fully managed compute instances instead of your limited local compute resource. It is designed to make data processing and model evaluation easy and scalable. It is flexible so that developers can use it to run any code at any time in the ML life cycle. SageMaker Processing is also integrated with several SageMaker features as the compute backbone. SageMaker Data Wrangler uses SageMaker Processing to execute your SageMaker Data Wrangler data recipe and save the processed features into storage. SageMaker Clarify uses SageMaker Processing to compute the bias metrics and feature importance. SageMaker Model Monitor, which will be discussed in the Deploy section later in this chapter, uses SageMaker Processing to compute the data drift. SageMaker Autopilot, which will be discussed in the Build section shortly, uses SageMaker Processing for data exploration and feature engineering.
SageMaker Feature Store
Amazon SageMaker Feature Store is a fully managed ML feature repository that allows ML developers to store, update, query, and share ML features among other ML developers with governance. Having a central feature repository as a single source of features in an organization where many teams are collaborating on feature engineering but go on to create their own models speeds up the development of the models, as features can now be shared and reused across teams, as well as applications for both training and inferencing. It reduces the feature development time and waste of effort for teams. SageMaker Feature Store offers both online and offline feature stores for real-time, low-latency ML inference use and for querying batch data for model training, respectively. SageMaker Feature Store also has versioning and time travel to allow developers to reuse features and audit past model training and inferences. We will explore more about SageMaker Feature Store in Chapter 4, Building a Feature Repository with SageMaker Feature Store .
Build
Amazon SageMaker Studio as an IDE for ML has many features and functionalities that can help you build ML models depending on your use case and project complexity. Heard of an ML algorithm but not sure how to implement it? Amazon SageMaker Studio has low to no-code options – automatic ML (autoML), pre-built ML solutions, and built-in training algorithms – to help you build a complex ML model and solution by simply plugging in your data. A SageMaker Studio notebook re-invents the way you develop ML models with Jupyter notebooks.
SageMaker Autopilot
Amazon SageMaker Autopilot explores, transforms data, and trains and tunes ML models automatically for your input dataset. You only need to select the dataset location and the target to make SageMaker Autopilot learn and predict in a simple-to-use graphic interface. Then, off it goes. SageMaker Autopilot provides full control and visibility of how the model is built. Jupyter notebooks with code and exploratory data analysis are given to you as well for you to understand how SageMaker Autopilot works under the hood. With the code available to you, you may also improve any step in the process and rerun the job to achieve even better results. When models are trained, the SageMaker Studio user interface makes it easy to browse through and choose the best model. You can view a leader board in SageMaker Studio, compare performance among the choice of an ML algorithm and other hyperparameters, and deploy the best model with just a couple of clicks. We will continue our exploration of SageMaker Autopilot in Chapter 8, Jumpstarting ML with SageMaker JumpStart and Autopilot.
SageMaker JumpStart
Amazon SageMaker JumpStart makes it easy to get started with ML by providing a collection of solutions purposefully built for the most common use cases across industries and a model zoo of more than 150 popular open source deep learning models for computer vision and natural language processing use cases. A solution in SageMaker JumpStart is composed of a reference architecture for an end-to-end system, beyond just the ML modeling, that can be deployed to your AWS account. You can simply browse the catalog inside SageMaker Studio IDE for the right solution, deploy with one click, and see how things work together as a production system in the cloud. As for the ML model zoo from SageMaker JumpStart, you can also easily choose a model that meets your use case from the catalog and deploy with one click to perform inferencing on your data or in your applications. You can also fine-tune a model to your use case with your own dataset with training completely managed by SageMaker JumpStart without any coding. We will learn more about how to use SageMaker JumpStart in Chapter 8, Jumpstarting ML with SageMaker JumpStart and Autopilot.
SageMaker Studio notebooks
On the topic of building an ML model, developers often write code in a Jupyter notebook for its simplicity and readability, as it captures code. The Amazon SageMaker Studio interface is built on top of JupyterLab, with many additional features designed to enhance the experience. SageMaker Studio notebooks provide an elastic and scalable way to write code and build ML models compared to a regular notebook in stock JupyterLab. For each notebook, not only can developers choose what notebook kernel to run the notebook, but also what compute instance to back the notebook. So, for a data exploration notebook, you can provision an instance that has 2 vCPU and 4 GiB of RAM for plotting and data processing for a modest amount of data. Should you need to load much more data or need a GPU for quick experimentation, you can either create a new notebook with a different compute instance or switch to a different instance on the existing notebook. You can find a list of supported SageMaker instances in the Studio Notebooks tab in https://aws.amazon.com/sagemaker/pricing/. We will spend more time talking about the infrastructure behind SageMaker Studio notebooks in the Demystifying SageMaker Studio notebooks, instances, and kernels section later in this chapter, and in Chapter 6, Detecting ML Bias and Explaining Models with SageMaker Clarify.
Training algorithms
Building ML models does not necessarily mean that you need to write lots of code. Amazon SageMaker offers 17 scalable, infrastructure-optimized, built-in algorithms for supervised and unsupervised problem types, and for tabular, computer vision, and Natural Language Processing (NLP) use cases. The built-in algorithms are designed to be used with Amazon SageMaker's fully managed compute. When training with the built-in algorithms, you point the algorithm and hyperparameters to a dataset on an S3 bucket, and SageMaker provisions training instances behind the scenes, takes your data and the algorithm as a Docker container to the training instances, and performs the training. By scalable and infrastructure-optimized, we mean the code base behind these algorithms is optimized for AWS compute infrastructure and is capable of running distributed training using multiple instances. The best thing about the built-in algorithms is that you do not need to write extensive code. We will learn more about the built-in algorithms and how to train models with them in Chapter 5, Building and Training ML Models with SageMaker Studio IDE.
Training and tuning
Training and tuning ML models perhaps consumes the most time and effort of a data scientist. To help data scientists focus on modeling and not infrastructure, having a fully managed, reliable, and scalable compute environment is critical for them to operate at their best. Amazon SageMaker Studio makes ML training easy and scalable with the following features.
Managed training
SageMaker-managed training enables ML developers to access on-demand compute resources from anywhere and makes model training a near-serverless experience. You can launch a model training job using an optimal compute resource from a wide variety of SageMaker ML instances. You can find a list of training instances under the Training tab in https://aws.amazon.com/sagemaker/pricing/. For a deep learning model that needs a powerful GPU instance, you can easily specify an Accelerated Computing instance that equips with GPU device(s). If you have a linear regression model at hand that utilizes a CPU rather than GPU, you can choose an instance from the Standard or Compute Optimized instances based on the CPU and memory need. As a SageMaker-managed feature, there is no server provisioning and management for you to do at all. You submit a training job, and SageMaker handles the server provision and shuts down when the training job completes. Monitoring a training job is easy because the training metrics and logs are pushed to Amazon CloudWatch. This experience allows you to focus on model building and training rather than the infrastructure. We will learn more about SageMaker managed training and examples of training ML models with popular ML frameworks such as TensorFlow and PyTorch in Chapter 5, Building and Training ML Models with SageMaker Studio IDE. SageMaker managed training also supports spot instances so that you can save up to 90% on on-demand instances. We will learn more about SageMaker managed spot training in Chapter 9, Training ML Models at Scale in SageMaker Studio..
Distributed training libraries
As deep learning models are getting bigger and need more data, training a large neural network pushes the need for GPUs beyond a single compute instance. You need to find a way to distribute the training data and the large neural network model to multiple instances. Amazon SageMaker's distributed training libraries make it easy to develop your ML training code in a distributed manner. A SageMaker distributed training library has two techniques for scaling – data parallelism and model parallelism. Data parallelism distributes large datasets to instances to train concurrently. Model parallelism splits models that are too large to fit on a single GPU into portions across multiple GPUs in order to train. SageMaker's distributed training libraries also optimize the distribution framework and partitioning algorithms to train fast on SageMaker's GPU instances, achieving near-linear scaling efficiency. With a few lines of code on top of your training code base, you can turn your model training into a distributed one to efficiently utilize multiple GPU devices on multiple instances. We will dive deeper with examples of how distributed training libraries work in Chapter 9, Training ML Models at Scale in SageMaker Studio.
SageMaker Debugger
During a model training job, it is critical to know whether there are problems during training and how your training code is utilizing the compute resource. This feedback information allows you to adjust network architecture, change hyperparameters, and modify other parameters so that you can train a better model and stop failing training jobs without wasting more time and resources. Amazon SageMaker Debugger makes it easy to optimize ML models and training instance utilization. SageMaker Debugger is designed to capture training metrics and compute resource utilization in real time and report actionable insights and issues when they arise. SageMaker Debugger creates an interactive dashboard in SageMaker Studio that you can visualize in real time as the training happens. This is especially helpful when training complex neural network models. We will discuss more and show how to use SageMaker Debugger when you are training models at scale in Chapter 9, Training ML Models at Scale in SageMaker Studio.
SageMaker Experiments
Amazon SageMaker Experiments is a feature that helps you organize and track your work in the ML life cycle. As you embark on an ML project, you process data, apply a transformation with parameters, and train ML models from various algorithms and hyperparameters. You will realize when the number of trials and experiments grow quickly and become unmanageable. Developers can use the SageMaker Experiments Python SDK to set up trackers to track the data sources, processing steps, and parameters. The SageMaker Studio IDE makes it easy to search the experiments and trials, compare the parameters and model performance, and create charts to visualize the progress. We will go deeper into SageMaker Experiments in Chapter 5, Building and Training ML Models with SageMaker Studio IDE.
Deploy
An ML model is created to serve and to make predictions. Deploying an ML model is the starting point of making use of a model. How you serve a model to make inference reliably, at scale, and cost-effectively while creating a feedback loop for your ML application is one of the most important aspects in the ML life cycle, as we learn that, often, 90% or more of ML costs are spent on hosting models for inference.
Managed deployment
SageMaker managed model deployment takes away the heavy lifting of managing, provisioning, and scaling compute instances for model inferencing. Machine learning models can be deployed for real-time inference and for batch inference on SageMaker. Real-time inference is typically required if the ML inference is a part of an online application. The deployed model is also expected to return an inference in a low-latency fashion. With just a couple of lines of code, the Amazon SageMaker model hosting feature deploys your model into fully managed ML instance(s) as an endpoint for low latency real-time inference. You can also set up autoscaling of the endpoints so that when the traffic to your model increases, SageMaker will automatically spin up more instances to handle the additional burden so as not to overwhelm the existing instances.
If your ML project requires you to create multiple models for better accuracy for each, say, a geographic area, SageMaker's multi-model endpoints are a cost-effective option for you to deploy your models. Instead of hosting 50 models on 50 endpoints for an ML use case with data from 50 US states and paying for 50 endpoints when you know the traffic to some states will be sparser compared to some other states, you can consolidate 50 models into 1 multi-model endpoint to fully utilize the compute capacity for the endpoint and reduce the hosting cost.
As for batch inference, SageMaker batch transform is a cost-effective and scalable way to make inferences against your model for a large dataset in batches. SageMaker batch transform handles the data ingestion efficiently so that you do not need to worry about the data size overwhelming the compute instance.
Model deployment and hosting is a big topic, and we will discuss more in Chapter 7, Hosting ML Models in the Cloud: Best Practices.
SageMaker Model Monitor
As discussed in Chapter 1, Machine Learning and Its Life Cycle in the Cloud, closing the ML feedback loop is a step that ensures the model quality and allows developers to take action before it's too late. The Amazon SageMaker Model Monitor feature closes the feedback loop by setting up data capture, computing the input data statistic as a baseline, and monitoring the data drift for your live endpoints, hosted on SageMaker on a schedule. SageMaker Model Monitor uses a set of statistics and metrics to determine whether the new incoming data is conforming to how the baseline training data looks statistically and schematically. You can also define your own metrics and use them in SageMaker Model Monitor. Once the model monitoring for an endpoint is set up, you can visualize the data drift and any data issues over time in a dashboard in SageMaker Studio IDE. You can also set up alarms and triggers using other AWS services in order to act according to data drift or model performance drift. We will learn more and show how to set up SageMaker model monitoring in Chapter 10, Monitoring ML Models in Production with SageMaker Model Monitor.
MLOps
Data scientists used to spend too much time and effort maintaining and manually managing an ML pipeline, a process that starts with data processing, model training, and evaluation, and ends with model hosting with ongoing maintenance. SageMaker Studio provides features that aim to streamline this operation with Continuous Integration (CI) and Continuous Delivery (CD) as best practices.
SageMaker Pipelines
Amazon SageMaker Pipelines is an orchestration layer that allows you to build workflows for your ML life cycle that can be automated in a production system. You can automate steps, including data processing, model training, tuning, evaluation, and deployment, under one pipeline. You can apply business conditions and logic into a pipeline in order to maintain the model's quality. SageMaker Pipelines creates an audit trail for models because it keeps information of every step in the pipeline in one place. ML pipelines from SageMaker Pipelines can be executed at any time, on a schedule, or in response to trigger events. We will discuss and run an example of SageMaker Pipelines in Chapter 11, Operationalize ML Projects with SageMaker Projects, Pipelines, and Model Registry.
SageMaker projects and model registry
Amazon SageMaker projects is a feature that helps you bring all your ML artifacts into one place with CI/CD best practices to ensure models in production come with reproducibility, auditability, and governance.
A SageMaker project collects ML code bases, pipelines, experiments, model registry, and deployed endpoints into one single pane of glass. SageMaker provides MLOps templates for you to get started with MLOps in AWS easily. You can choose a built-in template or create your own based on your use case, deploy the template, and start filling in your ML workflow to equip your ML workflow with CI/CD best practices. These include the following:
- Code repositories for version control
- ML pipelines for automating model training
- A code build process that verifies that code commits are working
- A model deployment quality control gate and a model registry for version control
- An automated model deployment process
We will walk through the feature and MLOps best practices in Chapter 11, Operationalize ML Projects with SageMaker Projects, Pipelines, and Model Registry.
Now that we've had a brief introduction to the many components of SageMaker Studio, let's get your AWS account ready and learn how to set up SageMaker Studio.
Setting up SageMaker Studio
With the core features out of the way, let's get started with Amazon SageMaker Studio. Please log in to your AWS account with your IAM user and go to the Amazon SageMaker console page from the Services drop-down menu. You should be greeted with the page shown in Figure 2.2:
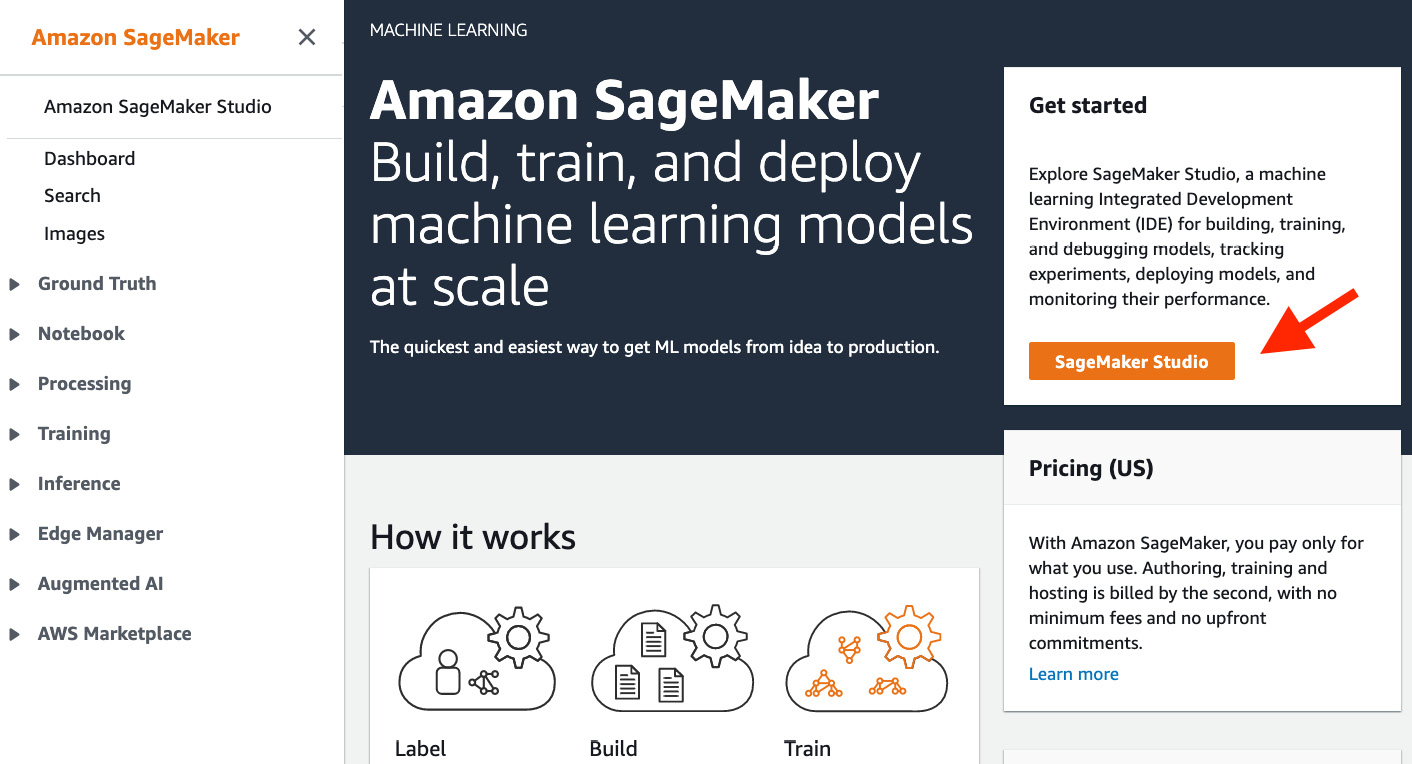
Figure 2.2 – Amazon SageMaker console page
Click on the SageMaker Studio button.
Setting up a domain
Because this is our first time with Amazon SageMaker Studio, we need to set up a SageMaker domain and a user profile. There is a quick start setup and a standard setup – which one should you use? Well, it depends on your needs. It is sufficient to use quick start to complete all of the exercises in this book and for most of your personal projects. The standard setup, on the other hand, provides additional options for customizing your compute environment to meet specific security requirements that are often in place in enterprises such as networking and authentication methods.
With the standard setup, you can configure the following:
- The authentication method: Single Sign-On (SSO) or AWS Identity and Access Management (IAM). SSO is a popular method for enterprise teams that allows you to log in with a single sign-on credential to access software and cloud resources in a portal from anywhere. You do not need to access the AWS console in this case. However, it requires you to first set up an SSO account. The IAM method allows you to set up a domain more quickly and simply. This is also the method used in the quick start setup. You need to first log in to the AWS console using your IAM role in order to access Studio.
- Permission: A default execution role defining permissions such as what S3 buckets you are allowed to access and what actions you can perform from within SageMaker Studio for the domain. Note that each new user added to the SageMaker Studio domain can either inherit this default execution role or can have another execution role with different permissions.
- Notebook-sharing configuration: Notebook sharing is a key feature when it comes to collaboration. You can configure where the notebook sharing metadata is saved on S3 if you want to encrypt the shareable notebooks and have the ability to share the cell output, or you can disable notebook sharing.
- SageMaker projects and JumpStart: Whether you would like to enable the SageMaker project templates and JumpStart for an account and/or users.
- Network and storage: SageMaker Studio, as a cloud resource, can be launched inside a Virtual Private Cloud (VPC), a logical virtual network where you can control the route tables, network gateways, public internet access, availability zones, and much more on network security. These options allow enterprises for whom cloud security is crucial to securely run an ML workload in the cloud. You have the option here to choose to host SageMaker Studio in a default VPC created in every AWS account, or your own VPC. You can choose one or more subnets for high availability.
Many organizations require a well-governed internet access policy in the cloud. You can choose whether the public internet is to be allowed and what set of security groups, which control inbound and outbound rules, should be enforced. Last but not least, you have the option to encrypt the storage used in SageMaker Studio, namely, the EFS filesystem.
- Tags: You can add tags in key-value pairs to the Studio domain. This allows you or the administrator to group resources based on tags attached and understand the spending in the cloud.
After reviewing the standard options, let's return to Quick start, as this is sufficient and more straightforward for us in the context of this book:
- Fill in your username.
- For Execution role, we create a new one.
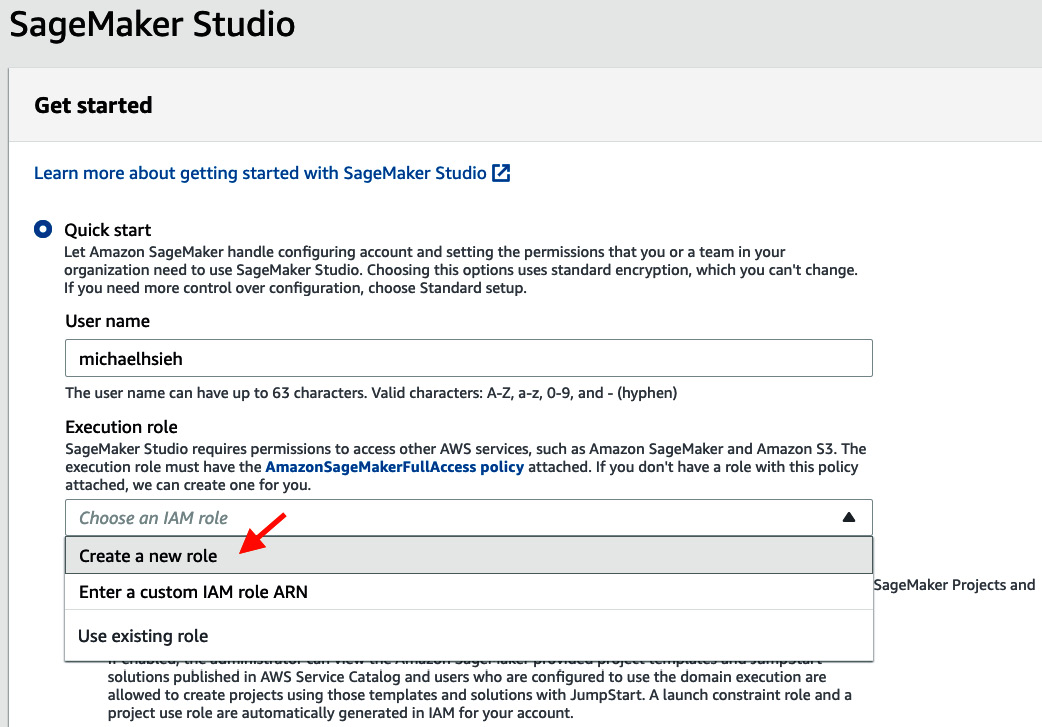
Figure 2.3 – Setting up a SageMaker Studio domain with Quick start
- You have an option to allow access to any S3 bucket, specific buckets, or no additional buckets, outside of the four other rules listed in the following figure. Let's choose None to practice least privilege access. We will be using a SageMaker default bucket that will be created later and satisfies existing rules. Click Create role:
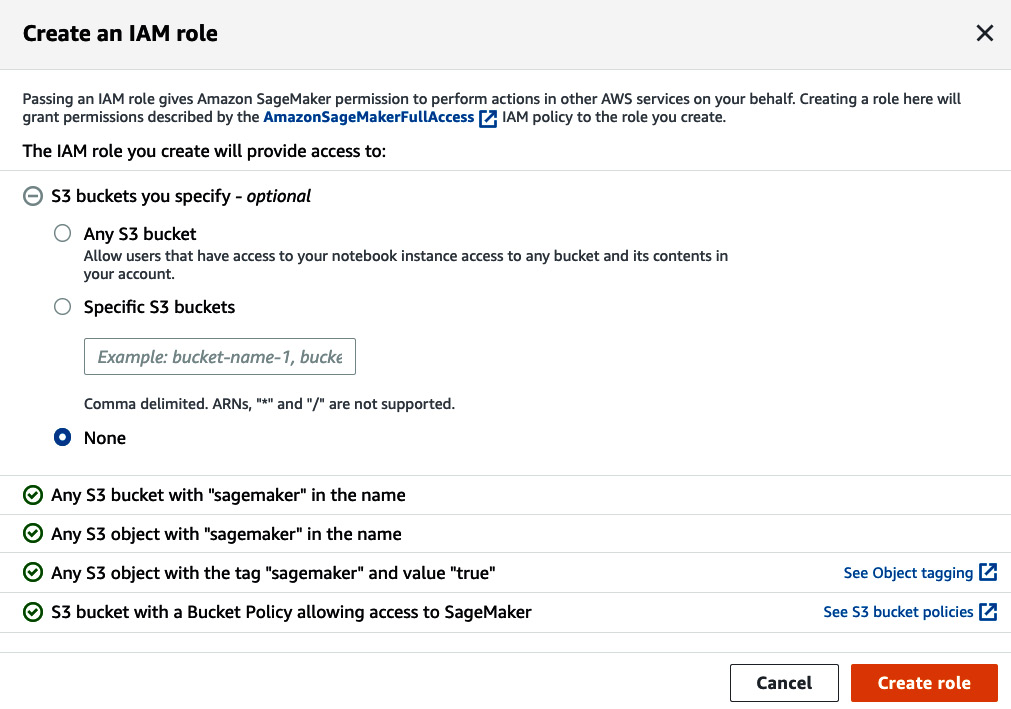
Figure 2.4 – Creating an IAM role
- Before you hit Submit, make sure to enable Amazon SageMaker project templates and JumpStart. Choose Submit. It will take a few minutes to spin up a domain and a user profile. Feel free to take a quick break and come back later:
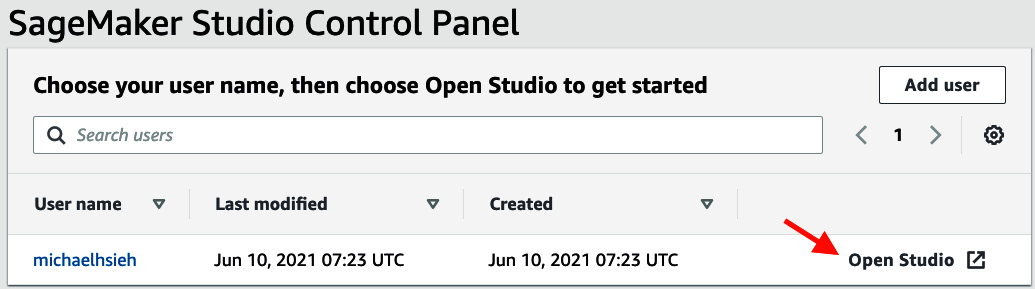
Figure 2.5 – SageMaker Studio Control Panel
- Once ready, click on Open Studio.
A Jupyter Server application will be created when you open it for the first time and this will take a couple of minutes.
Next, let's explore the SageMaker Studio UI.
Walking through the SageMaker Studio UI
Figure 2.6 is a screenshot of the SageMaker Studio UI and the Studio Launcher page. You may find the interface very similar to the JupyterLab interface. SageMaker Studio indeed builds on top of JupyterLab and adds many additional features to it to provide you with an end-to-end ML experience within the IDE:
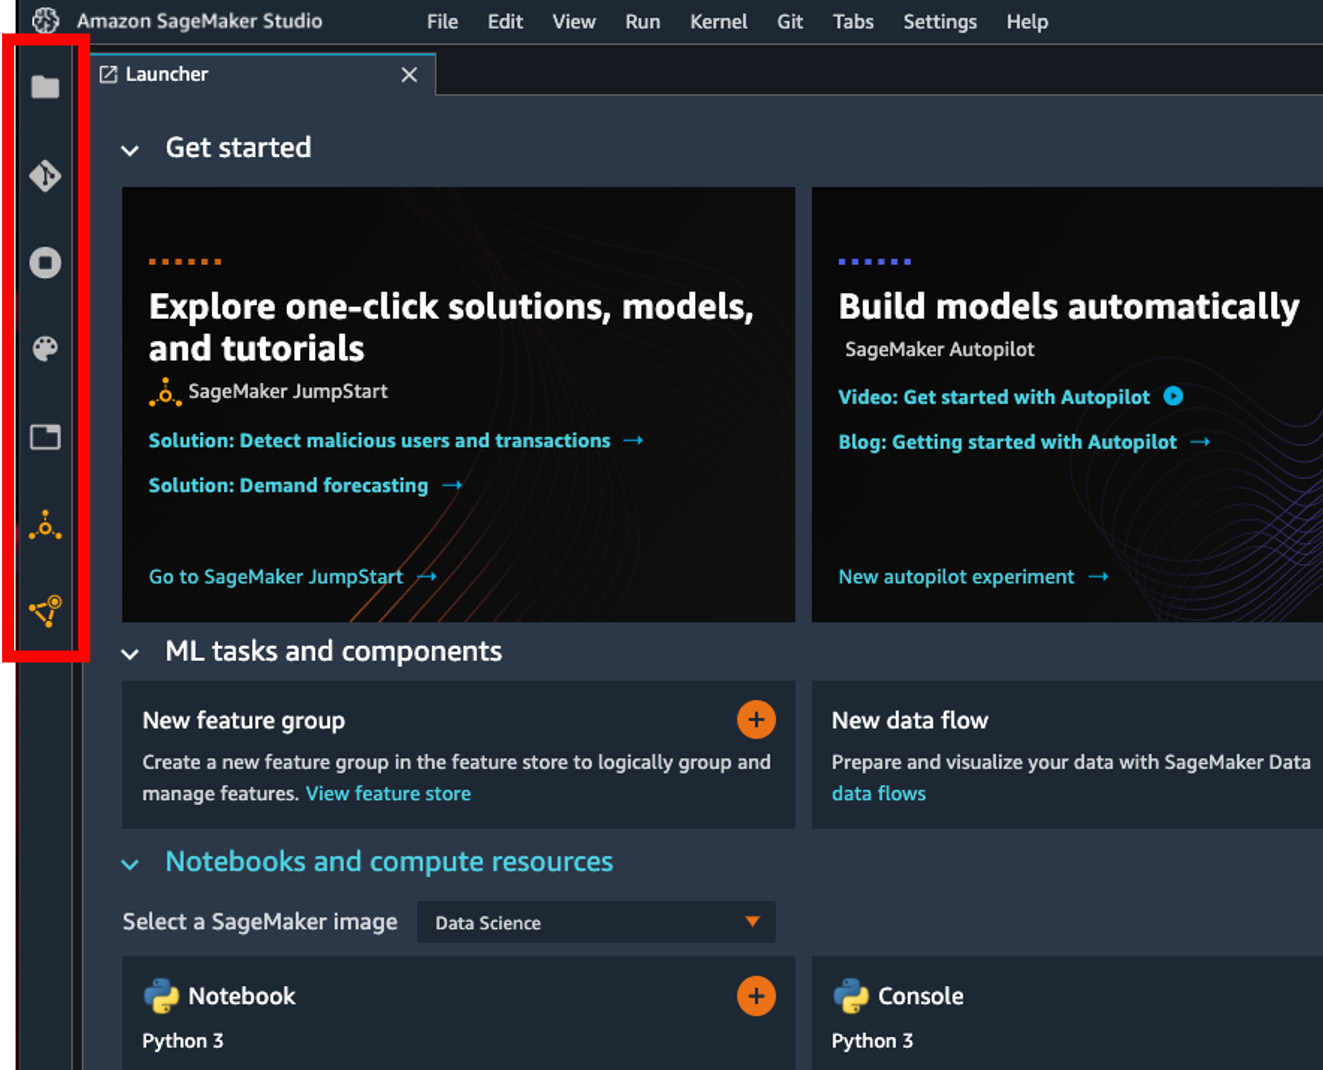
Figure 2.6 – The SageMaker Studio UI – the left sidebar is indicated in the red box
Let's talk about the key components in the Studio UI.
The main work area
The main work area is where the Launcher page, the notebooks, code editor, terminals, and consoles go. In addition to these base features from JupyterLab, as you will learn throughout the book, SageMaker Studio's own features, such as Data Wrangler, Autopilot, JumpStart, Feature Store, Pipelines, Model Monitor, and Experiments, also deliver the rich user experience in the main work area. The Launcher page is the portal to all the new resources you might like to create, such as a new JumpStart solution, a new feature store, a new MLOps project, a new notebook, and a new terminal.
The sidebar
The sidebar on the left with seven icons (eight when you have a notebook opened) serves as a portal to all of the resources that you have or may need, as indicated in Figure 2.6. From top to bottom, they are as follows:
- File Browser is where you access files on your home directory on the EFS filesystem and upload new files.
- Git is where you can connect to a Git repository and perform Git operations to your code base interactively.
- The Running Terminals and Kernels tab allows you to view, access, and shut down compute resources such as notebooks, kernels, and instances.
- Commands shows a list of commands and actions you can take in the Studio UI.
- Network Tools lets you access a notebook's metadata. It is only shown when a notebook is open in the main work area.
- Open Tabs shows a list of open tabs.
- The SageMaker JumpStart icon shows launched solutions and associated training jobs and endpoints.
- SageMaker Components and Registries lists projects, Data Wrangler files, pipelines, experiments, models, endpoints, and feature stores that you can view and access. There is also a search bar in each component for you to easily find your resources.
The sidebar to the right of the main working area is the Settings pane, which allows you to edit table and chart properties when you create a visual analysis from experiments or model monitoring jobs, which is a great feature of SageMaker Studio as well.
"Hello world!" in SageMaker Studio
Let's start with a very basic task – open a notebook, and run a very simple program in Python that every single programming book would use – "hello world!".
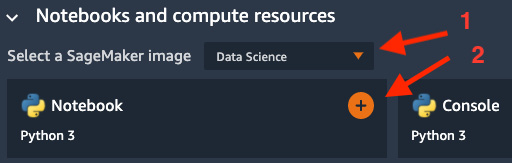
Figure 2.7 – Creating a SageMaker Studio notebook
- Go to Notebooks and compute resources, Select a SageMaker image (optional for now – the Data Science default is perfect but you may choose another image), and click on the + icon in the Notebook | Python 3 box. A new notebook will pop up.
- If you notice that there is an Unknown next to the Python 3 (Data Science) in the top right corner, and there is Kernel: Starting... in the status bar down at the bottom, as shown in Figure 2.8, it means the notebook is still connecting to the compute resource. It should take about a minute. We will talk more in depth about what's happening behind the scenes in the next section, Demystifying SageMaker Studio notebooks, instances, and kernels.
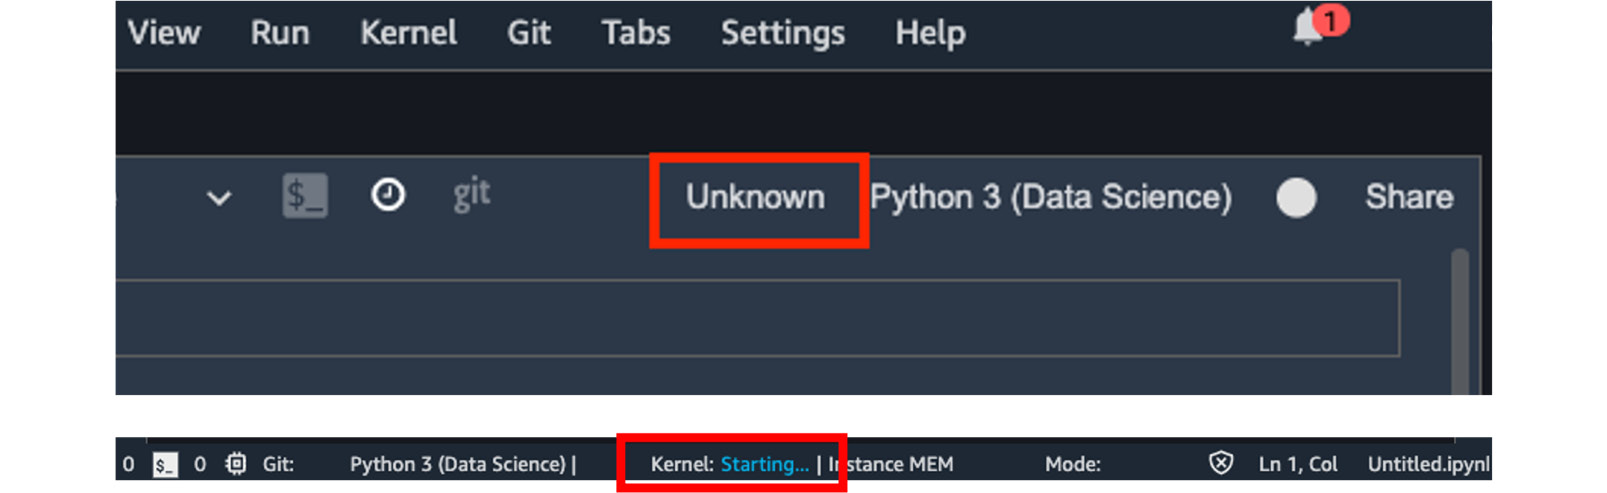
Figure 2.8 – A kernel is starting for a new SageMaker Studio notebook
- If you see 2 vCPU + 4 GiB next to the Python 3 (Data Science) kernel image, it means that the notebook has finally connected to the instance that has 2 virtual CPUs (vCPUs) and 4 GiB of RAM. Let's write our first line of code in the first cell of the notebook:
print('hello world!')
And now let's execute, as shown in the following screenshot:
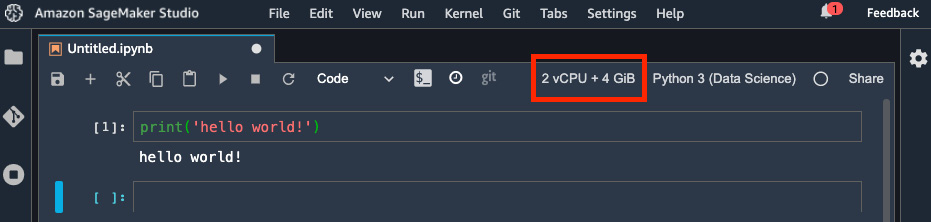
Figure 2.9 – The notebook has connected to the kernel and our "hello world!" program is working
Great! We just launched an elastic notebook in SageMaker Studio and executed our "hello world!" example. However, if you went too quickly and executed the code while the status bar at the bottom was still showing Kernel: Starting…, you might get the following error:
Note: The kernel is still starting. Please execute this cell again after the kernel is started.
What is happening here? Let's switch gears to talk about the infrastructure behind SageMaker Studio.
Demystifying SageMaker Studio notebooks, instances, and kernels
Figure 2.10 is an architectural diagram of the SageMaker Studio domain and how a notebook kernel relates to other components. There are four entities we need to understand here:
- EC2 instance: The hardware that the notebook runs on. You can choose what instance type to use based on the vCPU, GPU, and amount of memory. The instance type determines the pricing rate, which can be found in https://aws.amazon.com/sagemaker/pricing/.
- SageMaker image: A container image that can be run on SageMaker Studio. It contains language packages and other files required to run a notebook. You can run multiple images in an EC2 instance.
- KernelGateway app: A SageMaker image runs as a KernelGateway app. There is a one-to-one relationship between a SageMaker image and a KernelGateway app.
- Kernel: A process that runs the code in a notebook. There can be multiple kernels in a SageMaker image.
So far, we, as User1 in the illustration, have logged on to the Studio JupyterServer App, the frontend component, in the SageMaker Studio domain. As we open a notebook in the frontend, a new ipynb file will be created in the User1 home directory on the Amazon EFS filesystem. SageMaker Studio will attempt to connect the notebook (frontend) to a backend compute resource that satisfies the requirements, namely, the kernel image, and EC2 instance types. In SageMaker Studio, we also call a launched kernel image a KernelGateway app.
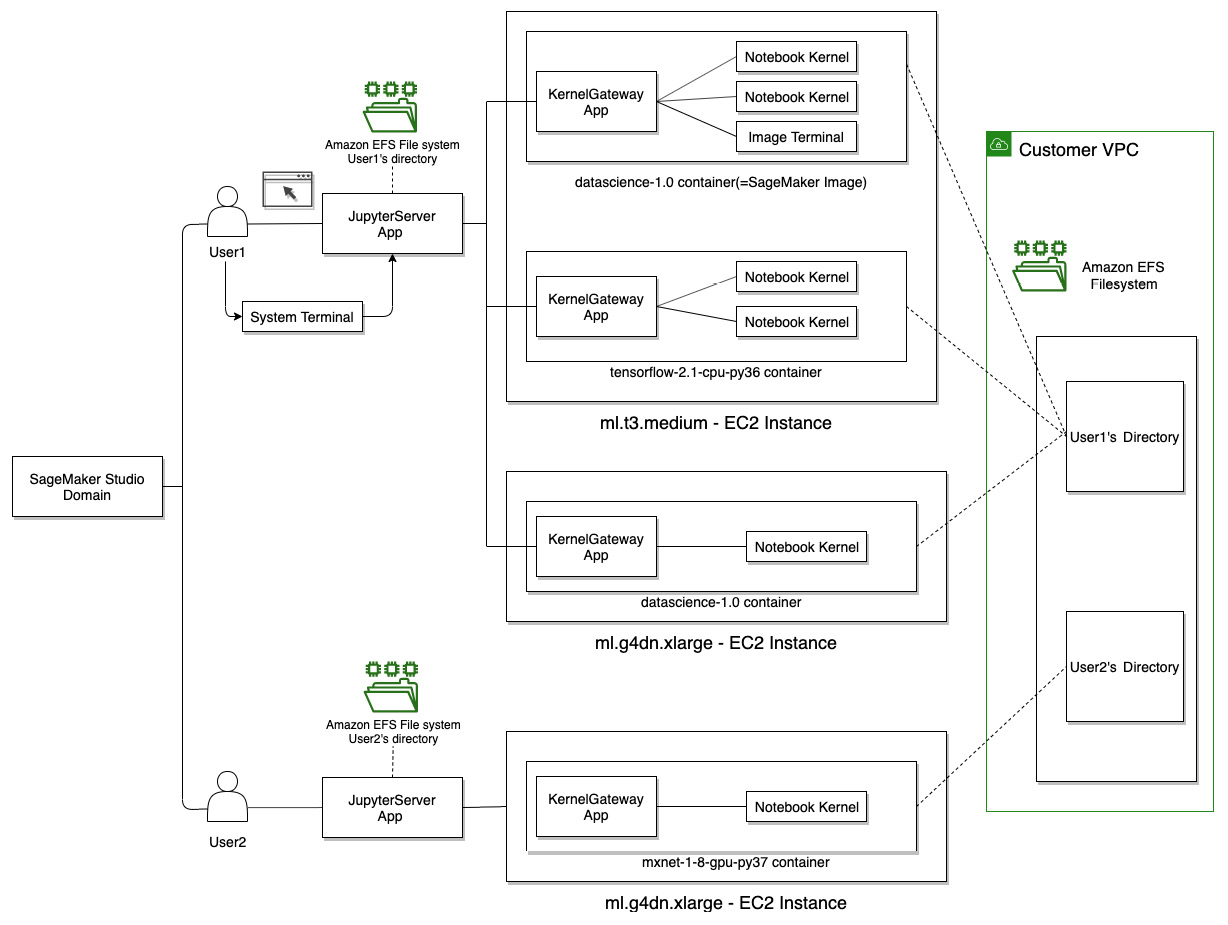
Figure 2.10 – The infrastructure behind the SageMaker Studio IDE
Important Note
Image courtesy of the following link: https://docs.aws.amazon.com/sagemaker/latest/dg/notebooks.html.
If the requested compute resource is available, a notebook will connect immediately and become ready for coding. If none are available, as in our case because we just launched our first-ever notebook in the domain, SageMaker Studio spins up a compute instance (ml.t3.medium, by default) and attaches the kernel image (the data science image we have chosen) as a container in the compute instance.
That's why we are seeing Kernel: Starting… down in the status bar, as shown in Figure 2.8. You can also see in your user profile on the SageMaker Studio page of the SageMaker console that a datascience-1-0-ml-t3-medium-xxxx KernelGateway app is in a pending state.

Figure 2.11 – A KernelGateway app is starting up in SageMaker Studio
Once the KernelGateway app is ready, our notebook becomes ready. This innovative mechanism behind the notebooks in SageMaker Studio allows users (multi-tenants) to use the right compute resource for each of the notebooks that we are running under one roof. If you click on 2 vCPU + 4 GiB, you will be able to see what instance type you are using and what is available to you, as follows:
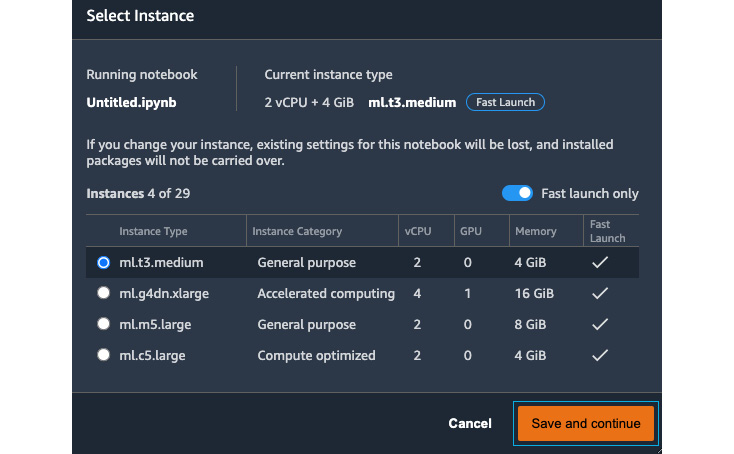
Figure 2.12 – Selecting an instance for a notebook
There are four commonly used instance types of different categories that are Fast Launch, that is, instances that are designed to launch in under 2 minutes. If you uncheck the Fast launch only checkbox, you will see all the instance types that are available in SageMaker Studio for your notebook, including the ones that are not of the fast launch type. Feel free to switch to other instance types and kernel images to experiment. You can see all the running instances, apps, and live notebook sessions in Running Terminals and Kernels in the left sidebar. You should shut down RUNNING APPS and KERNEL SESSIONS that you no longer need with the power buttons, as highlighted in the following screenshot, to terminate and recycle the resource on the running instance. Also, you should shut down the RUNNING INSTANCES you no longer need to stop incurring charges.
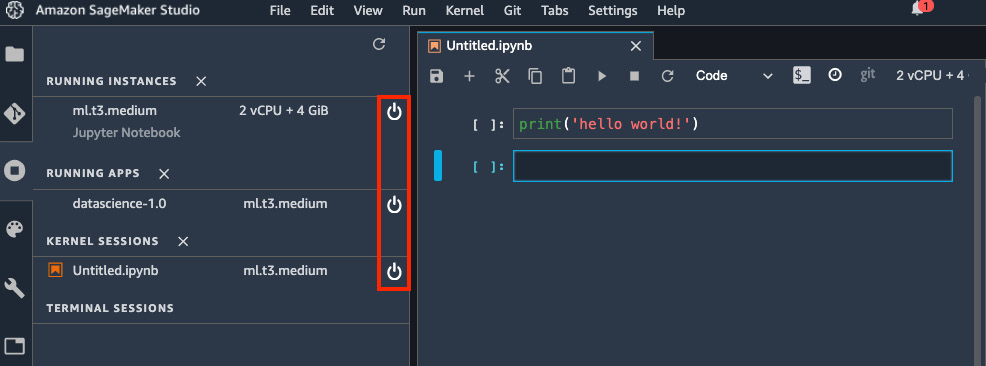
Figure 2.13 – Viewing Running Terminals and Kernels from the left sidebar
Now that we have a good understanding of how notebooks work with instances and kernel images, let's get our hands dirtier with another major resource that we will use throughout the book and your ML development life cycle in SageMaker Studio.
Using the SageMaker Python SDK
SageMaker Studio is more than just a place to run codes in notebooks. Yes, SageMaker Studio is a great place to start coding and training ML models in elastic notebooks, but there are so many more capabilities, as we discussed in the Introducing SageMaker Studio and its components section in this chapter.
There are two main ways to communicate and work with SageMaker features. One is through the components that have a UI frontend, such as SageMaker Data Wrangler; the other is through a Software Development Kit (SDK). The SDK enables developers to interact with the world of Amazon SageMaker beyond the interface. You can access SageMaker's scalable, built-in algorithms for your data. You can programmatically run SageMaker Autopilot jobs. If you develop your deep learning models with TensorFlow, PyTorch, or MXNet, you can use the SDK to interact with the SageMaker compute infrastructure for training, processing, and hosting models for them. You can create a feature store with the SDK. And there is so much more. I won't enumerate all the capabilities in this section, as we will mostly use and learn about the SDK for the SageMaker features in future chapters when we need to code.
There are several SDKs from AWS that use SageMaker features, such as the following:
- The SageMaker Python SDK, which provides a high-level API that is familiar to data scientists
- AWS SDK for Python (Boto3), which provides low-level access to SageMaker API and other AWS services
- AWS SDK for other programming languages (https://aws.amazon.com/sagemaker/resources/), depending on your application
For many data scientists, the SageMaker Python SDK is a more natural choice because of its API design. We will be using the SageMaker Python SDK throughout this book.
The SageMaker Python SDK comes standard in all fully managed SageMaker kernel images, so there is no need for you to install and manage the different versions. You can simply run import sagemaker in the code and notebook and use the library. You can also use the SageMaker Python SDK anywhere outside of SageMaker Studio, such as on your laptop or in a serverless application on AWS Lambda, to talk to SageMaker, provided that you have the correct IAM permission configurations.
Because SageMaker is a cloud service in AWS, there are some aspects that you need to take care of before using the service. The following code is a typical method for setting up the SageMaker Python SDK in a given environment. You will see more examples throughout the book:
import sagemaker
session = sagemaker.Session()
bucket = session.default_bucket()
role = sagemaker.get_execution_role()
This code snippet does the following:
- Import the SageMaker Python SDK into the runtime.
- Create a session that allows you to interact with the Amazon SageMaker API and any other AWS services.
- Create a default bucket for use and return the name of the bucket. The bucket has the form of sagemaker-{region}-{AWS account ID}.
- Retrieve the execution role that is available locally. On SageMaker Studio, it is the execution role that we assigned when the user profile was created. A role should have permissions to select S3 buckets and perform SageMaker-related actions in order to properly use the SDK. Our role has the AmazonSageMakerFullAccess policy attached to it, so we are covered. If you are using the SDK on your PC, make sure you have an AWS credential with an IAM user that permits you to perform SageMaker-related actions.
You may print out bucket and role to see what they are. They are string values to an S3 bucket and of an IAM role, respectively. The role value is required by all APIs that talk to and perform actions on the cloud. This is important because security is job zero in the cloud. As we discussed in Chapter 1, Machine Learning and Its Life Cycle in the Cloud, in AWS, you need to have valid and proper permissions in order to perform and access any cloud resources. When executing actions with SageMaker features, role will be used to verify whether you have sufficient permission to do so before proceeding.
As an open source library, you can access the source code here at https://github.com/aws/sagemaker-python-sdk and the documentation at https://sagemaker.readthedocs.io/en/stable/index.html.
Summary
In this chapter, we introduced the SageMaker Studio features at a high level. We mapped the features to the phases of a typical ML life cycle and discussed why and how SageMaker is used in the ML life cycle. We set up a SageMaker Studio domain and executed our first-ever notebook in SageMaker Studio. We learned the infrastructure of the SageMaker Studio and how to pick the right kernel image and compute instance for a notebook. Lastly, we talked about the basic concepts behind the key tool, the SageMaker Python SDK, and how it interacts with the cloud and SageMaker, as this is the foundation to lots of our future activities inside SageMaker Studio.
In the next chapter, we will jumpstart our ML journey by preparing a dataset with SageMaker Data Wrangler for an ML use case. You will learn how easy it is to prepare and process your data in SageMaker Studio.