
Chapter 2. Back to the basics
- Learning how to bootstrap your JavaScript code properly
- Managing DOM elements with Ext.Element
- Loading HTML fragments via Ajax
- Exercising a simple highlight effect on an HTML element
- Implementing Templates and XTemplates
When working on applications, I often think metaphorically, which helps me develop parallels for concepts in my mind. I like to think of the timing of an application’s launch as similar to that of the space shuttle’s launch, where timing can mean the difference between a successful launch and inevitable frustration. Knowing when to initialize your JavaScript is one of the most critical things when dealing with anything that manipulates the DOM. In this chapter you’ll learn how to launch your JavaScript using Ext to ensure your application code initializes at the right time on each browser. We can then begin our discussion on using Ext.Element to manipulate the DOM.
As you know, DOM manipulation is one of the tasks that web developers are required to code for most of the time. Whether it’s addition or removal of elements, I’m sure you’ve felt the pain of performing these tasks with the out-of-the-box JavaScript methods. After all, DHTML has been at the center of dynamic web pages for ages now.
We’ll look at the heart of Ext, known as the Ext.Element class, which is a robust cross-browser DOM element-management suite. You’ll learn to use Ext.Element to add and remove nodes from the DOM, and you’ll see how it makes this task easier.
Once you’re familiar with the Ext.Element class, you’ll learn how to use templates to stamp out HTML fragments into the DOM. We’ll also dive deep into the use of the XTemplate, which descends from Template, and you’ll learn how to use it to easily loop through data and inject behavior-modification logic while you’re at it. This is going to be a fun chapter. Before you can begin coding, however, you must learn the proper way of launching your code.
2.1. Starting off the right way
Since the early days, when most developers wanted to initialize their JavaScript, they typically would add an onLoad attribute to the <body> tag of the HTML page that’s loading:
<body onLoad='initMyApp();'>
Although this method of invoking JavaScript works, it’s not ideal for Ajax-enabled Web 2.0 sites or applications because the onLoad code is generally fired at different times for different browsers. For instance, some browsers fire this when the DOM is ready and all content has been loaded and rendered by the browser. For Web 2.0, this isn’t a good thing, because the code generally wants to start managing and manipulating DOM elements when the DOM is ready but before any images are loaded. This is where you can achieve the right balance of timing and performance. I like to call this the “sweet spot” in the page-loading cycle.
Like many things in the world of browser development, each browser generally has its own way of knowing when its DOM nodes can be manipulated.
2.1.1. Fire only when ready!
There are native browser solutions for detecting that the DOM is ready, but they aren’t implemented uniformly across each browser. For instance, Firefox and Opera fire the DOMContentLoaded event. Internet Explorer requires a script tag to be placed in the document with a defer attribute, which fires when its DOM is ready. WebKit fires no event but sets the document.readyState property to complete, so a loop must be executed to check for that property and fire off a custom event to tell your code that the DOM is ready. Boy, what a mess!
2.1.2. Let Ext JS pull the trigger
Luckily, you have Ext.onReady, which solves the timing issues and serves as the base from which to launch your application-specific code. Ext JS achieves cross-browser compatibility by detecting which browser the code is executing on and manages the detection of the DOM ready state, executing your code at just the right time.
Ext.onReady is a reference to Ext.EventManager.onDocumentReady and accepts three parameters: the method to invoke, the scope from which to call the method, and any options to pass to the method. The second parameter, scope, is used when you’re calling an initialization method that requires execution within a specific scope.
The concept of scope is something that many JavaScript developers wrestle with early in their career. It’s a concept that I think every JavaScript developer should master. A great resource to learn about scope can be found at http://www.digital-web.com/articles/scope_in_javascript/.d.
All of your Ext-based JavaScript code can be anywhere below (after) the inclusion of Ext JS script. This is important because JavaScript files are requested and loaded synchronously. Trying to call any Ext methods before Ext is defined in the namespace will cause an exception, and your code will fail to launch. Here’s a simple example of using Ext.onReady to fire up an Ext MessageBox alert window:
Ext.onReady(function() {
    Ext.MessageBox.alert('Hello', 'The DOM is ready!'),
});
In the preceding example, we pass what’s known as an anonymous function to Ext.onReady as the only parameter, which will be executed when the DOM is ready to be manipulated. Our anonymous function contains a line of code to invoke an Ext MessageBox, as shown in figure 2.1.
Figure 2.1. The result of our Ext.onReady call, an Ext.MessageBox window

An anonymous function is any function that has no variable reference to it or key reference in an object. Ext.onReady registers our anonymous function, which is to be executed when the internal docReadyEvent event is fired. In short, an event is like a message that something has occurred. A listener is a method that’s registered to be executed, or called, when that event occurs, or fires.
Ext fires this docReadyEvent event when it finds exactly the right time (remember the sweet spot) in the page-loading cycle to execute our anonymous method and any other registered listeners. If the concept of events sounds a bit confusing, don’t be alarmed. Event management is a complex topic, and we’ll cover it later, in chapter 3.
I can’t stress enough the importance of using Ext.onReady. All of our example code (and eventually your application code) has to be launched this way. Moving forward, if Ext.onReady isn’t explicitly detailed in the examples, please assume that you must launch the code with it and wrap the example code in the following manner:
Ext.onReady(function() {
  // ... Some code here ...
});
Now that you’re comfortable with using Ext.onReady to launch your code, we should spend some time exploring the Ext.Element class, which is known as the heart of the framework. This is one of those essential topics that’s used everywhere in the framework where DOM manipulation occurs.
2.2. The Ext.Element class
All JavaScript-based web applications revolve around a nucleus, which is the HTML Element. JavaScript’s access to the DOM nodes gives us the power and flexibility to perform any action against the DOM we wish. These could include adding, deleting, styling, or changing the contents of any node in the document. The traditional method to reference a DOM node by ID is
var myDiv = document.getElementById('someDivId'),
The getElementById method works well to allow you to perform some basic tasks such as changing the innerHTML or styling and assigning a CSS class. But what if you wanted to do more with the node, such as manage its events, apply a style on mouse click, or replace a single CSS class? You’d have to manage all of your own code and constantly update to make sure your code is fully cross-browser compatible. I honestly can’t think of another thing that I wouldn’t want to spend my time on than this. Thankfully, Ext takes care of this for you.
2.2.1. The heart of the framework
Let’s turn to the Ext.Element class, which is known to many in the Ext JS community as the heart of Ext JS because it plays a role in every UI widget in the framework and can be generally accessed by the getEl() method or the el property.
The Ext.Element class is a full DOM element-management suite, which includes a treasure chest of utilities, enabling the framework to work its magic on the DOM and provide the robust UI that we’ve come to enjoy. This toolset and all of its power are available to us, the end developers.
Because of its design, its capabilities aren’t relegated to simple management of DOM elements but rather to performing complex tasks such as managing dimensions, alignments, and coordinates with relative ease. You can also easily update an element via Ajax, manage child nodes, animate, enjoy full event management, and so much more.
2.2.2. Using Ext.Element for the first time
Using Ext.Element is easy and makes some of the hardest tasks simple. In order to exercise Ext.Element, you need to set up a base page. Set up a page where you include the Ext JavaScript and CSS, as we discussed in chapter 1. Next, include the following CSS and HTML:
<style type="text/css">
     .myDiv {
         border: 1px solid #AAAAAA;

         width: 200px;
         height: 35px;
         cursor: pointer;
         padding: 2px 2px 2px 2px;
         margin: 2px 2px 2px 2px;
    }
</style>

<div id='div1' class='myDiv'> </div>
What we’re doing here is setting the stage for our examples by ensuring our target div tags have specific dimensions and a border so we can clearly see them on the page. We include one div with the id of 'div1', which we’ll use as a target. If you set up your page correctly, the stylized div should be clearly visible, as shown in figure 2.2. This figure shows our generic HTML box, which we’ll use to exercise the fundamental Ext.Element methods.
Figure 2.2. Our base page with our stylized div ready for some Ext Element action

Note
All of our Ext.Element example code will reference the base page we just set up. If you’re interested in watching changes to the DOM occur live, I suggest using the multiline Firebug text editor inside of Firefox with these examples. If you’re unfamiliar with Firebug, you can learn all about it via http://getfirebug.com/wiki/index.php/Main_Page. Conversely, you can place these examples inside generic script blocks. Just be sure to use Ext.onReady().
According to the CSS, any div with the class myDiv is set to 35 pixels high and 200 pixels wide and looks a bit odd. Let’s make that element perfectly square by setting the height to 200 pixels:
var myDiv1 = Ext.get('div1'),
myDiv1.setHeight(200);
The execution of the previous two lines is pretty important. The first line uses Ext.get, which we pass the string 'div1', and returns an instance of Ext.Element referenced by the variable myDiv1. Ext.get uses document.getElementById and wraps it with the Ext element-management methods.
You leverage your newly referenced instance of Ext.Element, myDiv1, and call its setHeight method, passing it an integer value of 200, which grows the box to 200 pixels tall. Conversely, you could use its setWidth method to change the width of the element, but we’ll skip that and jump to something more fun.
“It now looks like a perfect square. Big deal!” you say. Well, let’s change dimensions again; this time we’ll use setSize. Let’s make the width and height 350 pixels. We’ll leverage the already created reference, myDiv1:
myDiv1.setSize(350, 350, {duration: 1, easing:'bounceOut'});
What happens when you execute this line of code? Does it animate and have a bouncing effect? That’s better!
Essentially, the setSize method is the composite of setHeight and setWidth. For this method, you passed the target width and height and an object with two properties, duration and easing. A third property, if defined, will make setSize animate the size transition of the element. If you don’t care for animation, omit the third argument, and the box will change size instantly, much like when you set the height.
Setting dimensions is a single facet of the many sides of element management with the Element class. Some of Ext.Element’s greatest power comes from its ease of use for full CRUD (create, read, update, and delete) of elements.
2.2.3. Creating child nodes
One of the great uses of JavaScript is the ability to manipulate the DOM, which includes the creation of DOM nodes. JavaScript provides many methods natively that give you this power. Ext JS conveniently wraps many of these methods with the Ext.Element class. Let’s have some fun creating child nodes.
To create a child node, you use Element’s createChild method:
var myDiv1 = Ext.get('div1'),
myDiv1.createChild('Child from a string'),
This code adds a string node to the innerHtml of your target div. What if you wanted to create an element? Easy as pie:
myDiv1.createChild('<div>Element from a string</div>'),
This usage of createChild will append a child div with the string 'Element from a string' to the innerHtml of div1. I don’t like to append children this way because I find the string representation of elements to be messy. Ext helps me with this problem by accepting a configuration object instead of a string:
myDiv1.createChild({
    tag  : 'div',
    html : 'Child from a config object'
});
Here, we’re creating a child element by using a configuration object. We specify the tag property as 'div' and the html as a string. This technically does the same thing as the prior createChild implementation but can be considered cleaner and self-documenting. What if you wanted to inject nested tags? With the configuration object approach, you can easily achieve this:
myDiv1.createChild({
    tag      : 'div',
    id       : 'nestedDiv',
    style    : 'border: 1px dashed; padding: 5px;',
    children : {
       tag    : 'div',
       html   : '...a nested div',
       style  : 'color: #EE0000; border: 1px solid'
    }
});
In this code, you’re creating one last child, which has an id, a bit of styling applied, and a child element, which is a div with some more styling. Figure 2.3 illustrates what the changes to the div look like.
Figure 2.3. A composite of the element additions using myDiv1.createChild()

In this illustration, you see all of the additions to myDiv1, including the live DOM view from Firebug, showing that you added a string node and three child divs, one of which has its own child div.
If you wanted to inject a child at the top of the list, you’d use the convenience method insertFirst, for instance:
myDiv1.insertFirst({
    tag  : 'div',
    html : 'Child inserted as node 0 of myDiv1'
});
Element.insertFirst will always insert a new element at position zero, even when no child elements exist in the DOM structure.
If you want to target the insertion of a child node at a specific index, the createChild method can take care of that task. All you need to do is pass it the reference of where to inject the newly created node, for instance:
myDiv1.createChild({
    tag  : 'div',
    id   : 'removeMeLater',
    html : 'Child inserted as node 2 of myDiv1'
}, myDiv1.dom.childNodes[3]);
In this code, you’re passing two arguments to createChild. The first is the configuration object representation of the newly created DOM element, and the second is the DOM reference of the target child node that createChild will use as the target to inject the newly created node. Please keep in mind the id that you set for this newly created item; you’ll use this in a bit.
Notice that we’re using myDiv1.dom.childNodes. Ext.Element gives you the opportunity to leverage all of the generic browser element-management goodness by means of the dom property.
Note
The Element.dom property is the same DOM object reference as returned by document.getElementById().
Figure 2.4 shows what the inserted nodes look like in both the page view and the DOM hierarchy using the Firebug DOM inspection tool. As you can see in this figure, the node insertions functioned as we wanted them to. We used insertFirst to inject a new node at the top of the list and createChild to inject a node above child node 3. Remember to always count child nodes starting with the number 0 instead of 1.
Figure 2.4. The results of our targeted DOM element insertions with createChild() using an index and insertFirst()

Adding is something that we do often as web developers. After all, this is part of what DHTML is all about. But removing is equally important to know. Let’s see how to remove some of the child elements using Ext.Element.
2.2.4. Removing child nodes
Removing nodes could be considered much easier than adding. All you need to do is locate the node with Ext and call its remove method. To exercise removal of child nodes, we’re going to start with a clean and controlled slate. Create a new page with the following HTML:
<div id='div1' class="myDiv">
    <div id='child1'>Child 1</div>
    <div class='child2'>Child 2</div>
    <div class='child3'>Child 3</div>
    <div id='child4' class='sameClass'>
            <div id="nestedChild1" class='sameClass'>Nest Child 1</div>
    </div>
    <div>Child 5</div>
</div>
Examining this HTML, you find a parent div with the id of 'div1'. It has five direct descendants, the first of which has the id of 'child1'. The second and third children have no ids but have CSS classes of 'child2' and 'child3'. The fourth child element has an id of 'child4' and a CSS class of 'sameClass'. Likewise, it has a direct child with an id of "nestedChild1" and the same CSS class as its parent. The last child of div1 has no id or CSS class. The reason we have all this stuff going on is that we’re going to start using CSS selectors as well as target directly the ids of the elements.
In the examples where we added child nodes, we always referenced the parent div (id='div1') by wrapping it in an Ext.Element class and leveraging its create methods. To remove a child node, the approach is different because we need to target specifically the node that’s to be removed. Using the new DOM structure, we’ll practice a few ways of doing this.
The first approach we’ll examine is removing a child node for an already wrapped DOM element. We’ll create an instance of Ext.Element wrapping div1 and then use it to find its first child node using a CSS selector:
var myDiv1 = Ext.get('div1'),
var firstChild = myDiv1.down('div:first-child'),
firstChild.remove();
In this example, we create a reference to div1 using Ext.get. We then create another reference, firstChild, to the first child using the Element.down method and pass a pseudo class selector, which causes Ext to query the DOM tree within the context of div1 for the first child, which is a div, and wrap it within an instance of Ext.Element.
The Element.down method queries the first-level DOM nodes for any given Ext.Element. It so happens that the element that’s found is the one with the div id of 'child1'. We then call firstChild.remove, which removes that node from the DOM.
Here’s how you could remove the last child from the list using selectors:
var myDiv1 = Ext.get('div1'),
var lastChild = myDiv1.down('div:last-child'),
lastChild.remove();
This example works similarly to the prior one. The biggest difference is that you use the selector 'div:last-child', which locates the last childNode for div1 and wraps it in an instance of Ext.Element. After that, you call lastChild.remove, and it’s gone.
Note
CSS selectors are a powerful way of querying the DOM for items. Ext JS supports the CSS3 selector specification. If you’re new to CSS selectors, I highly advise visiting the following W3C page, which has a plethora of information on selectors: http://www.w3.org/TR/2005/WD-css3-selectors-20051215/#selectors.
What if you want to target an element by an id? You can use Ext.get to do your dirty work. This time, you’ll create no reference and use chaining to take care of the job:
Ext.get('child4').remove();
Executing this code removes the child node with the id of 'child4' and its child node. Always remember that removing a node with children will also remove its child nodes.
Note
If you’d like to read more about chaining, Dustin Diaz, an industry-leading developer, has an excellent article on his site: http://www.dustindiaz.com/javascript-chaining/.
The last thing we’ll look at is using Ext.Element to perform an Ajax request to load remote HTML fragments from the server and inject them into the DOM.
2.2.5. Using Ajax with Ext.Element
The Ext.Element class has the ability to perform an Ajax call to retrieve remote HTML fragments and inject those fragments into its innerHTML. To exercise this, you’ll need to first write an HTML snippet to load:
<div>
    Hello there! This is an HTML fragment.
    <script type="text/javascript">
        Ext.getBody().highlight();
    </script>
</div>
In this HTML fragment, you have a simple div with an embedded script tag, which performs an Ext.getBody call and uses chaining to execute the results of that call to execute its highlight method. Ext.getBody is a convenience method to get a reference to the document.body wrapped by Ext.Element. Save this file as htmlFragment.html.
Next, you’ll perform the load of this snippet:
Ext.getBody().load({
    url     : 'htmlFragment.html',
    scripts : true
});
In this snippet, you call the load method of the result of the Ext.getBody call and pass a configuration object specifying the url to fetch, which is the htmlFragment.html file, and set scripts to true. What happens when you execute this code? See figure 2.5.
Figure 2.5. Loading an HTML fragment into the document body

When you execute this code snippet, you’ll see that the document body performs an Ajax request to retrieve your htmlFragment.html file. While the file is being retrieved, it shows a loading indicator. Once the request is complete, the HTML fragment is injected into the DOM. You then see the entire body element highlighted in yellow, which is an indication that your JavaScript was executed. Now you see that using the Ext.Element.load utility method is a great convenience over having to manually code an Ext.Ajax.request call.
And there you have it. Adding and removing elements to and from the DOM is a cinch when using Ext.Element. Ext has another way to make adding elements even simpler, especially if you have repeatable DOM structures to be placed in the DOM. These are the Template and XTemplate utility classes.
2.3. Using Templates and XTemplates
The Ext.Template class is a powerful core utility that allows you to create an entire DOM hierarchy with slots that later can be filled in with data. Once you define a template, you can then use it to replicate one or more of the predefined DOM structures, with your data filling in the slots. Mastering templates will help you master UI widgets that use templates, such as the GridPanel, DataView, and ComboBox.
2.3.1. Exercising templates
You’ll start out by creating an extremely simple template, and then you’ll move on to create one that’s much more complex:
var myTpl = new Ext.Template("<div>Hello {0}.</div>");

myTpl.append(document.body, ['Marjan']);
myTpl.append(document.body, ['Michael']);
myTpl.append(document.body, ['Sebastian']);
In this example, you create an instance of Ext.Template and pass it a string representation of a div with a slot, which is marked in curly braces, and store a reference in the variable myTpl. You then call myTpl.append and pass it a target element, document.body, and data to fill in the slots, which in this case happens to be a single element array that contains a first name.
You do this three consecutive times, which results in three divs being appended to the DOM, with each different first name filling in a slot. Figure 2.6 shows the result from our append calls.
Figure 2.6. Using our first template to append nodes to the DOM, shown in the exploded view in Firebug

As you can see, three divs were appended to the document body, each with a different name. The benefits of using templates should now be clear. You set the template once and apply it to the DOM with different values.
In the prior example, the slots were integers in curly braces, and you passed in single-item arrays. Templates can also map object key/values from plain objects. The following listing shows how to create a template that uses such syntax.
Listing 2.1. Creating a complex template

When creating our complex Template ![]() , the first thing you’ll probably notice is that you pass in quite a few arguments. You do this because when creating a template,
it’s much easier to view the pseudo HTML in a tab-delimited format rather than a long string. The Ext developers were keen
on this idea, so they programmed the Template constructor to read all of the arguments being passed, no matter how many.
, the first thing you’ll probably notice is that you pass in quite a few arguments. You do this because when creating a template,
it’s much easier to view the pseudo HTML in a tab-delimited format rather than a long string. The Ext developers were keen
on this idea, so they programmed the Template constructor to read all of the arguments being passed, no matter how many.
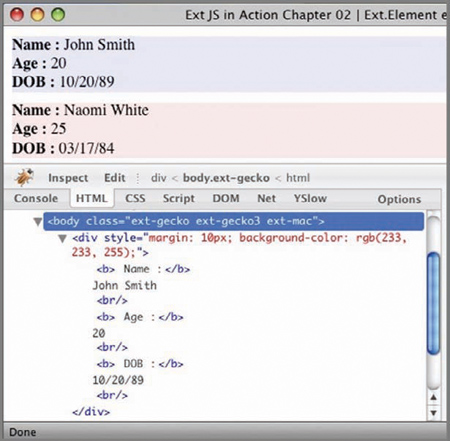
In the Template pseudo HTML are slots for four data points. The first is color, which will be used to style the background of the element. The three other data points are name, age, and dob, which will be directly visible when the template is appended.
You then compile ![]() our template, which speeds up the Template by eliminating regular expression overhead. For these two operations you technically don’t need to compile it because you wouldn’t see the speed benefits, but for larger applications, where many templates are stamped out, compiling has a clear benefit. To be safe, I always compile templates after instantiating
them.
our template, which speeds up the Template by eliminating regular expression overhead. For these two operations you technically don’t need to compile it because you wouldn’t see the speed benefits, but for larger applications, where many templates are stamped out, compiling has a clear benefit. To be safe, I always compile templates after instantiating
them.
Last, you perform two append calls ![]() , where you pass in the reference element and a data object. Instead of passing an array as you did when in your first exploration
of templates, you pass in a data object, which has keys that match the template slots. Figure 2.7 shows the result of the complex template with a DOM view in Firebug.
, where you pass in the reference element and a data object. Instead of passing an array as you did when in your first exploration
of templates, you pass in a data object, which has keys that match the template slots. Figure 2.7 shows the result of the complex template with a DOM view in Firebug.
Figure 2.7. The result of our complex template with a DOM view in Firebug

By using the template, you were able to get two differently styled elements in the DOM without being displayed. What if you had an array of objects? For instance, what if an Ajax request returned an array of data objects, and you needed to apply a template for each data object? One approach could be looping through the array, which is easily done with a generic for loop or the more robust Ext.each utility method. I say nay to that approach. I’d use XTemplate instead, which makes the code much cleaner.
2.3.2. Looping with XTemplates
XTemplates can technically be used for single data objects, but they can make life much easier when you have to deal with looping through arrayed data to stamp out HTML fragments onscreen. XTemplates extends Templates and offers much more functionality. We’ll start our exploration by creating an array of data objects and then create an XTemplate, which you’ll use to stamp out HTML fragments, as in the following listing.
Listing 2.2. Using an XTemplate to loop through data

In listing 2.2 you first set up an array of data objects ![]() , which are like the data objects you used in your last Template exploration, with the addition of a cars array, which you’ll use in the next example.
, which are like the data objects you used in your last Template exploration, with the addition of a cars array, which you’ll use in the next example.
Next, you instantiate an instance of XTemplate ![]() , which looks much like the last Template configuration, except you encapsulate the div container with a custom tpl element with the attribute for, which contains the value "."
, which looks much like the last Template configuration, except you encapsulate the div container with a custom tpl element with the attribute for, which contains the value "." ![]() . The tpl tag is like a logic or behavior modifier for the template and has two operators, for and if, which alter the way the XTemplate generates the HTML fragments. In this case, the value of "." instructs the XTemplate to loop through the root of the array for which it’s passed and construct the fragment based on the pseudo HTML encapsulated
inside the tpl element. When you look at the rendered HTML, you’ll see no tpl tags rendered to the DOM. The results of your efforts are identical to the Template example, as shown in figure 2.8.
. The tpl tag is like a logic or behavior modifier for the template and has two operators, for and if, which alter the way the XTemplate generates the HTML fragments. In this case, the value of "." instructs the XTemplate to loop through the root of the array for which it’s passed and construct the fragment based on the pseudo HTML encapsulated
inside the tpl element. When you look at the rendered HTML, you’ll see no tpl tags rendered to the DOM. The results of your efforts are identical to the Template example, as shown in figure 2.8.
Figure 2.8. The result of using XTemplate with an exploded DOM view from Firebug
Remember, the advantage of using XTemplates in this case is not having to write code to loop through the array of objects. You let the framework do the dirty work for you. The capabilities of XTemplates extend far beyond merely looping through arrays, which increase its usability exponentially.
2.3.3. Advanced XTemplate usage
You can configure XTemplates to loop through arrays within arrays and even have conditional logic. The example in the next listing will flex some XTemplate muscle and demonstrate many of these advanced concepts. Some of the syntax you’re about to see will be foreign to you. Don’t get discouraged. I’ll explain every bit.
Listing 2.3. Advanced XTemplate usage

This usage of XTemplate exercises quite a few advanced concepts, the first of which is looping within a loop ![]() . Remember, the for attribute instructs the XTemplate to loop through a list of values. In this case, the for attribute has the value of 'cars', which differs from the value that’s set for the first for attribute, ".". This instructs the XTemplate to loop through this block of pseudo HTML for each individual car. Remember that cars is an array of strings.
. Remember, the for attribute instructs the XTemplate to loop through a list of values. In this case, the for attribute has the value of 'cars', which differs from the value that’s set for the first for attribute, ".". This instructs the XTemplate to loop through this block of pseudo HTML for each individual car. Remember that cars is an array of strings.
Inside this loop is a string with "{.}" ![]() , which instructs XTemplate to place the value of the array at the current index of the loop. In simple terms, the name of a car will be rendered at
this position.
, which instructs XTemplate to place the value of the array at the current index of the loop. In simple terms, the name of a car will be rendered at
this position.
Next, you see a tpl behavior modifier with an if attribute ![]() , which executes this.isCamry and passes values. The this.isCamry method is generated at the end of the XTemplate
, which executes this.isCamry and passes values. The this.isCamry method is generated at the end of the XTemplate ![]() . We’ll speak more about this in a bit. The if attribute is more like an if condition, where the XTemplate will generate HTML fragments if the condition is met. In this case, this.isCamry must return true for the fragment that’s encapsulated inside this tpl flag to be generated.
. We’ll speak more about this in a bit. The if attribute is more like an if condition, where the XTemplate will generate HTML fragments if the condition is met. In this case, this.isCamry must return true for the fragment that’s encapsulated inside this tpl flag to be generated.
The values property is an internal reference of the values for the array you’re looping through. Because you’re looping through an array of strings, it references a single string, which is the name of a car.
In the next line, you’re arbitrarily executing JavaScript code ![]() . Anything encapsulated in curly braces and brackets ({[ ... JS code ... ] }) will be interpreted as generic JavaScript; it has access to some local variables that are provided by XTemplate and can change with each iteration of the loop. In this case, you’re checking to see if the current index (xindex) is less than the number of items in the array (xcount) and returning either a comma with a space or an empty string. Performing this test inline will ensure that commas are placed
exactly between the names of cars.
. Anything encapsulated in curly braces and brackets ({[ ... JS code ... ] }) will be interpreted as generic JavaScript; it has access to some local variables that are provided by XTemplate and can change with each iteration of the loop. In this case, you’re checking to see if the current index (xindex) is less than the number of items in the array (xcount) and returning either a comma with a space or an empty string. Performing this test inline will ensure that commas are placed
exactly between the names of cars.
The last item of interest is the object that contains your isCamry method ![]() . Including an object (or reference to an object) with a set of members with the passing arguments to the XTemplate constructor will result in those members being applied directly to the instance of XTemplate itself. This is why you called this.isCamry directly in the if condition of one of the tpl behavior modifier pseudo elements. All of these member methods are called within the scope of the instance of the XTemplate for which they’re being passed. This concept is extremely powerful but can be dangerous because you can override an existing
XTemplate member, so please try to make your methods or properties unique. The isCamry method uses JavaScript shorthand to test whether the passed string, car, is equal to "Camry" and will return true if it is; otherwise, it will return false. Figure 2.9 shows the results of the advanced XTemplate exercise.
. Including an object (or reference to an object) with a set of members with the passing arguments to the XTemplate constructor will result in those members being applied directly to the instance of XTemplate itself. This is why you called this.isCamry directly in the if condition of one of the tpl behavior modifier pseudo elements. All of these member methods are called within the scope of the instance of the XTemplate for which they’re being passed. This concept is extremely powerful but can be dangerous because you can override an existing
XTemplate member, so please try to make your methods or properties unique. The isCamry method uses JavaScript shorthand to test whether the passed string, car, is equal to "Camry" and will return true if it is; otherwise, it will return false. Figure 2.9 shows the results of the advanced XTemplate exercise.
Figure 2.9. The results from the advanced XTemplate exercise

The results of the advanced XTemplate exercise show that all of our behavior injections worked as planned. All of the cars are listed, including proper comma placement. You can tell that our arbitrary JavaScript injection worked because the string "(same car)" is placed to the right of the Camry name.
As you can see, Templates and XTemplates have myriad benefits over generic DOM injections using Ext.Element to stamp out HTML fragments with data. I encourage you to look over the Template and XTemplate API pages for more details and examples of how to use these utilities. Your next exposure to Templates will be when you learn how to create a custom ComboBox.
2.4. Summary
In this chapter we discussed how JavaScript application logic was launched in the olden days with the onLoad handler of the <body> element. Remember that browsers typically have their own way of publishing when the DOM is ready for manipulation, which causes a code-management nightmare. In exercising Ext.onReady, you learned that it takes care of launching your application code at just the right time for each browser, so you can concentrate on the important stuff, application logic.
We then took an in-depth look the Ext.Element class, which wraps and provides end-to-end management for DOM nodes. We exercised a few of the management utilities for DOM nodes by adding and removing elements. All UI widgets use the Ext.Element, making it one of the most used components of the core framework. Each widget’s element can be accessed via the (public) getEl method or the (private) el property, but only after it has been rendered.
Last, you learned about using the Template class to inject HTML fragments into the DOM. We also jumped into advanced techniques with XTemplates and showed how to embed behavioral modifying logic into the template definition itself, producing results depending on the data that provided.
Looking forward, we’re going to focus on the UI side of the framework, where we’ll jump right into the core concepts and models that drive the framework.