
Chapter 3. Events, Components, and Containers
This chapter covers
- Learning about software-driven events with Observable
- Getting to know the Component model and lifecycle
- Exploring the Ext JS Container model
- Managing parent-child relationship of widgets
- Implementing the Container model utility methods
I recall my early days with the Ext framework, when I started learning by toying with the examples and reading the API documentation. I spent many hours on some of the most important core UI concepts, such as adding user interaction, the reusability of widgets, and how one widget can contain or control another. For instance, how would I make the click of an anchor tag display an Ext Window? Sure, there’s a generic JavaScript way of attaching an event handler, but I wanted to use Ext JS. Likewise, I needed to know how to get widgets to communicate with each other. For example, how would I reload a GridPanel when a row of another GridPanel is clicked? Also, how would I add and remove items dynamically from a Panel? Or how could I find a particular field within a form panel based on the type field?
This chapter is designed to cover these core concepts, which are essential to building rich and interactive user interfaces with the framework. Because we just covered Ext.Element in chapter 2, we’ll leverage this information to set up native click handlers on DOM elements and learn how events flow in the DOM. We’ll also touch on how widget events work from registration to firing the event.
We’ll also explore the deep caverns of the fundamental UI building block, the Component class, and learn how it serves as the central model for all UI widgets by implementing a template for standard behaviors known as the Component lifecycle.
Last, we’ll take some time discussing the Container class, where you’ll get an in-depth understanding of how widgets can manage child items. You’ll learn how to dynamically add and remove items to and from widgets like the Panel, which can be used as a building block for dynamically updating UIs.
3.1. Managing events with Observable
For me, one of the most fun tasks in developing web applications is coding to manage events. An event can be thought of as a signal that’s sent by some source when something occurs that could require action. Understanding events is one of the key core concepts you must become familiar with, because this will aid you in developing user interfaces, which provide truly rich user interaction. For instance, what if you wanted to display a context menu on a GridPanel when a user right-clicks a row? You’d set up an event handler for the rowcontextmenu event, which will create and display the context menu.
Likewise, knowing how Ext Components communicate with each other via events is equally important. This section will give you the fundamental knowledge that you’ll need.
3.1.1. Taking a step back
Although you may not have realized it, you use an event-driven operating system every day. All modern user interfaces are driven by events, which on a high level generally come from inputs such as a mouse or keyboard but can be synthesized by software. Events that are sent are dispatched, or fired. Methods that take actions on these events are listeners and are sometimes called handlers.
Like modern operating systems, the browser too has an event model, where it fires events because of user input. This powerful model allows us to leverage that input and perform complex tasks, such as refreshing a grid or applying a filter. Just about every interaction that’s performed with the browser fires events that can be leveraged. These are known as DOM-based events.
3.1.2. DOM-based events
Recall that events can come from user input or be synthesized by software. We need to first explore DOM-based events, which are initiated by user input, before we can have fun with software-based events. A lot of old-school web developers attached listeners directly to HTML elements, such as the onclick attribute:
<div id="myDiv" onclick="alert(this.id + ' was clicked'),">Click me</div>
This method of adding event handlers was standardized by Netscape many years ago and is considered to be ancient practice by most modern JavaScript developers. This is because it adds a dependency for embedded JavaScript in HTML and leads to a code-management nightmare in addition to memory leaks by some browsers. I suggest avoiding this method at all costs.
The way events are managed across browsers is added to our ever-growing list of cross-browser incompatibilities. Luckily for us, Ext JS takes care of that and presents a unified interface for us to leverage:
var el = Ext.get('myDiv'),
el.on('click', doSomething);
Here, we use the utility method, Ext.get, which allows Ext to wrap its element management class, Ext.Element, around a referenced element, giving us the power to do pretty much anything we want with that element. Embedded with each instance of Ext.Element is the usage of the Ext event-management engine, Ext.util.Observable. It’s important to remember that all event management with Ext stems from Ext.util.Observable, which serves as a base for all DOM elements and Components that need to manage events.
Next, we attach a listener by calling el.on and pass the native event to be handled and a method to perform an action on the event. Ext takes event listener registration a step further by allowing you to pass a reference to the scope from which the event handler is to be called and any parameters:
var el = Ext.get('myDiv'),
el.on('click', doSomething, scopeRef, [opt1, opt2]);
It’s important to note that the default scope is always the object from which the handler is being defined. If scope were not explicitly passed, the method doSomething would be called within the scope of the object el, which is an instantiation of Ext.Element.
Now that you’ve learned and exercised simple event handling on an Element, we’ll take a quick glance at how events flow in the DOM.
3.1.3. Event flow in the DOM
In the early days of the internet, Netscape and Microsoft had two completely separate approaches with regard to event flow direction. In the Netscape model, events flowed downward from the document body to the source, which is known as event capture. The Microsoft model, known as bubbling, was exactly the inverse of capture, where the event is generated from the node from which the user action is performed and bubbles up to the document object, which performs a default action based on what type of node was clicked. Thankfully, the W3C model, shown in figure 3.1, combined these two models and is what we use now.
Figure 3.1. The W3C Event model, where events first flow downward (capture) and then return up the tree (bubbling)

As you can see, the user clicking the anchor tag generates a DOM-level click event. This causes the event-capture phase to occur, which cascades the event down the DOM tree, where it eventually lands at the target node, the anchor tag. If the event isn’t stopped, it’ll bubble back up to the browser window, where it’ll cause the browser’s location to change.
Note
If you’re new to DOM events and want to learn more about the inner workings, Peter-Paul Koch has an excellent article on his site, in which he explains events in browsers in much greater detail than what is covered in this book. Here’s the direct link: http://www.quirksmode.org/js/events_order.html.
Most of the time when you’re developing event handlers for DOM events, you have to worry about bubbling. To demonstrate why this is important, we’ll need to set up some HTML and attach event handlers to the node. We’ll use the Firebug console to echo out messages. If you don’t wish to use Firebug, the generic JavaScript alert box will work.
Suppose you have the following HTML, and you want to apply separate click listeners to both the div and the anchor tags:
<div id="myDiv">
    MyDiv Text
    <a href="#" id="myHref">
        My Href
    </a>
</div>
You’ll register a click handler to the outermost element, myDiv, and use chaining so you don’t have to set a static reference to the result of the Ext.get method call. You’ll also pass an anonymous function as the second parameter instead of passing a reference to an existing function:
Ext.get('myDiv').on('click', function(eventObj, elRef) {
  console.log('myDiv click Handler, source elment ID: ' + elRef.id);
});
After rendering the page, expand Firebug and click the anchor tag. You’ll see a Firebug console message indicating that you clicked the myHref tag. Hold the phone—you only assigned a listener to the anchor’s parent element, 'myDiv'. How could this be?
This is event bubbling in action. Remember that the click event generated from the anchor tag bubbled upward to the Container div, where you attached the click handler. That bubbled event triggered the event handler, causing its execution, thus the console message.
Next, attach a click handler to the anchor tag:
Ext.get('myHref').on('click', function(eventObj, elRef) {
  console.log('myHref click handler, source elment ID: ' + elRef.id);
});
Refresh your page and click the anchor again; you’ll see two events fired, as shown in figure 3.2.
Figure 3.2. The results of our click event handlers in the Firebug console
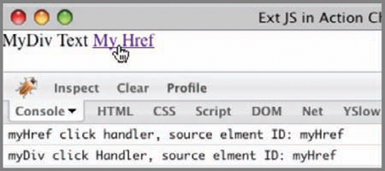
Having both event listeners fire could be troublesome and considered a waste of resources, especially if only one is needed. In order to stop this from happening, you need to stop the bubbling (propagation) of the click event in the anchor. Only then can you have separation from the anchor and the div element click event handlers.
3.1.4. Burst the bubble
To prevent both event handlers from triggering, you’ll have to modify the anchor click event handler to include a stopEvent call on the instance of Ext.EventObject (eventObj) passed to the handler:
Ext.get('myHref').on('click', function(eventObj, elRef) {
    eventObj.stopEvent();
    console.log('myHref click handler, source elment ID: ' + elRef.id);
});
Refresh the page and click the anchor again. This time, you’ll see only one Firebug console message per click, indicating that you’ve clicked the anchor tag. Likewise, clicking the div element will produce a message stating that you clicked the div.
The eventObj.stopEvent method call stops the event bubbling in its tracks. This is important to remember because there are other interactions for which you may want to cancel event propagation, such as contextmenu, where you’d want to show your own context menu instead of the browser’s default menu.
We’ll modify our example to listen to listen to the contextmenu event to perform this task:
Ext.get('myDiv').on('contextmenu', function(eventObj, elRef) {
    console.log('myDiv contextmenu Handler, source el ID: ' + elRef.id);
});
Ext.get('myHref').on('contextmenu', function(eventObj, elRef) {

    eventObj.stopEvent();
    console.log('myHref contextmenu Handler, source el ID: ' + elRef.id);

    if (!this.ctxMenu) {
        this.ctxMenu = new Ext.menu.Menu({
            items : [{
                text : "This is"
            },{
                text : "our custom"
            },{
                text : "context menu"
            }]
        });
    }
    this.ctxMenu.show(elRef);
});
In this example, we change the registered event from click to contextmenu for both the div and anchor elements. For the div event handler, we echo out a console message, providing an indication that the handler was triggered. For the anchor event handler, we stop the event propagation, log the event trigger in the Firebug console, create a new Ext menu, and display it below the anchor element.
If you right-click the div, you’ll see the default browser context menu. But if you right-click the anchor (figure 3.3), you’ll see your own custom menu because you halted the propagation of the contextmenu event, preventing it from bubbling back up to the browser.
Figure 3.3. Displaying our custom context menu by means of a contextmenu event handler

As you can see, the registration of event handlers on DOM nodes is a simple task, but knowing whether you have to stop an event from bubbling up can be tricky. Certainly the contextmenu event is the only event that comes to mind that always needs to be stopped to prevent default browser behavior.
Next, we’ll focus our attention on software-driven events, which is another key concept of the framework because inter-Component events are used extensively in the framework.
3.1.5. Software-driven events
Almost every Ext widget or Component has custom events that it fires when it deems necessary. For instance, when a widget is finished rendering in the DOM, it fires a render event.
This is because just about everything extends Ext.util.Observable, which gives widgets the ability to exhibit similar behavior to complex UI environments such as your desktop UI. Events from widgets and Components can include DOM-based events that are bubbled up, such as click and keyup or Ext internal events such as beforerender and datachanged.
The API is a great place to read about events for a particular subclass of Observable. The last section of each API page is dedicated to public events from which other Components can register listeners and take action.
3.1.6. Registration of events and event listeners
Before an Ext-based event can be fired, it must be added to the list of events for that instance of Observable. This is typically done with the addEvent method, which stems from the Observable class. Let’s instantiate a new instance of Observable and add a custom event:
var myObservable = new Ext.util.Observable();

myObservable.addEvents('sayHello'),
myObservable.addEvents('sayGoodbye'),
If you want to register more than one event, you can pass one event label per argument:
myObservable.addEvents('sayhello', 'saygoodbye'),
Alternatively, you can pass in a configuration object that has a list of event labels and whether they should be enabled by default:
myObservable.addEvents({
 'sayHello'   : true,
 'sayGoodbye' : true
});
Now that you have your events registered, you need to register an event handler. This should look familiar:
myObservable.on('sayHello', function() {
   console.log('Hello stranger'),
});
Here, you’re providing an event handler for your custom event, sayHello. Notice that this is exactly how you registered events on the DOM. The handler will log a console message in Firebug as an indication that it was executed. Because you have your custom event defined and you have a listener registered, you need to fire the event so that you can watch the event handler get called:
myObservable.fireEvent('sayHello'),
You can see in figure 3.4 that firing the event causes the handler to execute, resulting in a Firebug console message being displayed.
Figure 3.4. A Firebug console message being displayed, indicating that the registered handler for the sayHello event was triggered

Many events from the framework pass parameters when firing; among the parameters is a reference to the Component firing the event. Create an event handler for a custom sayGoodbye event so that it accepts two parameters, firstName and lastName:
var sayGoodbyeFn = function(firstName, lastName) {
    console.log('Goodbye ' + firstName + ' ' + lastName + '!'),
};
myObservable.on('sayGoodbye', sayGoodbyeFn);
Here, you define a method named sayGoodbyeFn, which accepts the two parameters. You then call myObservable.on, which is shorthand for myObservable.addListener, to register the event handler sayGoodbyeFn.
Next, fire the 'sayGoodbye' event and pass first and last names:
myObservable.fireEvent('sayGoodbye', 'John', 'Smith'),
When calling fireEvent, the only required parameter is the first one, which is the event name. Parameters passed on thereafter are relayed to the event handler. The result of the 'sayGoodbye' event being fired with the firstName and lastName parameters passed should appear in your Firebug console, as shown in figure 3.5.
Figure 3.5. A Firebug console message displays as the result of the firing of the sayGoodbye event.

Remember that if you register an event handler without specifying scope, it will be called within the scope of the Component that’s firing the event. As we continue our journey into the Ext JS world, we’ll revisit events again because we’ll use them to “wire” widgets together.
Just as the registration of event handlers is important to completing tasks, deregistration of event handlers is equally important to ensure proper cleanup when an event handler is no longer required. Fortunately, the method call to do so is extremely simple:
myObservable.removeListener('sayGoodbye', sayGoodbyeFn);
Here, we call myObservable.removeListener, passing in the event from which the listener is to be deregistered and the listener method to deregister. The shorthand for removeListener is un (opposite of on) and is commonly used in the framework and application code. The preceding code looks like this in shorthand:
myObservable.un('sayGoodbye', sayGoodbyeFn);
Managing events and event listeners is as straightforward as described. Using anonymous functions won’t work with this approach because you have to specify which function you want to remove from the listener. Always remember to deregister event handlers when they’re no longer needed. This will help reduce the memory footprint of your application and help ensure that no exceptions occur because of an event handler being triggered when it shouldn’t be.
You’re now familiar with registering events to DOM elements and have glanced at software-driven events; we can start to gravitate toward the UI portion of the framework. Before we dive into configuring and constructing widgets, we need to look at the Component model, which serves as the base model for all UI widgets. Having a solid grasp of how the Component model works in Ext JS 3.0 will allow you to better utilize the UI portion of framework, especially when managing child items of a Container.
3.2. The Component model
The Ext Component model is a centralized model that provides many of the essential Component-related tasks, which include a set of rules dictating how the Component instantiates, renders, and is destroyed, known as the Component lifecycle.
All UI widgets are subclasses of Ext.Component, which means that all of the widgets conform to the rules dictated by the model. Figure 3.6 partially depicts how many items subclass Component, directly or indirectly.
Figure 3.6. This illustration of the Ext class hierarchy focuses on some of the common subclasses of Ext.Component and depicts how widely the Component model is used in the framework.

Knowing how each UI widget is going to behave introduces stability and predictability into the framework, which I enjoy. The Component model also supports direct instantiation of classes or deferred instantiation, known as XTypes. Knowing which to use when can enhance the responsiveness of your application.
3.2.1. XTypes and Component Manager
Ext 2.0 introduced a radical new concept known as an XType, which allows for lazy instantiation of Components, which can speed up complex user interfaces and can clean up our code quite a bit.
In short, an XType is nothing more than a plain JavaScript object, which generally contains an xtype property with a string value denoting which class the XType is for. Here’s a quick example of an XType in action:
var myPanel = {
    xtype    : 'panel',
    height   : 100,
    width    : 100,
    html     : 'Hello!'
};
In this configuration object, myPanel is an XType configuration object that would be used to configure an Ext.Panel widget. This works because just about every widget is registered to the Ext.ComponentMgr class with a unique string key and a reference to that class, which is then referred to as an XType. At the tail end of each Ext UI widget class, you’ll find the registration of that widget in the Ext.ComponentMgr.
Registration of a Component is simple:
Ext.reg ('myCustomComponent', myApp.customClass);
The act of registering a Component to the ComponentMgr appends or replaces the new Component to the internal reference map of the ComponentMgr singleton. Once registration is complete, you can specify your custom Component as an XType:
new Ext.Panel({
    ...
    items : {
        xtype : 'myCustomComponent',
        ...
    }
 });
When a visual Component, which can contain children, is initialized, it looks to see if it has this.items and will inspect this.items for XType configuration objects. If any are found, it will attempt to create an instance of that Component using ComponentMgr.create. If the xtype property isn’t defined in the configuration object, the visual Component will use its defaultType property when calling ComponentMgr.create.
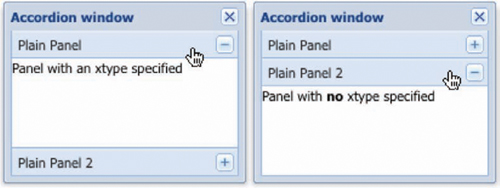
I realize that this may sound a tad confusing at first. I think you can better understand this concept if we demonstrate it. To do this, we’ll create a window with an accordion layout that includes two children, one of which won’t contain an xtype property. First, let’s create our configuration objects for two of the children:
var panel1 = {
    xtype : 'panel',
    title : 'Plain Panel',
    html  : 'Panel with an xtype specified'
};

var panel2 = {
    title : 'Plain Panel 2',
    html  : 'Panel with <b>no</b> xtype specified'
};
Notice that panel1 has an explicit xtype value of 'panel', which in turn will be used to create an instance of Ext.Panel. Objects panel1 and panel2 are similar but have two distinct differences. Object panel1 has an xtype specified, whereas panel2 doesn’t. Next, we’ll create our window, which will use these xtypes:
new Ext.Window({
    width        : 200,
    height       : 150,
    title        : 'Accordion window',
    layout       : 'accordion',
    border       : false,
    layoutConfig : {
        animate : true
    },
    items : [
        panel1,
        panel2
    ]
}).show();
In our new instantiation of Ext.Window, we pass items, which are an array of references to the two configuration objects we created earlier. The rendered window should appear as illustrated in figure 3.7. Clicking a collapsed panel will expand and collapse any other expanded panels, and clicking an expanded panel will collapse it.
Figure 3.7. The results of our XType exercise: an Ext Window, which has two child panels derived from XType configuration objects
One of the lesser-known advantages of using XTypes is developing somewhat cleaner code. Because you can use plain object notation, you can specify all of your XType child items inline, resulting in cleaner and more streamlined code. Here is the previous example reformatted to include all of its children inline:
new Ext.Window({
    width        : 200,
    height       : 150,
    title        : 'Accordion window',
    layout       : 'accordion',
    border       : false,
    layoutConfig : {
        animate : true
    },
    items : [
        {
            xtype : 'panel',
            title : 'Plain Panel',
            html  : 'Panel with an xtype specified'
        },
        {
            title : 'Plain Panel 2',
            html  : 'Panel with <b>no</b> xtype specified'
        }
    ]
}).show();
As you can see, we’ve included all of the child configuration items inline with the Window configuration object. The performance enhancements with using XTypes can’t be seen with such a simple example. The biggest XType-based performance gains come in bigger applications, where there are a rather large number of Components to be instantiated.
Components also contain another performance-enhancing feature, lazy rendering. This means a Component is rendered only when necessary.
3.2.2. Component rendering
The Ext.Component class supports both direct and lazy (on-demand) render models. Direct rendering can happen when a subclass of Component is instantiated with either the renderTo or applyTo attribute, where renderTo points to a reference from which the Component renders itself and applyTo references an element that has HTML that’s structured in such a way that allows the Component to create its own child elements based on the referenced HTML. You’d typically use these parameters when you wanted a Component to be rendered upon instantiation, for instance:
var myPanel = new Ext.Panel({
    renderTo : document.body,
    height   : 50,
    width    : 150,
    title    : 'Lazy rendered Panel',
    frame    : true
});
The result of this code would be the immediate render of the Ext.Panel, which sometimes is favorable and other times not. The times where it’s not favorable can be when you want to defer rendering to another time in code execution or the Component is a child of another.
If you want to defer the rendering of the Component, omit the renderTo and applyTo attributes and call the Components render method when you (or your code) deem it necessary:
var myPanel = new Ext.Panel({
    height : 50,
    width  : 150,
    title  : 'Lazy rendered Panel',
    frame  : true
});

// ... some business logic...

myPanel.render(document.body);
In this example, you instantiate an instance of Ext.Panel and create a reference to it, myPanel. After some hypothetic application logic, you call myPanel.render and pass a reference to document.body, which renders the panel to the document body.
You could also pass an ID of an element to the render method:
myPanel.render('someDivId'),
When passing an element ID to the render method, Component will use that ID with Ext.get to manage that element, which gets stored in its local el property. If this rings a bell, you may recall the conversation we had in the last chapter, when we were discussing Ext.Element, where you learned that you can access a widget’s el property or use its accessor method, getEl, to get obtain the reference.
There’s one major exception to this rule, however. You never specify applyTo or renderTo when the Component is a child of another. Components that contain other Components have a parent-child relationship, which is known as the Container model. If a Component is a child of another Component, it’s specified in the items attribute of the configuration object, and its parent will manage the call to its render method when required. This is known as lazy or deferred rendering.
We’ll investigate Containers later in this chapter, where you’ll learn more about the parent-child relationship Components can have. But first, you need to understand the Component lifecycle, which details how Components are created, rendered, and eventually destroyed. Learning how each phase works will better prepare you for building robust and dynamic interfaces and can assist in troubleshooting issues.
3.3. The Component lifecycle
Ext Components, like everything in the real world, have a lifecycle where they’re created, used, and destroyed. This lifecycle is broken up into three major phases: initialization, render, and destruction, as diagrammed in figure 3.8.
Figure 3.8. The Ext Component lifecycle always starts with initialization and always ends with destruction. The Component need not enter the render phase to be destroyed.

To better utilize the framework, you must understand in finer detail how the lifecycle works. This is especially important if you’ll be building extensions, plug-ins, or composite Components. Quite a few steps take place at each phase of the lifecycle, which is controlled by the base class, Ext.Component.
3.3.1. Initialization
The initialization phase is when a Component is born. All of the necessary configuration settings, event registration, and pre-render processes take place in this phase, as illustrated in figure 3.9.
Figure 3.9. The initialization phase of the Component lifecycle executes important steps such as event and Component registration as well as the calling the initComponent method. It’s important to remember that a Component can be instantiated but may not be rendered.
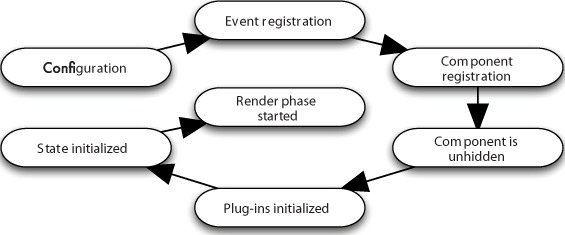
Let’s explore each step of the initialization phase:
- The configuration is applied— When instantiating an instance of a Component, you pass a configuration object, which contains all of the necessary parameters and references to allow the Component to do what it’s designed to do. This is done within the first few lines of the Ext.Component base class.
- Registration of the base Component events— Per the Component model, each subclass of Ext.Component has, by default, a set of core events that are fired from the base class. These are fired before and after some behaviors occur: enable/disable, show, hide, render, destroy, state restore, state save. The before events are fired and tested for a successful return of a registered event handler and will cancel the behavior before any real action has taken place. For instance, when myPanel.show is called, it fires the beforeshow event, which will execute any methods registered for that event. If the beforeshow event handler returns false, myPanel doesn’t show.
- ComponentMgr registration— Each Component that’s instantiated is registered with the ComponentMgr class with a unique Ext-generated string ID. You can choose to override the Ext-generated ID by passing an id parameter in the configuration object passed to a constructor. The main caveat is that if a registration request occurs with a non-unique registration ID, the newest registration will override the previous one. Be careful to use unique IDs if you plan to use your own ID scheme.
- initComponent is executed— The initComponent method is where a lot of work occurs for subclasses of Component, like registration of subclass-specific events, references to data stores, and creation of child Components. initComponent is used as a supplement to the constructor and is used as the main point to extending Component or any subclass thereof. We’ll elaborate on extending with initComponent later on.
- Plug-ins are initialized— If plug-ins are passed in the configuration object to the constructor, their init method is called, with the parent Component passed as a reference. It’s important to remember that the plug-ins are called upon in the order in which they’re referenced.
- State is initialized— If the Component is state aware, it will register its state with the global StateManager class. Many Ext widgets are state aware.
- Component is rendered— If the renderTo or applyTo parameter is passed into the constructor, the render phase begins at this time; otherwise, the Component then lies dormant, awaiting its render method to be called.
This phase of a Component’s life is usually the fastest because all of the work is done in JavaScript. It’s particularly important to remember that the Component doesn’t have to be rendered to be destroyed.
3.3.2. Render
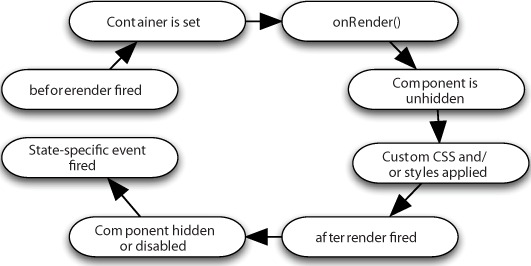
The render phase is the one where you get visual feedback that a Component has been successfully initialized. If the initialization phase fails for whatever reason, the Component may not render correctly or at all. For complex Components, this is where a lot of CPU cycles get eaten up, where the browser is required to paint the screen and computations take place to allow all of the items for the Component to be properly laid out and sized. Figure 3.10 illustrates the steps of the render phase.
Figure 3.10. The render phase of the a Component’s life can utilize a lot of CPU because it requires elements to be added to the DOM and calculations to be performed to properly size and manage them.
If renderTo or applyTo isn’t specified, a call to the render method must be made, which triggers this phase. If the Component is not a child of another Ext Component, your code must call the render method, passing a reference of the DOM element:
someComponent.render('someDivId''),
If the Component is a child of another Component, its render method will be called by the parent Component. Let’s explore the different steps of the render phase:
- beforerender is fired— The Component fires the beforerender event and checks the return of any of the registered event handlers. If a registered event handler returns false, the Component halts the rendering behavior. Recall that step 2 of the initialization phase registers core events for subclasses of Component and that “before” events can halt execution behaviors.
- The Container is set— A Component needs a place to live, and that place is known as its Container. If you specify a renderTo reference to an element, the Component adds a single child div element to the referenced element, known as its Container, and renders the Component inside that newly appended child. If an applyTo element is specified, the element referenced in the applyTo parameter becomes the Component’s Container, and the Component appends only those items to the referenced element that are required to render it. The DOM element referenced in applyTo will then be fully managed by the Component. You generally pass neither when the Component is a child of another Component, in which the container is the parent Component. It’s important to note that you should pass only renderTo or applyTo, not both. We’ll explore renderTo and applyTo later on, when you learn more about widgets.
- onRender is executed— This is a crucial step for subclasses of Component, where all of the DOM elements are inserted to get the Component rendered and painted onscreen. Each subclass is expected to call its superclass.onRender first when extending Ext.Component or any subclass thereafter, which ensures that the Ext.Component base class can insert the core DOM elements needed to render a Component.
- The Component is unhidden— Many Components are rendered hidden using the default Ext CSS class, like 'x-hidden'. If the autoShow property is set, any Ext CSS classes that are used for hiding Components are removed. It’s important to note that this step doesn’t fire the show event, so any listeners for that event won’t be fired.
- Custom CSS classes or styles are applied— Custom CSS classes and styles can be specified upon Component instantiation by means of the cls and style parameters. If these parameters are set, they’re applied to the Container for the Component. It’s suggested that you use cls instead of style, because CSS inheritance rules can be applied to the Component’s children.
- The render event is fired— At this point, all necessary elements have been injected into the DOM and styles applied. The render event is fired, triggering any registered event handlers for this event.
- afterRender is executed— The afterRender event is a crucial post-render method that’s automatically called by the render method within the Component base class and can be used to set sizes for the Container or perform any other post-render functions. All subclasses of Component are expected to call their superclass.afterRender method.
- The Component is hidden and/or disabled— If either hidden or disabled is specified as true in the configuration object, the hide or disable method is called, which fires its respective before<action> event, which is cancelable. If both are true, and the before<action> registered event handlers don’t return false, the Component is both hidden and disabled.
- State-specific events are fired— If the Component is state aware, it will initialize its state-specific events with its Observable and register the this.saveEvent internal method as the handler for each of those state events.
- Once the render phase is complete, unless the Component is disabled or hidden, it’s ready for user interaction. It stays alive until its destroy method is called, in which it then starts its destruction phase.
The render phase is generally where a Component spends most of its life until it meets its demise with the destruction phase.
3.3.3. Destruction
As in real life, the death of a Component is a crucial phase in its life. Destruction of a Component performs critical tasks, such as removing itself and any children from the DOM tree, deregistration of the Component from ComponentMgr, and deregistration of event listeners, as depicted in figure 3.11.
Figure 3.11. The destruction portion of a Component’s life is equally as important as its initialization because event listeners and DOM elements must be deregistered and removed, reducing overall memory usage.

The Component’s destroy method could be called by a parent Container or by your code. Here are the steps in this final phase of a Component’s life:
- beforedestroy is fired— This, like many before<action> events, is a cancelable event, preventing the Component’s destruction if its event handler returns false.
- beforeDestroy is called— This method is first to be called within the Component’s destroy method and is the perfect opportunity to remove any non-Component items, such as toolbars or buttons. Any subclass of Component is expected to call its superclass.beforeDestroy.
- Element and Element listeners are purged— If a Component has been rendered, any handlers registered to its Element are removed and the Element is removed from the DOM.
- onDestroy is called— Although the Component class itself doesn’t perform any actions within the onDestroy method, subclasses are expected to use this to perform any post-destruction actions, such as removal of data stores. The Container class, which subclasses Component indirectly, manages the destruction of all registered children by the onDestroy method, alleviating the end developer of this task.
- Component is unregistered from ComponentMgr— The reference for this Component in the ComponentMgr class is removed.
- The destroy event is fired— Any registered event handlers are triggered by this event, which signals that the Component is no longer in the DOM.
- Component’s event handlers are purged— All event handlers are deregistered from the Component.
And there you have it, an in-depth look at the Component lifecycle, which is one of the features of the Ext framework that makes it so powerful and successful.
Be sure to not dismiss the destruction portion of a Component’s lifecycle if you plan on developing your own custom Components. Many developers have gotten into trouble when they’ve ignored this crucial step and have code that has left artifacts such as data Stores that continuously poll web servers; or event listeners that are expecting an Element to be in the DOM were not cleaned properly and cause exceptions and the halt of execution of a crucial branch of logic.
Next, we’ll look at the Container class, which is a subclass of Component and gives Components the ability to manage other Components in a parent-child relationship.
3.4. Containers
The Container model is a behind-the-curtains class that provides a foundation for Components to manage their child items, and is often overlooked by developers. This class provides a suite of utilities, which includes add, insert, and remove methods along with some child query, bubble, and cascade utility methods. These methods are used by most of the subclasses, including Panel, Viewport, and Window.
In order for you to learn how these tools work, we need to build a Container with some child items for us to use. The following listing is rather long and involved, but stay with me on this. The reward is just around the corner.
Listing 3.1. Building our first Container

Take a gander at listing 3.1. The first thing you do is create two vanilla panels ![]() , and then you create myWin
, and then you create myWin ![]() , an instance of Ext.Window that contains the previously defined panels. The rendered UI should look like the one in figure 3.12.
, an instance of Ext.Window that contains the previously defined panels. The rendered UI should look like the one in figure 3.12.
Figure 3.12. The rendered Container UI from listing 3.1
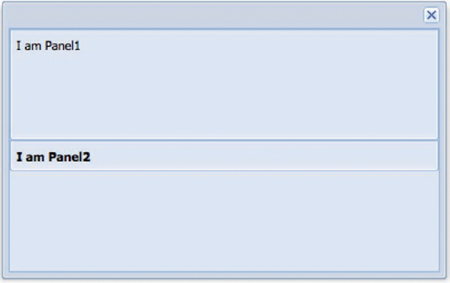
We left some room at the bottom of myWin, which will come in handy when we add items. Each Container stores references to its children via an items property, which can be accessed via someContainer.items and is an instance of Ext.util.MixedCollection.
MixedCollection is a utility that allows the framework to store and index a mixed collection of data, which includes strings, arrays, and objects and provides a nice collection of handy utility methods. I like to think of it as the Array on steroids.
Now that we’ve rendered our Container, let’s start to implement the addition of children to a container.
3.4.1. Learning to tame children
In the real world, learning to tame children can lead to frustration and many gray hairs, so we must learn to use the tools that are available to us. Mastering these utility methods will enable you to dynamically update your UI, which is in the spirit of Ajax web pages.
Adding Components is a simple task, in which we’re provided two methods: add and insert. The add method only appends a child to the Container’s hierarchy, whereas insert allows us to inject an item into the Container at a particular index.
Let’s add to the Container that you created in listing 3.1. For this, we’ll use our handy Firebug JavaScript console:
Ext.getCmp('myWin').add({
    title : 'Appended Panel',
    id    : 'addedPanel',
    html  : 'Hello there!'
});
Running the preceding code adds the item to the Container. Wait a cotton-picking second! Why didn’t the new panel appear? Why does the Container still look like figure 3.1? It didn’t show up because we didn’t call the doLayout method for the Container. Let’s see what happens when we call doLayout:
Ext.getCmp('myWin').doLayout();
Ah-ha! It showed up, but why? Well, the doLayout method forces the recalculation of the Container and its children and will render any unrendered children. The only reason you wouldn’t need to call it is if the Container isn’t rendered. We went down this path of pain so that you can learn the valuable lesson of calling doLayout when you add items to a Container at runtime.
Appending children is handy, but sometimes you need to be able to insert items at a specific index. Using the insert method and calling doLayout afterwards easily accomplishes this task:
Ext.getCmp('myWin').insert(1, {
    title : 'Inserted Panel',
    id    : 'insertedPanel',
    html  : 'It is cool here!'
});

Ext.getCmp('myWin').doLayout();
You insert a new Panel at index 1, which is right under Panel1. Because you call the doLayout method immediately after you do an insertion, you’ll see the newly inserted panel in the Window instantaneously. The changes should look like figure 3.13.
Figure 3.13. The rendered results of our dynamically added and inserted child panels

As you can see, adding and inserting child Components is a cinch. Removing items is just as easy; it requires two arguments, the first of which is a reference to the Component or the Component ID from which you want the child to be removed. The second parameter, however, specifies whether or not the destroy method should be called for that Component, which gives you incredible flexibility, allowing you to move Components from one Container to another if you so desire. Here’s how you’d remove one of the child panels that you recently added using your handy Firebug console:
var panel = Ext.getCmp('addedPanel'),
Ext.getCmp('myWin').remove(panel);
After you execute this code, you’ll notice that the panel immediately disappears. This is because you didn’t specify the second parameter, which is by default true. You can override this default parameter by setting autoDestroy to false on a parent Container. Also, you don’t need to call the parent’s doLayout method, because the removed Component’s destroy method is called, initiating its destruction phase and deleting its DOM element.
If you wanted to move a child to a different Container, you’d specify false as the remove’s second parameter and then add or insert it into the parent, like this:
var panel = Ext.getCmp('insertedPanel'),
Ext.getCmp('myWin').remove(panel, false);
Ext.getCmp('otherParent').add(panel);
Ext.getCmp('otherParent').doLayout();
The preceding code snippet assumes that you already have another parent Container instantiated with the ID of 'otherParent'. You create a reference to our previously inserted panel and perform a nondestructive removal from its parent. Next, you add it to its new parent and call its doLayout method to perform the DOM-level move operation of the child’s element into the new parent’s content body element.
The utilities offered by the Container class extend beyond the addition and removal of child items. They provide you the ability to descend deep into the Container’s hierarchy to search for child Components, which becomes useful if you want to gather a list of child items of a specific type or that meet special criteria and perform an operation on them.
3.4.2. Querying the Container hierarchy
Of all of the query utility methods, the easiest is findByType, which is used to descend into the Container hierarchy to find items of a specific XType and return a list of items that it finds. For instance, here’s how to find all of the text input fields for a given Container:
var fields = Ext.getCmp('myForm').findByType('field'),
Executing the preceding code against a Container with the Component ID of 'myForm' will result in a list of all input fields at any level in its hierarchy. findByType leverages the Container’s findBy method, which you can use as well. We’re going to explore how findBy works. Please stay with me on this, because it may not make sense at first.
The findBy method accepts two parameters: a custom method that you use to test for your search criteria and the scope from which to call your custom method. For each of the custom Containers, your custom method gets called and is passed the reference of the child Component from which it’s being called. If the custom search criteria are met, the custom method needs to return true, which instructs findBy to add that recently referenced Component to a list. Once all Components are exhausted, findBy returns the list, which contains any Components that met your criteria.
Okay, with that out of the way, let’s explore this concept through code. For argument’s sake, let’s say you wanted to find all child items that are hidden. You could use findBy in the following way to do so:
var findHidden = function(comp) {
    if (! comp.isVisible()) {
        return true;
    }
}
var panels = Ext.getCmp('myContainer').findBy(findHidden);
In this rather simplistic findHidden query method, you’re testing if the Component is not visible. If the Component’s isVisible method returns anything but true, your findHidden method returns true. You then call findBy on the Container with the ID of 'myContainer' and pass it your custom findHidden method, with the results being stored in the panel’s reference.
By now, you have the core knowledge necessary to manage child items. Let’s shift focus to flexing some Ext-UI muscle by exploring some of the commonly used subclasses of Containers. You’ll see how we can use Ext to create a UI using all of the browser’s available viewing space.
3.4.3. The Viewport Container
The Viewport class is the foundation from which all web applications that depend solely on Ext are built by managing 100 percent of the browser’s—you guessed it—viewport or display area. Weighing in at a tad over 20 lines, this class is extremely lightweight and efficient. Because it’s a direct subclass of the Container class, all of the child management and layout usage is available to you. To leverage the viewport, you can use the following example code:
new Ext.Viewport({
    layout : 'border',
    items  : [
        {
            height : 75,
            region : 'north',
            title  : 'Does Santa live here?'
        },
        {
            width  : 150,
            region : 'west',
            title  : 'The west region rules'
        },
        {
            region : 'center',
            title  : 'No, this region rules!'
        }
    ]
});
The rendered Viewport from the code utilizes the entire browser’s viewport and displays three panels organized by the border layout. If you resize the browser window, you’ll notice that the center panel is resized automatically, which demonstrates how the Viewport listens and responds to the browser’s window resize event (see figure 3.14).
Figure 3.14. Our first Viewport, which takes up 100 percent of the browser’s available viewing space

The Viewport class provides the foundation for all Ext-based applications that leverage the framework as a complete web-based UI solution for their RIAs.
Many developers run into a brick wall when they attempt to create more than one Viewport in a fully managed Ext JS page to display more than one screen. To get around this, you can use the card layout with the viewport and flip through different application screens, which are resized to fit the viewport. We’ll dive into layouts in chapter 5, where you’ll get to understand key terms like fit and flip in the context of layouts.
We’ve covered quite a few important core topics, which help you manage child items in a Container. You also learned how to use the Viewport to help manage all of the browser’s viewing space to lay out Ext UI widgets.
3.5. Summary
In this chapter we took a deep look at three fundamental areas of Ext JS. In doing so, you learned about managing the DOM level, where you exercised the registration of event listeners for DOM elements and learned how to stop them from bubbling up the DOM hierarchy. We also glanced at Component-level events and showed how to register an event and fire that event.
We took a real in-depth look at the Component model, which gives the Ext framework a unified method of managing instances of Components. The Component lifecycle is one of the most important concepts for the UI portion of the framework, which is why we covered it before we went too deep into learning about the many widgets.
Last, we explored the world of Containers and showed how they’re used to manage child Components. In doing so, you also learned about the Viewport class and how it’s the foundation for web applications that are based entirely on Ext JS.
You now have the foundation that will help propel you forward as you start to exercise the framework’s UI machinery. Next, we’ll explore the Panel, which is the most commonly used UI widget to display content.