
Appendix B. Publishing applications
- Preparing an application for distribution
- Digitally signing an application
- Publishing applications to the Android Market and beyond
Writing and debugging applications can be both exhausting and satisfying, but the day will come when it’s time to move past development and graduate to publishing your Android application for others to use. This appendix presents best practices for preparing an application for publication and then walks step by step through the process of digitally signing an application and uploading it to the Android Market.
In the most basic sense, publishing an application involves digitally signing it and uploading it to the Android Market or other venues for distribution. But for you to properly prepare an Android application, a few steps precede the distribution stage. If you observe these guidelines carefully, the odds of your customers having a positive experience with your application increase significantly. Ignore these best practices and you run the risk of tarnishing your reputation as a mobile developer.
B.1. Preparing an application for distribution
Preparing an Android application for distribution is a somewhat straightforward and methodical task, though one that requires considerable attention to detail. This section presents a list of things to consider prior to releasing your application. It’s not meant to be an exhaustive list but rather a framework for cleaning up your application.
B.1.1. Logging
During development it’s common to accumulate superfluous LogCat statements throughout your code. For example, you may make verbose entries to the LogCat by dumping the contents of objects to the log or recording every response from a remote server. You may even write sensitive information such as “before and after” strings related to an encryption routine. Although these entries are helpful during the debugging of your application, they can be fatal flaws if shipped to users. Imagine leaving breadcrumbs to your company’s intellectual property behind in the LogCat—bad idea!
B.1.2. Debugging notifications
Your code may include the use of a Toast notification to inform you of some condition or scenario, such as an unhandled branch in a switch statement or perhaps a notification of a caught exception. This notification is helpful during the debug cycle but certainly not desirable for a released application.
B.1.3. Sample data
Your application may ship with sample data; if so, be sure that it’s properly set up for your users in an intuitive manner. Also, be sure to avoid leaving behind your own data. For example, if you have an FTP application, don’t leave behind your own credentials in the database shipped with your application. And don’t prepopulate a form with your credit card number!
B.1.4. AndroidManifest.xml
The AndroidManifest.xml file requires careful attention before publication of your application. Let’s look at a few items you need to keep in mind.
- Remove the android:debuggable tag, or at minimum, set its value to false.
- Specify appropriate values for the label and icon attributes of the application tag. Keep the text as short as possible in the label. Unless you’re an artist, get someone to assist you in the creation of attractive logo artwork.
- Specify the android:versionCode and android:versionName attributes in the <application> element of the manifest as well. The versionCode is an integer value that can be checked programmatically and is typically incremented at each release. The versionName is displayed to users. The online documentation at http://developer.android.com covers these attributes in detail.
- Specify the minimum SDK level required for your application. For example, in the FindEdges application from chapter 19 X requires bitmap features introduced in the 2.2 version of the SDK. The SDK levels are integers that don’t correspond exactly
to the commonly referenced SDK versions. For example, the FindEdges application has the following line to specify the target
and minimum SDK level:
<uses-sdk android:targetSdkVersion="8" android:minSdkVersion="8">
</uses-sdk> The FindEdges application won’t run on a device with an older OS version due to the bitmap requirements, but your application may not be so constrained. If your application isn’t constrained, consider setting the minSdkVersion as low as possible to make the application accessible to a wide variety of devices. If your application contains a hard constraint, don’t neglect this step because properly specifying a minimum SDK level prevents users with older devices from installing an application that can’t run on their devices. This is better than allowing users to install your application and experience problems running the app.
B.1.5. End-user license agreement
We recommend providing your own end-user license agreement (EULA) even though most users will ignore it. You’ve written this software and likely invested heavily in its creation. You owe it to yourself and your investors to do what you can to protect your interest in it, particularly with respect to hedging against potential liabilities your application may introduce. Obtaining experienced legal counsel is a good idea unless you plan to employ one of the commonly used open source agreements—even then, consider obtaining guidance from an experienced legal expert familiar with software licensing agreements.
It’s common to display the EULA when the application is first launched, requiring the user to positively acknowledge and agree to the terms. After the user has consented to the terms of the EULA, don’t show it again unless the user explicitly requests to view it via a menu selection. Storing a Boolean value in the SharedPreferences is an easy approach to keeping track of the user’s consent to EULA agreement. You may also consider showing the EULA on every upgrade in the event that your EULA is modified.
B.1.6. Testing
After you go through these steps, be sure to perform regression testing on your application on a real device prior to distribution. It’s easy to break a functioning application during this cleanup phase. The purpose of this testing is to check that all of your potentially damaging debug information has been removed. You can then move on to acceptance-style testing. Having a documented test plan is a good idea, and if possible, let someone other than the primary developer be responsible for signing off on the test plan.
Be sure to run your application under as many conditions as you can with features such as Wi-Fi, 3G, and GPS both enabled and disabled. Verify that the application degrades gracefully in the event that a required service is unavailable, such as when data service is unavailable or when roaming. It’s fine for your application to not perform if a missing communications link is unavailable, but the application should present an easy-to-understand message to users, advising them of the situation and perhaps suggesting steps to restore connectivity.
Pay particular attention to how your application responds to being stopped and restarted. Change the screen orientation when running each Activity. Does the application behave as expected? Remember that the default behavior is for an Activity to be stopped and restarted when the screen orientation changes. You may need to return to your code and implement the Activity lifecycle methods.
B.1.7. Finishing touches
As an extra step, if your application persists data locally via a file, SharedPreferences, or a SQL database, consider providing an import/export feature. This feature can be implemented as an Activity, allowing the user to save the data out to the SD card in a readily parsable format such as CSV or XML. The import/export feature should also allow the user to restore the data to your application’s local storage. This extra feature may make application upgrades easier and more resistant to errors. Having an easy export/image mechanism via SD card also makes moving to a new device a nonevent because your users can easily bring their data with them to the new device. Your users will love you for this!
Once you’re convinced that your application is ready for release, it’s time to digitally sign the application in preparation for taking it to the Android Market.
B.2. Digitally signing an application
The Android platform requires every application file—that is, yourappname.apk—to be digitally signed in order to run on a device or emulator; without a signature, an application simply won’t run. When you use Eclipse to develop your application, Eclipse silently signs the application with an automatically provided debug key. The signing requirement is entirely transparent to most developers until it’s time to publish an application for others to use.
When you’re publishing an application for distribution, the application needs to be signed with a nondebug signature. Fortunately, the applications can be self-signed, meaning a certificate authority isn’t required. This keeps the complexity and cost down considerably compared to the signing process required for other mobile platforms.
B.2.1. Keystores
By default, the keystores are located under the user’s home directory in a folder named .android. The following listing shows the contents of this folder on the author’s development machine.
Listing B.1. .android folder showing keystores

The .android folder contains files and directories required by the Android Development Tools. Of particular interest here
is the debug.keystore ![]() , which contains the debug key used by Eclipse during normal edit, compile, install, and testing iterations. Eclipse silently
signs every application with the key stored within debug.keystore. When the time comes to distribute applications to the Android
Market, or other venues, a nondebug key must be created and stored in a separate keystore. In this case we’ve created a nondebug
key and stored it in releasekey.keystore
, which contains the debug key used by Eclipse during normal edit, compile, install, and testing iterations. Eclipse silently
signs every application with the key stored within debug.keystore. When the time comes to distribute applications to the Android
Market, or other venues, a nondebug key must be created and stored in a separate keystore. In this case we’ve created a nondebug
key and stored it in releasekey.keystore ![]() . This keystore may be named arbitrarily by the developer.
. This keystore may be named arbitrarily by the developer.
The next section walks through the process of creating a nondebug key and keystore.
B.2.2. keytool
This section demonstrates the creation of a key and its containing keystore via the program named keytool. keytool is provided with the Java SDK and should be in the executable path of your terminal or command window. When this step is complete, you’ll have a valid key with which an Android application may be signed for distribution.
The following command is an example of using keytool to create a self-signed private key in the .android directory:
keytool -genkey -v -keystore ~/.android/releasekey.keystore -alias
releasekey -keyalg
RSA -validity 10000
This command generates a key (-genkey) in verbose mode (-v) stored in a keystore file named releasekey.keystore with an alias of releasekey. The cryptographic algorithm is RSA and the key has a validity of 10,000 days prior to expiration. Every key in a keystore requires an alias. The alias is used when referring to the key within the key-store during the signing of the APK file. The Android documentation recommends at least a 25-year key life.
The keytool command prompts for a key password and organizational information when creating a key. You should use accurate information as it’s possible for your users to view this later, and you should use a strong password. Once you create your key, you also need to be careful to store it securely and keep the password private. If your key is lost or compromised, your identity can be misused, and the trust relationships to your key via your applications can be abused.
Now that you have a valid key, it’s time to sign the application. For this task, you’ll utilize the jarsigner application.
B.2.3. jarsigner
Signing applications is accomplished with the jarsigner tool. Like keytool, jarsigner is part of the Java SDK so be sure that it is in your executable path.
To sign an application, you must export it as an unsigned APK file. In Eclipse, right-click and select the Android Tools > Export Unsigned Application Package option, as shown in figure B.1.
Figure B.1. Using Android Tools from the Eclipse/ADT environment to export an unsigned application archive package

Save the file as projectname-unaligned.apk. In this example you’ll export the unsigned application file for the UA2E_FindEdges application to a file named UA2E_FindEdges_unaligned.apk.
Let’s now use jarsigner to sign the archive with our key, as shown here:
jarsigner -verbose -keystore ~/.android/releasekey.keystore
 UA2E_FindEdges-unaligned.apk releasekey
This command tells jarsigner to sign the APK file with a key named releasekey stored in the previously created keystore file—that is, releasekey.keystore in the ~/.android folder.
The jarsigner tool prompts for the password used when the key was created. Assuming the correct password is entered, jarsigner proceeds to sign the contents of the archive file as well as creating or updating manifest files, as shown here:
jarsigner -verbose -keystore ~/.android/releasekey.keystore
UA2E_FindEdges-unaligned.apk releasekey
Enter Passphrase for keystore: ****************
 updating: META-INF/RELEASEK.SF
 updating: META-INF/RELEASEK.RSA
  signing: res/layout/about.xml
  signing: res/layout/main.xml
  signing: AndroidManifest.xml
  signing: resources.arsc
  signing: res/drawable-hdpi/icon.png
  signing: res/drawable-ldpi/icon.png
  signing: res/drawable-mdpi/icon.png
  signing: classes.dex
  signing: lib/armeabi/libua2efindedges.so
  signing: lib/armeabi-v7a/libua2efindedges.so
Note that every file in the archive is signed, including the native JNI library files in addition to the Android SDK classes and resources.
At this point the application is ready to be installed, but there’s a recommended optimization step. If all the resources within the archive are properly aligned, the Android OS can access a memory map of the file, thereby preserving the runtime RAM required because the application need not be “copied” into memory. To accomplish this alignment step, you can use the zipalign tool, which you’ll find in the Android SDK/tools folder:
zipalign –v 4 UA2E_FindEdges_unaligned.apk UA2E_FindEdges.apk
The APK file is now ready for deployment to either a local device via the adb tool or for publishing to the Android Market.
To install the file to a locally attached device, use the adb command as follows:
adb install UA2E_FindEdges.apk
Replace the APK file with your filename, of course. To remove a currently installed application, either uninstall it from the settings application on the device or again use adb:
adb uninstall com.msi.manning.ua2efindedges
Be sure to substitute your application’s package name.
Let’s take a look at publishing an application to the Android Market.
B.3. Publishing to the Android Market
Every Android phone has a built-in application known as the Android Market; the label of the application says simply “Market.” This application permits users to browse the extensive catalog of applications by category and price. The best way to get your application onto thousands of Android devices is to publish your application to the Market. This is done through web-based tools found at android.com.
Checking the validity of an application’s license is accomplished by interacting with the License Verification Library (LVL). Interacting with this library requires the inclusion of the com.android.vending.licensing package and is beyond the scope of this chapter. Please examine the online documentation found at http://developer.android.com/guide/publishing/licensing.html for more details on the LVL.
B.3.1. The Market rules
Before you put your application on the Market, you should carefully read the developer terms (http://www.android.com/us/developer-distribution-agreement.html) and the content guidelines (http://www.android.com/market/terms/developer-content-policy.html).
The Market terms cover pricing, payments, returns, license grants, revocations, and other relevant topics to anyone looking to publish applications to the Android Market. The content guidelines further define what’s acceptable in terms of subject matter and media, though in practice an application must be very egregious to be pulled out of the Market. The bar for entry is very low.
If the Market terms are amenable to you and you plan to post applications, you need to register as an Android developer as well as have a Google account. There’s a nominal fee to register as an Android developer. Once you’re set up, you can begin placing your applications in the Market for users to download and install directly. Optionally, you can publish applications for a price other than “free”—that is, you can sell your software. To do so, you must also provide banking and tax identifier information.
B.3.2. Getting your application in the Market
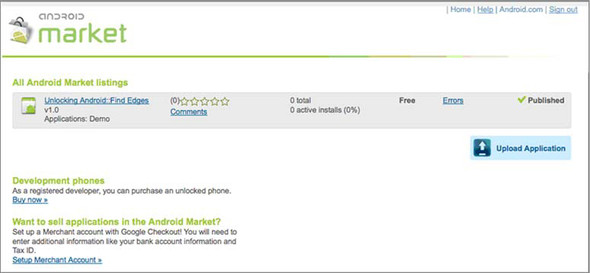
Registered Market developers simply use an online form to upload applications. When uploading applications, you can define the different Market locations that are supported, pricing and terms, as well as a category and description and other options. To demonstrate the application publication process, we’ll review this author’s account with a single published application. The application used for this exercise is the Find Edges application created chapter 19.
Figure B.2 shows the single application listed in the Android Market, ready for maintenance. Note that this screen is also the place where new applications can added to the market by clicking the Upload Application button in the lower-right corner.
Figure B.2. Managing Android Market applications
Clicking through the application allows you to edit this application’s properties on the Market. The editing screen is too large to fit into one screenshot, so it’s split between two figures. Figure B.3 shows the top portion of the management interface where updates to the APK file can be loaded along with screenshots to display the application to prospective users browsing in the Market.
Figure B.3. Managing the APK file and screenshots

Figure B.4 shows the textual aspects of the application description.
Figure B.4. Textual descriptions of application along with publication options

Once the application is published to the market, it’s visible to the Market application on the Android devices worldwide within moments. Figure B.5 shows a screenshot of the Market application running on a physical Android device. The Market application is displaying the catalog entry for the Find Edges application.
Figure B.5. The newly published application becomes available on the device in mere moments.

After that simple process your application is available for download to users across the globe.
The Android Market is easy to use—but is it effective?
B.3.3. Android Market—the right solution
The Android Market is an effective distribution mechanism because it’s built in and accessible to users and developers alike. Generally speaking, it’s the first place users go to find applications.
As mentioned in chapter 1, the open nature of the Android platform—and of the Android Market—offers distinct advantages to both developers and users. There’s no arbitrary inclusion or exclusion process that an individual or company holds over the Market. Anyone who joins and agrees to the terms can publish applications on the Market without fear of the thought police barring an application.
Virtually all applications are welcome, but some will do better than others. Users rate the applications on a scale of 1 to 5, and they may leave comments as well. These comments often influence the prospective purchasers with their positive or negative remarks. The Android Market is a merit-based system; impress your users and they’ll rate your application well and compliment you; shortchange your users and your download count and sales will suffer.
In keeping with the theme of being an open platform, Android applications may be distributed beyond just the Android Market.
B.4. Other distribution means
The last thing to consider with regard to distributing applications is that there are other venues beyond the Android Market.
Various third-party sites also offer distribution channels. These sites have different agreement types and different payment models, so you should research them carefully before using them.
You may want to distribute your application in the Android Market or on third-party services, or you may decide to use multiple distribution channels. If you do use third-party services, keep in mind that although these alternatives are growing in popularity they aren’t nearly as accessible to users compared to the built-in Market. Users have to find the third-party service and generally then have to install applications on their own or at least bootstrap the service with an application specifically designed for the market.
Last and certainly not least, Android applications can be distributed directly from a company’s website or any other means of shipping an APK file. For commercial developers targeting enterprise applications, this is a distinct advantage over the draconian measures taken by Apple for iPhone and iPad application deployment.
The more means you have at your disposal to get your applications into the hands of users, the greater your influence. Good luck!
Some applications can be developed working exclusively with the emulator whereas others require a real device from day one of development because the emulator can’t adequately deliver the complete functionality required for things such as Bluetooth connectivity or taking a photo with a built-in camera. Whether or not your application needs the real device during development, it’s a good practice to test all applications on physical hardware before publishing an Android application.
B.5. Recapping the Android Debug Bridge
Although we covered the Android Debug Bridge (adb) in chapter 2, a recap is in order as background for signing and installing applications and working with Android devices.
The adb is a client/server program that lets you interact with the Android SDK in various ways, including pushing and pulling files, installing and removing applications, issuing shell commands, and more. The adb tool consist of three components: a development machine–based server, a development machine client for issuing commands, and a client for each emulator or device in use. Other Android tools, such as the DDMS tool, also create clients to interact with the adb.
You can make sure your local adb server is running by issuing the adb start-server command. Similarly, you can stop your server with adb kill-server and then restart it, if necessary (or just to get familiar with the process). When you start the Eclipse/ADT environment, it automatically starts an adb server instance.
Once you’re sure your adb server is running, you can tell if any devices or emulators are connected by issuing the adb devices command. The output of this command with an emulator running and a physical device attached via a USB cable is shown here:
#$ adb devices
List of devices attached
emulator-5554     device
HT845GZ49611      device
The adb tool acts as the backplane for the Android development process. Communications between the development environment and a device/emulator rely on adb. The first step in getting your applications onto an actual device is to connect your device to the development machine and confirm that it’s recognized by adb. If you have any running emulator instances, it’d be a good idea to shut them down prior to beginning this process. Confirm that your physical device is the only attached Android client. To do this, run adb devices from the command line and confirm that there’s a single entry in the list of attached devices, as shown in figure B.1.