
8
Building an Application Component
The components you’ve built so far have been built in isolation: they don’t fit together, and there’s no workflow for the user to follow when they load the application. Up to this point, we’ve been manually testing our components by swapping them in and out of our index file, src/index.js.
In this chapter, we’ll tie all those components into a functioning system by creating a root application component, App, that displays each of these components in turn.
You have now seen almost all the TDD techniques you’ll need for test-driving React applications. This chapter covers one final technique: testing callback props.
In this chapter, we will cover the following topics:
- Formulating a plan
- Using state to control the active view
- Test-driving callback props
- Making use of callback values
By the end of this chapter, you’ll have learned how to use mocks to test the root component of your application, and you’ll have a working application that ties together all the components you’ve worked on in Part 1 of this book.
Technical requirements
The code files for this chapter can be found here: https://github.com/PacktPublishing/Mastering-React-Test-Driven-Development-Second-Edition/tree/main/Chapter08
Formulating a plan
Before we jump into the code for the App component, let’s do a little up-front design so that we know what we’re building.
The following diagram shows all the components you’ve built and how App will connect them:
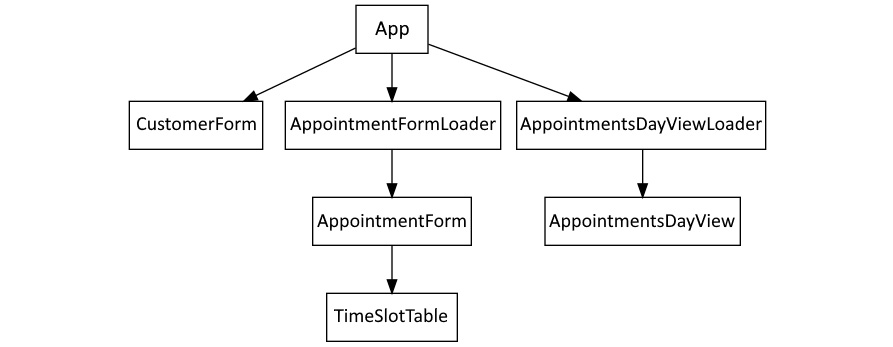
Figure 8.1 – The component hierarchy
Here’s how it’ll work:
- When the user first loads the app, they will see a list of today’s appointments using the AppointmentsDayView component, which will have its appointment data populated by its container AppointmentsDayViewLoader component.
- At the top of the screen, the user will see a button labeled Add customer and appointment. Clicking that button makes AppointmentsDayView disappear and CustomerForm appear.
- When the form is filled out and the submit button is clicked, the user is shown AppointmentForm and can add a new appointment for that customer.
- Once they’ve added the appointment, they’ll be taken back to AppointmentsDayView.
This first step is shown in the following screenshot. Here, you can see the new button in the top-left corner. The App component will render this button and then orchestrate this workflow:
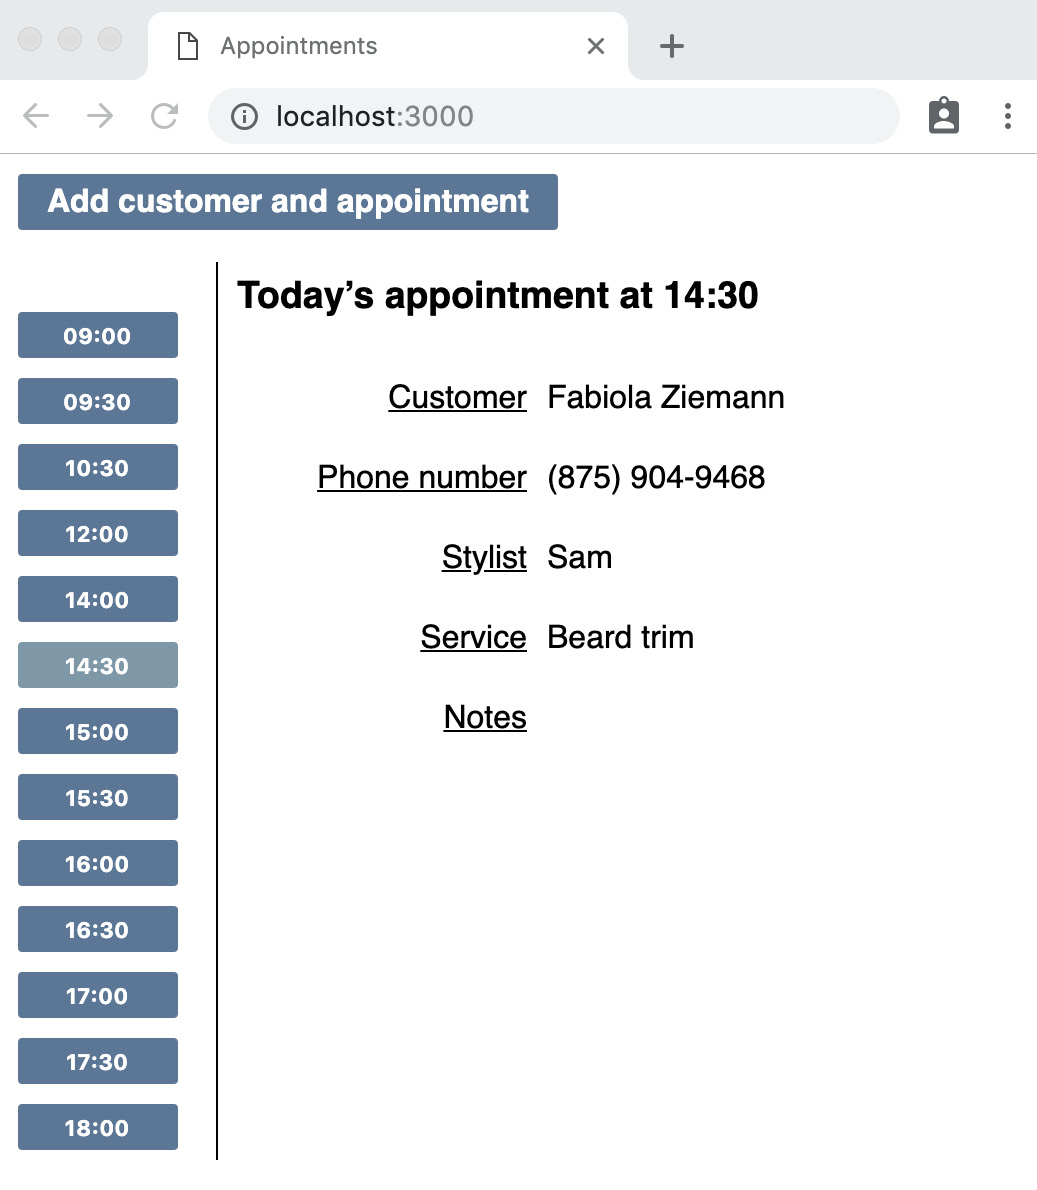
Figure 8.2 – The app showing the new button in the top-left corner
This is a very simple workflow that supports just a single use case: adding a new customer and an appointment at the same time. Later in this book, we’ll add support for creating appointments for existing customers.
With that, we’re ready to build the new App component.
Using state to control the active view
In this section, we’ll start building a new App component, in the usual way. First, we’ll display an AppointmentsDayViewLoader component. Because this child component makes a network request when mounted, we’ll mock it out. Then, we’ll add a button inside a menu element, at the top of the page. When this button is clicked, we switch out the AppointmentsDayViewLoader component for a CustomerForm component.
We will introduce a state variable named view that defines which component is currently displayed. Initially, it will be set to dayView. When the button is clicked, it will change to addCustomer.
The JSX constructs will initially use a ternary to switch between these two views. Later, we’ll add a third value called addAppointment. When we do that, we’ll “upgrade” our ternary expression to a switch statement.
To get started, follow these steps:
- Create a new file, test/App.test.js, with the following imports for the new App component:
import React from "react";
import {
initializeReactContainer,
render,
} from "./reactTestExtensions";
import { App } from "../src/App";
- Next, import AppointmentsDayViewLoader and mock its implementation:
import {
AppointmentsDayViewLoader
} from "../src/AppointmentsDayViewLoader";
jest.mock("../src/AppointmentsDayViewLoader", () => ({
AppointmentsDayViewLoader: jest.fn(() => (
<div id="AppointmentsDayViewLoader" />
)),
}));
- Now, let’s add our first test, which checks that AppointmentsDayViewLoader has been rendered:
describe("App", () => {
beforeEach(() => {
initializeReactContainer();
});
it("initially shows the AppointmentDayViewLoader", () => {
render(<App />);
expect(AppointmentsDayViewLoader).toBeRendered();
});
});
- Make that pass by adding the following code to a new file, src/App.js:
import React from "react";
import ReactDOM from "react-dom";
import {
AppointmentsDayViewLoader
} from "./AppointmentsDayViewLoader";
export const App = () => (
<AppointmentsDayViewLoader />
);
- For the second test, we’ll add a menu to the top of the page. For this, we’ll need the element matcher, so add that to your test suite imports:
import {
initializeReactContainer,
render,
element,
} from "./reactTestExtensions";
- Add the second test:
it("has a menu bar", () => {
render(<App />);
expect(element("menu")).not.toBeNull();
});
- To make that pass, change the App component so that it includes a menu element above the loader component:
export const App = () => (
<>
<menu />
<AppointmentsDayViewLoader />
</>
)
- Next, we want to display a button in the menu that, when clicked, will switch to CustomerForm. Add the following test, which asserts that the button appears on the page, using a CSS selector to find the rendered button element. This uses the :first-of-type pseudoclass to ensure we find the first button (later in this book, we’ll add a second button to the menu):
it("has a button to initiate add customer and appointment action", () => {
render(<App />);
const firstButton = element(
"menu > li > button:first-of-type"
);
expect(firstButton).toContainText(
"Add customer and appointment"
);
});
- To make that pass, change the menu in the App component to the following:
<menu>
<li>
<button type="button">
Add customer and appointment
</button>
<li>
</menu>
- For the next test, we must check that clicking the button renders CustomerForm. We must also mock this component out. To do that, we’ll need the component that’s been imported into the test suite. Add the following line to test/App.test.js:
import { CustomerForm } from "../src/CustomerForm";
- Just below that, add the following mock definition, which is our standard mock definition:
jest.mock("../src/CustomerForm", () => ({
CustomerForm: jest.fn(() => (
<div id="CustomerForm" />
)),
}));
Why mock a component that has no effects on mount?
This component already has a test suite so that we can use a test double and verify the right props to avoid re-testing functionality we’ve tested elsewhere. For example, the CustomerForm test suite has a test to check that the submit button calls the onSave prop with the saved customer object. So, rather than extending the test surface area of App so that it includes that submit functionality, we can mock out the component and call onSave directly instead. We’ll do that in the next section.
- To click the button, we’ll need our click helper. Bring that in now:
import {
initializeReactContainer,
render,
element,
click,
} from "./reactTestExtensions";
- Now, add the test. This introduces a helper function, beginAddingCustomerAndAppointment, which finds the button and clicks it. We’ll pull that out now because we’ll be using it in most of the remaining tests:
const beginAddingCustomerAndAppointment = () =>
click(element("menu > li > button:first-of-type"));
it("displays the CustomerForm when button is clicked", async () => {
render(<App />);
beginAddingCustomerAndAppointment();
expect(element("#CustomerForm")).not.toBeNull();
});
- Making this pass involves adding a component state to track that we’ve clicked the button. In src/App.js, import the two hooks we’ll need, useState and useCallback, and import CustomerForm too:
import React, { useState, useCallback } from "react";
import { CustomerForm } from "./CustomerForm";
- In the App component, define the new view state variable and initialize it to the dayView string, which we’ll use to represent AppointmentsDayViewLoader:
const [view, setView] = useState("dayView");
- Just below that, add a new callback named transitionToAddCustomer, which we’ll attach to the button’s onClick handler in the next step. This callback updates the view state variable so that it points to the second page, which we’ll call addCustomer:
const transitionToAddCustomer = useCallback(
() => setView("addCustomer"),
[]
);
- Plug that into the onClick prop of the button:
<button
type="button"
onClick={transitionToAddCustomer}>
Add customer and appointment
</button>
- Now, all that’s left is to modify our JSX to ensure the CustomerForm component is rendered when the view state variable is set to addCustomer. Notice how the test doesn’t force us to hide AppointmentsDayViewLoader. That will come in a later test. For now, we just need the simplest code that will make our test pass. Update your JSX, as shown here:
return (
<>
<menu>
...
</menu>
{view === "addCustomer" ? <CustomerForm /> : null}
</>
);
Testing for the presence of a new component
Strictly speaking, this isn’t the simplest way to make the test pass. We could make it pass by always rendering a CustomerForm component, regardless of the value of view. Then, we’d need to triangulate with a second test that proves the component is not initially rendered. I’m skipping this step for brevity, but feel free to add it in if you prefer.
- We need to ensure that we pass an original prop to CustomerForm. In this workflow, we’re creating a new customer so that we can give it a blank customer object, just like the one we used in the CustomerForm test suite. Add the following test below it. We’ll define blankCustomer in the next step:
it("passes a blank original customer object to CustomerForm", async () => {
render(<App />);
beginAddingCustomerAndAppointment();
expect(CustomerForm).toBeRenderedWithProps(
expect.objectContaining({
original: blankCustomer
})
);
});
- Create a new file, test/builders/customer.js, and add a definition for blankCustomer:
export const blankCustomer = {
firstName: "",
lastName: "",
phoneNumber: "",
};
- Import that new definition into your App test suite:
import { blankCustomer } from "./builders/customer";
Value builders versus function builders
We’ve defined blankCustomer as a constant value, rather than a function. We can do this because all the code we’ve written treats variables as immutable objects. If that wasn’t the case, we may prefer to use a function, blankCustomer(), that generates new values each time it is called. That way, we can be sure that one test doesn’t accidentally modify the setup for any subsequent tests.
- Let’s make that test pass. First, define blankCustomer at the top of src/App.js:
const blankCustomer = {
firstName: "",
lastName: "",
phoneNumber: "",
};
Using builder functions in both production and test code
You now have the same blankCustomer definition in both your production and test code. This kind of duplication is usually okay, especially since the object is so simple. But for non-trivial builder functions, you should consider test-driving the implementation and then making good use of it within your test suite.
- Then, simply reference that value by setting it as an original prop of CustomerForm. After making this change, your test should be passing:
{view === "addCustomer" ? (
<CustomerForm original={blankCustomer} />
) : null}
- Next, add the following test to hide AppointmentsDayViewLoader when a customer is being added:
it("hides the AppointmentsDayViewLoader when button is clicked", async () => {
render(<App />);
beginAddingCustomerAndAppointment();
expect(
element("#AppointmentsDayViewLoader")
).toBeNull();
});
- To make that pass, we need to move AppointmentsDayViewLoader into the ternary expression, in place of the null:
{ view === "addCustomer" ? (
<CustomerForm original={blankCustomer} />
) : (
<AppointmentsDayViewLoader />
)}
- Let’s hide the button bar, too:
it("hides the button bar when CustomerForm is being displayed", async () => {
render(<App />);
beginAddingCustomerAndAppointment();
expect(element("menu")).toBeNull();
});
- To solve this, we need to lift the ternary out of the JSX entirely, as shown in the following code. This is messy, but we’ll improve its implementation in the next section:
return view === "addCustomer" ? (
<CustomerForm original={blankCustomer} />
) : (
<>
<menu>
...
</menu>
<AppointmentsDayViewLoader />
</>
);
With that, you have implemented the initial step in the workflow – that is changing the screen from an AppointmentsDayViewLoader component to a CustomerForm component. You did this by changing the view state variable from dayView to addCustomer. For the next step, we’ll use the onSave prop of CustomerForm to alert us when it’s time to update view to addAppointment.
Test-driving callback props
In this section, we’ll introduce a new extension function, propsOf, that reaches into a mocked child component and returns the props that were passed to it. We’ll use this to get hold of the onSave callback prop value and invoke it from our test, mimicking what would happen if the real CustomerForm had been submitted.
It’s worth revisiting why this is something we’d like to do. Reaching into a component and calling the prop directly seems complicated. However, the alternative is more complicated and more brittle.
The test we want to write next is the one that asserts that the AppointmentFormLoader component is shown after CustomerForm has been submitted and a new customer has been saved:
it("displays the AppointmentFormLoader after the CustomerForm is submitted", async () => {
  // ...
});
Now, imagine that we wanted to test this without a mocked CustomerForm. We would need to fill in the real CustomerForm form fields and hit the submit button. That may seem reasonable, but we’d be increasing the surface area of our App test suite to include the CustomerForm component. Any changes to the CustomerForm component would require not only the CustomerForm tests to be updated but also now the App tests. This is the exact scenario we’ll see in Chapter 9, Form Validation, when we update CustomerForm so that it includes field validation.
By mocking the child component, we can reduce the surface area and reduce the likelihood of breaking tests when child components change.
Mocked components require care
Even with mocked components, our parent component test suite can still be affected by child component changes. This can happen if the meaning of the props changes. For example, if we updated the onSave prop on CustomerForm to return a different value, we’d need to update the App tests to reflect that.
Here’s what we’ve got to do. First, we must define a propsOf function in our extensions module. Then, we must write tests that mimic the submission of a CustomerForm component and transfer the user to an AppointmentFormLoader component. We’ll do that by introducing a new addAppointment value for the view state variable. Follow these steps:
- In test/reactTestExtensions.js, add the following definition of propsOf. It looks up the last call to the mocked component and returns its props:
export const propsOf = (mockComponent) => {
const lastCall = mockComponent.mock.calls[
mockComponent.mock.calls.length – 1
];
return lastCall[0];
};
- Back in test/App.test.js, update the extensions import so that it includes propsOf:
import {
initializeReactContainer,
render,
element,
click,
propsOf,
} from "./reactTestExtensions";
- You also need to import the act function from React’s test utils. Our test will wrap its invocation of the callback prop to ensure that any setters are run before the call returns:
import { act } from "react-dom/test-utils";
- There’s one more import to add – the import for AppointmentFormLoader:
import {
AppointmentFormLoader
} from "../src/AppointmentFormLoader";
- Just below that, define its mock using the standard component mock definition:
jest.mock("../src/AppointmentFormLoader", () => ({
AppointmentFormLoader: jest.fn(() => (
<div id="AppointmentFormLoader" />
)),
}));
- We’re almost ready for our test. First, though, let’s define a helper function, saveCustomer. This is the key part of the code that invokes the prop. Note that this sets a default customer object of exampleCustomer. We’ll use this default value to avoid having to specify the customer in each test where the value doesn’t matter:
const exampleCustomer = { id: 123 };
const saveCustomer = (customer = exampleCustomer) =>
act(() => propsOf(CustomerForm).onSave(customer));
Using act within the test suite
This is the first occasion that we’ve willingly left a reference to act within our test suite. In every other use case, we managed to hide calls to act within our extensions module. Unfortunately, that’s just not possible here – at least, it’s not possible with the way we wrote propsOf. An alternative approach would be to write an extension function named invokeProp that takes the name of a prop and invokes it for us:
invokeProp(CustomerForm, "onSave", customer);
The downside of this approach is that you’ve now downgraded onSave from an object property to a string. So, we’ll ignore this approach for now and just live with act usage in our test suite.
- Let’s write our test. We want to assert that AppointmentsFormLoader is displayed once CustomerForm has been submitted:
it("displays the AppointmentFormLoader after the CustomerForm is submitted", async () => {
render(<App />);
beginAddingCustomerAndAppointment();
saveCustomer();
expect(
element("#AppointmentFormLoader")
).not.toBeNull();
});
- Making this pass will involve adding a new value to the view state variable, addAppointment. With this third value, the ternary expression is no longer fit for purpose because it can only handle two possible values of view. So, before we continue making this pass, let’s refactor that ternary so that it uses a switch statement. Skip the test you just wrote using it.skip.
- Replace the return statement of your component with the following:
switch (view) {
case "addCustomer":
return (
<CustomerForm original={blankCustomer} />
);
default:
return (
<>
<menu>
<li>
<button
type="button"
onClick={transitionToAddCustomer}>
Add customer and appointment
</button>
</li>
</menu>
<AppointmentsDayViewLoader />
</>
);
}
- Once you’ve verified that your tests still pass, un-skip your latest test by changing it.skip back to it.
- The component should update the view to addAppointment whenever the onSave prop of CustomerForm is called. Let’s do that with a new callback handler. Add the following code just below the definition of transitionToAddCustomer:
const transitionToAddAppointment = useCallback(
() => {
setView("addAppointment")
}, []);
- Modify the CustomerForm render expression so that it takes this as a prop:
<CustomerForm
original={blankCustomer}
onSave={transitionToAddAppointment}
/>
- Hook up the new addAppointment value by adding the following case statement to the switch. After making this change, your test should be passing:
case "addAppointment":
return (
<AppointmentFormLoader />
);
- For the next test, we need to pass a value for the original prop, this time to AppointmentFormLoader. Note the double use of expect.objectContaining. This is necessary because our appointment is not going to be a simple blank appointment object. This time, the appointment will have a customer ID passed to it. That customer ID is the ID of the customer we’ve just added – we’ll write a test for that next:
it("passes a blank original appointment object to CustomerForm", async () => {
render(<App />);
beginAddingCustomerAndAppointment();
saveCustomer();
expect(AppointmentFormLoader).toBeRenderedWithProps(
expect.objectContaining({
original:
expect.objectContaining(blankAppointment),
})
);
});
- We need a builder function, just like with blankCustomer. Create a new file, test/builders/appointment.js, and add the following definition:
export const blankAppointment = {
service: "",
stylist: "",
startsAt: null,
};
- Update the test code to import that:
import {
blankAppointment
} from "./builders/appointment";
- Then, create the same thing in src/App.js:
const blankAppointment = {
service: "",
stylist: "",
startsAt: null,
};
- Finally, you can make the test pass by setting the original prop, as shown here:
<AppointmentFormLoader original={blankAppointment} />
We’re almost done with the display of AppointmentFormLoader, but not quite: we still need to take the customer ID we receive from the onSave callback and pass it into AppointmentFormLoader, by way of the original prop value, so that AppointmentForm knows which customer we’re creating an appointment for.
Making use of callback values
In this section, we’ll introduce a new state variable, customer, that will be set when CustomerForm receives the onSave callback. After that, we’ll do the final transition in our workflow, from addAppointment back to dayView.
Follow these steps:
- This time, we’ll check that the new customer ID is passed to AppointmentFormLoader. Remember in the previous section how we gave saveCustomer a customer parameter? We’ll make use of that in this test:
it("passes the customer to the AppointmentForm", async () => {
const customer = { id: 123 };
render(<App />);
beginAddingCustomerAndAppointment();
saveCustomer(customer);
expect(AppointmentFormLoader).toBeRenderedWithProps(
expect.objectContaining({
original: expect.objectContaining({
customer: customer.id,
}),
})
);
});
- For this to work, we’ll need to add a state variable for the customer. Add the following at the top of the App component:
const [customer, setCustomer] = useState();
- When we built the onSave prop of CustomerForm back in Chapter 6, Exploring Test Doubles, we passed it the updated customer object. Update the transitiontoAddAppointment handler so that it takes this parameter value and saves it using the setCustomer setter:
const transitionToAddAppointment = useCallback(
(customer) => {
setCustomer(customer);
setView("addAppointment")
}, []);
- Pass that through to AppointmentFormLoader by creating a new original object value that merges the customer ID into blankAppointment:
case "addAppointment":
return (
<AppointmentFormLoader
original={{
...blankAppointment,
customer: customer.id,
}}
/>
);
- It’s time for the final test for this component. We complete the user workflow by asserting that once the appointment is saved, the view updates back to dayView:
const saveAppointment = () =>
act(() => propsOf(AppointmentFormLoader).onSave());
it("renders AppointmentDayViewLoader after AppointmentForm is submitted", async () => {
render(<App />);
beginAddingCustomerAndAppointment();
saveCustomer();
saveAppointment();
expect(AppointmentsDayViewLoader).toBeRendered();
});
- Define a new function to set the state back to dayView:
const transitionToDayView = useCallback(
() => setView("dayView"),
[]
);
- Pass this function to AppointmentsFormLoader to ensure it’s called when the appointment is saved. After this, your tests should be complete and passing:
case "addAppointment":
return (
<AppointmentFormLoader
original={{
...blankAppointment,
customer: customer.id,
}}
onSave={transitionToDayView}
/>
);
We’re done!
Now, all that’s left is to update src/index.js to render the App component. Then, you can manually test this to check out your handiwork:
import React from "react";
import ReactDOM from "react-dom";
import { App } from "./App";
ReactDOM
  .createRoot(document.getElementById("root"))
  .render(<App />);
To run the application, use the npm run serve command. For more information see the Technical requirements section in Chapter 6, Exploring Test Doubles, or consult the README.md file in the repository.
Summary
This chapter covered the final TDD technique for you to learn – mocked component callback props. You learned how to get a reference to a component callback using the propsOf extension, as well as how to use a state variable to manage the transitions between different parts of a workflow.
You will have noticed how all the child components in App were mocked out. This is often the case with top-level components, where each child component is a relatively complex, self-contained unit.
In the next part of this book, we’ll apply everything we’ve learned to more complex scenarios. We’ll start by introducing field validation into our CustomerForm component.
Exercises
The following are some exercises for you to try out:
- Update your CustomerForm and AppointmentForm tests to use the new builders you’ve created.
- Add a test to AppointmentForm that ensures that the customer ID is submitted when the form is submitted.