
9
Form Validation
For many programmers, TDD makes sense when it involves toy programs that they learn in a training environment. But they find it hard to join the dots when they are faced with the complexity of real-world programs. The purpose of this part of this book is for you to apply the techniques you’ve learned to real-world applications.
This chapter takes a somewhat self-indulgent journey into form validation. Normally, with React, you’d reach for a ready-made form library that handles validation for you. But in this chapter, we’ll hand-craft our own validation logic, as an example of how real-world complexity can be conquered with TDD.
You will uncover an important architectural principle when dealing with frameworks such as React: take every opportunity to move logic out of framework-controlled components and into plain JavaScript objects.
In this chapter, we will cover the following topics:
- Performing client-side validation
- Handling server errors
- Indicating form submission status
By the end of the chapter, you’ll have seen how tests can be used to introduce validation into your React forms.
Technical requirements
The code files for this chapter can be found here:
Performing client-side validation
In this section, we’ll update the CustomerForm and AppointmentForm components so that they alert the user to any issues with the text they’ve entered. For example, if they enter non-digit characters into the phone number field, the application will display an error.
We’ll listen for the DOM’s blur event on each field to take the current field value and run our validation rules on it.
Any validation errors will be stored as strings, such as First name is required, within a validationErrors state variable. Each field has a key in this object. An undefined value (or absence of a value) represents no validation error, and a string value represents an error. Here’s an example:
{
  firstName: "First name is required",
  lastName: undefined,
  phoneNumber: "Phone number must contain only numbers, spaces, and any of the following: + - ( ) ."
}
This error is rendered in the browser like this:
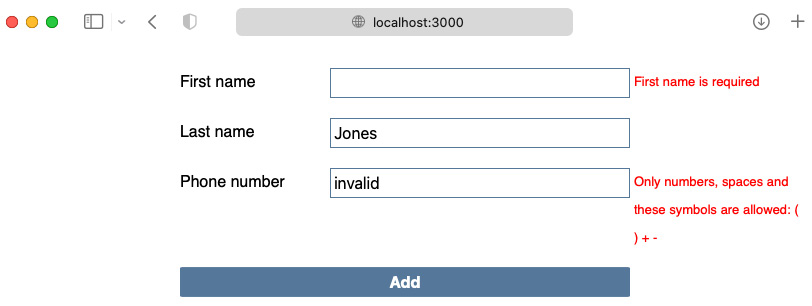
Figure 9.1 – Validation errors displayed to the user
To support tests that manipulate the keyboard focus, we need a new function that simulates the focus and blur events being raised when the user completes a field value. We’ll call this function withFocus. It wraps a test-supplied action (such as changing the field value) with the focus/blur events.
This section will start by checking that the CustomerForm first name field is supplied. Then, we’ll generalize that validation so that it works for all three fields in the form. After that, we’ll ensure validation also runs when the submit button is pressed. Finally, we’ll extract all the logic we’ve built into a separate module.
Validating a required field
Each of the three fields on our page – firstName, lastName, and phoneNumber – are required fields. If a value hasn’t been provided for any of the fields, the user should see a message telling them that. To do that, each of the fields will have an alert message area, implemented as a span with an ARIA role of alert.
Let’s begin by adding that alert for the firstName field, and then making it operational by validating the field when the user removes focus:
- Add the following new test to the bottom of the CustomerForm test suite. It should be within a new nested describe block named validation. This test checks that an alert space has been rendered. Notice the CSS selector: it’s a bit of a hack. We’re primarily interested in finding an element that matches [role=alert]. However, we are also qualifying it with the firstNameError ID since we’ll eventually have multiple alert spaces – one for each field:
describe("validation", () => {
it("renders an alert space for first name validation errors", () => {
render(<CustomerForm original={blankCustomer} />);
expect(
element("#firstNameError[role=alert]")
).not.toBeNull();
});
});
- To make that pass, move to src/CustomerForm.js and add the following span definition, just below the firstName input field:
<input
type="text"
name="firstName"
id="firstName"
value={customer.firstName}
onChange={handleChange}
/>
<span id="firstNameError" role="alert" />
- Next, we want to check that the field has an aria-describedby field that points to the error alert. This helps screen readers understand the content of the page. Add the following new test at the bottom of the test suite:
it("sets alert as the accessible description for the first name field", async () => {
render(<CustomerForm original={blankCustomer} />);
expect(
field(
"firstName"
).getAttribute("aria-describedby")
).toEqual("firstNameError");
});
- To make that pass, add the aria-describedby attribute to the firstName field definition:
<input
type="text"
name="firstName"
id="firstName"
value={customer.firstName}
onChange={handleChange}
aria-describedby="firstNameError"
/>
- The next test we’ll write will use the blur DOM event to trigger validation. For this test, we’ll start by building a new test extension, withFocus, which calls the focus event to ensure the target element has focus, then runs an action – such as entering text into the focused field – and ends by invoking the blur event. In test/reactTestExtensions.js, add the following definition for the withFocus function:
export const withFocus = (target, fn) =>
act(() => {
target.focus();
fn();
target.blur();
});
The focus and blur sequence
The initial call to focus is needed because if the element isn’t focused, JSDOM will think that blur has nothing to do.
- In test/CustomerForm.test.js, import the new withFocus function:
import {
...,
withFocus,
} from "./reactTestExtensions";
- Add the following new test at the bottom of the test suite (still inside the validation nested describe block). It checks that if the user enters a blank name value, they’ll see a message telling them that a value is required:
it("displays error after blur when first name field is blank", () => {
render(<CustomerForm original={blankCustomer} />);
withFocus(field("firstName"), () =>
change(field("firstName"), " ");
)
expect(
element("#firstNameError[role=alert]")
).toContainText("First name is required");
});
- To make this pass, we need to hardcode the message:
<span id="firstNameError" role="alert">
First name is required
</span>
- Let’s triangulate to replace the hardcoding. The following test asserts that the alert message is initially blank. Notice the use of toEqual rather than not.toContainText: this is forward planning. When we come to generalize this function in the next section, the alert text could be anything:
it("initially has no text in the first name field alert space", async () => {
render(<CustomerForm original={blankCustomer} />);
expect(
element("#firstNameError[role=alert]").textContent
).toEqual("");
});
A matcher for empty text content
Although not covered in this book, this would be a good opportunity to build a new matcher such as toHaveNoText, or maybe not.toContainAnyText.
- To make this test pass, we’ll add support for running validation rules within CustomerForm. Start by adding the following inline function definition at the top of src/CustomerForm.js, just below the imports but above the CustomerForm component definition. This is our first validation rule, required, which returns an error string if the supplied value is empty, and undefined otherwise:
const required = value =>
!value || value.trim() === ""
? "First name is required"
: undefined;
- Within the CustomerForm component, define a validationErrors state variable, initially set to an empty object:
const [
validationErrors, setValidationErrors
] = useState({});
- Create a handler function inside CustomerForm that can be used when the user switches focus away from the first name field. It runs the required validation we defined in the first step, and then saves the response in the validationErrors state object:
const handleBlur = ({ target }) => {
const result = required(target.value);
setValidationErrors({
...validationErrors,
firstName: result
});
};
- Next, define a function that the JSX will use to choose which message to display, named hasFirstNameError:
const hasFirstNameError = () =>
validationErrors.firstName !== undefined;
- All that’s left is to modify our JSX so that it invokes the validation logic, and then displays the validation error. Use the following code to set the onBlur handler on the existing input field for firstName and to render the error text just after it. After this change, your test should be passing:
<input
type="text"
name="firstName"
...
onBlur={handleBlur}
/>
<span id="firstNameError" role="alert">
{hasFirstNameError()
? validationErrors["firstName"]
: ""}
</span>
You now have a completed, working system for validating the first name field.
Generalizing validation for multiple fields
Next, we’ll add the required validation to the last name and phone number fields.
Since we’re on green, we can refactor our existing code before we write the next test. We will update the JSX and the hasFirstNameError and handleBlur functions so that they work for all the fields on the form.
This will be an exercise in systematic refactoring: breaking the refactoring down into small steps. After each step, we’re aiming for our tests to still be green:
- First, we’ll extract a function containing a JSX snippet for rendering errors. Just above the JSX return value in CustomerForm, add a new function named renderFirstNameError with the following content:
const renderFirstNameError = () => (
<span id="firstNameError" role="alert">
{hasFirstNameError()
? validationErrors["firstName"]
: ""}
<span>
);
- Now, you can use that in the JSX to replace the span alert. Your tests should still be passing at each step:
<input
type="text"
name="firstName"
...
/>
{renderFirstNameError()}
- Next, we’ll introduce a parameter into this function that will reference the ID of the field we’re showing the error from. Adjust the line you just added to introduce that new parameter:
<input
type="text"
name="firstName"
...
/>
{renderFirstNameError("firstName")}
Always having green tests – JavaScript versus TypeScript
This section is written in a way that your tests should still be passing at every step. In the preceding step, we passed a parameter to renderFirstNameError that the function can’t accept yet. In JavaScript, this is perfectly fine. In TypeScript, you’ll get a type error when attempting to build your source.
- Introduce that parameter into the renderFirstNameError function as follows, replacing occurrences of the firstName string with the fieldName variable. Your tests should still be passing after this change:
const renderFirstNameError = (fieldName) => (
<span id={`${fieldName}Error`} role="alert">
{hasFirstNameError()
? validationErrors[fieldName]
: ""}
<span>
);
- Repeat the same process for the hasFirstNameError function by adding a parameter value:
const renderFirstNameError = (fieldName) => (
<span id={`${fieldName}Error`} role="alert">
{hasFirstNameError(fieldName)
? validationErrors[fieldName]
: ""}
<span>
);
- Add the fieldName parameter to hasFirstNameError and modify the function body so that it uses the parameter in place of the firstName error property:
const hasFirstNameError = fieldName =>
validationErrors[fieldName] !== undefined;
- Now, rename renderFirstNameError so that it becomes renderError and
hasFirstNameError so that it becomes hasError.
Refactoring support in your IDE
Your IDE may have renaming support built in. If it does, you should use it. Automated refactoring tools lessen the risk of human error.
- Let’s tackle handleBlur. We’re already passing the target parameter, and we can use target.name to key into a map that then tells us which validator to run for each field:
const handleBlur = ({ target }) => {
const validators = {
firstName: required
};
const result =
validators[target.name](target.value);
setValidationErrors({
...validationErrors,
[target.name]: result
});
};
As you can see, the first half of the function (the definition of validators) is now static data that defines how the validation should happen for firstName. This object will be extended later, with the lastName and phoneNumber fields. The second half is generic and will work for any input field that’s passed in, so long as a validator exists for that field.
- The required validator is hardcoded with the first name description. Let’s pull out the entire message as a variable. We can create a higher-order function that returns a validation function that uses this message. Modify required so that it looks as follows:
const required = description => value =>
!value || value.trim() === ""
? description
: undefined;
- Finally, update the validator so that it calls this new required function:
const validators = {
firstName: required("First name is required")
};
At this point, your tests should be passing and you should have a fully generalized solution. Now, let’s generalize the tests too, by converting our four validation tests into test generator functions:
- Define a new errorFor helper at the top of the validations nested describe block. This will be used in the test generators:
const errorFor = (fieldName) =>
element(`#${fieldName}Error[role=alert]`);
- Find the first test you’ve written in this section (renders an alert space...). Modify it, as shown here, by wrapping it in a function definition that takes a fieldName parameter. Use that parameter in the test description and the expectation, replacing the use of firstName, and making use of the new errorFor helper to find the appropriate field:
const itRendersAlertForFieldValidation = (fieldName) => {
it(`renders an alert space for ${fieldName} validation errors`, async () => {
render(<CustomerForm original={blankCustomer} />);
expect(errorFor(fieldName)).not.toBeNull();
});
};
- Since you’ve now lost the test for the first name, add that back in with a call to the new test generator, just below it:
itRendersAlertForFieldValidation("firstName");
- Repeat the same process for the second test: wrap it in a function definition, introduce a fieldName parameter, and replace firstName with fieldName within the test description and expectation:
const itSetsAlertAsAccessibleDescriptionForField = (
fieldName
) => {
it(`sets alert as the accessible description for the ${fieldName} field`, async () => {
render(<CustomerForm original={blankCustomer} />);
expect(
field(fieldName).getAttribute(
"aria-describedby"
)
).toEqual(`${fieldName}Error`);
});
};
- Then, re-introduce the test case for the firstName field:
itSetsAlertAsAccessibleDescriptionForField(
"firstName"
);
- Next, it’s time to tackle the chunkiest test – the displays error after blur... test. The previous two test generators used just one parameter, fieldName. This one needs two more, value and description, that are used in the Act phase and the Assert phase, respectively:
const itInvalidatesFieldWithValue = (
fieldName,
value,
description
) => {
it(`displays error after blur when ${fieldName} field is '${value}'`, () => {
render(<CustomerForm original={blankCustomer} />);
withFocus(field(fieldName), () =>
change(field(fieldName), value)
);
expect(
errorFor(fieldName)
).toContainText(description);
});
};
- Just below that test generator definition, re-introduce the test case for the first name field:
itInvalidatesFieldWithValue(
"firstName",
" ",
"First name is required"
);
- Finally, repeat the same process for the fourth test:
const itInitiallyHasNoTextInTheAlertSpace = (fieldName) => {
it(`initially has no text in the ${fieldName} field alert space`, async () => {
render(<CustomerForm original={blankCustomer} />);
expect(
errorFor(fieldName).textContent
).toEqual("");
});
};
- Then, re-introduce the firstName test case:
itInitiallyHasNoTextInTheAlertSpace("firstName");
- After all that effort, it’s time to use the new test generators to build out the validation for the lastName field. Add the following single line at the bottom of your test suite:
itRendersAlertForFieldValidation("lastName");
- To make that pass, simply add the code to the CustomerForm JSX by rendering another alert just below the lastName field:
<label htmlFor="lastName">Last name</label>
<input
type="text"
name="lastName"
id="lastName"
value={customer.lastName}
onChange={handleChange}
/>
{renderError("lastName")}
- Next, we must create the test for the aria-describedby attribute:
itSetsAlertAsAccessibleDescriptionForField(
"lastName"
);
- To make it pass, add that attribute to the lastName input element:
<input
type="text"
name="lastName"
...
aria-describedby="lastNameError"
/>
- Next, add the test for the required validation rule:
itInvalidatesFieldWithValue(
"lastName",
" ",
"Last name is required"
);
- Given all the hard work we’ve done already, making this test pass is now super simple. Add a lastName entry to the validators object, as shown here:
const validators = {
firstName: required("First name is required"),
lastName: required("Last name is required"),
};
- For completeness, we need to add the fourth and final test for the lastName field. This test passes already since we’re relying on the mechanism we’ve just generalized. However, given that it’s a one-liner, it’s worth specifying, even if it’s not necessary:
itInitiallyHasNoTextInTheAlertSpace("lastName");
- Repeat Steps 10 to 16 for the phone number field.
Who needs test generator functions?
Test generator functions can look complex. You may prefer to keep duplication in your tests or find some other way to extract common functionality from your tests.
There is a downside to the test generator approach: you won’t be able to use it.only or it.skip on individual tests.
With that, we’ve covered the required field validation. Now, let’s add a different type of validation for the phoneNumber field. We want to ensure the phone number only contains numbers and a few special characters: brackets, dashes, spaces, and pluses.
To do that, we’ll introduce a match validator that can perform the phone number matching we need, and a list validator that composes validations.
Let’s add that second validation:
- Add the following new test:
itInvalidatesFieldWithValue(
"phoneNumber",
"invalid",
"Only numbers, spaces and these symbols are allowed: ( ) + -"
);
- Add the following definition at the top of src/CustomerForm.js. This expects a regular expression, re, which can then be matched against:
const match = (re, description) => value =>
!value.match(re) ? description : undefined;
Learning regular expressions
Regular expressions are a flexible mechanism for matching string formats. If you’re interested in learning more about them, and how to test-drive them, take a look at https://reacttdd.com/testing-regular-expressions.
- Now, let’s go for the list validator function. This is quite a dense piece of code that returns a short-circuiting validator. It runs each validator that it’s given until it finds one that returns a string, and then returns that string. Add this just below the definition for match:
const list = (...validators) => value =>
validators.reduce(
(result, validator) => result || validator(value),
undefined
);
- Replace the existing phoneNumber validation in the handleBlur function with the following validation, which uses all three validator functions:
const validators = {
...
phoneNumber: list(
required("Phone number is required"),
match(
/^[0-9+()- ]*$/,
"Only numbers, spaces and these symbols are allowed: ( ) + -"
)
)
};
- Your test should now be passing. However, if you look back at the test we just wrote, it says nothing about the allowed set of characters: it just says that invalid is not a valid phone number. To prove the use of the real regular expression, we need an inverse test to check that any combination of characters works. You can add this in; it should already pass:
it("accepts standard phone number characters when validating", () => {
render(<CustomerForm original={blankCustomer} />);
withFocus(field("phoneNumber"), () =>
change(field("phoneNumber"), "0123456789+()- ")
);
expect(errorFor("phoneNumber")).not.toContainText(
"Only numbers"
);
});
Is this a valid test?
This test passes without any required changes. That breaks our rule of only writing tests that fail.
We got into this situation because we did too much in our previous test: all we needed to do was prove that the invalid string wasn’t a valid phone number. But instead, we jumped ahead and implemented the full regular expression.
If we had triangulated “properly,” with a dummy regular expression to start, we would have ended up in the same place we are now, except we’d have done a bunch of extra intermediate work that ends up being deleted.
In some scenarios, such as when dealing with regular expressions, I find it’s okay to short-circuit the process as it saves me some work.
With that, you’ve learned how to generalize validation using TDD.
Submitting the form
What should happen when we submit the form? For our application, if the user clicks the submit button before the form is complete, the submission process should be canceled and all the fields should display their validation errors at once.
We can do this with two tests: one to check that the form isn’t submitted while there are errors, and another to check that all the fields are showing errors.
Before we do that, we’ll need to update our existing tests that submit the form, as they all assume that the form has been filled in correctly. First, we need to ensure that we pass valid customer data that can be overridden in each test.
Let’s get to work on the CustomerForm test suite:
- We need a new builder to help represent a validCustomer record. We’ll update many of our existing tests to use this new value. In test/builders/customer.js, define the following object:
export const validCustomer = {
firstName: "first",
lastName: "last",
phoneNumber: "123456789"
};
- In test/CustomerForm.test.js, update the import that contains blankCustomer, pulling in the new validCustomer too:
import {
blankCustomer,
validCustomer,
} from "./builders/customer";
- Starting at the top, modify each test that simulates a submit event. Each should be mounted with this new validCustomer object. After making these changes, run your tests and make sure they are still passing before continuing:
render(<CustomerForm original={validCustomer} />);
- Add a new test for submitting the form. This can go alongside the other submit tests, rather than in the validation block:
it("does not submit the form when there are validation errors", async () => {
render(<CustomerForm original={blankCustomer} />);
await clickAndWait(submitButton());
expect(global.fetch).not.toBeCalled();
});
- To make this pass, first, define the following validateMany function inside the CustomerForm component. Its job is to validate many fields at once. It takes a single parameter, fields, which is an object of the field values we care about:
const validateMany = fields =>
Object.entries(fields).reduce(
(result, [name, value]) => ({
...result,
[name]: validators[name](value)
}),
{}
);
- The validateMany function references the validators constant, but that constant is currently defined in the handleBlur function. Pull that definition up so that it exists at the top of the component scope and is now accessible by both handleBlur and validateMany.
- We need a new function to check for errors across all fields. That’s anyErrors; add that now, as shown here. It returns true if we had any errors at all, and false otherwise:
const anyErrors = errors =>
Object.values(errors).some(error => (
error !== undefined
)
);
- Now, we can use validateMany and anyErrors in our handleSubmit function, as shown here. We’re going to wrap most of the existing functions in a conditional. Your test should pass after adding this code:
const handleSubmit = async e {
e.preventDefault();
const validationResult = validateMany(customer);
if (!anyErrors(validationResult)) {
... existing code ...
}
}
- Let’s move on to the next test. We need a couple of new imports, textOf and elements, so that we can write an expectation across all three of the alert spaces. Add these now:
import {
...,
textOf,
elements,
} from "./reactTestExtensions";
- Next, add the following test at the bottom of the test suite. We want to check whether any errors appear on the screen:
it("renders validation errors after submission fails", async () => {
render(<CustomerForm original={blankCustomer} />);
await clickAndWait(submitButton());
expect(
textOf(elements("[role=alert]"))
).not.toEqual("");
});
Using the alert role on multiple elements
This chapter uses multiple alert spaces, one for each form field. However, screen readers do not behave well when multiple alert roles show alerts at the same time – for example, if clicking the submit button causes a validation error to appear on all three of our fields.
An alternative approach would be to rework the UI so that it has an additional element that takes on the alert role when any errors are detected; after that, it should remove the alert role from the individual field error descriptions.
- This one is easy to pass; we simply need to call setValidationErrors with validationResult when anyErrors returns false:
if (!anyErrors(validationResult)) {
} else {
setValidationErrors(validationResult);
}
You’ve now seen how to run all field validations when the form is submitted.
Extracting non-React functionality into a new module
One useful design guideline is to get out of “framework land” as soon as possible. You want to be dealing with plain JavaScript objects. This is especially true for React components: extract as much logic as possible out into standalone modules.
There are a few different reasons for this. First, testing components is harder than testing plain objects. Second, the React framework changes more often than the JavaScript language itself. Keeping our code bases up to date with the latest React trends is a large-scale task if our code base is, first and foremost, a React code base. If we keep React at bay, our lives will be simpler in the longer term. So, we always prefer to write plain JavaScript when it’s an option.
Our validation code is a great example of this. We have several functions that do not care about React at all:
- The validators: required, match, and list
- hasError and anyErrors
- validateMany
- Some of the code in handleBlur, which is like a single-entry equivalent of validateMany
Let’s pull all of these out into a separate namespace called formValidation:
- Create a new file called src/formValidation.js.
- Move across the function definitions for required, match, and list from the top of CustomerForm. Make sure you delete the old definitions!
- Add the word export to the front of each definition in the new module.
- Add the following import to the top of CustomerForm, and then check that your tests are still passing:
import {
required,
match,
list,
} from "./formValidation";
- In src/CustomerForm.js, change renderError so that it passes the errors from state into hasError:
const renderError = fieldName => {
if (hasError(validationErrors, fieldName)) {
...
}
}
- Update hasError so that it includes the new validationErrors argument, and uses that rather than state:
const hasError = (validationErrors, fieldName) =>
validationErrors[fieldName] !== undefined;
- Update validateMany so that it passes in the list of validators as its first argument, rather than using state:
const validateMany = (validators, fields) =>
Object.entries(fields).reduce(
(result, [name, value]) => ({
...result,
[name]: validators[name](value)
}),
{}
);
- Update handleBlur so that it uses validateMany:
const handleBlur = ({ target }) => {
const result = validateMany(validators, {
[target.name] : target.value
});
setValidationErrors({
...validationErrors,
...result
});
}
- Update handleSubmit so that it passes validators to validateMany:
const validationResult = validateMany(
validators,
customer
);
- Move hasError, validateMany, and anyErrors into src/formValidation.js, ensuring you delete the functions from the CustomerForm component.
- Add the word export in front of each of these definitions.
- Update the import so that it pulls in these functions:
import {
required,
match,
list,
hasError,
validateMany,
anyErrors,
} from "./formValidation";
Although this is enough to extract the code out of React-land, we’ve only just made a start. There is plenty of room for improvement with this API. There are a couple of different approaches that you could take here. The exercises for this chapter contain some suggestions on how to do that.
Using test doubles for validation functions
You may be thinking, do these functions now need their own unit tests? And should I update the tests in CustomerForm so that test doubles are used in place of these functions?
In this case, I would probably write a few tests for formValidation, just to make it clear how each of the functions should be used. This isn’t test-driving since you already have the code, but you can still mimic the experience by writing tests as you normally would.
When extracting functionality from components like this, it often makes sense to update the original components to simplify and perhaps move across tests. In this instance, I wouldn’t bother. The tests are high-level enough that they make sense, regardless of how the code is organized internally.
This section covered how to write validation logic for forms. You should now have a good awareness of how TDD can be used to implement complex requirements such as field validations. Next, we’ll integrate server-side errors into the same flow.
Handling server errors
The /customers endpoint may return a 422 Unprocessable Entity error if the customer data failed the validation process. This could happen if, for example, the phone number already exists within the system. If this happens, we want to withhold calling the onSave callback and instead display the errors to the user and give them the chance to correct them.
The body of the response will contain error data very similar to the data we’ve built for the validation framework. Here’s an example of the JSON that would be received:
{
  "errors": {
    "phoneNumber": "Phone number already exists in the system"
  }
}
We’ll update our code to display these errors in the same way our client errors appeared. Since we already handle errors for CustomerForm, we’ll need to adjust our tests in addition to the existing CustomerForm code.
Our code to date has made use of the ok property that’s returned from global.fetch. This property returns true if the HTTP status code is 200, and false otherwise. Now, we need to be more specific. For a status code of 422, we want to display new errors, and for anything else (such as a 500 error), we want to fall back to the existing behavior.
Let’s add support for those additional status codes:
- Update the fetchResponseError method in test/builders/fetch.js, as shown here:
const fetchResponseError = (
status = 500,
body = {}
) => ({
ok: false,
status,
json: () => Promise.resolve(body),
});
- Write a test for 422 errors in test/CustomerForm.test.js. I’ve placed this toward the top of the file, next to the other tests that manipulate the HTTP response:
it("renders field validation errors from server", async () => {
const errors = {
phoneNumber: "Phone number already exists in the system"
};
global.fetch.mockResolvedValue(
fetchResponseError(422, { errors })
);
render(<CustomerForm original={validCustomer} />);
await clickAndWait(submitButton());
expect(errorFor("phoneNumber")).toContainText(
errors.phoneNumber
);
});
- To make that pass, add a new branch to the nested conditional statement in handleSubmit, which handles the response of the fetch request:
if (result.ok) {
setError(false);
const customerWithId = await result.json();
onSave(customerWithId);
} else if (result.status === 422) {
const response = await result.json();
setValidationErrors(response.errors);
} else {
setError(true);
}
Your tests should now be passing.
This section has shown you how to integrate server-side errors into the same client-side validation logic that you already have. To finish up, we’ll add some frills.
Indicating form submission status
It’d be great if we could indicate to the user that their form data is being sent to our application servers. The GitHub repository for this book contains a spinner graphic and some CSS that we can use. All that our React component needs to do is display a span element with a class name of submittingIndicator.
Before we write out the tests, let’s look at how the production code will work. We will introduce a new submitting boolean state variable that is used to toggle between states. It will be toggled to true just before we perform the fetch request and toggled to false once the request completes. Here’s how we’ll modify handleSubmit:
...
if (!anyErrors(validationResult)) {
  setSubmitting(true);
  const result = await global.fetch(...);
  setSubmitting(false);
  ...
}
...
If submitting is set to true, then we will render the spinner graphic. Otherwise, we will render nothing.
Testing state before promise completion
One of the trickiest aspects of testing React components is testing what happens during a task. That’s what we need to do now: we want to check that the submitting indicator is shown while the form is being submitted. However, the indicator disappears as soon as the promise completes, meaning that we can’t use the standard clickAndWait function we’ve used up until now because it will return at the point after the indicator has disappeared!
Recall that clickAndWait uses the asynchronous form of the act test helper. That’s the core of the issue. To get around this, a synchronous form of our function, click, will be needed to return before the task queue completes – in other words, before the global.fetch call returns any results.
However, to stop React’s warning sirens from going off, we still need to include the asynchronous act form somewhere in our test. React knows the submit handler returns a promise and it expects us to wait for its execution via a call to act. We need to do that after we’ve checked the toggle value of submitting, not before.
Let’s build that test now:
- Add act as an import to test/CustomerForm.test.js:
import { act } from "react-dom/test-utils";
- Re-add the click function import:
import {
...,
click,
clickAndWait,
} from "./reactTestExtensions";
- Create a new nested describe block at the bottom of the CustomerForm test suite, just below the existing form submission tests. This submits the call itself within a synchronous click, as explained previously. Then, we must wrap the expectation in an async act call that suppresses any warnings or errors from React:
describe("submitting indicator", () => {
it("displays when form is submitting", async () => {
render(
<CustomerForm
original={validCustomer}
onSave={() => {}}
/>
);
click(submitButton());
await act(async () => {
expect(
element("span.submittingIndicator")
).not.toBeNull();
});
});
});
- To make this pass, we just need to show that span within the JSX. Place that just after the submit button, as follows:
return (
<form id="customer" onSubmit={handleSubmit}>
...
<input type="submit" value="Add" />
<span className="submittingIndicator" />
</form>
);
- Now, we need to triangulate, to ensure the indicator only shows when the form has been submitted and not before:
it("initially does not display the submitting indicator", () => {
render(<CustomerForm original={validCustomer} />);
expect(element(".submittingIndicator")).toBeNull();
});
- We can make this pass by using a flag called submitting. It should be set to false when the indicator is disabled, and true when it’s enabled. Add the following state variable to the top of the CustomerForm component:
const [submitting, setSubmitting] = useState(false);
- Change the submitting span indicator so that it reads as follows:
{submitting ? (
<span className="submittingIndicator" />
) : null}
- The new test will now be passing, but the original test will be failing. We had to switch submittingIndicator to true just before we called fetch. In handleSubmit, add this line just above the call to fetch. After adding this code, your test should be passing:
if (!anyErrors(validationResult)) {
setSubmitting(true);
const result = await global.fetch(/* ... */);
...
}
- Add this final test, which checks that the indicator disappears once the response has been received. This test is very similar to our first test for the submitting indicator:
it("hides after submission", async () => {
render(
<CustomerForm
original={validCustomer}
onSave={() => {}}
/>
);
await clickAndWait(submitButton());
expect(element(".submittingIndicator")).toBeNull();
});
- This time, we need to add a setSubmitting call after the fetch:
if (!anyErrors(validationResult)) {
setSubmitting(true);
const result = await global.fetch(/* ... */);
...
}
That’s everything; your tests should all be passing.
Refactoring long methods
After this, our handleSubmit function is long – I have counted 23 lines in my implementation. That is too long for my liking!
Refactoring handleSubmit into smaller methods is an exercise left for you; see the Exercises section for more details. But here are a couple of hints for how you can go about that systematically:
- Extract blocks into methods; in this case, that means the contents of if statements. For example, if there are no validation errors, you could call out to a doSave method, which does the submission.
- Look for temporal coupling and see if there are other ways to format that code. In this case, we have the submitting state variable, which is set to true, before the fetch call, and then false after. This could be done differently.
Now, let’s summarize this chapter.
Summary
This chapter has shown you how TDD can be applied beyond just toy examples. Although you may not ever want to implement form validation yourself, you can see how complex code can be test-driven using the same methods that you learned in the first part of this book.
First, you learned how to validate field values at an appropriate moment: when fields lose focus and when forms are submitted. You also saw how server-side errors can be integrated into that, and how to display an indicator to show the user that data is in the process of being saved.
This chapter also covered how to move logic from your React components into their own modules.
In the next chapter, we’ll add a new feature to our system: a snazzy search interface.
Exercises
The following are some exercises for you to complete:
- Add a feature that clears any validation errors when the user corrects them. Use the onChange handler for this rather than onBlur, since we want to let the user know as soon as they’ve corrected the error.
- Add a feature that disables the submit button once the form has been submitted.
- Write tests for each of the functions within the formValidation module.
- The handleSubmit function is long. Extract a doSave function that pulls out the main body of the if statement.
Further reading
To learn more about the topics that were covered in this chapter, take a look at the following resources:
- A guide to regular expressions, explained by examples
https://reacttdd.com/testing-regular-expressions
- More information on ARIA annotations such as aria-describedby
https://developer.mozilla.org/en-US/docs/Web/Accessibility/ARIA/Annotations