
3
Refactoring the Test Suite
At this point, you’ve written a handful of tests. Although they may seem simple enough already, they can be simpler.
It’s extremely important to build a maintainable test suite: one that is quick and painless to build and adapt. One way to roughly gauge maintainability is to look at the number of lines of code in each test. To give some comparison to what you’ve seen so far, in the Ruby language, a test with more than three lines is considered a long test!
This chapter will take a look at some of the ways you can make your test suite more concise. We’ll do that by extracting common code into a module that can be reused across all your test suites. We’ll also create a custom Jest matcher.
When is the right time to pull out reusable code?
So far, you’ve written one module with two test suites within it. It’s arguably too early to be looking for opportunities to extract duplicated code. Outside of an educational setting, you may wish to wait until the third or fourth test suite before you pounce on any duplication.
The following topics will be covered in this chapter:
- Pulling out reusable rendering logic
- Creating a Jest matcher using TDD
- Extracting DOM helpers
By the end of the chapter, you’ll have learned how to approach your test suite with a critical eye for maintainability.
Technical requirements
The code files for this chapter can be found here: https://github.com/PacktPublishing/Mastering-React-Test-Driven-Development-Second-Edition/tree/main/Chapter03.
Pulling out reusable rendering logic
In this section, we will extract a module that initializes a unique DOM container element for each test. Then, we’ll build a render function that uses this container element.
The two test suites we’ve built both have the same beforeEach block that runs before each test:
let container;
beforeEach(() => {
  container = document.createElement("div");
  document.body.replaceChildren(container);
});
Wouldn’t it be great if we could somehow tell Jest that any test suite that is testing a React component should always use this beforeEach block and make the container variable available to our tests?
Here, we will extract a new module that exports two things: the container variable and the initializeReactContainer function. This won’t save us any typing, but it will hide the pesky let declaration and give a descriptive name to the call to createElement.
The importance of small functions with descriptive names
Often, it’s helpful to pull out functions that contain just a single line of code. The benefit is that you can then give it a descriptive name that serves as a comment as to what that line of code does. This is preferable to using an actual comment because the name travels with you wherever you use the code.
In this case, the call to document.createElement could be confusing to a future maintainer of your software. Imagine that it is someone who has never done any unit testing of React code. They would be asking, “Why do the tests create a new DOM element for each and every test?” You can go some way to answer that by giving it a name, such as initializeReactContainer. It doesn’t offer a complete answer as to why it’s necessary, but it does allude to some notion of “initialization.”
Let’s go ahead and pull out this code:
- Create a new file called test/reactTestExtensions.js. This file will ultimately contain a whole bunch of helper methods that we’ll use in our React component tests.
- Add the following content to the file. The function is implicitly updating the container variable within the module. That variable is then exported – our test suites can access this variable as if it were a “read-only” constant:
export let container;
export const initializeReactContainer = () => {
container = document.createElement("div");
document.body.replaceChildren(container);
}
- Move to test/AppointmentsDayView.test.js. Add the following import just below the existing imports:
import {
initializeReactContainer,
container,
} from "./reactTestExtensions";
- Now, replace the two beforeEach blocks – remember that there is one in each describe block – with the following code:
beforeEach(() => {
initializeReactContainer();
});
- Delete the let container definition from the top of both describe blocks.
- Run npm test and verify that your tests are still passing.
Now, how about continuing with the render function? Let’s move that into our new module. This time, it’s a straight lift and replace job:
- Copy the definition of render from one of the describe blocks.
- Paste it into reactTestExtensions.js. For reference, here it is again:
export const render = (component) =>
act(() =>
ReactDOM.createRoot(container).render(component)
);
- You’ll also need to add these imports at the top of the file:
import ReactDOM from "react-dom/client";
import { act } from "react-dom/test-utils";
- Back in your test file, you can now change the test extensions import so that it includes the new render function, and then remove the container import:
import {
initializeReactContainer,
render,
} from "./reactTestExtensions";
- Delete the two render definitions from the two test suites.
- Run npm test and verify that your tests are still passing.
So far, we've extracted two functions. We have one more to do: the click function. However, we have one more “action” function that we can create: click. Let’s do that now:
- Create the click function in your test extensions file, as shown here:
export const click = (element) =>
act(() => element.click());
- Back in your test file, adjust your import:
import {
initializeReactContainer,
container,
render,
click,
} from "./reactTestExtensions";
- In your test suite, replace each invocation of the click function with the following line:
click(button);
- The act import is no longer needed in your test suite. Go ahead and delete that import from your test file.
- Run npm test and verify that your tests are still passing.
Avoiding the act function in your test code
The act function causes a fair amount of clutter in tests, which doesn’t help in our quest for conciseness. Thankfully, we can push it out into our extensions module and be done with it.
Remember the Arrange-Act-Assert pattern that our tests should always follow? Well, we’ve now extracted everything we can from the Arrange and Act sections.
The approach we’ve taken here, of using an exported container variable, isn’t the only approach worth exploring. You could, for example, build a wrapper function for describe that automatically includes a beforeEach block and builds a container variable that’s accessible within the scope of that describe block. You could name it something like describeReactComponent.
An advantage of this approach is that it involves a lot less code – you won’t be dealing with all those imports, and you could get rid of your beforeEach block in the test suites. The downside is that it’s very clever, which is not always a good thing when it comes to maintainability. There’s something a bit magical about it that requires a certain level of prior knowledge.
That being said, if this approach appeals to you, I encourage you to try it out.
In the next section, we’ll start to tackle the Assert section of our tests.
Creating a Jest matcher using TDD
In our tests so far, we’ve used a variety of matchers. These functions tack on to the end of the expect function call:
expect(appointmentTable()).not.toBeNull();
In this section, you’ll build a matcher using a test-driven approach to make sure it’s doing the right thing. You’ll learn about the Jest matcher API as you build your test suite.
You’ve seen quite a few matchers so far: toBeNull, toContain, toEqual, and toHaveLength. You’ve also seen how they can be negated with not.
Matchers are a powerful way of building expressive yet concise tests. You should take some time to learn all the matchers that Jest has to offer.
Jest matcher libraries
There are a lot of different matcher libraries available as npm packages. Although we won’t use them in this book (since we’re building everything up from first principles), you should make use of these libraries. See the Further reading section at the end of this chapter for a list of libraries that will be useful to you when testing React components.
Often, you’ll want to build matchers. There are at least a couple of occasions that will prompt you to do this:
- An expectation you’re writing is quite wordy, lengthy, or just doesn’t read well in plain language.
- Some of the tests are repeating the same group of expectations again and again. This is a sign that you have a business concept that you can encode in a single matcher that will be specific to your project.
The second point is an interesting one. If you’re writing the same expectations multiple times across multiple tests, you should treat it just like you would if it was repeated code in your production source code. You’d pull that out into a function. Here, the matcher serves the same purpose, except using a matcher instead of a function helps remind you that this line of code is a special statement of fact about your software: a specification.
One expectation per test
You should generally aim for just one expectation per test. "Future you" will thank you for keeping things simple! (In Chapter 5, Adding Complex Form Interactions, we’ll look at a situation where multiple expectations are beneficial.)
You might hear this guideline and be instantly horrified. You might be imagining an explosion of tiny tests. But if you’re ready to write matchers, you can aim for one expectation per test and still keep the number of tests down.
The matcher we’re going to build in this section is called toContainText. It will replace the following expectation:
expect(appointmentTable().textContent).toContain("Ashley");It will replace it with the following form, which is slightly more readable:
expect(appointmentTable()).toContainText("Ashley");Here’s what the output looks like on the terminal:
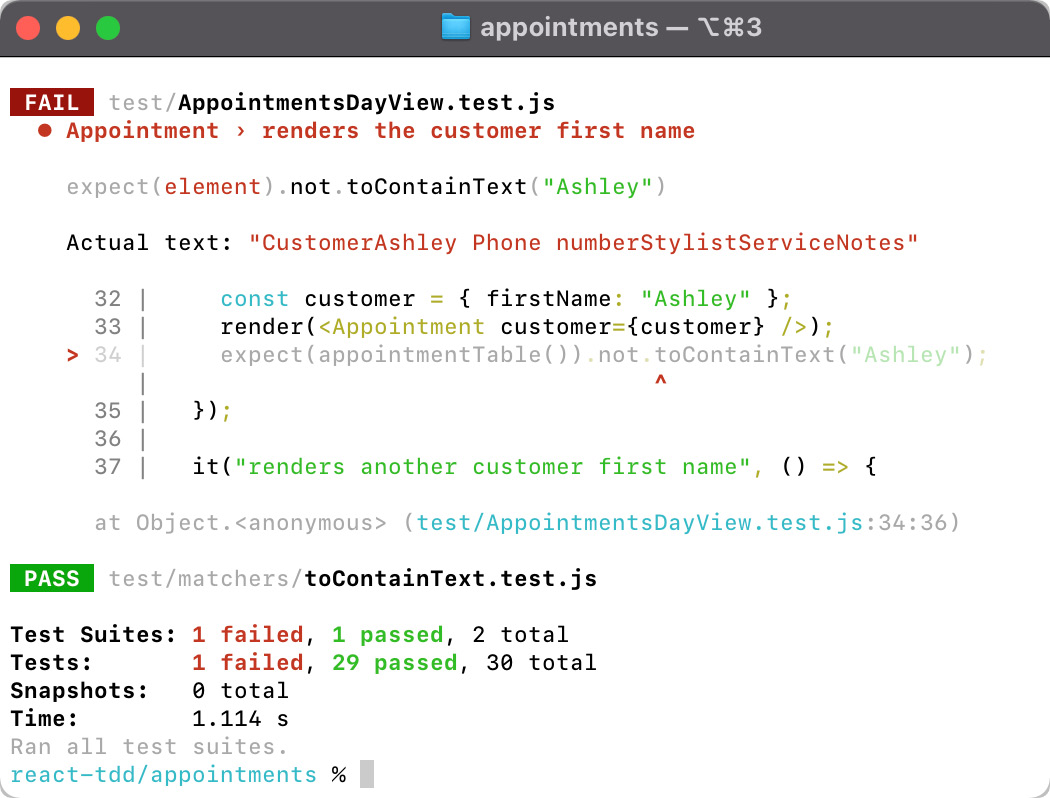
Figure 3.1 – The output of the toContainText matcher when it fails
Let’s get started:
- Create a new directory named test/matchers. This is where both the source code and tests for the matchers will live.
- Create the new test/matchers/toContainText.test.js file.
- Write the first test, as shown here. This test introduces a couple of new ideas. First, it shows that matcher is a function that takes two parameters: the actual element and the data to match on. Second, it shows that the function returns an object with a pass property. This property is true if the matcher successfully “matched” – in other words, it passed:
import { toContainText } from "./toContainText";
describe("toContainText matcher", () => {
it("returns pass is true when text is found in the given DOM element", () => {
const domElement = {
textContent: "text to find"
};
const result = toContainText(
domElement,
"text to find"
);
expect(result.pass).toBe(true);
});
});
- Create another new file called test/matchers/toContainText.js. This first test is trivial to make pass:
export const toContainText = (
received,
expectedText
) => ({
pass: true
});
- We need to triangulate to get to the real implementation. Write the next test, as shown here:
it("return pass is false when the text is not found in the given DOM element", () => {
const domElement = { textContent: "" };
const result = toContainText(
domElement,
"text to find"
);
expect(result.pass).toBe(false);
});
- Now, continue the implementation for our matcher, as shown here. At this stage, you have a functioning matcher – it just needs to be plugged into Jest:
export const toContainText = (
received,
expectedText
) => ({
pass: received.textContent.includes(expectedText)
});
- Before we make use of this, it’s good practice to fill in an expected second property of your return value: message. So, go ahead and do that. The following test shows that we expect the message to contain the matcher text itself, as a useful reminder to the programmer:
it("returns a message that contains the source line if no match", () => {
const domElement = { textContent: "" };
const result = toContainText(
domElement,
"text to find"
);
expect(
stripTerminalColor(result.message())
).toContain(
`expect(element).toContainText("text to find")`
);
});
Understanding the message function
The requirements for the message function are complex. At a basic level, it is a helpful string that is displayed when the expectation fails. However, it’s not just a string – it’s a function that returns a string. This is a performance feature: the value of message does not need to be evaluated unless there is a failure. But even more complicated is the fact that the message should change, depending on whether the expectation was negated or not. If pass is false, then the message function should assume that the matcher was called in the “positive” sense – in other words, without a .not qualifier. But if pass is true, and the message function ends up being invoked, then it’s safe to assume that it was negated. We’ll need another test for this negated case, which comes a little later.
- This function uses a stripTerminalColor function that we should now define, above the test suite. Its purpose is to remove any ASCII escape codes that add colors:
const stripTerminalColor = (text) =>
text.replace(/x1B[d+m/g, "");
Testing ASCII escape codes
As you’ve seen already, when Jest prints out test failures, you’ll see a bunch of red and green colorful text. That’s achieved by printing ASCII escape codes within the text string.
This is a tricky thing to test. Because of that, we’re making a pragmatic choice to not bother testing colors. Instead, the stripTerminalColor function strips out these escape codes from the string so that you can test the text output as if it was plain text.
- Make that test pass by making use of Jest’s matcherHint and printExpected functions, as shown here. It isn’t particularly clear how the matcherHint function works but, hopefully, you can convince yourself that it does what we expect by running tests and seeing the last one pass! The printExpected functions add quotes to our value and colors it green:
import {
matcherHint,
printExpected,
} from "jest-matcher-utils";
export const toContainText = (
received,
expectedText
) => {
const pass =
received.textContent.includes(expectedText);
const message = () =>
matcherHint(
"toContainText",
"element",
printExpected(expectedText),
{ }
);
return { pass, message };
};
Learning about Jest’s matcher utilities
At the time of writing, I’ve found the best way to learn what the Jest matcher utility functions do is to read their source. You could also avoid them entirely if you like – there’s no obligation to use them.
- Now comes the complicated part. Add the following test, which specifies the scenario of a failed expectation when using the negated matcher. The message should reflect that the matcher was negated, as shown here:
it("returns a message that contains the source line if negated match", () => {
const domElement = { textContent: "text to find" };
const result = toContainText(
domElement,
"text to find"
);
expect(
stripTerminalColor(result.message())
).toContain(
`expect(container).not.toContainText("text to find")`
);
});
- To make that pass, pass a new option to matcherHint:
...
matcherHint(
"toContainText",
"element",
printExpected(expectedText),
{ isNot: pass }
);
...
- There’s one final test to add. We can print out the actual textContent property value of the element, which will help debug test failures when they occur. Add the following test:
it("returns a message that contains the actual text", () => {
const domElement = { textContent: "text to find" };
const result = toContainText(
domElement,
"text to find"
);
expect(
stripTerminalColor(result.message())
).toContain(`Actual text: "text to find"`);
});
- Make it pass by adjusting your matcher code, as shown here. Note the use of the new printReceived function, which is the same as printExpected except it colors the text red instead of green:
import {
matcherHint,
printExpected,
printReceived,
} from "jest-matcher-utils";
export const toContainText = (
received,
expectedText
) => {
const pass =
received.textContent.includes(expectedText);
const sourceHint = () =>
matcherHint(
"toContainText",
"element",
printExpected(expectedText),
{ isNot: pass }
);
const actualTextHint = () =>
"Actual text: " +
printReceived(received.textContent);
const message = () =>
[sourceHint(), actualTextHint()].join(" ");
return { pass, message };
};
- It’s time to plug the test into Jest. To do that, create a new file called test/domMatchers.js with the following content:
import {
toContainText
} from "./matchers/toContainText";
expect.extend({
toContainText,
});
- Open package.json and update your Jest configuration so that it loads this file before your tests run:
"jest": {
...,
"setupFilesAfterEnv": ["./test/domMatchers.js"]
}
- Your new matcher is ready to use. Open test/AppointmentsDayView.test.js and change all your tests that use the expect(<element>.textContent).toEqual(<text>)and expect(<element>.textContent).toContain(<text>) forms. They should be replaced with expect(<element>).toContainText(<text>).
- Run your tests; you should see them all still passing. Take a moment to play around and see how your matcher works. First, change one of the expected text values to something incorrect, and watch the matcher fail. See how the output messages look. Then, change the expected value back to the correct one, but negate the matcher by changing it to .not.toContainText. Finally, revert your code to the all-green state.
Why do we test-drive matchers?
You should write tests for any code that isn’t just simply calling other functions or setting variables. At the start of this chapter, you extracted functions such as render and click. These functions didn’t need tests because you were just transplanting the same line of code from one file to another. But this matcher does something much more complex – it must return an object that conforms to the pattern that Jest requires. It also makes use of Jest’s utility functions to build up a helpful message. That complexity warrants tests.
If you are building matchers for a library, you should be more careful with your matcher’s implementation. For example, we didn’t bother to check that the received value is an HTML element. That’s fine because this matcher exists in our code base only, and we control how it’s used. When you package matchers for use in other projects, you should also verify that the function inputs are values you’re expecting to see.
You’ve now successfully test-driven your first matcher. There will be more opportunities for you to practice this skill as this book progresses. For now, we’ll move on to the final part of our cleanup: creating some fluent DOM helpers.
Extracting DOM helpers
In this section, we’ll pull out a bunch of little functions that will help our tests become more readable. This will be straightforward compared to the matcher we’ve just built.
The reactTestExtensions.js module already contains three functions that you’ve used: initializeReactContainer, render, and click.
Now, we’ll add four more: element, elements, typesOf, and textOf. These functions are designed to help your tests read much more like plain English. Let’s take a look at an example. Here are the expectations for one of our tests:
const listChildren = document.querySelectorAll("li");
expect(listChildren[0].textContent).toEqual("12:00");
expect(listChildren[1].textContent).toEqual("13:00");
We can introduce a function, elements, that is a shorter version of document.querySelectorAll. The shorter name means we can get rid of the extra variable:
expect(elements("li")[0].textContent).toEqual("12:00");
expect(elements("li")[1].textContent).toEqual("13:00");
This code is now calling querySelectorAll twice – so it’s doing more work than before – but it’s also shorter and more readable. And we can go even further. We can boil this down to one expect call by matching on the elements array itself. Since we need textContent, we will simply build a mapping function called textOf that takes that input array and returns the textContent property of each element within it:
expect(textOf(elements("li"))).toEqual(["12:00", "13:00"]);The toEqual matcher, when applied to arrays, will check that each array has the same number of elements and that each element appears in the same place.
We’ve reduced our original three lines of code to just one!
Let’s go ahead and build these new helpers:
- Open test/reactTestExtensions.js and add the following definitions at the bottom of the file. You’ll notice that the elements are using Array.from. This is so that the resulting array can be mapped over by both typesOf and textOf:
export const element = (selector) =>
document.querySelector(selector);
export const elements = (selector) =>
Array.from(document.querySelectorAll(selector));
export const typesOf = (elements) =>
elements.map((element) => element.type);
export const textOf = (elements) =>
elements.map((element) => element.textContent);
- Open test/AppointmentsDayView.test.js and change the extensions import to include all these new functions:
import {
initializeReactContainer,
render,
click,
element,
elements,
textOf,
typesOf,
} from "./reactTestExtensions";
- Now, do a search and replace for document.querySelectorAll, replacing each occurrence with elements. Run npm test and verify that your tests still pass.
- Search for and replace document.querySelector, replacing each occurrence with element. Again, run your tests and check that everything is fine.
- You will see that the test renders at the time of the appointment. Replace the existing expectations with this one:
expect(textOf(elements("li"))).toEqual([
"12:00", "13:00"
]);
- Find the "has a button element in each li" test and replace the existing expectations with the following single expectation. Observe that the expectation on the length of the array is no longer necessary if your expectation tests the entire array:
expect(typesOf(elements("li > *"))).toEqual([
"button",
"button",
]);
- The final three tests pull out the second button on the screen using elements("button")[1]. Push this definition up, just below the beforeEach block, and give it a more descriptive name:
const secondButton = () => elements("button")[1];
- Now, you can use this in the three tests. Go ahead and update them now. For example, the middle test can be updated as follows:
click(secondButton());
expect(secondButton().className).toContain("toggled");
- As a final touch, inline the listChild and listElement variables that appear in some of the tests – in other words, remove the use of variables and call the function directly within the expectation. As an example, the "renders an ol element to display appointments" test can have its expectation rewritten, as follows:
expect(element("ol")).not.toBeNull();
- Run npm test one final time and verify that everything is still green.
Not all helpers need to be extracted
You’ll notice that the helpers you have extracted are all very generic – they make no mention of the specific components under test. It’s good to keep helpers as generic as possible. On the other hand, sometimes it helps to have very localized helper functions. In your test suite, you already have one called appointmentsTable and another called secondButton. These should remain in the test suite because they are local to the test suite.
In this section, you’ve seen our final technique for simplifying your test suites, which is to pull out fluent helper functions that help keep your expectations short and help them read like plain English.
You've also seen the trick of running expectations on an array of items rather than having an expectation for individual items. This isn’t always the appropriate course of action. You’ll see an example of this in Chapter 5, Adding Complex Form Interactions.
Summary
This chapter focused on improving our test suites. Readability is crucially important. Your tests act as specifications for your software. Each component test must clearly state what the expectation of the component is. And when a test fails, you want to be able to understand why it’s failed as quickly as possible.
You’ve seen that these priorities are often in tension with our usual idea of what good code is. For example, in our tests, we are willing to sacrifice performance if it makes the tests more readable.
If you’ve worked with React tests in the past, think about how long an average test was.In this chapter, you've seen a couple of mechanisms for keeping your test short: building domain-specific matchers and extracting little functions for querying the DOM.
You’ve also learned how to pull out React initialization code to avoid clutter in our test suites.
In the next chapter, we’ll move back to building new functionality into our app: data entry with forms.
Exercises
Using the techniques you’ve just learned, create a new matcher named toHaveClass that replaces the following expectation:
expect(secondButton().className).toContain("toggled");With your new matcher in place, it should read as follows:
expect(secondButton()).toHaveClass("toggled"); There is also the negated form of this matcher:
expect(secondButton().className).not.toContain("toggled");Your matcher should work for this form and display an appropriate failure message.
Further reading
To learn more about the topics that were covered in this chapter, take a look at the following resources:
- The following GitHub repository contains useful matchers for testing React components: https://github.com/jest-community/jest-extended
- The following link provides the source of Jest’s matcher utilities, which I find useful for figuring out how to write simple matchers: https://github.com/facebook/jest/tree/main/packages/jest-matcher-utils