
14
Building a Logo Interpreter
Logo is a programming environment created in the 1960s. It was, for many decades, a popular way to teach children how to code—I have fond memories of writing Logo programs back in high school. At its core, it is a method for building graphics via imperative instructions.
In this part of the book, we’ll build an application called Spec Logo. The starting point is an already-functioning interpreter and a barebones UI. In the following chapters, we’ll bolt on additional features to this codebase.
This chapter provides a second opportunity to test-drive Redux. It covers the following topics:
- Studying the Spec Logo user interface
- Undoing and redoing user actions in Redux
- Saving to local storage via Redux middleware
- Changing keyboard focus
By the end of the chapter, you’ll have learned how to test-drive complex Redux reducers and middleware.
Technical requirements
The code files for this chapter can be found here:
Studying the Spec Logo user interface
The interface has two panes: the left pane is the drawing pane, which is where the output from the Logo script appears. On the right side is a prompt where the user can edit instructions:
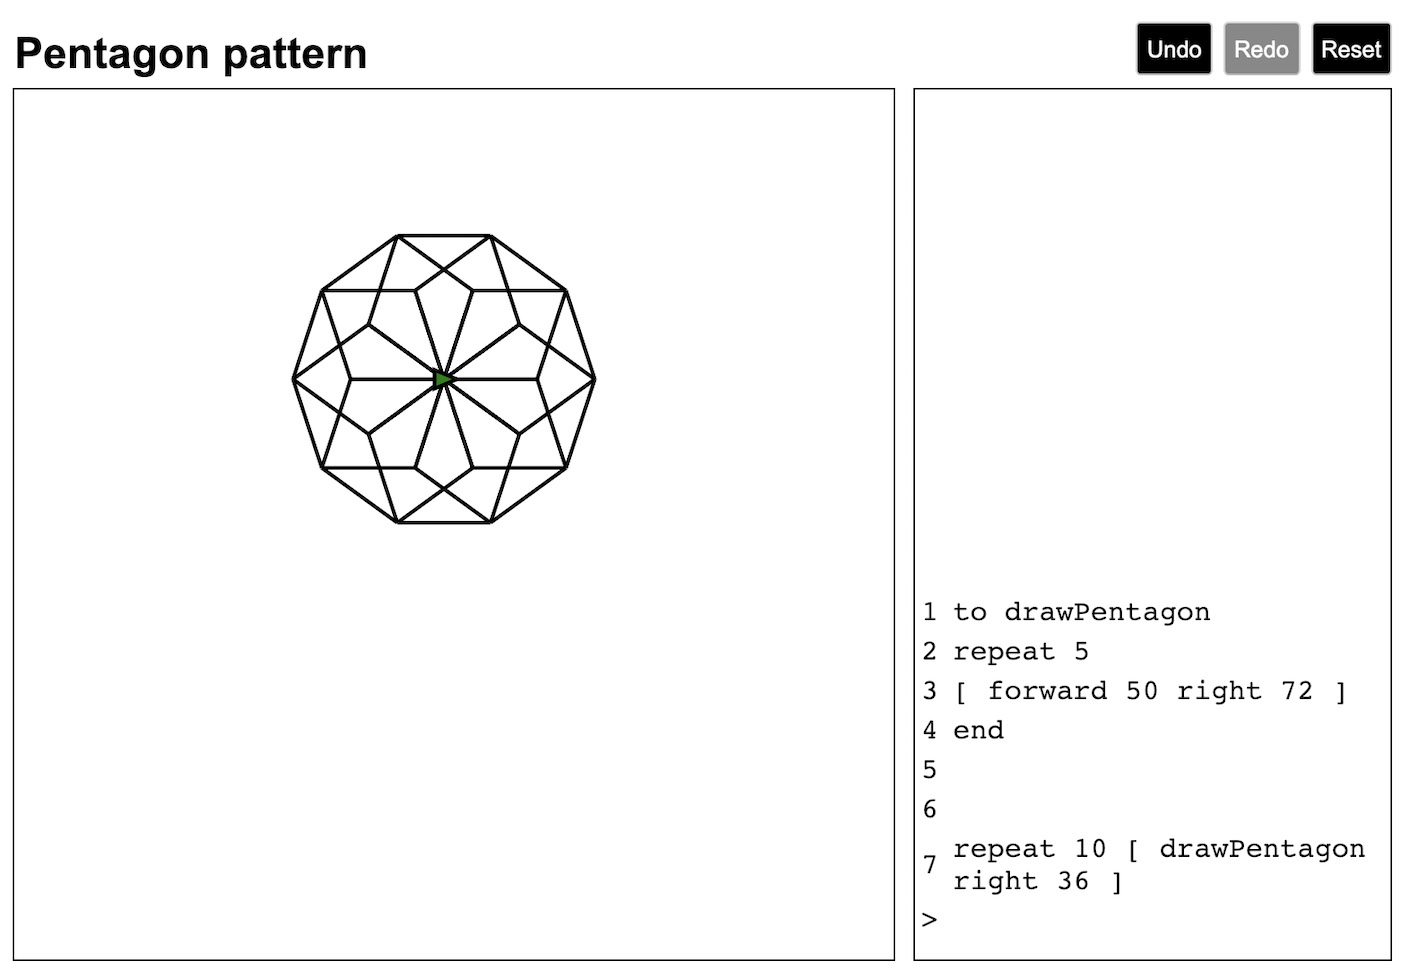
Figure 14.1: The Spec Logo interface
Look at the screenshot. You can see the following:
- The script name in the top-left corner. This is a text field that the user can click on to change the name of the current script.
- The display, which shows script output on the left-hand side of the page. You can see a shape has been drawn here, which is the result of the Logo statements entered at the prompt.
- The turtle, shown in the middle of the screen. This is a little green triangle that marks where drawing commands originate. The turtle has an x and y position, starting at 0,0, which is the middle of the screen. The viewable drawing is 600x600 in size, and the turtle can move throughout this area. The turtle also has an angle, initially zero, which is pointing directly right.
- The prompt in the bottom right-hand corner, marked with a > symbol. This is where you enter your statements, which can be multiline. Hitting Enter will send the current prompt text to the interpreter. If it makes a complete statement, it will be executed, and the prompt cleared ready for your next statement.
- The statement history above the prompt. It lists all the previously executed statements. Each is given a number so you can refer back to the statement.
- A menu bar in the top-right corner, containing Undo, Redo, and Reset buttons. It is this menu bar that we’ll be building out in this chapter.
Although we won’t be writing any Logo code in this chapter, it’s worth spending some time playing around and making your own drawings with the interpreter. Here’s a list of instructions that you can use:

It’s also worth looking through the codebase. The src/parser.js file and the src/language directory contain the Logo interpreter. There are also corresponding test files in the test directory. We won’t be modifying these files, but you may be interested in seeing how this functionality has been tested.
There is a single Redux reducer in src/reducers/script.js. Its defaultState definition neatly encapsulates everything needed to represent the execution of a Logo program. Almost all the app’s React components use this state in some way.
In this chapter, we’ll be adding two more reducers into this directory: one for undo/redo and one for prompt focus. We’ll be making modifications to three React components: MenuButtons, Prompt, and ScriptName.
Let’s start by building a new reducer, named withUndoRedo.
Undoing and redoing user actions in Redux
In this section, we’ll add undo and redo buttons at the top of the page, which allow the user to undo and redo statements that they’ve previously run. They’ll work like this:
- Initially, both buttons will be disabled.
- Once the user executes a statement, the Undo button will become enabled.
- When the user clicks the Undo button, the last statement will be undone.
- At that point, the Redo button becomes available, and the user can choose to redo the last statement.
- Multiple actions can be undone and then redone, in sequence.
- If the user performs a new action while Redo is available, the redo sequence is cleared, and the Redo button becomes unavailable again.
Aside from adding button elements, the work involved here is building a new reducer, withUndoRedo, which will decorate the script reducer. This reducer will return the same state as the script reducer, but with two additional properties: canUndo and canRedo. In addition, the reducer stores past and future arrays within it that record the past and future states. These will never be returned to the user, just stored, and will replace the current state should the user choose to undo or redo.
Building the reducer
The reducer will be a higher-order function that, when called with an existing reducer, returns a new reducer that returns the state we’re expecting. In our production code, we’ll replace this store code:
combineReducers({
  script: scriptReducer
})
We’ll replace it with this decorated reducer, which takes exactly the same reducer and wraps it in the withUndoRedo reducer that we’ll build in this section:
combineReducers({
  script: withUndoRedo(scriptReducer)
})
To test this, we’ll need to use a spy to act in place of the script reducer, which we’ll call decoratedReducerSpy.
Setting the initial state
Let’s make a start by building the reducer itself, before adding buttons to exercise the new functionality:
- Create a new file named test/reducers/withUndoRedo.test.js and add the following setup and test, which specifies what should happen when we pass an undefined state to the reducer. This is equivalent to how we began testing our other reducers, but in this case, we pass the call through to the decorated reducer. The test passes an undefined state to the reducer, which is the required mechanism for initializing a reducer:
import {
withUndoRedo
} from "../../src/reducers/withUndoRedo";
describe("withUndoRedo", () => {
let decoratedReducerSpy;
let reducer;
beforeEach(() => {
decoratedReducerSpy = jest.fn();
reducer = withUndoRedo(decoratedReducerSpy);
});
describe("when initializing state", () => {
it("calls the decorated reducer with undefined state and an action", () => {
const action = { type: "UNKNOWN" };
reducer(undefined, action);
expect(decoratedReducerSpy).toBeCalledWith(
undefined,
action);
});
});
});
- Create a new src/reducers/withUndoRedo.js file and make the test pass with the following code:
export const withUndoRedo = (reducer) => {
return (state, action) => {
reducer(state, action);
};
};
- Add the next test to the describe block, as shown. This uses the toMatchObject matcher, which we first encountered in Chapter 6, Exploring Test Doubles:
it("returns a value of what the inner reducer returns", () => {
decoratedReducerSpy.mockReturnValue({ a: 123 });
expect(reducer(undefined)).toMatchObject(
{ a : 123 }
);
});
- Make that pass by adding the return keyword:
export const withUndoRedo = (reducer) => {
return (state, action) => {
return reducer(state, action);
};
}
- Initially, both canUndo and canRedo should be false, as there are no previous or future states that we can move to. Let’s add those two tests as a pair, still in the same describe block:
it("cannot undo", () => {
expect(reducer(undefined)).toMatchObject({
canUndo: false
});
});
it("cannot redo", () => {
expect(reducer(undefined)).toMatchObject({
canRedo: false
});
});
- To make these tests pass, we need to create a new object with those properties added:
export const withUndoRedo = (reducer) => {
return (state, action) => {
return {
canUndo: false,
canRedo: false,
...reducer(state, action)
};
};
}
- Let’s move on to the meat of the reducer. After performing an action, we want to be able to perform an Undo action to revert to the previous state. We’ll use the present and future constants to denote those states:
describe("performing an action", () => {
const innerAction = { type: "INNER" };
const present = { a: 123 };
const future = { b: 234 };
beforeEach(() => {
decoratedReducerSpy.mockReturnValue(future);
});
it("can undo after a new present has been provided", () => {
const result = reducer(
{ canUndo: false, present },
innerAction
);
expect(result.canUndo).toBeTruthy();
});
});
- Make that pass with the following code. Since we’re no longer dealing with an undefined state, this is the moment that we need to wrap our existing code in a conditional block:
export const withUndoRedo = (reducer) => {
return (state, action) => {
if (state === undefined)
return {
canUndo: false,
canRedo: false,
...reducer(state, action)
};
return {
canUndo: true
};
};
};
- Next, we make sure we call the reducer again since, for this new block, it won’t happen. Write the following test:
it("forwards action to the inner reducer", () => {
reducer(present, innerAction);
expect(decoratedReducerSpy).toBeCalledWith(
present,
innerAction
);
});
- To make that pass, simply call the reducer before the return value:
if (state === undefined)
...
reducer(state, action);
return {
canUndo: true
};
- The next test shows that this object also needs to return the new state:
it("returns the result of the inner reducer", () => {
const result = reducer(present, innerAction);
expect(result).toMatchObject(future);
});
- Make that pass by saving the reducer value in a variable named newPresent and returning it as part of the returned object:
const newPresent = reducer(state, action);
return {
...newPresent,
canUndo: true
};
- The script reducer holds a special value named nextInstructionId. We can use this to determine whether the script instruction was processed or whether an error occurred. When a statement is valid, it is executed and nextInstructionId is incremented. But when a statement can’t be processed, nextInstructionId remains the same. We can use that fact to avoid saving history if a statement contains an error. To do that, modify the present and future constants to include this parameter, and add the new test, as shown next:
const present = { a: 123, nextInstructionId: 0 };
const future = { b: 234, nextInstructionId: 1 };
...
it("returns the previous state if nextInstructionId does not increment", () => {
decoratedReducerSpy.mockReturnValue({
nextInstructionId: 0
});
const result = reducer(present, innerAction);
expect(result).toBe(present);
});
- Make that pass by wrapping our new return block in a conditional, and returning the old state if the condition doesn’t pass:
const newPresent = reducer(state, action);
if (
newPresent.nextInstructionId !=
state.nextInstructionId
) {
return {
...newPresent,
canUndo: true
};
}
return state;
This covers all the functionality for performing any actions other than Undo and Redo. The next section covers Undo.
Handling the undo action
We’ll create a new Redux action, of type UNDO, which causes us to push the current state into a new array called past:
- For this test, we can reuse the present and innerAction properties, so push those up into the outer describe block now. Also, define a new undoAction Redux action. We’ll use it within our first test:
describe("withUndoRedo", () => {
const undoAction = { type: "UNDO" };
const innerAction = { type: "INNER" };
const present = { a: 123, nextInstructionId: 0 };
const future = { b: 234, nextInstructionId: 1 };
...
});
- Add a new nested describe block with the following test and setup. The beforeEach block sets up a scenario where we’ve already performed an action that will have stored a previous state. We’re then ready to undo it within the test:
describe("undo", () => {
let newState;
beforeEach(() => {
decoratedReducerSpy.mockReturnValue(future);
newState = reducer(present, innerAction);
});
it("sets present to the latest past entry", () => {
const updated = reducer(newState, undoAction);
expect(updated).toMatchObject(present);
});
});
Performing an action within a beforeEach block
Notice the call to the reducer function in the beforeEach setup. This function is the function under test, so it could be considered part of the Act phase that we usually keep within the test itself. However, in this case, the first call to reducer is part of the test setup, since all these tests rely on having performed at least one action that can then be undone. In this way, we can consider this reducer call to be part of the Assert phase.
- Make that pass by modifying the function as follows. We use a past variable to store the previous state. If we receive an UNDO action, we return that value. We also use a switch statement since we’ll be adding a case for REDO later:
export const withUndoRedo = (reducer) => {
let past;
return (state, action) => {
if (state === undefined)
...
switch(action.type) {
case "UNDO":
return past;
default:
const newPresent = reducer(state, action);
if (
newPresent.nextInstructionId !=
state.nextInstructionId
) {
past = state;
return {
...newPresent,
canUndo: true
};
}
return state;
}
};
};
- Next, let’s adjust this so that we can undo any number of levels deep. Add the next test:
it("can undo multiple levels", () => {
const futureFuture = {
c: 345, nextInstructionId: 3
};
decoratedReducerSpy.mockReturnValue(futureFuture);
newState = reducer(newState, innerAction);
const updated = reducer(
reducer(newState, undoAction),
undoAction
);
expect(updated).toMatchObject(present);
});
- For this, we’ll need to upgrade past to an array:
export const withUndoRedo = (reducer) => {
let past = [];
return (state, action) => {
if (state === undefined)
...
switch(action.type) {
case "UNDO":
const lastEntry = past[past.length - 1];
past = past.slice(0, -1);
return lastEntry;
default:
const newPresent = reducer(state, action);
if (
newPresent.nextInstructionId !=
state.nextInstructionId
) {
past = [ ...past, state ];
return {
...newPresent,
canUndo: true
};
}
return state;
}
};
};
- There’s one final test we need to do. We need to check that after undoing, we can also redo:
it("sets canRedo to true after undoing", () => {
const updated = reducer(newState, undoAction);
expect(updated.canRedo).toBeTruthy();
});
- To make that pass, return a new object comprised of lastEntry and the new canRedo property:
case "UNDO":
const lastEntry = past[past.length - 1];
past = past.slice(0, -1);
return {
canRedo: true
};
That’s all there is to the UNDO action. Next, let’s add the REDO action.
Handling the redo action
Redo is very similar to undo, just reversed:
- First, add a new definition for the Redux action of type REDO, in the top-level describe block:
describe("withUndoRedo", () => {
const undoAction = { type: "UNDO" };
const redoAction = { type: "REDO" };
...
});
- Underneath the undo describe block, add the following redo describe block with the first test. Be careful with the setup for the spy; the call is mockReturnValueOnce here, not mockReturnValue. The test needs to ensure it takes its value from the stored redo state:
describe("redo", () => {
let newState;
beforeEach(() => {
decoratedReducerSpy.mockReturnValueOnce(future);
newState = reducer(present, innerAction);
newState = reducer(newState, undoAction);
});
it("sets the present to the latest future entry", () => {
const updated = reducer(newState, redoAction);
expect(updated).toMatchObject(future);
});
});
- To make this pass, in your production code, declare a future variable, next to the declaration for past:
let past = [], future;
- Set this within the UNDO action:
case "UNDO":
const lastEntry = past[past.length - 1];
past = past.slice(0, -1);
future = state;
- Now that it’s saved, we can handle the REDO action. Add the following case statement, between the UNDO clause and the default clause:
case "UNDO":
...
case "REDO":
return future;
default:
...
- The next test is for multiple levels of redo. This is slightly more complicated than the same case in the undo block—we’ll have to modify the beforeEach block to take us back twice. First, pull out the futureFuture value from the undo test and bring it into the outer scope, next to the other values, just below future:
const future = { b: 234, nextInstructionId: 1 };
const futureFuture = { c: 345, nextInstructionId: 3 };
- Now, update beforeEach to take two steps forward and then two back:
beforeEach(() => {
decoratedReducerSpy.mockReturnValueOnce(future);
decoratedReducerSpy.mockReturnValueOnce(
futureFuture
);
newState = reducer(present, innerAction);
newState = reducer(newState, innerAction);
newState = reducer(newState, undoAction);
newState = reducer(newState, undoAction);
});
- Finally, add the test:
it("can redo multiple levels", () => {
const updated = reducer(
reducer(newState, redoAction),
redoAction
);
expect(updated).toMatchObject(futureFuture);
});
- To make this pass, start by initializing the future variable to be an empty array:
let past = [], future = [];
- Update the UNDO clause to push the current value to it:
case "UNDO":
const lastEntry = past[past.length - 1];
past = past.slice(0, -1);
future = [ ...future, state ];
- Update the REDO clause to pull out that value we just pushed. After this change, the test should be passing:
case "REDO":
const nextEntry = future[future.length - 1];
future = future.slice(0, -1);
return nextEntry;
- There’s one final test we need to write for our barebones implementation, which checks that a redo followed by an undo brings us back to the original state:
it("returns to previous state when followed by an undo", () => {
const updated = reducer(
reducer(newState, redoAction),
undoAction
);
expect(updated).toMatchObject(present);
});
- Make that pass by setting the past property in the REDO case:
case "REDO":
const nextEntry = future[future.length - 1];
past = [ ...past, state ];
future = future.slice(0, -1);
return nextEntry;
- This completes our reducer. However, our implementation has a memory leak! We never clear out the future array when we generate new states. If the user repeatedly hit Undo and then performed new actions, all their old actions would remain in future but become inaccessible, due to canRedo being false in the latest state.
To test for this scenario, you can simulate the sequence and check that you expect to return undefined. This test isn’t great in that we really shouldn’t be sending a REDO action when canRedo returns false, but that’s what our test ends up doing:
it("return undefined when attempting a do, undo, do, redo sequence", () => {
decoratedReducerSpy.mockReturnValue(future);
let newState = reducer(present, innerAction);
newState = reducer(newState, undoAction);
newState = reducer(newState, innerAction);
newState = reducer(newState, redoAction);
expect(newState).not.toBeDefined();
});
- To make that pass, simply clear future when setting a new state, as shown:
if (
newPresent.nextInstructionId !=
state.nextInstructionId
) {
past = [ ...past, state ];
future = [];
return {
...newPresent,
canUndo: true
};
}
- We are now done with the reducer. To finish this off, hook it into our Redux store. Open src/store.js and make the following changes:
import {
withUndoRedo
} from "./reducers/withUndoRedo";
export const configureStore = (
storeEnhancers = [],
initialState = {}
) => {
return createStore(
combineReducers({
script: withUndoRedo(scriptReducer)
}),
initialState,
compose(...storeEnhancers)
);
};
Your tests should all be passing and the app should still run.
However, the undo and redo functionality is still not accessible. For that, we need to add some buttons to the menu bar.
Building buttons
The final piece to this puzzle is adding buttons to trigger the new behavior by adding Undo and Redo buttons to the menu bar:
- Open test/MenuButtons.test.js and add the following describe block at the bottom of the file, nested inside the MenuButtons describe block. It uses a couple of helper functions that have already been defined with the renderWithStore file and button:
describe("undo button", () => {
it("renders", () => {
renderWithStore(<MenuButtons />);
expect(buttonWithLabel("Undo")).not.toBeNull();
});
});
- Make that pass by modifying the implementation for MenuButtons as shown, in the src/MenuButtons.js file:
export const MenuButtons = () => {
...
return (
<>
<button>Undo</button>
<button
onClick={() => dispatch(reset())}
disabled={!canReset}
>
Reset
</button>
</>
);
};
- Add the next test, which checks that the button is initially disabled:
it("is disabled if there is no history", () => {
renderWithStore(<MenuButtons />);
expect(
buttonWithLabel("Undo").hasAttribute("disabled")
).toBeTruthy();
});
- Make that pass by adding a hardcoded disabled attribute, as shown:
<button disabled={true}>Undo</button>
- Now, we add in the code that will require us to connect with Redux:
it("is enabled if an action occurs", () => {
renderWithStore(<MenuButtons />);
dispatchToStore({
type: "SUBMIT_EDIT_LINE",
text: "forward 10 "
});
expect(
buttonWithLabel("Undo").hasAttribute("disabled")
).toBeFalsy();
});
- Modify MenuButtons to pull out canUndo from the store. It already uses the script state for the Reset button behavior, so in this case, we just need to destructure it further:
export const MenuButtons = () => {
const {
canUndo, nextInstructionId
} = useSelector(({ script }) => script);
...
const canReset = nextInstructionId !== 0;
return (
<>
<button disabled={!canUndo}>Undo</button>
<button
onClick={() => dispatch(reset())}
disabled={!canReset}
>
Reset
</button>
</>
);
}
);
- The final test for the Undo button is to check that it dispatches an UNDO action when it is clicked:
it("dispatches an action of UNDO when clicked", () => {
renderWithStore(<MenuButtons />);
dispatchToStore({
type: "SUBMIT_EDIT_LINE",
text: "forward 10 "
});
click(buttonWithLabel("Undo"));
return expectRedux(store)
.toDispatchAnAction()
.matching({ type: "UNDO" });
});
- Make that pass by adding the lines highlighted next. We add the new undo action helper and then use that to call dispatch:
const reset = () => ({ type: "RESET" });
const undo = () => ({ type: "UNDO" });
export const MenuButtons = () => {
...
return (
<>
<button
onClick={() => dispatch(undo())}
disabled={!canUndo}
>
Undo
</button>
...
</>
);
};
- Repeat from Step 2 to Step 8 for the Redo button. This time, you’ll need to pull out the canRedo property from the script state.
That’s the last change needed. The undo and redo functionality is now complete.
Next up, we’ll move from building a Redux reducer to building Redux middleware.
Saving to local storage via Redux middleware
In this section, we’ll update our app to save the current state to local storage, a persistent data store managed by the user’s web browser. We’ll do that by way of Redux middleware.
Each time a statement is executed in the Spec Logo environment, the entire set of parsed tokens will be saved via the browser’s LocalStorage API. When the user next opens the app, the tokens will be read and replayed through the parser.
The parseTokens function
As a reminder, the parser (in src/parser.js) has a parseTokens function. This is the function we’ll call from within our middleware, and in this section, we’ll build tests to assert that we’ve called this function.
We’ll write a new piece of Redux middleware for the task. The middleware will pull out two pieces of the script state: name and parsedTokens.
Before we begin, let’s review the browser LocalStorage API:
- window.localStorage.getItem(key) returns the value of an item in local storage. The value stored is a string, so if it’s a serialized object, then we need to call JSON.parse to deserialize it. The function returns null if no value exists for the given key.
- window.localStorage.setItem(key, value) sets the value of an item. The value is serialized as a string, so we need to make sure to call JSON.stringify on any objects before we pass them in here.
Building middleware
Let’s test-drive our middleware:
- Create the src/middleware and test/middleware directories, and then open the test/middleware/localStorage.test.js file. To make a start, define two spies, getItemSpy and setItemSpy, which will make up the new object. We have to use Object.defineProperty to set these spies because the window.localStorage property is write protected:
import {
save
} from "../../src/middleware/localStorage";
describe("localStorage", () => {
const data = { a: 123 };
let getItemSpy = jest.fn();
let setItemSpy = jest.fn();
beforeEach(() => {
Object.defineProperty(window, "localStorage", {
value: {
getItem: getItemSpy,
setItem: setItemSpy
}});
});
});
- Let’s write our first test for the middleware. This test simply asserts that the middleware does what all middleware should, which is to call next(action). Redux middleware functions have complicated semantics, being functions that return functions that return functions, but our tests will make short work of that:
describe("save middleware", () => {
const name = "script name";
const parsedTokens = ["forward 10"];
const state = { script: { name, parsedTokens } };
const action = { type: "ANYTHING" };
const store = { getState: () => state };
let next;
beforeEach(() => {
next = jest.fn();
});
const callMiddleware = () =>
save(store)(next)(action);
it("calls next with the action", () => {
callMiddleware();
expect(next).toBeCalledWith(action);
});
});
- To make that pass, create the src/middleware/localStorage.js file and add the following definition:
export const save = store => next => action => {
next(action);
};
- The next test checks that we return that value:
it("returns the result of next action", () => {
next.mockReturnValue({ a : 123 });
expect(callMiddleware()).toEqual({ a: 123 });
});
- Update the save function to return that value:
export const save = store => next => action => {
return next(action);
};
- Now, check that we add the stringified value to local storage:
it("saves the current state of the store in localStorage", () => {
callMiddleware();
expect(setItemSpy).toBeCalledWith("name", name);
expect(setItemSpy).toBeCalledWith(
"parsedTokens",
JSON.stringify(parsedTokens)
);
});
- To make that pass, complete the implementation of the save middleware:
export const save = store => next => action => {
const result = next(action);
const {
script: { name, parsedTokens }
} = store.getState();
localStorage.setItem("name", name);
localStorage.setItem(
"parsedTokens",
JSON.stringify(parsedTokens)
);
return result;
};
- Let’s move on to the load function, which isn’t middleware but there’s no harm in placing it in the same file. Create a new describe block with the following test, ensuring import is updated as well:
import {
load, save
} from "../../src/middleware/localStorage";
...
describe("load", () => {
describe("with saved data", () => {
beforeEach(() => {
getItemSpy.mockReturnValueOnce("script name");
getItemSpy.mockReturnValueOnce(
JSON.stringify([ { a: 123 } ])
);
});
it("retrieves state from localStorage", () => {
load();
expect(getItemSpy).toBeCalledWith("name");
expect(getItemSpy).toHaveBeenLastCalledWith(
"parsedTokens"
);
});
});
});
- Make that pass by defining a new function in the production code, by adding load, just below the definition of save:
export const load = () => {
localStorage.getItem("name");
localStorage.getItem("parsedTokens");
};
- Now to send this data to the parser. For this, we’ll need a parserSpy spy function that we use to spy on the parser’s parseTokens function:
describe("load", () => {
let parserSpy;
describe("with saved data", () => {
beforeEach(() => {
parserSpy = jest.fn();
parser.parseTokens = parserSpy;
...
});
it("calls to parsedTokens to retrieve data", () => {
load();
expect(parserSpy).toBeCalledWith(
[ { a: 123 } ],
parser.emptyState
);
});
});
});
- Add the following production code to make that pass:
import * as parser from "../parser";
export const load = () => {
localStorage.getItem("name");
const parsedTokens = JSON.parse(
localStorage.getItem("parsedTokens")
);
parser.parseTokens(parsedTokens, parser.emptyState);
};
- The next test makes sure the data is returned in the right format:
it("returns re-parsed draw commands", () => {
parserSpy.mockReturnValue({ drawCommands: [] });
expect(
load().script
).toHaveProperty("drawCommands", []);
});
- Make that pass by returning an object with the parsed response:
export const load = () => {
localStorage.getItem("name");
const parsedTokens = JSON.parse(
localStorage.getItem("parsedTokens")
);
return {
script: parser.parseTokens(
parsedTokens, parser.emptyState
)
};
};
- Next, let’s add the name to that data structure:
it("returns name", () => {
expect(load().script).toHaveProperty(
"name",
"script name"
);
});
- To make that pass, first, we need to save the name that’s returned from local storage, and then we need to insert it into the present object:
export const load = () => {
const name = localStorage.getItem("name");
const parsedTokens = JSON.parse(
localStorage.getItem("parsedTokens")
);
return {
script: {
...parser.parseTokens(
parsedTokens, parser.initialState
),
name
}
};
};
- Finally, we need to deal with the case where no state has been saved yet. The LocalStorage API gives us null back in that case, but we’d like to return undefined, which will trigger Redux to use the default state. Add this test to the outer describe block, so that it won’t pick up the extra getItemSpy mock values:
it("returns undefined if there is no state saved", () => {
getItemSpy.mockReturnValue(null);
expect(load()).not.toBeDefined();
});
- Make that pass by wrapping the return statement in an if statement:
if (parsedTokens && parsedTokens !== null) {
return {
...
};
}
- Open src/store.js and modify it to include the new middleware. I’m defining a new function, configureStoreWithLocalStorage, so that our tests can continue using configureStore without interacting with local storage:
...
import {
save, load
} from "./middleware/localStorage";
export const configureStore = (
storeEnhancers = [],
initialState = {}
) => {
return createStore(
combineReducers({
script: withUndoRedo(scriptReducer)
}),
initialState,
compose(
...[
applyMiddleware(save),
...storeEnhancers
]
)
);
};
export const configureStoreWithLocalStorage = () =>
configureStore(undefined, load());
- Open src/index.js and replace the call to configureStore with a call to configureStoreWithLocalStorage. You’ll also need to update import for this new function:
import {
configureStoreWithLocalStorage
} from "./store";
ReactDOM.createRoot(
document.getElementById("root")
).render(
<Provider store={configureStoreWithLocalStorage()}>
<App />
</Provider>
);
That’s it. If you like, this is a great time to run the app for a manual test and try it. Open the browser window, type a few commands, and try it out!
If you’re stuck for commands to run a manual test, you can use these:
forward 100
right 90
to drawSquare
  repeat 4 [ forward 100 right 90 ]
end
drawSquare
These commands exercise most of the functionality within the interpreter and display. They’ll come in handy in Chapter 15, Adding Animation, when you’ll want to be manually testing as you make changes.
You’ve learned how to test-drive Redux middleware. For the final part of the chapter, we will write another reducer, this time one that helps us manipulate the browser’s keyboard focus.
Changing keyboard focus
The user of our application will, most of the time, be typing in the prompt at the bottom right of the screen. To help them out, we’ll move the keyboard focus to the prompt when the app is launched. We should also do this when another element—such as the name text field or the menu buttons—has been used but has finished its job. Then, the focus should revert back to the prompt, ready for another instruction.
React doesn’t support setting focus, so we need to use a React ref on our components and then drop it into the DOM API.
We’ll do this via a Redux reducer. It will have two actions: PROMPT_FOCUS_REQUEST and PROMPT_HAS_FOCUSED. Any of the React components in our application will be able to dispatch the first action. The Prompt component will listen for it and then dispatch the second, once it has focused.
Writing the reducer
We’ll start, as ever, with the reducer:
- Create a new file named test/reducers/environment.test.js and add the following describe block. This covers the basic case of the reducer needing to return the default state when undefined is passed to it:
import {
environmentReducer as reducer
} from "../../src/reducers/environment";
describe("environmentReducer", () => {
it("returns default state when existing state is undefined", () => {
expect(reducer(undefined, {})).toEqual({
promptFocusRequest: false
});
});
});
- Make the test pass with the following code, in a file named src/reducers/environment.js. Since we’ve built reducers before, we know where we’re going with this one:
const defaultState = {
promptFocusRequest: false
};
export const environmentReducer = (
state = defaultState,
action) => {
return state;
};
- Add the next test, which checks that we set the promptFocusRequest value:
it("sets promptFocusRequest to true when receiving a PROMPT_FOCUS_REQUEST action", () => {
expect(
reducer(
{ promptFocusRequest: false},
{ type: "PROMPT_FOCUS_REQUEST" }
)
).toEqual({
promptFocusRequest: true
});
});
- Make that pass by adding in a switch statement, as shown:
export const environmentReducer = (
state = defaultState,
action
) => {
switch (action.type) {
case "PROMPT_FOCUS_REQUEST":
return { promptFocusRequest: true };
}
return state;
};
- Add the final test for this reducer:
it("sets promptFocusRequest to false when receiving a PROMPT_HAS_FOCUSED action", () => {
expect(
reducer(
{ promptFocusRequest: true},
{ type: "PROMPT_HAS_FOCUSED" }
)
).toEqual({
promptFocusRequest: false
});
});
- Finally, make that pass by adding another case statement:
export const environmentReducer = (...) => {
switch (action.type) {
...,
case "PROMPT_HAS_FOCUSED":
return { promptFocusRequest: false };
}
...
}
- Before we can use the new reducer in our tests, we’ll need to add it to the store. Open up src/store.js and modify it as follows:
...
import {
environmentReducer
} from "./reducers/environment";
export const configureStore = (
storeEnhancers = [],
initialState = {}
) => {
return createStore(
combineReducers({
script: withUndoRedo(logoReducer),
environment: environmentReducer
}),
...
);
};
That gives us a new reducer that’s hooked into the Redux store. Now, let’s make use of that.
Focusing the prompt
Let’s move on to the most difficult part of this: focusing the actual prompt. For this, we’ll need to introduce a React ref:
- Open test/Prompt.test.js and add the following describe block at the bottom, nested within the Prompt describe block. The test uses the document.activeElement property, which is the element that currently has focus. It’s also using the renderInTableWithStore function, which is the same as the renderWithStore helper you’ve seen already, except that the component is first wrapped in a table:
describe("prompt focus", () => {
it("sets focus when component first renders", () => {
renderInTableWithStore(<Prompt />);
expect(
document.activeElement
).toEqual(textArea());
});
});
- Let’s make that pass. We define a new ref using the useRef hook and add a useEffect hook to focus when the component mounts. Make sure to pull out the new constants from the React constant, which is at the top of the file:
import
React, { useEffect, useRef, useState }
from "react";
export const Prompt = () => {
...
const inputRef = useRef();
useEffect(() => {
inputRef.current.focus();
}, [inputRef]);
return (
...
<textarea
ref={inputRef}
/>
...
);
};
- For the next test, we’ll dispatch an action to the Redux store. Since this test suite hasn’t yet got a test that dispatches actions, we’ll need to add all the plumbing. Start by importing the dispatchToStore function into the test suite:
import {
...,
dispatchToStore,
} from "./reactTestExtensions";
- Now, we need a new helper function that will clear focus. Because focus will be set as soon as the component mounts, we need to unset it again so we can verify the behavior of our focus request. Once we have that helper, we can add the next test:
const jsdomClearFocus = () => {
const node = document.createElement("input");
document.body.appendChild(node);
node.focus();
node.remove();
}
it("calls focus on the underlying DOM element if promptFocusRequest is true", async () => {
renderInTableWithStore(<Prompt />);
jsdomClearFocus();
dispatchToStore({ type: "PROMPT_FOCUS_REQUEST" });
expect(document.activeElement).toEqual(textArea());
});
- To make that pass, first, create a new call to useSelector to pull out the promptFocusRequest value from the store:
export const Prompt = () => {
const nextInstructionId = ...
const promptFocusRequest = useSelector(
({ environment: { promptFocusRequest } }) =>
promptFocusRequest
);
...
};
- Then, add a new effect that will run when promptFocusRequest changes. This uses the ref to call the DOM’s focus method on the HTML element:
useEffect(() => {
inputRef.current.focus();
}, [promptFocusRequest]);
- For the next test, dispatch an action when the focus has occurred:
it("dispatches an action notifying that the prompt has focused", () => {
renderWithStore(<Prompt />);
dispatchToStore({ type: "PROMPT_FOCUS_REQUEST" });
return expectRedux(store)
.toDispatchAnAction()
.matching({ type: "PROMPT_HAS_FOCUSED" });
});
- To make that pass, start by adding a new action helper function that we can call within the Prompt component:
const submitEditLine = ...
const promptHasFocused = () => (
{ type: "PROMPT_HAS_FOCUSED" }
);
- Finally, call promptHasFocused within the useEffect hook:
inputRef.current.focus();
dispatch(promptHasFocused());
}, [promptFocusRequest]);
There is a slight issue with this last code snippet. The dispatched PROMPT_HAS_FOCUSED action will set promptFocusRequest back to false. That then causes the useEffect hook to run a second time, with the component re-rendering. This is clearly not intended, nor is it necessary. However, since it has no discernable effect on the user, we can skip fixing it at this time.
This completes the Prompt component, which now steals focus anytime the promptFocusRequest variable changes value.
Requesting focus in other components
All that’s left is to call the request action when required. We’ll do this for ScriptName, but you could also do it for the buttons in the menu bar:
- Open test/ScriptName.test.js, find the describe block named when the user hits Enter:, and add the following test:
it("dispatches a prompt focus request", () => {
return expectRedux(store)
.toDispatchAnAction()
.matching({ type: "PROMPT_FOCUS_REQUEST" });
});
- In src/ScriptName.js, modify the component to define an action helper named promptFocusRequest:
const submitScriptName = ...
const promptFocusRequest = () => ({
type: "PROMPT_FOCUS_REQUEST",
});
- Call that from within the edit completion handler:
const completeEditingScriptName = () => {
if (editingScriptName) {
toggleEditingScriptName();
dispatch(submitScriptName(updatedScriptName));
dispatch(promptFocusRequest());
}
};
That’s it! If you build and run now, you’ll see how focus is automatically given to the prompt textbox, and if you edit the script name (by clicking on it, typing something, and then hitting Enter), you’ll see that focus returns to the prompt.
Summary
You should now have a good understanding of test-driving complex Redux reducers and middleware.
First, we added support undo/redo with a Redux decorator reducer. Then, we built Redux middleware to save and load existing states via the browser’s LocalStorage API. And finally, we looked at how to test-drive changing the browser’s focus.
In the next chapter, we’ll look at how to test-drive something much more intricate: animation.
Further reading
Wikipedia entry on the Logo programming language: