
2
Rendering Lists and Detail Views
The previous chapter introduced the core TDD cycle: red, green, refactor. You had the chance to try it out with two simple tests. Now, it’s time to apply that to a bigger React component.
At the moment, your application displays just a single item of data: the customer’s name. In this chapter, you’ll extend it so that you have a view of all appointments for the current day. You’ll be able to choose a time slot and see the details for the appointment at that time. We will start this chapter by sketching a mock-up to help us plan how we’ll build out the component. Then, we’ll begin implementing a list view and showing appointment details.
Once we’ve got the component in good shape, we’ll build the entry point with webpack and then run the application in order to do some manual testing.
The following topics will be covered in this chapter:
- Sketching a mock-up
- Creating the new component
- Specifying list item content
- Selecting data to view
- Manually testing our changes
By the end of this chapter, you’ll have written a decent-sized React component using the TDD process you’ve already learned. You’ll also have seen the app running for the first time.
Technical requirements
The code files for this chapter can be found at https://github.com/PacktPublishing/Mastering-React-Test-Driven-Development-Second-Edition/tree/main/Chapter02.
Sketching a mock-up
Let’s start with a little more up-front design. We’ve got an Appointment component that takes an appointment and displays it. We will build an AppointmentsDayView component around it that takes an array of appointment objects and displays them as a list. It will also display a single Appointment: the appointment that is currently selected. To select an appointment, the user simply clicks on the time of day that they’re interested in.
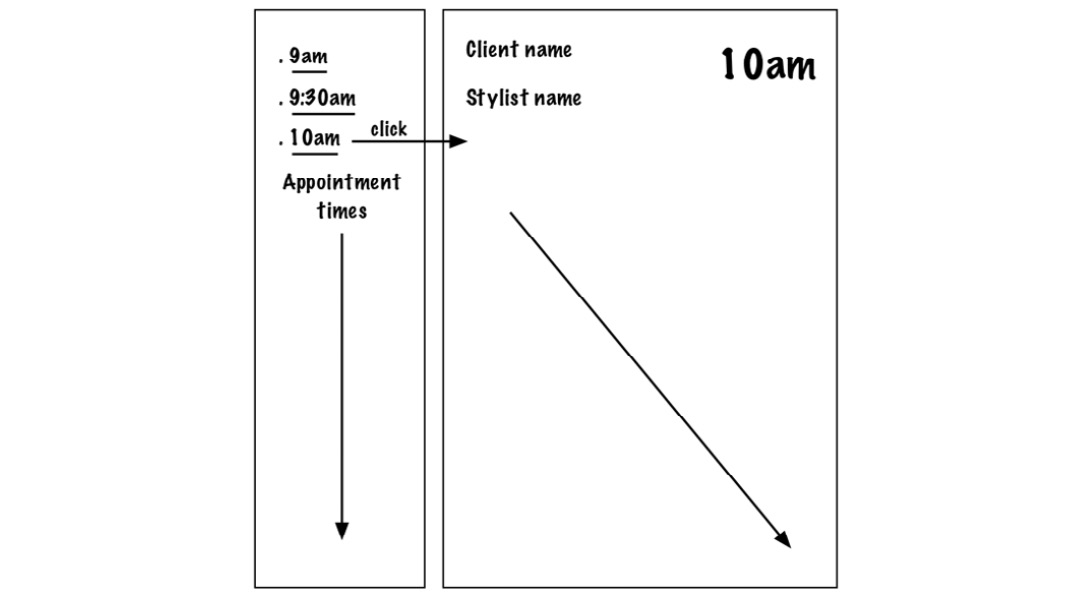
Figure 2.1 – A mock-up of our appointment system UI
Up-front design
When you’re using TDD to build new features, it’s important to do a little up-front design so that you have a general idea of the direction your implementation needs to take.
That’s all the design we need for now; let’s jump right in and build the new AppointmentsDayView component.
Creating the new component
In this section, we’ll create the basic form of AppointmentsDayView: a list of appointment times for the day. We won’t build any interactive behavior for it just yet.
We’ll add our new component into the same file we’ve been using already because so far there’s not much code in there. Perform the following steps:
Placing components
We don’t always need a new file for each component, particularly when the components are short functional components, such as our Appointment component (a one-line function). It can help to group related components or small sub-trees of components in one place.
- In test/Appointment.test.js, create a new describe block under the first one, with a single test. This test checks that we render a div with a particular ID. That’s important in this case because we load a CSS file that looks for this element. The expectations in this test use the DOM method, querySelector. This searches the DOM tree for a single element with the tag provided:
describe("AppointmentsDayView", () => {
let container;
beforeEach(() => {
container = document.createElement("div");
document.body.replaceChildren(container);
});
const render = (component) =>
act(() =>
ReactDOM.createRoot(container).render(component)
);
it("renders a div with the right id", () => {
render(<AppointmentsDayView appointments={[]} />);
expect(
document.querySelector(
"div#appointmentsDayView"
)
).not.toBeNull();
});
});
Note
It isn’t usually necessary to wrap your component in a div with an ID or a class. We tend to do it when we have CSS that we want to attach to the entire group of HTML elements that will be rendered by the component, which, as you’ll see later, is the case for AppointmentsDayView.
This test uses the exact same render function from the first describe block as well as the same let container declaration and beforeEach block. In other words, we’ve introduced duplicated code. By duplicating code from our first test suite, we’re making a mess straight after cleaning up our code! Well, we’re allowed to do it when we’re in the first stage of the TDD cycle. Once we’ve got the test passing, we can think about the right structure for the code.
- Run npm test and look at the output:
FAIL test/Appointment.test.js
Appointment
✓ renders the customer first name (18ms)
✓ renders another customer first name (2ms)
AppointmentsDayView
✕ renders a div with the right id (7ms)
● AppointmentsDayView › renders a div with the right id
ReferenceError: AppointmentsDayView is not defined
Let’s work on getting this test to pass by performing the following steps:
- To fix this, change the last import statement in your test file to read as follows:
import {
Appointment,
AppointmentsDayView,
} from "../src/Appointment";
- In src/Appointment.js, add this functional component below Appointment as shown:
export const AppointmentsDayView = () => {};
- Run your tests again. You'll see output like this:
● AppointmentsDayView › renders a div with the right id
expect(received).not.toBeNull()
- Finally, a test failure! Let’s get that div in place as follows:
export const AppointmentsDayView = () => (
<div id="appointmentsDayView"></div>
);
- Your test should now be passing. Let’s move on to the next test. Add the following text, just below the last test in test/Appointment.test.js, still inside the AppointmentsDayView describe block:
it("renders an ol element to display appointments", () => {
render(<AppointmentsDayView appointments={[]} />);
const listElement = document.querySelector("ol");
expect(listElement).not.toBeNull();
});
- Run your tests again and you'll see output matching the text shown below:
● AppointmentsDayView › renders an ol element to display appointments
expect(received).not.toBeNull()
Received: null
- To make that pass, add the ol element as follows:
export const AppointmentsDayView = () => (
<div id="appointmentsDayView">
<ol />
</div>
);
- Alright, now let’s fill that ol with an item for each appointment. For that, we’ll need (at least) two appointments to be passed as the value of the appointments prop, as. Add the next test, as shown:
it("renders an li for each appointment", () => {
const today = new Date();
const twoAppointments = [
{ startsAt: today.setHours(12, 0) },
{ startsAt: today.setHours(13, 0) },
];
render(
<AppointmentsDayView
appointments={twoAppointments}
/>
);
const listChildren =
document.querySelectorAll("ol > li");
expect(listChildren).toHaveLength(2);
});
Testing dates and times
In the test, the today constant is defined to be new Date(). Each of the two records then uses this as a base date. Whenever we’re dealing with dates, it’s important that we base all events on the same moment in time, rather than asking the system for the current time more than once. Doing that is a subtle bug waiting to happen.
- Run npm test again and you'll see this output:
● AppointmentsDayView › renders an li for each appointment
expect(received).toHaveLength(expected)
Expected length: 2
Received length: 0
Received object: []
- To fix this, we map over the provided appointments prop and render an empty li element:
export const AppointmentsDayView = (
{ appointments }
) => (
<div id="appointmentsDayView">
<ol>
{appointments.map(() => (
<li />
))}
</ol>
</div>
);
Ignoring unused function arguments
The map function will provide an appointment argument to the function passed to it. Since we don’t use the argument (yet), we don’t need to mention it in the function signature—we can just pretend that our function has no arguments instead, hence the empty brackets. Don’t worry, we’ll need the argument for a subsequent test, and we’ll add it in then.
- Great, let’s see what Jest thinks. Run npm test again:
console.error
Warning: Each child in a list should have a unique "key" prop.
Check the render method of AppointmentsDayView.
...
PASS test/Appointment.test.js
Appointment
✓ renders the customer first name (19ms)
✓ renders another customer first name (2ms)
AppointmentsDayView
✓ renders a div with the right id (7ms)
✓ renders an ol element to display appointments (16ms)
✓ renders an li for each appointment (16ms)
- Our test passed, but we got a warning from React. It’s telling us to set a key value on each child element. We can use startsAt as a key, like this:
<ol>
{appointments.map(appointment => (
<li key={appointment.startsAt} />
))}
</ol>
Testing keys
There’s no easy way for us to test key values in React. To do it, we’d need to rely on internal React properties, which would introduce a risk of tests breaking if the React team were to ever change those properties.
The best we can do is set a key to get rid of this warning message. In an ideal world, we’d have a test that uses the startsAt timestamp for each li key. Let’s just imagine that we have that test in place.
This section has covered how to render the basic structure of a list and its list items. Next, it’s time to fill in those items.
Specifying list item content
In this section, you’ll add a test that uses an array of example appointments to specify that the list items should show the time of each appointment, and then you’ll use that test to support the implementation.
- Create a fourth test in the new describe block as shown:
it("renders the time of each appointment", () => {
const today = new Date();
const twoAppointments = [
{ startsAt: today.setHours(12, 0) },
{ startsAt: today.setHours(13, 0) },
];
render(
<AppointmentsDayView
appointments={twoAppointments}
/>
);
const listChildren =
document.querySelectorAll("li");
expect(listChildren[0].textContent).toEqual(
"12:00"
);
expect(listChildren[1].textContent).toEqual(
"13:00"
);
});
Jest will show the following error:
● AppointmentsDayView › renders the time of each appointment
expect(received).toEqual(expected) // deep equality
Expected: "12:00"
Received: ""
The toEqual matcher
This matcher is a stricter version of toContain. The expectation only passes if the text content is an exact match. In this case, we think it makes sense to use toEqual. However, it’s often best to be as loose as possible with your expectations. Tight expectations have a habit of breaking any time you make the slightest change to your code base.
- Add the following function to src/Appointment.js, which converts a Unix timestamp (which we get from the return value from setHours) into a time of day. It doesn’t matter where in the file you put it; we usually like to define constants before we use them, so this would go at the top of the file:
const appointmentTimeOfDay = (startsAt) => {
const [h, m] = new Date(startsAt)
.toTimeString()
.split(":");
return `${h}:${m}`;
}
Understanding syntax
This function uses destructuring assignment and template literals, which are language features that you can use to keep your functions concise.
Having good unit tests can help teach advanced language syntax. If we’re ever unsure about what a function does, we can look up the tests that will help us figure it out.
- Use the preceding function to update AppointmentsDayView as follows:
<ol>
{appointments.map(appointment => (
<li key={appointment.startsAt}>
{appointmentTimeOfDay(appointment.startsAt)}
</li>
))}
</ol>
- Running tests should show everything as green:
PASS test/Appointment.test.js
Appointment
✓ renders the customer first name (19ms)
✓ renders another customer first name (2ms)
AppointmentsDayView
✓ renders a div with the right id (7ms)
✓ renders an ol element to display appointments (16ms)
✓ renders an li for each appointment (6ms)
✓ renders the time of each appointment (3ms)
This is a great chance to refactor. The last two AppointmentsDayView tests use the same twoAppointments prop value. This definition, and the today constant, can be lifted out into the describe scope, the same way we did with customer in the Appointment tests. This time, however, it can remain as const declarations as they never change.
- To do that, move the today and twoAppointments definitions from one of the tests to the top of the describe block, above beforeEach. Then, delete the definitions from both tests.
That’s it for this test. Next, it’s time to focus on adding click behavior.
Selecting data to view
Let’s add in some dynamic behavior to our page. We’ll make each of the list items a link that the user can click on to view that appointment.
Thinking through our design a little, there are a few pieces we’ll need:
- A button element within our li
- An onClick handler that is attached to that button element
- Component state to record which appointment is currently being viewed
When we test React actions, we do it by observing the consequences of those actions. In this case, we can click on a button and then check that its corresponding appointment is now rendered on the screen.
We’ll break this section into two parts: first, we’ll specify how the component should initially appear, and second, we’ll handle a click event for changing the content.
Initial selection of data
Let’s start by asserting that each li element has a button element:
- We want to display a message to the user if there are no appointments scheduled for today. In the AppointmentsDayView describe block, add the following test:
it("initially shows a message saying there are no appointments today", () => {
render(<AppointmentsDayView appointments={[]} />);
expect(document.body.textContent).toContain(
"There are no appointments scheduled for today."
);
});
- Make the test pass by adding in a message at the bottom of the rendered output. We don’t need a check for an empty appointments array just yet; we’ll need another test to triangulate to that. The message is as follows:
return (
<div id="appointmentsDayView">
...
<p>There are no appointments scheduled for today.</p>
</div>
);
- When the component first loads, we should show the first appointment of the day. A straightforward way to check that happens is to look for the customer's first name is shown on the page. Add the next test which does just that, shown below:
it("selects the first appointment by default", () => {
render(
<AppointmentsDayView
appointments={twoAppointments}
/>
);
expect(document.body.textContent).toContain(
"Ashley"
);
});
- Since we’re looking for the customer’s name, we’ll need to make sure that’s available in the twoAppointments array. Update it now to include the customer’s first name as follows:
const twoAppointments = [
{
startsAt: today.setHours(12, 0),
customer: { firstName: "Ashley" },
},
{
startsAt: today.setHours(13, 0),
customer: { firstName: "Jordan" },
},
];
- Make the test pass by modifying the Appointment component. Change the last line of the div component to read as follows:
<div id="appointmentsDayView">
...
{appointments.length === 0 ? (
<p>There are no appointments scheduled for today.</p>
) : (
<Appointment {...appointments[0]} />
)}
</div>
Now we’re ready to let the user make a selection.
Adding events to a functional component
We’re about to add state to our component. The component will show a button for each appointment. When the button is clicked, the component stores the array index of the appointment that it refers to. To do that, we’ll use the useState hook.
What are hooks?
Hooks are a feature of React that manages various non-rendering related operations. The useState hook stores data across multiple renders of your function. The call to useState returns both the current value in storage and a setter function that allows it to be set.
If you’re new to hooks, check out the Further reading section at the end of this chapter. Alternatively, you could just follow along and see how much you can pick up just by reading the tests!
We’ll start by asserting that each li element has a button element:
- Add the following test below the last one you added. The second expectation is peculiar in that it is checking the type attribute of the button element to be button. If you haven’t seen this before, it’s idiomatic when using button elements to define its role by setting the type attribute as shown in this test:
it("has a button element in each li", () => {
render(
<AppointmentsDayView
appointments={twoAppointments}
/>
);
const buttons =
document.querySelectorAll("li > button");
expect(buttons).toHaveLength(2);
expect(buttons[0].type).toEqual("button");
});
Testing element positioning
We don’t need to be pedantic about checking the content or placement of the button element within its parent. For example, this test would pass if we put an empty button child at the end of li. But, thankfully, doing the right thing is just as simple as doing the wrong thing, so we can opt to do the right thing instead. All we need to do to make this test pass is wrap the existing content in the new tag.
- Make the test pass by wrapping the appointment time with a button element in the AppointmentsDayView component, as follows:
...
<li key={appointment.startsAt}>
<button type="button">
{appointmentTimeOfDay(appointment.startsAt)}
</button>
</li>
...
- We can now test what happens when the button is clicked. Back in test/Appointment.test.js, add the following as the next test. This uses the click function on the DOM element to raise a DOM click event:
it("renders another appointment when selected", () => {
render(
<AppointmentsDayView
appointments={twoAppointments}
/>
);
const button =
document.querySelectorAll("button")[1];
act(() => button.click());
expect(document.body.textContent).toContain(
"Jordan"
);
});
Synthetic events and Simulate
An alternative to using the click function is to use the Simulate namespace from React’s test utilities to raise a synthetic event. While the interface for using Simulate is somewhat simpler than the DOM API for raising events, it’s also unnecessary for testing. There’s no need to use extra APIs when the DOM API will suffice. Perhaps more importantly, we also want our tests to reflect the real browser environment as much as possible.
- Go ahead and run the test. The output will look like this:
● AppointmentsDayView › renders appointment when selected
expect(received).toContain(expected)
Expected substring: "Jordan"
Received string: "12:0013:00Ashley"
Notice the full text in the received string. We’re getting the text content of the list too because we’ve used document.body.textContent in our expectation rather than something more specific.
Specificity of expectations
Don’t be too bothered about where the customer’s name appears on the screen. Testing document.body.textContent is like saying “I want this text to appear somewhere, but I don’t care where.” Often, this is enough for a test. Later on, we’ll see techniques for expecting text in specific places.
There’s a lot we now need to get in place in order to make the test pass. We need to introduce state and we need to add the handler. Perform the following steps:
- Update the import at the top of the file to pull in the useState function as follows:
import React, { useState } from "react";
- Wrap the constant definition in curly braces, and then return the existing value as follows:
export const AppointmentsDayView = (
{ appointments }
) => {
return (
<div id="appointmentsDayView">
...
</div>
);
};
- Add the following line of code above the return statement:
const [selectedAppointment, setSelectedAppointment] =
useState(0);
- We can now use selectedAppointment rather than hardcoding an index selecting the right appointment. Change the return value to use this new state value when selecting an appointment, like this:
<div id="appointmentsDayView">
...
<Appointment
{...appointments[selectedAppointment]}
/>
</div>
- Change the map call to include an index in its arguments. Let’s just name that i as shown here:
{appointments.map((appointment, i) => (
<li key={appointment.startsAt}>
<button type="button">
{appointmentTimeOfDay(appointment.startsAt)}
</button>
</li>
))}
- Now call setSelectedAppointment from within the onClick handler on the button element as follows:
<button
type="button"
onClick={() => setSelectedAppointment(i)}
>
- Run your tests, and you should find they’re all green:
PASS test/Appointment.test.js
Appointment
✓ renders the customer first name (18ms)
✓ renders another customer first name (2ms)
AppointmentsDayView
✓ renders a div with the right id (7ms)
✓ renders multiple appointments in an ol element (16ms)
✓ renders each appointment in an li (4ms)
✓ initially shows a message saying there are no appointments today (6ms)
✓ selects the first element by default (2ms)
✓ has a button element in each li (2ms)
✓ renders another appointment when selected (3ms)
We’ve covered a lot of detail in this section, starting with specifying the initial state of the view through to adding a button element and handling its onClick event.
We now have enough functionality that it makes sense to try it out and see where we’re at.
Manually testing our changes
The words manual testing should strike fear into the heart of every TDDer because it takes up so much time. Avoid it when you can. Of course, we can’t avoid it entirely – when we’re done with a complete feature, we need to give it a once-over to check we’ve done the right thing.
As it stands, we can’t yet run our app. To do that, we’ll need to add an entry point and then use webpack to bundle our code.
Adding an entry point
React applications are composed of a hierarchy of components that are rendered at the root. Our application entry point should render this root component.
We tend to not test-drive entry points because any test that loads our entire application can become quite brittle as we add more and more dependencies into it. In Part 4, Behavior-Driven Development with Cucumber, we’ll look at using Cucumber tests to write some tests that will cover the entry point.
Since we aren’t test-driving it, we follow a couple of general rules:
- Keep it as brief as possible
- Only use it to instantiate dependencies for your root component and to call render
Before we run our app, we’ll need some sample data. Create a file named src/sampleData.js and fill it with the following code:
const today = new Date();
const at = (hours) => today.setHours(hours, 0);
export const sampleAppointments = [
  { startsAt: at(9), customer: { firstName: "Charlie" } },
  { startsAt: at(10), customer: { firstName: "Frankie" } },
  { startsAt: at(11), customer: { firstName: "Casey" } },
  { startsAt: at(12), customer: { firstName: "Ashley" } },
  { startsAt: at(13), customer: { firstName: "Jordan" } },
  { startsAt: at(14), customer: { firstName: "Jay" } },
  { startsAt: at(15), customer: { firstName: "Alex" } },
  { startsAt: at(16), customer: { firstName: "Jules" } },
  { startsAt: at(17), customer: { firstName: "Stevie" } },
];
Important note
The Chapter02/Complete directory in the GitHub repository contains a more complete set of sample data.
This list also doesn’t need to be test-driven for the following couple of reasons:
- It’s a list of static data with no behavior. Tests are all about specifying behavior, and there’s none here.
- This module will be removed once we begin using our backend API to pull data.
Tip
TDD is often a pragmatic choice. Sometimes, not test-driving is the right thing to do.
Create a new file, src/index.js, and enter the following code:
import React from "react";
import ReactDOM from "react-dom/client";
import { AppointmentsDayView } from "./Appointment";
import { sampleAppointments } from "./sampleData";
ReactDOM.createRoot(
  document.getElementById("root")
).render(
  <AppointmentsDayView appointments={sampleAppointments} />
);Putting it all together with webpack
Jest uses Babel to transpile all our code when it’s run in the test environment. But what about when we’re serving our code via our website? Jest won’t be able to help us there.
That’s where webpack comes in, and we can introduce it now to help us do a quick manual test as follows:
- Install webpack using the following command:
npm install --save-dev webpack webpack-cli babel-loader
- Add the following code to the scripts section of your package.json file:
"build": "webpack",
- You’ll also need to set some configuration for webpack. Create the webpack.config.js file in your project root directory with the following content:
const path = require("path");
const webpack = require("webpack");
module.exports = {
mode: "development",
module: {
rules: [
{
test: /.(js|jsx)$/,
exclude: /node_modules/,
loader: "babel-loader",
},
],
},
};
This configuration works for webpack in development mode. Consult the webpack documentation for information on setting up production builds.
- In your source directory, run the following commands:
mkdir dist
touch dist/index.html
- Add the following content to the file you just created:
<!DOCTYPE html>
<html>
<head>
<title>Appointments</title>
</head>
<body>
<div id="root"></div>
<script src="main.js"></script>
</body>
</html>
- You’re now ready to run the build using the following command:
npm run build
You should see output such as the following:
modules by path ./src/*.js 2.56 KiB
./src/index.js 321 bytes [built] [code generated]
./src/Appointment.js 1.54 KiB [built] [code generated]
./src/sampleData.js 724 bytes [built] [code generated]
webpack 5.65.0 compiled successfully in 1045 ms
- Open dist/index.html in your browser and behold your creation!
The following screenshot shows the application once the Exercises are completed, with added CSS and extended sample data. To include the CSS, you’ll need to pull dist/index.html and dist/styles.css from the Chapter02/Complete directory.

Figure 2.2 – The application so far
Before you commit your code into Git...
Make sure to add dist/main.js to your .gitignore file as follows:
echo "dist/main.js" >> .gitignore
The main.js file is generated by webpack, and as with most generated files, you shouldn’t check it in.
You may also want to add README.md at this point to remind yourself how to run tests and how to build the application.
You’ve now seen how to put TDD aside while you created an entry point: since the entry point is small and unlikely to change frequently, we’ve opted not to test-drive it.
Summary
In this chapter, you’ve been able to practice the TDD cycle a few times and get a feel for how a feature can be built out using tests as a guide.
We started by designing a quick mock-up that helped us decide our course of action. We have built a container component (AppointmentsDayView) that displayed a list of appointment times, with the ability to display a single Appointment component depending on which appointment time was clicked.
We then proceeded to get a basic list structure in place, then extended it to show the initial Appointment component, and then finally added the onClick behavior.
This testing strategy, of starting with the basic structure, followed by the initial view, and finishing with the event behavior, is a typical strategy for testing components.
We’ve only got a little part of the way to fully building our application. The first few tests of any application are always the hardest and take the longest to write. We are now over that hurdle, so we’ll move quicker from here onward.
Exercises
- Rename Appointment.js and Appointment.test.js to AppointmentsDayView.js and AppointmentsDayView.test.js. While it’s fine to include multiple components in one file if they form a hierarchy, you should always name the file after the root component for that hierarchy.
- Complete the Appointment component by displaying the following fields on the page. You should use a table HTML element to give the data some visual structure. This shouldn’t affect how you write your tests. The fields that should be displayed are the following:
- Customer last name, using the lastName field
- Customer telephone number, using the phoneNumber field
- Stylist name, using the stylist field
- Salon service, using the service field
- Appointment notes, using the notes field
- Add a heading to Appointment to make it clear which appointment time is being viewed.
- There is some repeated sample data. We’ve used sample data in our tests, and we also have sampleAppointments in src/sampleData.js, which we used to manually test our application. Do you think it is worth drying this up? If so, why? If not, why not?
Further reading
Hooks are a relatively recent addition to React. Traditionally, React used classes for building components with state. For an overview of how hooks work, take a look at React’s own comprehensive documentation at the following link: