
Chapter 5. Working with Libraries
Chapter at a Glance
In this chapter, you will learn how to | |
✓ | Create a document library. |
✓ | Create a new document. |
✓ | Edit documents. |
✓ | Add documents. |
✓ | Create a picture library and add pictures. |
✓ | Create a form library. |
✓ | Create a wiki page library. |
✓ | Create a new folder in a library. |
✓ | Check documents in and out. |
✓ | Work with version history. |
✓ | Use alerts. |
✓ | Delete and restore documents. |
✓ | Work offline with SharePoint Workspace. |
✓ | Work offline with Outlook. |
One of the most useful features that Microsoft SharePoint Foundation 2010 provides is libraries. Libraries are a great place to store documents, pictures, forms, or web pages. In the business world, being able to work with documents quickly and effectively is of paramount importance. In the previous chapter, you learned that lists provide an effective way to work with all types of data. SharePoint libraries function similarly for documents and forms, such as Microsoft Word documents. Using Microsoft SharePoint document libraries, you can filter and group documents, as well as view metadata for documents stored in the library.
In this chapter, you will learn how to work with libraries and their documents in SharePoint Foundation 2010. This chapter focuses on creating libraries, adding documents and pictures, and working with documents in document libraries. In Chapter 8 we will focus on modifying and configuring document libraries.
Practice Files
Before you can complete the exercises in this chapter, you need to download the Chapter 5 practice files from the book’s catalog page to the following folder on your computer: DocumentsMicrosoft PressSBS_SPFChapter05. See Using the Practice Files at the beginning of this book for more information.
Important
Remember to use your SharePoint site location in place of http://wideworldimporters in the following exercises.
Creating a Document Library
A library is a location on a site where you can create, collect, update, and manage files with other team members. Each library displays a list of files and key information about the files, which helps people to use the files to work together. SharePoint’s information managing capabilities come through the document libraries and lists.
You can use document libraries to store your documents on a SharePoint site rather than on your local computer’s hard disk so that other employees can find and work with them more easily. Libraries are used to store files, whereas lists are used to store other types of content. Like lists, libraries contain metadata that allow you to filter, sort, and group items in the libraries easily.
When you create a new SharePoint site, a generic document library called Shared Documents is created. Because this library lacks a descriptive name, you should create new libraries for a particular business category or subject instead. In the examples used in this book, Bill Malone of Wide World Importers could create a document library for documents describing different types of art that the company carries, or one for company newsletters. You want to make sure that the name of a document library is descriptive and that each library has a specific topic to make it easier to find documents. Storing all documents together in the Shared Documents—or any other—document library defeats the purpose of using SharePoint sites to make information easier to locate.
In the following exercise, you will open your SharePoint site and create a new document library called Oak Furniture.
Set Up
Open the SharePoint site in which you would like to create your document library. The exercise will use the http://wideworldimporters site, but you can use whatever site you want. If prompted, type your user name and password, and click OK.
Note
BE SURE TO verify that you have sufficient rights to create a library in this site. If in doubt, see the Appendix A at the back of this book.
From the Site Actions menu, select New Document Library.
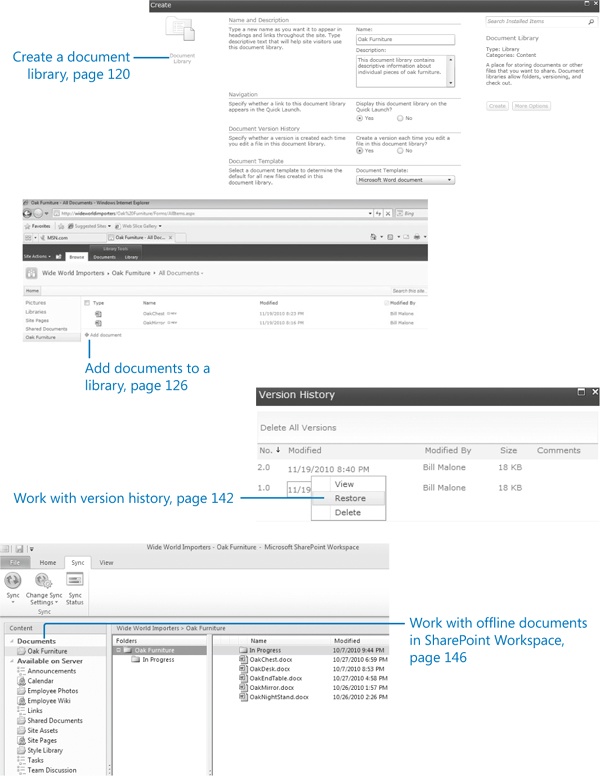
The Create dialog opens and displays the options for your new library. In the Name box, type the name that you want to give to the new document library, such as Oak Furniture.
In the Description box, type the description of the document library, such as This document library contains descriptive information about individual pieces of oak furniture.
In the Document Version History area, under Create a version each time you edit a file in this document library?, click Yes.
Leave all other options on the page at their default settings. You have entered all the necessary information to create a document library.
Click Create. The new Oak Furniture document library has been created and is displayed in the browser. The link to this library is shown on the Quick Launch.


Creating a New Document
After a library has been created, you can populate it with documents. In this section, you will create a new document from the SharePoint document library. The new document will use the default template for the library.
See Also
For more information about templates in document libraries, refer to Chapter 8.
The new document can be created in the Word 2010 client application that is installed on your computer, or in the online Word Web App using the browser.
Tip
Microsoft Office Web Apps should be installed and configured on your SharePoint Foundation server to enable creating and editing documents in online Microsoft Word, Excel, or PowerPoint Web Apps. These Office Web Apps can be used from any device where a browser is available, but they have less functionality in comparison with associated client applications.
In the following exercise, you will create a new document from the SharePoint document library.
Set Up
Open the SharePoint site where you want to create a new document. If prompted, type your user name and password, and then click OK.
Note
BE SURE TO verify that you have sufficient rights to create a document in this library. If in doubt, see the Appendix A at the back of this book.
On the Quick Launch, click the Oak Furniture document library.
Click the Documents tab on the Ribbon, and then click New Document.
Depending on your server settings, a new document will open either in the browser or in Word. If a new document opens in the browser, skip to step 7. Otherwise, continue to the next step.
A new document opens in Word. It is based on the default template for this SharePoint library called template.dotx. If a warning about this template appears in the Open Document message box, click OK to confirm that you want to proceed with opening a new file based on this template.
If prompted, provide your user name and password. Word opens. In the new document, type some text, such as Oak Mirror.
Click the File tab and then click Save to save the document to the Oak Furniture document library.
The Save As dialog box opens. Note that Location points to the Oak Furniture document library. Enter OakMirror as the name of your new document, and then click Save.
Go back to the browser where the Oak Furniture library is displayed, and then skip to step 9.
The browser opens an empty document based on the library’s default template in the Word Web App. If prompted, provide your user name and password. The Word Web App interface is similar to Word’s interface, and you can perform many light editing tasks in the Word Web App. In the new document, type some text, such as Oak Mirror.
Click the File tab and then click Save to save the document to the Oak Furniture document library. The Oak Furniture library is displayed.
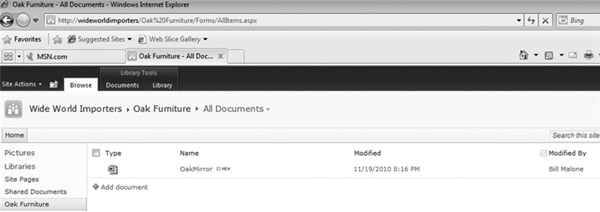
Validate that OakMirror.docx is listed in the Oak Furniture library. There is a New flag next to the document, indicating that this document is a new addition to this library.


Editing Documents
Once documents are placed in the library, you can search and filter them to make it easier to find what you are looking for, as well as collaborate with others to help develop the final version of the document. You will find at times that you have a need to edit a document in a SharePoint document library.
SharePoint allows you to edit documents in Office client applications, such as Word and Excel, or in the browser using Office Web Apps that provide online companions to Office client applications, such as Word Web App or Excel Web App. For in-browser editing to be available, Office Web Apps must be installed and configured on the SharePoint Foundation server.
In the following exercise, you will edit in Word the document called OakMirror.docx that was created in the previous exercise in the Oak Furniture library.
Set Up
Open the SharePoint site where you’d like to edit a file in a document library. If prompted, type your user name and password, and then click OK.
Note
BE SURE TO verify that you have sufficient rights to edit a document in this library. If in doubt, see the Appendix A at the back of this book.
On the Quick Launch, click the Oak Furniture document library.
Hover your mouse over a document that you would like to edit, such as OakMirror.docx. An arrow appears to the right of the document name. Click the arrow to open a drop-down menu and select Edit in Microsoft Word.
The document opens in Word. If a warning about the template appears in the Open Document message box, click OK to confirm that you want to proceed.
In Word, make some changes to the document. For example, select the text “Oak Mirror” and make it bold and centered.
Click File, Save to save the document back to the Oak Furniture document library, and then click Save to confirm the file name.
Go back to the browser and validate that the document has been saved to the document library.
When you’re on the move, it is often very useful to be able to edit your document within the browser, without needing the client application to be installed on the device that you’re using. In the following exercise, you will modify the OakMirror.docx document using in-browser editing in the Word Web App.
Set Up
Open the SharePoint site where you’d like to edit a file in a document library, if it is not already open. If prompted, type your user name and password, and then click OK.
Note
BE SURE TO verify that you have sufficient rights to edit a document in this library. If in doubt, see the Appendix A at the back of this book.
On the Quick Launch, click the Oak Furniture document library.
Hover your mouse over a document that you would like to edit, such as OakMirror.docx. An arrow appears to the right of the document name. Click the arrow to open a drop-down menu and select Edit in Browser.
Troubleshooting
Office Web Apps must be installed and configured on your SharePoint Foundation server to enable in-browser editing. If the Edit In Browser option is not shown on the drop-down menu, it means that Office Web Apps have not been installed and activated in your environment. You will not be able to complete this exercise.
The document opens in the Word Web App in the browser. Make some changes to the document. For example, select the text “Oak Mirror” and make it italicized.
Click the File tab and then click Save to save the document back to the Oak Furniture document library.
Validate that the newly edited document has been saved to the document library by checking its time stamp.
Adding Documents
Document libraries give you the ability to keep track of new versions of a document as it is modified and revert to older versions if necessary. First, you need to ensure that your documents are uploaded to and available in the SharePoint library.
There are several ways to add documents to a document library, including the following:
Use the browser to upload documents to the library via the SharePoint interface.
Use Windows Explorer to copy or move documents into the library.
Use a SharePoint Workspace to upload the documents stored offline.
You can also add a document to an email-enabled document library by sending it as an attachment to an email.
In this section, you will practice the first two methods: using the browser and using Windows Explorer. Later in this chapter, you will use the SharePoint Workspace to add a document to the library as well. We will cover email-enabling a library in Chapter 8.
You will now add documents to the library using a browser. In the following exercise, you will upload two new furniture descriptions to the Oak Furniture library.
Practice Files
You will use the practice files OakDesk.docx and OakChest.docx, located in the DocumentsMicrosoft PressSBS_SPFChapter05 folder.
Set Up
Open the SharePoint site where you’d like to upload a file to a document library. If prompted, type your user name and password, and then click OK.
Note
BE SURE TO verify that you have sufficient rights to add a document in this library. If in doubt, see the Appendix A at the back of this book.
On the Quick Launch, click the Oak Furniture document library.
In the Oak Furniture document library, click the Add document link. The Oak Furniture - Upload Document dialog appears.
Click Browse.
In the Choose File to Upload dialog, browse to the file that you would like to upload, such as OakChest.docx, select it, and then click Open.
In the Upload Document dialog, type a comment in the Version Comments text box stating that this is a new document for this library, such as Initial upload of new document.
Click OK to confirm the upload and return to the Oak Furniture library.
Repeat steps 2–6 for the OakDesk.docx file. You have added two documents to the library using the browser.


Another way to add a document to the library is via Windows Explorer. In the following exercise, you will copy a document to the SharePoint library by using the Explorer view of the Oak Furniture document library.
Practice Files
You will use the practice files OakEndTable.docx and OakNightStand.docx, located in the DocumentsMicrosoft PressSBS_SPFChapter05 folder.
Set Up
Open the SharePoint site where you’d like to add files to a document library. If prompted, type your user name and password, and then click OK.
Note
BE SURE TO verify that you have sufficient rights to add a document in this library. If in doubt, see the Appendix A at the back of this book.
On the Quick Launch, click the Oak Furniture document library.
Click the Library tab on the Ribbon and then click Open with Explorer. The library content is displayed in Explorer view.
Open a new Windows Explorer window and navigate to the folder on the file system where the documents are stored that you want to copy to the library, such as DocumentsMicrosoft PressSBS_SPFChapter05.
Select the files titled OakNightStand.docx and OakEndTable.docx by clicking the first file and then holding down the CTRL key and clicking the second file.
Right-click in Windows Explorer and select Copy, or press CTRL+C on the keyboard.
Go back to the Explorer view of the Oak Furniture library. In the Explorer window that shows files in the Oak Furniture library, right-click and select Paste, or press CTRL+V on the keyboard, to add the files to the library.
Go back to the browser where the Oak Furniture library is displayed and verify that OakNightStand.docx and OakEndTable.docx are shown. You might need to refresh the page to see the new files.


Creating a Picture Library and Adding Pictures
A picture library is used to share a collection of pictures. Although picture files can be stored in other types of SharePoint libraries (such as document libraries), picture libraries are designed especially for storing image file types and therefore have several advantages. For example, from a picture library, you can view pictures in a slideshow, download pictures to your computer, and edit pictures with graphics programs that are compatible with SharePoint.
Picture libraries work in the same way as document libraries, except that they are geared to storing the image file types. The picture library provides special views for looking at all the pictures in the library as a slideshow. It also provides enhanced features for editing and downloading pictures by integrating with Microsoft Picture Manager.
In this exercise, you will create a picture library for storing photographs of employees.
Set Up
Open the SharePoint site where you’d like to create a picture library. If prompted, type your user name and password, and then click OK.
Note
BE SURE TO verify that you have sufficient rights to create a library in this site. If in doubt, see the Appendix A at the back of this book.
On the Site Actions menu, click More Options.
In the Create dialog, in the left pane, under Filter By, click Library.
Select Picture Library, and then click More Options.
In the Create dialog, in the Name box, type Employee Photos.
In the Description box, type Contains photographs of each employee.
Leave all other options on the page at their default settings. You have entered all the necessary information to create a picture library.
Click Create.


The picture library is created, and a new Employee Photos picture library is displayed in the browser.
After the new library has been created, you can add pictures to it. Adding pictures to a picture library is like adding documents to a document library. In the following exercise, you will add an employee picture to the Employee Photos document library using the browser.
Practice Files
You will use the practice file pjcov.jpg, located in the Documents Microsoft PressSBS_SPFChapter05 folder.
Set Up
Open the SharePoint site where you’d like to upload a picture to a picture library. If prompted, type your user name and password, and then click OK.
Note
BE SURE TO verify that you have sufficient rights to add a picture to this library. If in doubt, see the Appendix A at the back of this book.
On the Quick Launch, click the Employees Photos picture library. The Employee Photos picture library is displayed.
On the menu bar, click Upload, and then select Upload Picture.
The Employee Photos - Select Pictures: dialog appears. Click Browse.
In the Choose File to Upload dialog, browse to the file that you would like to upload, such as pjcov.jpg, and then click Open.
Click OK to confirm the selection and upload of the picture. The Employee Photos: pjcov dialog appears.
This page is used to provide metadata for the picture, including Name, Title, Date Picture Taken, Description, and Keywords.
Fill in the metadata if needed (Title, Date Picture Taken, Description, and Keywords), and then click Save.
The picture has been uploaded, and you are taken back to the Employee Photos picture library.


Creating a Form Library
Form libraries function similarly to document libraries, but they store specific types of documents—forms—and have enhanced integration with Microsoft InfoPath, such as allowing you to create form libraries from InfoPath. Chapter 15, discusses in detail how SharePoint Foundation and InfoPath work together.
Forms are a more structured type of information than documents. They contain a set of fields that are filled out in a uniform manner. Form libraries are excellent repositories for structured documents, such as purchase orders or vacation requests. To obtain the full benefit of form libraries, you must use InfoPath for designing and filling out forms.
The following exercise walks you through creating a new form library by using SharePoint Foundation. You will open the SharePoint site and create a new form library called Purchase Orders. You will then associate a Purchase Order form template with that library so that when someone fills out the form, they are presented with the standard Purchase Order form.
Note that this is a long series of steps to perform, so keep in mind that you will be accomplishing the following tasks:
Creating a new form library
Associating a new form template with the form library
Setting this form template as the primary form that is invoked when the New Document command is invoked
Practice Files
You will use the practice file WideWorldPurchaseOrder.xsn, located in the DocumentsMicrosoft PressSBS_SPFChapter05 folder.
Set Up
Open the SharePoint site where you’d like to create a form library. If prompted, type your user name and password, and then click OK.
Note
BE SURE TO verify that you have sufficient rights to create a form library and modify a content type on this site. If in doubt, see the Appendix A at the back of this book.
On the Site Actions menu, click More Options to display the list and library templates in the Create dialog.
In the left pane, under Filter By, click Library. Select Form Library and then click More Options.
In the Name box, type Purchase Orders.
In the Description box, type Contains purchase orders.
You have now entered all the necessary information to create a form library.
Click Create.
The form library is created, and you are taken to the new Purchase Orders form library page. At this point, if you click New Document on the Document tab on the Ribbon, you will be presented with a blank form. You still need to associate a necessary form template with the newly created library. To associate a form template with a form library, it is necessary to create a new content type as the default selection when the New Document button is clicked.
On the Site Actions menu, click Site Settings.
Under Galleries, click the Site Content Types link. The Site Content Types page appears.
On the top of the page, click Create.
On the New Site Content Type page, in the Name box, type Purchase Order.
From the Select Parent Content Type From: drop-down list, select Document Content Types.
From the Parent Content Type: drop-down list, select Form. Leave the rest of the page at the default settings.
Click OK. The Site Content Types-Purchase Orders page appears.
Under Settings, click Advanced Settings.
Select the Upload a New Document Template option.
Click Browse and navigate to the new form template, such as WideWorldPurchaseOrder.xsn.
Click Open to upload the template.
On the Site Content Types-Purchase Orders-Advanced Settings page, click OK. You are taken to the Site Content Type-Purchase Orders page.
On the Quick Launch, click the Purchase Orders form library.
On the Purchase Orders library page, under Library Tools, click the Library tab on the Ribbon.
Click the Library Settings button on the Ribbon. The Purchase Orders-Form Library Settings page appears.
Under General Settings, click Advanced Settings. The Advanced Settings page appears.
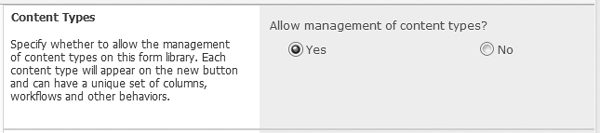
In the Content Types area, under Allow management of content types?, select Yes.
Leave the rest of the page at the default settings, and then click OK.
On the Purchase Orders-Form Library Settings page, scroll down to the Content Types section. One content type, called Form, is associated with this form library.
Click Add from existing site content types. The Add Content Types page appears.
From the Available Site Content Types list, select the Purchase Order content type.
Click Add, and then click OK.
On the Purchase Orders-Form Library Settings page, in the Content Types section, click the Change new button order and default content type link.
On the Position from Top drop-down list, ensure that the Purchase Order content type is assigned the number one (1), and then click OK.
On the Quick Launch, click Purchase Orders. On the Purchase Orders library page, click the Documents tab, and then click the New Document button on the Ribbon.
This action invokes InfoPath 2010 (if it is installed on your computer), and the default Wide World Importers Purchase Order form appears.


Creating a Wiki Page Library
A wiki is a website containing wiki web pages that enable users to collect team knowledge, plan events, or work on projects together. Wikis are a way for many members of the community to come together and edit content collaboratively.
The very first wiki (pronounced wee-kee) site, WikiWikiWeb, was created for the Portland Pattern Repository in 1995 by Ward Cunningham, who devised a system that created web pages quickly and allowed users to create and edit web page content freely by using a web browser, as well as allowing users to create an interconnected collection of wiki pages. Wiki is the Hawaiian word for quick, and as Hawaiian words are doubled for emphasis, wikiwiki means very quick. WikiWikiWeb is the proper name of the concept, of which wiki and wikis are abbreviations.
Tip
One wiki implementation is Wikipedia, from Wikimedia Foundation Inc. (http://www.wikipedia.org), which is an encyclopedia-like website that has inherited many of the nonencyclopedic properties of a wiki site.
Wiki page libraries can be created and used on any site in SharePoint Foundation 2010. We will look at creating wiki pages in detail in Chapter 6.
In the following exercise, you will create a wiki page library where employees can create and modify their own wiki pages.
Set Up
Open the SharePoint site where you’d like to create a wiki page library. If prompted, type your user name and password, and then click OK.
Note
BE SURE TO verify that you have sufficient permissions to create a library on this site. If in doubt, see the Appendix A at the back of this book.
On the Site Actions menu, click More Options to display the list and library templates in the Create dialog.
In the left pane, under Filter By, click Library.
Select Wiki Page Library and then click More Options. The Create dialog appears.
In the Name box, type Employee Wiki.
In the Description box, type Contains wiki pages created by company employees.
You have entered all the necessary information to create a wiki page library.
Click Create. Your new wiki page library has been created and is displayed in the browser.

Creating a New Folder in a Library
Using folders provides a common way to organize documents in an efficient way. SharePoint 2010 allows you to create folders in a library.
Tip
SharePoint Foundation 2010 provides other mechanisms for organizing your documents, such as views and filters. However, people often are most familiar with folders, and thus they may find it easier to create a folder structure.
In this exercise, you will create a folder for documents classified as In Progress so that they can be differentiated from completed documents.
Set Up
Open the SharePoint site where you’d like to add a folder to a document library. If prompted, type your user name and password, and then click OK.
Note
BE SURE TO verify that you have sufficient permissions to create a folder in the document library. If in doubt, see the Appendix A at the back of this book.

The updated Oak Furniture page appears, with the In Progress folder added to the page.

Checking Documents In and Out
One of the features provided by SharePoint Foundation 2010 is basic document management. Checking out and checking in a document allows you to work on a document exclusively, while letting others know that you are editing this document so that they don’t try to change it at the same time. When a document is checked out, other users will not be able to open this document for editing, so your changes will not get overwritten. When you are checking in a document, you can also enter comments about what you’ve changed that others can then view.
When you check out a file, you lock the file for editing to prevent other users from editing the file at the same time. When you have finished editing the file, you check the file back in, allowing other users to edit the file.
In the following exercise, you will check out a document from a document library, and then check it back in and change the comments to reflect that this is the final version of the document.
Set Up
Open the SharePoint site where you’d like to check in or check out a document. If prompted, type your user name and password, and then click OK.
Note
BE SURE TO verify that you have sufficient permissions to the document library to check out and check in documents. If in doubt, see the Appendix A at the back of this book.
On the Quick Launch, click Oak Furniture. The Oak Furniture document library appears.
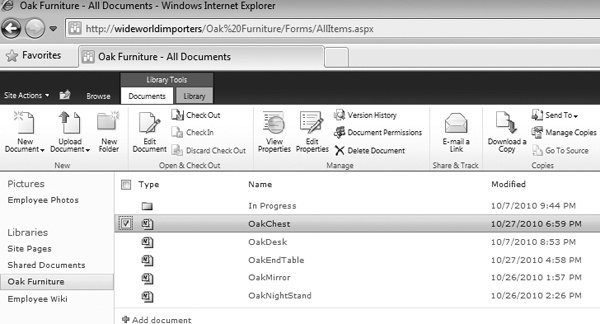
Hover your mouse over a document that you would like to check out, such as OakChest.docx. A check box appears to the left of the document name. Click the check box to select the document.
Click Check Out on the Documents tab on the Ribbon.
Click OK in the confirmation message box that appears.
The document now has been checked out. The file icon in the Type column has changed and shows a green, downward-pointing arrow, indicating that the document is checked out.
Hover the mouse over this icon. A tooltip is displayed, showing who has checked out the document (you, in this case). This is useful to know when you want to edit a document that is checked out to another user. For example, you can contact that person and ask him or her to check the document back in.
See Also
With appropriate permissions, it is possible to enforce the check-in of a document that has been checked out by another user. For more information, refer to Chapter 8.
When you have a document checked out, no one else can change it, and no one else can see the changes you’ve made while you have it checked out.
You will now check the document back in.
In the browser window, select the document OakChest.docx (see step 2 for instructions on doing that, if necessary).
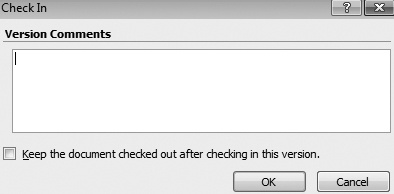
Click Check in on the Documents tab on the Ribbon. The Check In dialog appears.
In the Check In dialog, in the Comments box, type This is the final version of this document.
Click OK to check the document in and return to the Oak Furniture document library. The document now has been checked in, and its icon no longer shows a green arrow.


Working with Version History
When versioning is enabled, SharePoint Foundation 2010 creates a separate copy of the document each time that it is edited. Although this takes up extra space on the server, it also makes it easy to revert to an older version of the document if necessary.
You can keep major versions only, or major and minor versions. Major versions have whole numbers such as 1, 2, 3, and so on. Minor versions have decimal numbers such as 1.1, 1.2, 1.3, and so on. A major version number is associated with a version that has been published (in other words, with the version that is available in the library). A minor version number is associated with a version that is in progress but is not yet published.
See Also
A more in-depth discussion of versioning will be covered in Chapter 8.
When you view a document’s version history, you see a list of the occasions when this document was edited and saved, as well as the author’s comments on those changes.
In the following exercise, you will see what changes have been made to the OakChest.docx document and then revert to the final copy of the document.
Set Up
Open the SharePoint site where you’d like to see the version history for a document. If prompted, type your user name and password, and then click OK.
Note
BE SURE TO verify that you have sufficient permissions to the document library to check out, modify, and check in documents. If in doubt, see the Appendix A at the back of this book.
On the Quick Launch, click Oak Furniture. The Oak Furniture document library appears.
Hover your mouse over a document that you would like to check out, such as OakChest.docx. A check box appears to the left of the document name. Click the check box to select the document.
On the Documents tab on the Ribbon, click Version History.
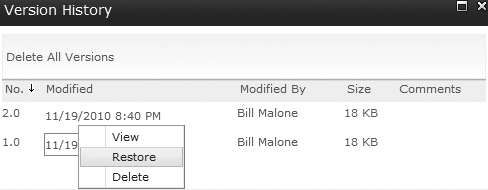
You are taken to the Version History dialog, which shows the versions saved for the OakChest.docx page. Each version of the saved document, the date and time that version was created, and any comments for the version appear.
Hover the mouse over the time stamp in the Modified column that identifies an earlier version of the document, and then click the arrow that appears on the right of the time stamp.
On the drop-down menu, click Restore.
A message box appears, indicating that you are about to replace the current version with the selected version. Click OK.
Tip
If minor versioning is enabled, then there is now an additional, unpublished version. SharePoint Foundation 2010 actually copies the version that you want to restore and makes it the newest minor version. If you want to publish this version, you need to do so manually, using the Publish button on the Ribbon.


Using Alerts
One of the most difficult obstacles encountered in the business world is knowing when information changes. SharePoint Foundation 2010 can help address this problem by allowing you to subscribe to an alert. When a document to which you subscribe changes, you receive a message stating that the document has changed.
Alerts are a great way for users to be notified when a document is changed or deleted. Users can specify if they want to receive the alert notification via email or as a text message (SMS). Users can also specify if they want to be notified immediately or receive a summary alert on either a weekly or monthly basis.
For example, you (Bill Malone, in this example) may want to know when the OakChest.docx document is updated. In the following exercise, you will set up an alert for this document and then receive an alert via email that it has been changed.
Set Up
Your server has to be configured to send email messages. Otherwise, you will not be able to complete the steps in this exercise.
Set Up
Open the SharePoint site where you’d like to set up an alert on a document. If prompted, type your user name and password, and then click OK.
Note
BE SURE TO verify that you have sufficient permissions to create alerts. If in doubt, see the Appendix A at the back of this book.
On the Quick Launch, click Oak Furniture. The Oak Furniture document library appears.
Select the document for which you would like an alert, such as OakChest.docx, by hovering the mouse over it and clicking the check box that appears to the left of the document. Click View Properties on the Documents tab on the Ribbon. The Oak Furniture - OakChest.docx dialog appears.
Click Alert Me in the Actions section.
The Oak Furniture: OakChest.docx - New Alert dialog appears. You are given several options about the frequency of alerts, as well as when you want to be alerted. Retain the default values for this exercise and click OK.
Important
If your server is not configured to send outgoing email, an error message will appear and you will be unable to complete step 4 of this exercise.
You are returned to the Oak Furniture document library.
You will now modify the document, and then you will receive an alert that this document has been modified. Click the check box to the left of the OakChest.docx document to select it, and then, on the Documents tab on the Ribbon, click Check Out, and then click OK in the message box that appears. Click the arrow to the right of the document name, and then select Edit in Microsoft Word from the drop-down menu.
The document opens in Word. If a warning about the template appears in the Open Document message box, click OK to confirm that you want to proceed.
Make some changes to the document. For example, make some text bold.
On the File tab, click Save to save the document back to the document library, and then click Exit to close Word.
Word prompts you to check in your document. Click OK.
Open Outlook. You should receive two email messages. The first message indicates that an alert was created successfully. The second message indicates that OakChest.docx has been modified.


Deleting and Restoring Documents
Documents accumulate over time, and you eventually need to delete the ones that are no longer needed. In this exercise, you will delete a document that is no longer in use.
The Recycle Bin provides a safety net when deleting documents, document sets, list items, lists, folders, and files. When you or other site members delete any of these items, the items are placed in the Recycle Bin instead of immediately being deleted permanently. Items remain in the Recycle Bin until you decide to delete them permanently from your site or until the items are deleted permanently after a set number of days, which is based on a schedule defined in SharePoint Central Administration. The default is 30 days.
If you click Recycle Bin in the left navigation pane, you can see all the items that you have deleted from your site. You can either restore or delete each item from the Recycle Bin. When you delete an item from the site Recycle Bin, the item is sent to the Site Collection Recycle Bin. Note that to retrieve items from the Site Collection Recycle Bin, you must contact the Site Collection Administrator.
In the following exercise, you will delete a document from the Oak Furniture library and then restore it from the site Recycle Bin.
Set Up
Open the SharePoint site where you’d like to delete a document. If prompted, type your user name and password, and then click OK.
Note
BE SURE TO verify that you have sufficient permissions to delete a document in the document library. If in doubt, see the Appendix A at the back of this book.
On the Quick Launch, click Oak Furniture. The Oak Furniture document library appears.
Select the document that you would like to delete, such as OakChest.docx, by clicking the check box to the left of the document.
On the Documents tab on the Ribbon, click Delete Document.
In the message box that asks whether you are sure that you want to delete the document, click OK. The document is deleted from the library and placed into the site Recycle Bin.
To recover your document, click Recycle Bin in the left navigation pane.
In the Recycle Bin, select the OakChest.docx document by clicking the check box next to it, and then click the Restore Selection link. Click OK in the message box to confirm that you want to restore the document.
Go back to the Oak Furniture library and verify that the OakChest.docx document has been restored and is listed on the library page.
Working Offline with SharePoint Workspace
For mobile users, it’s not always possible or convenient to connect to SharePoint every time they want to read or modify a document. SharePoint Foundation 2010 provides the ability to work with documents offline. We will look into two ways of taking your documents offline. The first way is to synchronize your documents with a SharePoint Workspace. The second way is to copy the documents to your Outlook client.
SharePoint Workspace allows mobile users to download SharePoint content to their local machine to work offline. This can be either an entire SharePoint site or a subset of a site defined by the user. You can synchronize various lists and libraries from different sites to the same Workspace.
When working offline, you can view and modify the content in the same way that you can when working in SharePoint. When connected back to the network, you can synchronize your changes back to SharePoint, either automatically or manually.
SharePoint Workspace also includes additional functionality to help you keep track of documents, such as notification icons to show which documents you have read and which ones have been modified recently.
Tip
There are limits on the number of files and the size of each SharePoint Workspace. Each Workspace is limited to approximately 500 files and a maximum size of 2 gigabytes (GB). You cannot store more than 1,800 files in all your SharePoint Workspaces.
In this exercise, you will create an account and then synchronize documents to a SharePoint Workspace. You need to create an account only once on the first use of the SharePoint Workspace with the server.
Set Up
Open the SharePoint site that you want to synchronize to SharePoint Workspace. If prompted, type your user name and password, and then click OK.
Note
BE SURE TO verify that you have sufficient permissions to synchronize to SharePoint Workspace. If in doubt, see the Appendix A at the back of this book.
On the Quick Launch, click the Oak Furniture library. On the Library tab on the Ribbon, in the Connect & Export section, click Sync to SharePoint Workspace.
The Account Configuration Wizard is displayed.
Leave the default option, Create a new account, selected and click Next.
Enter the appropriate information in the Name and E-mail Address boxes.
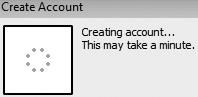
Click Finish. If prompted, provide your user name and password and then click OK. You will see the following dialog, indicating that the account is being created.
In the Sync to SharePoint Workspace message box that appears, click OK.
A dialog appears, indicating that the Workspace is ready. Steps that have been completed are shown with a green check mark. Items that are not supported for offline editing are shown with an exclamation mark. Items that are available but have not been selected for download do not show any mark next to them. Click Open Workspace.
The Wide World Importers – Oak Furniture – Microsoft SharePoint Workspace window opens. You now have the Oak Furniture library and its contents available offline while you are not connected to the network. Click the Oak Furniture document library to see its contents.
Note that all files and folders from the Oak Furniture library are synchronized to the SharePoint Workspace client, which holds copies of its documents on your local hard disk. You can repeat these steps to connect to other SharePoint sites and synchronize their libraries and lists into a common Workspace.


After documents have been modified offline, they need to be synchronized with the server. In this exercise, you will upload an offline document to the Oak Furniture document library using SharePoint Workspace. First, you will add the document to the library in the SharePoint Workspace, and then you will synchronize the library with the server.
Practice Files
You will use the practice file WideWorldInvoice.docx, located in the DocumentsMicrosoft PressSBS_SPFChapter05 folder.
Set Up
Open the SharePoint site that you want to synchronize to SharePoint Workspace. If prompted, type your user name and password, and then click OK.
Note
BE SURE TO verify that you have sufficient permissions to add a document to a library. If in doubt, see the Appendix A at the back of this book
Open SharePoint Workspace by clicking the Start button on your computer, and then selecting All ProgramsMicrosoft OfficeMicrosoft SharePoint Workspace 2010.
The Wide World Importers site that you synchronized in the previous exercise is shown under Read.
Double-click Wide World Importers to open the content from this site that has been taken offline. The Oak Furniture library opens. Oak Furniture is currently the only library on the Wide World Importers site that you have synchronized to SharePoint Workplace, so it is the only library shown.
Click the Home tab, and then click Add Documents on the Ribbon to add a new document to the Oak Furniture library in the SharePoint Workspace.
In the Add Files dialog, navigate to the location C:DocumentsMicrosoft_Press SBS_SPFChapter05.
Select the document titled WideWorldInvoice.docx, and click Open. The document has been added to the Oak Furniture library in the SharePoint Workspace.
You will now synchronize the SharePoint Workspace with the SharePoint site. In the SharePoint Workspace, click the Sync tab on the Ribbon and then click Sync Workspace. The offline changes you made in the Oak Furniture library are synchronized with the live site.
In the browser, navigate to the Oak Furniture library and verify that the new file, WideWorldInvoice.docx, has been uploaded to the library on the SharePoint server.


Working Offline with Outlook
Another method of taking your documents offline is by using an Outlook client. The documents are emailed to you as attachments and placed into the SharePoint list in Outlook.
Set Up
Open the SharePoint site where you’d like to copy documents offline. If prompted, type your user name and password, and then click OK.
Note
BE SURE TO verify that you have sufficient permissions to the document library to check out, modify, and check in documents. If in doubt, see the Appendix A at the back of this book.
In the following exercise, you will take documents offline by using Outlook.
On the Quick Launch, click the Oak Furniture library.
On the Library tab on the Ribbon, click Connect to Outlook.
A message box appears, asking whether you want to allow this website to open a program on your computer (Microsoft Outlook). Click Allow.
Outlook opens, and a SharePoint list is created in Outlook. The documents in the library are downloaded automatically into this new list as attachments to emails.
See Also
For more information on SharePoint Foundation integration with Outlook, refer to Chapter 13.


Key Points
Libraries provide a central location to store documents, forms, and pictures so that they can be shared easily.
You can create document libraries for specific topics and give them descriptive names.
You can add existing documents to a document library in many ways, including by using the browser, using Windows Explorer, and using SharePoint Workspace.
Remember to check out a document before you edit it.
You can check in and check out documents by using Office suite applications.
You can use versioning to manage the history of your documents in SharePoint.
Set up alerts on documents when you want to know that a document has been changed or deleted.
Deleted documents can be restored from the site Recycle Bin.
You can take the documents in the SharePoint library offline in several ways, including using SharePoint Workspace and also Outlook.