
Chapter 13. Using SharePoint Foundation with Outlook 2010
Chapter at a Glance

✓ | Connect a SharePoint Contacts list to Outlook. |
✓ | Move an Outlook contact to a SharePoint Contacts list. |
✓ | Copy SharePoint contacts into Outlook. |
✓ | Send an email using a SharePoint Contacts list. |
✓ | View SharePoint calendars and personal calendars in Outlook. |
✓ | Take SharePoint content offline. |
✓ | Manage SharePoint alerts in Outlook. |
✓ | Create Meeting Workspaces from Outlook. |
✓ | Configure an RSS feed. |
Microsoft SharePoint Foundation 2010 integrates with Microsoft Outlook 2007 and Outlook 2010 to enable you to keep a local copy of your team’s Calendars, Tasks, and Contacts lists, as well as libraries. Information can be synchronized in two directions for items in Contacts lists, calendars, Tasks lists, and discussion boards. A local copy of the Microsoft SharePoint data is then available offline when you are not connected to the network and can be synchronized with the SharePoint site manually or automatically when you next connect. You can aggregate and manage all your tasks in one place whether you created them within Outlook, in a SharePoint Tasks list, or within Microsoft OneNote.
When dealing with documents, Outlook 2007 and Outlook 2010 also provide a method of taking libraries or folders offline. In addition, documents held within SharePoint libraries or folders can be synchronized with their offline copies using the other applications in the Microsoft Office 2010 suite. Other types of standard lists—such as Issues, Link lists, Custom lists, or properties, such as views and metadata—are not supported in Outlook. Microsoft SharePoint Workspace 2010 should be used to synchronize these SharePoint resources with their offline copies.
Outlook supports Really Simple Syndication (RSS) feeds so that you can subscribe to and stay up to date with the latest news sites and blogs. You can manage your RSS feeds in Outlook just like other mail by flagging them for follow-up, assigning them a specific color, or automating any process by using rules.
By using other integration features, you can manage all your SharePoint alerts from one Outlook dialog box. By using Outlook meeting requests, you can create Meeting Workspace sites.
Note
Like other Office applications, Outlook 2010 comes with the new Microsoft Office Fluent user interface (UI), which features a Quick Steps area and the backstage view. If you are new to Outlook 2010 and want to investigate the new features, a short video can be found on the Outlook product team blog at http://blogs.msdn.com/b/outlook/archive/2009/07/14/announcing-microsoft-office-2010-technical-preview.aspx; and a Microsoft TechNet article, titled “Changes in Outlook 2010,” can be found at http://technet.microsoft.com/en-us/library/cc179110.aspx.
In this chapter, you will learn how to copy and move Outlook contacts to and from a SharePoint Contacts list. You will also learn how to connect SharePoint Calendar lists to Outlook, view SharePoint calendars side by side with personal calendars, edit SharePoint calendar items offline, manage SharePoint alerts in Outlook, create Meeting Workspaces from Outlook, and subscribe to a SharePoint list’s RSS feed.
Although you can complete the tasks documented in this chapter using Outlook 2007, the steps and screenshots in this chapter were created using Outlook 2010. If you use Outlook 2007, your steps and screenshots will be slightly different. See the book Microsoft Windows SharePoint Services 3.0 Step by Step, by Olga Londer, Bill English, Todd Bleeker, and Penelope Coventry (Microsoft Press, 2007), for detailed steps on using Outlook 2007.
Practice Files
Before you can complete the exercises in this chapter, you need to (1) download the Chapter 13 practice files from the book’s catalog page to the following folder on your computer: DocumentsMicrosoft PressSBS_SPFChapter13 and (2) install the Chapter 13 practice site using the Chapter13_Starter.wsp file. See Using the Practice Files at the beginning of this book for more information.
Important
Remember to use your SharePoint site location in place of http://wideworldimporters in the following exercises.
Connecting a SharePoint Contacts List to Outlook
To initiate the integration between SharePoint lists and libraries and Outlook 2007 or Outlook 2010, you need to connect the list or library. You can connect most SharePoint lists, as well as all SharePoint library types, to Outlook. The following list and gallery types are not supported for connection to Outlook:
Survey
Issue Tracking
Announcements
Links
Custom List
Solutions Gallery
List Templates Gallery
Web Part Gallery
Once a list is connected to Outlook, you can modify that list within Outlook at any time whether you are online or offline. You can also share the connection with others: right-click the library name in Outlook, and then click Share This Folder.
SharePoint permissions carry over when using SharePoint resources in Outlook 2007 or Outlook 2010. For example, if you have permission to edit a document or list item on the SharePoint site, you can also edit the document or list item within Outlook.
When you modify a document from a library that you have connected to Outlook, you will be modifying an offline copy of that document, known as a cached copy, by default. You can choose to send to the SharePoint library when you have completed your modification. During your offline editing, another user could modify the same document, so it is recommended that you always check out your document before you edit it. You can turn off offline editing using Options in Microsoft Word 2010 backstage view.
Note
In Outlook 2003, connecting to a SharePoint list was called linking, and you were allowed to link only to SharePoint Contacts and Calendar lists. Although you could see the contents of these SharePoint lists within Outlook 2003, both online and offline, the information presented was read-only. To edit the contents of these lists, you had to use the browser.
In the following exercise, you will connect to Outlook from a Contacts list on a SharePoint site. You can use the same technique to connect to other SharePoint lists or libraries.
Set Up
Open a SharePoint site, such as one created from the practice .wsp file for this chapter. If you have not created a site based on this chapter’s .wsp file, then you will need a Contacts list to complete this exercise. You can create a Contacts list by following the steps in the exercise in Chapter 4, that explains how to create a list.
Note
BE SURE TO verify that you have sufficient rights to read the items in the Contacts list. If in doubt, see the Appendix A at the back of this book.
On the Quick Launch, under the Lists section, click Contacts.
On the List tab in the List Tools contextual tab set, click Connect to Outlook in the Connect & Export group.
If a Microsoft Internet Explorer Security dialog box opens, stating: Do you want to allow this website to open a program on your computer?, click Allow.
If an Internet Explorer Security warning dialog box opens, stating: A website wants to open web content using this program on your computer, click Allow.
Outlook opens, and you might be asked to supply your user name and password.
An Outlook dialog box appears, stating: You should only connect lists from sources you know and trust.
Click Advanced to open a SharePoint Lists Options dialog box.
In the Folder Name text box, type WideWorldImporters – Contacts, and click OK.
In the Microsoft Outlook dialog box, click Yes. Outlook displays the WideWorldImporters Contacts list.
When you connect a list or library to Outlook, the list or library appears in the respective areas of the Outlook Navigation pane. Calendars appear in the Calendar pane under Other Calendars, tasks appear in the Tasks pane under Other Tasks, and Contacts lists appear in the Contacts pane under Other Contacts. Discussion lists and libraries appear in a folder in the Mail pane under SharePoint Lists.
Tip
To remove a connected SharePoint list or library from Outlook, select the folder in the Navigation pane and then, on the Home tab, click Delete in the Delete group. Alternatively, right-click the folder in the Navigation pane and then click Delete Folder. Removing connected lists or libraries from Outlook helps you to focus on current projects.
Deleting a connected SharePoint list folder from Outlook does not delete the SharePoint list or its data from the SharePoint server; however, the data in that list is no longer available offline from within Outlook. An alternative method of managing connected SharePoint lists or libraries is to click the File tab to switch to the backstage view of Outlook. Then, under Account Information, click Account Settings, and then click Account Settings in the drop-down menu to display the Account Settings dialog box. Click the SharePoint Lists tab, click the SharePoint list or library that you want to manage, and then click Remove or Change.


Moving an Outlook Contact to a SharePoint Contacts List
By connecting a SharePoint Contacts list to Outlook 2007 or Outlook 2010, you are creating an Outlook Contacts folder. You can then copy the contact information in your Outlook Contacts folder back into the SharePoint Contacts list. The new contacts within the Contacts folder are added to the SharePoint Contacts list the next time Outlook synchronizes with SharePoint, and you can then share the contact information with users who visit your SharePoint site. Any other users who also have connected the SharePoint Contacts list to their copy of Outlook will observe the new contacts within their Outlook Contacts folder, when they next synchronize with SharePoint.
In this exercise, you will move contact information from your Outlook Address Book to a Contacts list on a SharePoint site. You can use the same technique to move calendar items from a SharePoint Calendar list to your Calendar folder, as well as to move task and event items into their respective Outlook folders.
Troubleshooting
You cannot move a recurring series of events by using the steps detailed in this exercise. Instead, open the recurring series or the individual occurrence from a recurring series within Outlook. Click the File tab to display the backstage, and then click Move to Folder.
Set Up
Open Outlook, if it is not already open. You can use the Contacts list that you connected to Outlook in the previous exercise, or you can use another Contacts list.
Note
BE SURE TO verify that you have sufficient rights to create new list items in a Contacts list. If in doubt, see the Appendix A at the back of this book.
In the Outlook Navigation pane, under My Contacts, select Contacts.
Select the two or more users that you want to move by holding down the SHIFT or CTRL key while clicking the left mouse button.
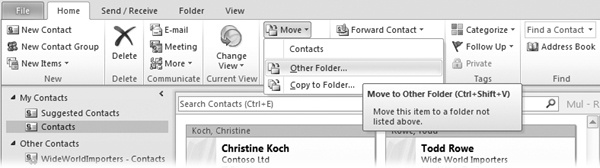
On the Home tab, click Move in the Actions group, and then click Other Folder.
In the Move Items dialog box, scroll down. To the left of the SharePoint Lists folder, click the green arrow icon and then select WideWorldImporters – Contacts.
Click OK.
A Microsoft Outlook dialog box appears, stating that any incompatible content will be removed during the next synchronization and that the original version of each affected item will be preserved in the “Local Failures” folder.
Click Yes.
The Contacts folder is displayed; the contacts that you selected are not.
Tip
To move a single contact, select the contact and press CTRL+SHIFT+V to open the Move Items dialog box. Alternatively, while holding down the mouse button, drag the contact to WideWorldImporters – Contacts in the Outlook Navigation pane. You can also use these techniques to move more than one contact.


Copying SharePoint Contacts into Outlook
You can copy any single contact or event item from a SharePoint list to Outlook 2007 or Outlook 2010. Once the contact item is copied into the Contacts folder, the contact item in the Contacts folder and the contact item on the SharePoint Contacts list are independent of each other—that is, there is no link between them. Therefore, amendments made to the contact in the Outlook Contacts folder are not done to the version in the SharePoint Contacts list. To ensure that your contact information does not become out of date, you should assign a definitive location for a specific contact by maintaining it as a contact item on either a SharePoint Contacts list or in your Outlook Contacts folder. If contact information is to be shared among a team, then a SharePoint Contacts list is the preferred location.
Troubleshooting
You cannot copy a recurring series of events by using the steps detailed in the following exercise. Instead, copy a recurring series or an individual occurrence from a recurring series by opening it within Outlook. On the Appointment Series tab, click Copy to My Calendar in the Actions group.
In the following exercise, you will copy contacts from a Contacts list in a SharePoint site into Outlook. You can also copy calendar, event, or task items by using the same technique.
Set Up
Open Outlook, if it is not already open. You can use the Contacts list that you connected to Outlook in a previous exercise, or you can use another Contacts list. Ensure that there are contact items added to the list.
Note
BE SURE TO verify that you have sufficient rights to read items in the Contacts list. If in doubt, see the Appendix A at the back of this book.
In the Outlook Navigation pane, under Other Contacts, select WideWorldImporters – Contacts.
Select the users that you want to copy by holding down the SHIFT or CTRL key when selecting the users.
Right-click one of the contacts that you selected, click Move, and then click Copy to Folder.
The Copy Items dialog box appears.
Scroll to the top of the dialog box and select Contacts, and then click OK. The contacts are added to your Outlook Contacts folder.

Sending an Email Using a SharePoint Contacts List
You might occasionally move and copy contacts to a SharePoint Contacts list. You may also frequently use a Contacts list to look up specific contact details, such as a telephone number, or send the contact an email.
In this exercise, you will send an email by using a SharePoint Contacts list.
Set Up
Open Outlook, if it is not already open. You can use the Contacts list that you connected to Outlook in a previous exercise, or you can use another Contacts list. Ensure that there are contact items added to the list.
Note
BE SURE TO verify that you have sufficient rights to read list items in a Contacts list. If in doubt, see the Appendix A at the back of this book.
In the Outlook Navigation pane, select Mail.
On the Home tab, click New E-mail in the New group. The Untitled – Message (HTML) dialog box opens.
Click To. The Select Names: Global Address List dialog box opens.
On the Address Book list, select WideWorldImporters – Contacts.
Double-click the name of the contact to whom you want to send a new email message, and then click OK.
Enter your email message subject and text, and then click Send.


Viewing SharePoint Calendars and Personal Calendars in Outlook
You can work with multiple calendars when using Outlook 2007 or Outlook 2010, thereby enabling you to create calendars for specific purposes, such as having one for work and one for your personal life. By using Outlook, you can view several calendars at the same time. When you view and scroll multiple calendars, they all display the same date or time period. This feature is particularly useful if you have connected a SharePoint Calendar list to Outlook. By doing so, you are creating an Outlook Calendar folder in which a copy of the data from the SharePoint list is stored locally. In this way, you can keep track of any calendar items in a SharePoint list from the Outlook Calendar folder, even if you are not connected to the network.
In the following exercise, you will connect to a SharePoint Calendar list and view your personal Outlook calendar and a connected SharePoint Calendar list side by side.
Note
BE SURE TO verify that you have sufficient rights to read list items in a Calendar list. If in doubt, see the Appendix A at the back of this book.
On the Quick Launch, under the Lists section, click Calendar, and then, on the Calendar tab, click Connect to Outlook in the Connect & Export group.
If an Internet Explorer Security dialog box opens, stating: Do you want to allow this website to open a program on your computer?, click Allow. Then, if an Internet Explorer Security warning dialog box opens, stating: A website wants to open web content using this program on your computer, click Allow.
Outlook opens, and an Outlook dialog box appears, stating that you should connect only lists from sources you know and trust, and asking whether you want to connect this SharePoint Calendar to Outlook.
Click Advanced to open a SharePoint Lists Options dialog box, and then, in the Folder Name text box, type WideWorldImporters – Calendar and click OK. Then, in the Microsoft Outlook dialog box, click Yes.
You might be asked to supply your user name and password. Your personal Outlook calendar appears side by side with the connected SharePoint Calendar list. The background color of the Calendar folder name matches the color on the displayed calendar so that you can discern between the two calendars.
Click the arrow on the WideWorldImporters – Calendar tab.
The two calendars are viewed in overlay mode, where the two calendars are merged; however, the two calendars remain color-coordinated as do the appointments in both calendars.

Taking SharePoint Content Offline
Connecting lists to Outlook enables you to aggregate all your list items in one place. For example, you can view all the calendar events in the Calendar window or all your tasks in the Tasks window, or you can view tasks assigned only to you on the To-Do Bar. When you connect a SharePoint list or library, including external lists, to Outlook, a local copy of the SharePoint content is stored locally on your computer. Connected SharePoint content can be used online or offline; however, it is important to understand the synchronization process for each.
Online. Once a list or library is connected, edits made in Outlook are synchronized automatically with the master content on the SharePoint site, dependent on the Send/Receive settings. The default, Send/Receive Group, All Accounts, is configured for your mail items, and it also controls the updates to subscribed RSS feeds and SharePoint lists. The All Accounts group schedules an update to occur every 30 minutes. You can force synchronization by using the Send/Receive All Folders command on the Send/Receive tab or by using F9. You can create new Send/Receive groups, which contain all or only a subset of your SharePoint connected lists or libraries, with their own synchronization schedules. Once the SharePoint list or library is updated, your changes are synchronized with other users who are connected to these SharePoint lists and libraries in Outlook. If those users have the list or library open in the Outlook detail pane, then they will not see the updates until the next synchronization schedule.
Note
When connected to Outlook, external lists (meaning that the data is external to SharePoint) are created in the SharePoint External Lists folder, which is not controlled by the Send/Receive settings. External lists are synchronized by default every 6 hours. When you right-click an external list in Outlook, you can find the Synchronization status and when the data was last refreshed from the external system. You can then force synchronization.
Offline. When you are offline, you can view and edit cached copies of the SharePoint content, but your modifications are not synchronized with the master content on the SharePoint site. To synchronize the content, you must go online. Data that is presented in an external list may or may not be available offline, depending on how the External Content Type for that external list is configured.
Tip
The Archive feature in Outlook cannot be used with the SharePoint List folder, or with any connected lists or libraries.
In this exercise, you will make Calendar list content available offline, and then edit an appointment offline.
Set Up
Open Outlook, if it is not already open, showing the Calendar list that you connected to Outlook in a previous exercise.
Note
BE SURE TO verify that you have sufficient rights to modify list items in a Calendar list. If in doubt, see the Appendix A at the back of this book.
On the Send/Receive tab, click Work Offline in the Preferences group.
On the Outlook status bar, a red circle with a white cross and the text “Working Offline” appears.
Troubleshooting
If the Work Offline command does not appear in the Preferences group, verify that your account is configured for Cached Exchange Mode. This can be configured using the backstage by clicking Account Settings, and then, from the drop-down menu, clicking Account Settings. On the E-mail tab, select the relevant account, and then click Change. Select the Use Cached Exchange Mode option. You will need to close Outlook and reopen it for the changes to take effect.
Click the WideWorldImporters – Calendar tab, and then, on the Home tab, click New Appointment. A new, untitled appointment form opens.
On the form status bar, hover the mouse over the icon, or put it over the link to the right of In Shared Folder. A tooltip appears with the date that the Calendar list was last updated.
In the Subject box, type SharePoint team meeting, and then, on the Appointment tab, click Save & Close. If a Reminder dialog box opens, click Dismiss.
In the Navigation pane, under Other Calendars, right-click WideWorldImporters – Calendar, and click Open in Web Browser.
The SharePoint Calendar list is displayed. Notice that the appointment that you added in Outlook does not appear in the SharePoint Calendar list.
Close the browser.
On the Send/Receive tab, click Work Offline in the Preferences group.
The Offline icon disappears from the Outlook status bar.
Press F9.
In the Navigation pane, under Other Calendars, right-click WideWorldImporters – Calendar, and then click Open in Web Browser.
The SharePoint Calendar list is displayed. The appointment that you added in Outlook appears in the SharePoint Calendar list.


Managing SharePoint Alerts in Outlook
When you create an alert for an item, such as a document, list item, document library, list, survey, or search result, you immediately receive a confirmation email message notifying you that the alert was created successfully. This message indicates that the alert process is working. The confirmation message also contains information about the alert and provides links to the SharePoint site where the item is located. When someone makes a change to the item, you receive an email message alert that indicates what was changed, who made the change, and when the change was made. You should create an alert when content has changed and you need (or want) to take notice of it.
To avoid alerts swamping your inbox, you should choose carefully the SharePoint content about which you wish to be alerted. Ideally, you should select only important content that you want to monitor. Consider subscribing to RSS feeds to monitor other SharePoint content that is not as important and does not need your close supervision.
By default, Windows SharePoint Services does not provide an alert aggregation capability for all your alerts across every SharePoint site. To manage your alerts by using the browser, you would have to visit each site that has an alert set. To help you manage your alerts, you could save the message notifying you that an alert was created successfully because it provides a link to the SharePoint site. You could then use the email message alert to navigate to those sites on which the alerts are set.
In an environment where many SharePoint sites exist, managing your alerts could be a daunting task if they were monitored and organized merely by the links in your email alert messages and by memory. When using Outlook 2007 or Outlook 2010, you can manage the email alerts received from all SharePoint intranet sites and trusted websites from one dialog box.
In the following exercise, you will use Outlook 2010 to create a new alert.
Set Up
Open Outlook, if it is not already open. The exercise will use the SharePoint Contacts list that you used earlier in this chapter, but you can use another Contacts list if you want.
Note
BE SURE TO verify that you have sufficient rights to create an alert on the Contacts list. If in doubt, see the Appendix A at the back of this book.
Click the File tab to display the backstage, and then click Manage Rules & Alerts in the middle pane. You may need to scroll down.
The Rules And Alerts dialog box is displayed.
Click the Manage Alerts tab.
Click New Alert. The New Alert dialog box is displayed.
In the Web site Address box, type the Uniform Resource Locator (URL) of a SharePoint site that contains a Contacts list, and then click Open.
A browser window opens, displaying the New Alert page.
Select Contacts.
Scroll down and click Next. The New Alert page is displayed.
In the Send Alerts To section, type your email address if it doesn’t already appear. Review the other settings, and then click OK.
Troubleshooting
If your SharePoint server is not configured to send email, an Error page will display. Only a server administrator can configure email settings for a SharePoint installation.
The browser displays the My Alerts On This Site page. Under the Frequency: Immediate area, the alert named Contacts is listed.
Close all browser windows.
Switch to Outlook, where the Rules and Alerts dialog box should still be visible. A new alert, Contacts: All items (All Changes), should be listed.
Troubleshooting
If the alert does not appear in the Rules And Alerts dialog box, click OK and then click Manage Rules & Alerts. If the new alert still does not appear, then close Outlook. Restart Outlook, and then reopen the Rules And Alerts dialog box.
From the Rules And Alerts dialog box, you can do any or all of the following:
Alter the properties of an alert. The Alert Properties dialog box provides a link to the SharePoint site, buttons to “Modify Alert” and “View Item,” and a link to the Alerts management page on the SharePoint site.
Select multiple alerts by using the SHIFT or CTRL key when you click an alert. You can then click Delete to delete all the alerts you selected. Click Yes in the Microsoft Outlook warning dialog box that appears, asking whether you want to delete the selected rows.
Use Outlook rules to manage your alerts so that a notification window pops up, a sound is played, the alert email message is moved to a specified folder, or some other action is performed on the alert message.


Creating Meeting Workspaces from Outlook
Every company holds meetings. These meetings often have a specific agenda; participants may need to prepare for meetings by completing a task or two prior to the meeting. The task may be simply reviewing a document, assembling a list of questions, or perhaps creating a prototype of something to bring to the meeting. A meeting can become inefficient, or even completely ineffective, because the preparation tasks that participants are expected to complete are not communicated effectively. In addition, after the meeting is over, meeting notes or follow-up steps may need to be provided to the participants and tracked.
SharePoint Foundation provides a site template called Meeting Workspace that helps improve communications before and after a meeting. Meeting Workspaces enable you to share your meeting agenda and objectives, publish documents and files, track tasks, and complete other collaborative activities through one central location. By centralizing this information, your meeting attendees have access to the latest information, and you avoid sending files through your email system. Three of the methods that can be used to create a Meeting Workspace are as follows:
In the browser, select New Site from the Site Actions menu on a SharePoint site.
Select the Meeting Workspace check box when you create a Calendar list.
Click Meeting Workspace on a new meeting request in Outlook 2007 or Outlook 2010. When you create a meeting request in Outlook, you can create a Meeting Workspace site or link the meeting to an existing Workspace site.
Once you have created a Meeting Workspace, you should familiarize yourself with the site because it is slightly different from a Team site. It has no Quick Launch, and the pages are Web Part pages and not wiki pages. And if you create a Meeting Workspace from a recurring event, additional information is provided on the home page of the site.
Note
Before you can create your first Meeting Workspace using Outlook, you must add the Meeting Workspace command to either the Quick Access Toolbar or the Ribbon, which you will do in the next exercise. You will need to do this only once because Outlook will remember your custom settings.
In this exercise, you will create a Meeting Workspace using Outlook.
Note
BE SURE TO verify that you have sufficient rights to create a site. If in doubt, see the Appendix A at the back of this book.
On the Home tab, click New Items in the New group, and then click Meeting. A new, untitled meeting form opens.
Click the File tab to display the backstage, and then click Options.
The Outlook Options dialog box opens.
Click the Quick Access Toolbar, and then, from the Choose commands from list, select Commands Not in the Ribbon.
In the list of commands, scroll down to Meeting Workspace and then click Add.
The Meeting Workspace command appears in the Customize Quick Access Toolbar list.
Click OK to close the Outlook Options dialog box. The untitled meeting form is displayed.
In the To box, type the email addresses of the people you want to invite to the meeting. In the Subject box, type Product Review.
Important
SharePoint uses the Subject of the meeting request as the Meeting Workspace site name. If you create a Meeting Workspace site with a blank Subject line, Outlook will create a Meeting Workspace site with the name UntitledXXX, where XXX is a number based on the number of existing untitled sites.
In the Location box, type Wide World Importers Main Office.
On the Quick Access Toolbar, click Meeting Workspace. The Meeting Workspace Task pane appears to the right of the form.
In the Meeting Workspace Task pane, in the Create a workspace section, click Change settings. The Meeting Workspace Task pane displays Select a location.
Click Click to select, and then select Other. The Other Workspace Server dialog box is displayed.
Type the URL of a SharePoint site. The Meeting Workspace site will be a subsite of the SharePoint site that you type here.
Click OK.
Tip
You can select a different language for your site if other language packs are installed on your SharePoint server. You can also choose a different Meeting Workspace template. By default, SharePoint installs five Meeting Workspace templates: Basic Meeting Workspace, Blank Meeting Workspace, Decision Making Workspace, Social Meeting Workspace, and Multipage Meeting Workspace. You can associate a meeting request with an existing Meeting Workspace by selecting the link to an existing Workspace option.
In the Meeting Workspace Task pane, click OK, and then click Create.
Outlook connects to the SharePoint website and creates the Workspace. A meeting request is placed in your Outlook Calendar that contains the details of the meeting and a URL to the Meeting Workspace. No corresponding entry exists in the Calendar list for the parent site. The Outlook meeting request and Meeting Workspace Task pane are updated.
Click Send.
Outlook attempts to add the attendees to the Meeting Workspace site in the Contributor site group. If you have entered an illegal email address, a Check Names dialog box opens, which you can use to choose a new name or add a new contact. If Outlook was unable to include the attendees to the site, a notification is displayed.
Attendees can access the Meeting Workspace site that you created by clicking the link in the invitation email that they receive from you.
Click the Product Review link to display the Product Review Meeting Workspace site in the browser.


After creating the Meeting Workspace, you can add or remove attendees using the meeting request in Outlook. When you send the meeting request, Outlook updates the Meeting Workspace.
Important
If you change the meeting request and click Save and then close the meeting request instead of clicking Send Update, the updates will not be sent to the Meeting Workspace site.
You can also add and remove attendees through the Meeting Workspace site by clicking Manage Attendees in the Attendees Web Part; however, this does not update the meeting request in Outlook, which you will need to do manually. For this reason, many users prefer to create and manage Meeting Workspaces from within Outlook.
When you delete a Meeting Workspace, the meeting request in your calendar contains a broken link pointing to the recently deleted site. Similarly, when you cancel the meeting or delete the meeting request in your Outlook calendar, the Meeting Workspace still exists and displays a message that this has occurred.

This is sometimes called an orphan site. Of course, you can still delete the site from the Site Settings page accessed through the Site Actions menu. However, you may not remember where you created the Meeting Workspace. Consequently, you should save a link to your Meeting Workspace, such as on a SharePoint link list, or delete the Meeting Workspace after saving any important information that the site contained. Therefore, do not cancel a meeting and send a new meeting request if you just want to change some details about a meeting. Instead, send an updated meeting request to attendees because this maintains the link between the meeting request and the Meeting Workspace.
Configuring an RSS Feed
In the previous section, you learned how to manage alerts, which are notifications received via email that notify you when content has changed in a SharePoint list or library. Alerts are a “push” method of notification. SharePoint pushes content to you based on specific criteria at predefined intervals.
Outlook 2007 and Outlook 2010 support RSS—the acronym previously meant Rich Site Summary—which is another method of notifying you when something has changed or new content is published within a SharePoint site. Outlook allows you to syndicate this information, and such programs are called RSS readers.
RSS is a “pull” method of notification. You decide when to use an RSS reader to read content exposed as RSS feeds; therefore, most people will use RSS for tracking content that is regularly updated. It is commonly used to stay up to date with the latest news on websites and blogs, but it can also be used to distribute pictures or audio or video content. Sites that expose their content via RSS are said to have an RSS feed. You can create an RSS feed on content stored in a SharePoint list. Therefore, very simple business processes can be handled by alerts. RSS suits ad-hoc queries or processes. More complex business processes can be managed using the built-in workflows or built using Microsoft SharePoint Designer 2010 or Visual Studio 2010.
See Also
More information on the built-in workflows can be found in Chapter 11.
In this exercise, you will add an RSS feed to Outlook 2010.
Set Up
Open the browser and display the SharePoint list or library with which you would like to subscribe to the RSS feed. The exercise will use the http://wideworldimporters site and the Shared Documents library, but you can use whatever site and list or library you want.
Note
BE SURE TO verify that you have sufficient rights to the list or library. If in doubt, see the Appendix A at the back of this book.
On the Library tab, click RSS Feed in the Share & Track group.
The Team Site: Shared Documents page is displayed.
Right-click Subscribe to this feed, and then click Copy Shortcut.
Open Outlook 2010, if it is not already open. On the navigation bar, under your mail folders, right-click RSS Feeds, and then click Add a New RSS Feed.
The New RSS Feed dialog box opens.
In the Enter the location of the RSS Feed box, press CTRL+V to paste the shortcut that you copied in step 2.
Click Add.
The New RSS Feed dialog box closes, and an Outlook dialog box opens, warning that you should only add subscriptions from sources you know and trust.
Click Advanced to open the RSS Feed Options dialog box.
In the General section, in the Feed Name box, type WideWorldImporters: Shared Documents.
Click OK to close the RSS Feed Options dialog box, and then click Yes to close the Microsoft Outlook dialog box.
The RSS feed, WideWorldImporters:Shared Documents, appears as a folder. The detail pane displays an entry for each document in the Shared Documents library.
Note
You can change the properties of the RSS feed as follows: Click the File tab to display the backstage, click Account Settings, and then, from the drop-down menu, click Account Settings to display the Account Settings dialog box. Click the RSS Feeds tab and then select the RSS feed whose properties you wish to modify. Click Change to display the RSS Feed Options dialog box, where you can change the RSS feed properties.


Key Points
You can copy contacts listed in your personal Outlook Contacts folder both to and from a SharePoint Contacts list.
You can copy and move SharePoint list items both to and from Outlook.
You can connect any SharePoint Contacts list, Calendar list, Tasks list, or discussion board to Outlook. This action creates a folder in Outlook that you can synchronize with the SharePoint list or that synchronizes automatically every 20 minutes.
In Outlook 2010 and Outlook 2007, you can view multiple calendars side by side. These calendars can be connected to SharePoint Calendar lists.
You can aggregate and manage all your tasks in one place whether you created them within Outlook, in a SharePoint Tasks list, or within Microsoft OneNote.
You can manage all your SharePoint alerts from the Rules And Alerts dialog box in Outlook.
You can create a Meeting Workspace site from Outlook by using a meeting request. When using this technique, you create a Meeting Workspace as a subsite to a SharePoint website.
You can manage your RSS feeds in Outlook just like your other mail by flagging them for follow-up, assigning them a specific color, or automating any process by using the rules.