
Chapter 3. Creating and Managing Sites

In this chapter, you will learn how to | |
✓ | Create sites. |
✓ | Manage site users and permissions. |
✓ | Create a child Workspace. |
✓ | Change a site’s theme. |
✓ | Save and use a site template. |
✓ | Manage site features. |
✓ | Manage site content syndication. |
✓ | Delete a site. |
Microsoft SharePoint Foundation sites and Workspaces are containers for the web pages, lists, document libraries, child sites, and other elements, as well as features and settings, that provide the site’s functionality. Lists contain structured, tabular data, while document libraries contain unstructured binary documents. You can use any site as a single container for your data, or you can create as many child sites as you need to make your data easier to find and manage. You will also frequently find yourself creating sites to secure a place for a given group of people to collaborate on its contents. For example, you might create a site to manage a new team or project, collaborate on a document, or prepare for and follow up on a meeting. As a container, sites can be used to secure their contents.
As we discussed in Chapter 2, sites and Workspaces are organized hierarchically within a site collection. There is always one top-level site, and there can be one or more child sites as well. Typically, top-level sites are created for an entire team and therefore have many visitors (that is, people who only read), a few members (that is, people who can create and update content), and one or two owners. But as child sites and grandchild sites are created, the total number of users typically decreases, while the number of people designated as members increases.
Workspaces function just like sites except that they can be created from within Microsoft Office clients, such as Microsoft Word and Microsoft Outlook, their expected lifetime is short relative to a site, and child sites and Workspaces are not allowed. Similar to clearing off a desk to work specifically on a given project, you could create a SharePoint Foundation Workspace to work on a specific document or meeting. When the given project is completed, you would likely keep the results of the project and throw away all the other scraps. Similarly, once you are finished with a Workspace, you publish the results and throw away the container.
Site templates are used in SharePoint Foundation as a blueprint to jump-start a new site’s usefulness by autogenerating lists, document libraries, and web pages, prepopulated with Web Parts that likely will be most useful in a given situation. In this chapter, you will learn how to create a site using one of the site templates available from a default installation, as well as the steps necessary to manage a site. You may want to differentiate a site by the way it is presented to the user, so you will also learn how to apply a theme to your site.
Important
Remember to use your SharePoint site location in place of http://wideworldimporters in the following exercises.
Creating Sites
The catalyst for organizing your data into different site containers will often be the same catalyst for creating multiple subdirectories on the file system. You may have too much information to use a single container and still locate your information easily. If all your files were kept in the root of the hard drive along with the operating system files and other program files, the list of files would be difficult to sort through, work with, and manage. Just as you would create subdirectories to organize your file system data, you likely will create child sites to help organize your SharePoint Foundation data in logical ways.
The initial site created in a SharePoint Foundation site collection is called the top-level site. Top-level sites are created from within SharePoint Central Administration because they don’t have a parent site. Although the top-level site is functionally the same as its child sites, it includes administrative links on its Site Settings page to manage site collection functionality.
To create a child site, you must navigate to the Create page of the would-be parent site by selecting the New Site option from the Site Actions menu. When Silverlight is installed on the client, selecting the New Site option displays the Silverlight Create dialog that has an improved, intuitive user interface in comparison with the Create page, while providing the same choice of options.
Tip
Alternatively, you can navigate to the site’s Create page directly from the browser’s address bar. See the sidebar entitled Layouts Directory, which follows, for details on how to gain direct access to the destination directly from the browser’s address bar.
When you initially create objects like sites, Workspaces, lists, and libraries in SharePoint Foundation, you are establishing two name values: the display name, usually labeled Title or Name, and the Uniform Resource Locator (URL) name, also known as the internal name. Typically, as is the case with sites, there is an option to provide the URL name separately. Comply with the best practices outlined in the sidebar entitled Naming a URL, which follows, when specifying the URL name.
From the Create dialog or page, you can choose to provision your site initially using one of the 10 built-in site templates. Each site template provisions lists, document libraries, and web pages prepopulated with Web Parts that use the navigation best suited for the purpose of the site template.
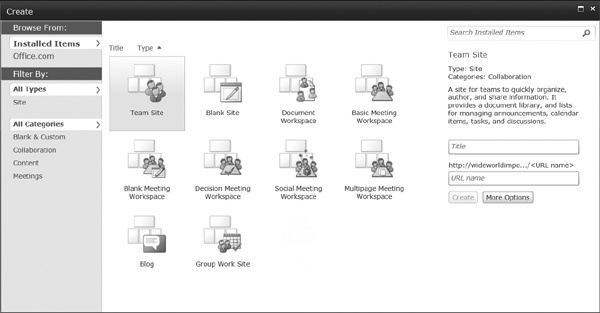
Team Site, Document Workspace, Group Work Site, and Blank Site have the same latent capabilities and Quick Launch navigation. The Team Site template provisions a Shared Documents library and four lists: Announcements, Calendar, Links, and Tasks. The Shared Documents library is made more visible by placing a Web Part for it on the site’s default home page. The Document Workspace template provisions the same document libraries and lists as the Team Site, but places a Members Web Part on the default home page. In addition to the same basic lists and libraries as the Team Site, the Group Work Site template provisions four lists: Circulations, Phone Call Memo, Resources, and Whereabouts. Instead of a Calendar list, the Group Work Site provides the Group Calendar list that is placed on the site’s default home page, together with the Whereabouts list displayed in their associated Web Parts. The Blank Site template, as you might surmise, has no lists or document libraries.
The Blog site template provides a way to publish a type of journal known as a web log or just a blog. The blog owner creates posts on which other users can comment. Each post is a separate content page, and a rollup summary of these pages is typically presented in reverse chronological order (with newest entries listed first) on the home page of the blog site. Blogs are commonly used as news sites, journals, and diaries. A blog focuses on one or more core competencies of the author and is sometimes used as a soapbox for the blog owner to state an opinion. Blogs can also be used as a one-way communication tool for keeping project stakeholders and team members informed.
Tip
Blog site content can be syndicated using a Really Simple Syndication (RSS) feed. RSS feed-aggregating software allows people to subscribe to the content they are interested in and have new and updated posts delivered to them. Using these tools, people can aggregate the content from many blogs (or any SharePoint Foundation list) into one common reader where posts from selected authors can be sorted, filtered, and grouped. Microsoft Outlook 2010 can aggregate RSS feeds; there are also many vendors that give away or sell RSS feed–aggregating software.
The five Meeting Workspace templates provided by SharePoint Foundation are variations on a theme. Unlike all the previously described site templates, they don’t have a Quick Launch or a left navigation area. In addition to the traditional lists and libraries, such as Document Library, Picture Library, Tasks, and Discussion Board, they can provision unique lists, such as Agenda, Attendees, Decisions, Objectives, and Things To Bring.
See Also
For more details on Meeting Workspaces and blogs, refer to Chapter 12.
Tip
The 10 built-in templates are actually configurations of the underlying site definitions. Additional configurations, and even alternate site definitions, can be created in the underlying files by the managers of your web servers. Built-in configurations can also be removed or altered.
You will likely focus, at least initially, on using these built-in site templates that are based on the underlying site definitions. However, it is possible to save the websites you create as custom site templates that you and others can then choose from the Create dialog as a foundation for a new site. When you save the website as a template, a custom web template is created by SharePoint Foundation and saved as a file with a .wsp extension. This is done by using the Save Site As Template link in the Site Action section of the Site Settings page of any site. Custom web templates saved in this way are initially available only in the same site collection in which they are saved. The section entitled Saving and Using a Site Template, later in this chapter, will explain how to copy a saved web template into another site collection. All alterations except security-related settings are retained on those sites provisioned by using saved custom web templates.
When creating a new site, there are two obvious permission options available. The default option, Use Same Permissions As Parent Site, checks the parent site’s permission every time the user visits the child site to determine what the user is allowed to do on that site. As the permissions on the parent site change over time, the permissions on the child site also reflect those changes. The other option is to Use Unique Permissions. When you click this option as the site’s creator, you are initially the only user with access to the site and are then associated with the Administrator permission level.
Important
If you choose Use Same Permissions As Parent Site, it is possible to have the right to create a new site but not have the right to delete it. However, if you choose Use Unique Permissions, you are the site’s administrator and, as such, will always have the right to delete the new site.
You have two other options for assigning permissions to a new site that are less obvious. If you initially choose Use Unique Permissions, you are the only user with access to the site and can make any changes you wish. You can then switch to Use Same Permissions As Parent Site, whereby everyone who has access to the parent site (including you) will subsequently have access to the child site using the permissions assigned on the parent site. If you initially choose Use Same Permissions As Parent Site, the parent site’s permissions will be used. Yet, if you subsequently switch to Use Unique Permissions, all the permissions of the parent site are copied to the child site. This can save a great deal of time if most of the people who have access to the parent site also need access to the child site.
Three navigation options can be specified when creating a new site. The first two deal with the visibility of the child site being created within the navigation of the parent site. You can choose to show the child site on either the Quick Launch or the top link bar of the parent site. The former defaults to No, and the latter defaults to Yes. Conversely, you can specify whether the top link bar of the parent site should display on the top link bar of the created child site. The default is No.
See Also
See Using the Practice Files, at the beginning of this book, for more information about using the practice site templates provided for chapters in this book.
In the following exercise, you will create a child site that the buyers at Wide World Importers will use for collaboration. As a team, the buyers need a centralized place to consolidate their announcements, links, and general discussions, as well as to track the status of their purchases and the list of current suppliers. You will use the Team Site template to provision the new child site.
Set Up
Open the top-level, would-be parent site from which you’d like to create the new site. The exercise will use the http://wideworldimporters site, but you can use whatever site you wish. If prompted, type your user name and password, and click OK.
Note
BE SURE TO verify that you have sufficient rights to create a site. If in doubt, see the Appendix A at the back of this book.
On the Site Actions menu, click New Site to display the Create dialog.
Select Team Site from the available templates in the middle pane, and then click More Options in the right pane. The Create dialog for Team Site appears.
In the Title text box, type Buyers to establish a display name for the new site.
In the Description text box, type a description, such as Site for general buyer collaboration, to help users understand the purpose for the new site.
In the Web Site Address section, in the URL name text box, type buyers.
This determines the value in the browser’s address bar that users will see when they visit the site. Refer to the sidebar entitled Naming a URL, earlier in this chapter, for best practices regarding naming conventions.
Click the option button that defines the type of permissions that you want to use on the site initially. For the Buyers site, use the default permission Use same permissions as parent site.
In the Navigation section, define whether the links to this site will appear on the Quick Launch and the top link bar of the parent site. Click Yes for the link to this site to be displayed on the Quick Launch of the parent site, and keep the default Yes option for the link to this site to appear on the top link bar of the parent site.
In the Navigation Inheritance section, define whether this site will use the top link bar from the parent site or have its own. For the Buyers site, keep the default No option for this site to have its own top link bar.
Scroll down to the bottom of the dialog and click Create.
The new Team site with a default set of lists, document libraries, and web pages has been created and is displayed in the browser.


Managing Site Users and Permissions
Information in SharePoint Foundation is secured at one of four levels, as follows: site level, list or document library level, folder level, and list item level. By default, all lists inherit the permissions of the site that contains them; all folders inherit the permissions of the list that contains them; and all list items inherit the permissions of the folder that contains them.
See Also
For deeper discussion about list, folder, and list item security, refer to Chapter 7.
Selecting the default option, Use Same Permissions As Parent Site, provides permissions inheritance from the parent site to a newly created child site. SharePoint Foundation checks the parent site’s permission every time the user visits the child site.
When creating a new site, if you select the Use Unique Permissions option, SharePoint Foundation initially categorizes users of a site into three SharePoint groups, as follows:
Visitors. People or groups who only need to be able to read content on a site
Members. People or groups who need to be able to create and edit content, but not create lists or manage site membership
Owners. People who are responsible for all aspects of managing and maintaining a site
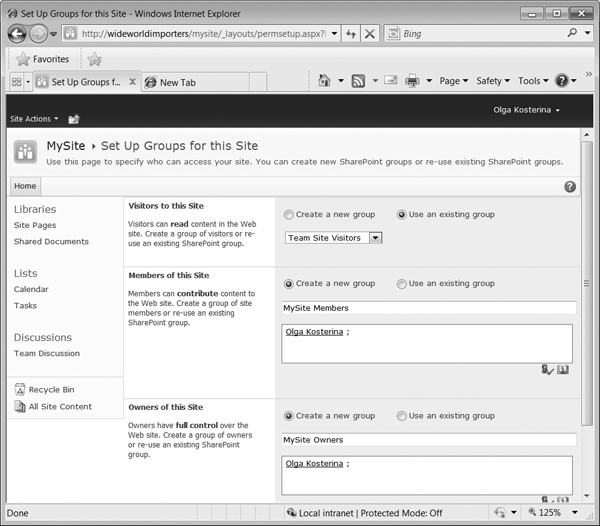
The Use Unique Permissions option initially specifies you as the site’s creator, with sole access to the new site as its owner. After you click Create, you are presented with the Set Up Groups For This Site page to add users to the three groups to provide them with access to the newly created site.
A site can be toggled between inherited permissions and unique permissions using its Permissions page, which you navigate to by clicking Site Permissions on the Site Actions menu. Once on the Permissions page, choosing Inherit Permissions on the Ribbon of a site using unique permissions allows you to toggle the site to have inherited permissions. Choosing Stop Inheriting Permissions on the Ribbon of a site inheriting permissions allows you to toggle the site to have unique permissions. A warning message will display, asking you to confirm your action.
A site using unique permissions has no tie to the parent site, so you are allowed to add and remove users from the site regardless of whether they have permissions on any other site. When users are added to a site, they must be added to a SharePoint group or associated with at least one permission level.
SharePoint groups are maintained at the site collection level and represent a collection of users or groups with a defined set of one or more permission levels and a few governing attributes. When new users or groups are added to a SharePoint group, they are granted the permissions of that group in any site.
Think of permission levels as a named collection of permissions that can be assigned to SharePoint groups or individual users. Five permission levels are made available by SharePoint Foundation on every site, as follows:
Read. The user can only view site content.
Contribute. The user can view, add, update, and delete site content.
Design. The user can view, add, update, delete, approve, and customize site content.
Full Control. The user has full control over site content.
Limited. The user has no permissions to the site in its entirety, but only to specific lists, document libraries, folders, list items, or documents when given explicit permission.
The list of individual permissions and the permissions levels they are included in by default is shown here.

See Also
For more details on the individual permissions and permission levels, refer to the Appendix A at the back of this book.
The initial SharePoint groups on a site with unique permissions have the following permission levels:
The Visitors group has the permission level of Read.
The Members group has the permission level of Contribute.
The Owners group has the permission level of Full Control.
Not only can you associate existing SharePoint groups and individual users with permission levels, but you can also associate Windows groups (including Active Directory groups, and Local Machine groups) with permission levels. This is a very practical approach to providing tight security with minimal maintenance. However, you may not have control over the Windows groups defined in your organization.
Although you can create your own permission levels and even alter all permission levels except for Full Control and Limited, you will likely find these built-in levels to be adequate for most business scenarios. You may also want to provide all users with some level of access to the data on your site.
Tip
If anonymous access has been enabled for Web application in SharePoint Central Administration and has not been denied via the Anonymous User Policy, anonymous users can be granted some access, either to the entire site or to individual lists on a case-by-case basis. This provides the central administrator with the option to decide whether to grant anonymous access for each Web application before its site administrators can begin to turn on this option.
Tip
You will also find an option to provide all authenticated users with site access on each site’s Permissions page using the Grant Permissions command. The topic of adding users is covered later in this section.
After all users and groups are assigned to various permission levels, it is possible—even likely—that someone will be associated with more than one permission level. Rather than enforcing the most restrictive permission level, all associated rights are aggregated, and the cumulative list of unique rights applies. This can be overridden only by policies created in SharePoint Central Administration.
In the following exercise, you will change the permissions for a child site from inheriting permissions from its parent site to using unique permissions. You will then add users representing Wide World Importers buyers to the child site with the Contribute permission.
Set Up
Open the Buyer child site created in the first exercise (http://wideworldimporters/buyers) from the address bar of your browser, if it is not already open. If prompted, type your user name and password, and click OK.
Note
BE SURE TO verify that you have sufficient rights to alter the site’s permissions. If in doubt, see the Appendix A at the back of this book.
On the Site Actions menu, click Site Permissions.
The Permissions: Buyers page is displayed, showing permission levels that have been assigned to the groups associated with this site. There is a yellow bar across the top of the page stating that this website inherits permissions from its parent. Because this child site is inheriting permissions from its parent, you see the SharePoint groups from the parent site listed.
On the Ribbon, click Stop Inheriting Permissions to establish unique permissions for this site.
Click OK in the message box that appears to confirm the change.
Notice how this page has changed. You now have check boxes next to each group, and there are additional commands on the Ribbon that allow you to modify the permissions. The yellow bar across the top of the page now states that this website has unique permissions.
On the Ribbon, click Create Group to display the Create Group page.
Type a name, such as Buyers Members, into the Name text box.
If you want, type a description of the new group in the About Me text box.
Select the user or group that will own this group. It defaults to you; this example uses Olga Kosterina.
Leave the default settings for Group Settings and Membership Requests.
Scroll down to the Group Permissions for this Site section and click the Contribute check box to grant your new group the Contribute permission level on the Buyers site.
Click Create. The new group has been created and added to the People and Groups page for the Buyers Members group.
For the Buyers site, everyone in a Windows group called Buyers needs to be added and associated with the Contribute permission level. You will now add a Windows group to the new SharePoint group.
On the New menu at the top of the page, click Add Users to display the Grant Permissions dialog.
In the Users/Groups text area, type the name of a group to whom to grant Contribute permissions, such as Buyers.
Important
Typically, you add users and Windows groups by using a format such as domainnameusername or domainnamegroupname, but your computer name cannot be anticipated here. Fortunately, SharePoint Foundation searches your computer for users and Windows groups that match even if the proper naming convention isn’t provided.
Click OK. The Buyers Windows group has been added to the Buyers Members SharePoint group.
On the Site Actions menu, click Site Permissions. Verify that the Buyers Members group is listed on the site Permissions page with Contribute permissions.
Bill Malone, who is Wide World Importers’ head buyer, needs to be associated with the Full Control permission level for the Buyers site. You will now grant Bill the Full Control permission level.
On the Ribbon, click Grant Permissions. The Grant Permissions dialog opens.
In the Users/Groups text area, type the name of a user account to whom to grant Full Control. This exercise uses Bill Malone.
Click the Grant users permission directly option.
Select the Full Control check box. If email has been enabled for your SharePoint installation, you have the option of sending a message to Bill to notify him that he now has Full Control of this site. For this exercise, clear the Send E-Mail check box.
Click OK to add the permissions for this user (Bill, in this case) to the site. The user permissions have been added and are shown in the site Permissions page.
No other SharePoint group needs permissions on the Buyers site. You will now remove all other groups.
Select the three parent site SharePoint groups by clicking the check boxes to the left of their names.
On the Ribbon, click Remove User Permissions.
In the confirmation message box, click OK to apply the change. The groups have been removed. Only the Buyers Members group and Bill Malone have permissions on the site.
Tip
It is wise to associate every user in the various child sites in a site collection with at least the Read permission level in the top-level site. Users might be unable to use custom site templates and list templates imported into a site collection unless they are associated with one of the built-in permission levels in the top-level site.


Creating a Child Workspace
SharePoint Foundation makes it easy to navigate from a parent site to a child site. Because the Buyers child site was created with navigational links on both the top link bar and the Quick Launch of the parent site, navigating to the child site from the top-level site is easy: you simply click the link on the Buyers tab. However, how would you find the Buyers child site if this navigation wasn’t included? In the following exercise, you will create a Meeting Workspace as a child site of the Buyers child site. Because you must already be in a site to create a child site, you will first see how to navigate to the Buyers child site from its parent. You will then view the site hierarchy of the entire site collection from the top-level site.
Set Up
Open the top-level site from the address bar of your browser: http://wideworldimporters. If prompted, type your user name and password, and click OK.
Note
BE SURE TO verify that you have sufficient rights to create a new site. If in doubt, see the Appendix A at the back of this book.
In the left navigation area, click All Site Content to see all lists, document libraries, sites, and Workspaces that have been created on the All Site Content page of this site.
In the Sites and Workspaces area near the bottom of the page, click Buyers to navigate to the child site. This link would appear even if there weren’t a link to this child site in the top link bar or the Quick Launch of the parent site.
Tip
Alternatively, you can type the entire site hierarchy directly into the browser’s address bar. This suggestion may seem a bit odd at first, but Internet Explorer memorizes the places that you type often, which can be a real time saver over clicking through the user interface. To see the child sites of the current site, complete the current site’s website address with /_layouts/mngsubwebs.aspx.
In the Buyers site, click Site Actions and select New Site to display the Create dialog.
Select Basic Meeting Workspace, and then click More Options.
In the Create dialog for Basic Meeting Workspace, as in the earlier example, type a Title and URL name, such as Team Meeting and TeamMeeting, respectively. Remember to follow the best practices concerning naming conventions that are found in the sidebar entitled Naming a URL, earlier in this chapter.
Optionally, in the Description text box, type a description, such as Site for monthly team meeting details, to help users understand the purpose for the new site.
Keep the default permissions that are set on Use same permissions as parent site.
Keep the default navigation settings so that the link to the new Workspace is displayed on the top link bar of the Buyers site, but not on its Quick Launch. In the Navigation Inheritance section, click Yes so that the new Workspace uses the top-link bar of the Buyers site.
Click Create to create and display the new Meeting Workspace.
Notice that Meeting Workspaces differ in appearance from Team sites. There is no Quick Launch, and the Site Actions menu has the Add Pages and Manage Pages options that were not there for the Team site.
You will now navigate up to the top-level site and then view the entire hierarchy of child sites. To return to the top-level site, in the top navigation area, click the Navigate Up icon and then click the top-level site. In our scenario, the top-level site is Wide World Importers.
On the home page of the top-level site, click Site Actions and select Site Settings.
On the Site Settings page, in the Site Collection Administration section, click Site hierarchy to display the Site Hierarchy page.
This page shows all the fully qualified, flattened-out child sites in the entire site hierarchy. You can click a site name to display the site or click the Manage link to display the Site Settings page for the associated child site.


Changing a Site’s Theme
These blue SharePoint sites are all right initially, but they eventually blur together and start to look too similar. Thankfully, SharePoint Foundation provides us with the ability to apply themes to our sites. Themes can radically affect display items such as colors, graphics, text, banners, and borders. Numerous built-in themes are available from which to choose.
Tip
With Microsoft SharePoint Designer, you can gain even more control over how themes are applied to your site. You can choose to apply a theme to only specific pages, or even create your own custom themes.
Each SharePoint Foundation site can have its own theme, or you can set several sites so that they all have a common theme and are related visually.
Tip
Because of many changes in the user interface in SharePoint Foundation, the themes created in Windows SharePoint Services 3.0 are not compatible with SharePoint Foundation 2010. You can create new themes in SharePoint Foundation 2010 and apply them to your existing sites. Alternatively, if necessary, you can use Visual Upgrade to continue to use existing sites with the old user interface.
Perhaps the buyers at Wide World Importers want to create a theme for their Team Meeting child site so that it stands out from other sites. In this exercise, you will navigate to the Team Meeting site and apply a theme.
Set Up
Open the top-level site (http://wideworldimporters) from the address bar of your browser, if it is not already open. If prompted, type your user name and password, and click OK.
Note
BE SURE TO verify that you have sufficient rights to set a site’s theme and view the site hierarchy. If in doubt, see the Appendix A at the back of this book.
On the top-level site, navigate to the Site Hierarchy page (if it is not displayed already) by selecting Site Settings from the Site Actions menu, and then, on the Site Settings page, in the Site Collection Administration area, clicking Site hierarchy.
Click the Manage link to the far right of the Site URL (http://wideworldimporters/buyers/TeamMeeting) for the Site Settings page of the Team Meeting child site to display.
In the Look and Feel section, click Site theme to display the Site Theme page.
On the Select a Theme list, click Berry. Note the color scheme and the hyperlinks and font preview displayed on the left of the screen, and then click Summer. The color scheme and font preview changes to reflect the selected theme. Browse through the available themes and select the one that you like most.
Click Apply. The changes have been processed, and the new theme is applied to the Workspace site.
On the Site Settings page, on the breadcrumb, click Team Meeting to go to the home page of the Team Meeting site. Verify that the new theme has been applied.

Saving and Using a Site Template
After working with a site, you may want to save it just the way it is so that it can be re-created over and over again. SharePoint Foundation facilitates this action by allowing anyone with a Design permission level to save a site as a custom web template. Custom web templates provide a way of packaging up a set of changes to an underlying site definition and making that package available as a template for new sites. Web templates behave in much the same way as built-in templates, in that they provision lists, document libraries, and web pages prepopulated with Web Parts that are best suited for the purpose of the template. In fact, everything in a website except security-related information is saved in a custom web template, including its theme and navigation.
Every custom web template is based on an underlying site definition and saved as a file with a .wsp extension in the Solutions Gallery of the site collection.
Tip
Because custom web templates are based on existing sites, they continue to depend, throughout their life cycle, on the site definition that is their ultimate foundation. Therefore, the first site in any SharePoint Foundation deployment must be based on a site definition, not a web template.
Once saved, a web template is made immediately available throughout the entire site collection in which it is saved. When creating a new child site, any user associated with one of the default permission levels (excluding the Limited permission level) in the top-level site can see the saved web template as an option in the Create dialog. Web templates can be downloaded and redeployed to other site collections.
Tip
The .wsp files on this book’s catalog page that are used to create the practice sites for exercises are actually custom web templates saved to a file.
Important
Both custom web templates and custom site definitions can be used to create site templates in SharePoint Foundation. Using a web template is recommended because it maximizes the chances that your solution will be compatible with future versions of SharePoint Foundation. However, in some scenarios, you might need to create the custom site definition to preserve specific site functionality. For more information, refer to “Deciding Between Custom Web Templates and Custom Site Definitions,” at http://msdn.microsoft.com/en-us/library/aa979683.aspx.
Let’s assume that the unique look that the buyers of Wide World Importers created for their Team Meeting site has caught on, and they want to be able to use it repeatedly. In the following exercise, you will save the Team Meeting site as a web template and then use it to create another meeting site as a child of the Buyers child site.
Set Up
Open the Team Meeting site (http://wideworldimporters/buyer/TeamMeeting) from the address bar of your browser, if it is not already open. If prompted, type your user name and password, and click OK.
Note
BE SURE TO verify that you have sufficient rights to save a site template and create a new site. If in doubt, see the Appendix A at the back of this book.
On the Site Actions menu, click Site Settings.
On the Site Settings page, in the Site Actions section, click Save site as template to display the Save as Template page.
In the File name text box, type Team Meeting to establish a name for the .wsp file.
In the Template name text box, type Team Meeting Template.
In the Template description text box, type a description, such as Summer themed site for team meetings that the buyers created, to help site creators understand the intended purpose of this custom web template.
Click OK to create the custom web template file, save it in the Solution Gallery, and activate the template within the site collection. When the Operation Completed Successfully page is displayed, click OK.
You will now create a new child site for the Buyers site that will be based on the site template that you’ve just created. On the top link bar, click Home to display the Buyers site.
On the Site Actions menu, click New Site to display the Create dialog.
In the central pane of the Create dialog, click the Team Meeting template, which is now available, and then click More Options.
In the Title text box, type Important Meeting to establish a display name for the new Meeting Workspace site.
In the Description text box, type a description, such as Site for that important meeting, to help users understand the purpose for the new site.
In the URL name text box, type ImportantMeeting as the website address. (Remember the naming conventions listed in the sidebar entitled Naming a URL, earlier in this chapter, when naming URLs.)
Keep the default permissions that are set on Use same permissions as parent site. Keep the default navigation and navigation inheritance options.
Click Create to create the new Workspace site.
The new Important Meeting site is displayed. It is identical to the original Team Meeting site.


Managing Site Features
SharePoint Features group together chunks of custom functionality that developers and administrators can activate to make this combined functionality available at one of four scopes, as follows:
Farm level. These Features are activated for all sites in the entire SharePoint Foundation farm and are managed by the farm central administrators.
Web Application level. These Features are activated for all sites where the web address is the same. For instance, all sites that start with http://wideworldimporters would be managed under the same Web application. These Features are also managed by farm central administrators.
Site Collection level. These Features are activated only for sites within a given site collection. Management of these Features is accomplished from the top-level site of the site collection and is typically distributed to department-level administrators.
Site level. These Features are activated only for the site in which the activation is performed. Management of these Features may be done by anyone with Administrator privileges on the site.
Features encapsulate a combination of custom functionality, such as the following:
Customizing the Ribbon, including creating new buttons and other controls, groups, and tabs.
Adding or removing links in the SharePoint Foundation user interface, including the Ribbon controls, the Site Actions menu, the Site Settings page, the Content Type Settings page, and Web Application Settings pages in SharePoint Central Administration.
Registering a computer program that converts documents from one format to another when uploaded to a document library.
Adding new application and administration web pages or any other physical documents, including site and list templates, images, or other technical files.
Defining the style and behavior of a new list of your choice from the Create page.
Creating a new list.
Defining a new site column that could be used in lists, document libraries, or content types.
Defining an entire content type that could be associated with a list or document library subsequently.
Adding a custom workflow that could dictate the order of tasks that must be accomplished for a list item to move from one state to another.
Registering a computer program that runs custom code when you interact with items in a list or document library. Adding new items, modifying an existing item, checking out, checking in, or even undoing a checkout of an item or deleting an item are all examples of interactions that can cause this custom code to run.
A Feature must be installed in a scope on your SharePoint Foundation server farm before you can begin working with it. When you created a custom web template for the Team Meeting site in the previous exercise, the Web Template Feature for this template that provided its functionality was created and activated in the site collection. For example, it is this Feature that provides the display of the new template in the Create dialog.
In the following exercise, you will work with the Web Template Feature. You will first deactivate this Feature and verify that the Team Meeting template is no longer available for new site creation. You will then activate this Feature to restore the Team Meeting template in the Create dialog.
Set Up
Open the top-level site from the address bar of your browser: http://wideworldimporters. If prompted, type your user name and password, and click OK.
Note
BE SURE TO verify that you have sufficient rights to manage Features. If in doubt, see the Appendix A at the back of this book.
On the Site Actions menu, click Site Settings.
On the Site Settings page, in the Site Collection Administration area, click Site collection features. Notice that the Web template feature of exported web template Team Meeting has been activated in this site collection; its status is shown as Active.
To the right of the Web template feature of exported web template Team Meeting, click Deactivate.
A warning page is shown, asking you to confirm that you really want to deactivate this Feature. Click the Deactivate this feature link.
On the Features page, verify that the Feature is no longer shown as Active.
Because this Feature has been deactivated, the associated site template is no longer available for new site creation. You will now validate that the template has been removed from the Create dialog.
On the Site Actions menu, click New Site. In the Create dialog, verify that the Team Meeting site template that was previously there has been removed, and then close the Create dialog by clicking the Close icon in the upper-right corner.
You will now activate the Web Template Feature to restore the Team Meeting template in the Create dialog.
On the Site Actions menu, click Site Settings one last time, and then, on the Site Settings page, in the Site Administration area, click Site collection features.
To the right of the Web template feature of exported web template Team Meeting, click Activate to add the site template back to the Create dialog.
On the Site Actions menu, click New Site again to verify that the site template has been restored and is available from the Create dialog.

Managing Site Content Syndication
RSS is a standard way to make new or modified content available to readers of a SharePoint Foundation list or document library. Once you subscribe to an RSS feed (the XML emitted from a web request), you can use an RSS aggregator running on your desktop to check for new or modified content as often as you choose.
Tip
Outlook 2010 can be used as an aggregator. This topic is discussed in Chapter 13.
The aggregator gathers all updates into a common pool of data that can be searched, sorted, filtered, and grouped by the aggregator as directed. RSS content is sometimes described as being “pulled” by the subscribers, for they can easily unsubscribe from a feed at any time. This can be a fabulous way to roll up data entered into a SharePoint list. By default, every Web application in SharePoint Foundation is configured to allow RSS feed for all site collections that they contain.
Site collection administrators can specify whether RSS feeds are allowed on lists in the sites within the site collection; they are allowed by default. Each site can then subsequently specify whether RSS feeds are allowed on lists in the site; they are also allowed by default. If sites do allow feeds, several attributes can be defined that will be included in every feed. In the following exercise, you will verify that RSS is allowed on both the site collection and the top-level site and specify the optional attributes.
See Also
Consuming the RSS feed for a library is discussed in Chapter 5, while using the RSS feed for a list is covered in Chapter 7.
Set Up
Open the top-level site (http://wideworldimporters) from the address bar of your browser, if it is not already open. If prompted, type your user name and password, and click OK.
Note
BE SURE TO verify that you have sufficient rights to administrate a site. If in doubt, see the Appendix A at the back of this book.
On the Site Actions menu, click Site Settings to display the Site Settings page of a top-level site, if not already displayed.
On the Site Settings page, in the Site Administration section, click RSS to display the RSS page.
If you are on the top-level site of the site collection, as in this example, and you are a site collection administrator, you see the Allow RSS Feeds In This Site Collection check box in the Site Collection RSS area. Clearing this check box dims the options in the Enable RSS area, and therefore no sites in this collection can allow RSS feeds. Leave this check box selected in this exercise.
All sites have the Allow RSS Feeds In This Site check box in the Enable RSS area. If this check box is cleared, no lists in this site are allowed to provide their data in the form of an RSS feed. As with the Allow RSS Feeds In This Site Collection check box, leave this check box selected in this exercise.
In the Copyright text box, enter 2011.
In the Managing Editor text box, enter Bill Malone.
In the Webmaster text box, enter Todd Rowe.
Leave the Time to Live text box at 60 minutes. This instructs the aggregator to wait at least this long before checking for updates. A shorter period will increase the frequency that a site could receive requests from aggregators, while a longer duration can help to reduce the number of aggregator requests.
Click OK to commit the changes.

Deleting a Site
There will be times when you want to remove a site that you either created in error or no longer need. SharePoint Foundation automatically generates all the necessary user interface elements to create, review, update, manage, and delete your sites.
The creator of the Important Meeting child site at Wide World Importers had a change in priorities and no longer needs the site. In this exercise, you will delete the Important Meeting child site from the Buyers child site.
Set Up
Open the Buyers site from the address bar of your browser: http://wideworldimporters/buyers. If prompted, type your user name and password, and click OK.
Note
BE SURE TO verify that you have sufficient rights to delete a site. If in doubt, see the Appendix A at the back of this book.
On the Site Actions menu, click Site Settings.
On the Site Settings page, in the Site Administration area, click Sites and workspaces to display the Sites and Workspaces page.
To the far right of the Important Meeting line, in the Delete column, click the cross icon to begin the site deletion process.
On the Delete Web Site page, click Delete to confirm the deletion request.
Click OK in the message box that appears to confirm the site removal. The site has been deleted.
On the Sites and Workspaces page, verify that the Important Meeting site is no longer displayed.

Key Points
Sites are containers for lists, document libraries, and web pages prepopulated with Web Parts.
The top-level site is the initial site created in a SharePoint Foundation site collection.
To create a child site, you must navigate to the Create dialog.
Don’t use spaces in site names, and keep them short and intuitive.
Sites are easy to create and secure.
Only after a site is using unique permissions can you manage its users and SharePoint groups.
Permission levels are named collections of permissions.
All associated permissions are aggregated, and the cumulative list of unique permissions applies.
Each site can have its own theme.
Sites can be saved as custom templates and used immediately to create other clone sites in a site collection.
Features combine custom functionality and can be installed and activated at farm, Web application, site collection, or site level, depending on their scope.
Sites can allow or disallow RSS feeds on the lists and libraries contained within them.
SharePoint Foundation will prevent you from deleting a site that contains subsites.