
Chapter 4. Working with Lists
In this chapter, you will learn how to | |
✓ | Discover default lists in a site. |
✓ | Create a new list. |
✓ | Add and edit list items. |
✓ | Delete and restore a list item. |
✓ | Attach files to list items. |
✓ | Add, edit, and delete list columns. |
✓ | Add summary tasks to a Task list. |
✓ | Sort and filter a list. |
✓ | Set up alerts. |
You can think of the lists found in Microsoft SharePoint Foundation 2010 as spreadsheets that you and your coworkers can use simultaneously on the Internet. SharePoint lists represent editable, web-based tables that facilitate concurrent, multi-user interactions against a common, centralized, extensible set of columns and rows. They empower you to provision your own repositories of structured information in which list items behave like rows consisting of self-labeled columns. All the web pages needed to create, review, update, delete, and manage a list and its data are generated automatically and dynamically by SharePoint Foundation.
Tip
Unstructured information is typically stored as a document with associated columns in a document library. The document library can be thought of as a list of documents. Document libraries are discussed at length in Chapter 5, and Chapter 8.
In this chapter, you will discover the default lists that already exist on your site, create new lists, and alter existing lists. Depending on the site that you initially create, some lists (such as Announcements, Events, and Links) may be provisioned when the site is created, and you need only begin using them. Yet, there will come a time when the lists that are provided automatically do not quite meet your needs. Therefore, this chapter explores web pages that allow you to not only alter existing lists, but also create your own custom lists.
See Also
For more information on how to manage the SharePoint lists, refer to Chapter 7.
Important
Remember to use your SharePoint site location in place of http://wideworldimporters in the following exercises.
Discovering Default Lists in a Site
Many default lists are included with SharePoint Foundation. When you need to create a list, you can use the default list templates to generate a new list with a static set of predefined columns by using More Options from the Site Actions menu. Later in this chapter, we’ll explore how additional columns can be added and how most default columns can be altered or deleted, even after data have been entered into a list. There are many list and library templates built into SharePoint Foundation, which are described in the following table.
As discussed in Chapter 3, SharePoint Foundation will provision some of these lists and libraries for you when you create a new site, depending on which site template you use. The SharePoint site templates provision lists as follows:
The Blank Site template has no lists or document libraries.
Both the Team Site template and Document Workspace template provision a Shared Documents library and four lists (Announcements, Calendar, Links, Tasks), as well as a Team Discussion board. We will discuss Document Workspaces in detail in Chapter 12.
The Group Work Site template provisions a Shared Documents library and eight lists (Announcements, Circulations, Group Calendar, Links, Phone Call Memo, Resources, Tasks, and Whereabouts), as well as a Team Discussion board.
The Blog Site template provisions a picture library called Photos and five lists: Categories (Custom list), Comments (Custom list), Links, Other Blogs (Links list), and Posts (Custom list).
The Meeting Workspace templates provision unique lists, such as Agenda, Attendees, Decisions, Objectives, and Things To Bring. We will discuss Meeting Workspaces in Chapter 12.
In the following exercise, you will first browse to the lists created for the top-level site. Subsequently, you will navigate to the Create page to see the list templates available when you create a new Team site.
Set Up
Open a top-level SharePoint site. The exercise will use the http://wideworldimporters site, but you can use whatever site you wish. If prompted, type your user name and password, and click OK.
Note
BE SURE TO verify that you have sufficient rights to create a list. If in doubt, see the Appendix A at the back of this book.
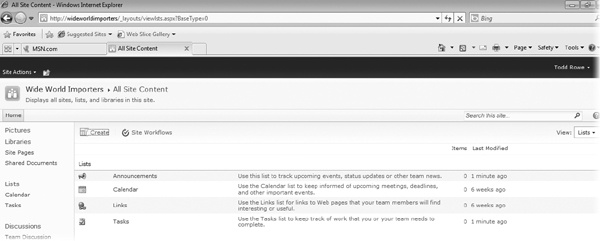
On the Quick Launch, click Lists to display the All Site Content page in the Lists view.
This team site has four default lists (Announcements, Calendar, Links, and Tasks) and a discussion board called Team Discussion.
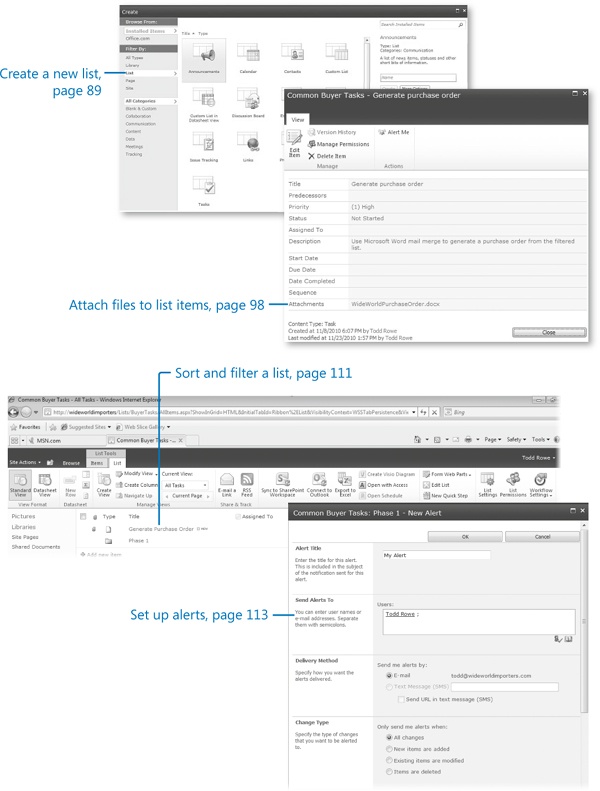
On the top of the page, click Create. On the Create page, under Filter By, click List to display list templates.
Tip
Don’t be confused by the naming convention here. The names of list templates are identical to the names of the default lists generated by SharePoint Foundation; however, they are radically different. Each list template shown on the Create page could be used to create one or more uniquely named instances in the All Site Content page. For example, the Announcements list template was used to create the Announcements list, but the resulting list could have been called something entirely different, such as Sales Notices. The names do not have to be identical.

Creating a New List
The first step in creating a new list is to ask yourself, “What kind of information do I want to gather/display?” The answer to this question will help you determine which list template to choose. Perhaps you want to start with a list that is close to your goal and then add, delete, and alter the default columns to provide the solution that you are trying to achieve. For example, if you are planning to collect information such as names and addresses, you can choose to use the Contacts list template to create your initial list and then modify it. Perhaps you want to start with a bare-bones list and build it entirely from scratch. In that case, you would likely choose to use the Custom List template to create your initial list.
Tip
If the list items in the list that you want to create always begin with a document, consider using a document library instead of a list. Document libraries are discussed at length in Chapter 5 and Chapter 8.
In the following exercise, you will create a list for the buyers at Wide World Importers to track the status of tasks involved in the buying process. This Task list will be based on the Tasks list template. Once the list is created, you will alter the display name so that it displays “Common Buyer Tasks.”
Set Up
Open the SharePoint site where you would like to create the new list. The exercise will use the http://wideworldimporters site, but you can use whatever site you want. If prompted, type your user name and password, and click OK.
Note
BE SURE TO verify that you have sufficient rights to create lists in this site. If in doubt, see the Appendix A at the back of this book.
On the Site Actions menu at the top left of the page, click More Options to display the Create page.
On the Create page, under Filter By, click List, and then, in the middle pane, click Tasks.
Click More Options on the far-right side. The Create dialog changes to display information to create the Task list.
You will use this page to create a Task list based on the Tasks list template. You can name your new Task list anything you want.
In the Name text box, type BuyerTasks to establish a display name for the new list.
Because there is no text box with which to provide the Uniform Resource Locator (URL) name, this text box also supplies the value that SharePoint Foundation uses for the internal names.
Important
When you initially create a list in SharePoint Foundation, you are establishing two name values: the display name, usually labeled Name or Title, and the URL name, also known as the internal name. However, only the display name can be changed after the list is created. When the URL name cannot be set on a SharePoint Foundation Create page, the display name (usually labeled Title) is used to populate both names.
Tip
Best practices to follow when initially naming a list in SharePoint Foundation include the following: The initial name should be descriptive, intuitive, and easy to remember. The initial name should be concise. The initial name should not contain spaces. The initial name should be consistently used throughout the site. Your organization may also have specific naming conventions that you will want to follow
See Also
More details about these naming recommendations and the reasons they are needed can be found in the sidebar entitled Naming a URL, in Chapter 3.
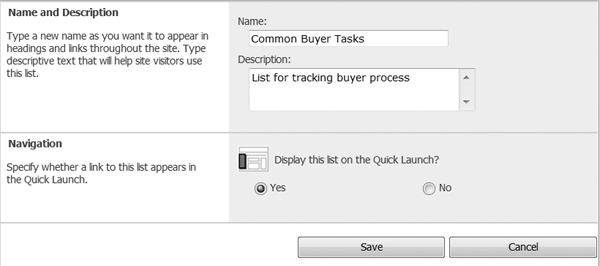
In the Description text box, type the description List for tracking buyer process to help users understand the purpose for the new list.
Check that the option indicating whether you want to see this new list on the Quick Launch is selected. This is a default setting.
Click Create to complete the list creation. The BuyerTasks default list view page (AllItems.aspx) is displayed.
Go to the home page of the site by clicking Navigate Up and selecting your Team site. In our scenario, it is Wide World Importers.
The new BuyerTasks list is now showing in the Quick Launch.
Because this list was named without a space between Buyer and Tasks, it would be useful to change the display name so that it has a space in it. The remainder of this exercise demonstrates that revisions to the list name affect only the display name, not the URL name.
See Also
For more information on configuring the lists, refer to Chapter 7.
On the Quick Launch, click BuyerTasks to redisplay the BuyerTasks default list view page.
On the List Tools group on the Ribbon, click the List tab, and then click List Settings in the Settings group.
In the General Settings area, click Title, description and navigation to display the General Settings page.
In the Name and Description area, in the Name box, replace the BuyerTasks name by typing Common Buyer Tasks (with spaces).
Click Save to save the change and display the List Settings page.
On the breadcrumb, click Common Buyer Tasks to navigate to the Common Buyer Tasks default list view page. The Quick Launch shows the new display name.
The title on the tab on the top of this page and all other pages associated with this list now reflects the modified display name. However, you can see that the browser’s address bar still reflects the initial name (internal name) given to this list.


Adding and Editing List Items
Creating a SharePoint list automatically generates the pages needed to view the list as a whole, view a list item, add a new list item, and edit an existing list item. The interface also provides options to delete a list item and subscribe to an alert for the list or list item, as well as other options, such as importing and exporting list items.
See Also
Subscribing to an alert is covered later in this chapter, while importing and exporting of list items is covered in Chapter 14.
While some lists have only a single view when initially created, multiple list views are generated when a new Task list is created. The Common Buyer Tasks list was created using the Tasks list template that has the following list views: All Tasks (default), Active Tasks, By Assigned To, By My Groups, Due Today, and My Tasks. All views are public, which means that they are available to anyone who looks at the list.

You can navigate to a list’s default list view page by clicking the list’s name in the Quick Launch or clicking the link at the top of any List View Web Part for that list.
In this exercise, you will add several Task list items for the buyers at Wide World Importers to use in their buying process and then edit one of the items.
Set Up
Open the SharePoint site where you would like to modify the list, if it is not already open. The exercise will use the http://wideworldimporters site, but you can use whatever site you want. If prompted, type your user name and password, and click OK.
Note
BE SURE TO verify that you have sufficient rights to modify this list. If in doubt, see the Appendix A at the back of this book.
On the Quick Launch, click the Common Buyer Tasks list that you created in the last exercise to display the Common Buyer Tasks default list view page, if it is not already displayed.
Click Add new item. The Common Buyer Tasks: New Item dialog is displayed.
In the Title text box, type Create vendor SharePoint list.
Leave the default values for the Priority, Status, and % Complete fields.
In the Description text box, type List for vendors to submit products offered this year.
From the Start Date text box, delete today’s date.
Leave the Due Date text box empty.
Click Save to save the list item and redisplay the Common Buyer Tasks default list view page.
The newly created list item shows in the body of the page. The green icon NEW displays to the right of the Title text, indicating that this list item was created recently.
Using steps 2–8 as a guide, create four new list items using the values in the following table.
Title
Description
Ensure vendor access
Ensure vendor has access to add a list item for each product line offered
Identify products to purchase
Identify which vendor products to purchase
Generate purchase order
Use Microsoft Word mail merge to generate a purchase order from the filtered list
Notify Receiving about purchase
Notify Receiving about the anticipated arrival of vendor products
Tip
When you need to create several items for a list, creating one item at a time can become tedious. It is possible to create multiple list items using a Datasheet view. This option is covered in detail in Chapter 9.
Todd suggests that generating the purchase order should be changed to a high-priority task. You will now edit the Generate Purchase Order list item to implement this suggestion.
Select the Generate purchase order list item by hovering your mouse over its title and then clicking the check box to the left of it. Then click the Edit Item button on the Ribbon.
The Common Buyer Tasks – Generate purchase order page is displayed. Change the Priority field from (2)Normal to (1)High, and then click Save to save the change and redisplay the default list view page.


Deleting and Restoring a List Item
When documents, list items, folders, or even entire lists are deleted, they are simply flagged as removed so that they no longer appear in the site from which they were deleted. By default, sites in a SharePoint web application are configured to display the deleted item in the site’s Recycle Bin for 30 days. If the user hasn’t restored the deleted item in that time period, it is then permanently expunged from the database. If the user empties the Recycle Bin before the 30 days have elapsed, the deleted item is still available to a site collection administrator from the site collection’s Recycle Bin. However, the total size of the deleted items must remain below a given percentage (50% by default) of the total size that a site is allowed to consume, which is called the site quota.
If a deleted item exceeds the configured size allowed by the SharePoint central administrator for sites in the web application, the items deleted first are purged, even if 30 days have not elapsed, to make room for the newly deleted item. In this way, SharePoint central administrators can make disaster recovery plans based on the Recycle Bin’s allowable total maximum size. Of course, SharePoint central administrators can set the number of days that Recycle Bins retain deleted items, ranging from the default 30 days to some other specific number of days; they can also select to never retain deleted items or to never remove deleted items.
Todd suggests that creating the vendor SharePoint list is done only when a new vendor is established, rather than at each buying cycle. He therefore wants the task removed. In the next part of the exercise, you will delete the Create vendor SharePoint list task from the list.
Set Up
Open the SharePoint site where you would like to delete an item from the list. The exercise will use the http://wideworldimporters site, but you can use whatever site you want. If prompted, type your user name and password, and click OK.
Note
BE SURE TO verify that you have sufficient rights to delete list items. If in doubt, see the Appendix A at the back of this book.
Open the Common Buyer Tasks list, if it is not already displayed. Click the check box to the left of the Create vendor SharePoint list list item to select it, and then click the Delete Item button on the Items tab on the Ribbon. You will be prompted to confirm the deletion.
Once a list item is deleted, it is moved into the site’s Recycle Bin.
Todd realizes that the deletion of the Create vendor SharePoint list task that he just performed was a mistake. He visits the Recycle Bin and restores the data.
In the left navigation area, click Recycle Bin to display the site Recycle Bin page.
Click the check box to the left of the Create vendor SharePoint list to select it.
Click Restore Selection to restore the list item.
Click OK to confirm the restoration.
Go to the Home page of the site by clicking a link to it on the breadcrumb or top-link bar.
On the Quick Launch, click Common Buyer Tasks to display the Common Buyer Tasks default list view page.
The Create vendor SharePoint list item is once again visible in the list view.
Attaching Files to List Items
Occasionally, you might want to attach one or more documents to a list item. By default, all lists in SharePoint Foundation allow attachments. However, if every list item always has one and only one document, reconsider the use of a list and opt for using a document library instead.
Tip
It is possible to disable attachments to list items. To do this, choose List Settings from the Settings menu, click Advanced Settings, and finally select the Disabled option in the Attachments area. Refer to Chapter 8 for more information on how to configure list attachments.
In the following exercise, you will create a simple Word document to simulate a purchase order and attach it to an existing list item in the Common Buyer Tasks list.
Set Up
Open the SharePoint site where you would like to attach a file to a list item. The exercise will use the http://wideworldimporters site, but you can use whatever site you want. If prompted, type your user name and password, and click OK.
Note
BE SURE TO verify that you have sufficient rights to attach a file to a list item. If in doubt, see the Appendix A at the back of this book.
Open Microsoft Word.
In the new document, type Purchase Order.
On the File tab, select the Save As option. Save the document to the Documents folder on your hard disk as WideWorldPurchaseOrder.docx.
Close Microsoft Word.
In the browser, on the Quick Launch, click Common Buyer Tasks. The Common Buyer Tasks default list view page is displayed.
Select the Generate purchase order list item by clicking the check box to the left of it.
On the Items tab on the Ribbon, click Attach File.
Click Browse. . . and navigate to the Documents folder on your computer to locate the WideWorldPurchaseOrder.docx file that you created in steps 1–3.
Click WideWorldPurchaseOrder.docx and then click Open, or double-click the document to open it.
Once chosen, the location of the selected document is displayed in the Name text box on the Attach File page.
Click OK to attach the document to the list item. The default list view page is displayed.
Each list item in the list that has one or more attachments will display with an attachment icon in the leftmost column.
You will now verify that the document has been attached to the list item. Click the Generate purchase order list item. The Common Buyer Tasks – Generate purchase order page is displayed, and the attachment is listed at the bottom of the page.
Click Close to close the list item. The default list view page is displayed once again.


Adding, Editing, and Deleting List Columns
The list templates provided by SharePoint Foundation provide an easy way to generate a list with very little effort. However, should you need to customize the templates, SharePoint Foundation allows you to add, edit, and delete columns.
There are many column types available when you want to extend a list with an additional column. Once you name your new column, you need to select one of the column types displayed in the following table.
Tip
Most, but not all, column types have both Required and Default value options. If Required is set to true, the user must enter a value into the column when creating or editing a list item. If the user doesn’t enter a value, the Default value is used.
Because every column type has a Description option and an Add To Default View option, these options are not listed explicitly in the table.
Column Type | Used to | Options | Edit Using |
Single Line Of Text | Enter a word or free-form phrase up to 255 characters. |
| Single-line text box |
Multiple Lines Of Text | Optionally, enter free-form prose, including formatted text. |
| Multiple-line text box with toolbar to edit text |
Choice | Select one or more options from the static list. |
| Drop-down list, option buttons, or group of check boxes |
Number | Enter a number. |
| Single-line text box |
Currency | Enter a monetary value. |
| Single-line text box |
Date And Time | Enter date, time of day, or both. |
| Date text box with pop-up calendar and drop-down lists for hours and minutes |
Lookup | Select one list item from a list in the site. |
| Drop-down list |
Yes/No | Enter true or false. |
| Single check box |
Person Or Group | Select one or more users. |
| Text box with Check Names icon |
Hyperlink Or Picture | Enter a link to a page or picture. |
| Single-line text box |
Calculated | Calculate information from columns on this list, columns on another list, dates, or numbers using standard mathematical operators. |
| Single-line text box |
External Data | Pull data from an external content type. |
| Actions menu |
After a column has been added, it is possible to make changes to it. You can change the display name, but the internal name cannot be changed easily. Most other column options can be changed even after data has already been entered into the list. If changing an option will potentially result in the loss of information, SharePoint Foundation prompts you to confirm the change before proceeding.
Tip
You can also change a field from “not required” to “required” after data has already been entered into the list. The underlying data is not affected unless someone attempts to edit an existing record. The new Required rule is enforced, and the list item cannot be saved without providing a value in the Required column.
Most columns in the list can be deleted. However, all lists have at least one column that cannot be removed. For instance, the Title column can be renamed but not deleted. Certain lists also prevent the deletion of columns so that the list can display properly or integrate with the Microsoft Office suite properly. For example, the Assigned To, Status, and Category columns of any list based on the Issues list template cannot be deleted, and no default columns in any list based on the Calendar list template can be deleted.
Other columns that are created and populated automatically for each list item and cannot be changed include the following: ID, Created, Created By, Modified, and Modified By. The ID column ensures that the list item is unique in the list. It contains a sequential number beginning with 1 and increments by 1 for each new list item. SharePoint Foundation automatically captures when the list item was created, by whom it was created, when it was last modified, and by whom it was last modified. Initially, the Created and Modified columns are equal, as are the Created By and Modified By columns.
SharePoint Foundation allows for a special type of column to be added to the list called a site column. These columns are typically defined once by an administrator and represent a common set of data used across multiple lists. They are stored at the site level in a site column gallery, but the collective site columns in all the galleries in the current site’s parentage can be used on a list or content type in this site. Thus, an administrator could define a site column in the top-level site for users in all sites in the site collection to use. Site columns provide several very valuable enhancements over regular list columns:
Administrators can change site columns at any time, and the change can be pushed down to all content types and lists that have used that site column within a given site collection. If the site column changes, the changes will be pushed down and will override any changes that were made to the column at the site level.
Because site columns define a common set of data, lists that contain multiple content types can sort, filter, and group the disparate list items using their common site columns.
In the following exercise, you will enhance the Common Buyer Tasks list by adding a Sequence column, adding a Date Completed site column, editing the Priority column to include an additional option, and deleting the % Complete column. Finally, you will change the order of the columns on the New, Display, and Edit pages to show the Description column immediately after the Title column.
Set Up
Open the SharePoint site where you would like to modify a list, if it is not already open. The exercise will use the http://wideworldimporters site, but you can use whatever site you want. If prompted, type your user name and password, and click OK.
Note
BE SURE TO verify that you have sufficient rights to modify columns in this list. If in doubt, see the Appendix A at the back of this book.
On the Quick Launch, click Common Buyer Tasks to display the Common Buyer Tasks list.
In the List Tools group on the Ribbon, click the List tab, and then click List Settings.
On the List Settings page, in the Columns section, scroll down and click Create column to display the Create Column page.
On the Create Column page, in the Name and Type section, in the Column name box, type Sequence.
In the list of column types, click Number.
In the Additional Column Settings section, in the Description text box, type Used to order tasks.
Leave the default values for the rest of the column’s settings, and click OK to finish adding the Sequence column to the list. The List Settings page is displayed.
Todd Rowe would like to see a column added to track the date that each task is completed. You will now add the Date Completed column to the list.
On the List Settings page, in the Columns section, scroll down and click Add from existing site columns. The Add Columns from Site Columns page is displayed.
On the Add Columns from Site Columns page, open the Select site columns from drop-down list and click Core Task and Issue Columns, so that the list of available site columns shows only the task-oriented site columns.
Click Date Completed and then click Add, or simply double-click Date Completed to move it to the Columns to add list.
Click OK to add the column to the list. The List Settings page is displayed.
Some tasks are commonly very low on the Task list, and the buyers want to add an option to the Priority column to reflect this. They typically use Medium rather than Normal to rank their tasks, and they would like to allow people to type in priorities other than High, Medium, Low, or Very Low. You will now edit the setting for the existing Priority column.
On the List Settings page, in the Columns section, under Column (click to edit), click Priority to edit the settings for the existing column. The Change Column page is displayed.
On the Change Column page, in the Additional Column Settings area, in the Type each choice on a separate line text box, type (4) Very Low as the last line to add another option to the drop-down list.
In the Type each choice on a separate line text box, type (2) Medium in the second line to replace the (2) Normal text. This will alter the options available in the Priority drop-down list during data entry.
Tip
Any list items that previously had the (2) Normal option chosen need to be changed manually to the new option, (2) Medium. Also, when leaving the Choice text box, the Default value changes to the first choice—(1) High, in this case. If you want the Default value to remain the second option, you must type (2) Medium into the Default value text box. For this exercise, you can use the default, (1) High.
For the Allow ‘Fill-in’ choices option, select Yes to allow values that are not included in the column’s list of choices to be entered.
Click OK to save changes to the Priority column. The List Settings page is displayed.
The buyers don’t plan to use the % Complete column, and it can therefore be deleted. In the next part of the exercise, you will delete this column from the list.
On the List Settings page, in the Columns section, click % Complete. The Change Column page is displayed.
At the bottom of the Change Column page, click Delete to initiate deletion of the % Complete column from the list. The deletion confirmation message box is displayed.
Click OK to finish deleting the % Complete column. The List Settings page is displayed.
When creating or editing list items, the buyers would like to show the Description column immediately after the Title column. In the next part of the exercise, you will change the order of the columns in the list.
In the Content Types area, click the Task content type. On the Task list content type page, in the Columns area, scroll down and click Column order. The Column Ordering page is displayed.
In the Column Order section, to the right of the Description column, on the Position from Top drop-down list, select 2 to change the sequence of the fields displayed on the New, Display, and Edit pages so that the Description column comes immediately after the Title column.
Click OK to save the sequence change. The Task list content type page is displayed. The column has moved to the second position.
In the breadcrumb at the top of the page, click Common Buyer Tasks to navigate to the list.
Click the Items tab on the Ribbon, and then, in the New section, click the down arrow on the New Item button. Select Task from the drop-down menu to display the Common Buyer Tasks – New Item page.
On the Common Buyer Tasks – New Item page, verify that the order of the fields has changed so that the Description field comes second, immediately after the Title field.
Click Cancel on the Common Buyer Tasks – New Item page to close it and return to the list.


Adding Summary Tasks to a Task List
When creating tasks in a Project Tasks list, it’s important to plan which tasks might fall under larger tasks. For example, your project might be completed in phases, with several tasks occurring within each phase. Having the phases represented in your Project Tasks list provides a useful, high-level look at what’s going on in your project.
In this exercise, you will create a summary task for Phase 1 of the project.
Set Up
Open the SharePoint site where you would like to create the summary task, if it is not already open. The exercise will use the http://wideworldimporters site, but you can use whatever site you want. If prompted, type your user name and password, and click OK.
Note
BE SURE TO verify that you have sufficient rights to create list items. If in doubt, see the Appendix A at the back of this book.
On the Quick Launch, click Common Buyer Tasks to display the Common Buyer Tasks list, if it is not already displayed.
On the Items tab, in the New group, click the down arrow on the New Item button, and then click Summary Task.
You will now complete the form to create the new summary task.
On the New Item page, type Phase 1 as the name of the summary task.
Do not select any Predecessors for this summary task.
Select the priority of (1) High.
Choose the descriptor that most accurately reflects the status of the set of tasks that fall within this summary task. If you are just planning a project and none of the tasks in this summary task have begun, choose Not Started.
Do not assign anyone to this summary task. Leave the Assigned To field empty.
Type a brief description of this summary task, such as The following tasks will be associated with Phase 1 of this project.
Enter the date when the first subtask within this summary task should begin. For example, enter today’s date.
Enter the date by when the last subtask in this summary task should be completed. Do not enter a due date for the summary task.
Click Save to create the summary task.
Once the summary task is created, you can click the title of the summary task in the list page to open the summary task page. On that page, you can add the tasks that fall within that summary task. To get back to the page that lists your summary task, on the List tab, in the Manage Views group on the Ribbon, click Navigate Up.


Sorting and Filtering a List
As the list grows, it eventually becomes difficult to see the entire list on a single page. To this end, SharePoint Foundation provides built-in sorting and filtering capabilities. On any standard list view page, individual column headers can be used to sort the entire list alphabetically, by ascending or descending order.
Filtering on the list page works similarly to the way that an AutoFilter works in Excel. Filtering is enabled on the upper-right corner of every column, and a unique list of the values for each column is generated and presented as a drop-down list above that column. Filters are cumulative but temporal; the next time a list view is chosen, its settings, including filters, will be applied to the list, regardless of what was previously chosen for a given column.
Tip
In Datasheet view, sorting and filtering are available from the drop-down arrow, which is also located on the upper-right corner of every column.
In this exercise, you will sort and filter the Common Buyer Tasks list.
Set Up
Open the SharePoint site where you would like to filter the list, if it is not already open. The exercise will use the http://wideworldimporters site, but you can use whatever site you want. If prompted, type your user name and password, and click OK.
Note
BE SURE TO verify that you have sufficient rights to sort and filter lists. If in doubt, see the Appendix A at the back of this book.
On the Quick Launch, click Common Buyer Tasks to display the Common Buyer Tasks page, if it is not already displayed.
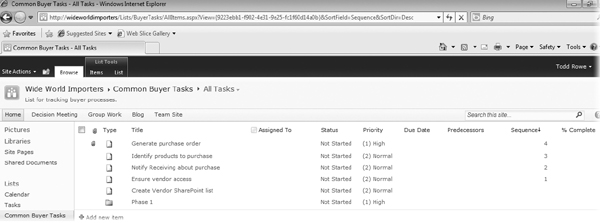
You will now assign a sequence number to a list item. Select the Ensure vendor access list item by hovering your mouse over its title and clicking the check box that appears on the left.
On the Items tab of the Ribbon, in the Manage group, click Edit Item.
At the bottom of the dialog, in the Sequence box, type 1, and click Save.
Using steps 2–4 as a guide, edit other list items to add sequence numbers, as indicated in the following table.
Title
Sequence
Ensure vendor access
1
Notify Receiving about purchase
2
Identify products to purchase
3
Generate purchase order
4
In the list page, hover your mouse over the Sequence column heading. When the column heading is underlined, click the Sequence column heading. The list items are displayed in ascending numerical order sorted by this column, and a thin down-arrow icon displays to the right of the column name, indicating that the list is sorted by this column in ascending order.
Click the Sequence column heading again. The list items are displayed in descending order, and a thin up-arrow icon displays to the right of the column name.
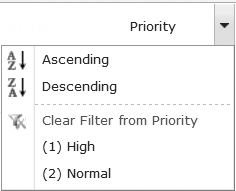
Next, hover your mouse over the Priority column and click the down arrow that appears on the right to show the sorting and filtering options for this column.
On the menu, click (1) High for Priority, and the page redisplays the filtered list with only those list items that are set to High priority.
The Filtered icon displays to the right of each column that has an applied AutoFilter, such as Priority.
To display a full list, hover your mouse over the Priority column, click the down arrow to display a menu, and then click the Clear Filter from Priority option.

Setting up Alerts
SharePoint Foundation includes a handy feature that sends an email notification or a text message whenever changes are made to content in a site, including changes made to items in a list. The setup for this notification is called an alert. No alerts are set up automatically, so you must sign up for the alerts that you want.
Alerts are quite easy to set up. Every list in a SharePoint Foundation site displays an Alert Me option on the Ribbon. Clicking this option allows you to subscribe to a list-level alert. You also find a similar Alert Me option on the Ribbon when viewing any list item, as well as on the menu for each list item. This option allows you to subscribe to a list item–level alert.
Alerts specify to whom the alert will be sent and the kind of changes and frequency for which the alert will be sent. By default, the alert is sent to the email address of the user setting up the alert. If no email address has been established for the authenticated user, an email prompt is generated in the Send Alerts To area. Once provided, the address will be remembered for subsequent subscriptions.
When setting up alerts, you have a choice as to the type of change for which you want an alert to be initiated. List-level alerts allow subscriptions for All Changes To Any List Item, New Items Are Added Only, Existing Items Are Modified Only, or Items Are Deleted Only. If you want to see added and changed items but not deleted items, you need to set up two alerts. List item–level alerts, on the other hand, are fired only when that item changes because you can set up this alert only when the list item already exists, and a deletion is considered a change to the list item.
Tip
Administrators of the SharePoint Foundation environment can establish quotas for the total number of alerts to which any user can subscribe. By default, this quota is set to 50. This number can be changed or even set to unlimited. Alerts can also be turned off entirely.
You must specify a filter concerning when to send alerts; the default is when anything in a list changes. Different lists have different filters. For example, the Task list that you are working with has the following filters:
Anything changes
A task is assigned to me
A task becomes complete
A high-priority task changes
Someone else changes a task assigned to me
Someone else changes a task
Someone else changes a task created by me
Someone else changes a task last modified by me
Someone changes an item that appears in the following view (choose a list view)
You must also specify the alert frequency. Three choices exist for any type of alert:
Send email immediately
Send a daily summary
Send a weekly summary
Choosing to receive an alert immediately actually queues the notice to be sent with the running of the next job after the alert is triggered. By default, the alert job runs every 5 minutes, but it could be configured by your administrator to wait as long as 59 minutes. The daily and weekly summaries store all changes made to the list or list item and send a summary at the end of the period chosen. By default, daily summary alerts are generated at midnight each night, and weekly summary alerts are generated at midnight every Sunday night.
Important
Alerts must be deleted manually when users are removed from a site; otherwise, their alerts will be orphaned. Also, when users set up alerts for themselves, they will continue to receive them even when they are removed from access to the list. It is important to delete these alerts to prevent unauthorized users from accessing site and user information.
In this exercise, you will set up an alert for the list item in the Common Buyer Tasks list.
Set Up
Open the SharePoint site where you would like to set up an alert, if it is not already open. The exercise will use the http://wideworldimporters site, but you can use whatever site you want. If prompted, type your user name and password, and click OK.
Note
BE SURE TO verify that you have sufficient rights to set up alerts. If in doubt, see the Appendix A at the back of this book.
On the Quick Launch, click Common Buyer Tasks to display the Common Buyer Tasks page, if it is not already displayed.
Select the Phase 1 summary task by hovering your mouse over its title and clicking the check box that appears on the left.
On the Items tab of the Ribbon, in the Share & Track group, click Alert Me, and then select Set alert on this item from the drop-down menu.
Tip
For email alerts to be available, the SharePoint Farm administrator must configure the outgoing email settings for your server. Similarly, for the text alerts to be available, the SharePoint Farm administrator must configure the SMS/MMS service settings. Both settings can be configured using the E-mail and Text Messages settings in System Settings in SharePoint Central Administration. If these settings are not configured, the Alert Me button will not be available, and you will not be able to complete the exercise.
On the New Alert page, in the Alert Title section, type My Alert. Leave the other options unchanged and click OK.
The email alert has been set. You will now modify the list item to trigger an alert.
Using step 2 as a guide, select the Phase 1 list item. On the Items tab of the Ribbon, click Edit Item.
On the Phase 1 page, in the Priority field, select 3 (Low), and then click Save.
Open Outlook and verify that you have received two email messages. The first message indicates that an alert was created successfully. The second message is an email alert notifying you of a change in priority in this list item.

Key Points
Lists are like editable, web-based tables.
List templates can be used to generate a new list with a static set of default columns. SharePoint Foundation provides many prebuilt list templates
Create lists in SharePoint Foundation by using descriptive, memorable, and consistent names.
Deleted list items can be restored from the site Recycle Bin.
One or more documents can be attached to a list item if you want.
SharePoint Foundation allows you to add, edit, and delete the columns in any list.
Summary tasks can be created in SharePoint Foundation Task lists.
Lists can be sorted and filtered using the column headings.
You can set up alerts to be notified about changes to the list and list items.