
Chapter 8. Working with Library Settings

In this chapter, you will learn how to | |
✓ | Open documents in the client or the browser. |
✓ | Modify a library template. |
✓ | Configure required checkout. |
✓ | Enable versioning. |
✓ | Manage checked-out files. |
✓ | Configure the Sites Assets library. |
✓ | Create a custom Send To destination. |
✓ | Manage users and permissions. |
✓ | Create content types. |
✓ | Create a Standard view. |
✓ | Delete and restore a library. |
✓ | Configure other library types. |
In Chapter 5, we discussed how to create SharePoint libraries and how to work with the documents that are stored in these libraries. In this chapter, we will look at managing library settings and how to configure a library’s functionality by modifying its settings in Microsoft SharePoint Foundation. You can access the settings for a library using the Library Settings button in the Settings group on the Ribbon located on the Library tab on the Library Tools tab set.

Because a library is a list of files, list settings and library settings are very similar. The list settings that we discussed in Chapter 7, such as naming and navigation, are applicable to libraries as well. For example, you can set up a document library on the Quick Launch to make it easier to find, the same way as you do for a list.
In addition, in this chapter, we will explore configuration settings that are specific to libraries, including configuring default behavior for opening documents, managing library templates, setting up required checkout and versioning, permission management, and the deletion and restoration of a library.
Practice Files
Before you can complete the exercises in this chapter, you need to download the Chapter 8 practice files from the book’s catalog page to the following folder on your computer: DocumentsMicrosoft PressSBS_SPFChapter08. See Using the Practice Files at the beginning of this book for more information.
Important
Remember to use your SharePoint site location in place of http://wideworldimporters in the following exercises.
Opening Documents in the Client or the Browser
SharePoint document libraries have the ability to open a document within the browser, as opposed to having them display in their native Microsoft Office client application, such as Microsoft Word or Microsoft Excel. The default option is to open in a browser using Office Web Apps, such as Word Web App or Excel Web App, so that users can use their browser to enter information online. This feature, however, does depend on Office Web Apps being installed and activated on the SharePoint Foundation server. The benefit of opening Microsoft Word, Excel, PowerPoint, and One Note documents in the browser is that you can edit them using Office Web Apps from any computer or other device that has a browser. While the online functionality of Word Web App, for example, is lighter than a Word client application, there are many everyday editing tasks that Word Web App supports, and this is very handy for making changes to the documents when you are traveling and only have access to your SharePoint site via a browser. You can configure the default behavior for a document to always open documents in the client application, to always open documents in the browser, or to go by the server default, which is to open in the browser. Regardless of the default opening behavior configured for a library, it is always possible to select another opening option from the document drop-down context menu. For example, if the library is configured to always open documents in a client application but you would like to edit a particular document in the browser, you can select the Edit In Browser option for this document using the document’s drop-down context menu.
In this exercise, you will configure the library so that its documents always open in the Office client applications.
Set Up
Open the SharePoint site that contains the library that you want to configure. The exercise will use the http://wideworldimporters site, but you can use whatever site you want. If prompted, type your user name and password, and click OK.
Note
BE SURE TO verify that you have sufficient rights to manage this library. If in doubt, see the Appendix A at the back of this book.
On the Quick Launch, click Shared Documents.
In the Library Tools, click the Library tab.
In the Settings group on the Ribbon, click the Library Settings button to display the Document Library Settings page.
Click Advanced Settings from the General Settings section. The Advanced Settings page is displayed.
In the Opening Documents in the Browser section, select the Open in the client application option, scroll to the bottom of the page, and then click OK.
From now on, documents from this document library always open in the client application.


Modifying a Library Template
When a document library is created, you can choose the document template for this library. Then, when you click the New Document command on the Documents ribbon tab, the document template determines which Office client program or which Office Web App is opened. The document template is then used as a basis for the new document. For example, the Shared Documents library on a Team site uses a blank Word document as its document template by default.
You can change the template for a library. For example, you may prefer to use a blank Excel workbook or a Word template that contains a header such as your corporate logo. The template document resides in a hidden folder called Forms within the library. You can upload an alternative document template file for the library, or you can edit the existing template.
In this exercise, you will modify the default template for the Shared Documents document library and then create a new document based on the modified template.
Set Up
Open the SharePoint site that you used in the previous exercise, if it is not already open, and navigate to the Shared Documents library.
Note
BE SURE TO verify that you have sufficient rights to manage this library. If in doubt, see the Appendix A at the back of this book.
In the Library Tools, click the Library tab, and then click the Library Settings button in the Settings group on the Ribbon to display the Document Library Settings page, if it is not already displayed.
Under General Settings, click Advanced Settings. The Advanced Settings page is displayed.
In the Content Types section, confirm that the Allow management of content types? option is set to No so that the Template URL field in the Document Template section is enabled.
Click Edit Template below the Template URL box in the Document Template section.
The Open Document message box appears. Click OK to open the template.dotx file in Word.
Double-click the top of the blank Word document to enter the Header section.
Type Wide World Importers, set the text to bold, and increase the point size as desired.
Click File, Close to close the document. When the Microsoft Word message box opens, click Save.
The modified template has been saved to the library. You will now create a new document based on this template. In the browser, navigate back to the document library by clicking Shared Documents on the breadcrumb.
Click the Documents tab on the Ribbon, and then click New Document.
If a warning message appears, click OK.
Word opens a new document that is based on the template that you’ve just created. In the document, type Proposal.
Click File, Save As, type Proposal in the Name box, and then click Save. The new document, called Proposal.docx, is saved back to the library.


Configuring Required Checkout
Checking documents out of the library is invaluable when several people could be making changes to the same document at the same time. In Chapter 5, you learned how to check out a document and then check it back in the library. You can also enforce the checkout of a document before a user can edit it by configuring the Require Check Out option. The default for this option is set to No, meaning that users are not required to check out a document before it can be edited. Many organizations, however, have a policy requiring that all documents are always checked out for editing. To meet this requirement, a SharePoint library can be configured to require checkout before a document can be edited.
In this exercise, you will configure a Shared Documents library to require checkout of all documents, and then explore how this setting is working.
Set Up
Open the SharePoint site that you used in the previous exercise, if it is not already open, and navigate to the Shared Document library.
Note
BE SURE TO verify that you have sufficient rights to manage this library. If in doubt, see the Appendix A at the back of this book.
In the Library Tools, click the Library tab, and then click the Library Settings button in the Settings group to display the Document Library Settings page, if not already displayed.
Click Versioning settings under General Settings.
On the Versioning Settings page, in the Require Check Out section, select Yes. Click OK at the bottom of the page.
The Document Library Settings page is displayed. You will now edit a document in the Shared Documents library to validate the required checkout setting. On the breadcrumb at the top of the page, click Shared Documents.
The Shared Documents library is displayed in the All Documents view. Click the Proposal document.
An Open Document message box appears. You can either open the document as read-only or check it out for editing. Make sure that the default option, Read Only, is selected and then click OK.
Word 2010 opens and displays the information bar, requiring that you check out the document. To edit a document, click Check Out on the information bar.
The information bar disappears, and the Word ribbon is displayed. Type some text in the document, and then, on the Quick Access Toolbar, click the Save icon.
Close Word by clicking the cross in the upper-right corner of the window.
A Word message box opens, stating that other users cannot see your changes until you check in the document and asking whether you want to check in the document. Click Yes.
The Check In dialog opens. Click OK. The document is saved and checked back in the library so that other users can edit it.


Enabling Versioning
You can turn on or turn off the versioning of documents stored in the library via Versioning settings. Each time a document is changed when versioning is turned on, SharePoint Foundation saves a copy of the edited version of the document. This provides you with multiple versions of the same document so that you can easily see what the document contained before the modifications and revert to a previous version if necessary.
When versioning is turned on, you can select between two types of versioning: major versions only, or major and minor versions. Major versions store a full-text copy of each document version. The latest version is always published, meaning that those with access to the document library can view the most recent version of the document.
Major and minor versioning allows you to publish major versions of a document while creating modified, minor versions of the same document that only a subset of users with access to the library can view and edit. You can control who views a minor version by using the Draft Item Security configuration setting. Using major and minor versions is useful when performing multiple modifications of a document prior to submitting it for approval. When major and minor versioning is selected, you can control how many versions of each document are retained in the document library.
Tip
Only SharePoint libraries provide the ability to use both major and minor document versions. SharePoint lists also have versioning settings, but you cannot use major and minor versions as you can with libraries.
In this exercise, you will configure a document library to use both major and minor versions, and then explore a major and a minor version of a document.
Set Up
Open the SharePoint site that you used in the previous exercise, if it is not already open, and navigate to the Shared Document library.
Note
BE SURE TO verify that you have sufficient rights to manage this library. If in doubt, see the Appendix A at the back of this book.
In the Library Tools, click the Library tab, and then click the Library Settings button in the Settings group to display the Document Library Settings page.
Click Versioning Settings under General Settings.
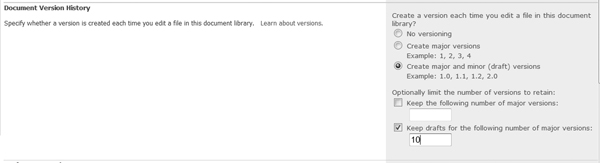
In the Document Version History section, select Create major and minor (draft) versions.
Select the Keep drafts for the following number of major versions check box, and then type 10 in the text box.
Scroll to the bottom of the page and click OK to enable versioning.
You will now create a version of a document in this library. Using the breadcrumb at the top of the page, navigate to the Shared Documents library.
Click Proposal, and then, in the Open Document message box, click Check Out and Edit.
Word 2010 opens and displays the contents of the document.
Make any changes to the document. For example, you might decide to type =rand() followed by ENTER to insert some text. On the Quick Access Toolbar in Word, click the Save icon. Close the document by clicking the cross in the upper-right corner of the Word window.
A Word message box opens, stating that other users cannot see your changes until you check in the document. Click Yes to check in the document now.
The Check In dialog opens. Leave the default option, 1.1 Minor version (draft), selected. In the Version Comments box, type WideWorldChanges, and then click OK.
Word closes, and the library page displays in the browser. In the Shared Documents library, hover the mouse over the name of the document and click the arrow that appears on the right. Click Version History from the drop-down context menu.
Notice that the latest version is 1.1.
Close the Version History dialog.
Hover the mouse over the name of the document again, click the down arrow, and choose Publish a Major Version.
In the Publish Major Version dialog, in the Comments field, delete the existing text. Type Ready to send to the customer, and click OK.
The Shared Documents library is displayed. You will now restore the previous version of the document. Hover the mouse over the name of the document, click the down arrow, and select Check Out. Click OK to confirm the checkout.
Hover the mouse over the name of the document, click the down arrow, and then click Version History. Note that version 2.0 is now the latest version.
In the Version History dialog, hover the mouse over the Modified date for version 1.0, and click the down arrow.
Select Restore from the menu to restore version 1.0 as the latest version.
Click OK in the warning message box that appears.
Note that the latest version is now version 2.1, which is the same as 1.0 and does not have the version comments that you set for version 2.0.
On the library page, hover the mouse over the document, click the down arrow, and select Check In. In the Check In dialog, in the Version section, select 2.1 Minor version (draft) and click OK.
Hover the mouse over the name of the document again, click the down arrow, and choose Publish a Major Version. Click OK in the Publish Major Version dialog. The restored version is now published.


Managing Checked-Out Files
Imagine how many times during the day you are interrupted by telephone calls or last-minute meetings that divert your attention from an open document you are working with. As a result, you may inadvertently leave a document checked out of a SharePoint library. Many people work collaboratively in different time zones nowadays, and it is possible that somebody will need to see and edit a document that you have left checked out while you are offline. To address this problem, SharePoint Foundation allows users with permission to override the check out in this library to check a document back in a library even if the document has been checked out by another user. If the document has a checked-in version that is displayed on the library page, then a user with appropriate permissions can override the checkout by another user and check the document in using the Check In command on the context menu or on the Ribbon. However, if the checked-out document is new and does not have a checked-in version displayed on the library page, an additional step is required to take ownership of this document using the Library Settings.
In this exercise, you will check in a new document that has been left checked out by another user.
Practice Files
You will use the practice file Contoso Proposal.docx, located in the DocumentsMicrosoft PressSBS_SPFChapter08 folder.
Set Up
For this exercise, you need to have two sets of user credentials. The first user should have sufficient permissions to check out and edit documents in a library. The second user should have sufficient permissions to override the checkout in the library. For more information about permissions, see the Appendix A at the back of this book.
Note
BE SURE TO open the SharePoint site that you used in the previous exercise, log in as the first user, and navigate to the Shared Document library.
You will first add a new document to the library, which then will be checked out to you. In the Shared Documents library that you have been working with, click Add Document, and then, in the Upload Document dialog, browse to the practice files folder DocumentsMicrosoft PressSBS_SPFChapter08, select Contoso Proposal.docx, and click Open.
In the Upload dialog, click OK.
In the Shared Documents-Contoso Proposal.docx dialog that appears, notice the confirmation that the document has been uploaded and is currently checked out to you, and then close the dialog.
You will now sign in as a different user. Click the down arrow to the right of your name in the right corner of the page and click Sign in as a Different User.
Enter the Username and Password for a second user who has permissions to manage this library.
The library page is displayed. Notice that you cannot see the new document, My Proposal.docx, any longer because it does not have the checked-in version that is available to the users other than its owner, whom the new document is checked out to.
You will now take ownership of the document, so that you can check it back in.
In the Library Tools, click the Library tab, and then click the Library Settings button in the Settings group on the Ribbon.
In the Document Library Settings page, in the Permissions and Management section, select Manage files which have no checked in version.
The Checked Out Files page is displayed.
Select the document that you added to the library in step 1.
Click Take Ownership of Selection, and then click OK in the confirmation message box that appears.
You now have taken ownership of the document and can check it back in so that other users can have access to it. Notice that the check box has disappeared because you are the document’s owner.
You will now check the document back in so that it is available to other users. On the breadcrumb, click Shared Documents to go back to the library.
Notice that you can see the document on the library page because you are now its owner. Hover the mouse over the document, click the down arrow, and then click Check In from the context menu.
In the Check In dialog that appears, click OK to check the document in the library.
You have now checked in a new document that has been checked out to another user.


Configuring the Sites Assets Library
The Sites Assets library is a library that is created by default by SharePoint Foundation when a new Team site is created. It is especially useful when you work with wiki web pages. Site assets are usually images that are uploaded to this library for use within a wiki web page. When you upload a file to a site via the Ribbon commands on the Insert tab while editing a wiki web page, the Site Assets library can be used as the default location instead of you being prompted to choose a location. This makes it easier to find site assets for wiki web pages. You can set up any document library as the default location for your site’s assets.
See Also
For more information on editing wiki web pages, refer to Chapter 6.
In this exercise, you will set the Shared Documents library as the default location for storing images or other files in wiki web pages.
Practice Files
You will use the practice file WideWorldImportersLogo.png, located in the DocumentsMicrosoft PressSBS_SPFChapter08 folder.
Set Up
Open the SharePoint site that you used in the previous exercise, if it is not already open, and navigate to the document library that you want to make the default location, such as Shared Documents Library.
Note
BE SURE TO verify that you have sufficient rights to manage this library. If in doubt, see the Appendix A at the back of this book.
In the Library Tools, click the Library tab, and then click the Library Settings button in the Settings group on the Ribbon to display the Document Library Settings page.
Click Advanced Settings from the General Settings section. The Advanced Settings page is displayed.
In the Site Assets Library section, click Yes to confirm that this library should be a site assets library and should store images and other files that users upload to their wiki pages.
Click OK. The Document Library Settings page is displayed.
You will now validate that this library has become the site assets library by editing a wiki web page. Click the Home link on the top link bar to display the home page of your Team site.
On the Site Actions menu, click Edit Page to put the page into Edit mode.
In the Editing Tools, click the Insert tab, and then click the Upload File button in the Links group on the Ribbon.
The Upload Document dialog appears, with the name of the document library that you have chosen as the default site assets library listed in the Upload to text box.
Click Browse and, in the Choose File to Upload dialog, navigate to the practice files folder DocumentsMicrosoft PressSBS_SPFChapter08.
Select the WideWorldImportersLogo.png image and click Open.
In the Upload Document dialog, click OK. The Shared Documents-WideWorldImportersLogo.png dialog opens.
Type a name for your image, such as Logo, and then click Save.
The image is uploaded to the document library that you have configured to be the site assets library, and a link to that file is used on the wiki page.


Creating a Custom Send To Destination
The Custom Send To Destination feature allows you to enter a Uniform Resource Locator (URL) for a document library other than the repository that your SharePoint administrators might have set at the SharePoint Foundation 2010 farm level, where users can send their documents automatically once they are finished and ready for a wider audience’s consumption. This is handy if you want to ensure that all documents under development are written in one document library, while those available for public consumption are hosted in a different document library with different permissions in the same site.
Tip
You can also ensure that the contents in this library are not included in the search results by removing them from the indexing feature in SharePoint Server 2010.
Each document within a document library contains a drop-down context menu known as the Edit Control Block (ECB).

You can add to the ECB a menu item that allows you to send a document from this library to another location, such as a document archive. To set up the Send To destination menu item, you simply enter the URL of the destination location to which you want to send documents.
In this exercise, you will configure a custom Send To destination setting to allow users to move documents easily from Shared Documents to a new library called Accepted Proposals.
Note
BE SURE TO verify that you have sufficient rights to manage this library and create libraries on this site. If in doubt, see the Appendix A at the back of this book.
You will first create a new library that will serve as the destination. On the Site Actions menu, click New Document Library. The Create dialog opens.
In the Name text box, type Accepted Proposals, and then, at the bottom of the dialog, click Create to accept all the default options.
You will now configure the Custom Send To Destination setting in the Shared Documents library. On the Quick Launch, under Libraries, click Shared Documents, and then, in the Library Tools, click the Library tab.
Click the Library Settings button in the Settings group on the Ribbon to display the Document Library Settings page, and then click Advanced Settings from the General Settings section. The Advanced Settings page is displayed.
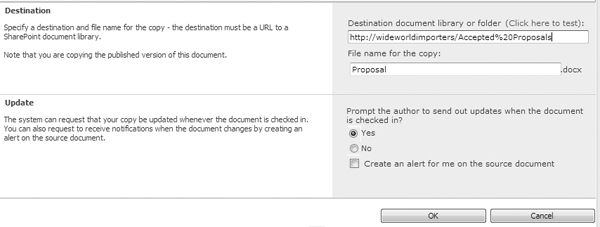
In the Custom Send To Destination section, in the Destination text box, type Accepted Proposals.
In the URL text box, type http://wideworldimporters/Accepted%20Proposals (where %20 in the URL represents a space in the library name). Click OK.
You will now explore how the setting works. Navigate back to the Shared Documents library using the breadcrumb.
Hover the mouse over a document, such as Proposal, click the down arrow, and then click Send To. Click Accepted Proposals from the drop-down menu.
The Copy page is displayed. In the Update section, click Yes to prompt the author to send out updates when the document is checked in, and then click OK.
The Copy Progress message box opens. Click OK.
The Copy Progress message box states that the copy operation was successful. Click Done.
Using the Quick Launch, navigate to the Accepted Proposals library to confirm that the document has been copied.

Managing Users and Permissions
A document library can inherit its permissions from the site where the library is located, or it can have its own unique permissions. If the permissions are inherited, they are managed either on the site in which the library resides or on a parent site, depending on where the inheritance starts. A folder or a document within a library can inherit their permissions from the library, or unique permissions can be granted for a folder or a document within the library.
SharePoint Foundation includes 12 library permissions that determine the specific actions that users can perform in the library. They are listed in the following table.
Library Permissions | Description |
Manage Lists | Allows the user to create and delete lists and libraries, add or remove columns in a list or a library, and add or remove public views of a list or a library |
Override Check Out | Allows the user to discard or check in a document that is checked out to another user |
Add Items | Allows the user to add items to lists and add documents to document libraries |
Edit Items | Allows the user to edit items in lists, edit documents in document libraries, and customize Web Part Pages in document libraries |
Delete Items | Allows the user to delete items from a list and documents from a document library |
View Items | Allows the user to view items in lists and documents in document libraries |
Approve Items | Allows the user to approve a minor version of a list item or document |
Open Items | Allows the user to view the source of documents with server-side file handlers |
View Versions | Allows the user to view past versions of a list item or document |
Delete Versions | Allows the user to delete past versions of a list item or document |
Create Alerts | Allows the user to create alerts |
View Application Pages | Allows the user to view forms, views, and application pages, and enumerate lists |
The library permissions can be assigned to permission levels. Each permission level is a named collection of permissions that can be assigned to SharePoint users and groups. There are five default permission levels: Read, Contribute, Design, Full Control, and Limited Access. You can use the default permission levels or create your own.
See Also
For more information about permissions, see the Appendix A at the back of this book.
After creating a library, you might want to grant more privileges to certain people, or restrict their privileges. More often than not, you might want to give some people more access rights to a particular library. For example, Olga Kosterina might have given Read permission for the overall site to Todd Rowe when it was created. However, she might decide later that she wants him to manage the Accepted Proposals library. Todd currently has only Read access to this library because that is his overall permissions level on the site, but Olga can assign Todd a permission level of Full Control for the Accepted Proposals library so that Todd can manage it.
In this exercise, you will configure the permissions for the Accepted Proposals document library so that a user such as Todd has a permission level of Full Control in this document library. You will then remove the Full Control permission level from the site owners so that only Todd has the Full Control permission level in this library.
Note
BE SURE TO verify that you have sufficient rights to manage permissions for this library. If in doubt, see the Appendix A at the back of this book.
On the Quick Launch, click Accepted Proposals.
On the Library tab, click the Library Settings button in the Settings group on the Ribbon to display the Document Library Settings page.
In the Permissions and Management section, click Permissions for this document library. The Permissions page appears.
Notice that the yellow status bar below the Ribbon states that this library inherits permissions from its parent.
On the Edit tab, click Stop Inheriting Permissions.
A message box opens, warning you that you are about to create unique permissions for this document library and that changes made to the parent site permissions will no longer affect this document library.
Click OK.
Notice that the yellow status bar below the Ribbon now states that this library has unique permissions.
On the Edit tab, click Grant Permissions. The Grant Permissions dialog appears.
In the User/Groups box, type the user name or email address of the user to whom you would like to grant permissions, such as Todd, and then click the Check Names icon.
In the Grant Permissions section, under Grant users permission directly, select the Full Control check box and click OK.
Todd is now added to the list of users and groups who have access to the document library. Todd is mapped to the Full Control permission level.
You will now remove the Full Control permission level for this library from the site owners group. Click the check box to the left of <site name> Owners group to select it (your site name will be shown in the name of the group).
On the Edit tab, click Remove User Permissions, and then click OK to confirm removal of all permissions for the Owners SharePoint group. Todd is now the only user who has Full Control over the Accepted Proposals library.
Tip
You can check the permissions for any specific user within the document library. An exercise in the section entitled Managing Users and Permissions, in Chapter 7, describes the process for a list, and the same process can be used for a library.


Creating Content Types
Content types are very useful within document libraries. Document Content Types allow you to specify a template document for each content type that is used within a library. For example, consider a Sales Team site that allows salespeople to create quotations, proposals, and invoices. These three document types could be created within the same document library, each one using its own template and metadata.
In this exercise, you will create a content type for proposal documents and then create a new document based on this content type. The new content type will consist of a new document template, along with custom metadata that will capture the Customer and the Proposal Value properties.
Practice Files
You will use the practice file ProposalsTemplate.docx, located in the DocumentsMicrosoft PressSBS_SPFChapter08 folder.
Note
BE SURE TO verify that you have sufficient rights to create content types. If in doubt, see the Appendix A at the back of this book.
Click Site Actions, and then click Site Settings.
In the Site Settings page, under Galleries, click Site content types. The Site Content Types page is displayed.
Click Create.
On the New Site Content Type page, in the Name box, type Proposals, and in the Description box, type Wide World Importers Customer Proposals.
Make sure that the Select parent content type from option is set to Document Content Types, and then, in the Parent Content Type list, select Document.
Leave the other options at the default settings and click OK.
The Proposals content type page is displayed.
Under Settings, click Advanced settings. The Advanced Settings page is displayed.
In the Document Template section, click Upload a new document template, and then click Browse.
In the Choose File to Upload dialog box, navigate to the DocumentsMicrosoft PressSBS_SPFChapter08 folder and click ProposalsTemplate.docx. Click Open.
On the Advanced Settings page, accept the defaults and click OK.
The Proposals content type page is displayed.
In the Columns section, click Add from new site column to create the first custom column for this content type. The New Site Column page is displayed.
In the Column name box, type the name of your column, such as Customer Name, and ensure that Single Line of Text is selected. Accept the defaults and click OK.
The Proposals content type page is displayed.
In the Columns section, click Add from new site column again to create another custom column with the name Proposal Value, column type Currency, minimum value of 50, and maximum value of 10000. Click OK.
The Proposals content type page is displayed.
You have created a new content type and have added two custom columns. You will now add this content type to the Shared Documents library.
On the Quick Launch, click Shared Documents. Click the Library tab, and then click Library Settings in the Settings group on the Ribbon to display the Document Library Settings page.
In the General Settings section, click Advanced settings, and in the Content Types section, under Allow management of content types, select Yes. Scroll down the page and click OK.
The Document Library Settings page is displayed.
In the Content Types section, click Add from existing site content types. The Add Content Types page is displayed.
From the Available Site Content Types list, select Proposals, and then click Add. Click OK to confirm the addition of the content type.
You will now create a new document that is based on this content type. Using the breadcrumb, navigate back to the Shared Documents library.
Click the Documents tab, and then click the down arrow on the New Document button.
Select Proposals, and then click OK in the Open Document message box (if it appears) to confirm the opening of the file.
Troubleshooting
If you see an error that states that the Office application or the browser is incompatible, it may be because you are using a 64-bit browser. Switch to a 32-bit browser. More information on this error can be found at http://technet.microsoft.com/en-us/library/cc288142.aspx.
Word opens. In the document information panel displayed on the top of the Word window, set the Title to My Company Proposal, Customer Name to My Company, and Value to $1000.
In Word, click File, Save As, type My Company Proposal in the File name box, and then click Save to save the new document to the library. Click OK in the Check In dialog if it appears.
In the browser, hover the mouse over the name of the document that you have just created and click the down arrow that appears on the right to display the context menu.
Click View Properties. In the Shared Documents – My Company Proposal dialog that appears, notice the values that you set for the Title, Customer Name, and Proposal Value properties.
Close the Shared Documents – My Company Proposal dialog.
Note
The properties that you set will not display in the default view because you have used a content type. If you had created custom columns directly in the library, the option to display them in the default view would be available. In the next exercise, you will create a view to display these columns.


Creating a View
Creating a view in a library is a beneficial way of organizing content within a library. A view can be created with filters based on the columns, allowing for an easy way to find documents. If a library contains custom metadata, you may want your view to be created with a filter on that custom column. Custom views work very well with the content types that were described in the previous exercise. For example, if you would like to display all proposal documents in a separate view to set documents apart from invoices, you could create a filter on each view based upon the content type column.
See Also
We will look into views in more detail in Chapter 9.
In this exercise, you will create a new view within a document library to display all the proposal documents that are created with the new proposal template. The custom columns of Customer Name and Proposal Value will become the columns within the view.
Set Up
Open the SharePoint site and display the document library where you would like to create a new view.
Note
BE SURE TO verify that you have sufficient rights to create views in this library. If in doubt, see the Appendix A at the back of this book.
On the Library tab, click the Create View button in the Manage Views group on the Ribbon. The Create View page is displayed.
Under Choose a view format, click Standard View.
In the View name box, type a view name, such as Proposals.
In the Columns section, click the Customer Name and Proposal Value columns to add them to the selection of columns for the new view.
In the Sort section, set the First sort by the column field to Customer Name.
In the Filter section, set Show items only when the following is true, and set the filter to Content Type is equal to Proposals.
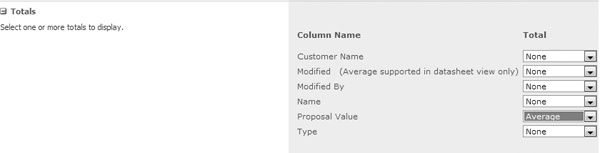
Expand the Totals section, and for the Proposal Value column, from the Total drop-down list, select Average.
Click OK.
The library page displays in the Proposals view and shows only proposals created using the Proposals content type. Two custom columns that you created are displayed, along with an average value in the Proposal Value column.


Deleting and Restoring a Library
Libraries can be deleted if they are no longer required within a Team site. Note that deleting a library will delete the content within the library as well. If a library is deleted accidentally, it can be restored from the Recycle Bin at the site level.
In the exercise, you will delete the Shared Documents document library and then restore it from the site Recycle Bin.
Set Up
Open the SharePoint site and navigate to the library you would like to delete, if not already open. The exercise will use the Shared Documents library on http://wideworldimporters site, but you can use whatever site you want. If prompted, type your user name and password, and click OK.
Note
BE SURE TO verify that you have sufficient rights to delete and restore this library. If in doubt, see the Appendix A at the back of this book.
Within the library that you would like to delete, in the Library Tools, click the Library tab, and then click the Library Settings button in the Settings group on the Ribbon.
Click Delete this document library from the Permissions and Management section.
Click OK to the warning message that appears.
The document library is now deleted.
You will now restore the deleted library. In the left navigation area, click the Recycle Bin.
On the Recycle Bin page, select the deleted library by clicking the check box to the left of its name.
Click Restore Selection, and then click OK in the confirmation message box that appears. The document library has been restored.
Navigate to the library and verify that it has been restored.


Configuring Other Library Types
So far in this chapter, we’ve been focusing on configuring the document libraries. You may also need to configure other library types, such as form libraries, picture libraries, and wiki page libraries. While there are no unique configuration settings for each of these library types, the navigation to the library settings is different for wiki page libraries and picture libraries.
Wiki libraries do not have a Library Tools tab or a Library ribbon. Instead, there is a Page tab that displays a ribbon. The Library Settings button is located in the Page Library section of the Ribbon.

Picture libraries do not use the Ribbon interface in SharePoint Foundation. The Picture Library Settings are accessible from the Settings menu in the Library page.
In this exercise, you will explore the Picture Library Settings.
Set Up
Open the SharePoint site in which you would like to explore picture library settings. The exercise will use the http://wideworldimporters site, but you can use whatever site you want. If prompted, type your user name and password and click OK.
Note
BE SURE TO verify that you have sufficient rights to create libraries on this site. If in doubt, see the Appendix A at the back of this book.
Click Site Actions, and then click More Options. The Create page is displayed.
Under Filter by, click Library, select Picture Library, and then, in the Name field, type Wide World Importers Images, and click Create.
The picture library has been created and is displayed in the browser.
On the picture library page, click the Settings menu on the toolbar at the top of the page, and choose Picture Library Settings.
The Picture Library Settings page is displayed. Explore the page, and notice that the settings for the picture library are very similar to the ones for a document library.

Key Points
You can think about libraries as lists of files, and many library settings are similar to list settings.
There are specific settings for libraries, including default open behavior, library templates, required checkout, and major and minor versioning.
You can configure the default open behavior for a library by setting up whether documents from this library will open by default in the client application or in the browser.
You can set up Required Check Out for the library to make sure that users do not make changes to a document at the same time.
Custom Send To locations can be configured when documents need to be copied to other locations.
Configuring a Site Assets library is useful to store resources for wiki pages.
Content types are used to enable custom metadata, as well as multiple document templates within a document library.
Custom views can be created to display the custom column values.
If a library is deleted by accident, it can be restored from the site’s Recycle Bin within 30 days.