
Chapter 6. Working with Web Pages

In this chapter, you will learn how to | |
✓ | Edit a page. |
✓ | Change the layout of a page. |
✓ | Create a new page. |
✓ | Add links. |
✓ | Work with page history and versions. |
✓ | Use alerts. |
✓ | Add a Web Part from the Web Part pane. |
✓ | Remove a Web Part. |
✓ | Customize a Web Part by using the Web Part tool pane. |
✓ | Edit Web Part pages. |
✓ | Move Web Parts. |
In Microsoft SharePoint Foundation 2010, a website is a collection of web pages. You will find this approach more natural than in Microsoft Windows SharePoint Services 3.0, where a site was seen as a container for list and library data and web pages were used to display data held in the lists and libraries. In Windows SharePoint Services 3.0, the addition of static text and images was possible only by adding the Content Editor Web Part.
In SharePoint Foundation, when you create a Team site, SharePoint creates a wiki page library, named Site Pages, where the web pages are stored and where the new pages can be created from the Site Actions menu. There are two types of web pages—wiki pages and Web Part pages. Wiki pages are the default pages at sites created from the Team, Blank, or Document Workspace site template. Both wiki pages and Web Part pages can contain Web Parts. Web Parts are reusable components that can contain any type of web-based information, including analytical, collaborative, and database information. Wiki pages consist of a mix of free-format static text and images in addition to Web Parts, whereas Web Part pages can contain only Web Parts. To include free-format static text or images on a Web Part page, you must use the Content Editor Web Part or the Image Web Part.
Both types of pages are flexible and highly customizable using three types of tools:
A browser
A SharePoint Foundation–compatible web page editing tool, such as Microsoft SharePoint Designer 2010
A professional development tool such as Microsoft Visual Studio 2010
No one tool can do everything, and therefore it is likely that in any deployment of SharePoint Foundation, all three tools will be used at some point.
This chapter introduces the basic concepts of wiki pages, Web Part pages, and Web Parts. Using the browser, you will learn how to view wiki pages and Web Part pages in different ways, as well as how to change the appearance of these pages by adding and removing static text and images and adding and removing Web Parts.
Practice Files
Before you can complete the exercises in this chapter, you need to download the Chapter 6 practice files from the book’s catalog page to the following folder on your computer: DocumentsMicrosoft PressSBS_SPFChapter06. See Using the Practice Files at the beginning of this book for more information.
Important
Remember to use your SharePoint site location in place of http://wideworldimporters in the following exercises.
Editing a Page
On a Team site, blank site, or Document Workspace, the default web pages are wiki pages. They are stored in a SharePoint Foundation–based wiki library, named Site Pages.
The wiki library, Site Pages, inherits its permissions from the site. Therefore, anyone who is mapped to the Contribute permission level at the site level—that is, anyone who is a member of the site’s Members SharePoint group—is allowed to change any wiki page or create new pages, which is known as “open editing.” If a page is found to be incomplete or poorly organized, any member of the site can edit it as he or she sees fit. Therefore, as users share their information, knowledge, experience, ideas, and views, the content evolves. Site members can work together to change or update information without the need to send emails or attend meetings or conference calls. All users are allowed to control and check the content, because open editing relies on the assumption that most members of a collaboration site have good intentions.
When you edit a page, you should always check it out before you modify the content. This is to prevent other users in your team from editing the page at the same time.
Tip
Wiki pages stored in a SharePoint Foundation–based wiki library can include static text, images, and Web Parts, without the need for Web Part zones.
In this exercise, you will edit the home page of a site.
Practice Files
You will use the practice file pjcov.jpg, located in the DocumentsMicrosoft PressSBS_SPFChapter06 folder.
Set Up
Open the SharePoint Team site where you would like to edit the home page. The exercise will use the http://wideworldimporters site, but you can use whatever site you want. If prompted, type your user name and password, and then click OK.
Note
BE SURE TO verify that you have sufficient rights to edit the home page of this site. If in doubt, see the Appendix A at the back of this book.
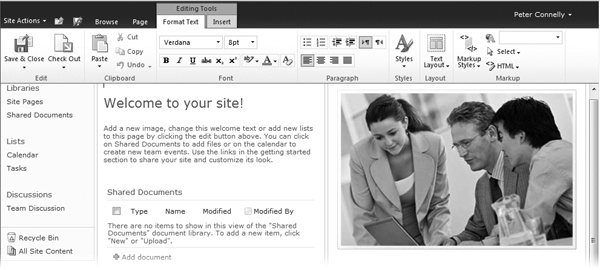
Click the Edit icon that is displayed to the left of the Browse tab.
The Editing Tools ribbon tabs—Format Text and Insert—are displayed on the right side of the Page tab, and the Ribbon is displayed above the two wiki page content areas. The Edit icon that was displayed to the left of the Browse tab is replaced with the Save & Close icon.
On the Format Text tab, click Check Out in the Edit group.
A notification message briefly appears below the Ribbon and to the right, displaying the text “Page Checked Out,” and a yellow status bar appears below the Ribbon stating that the page is checked out and editable. On the Format Text tab, the Check Out command in the Edit group is replaced with the Check In command.
Tip
The Status bar and notification area are new to SharePoint 2010. Both give you contextual information. The Status bar displays persistent information and uses four predefined background colors to identify the level of importance of the information. Very important information has a red background, important information has a yellow background, success information has a green background, and all other information has a blue background.
Place the cursor to the left of the Welcome title. Press CTRL+A to select all the content in the left content area of the page, and then press DELETE.
The contents in the left area of the wiki page are deleted.
In the left content area, type Welcome to the Financial team site, and then press ENTER to move the cursor to a new line.
On the Format Text tab, click Styles, and then click Normal.
Type This web site is used by members of the Wide World Importers Financial team and allows us to share content and then press ENTER.
Tip
Start the home page of a Team site with an introduction that states its purpose. The first page in the Site Pages wiki library is labeled Home and should contain the context or any assumptions that will apply to all pages, as well as list or library content that is stored in the site. If you edit an existing wiki page, you should not place new content before the introduction, nor should the content necessarily be added to the bottom of the page. You should emphasize the flow of ideas, be concise, write factual information, and stay on topic for the page. Check for spelling and grammatical errors that can detract from the content. You might consider entering the text in Microsoft Word first, check it for spelling and grammar using the Spelling & Grammar feature of Word, and then paste it into the wiki content area.
Click the Insert tab, and then click Picture in the Media group.
The Select Picture dialog opens.
Click Browse, and then navigate to the Chapter06 practice file folder. Click pjcov.jpg and then click Open.
Leave the default library where the image will be uploaded to Site Assets, and then click OK.
The Site Assets – pjcov.jpg dialog opens.
Click Save to upload the image and display the image on the page. The Design tab is displayed.
On the Format Text tab, click Check In in the Edit group.
The Check In dialog is displayed.
In the Comments box, type Welcome message added to the page, and then click Continue.
The page is saved, the Editing Tools ribbon tabs disappear, and the Save & Close icon to the left of the Browse tab is replaced with the Edit icon. The Browse tab becomes the active tab.


Changing the Layout of a Page
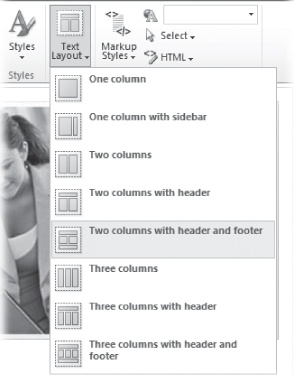
The home page of a Team site contains two content areas. You can change the number of content areas that a wiki page contains using the Format Text contextual ribbon and clicking the Text Layout command in the Layout group.
In this exercise, you will change the layout of your page.
Note
BE SURE TO verify that you have sufficient rights to edit the home page of this site. If in doubt, see the Appendix A at the back of this book.
Click Site Actions, and then click Edit Page.
On the Format Text tab, click Text Layout in the Layout group, and then click Two columns with header and footer.
Select Welcome to the Financial team site, and then, on the Format Text tab, click Cut.
Place the cursor in the top content area, and then, on the Format Text tab, click the down arrow on the Paste command and click Paste plaintext.
On the Format Text tab, click Save & Close in the Edit group.

Creating a New Page
Typically, pages are limited to no more than two or three screens of information. This enables the information on the page to be in an easily accessible and modifiable format. There are four methods that you can use to create a new page in a wiki page library:
Create a forward link and then click it to create a page. This is the recommended method, because it is easier for people to find a page when another page is linked to it.
The New Page command on the Site Actions menu.
The All Pages view of the Site Pages library.
The More Options command on the Site Actions menu.
In this exercise, you will create a wiki page by using these four methods.
Note
BE SURE TO verify that you have sufficient rights to create a page in this site. If in doubt, see the Appendix A at the back of this book.
Click the Edit icon that is displayed to the left of the Browse tab.
In the top content area, place the cursor on a new line under Welcome and type WideWorldImporters are specialist importers of unique furniture ([[
A list of pages that exist in the Site Pages wiki library is displayed.
Type B.
A message appears that the Item does not exist—that is, there is no page in the Site Pages library with a name starting with the letter B.
Type edRoom]], [[OfficeFurniture]] and [[GardenFurniture]]) and then press ENTER.
Click Save & Close.
The home page is displayed with the words “BedRoom,” “OfficeFurniture,” and “GardenFurniture” shown as hyperlinks and underlined with a dotted line. By using double brackets on the edit form, you have created three linked pages. Linked pages do not have to exist, and such nonexistent pages are denoted by a dotted underline, as is the case with “BedRoom,” “OfficeFurniture,” and “GardenFurniture.”
Tip
The naming convention for wiki pages, known as WikiWords or WikiNames, is to concatenate two or more words. Each word is composed of two or more letters, with no spaces between words. The first letter of each word is capitalized, and the remaining letters are lowercase. This formatting is known as Camel case. The wiki page name is used to form part of the Uniform Resource Locator (URL).
Click BedRoom. The New Page dialog is displayed.
Click Create.
The BedRoom page is displayed, and BedRoom appears in the list of Recently Modified pages in the left navigation pane.
Click Site Actions, and then click New Page.
The New Page dialog is displayed.
In the New page name box, type KitchenFurniture and then click Create.
The KitchenFurniture page is displayed, and KitchenFurniture appears in the list of Recently Modified pages in the left navigation pane.
Click the Page tab, and then click View All Pages in the Page Library group. The Site Pages library is displayed in the All Pages view.
Click Add new page. The New Page dialog is displayed.
In the New page name box, type Seating, and then click Create.
The Seating page is displayed, and Seating appears under Recently Modified in the left navigation pane.
Click Site Actions, and then click More Options.
The Create dialog is displayed.
Under Filter By, click Page.
In the middle pane, the types of pages are shown—Page and Web Part Page, with Page selected.
Under Page in the right pane, type FloorCoverings, and then click Create.
The FloorCovering page is displayed, and FloorCoverings appears under Recently Modified in the left navigation pane.


Adding Links
In the previous section, you created a forward link to a page yet to be created by enclosing the name of the page in double square brackets on the edit form. In the following exercise, you will create a link to a page and have the link display text that is different from the page name. You will then use the Incoming Links feature to identify those pages that link to a wiki page before you delete the page.
Tip
When you add content to a wiki page and suggest a topic that other contributors to the Team site may know the answer to, try to enter text on the page in the form of a forward link; that is, place text between double square brackets. Other contributors to the page can enter information by clicking the forward link and creating new pages.
In this exercise, you will add a forward link.
Set Up
Open the SharePoint site that you used in the previous exercise, if it is not already open. Be sure to complete the previous exercises in this chapter before beginning this exercise.
Note
BE SURE TO verify that you have sufficient rights to edit the home page in this site. If in doubt, see the Appendix A at the back of this book.
On the Quick Launch, under Libraries, click Site Page, and then, in the Name column, click Home. The home page of the Team site appears.
Click the Edit icon that is displayed to the left of the Browse tab.
Place the cursor on a new line below WideWorldImporters. Type [[s, and then press TAB to select Seating, and then type | Seating Furniture]].
Click Close & Save.
The words “Seating Furniture” are not underlined with dashes; therefore, this forward link points to the existing Seating page that you created in the previous exercise.
Click Seating Furniture. The Seating page is displayed.
Click the Page tab, and then click Incoming Links in the Page Actions group. The pages that link to the Seating page are listed; the home page is the only one listed here.
Click Home, and then click the Edit icon that is displayed to the left of the Browse tab.
In the content area, select [[Seating|Seating Furniture]], press DELETE, and then click Save & Close.
On the Quick Launch, under Libraries, click Site Pages, and then click Seating.
Click the Page tab, and then click Delete Page in the Manage group.


Working with Page History and Versions
A SharePoint Foundation–based wiki library has all the features of a document library, such as history and version management. Therefore, no amendments are lost. Major versioning is turned on by default when you create a wiki page library. You can also use content approval and workflow, as well as restrict the rights as to who can publish and edit pages.
In the following exercise, you will view the history of a page, observe the changes to the page, and then revert to the previous copy of the page.
Set Up
Open the SharePoint site that you used in the previous exercise, if it is not already open. Be sure to complete the previous exercises in this chapter before beginning this exercise.
Note
BE SURE TO verify that you have sufficient rights to manage pages in this site. If in doubt, see the Appendix A at the back of this book.
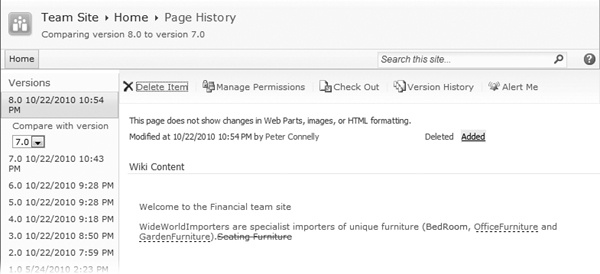
Click the Page tab, and then click Page History in the Manage group.
You are taken to the History page of the home page. In the content area, deletions have a strikethrough red font, and additions have a green background color. In the left navigation pane, each version of the page is listed with the date and time that the version was created.
In the left navigation pane, in the Compare with version list, select 4.0.
The current version of the page is compared with version 4.0 of the page.
In the left navigation pane, under Versions, click 4.0. The fourth version of the page is displayed.
Click Restore this version. A Message From Webpage dialog box appears.
Click OK to replace the current version of the wiki page with the selected version. The home page is displayed. A yellow status bar appears, stating that the current page has been customized from its template. This can occur when you restore a previous version of a page using the browser or when using a program such as SharePoint Designer 2010.
On the status bar, click Revert to template. A Message From Webpage dialog box opens.


Using Alerts
One of the most difficult obstacles encountered in the business world is knowing when information changes. SharePoint Foundation can help with this problem by enabling you to subscribe to an alert. When a web page to which you subscribe undergoes changes, you will receive an email message stating that the page has changed.
In the following exercise, you will set up an alert for a page and then receive an alert that it has been changed. You will then remove the alert.
Note
BE SURE TO verify that you have sufficient rights to create alerts and edit the home page in this site. If in doubt, see the Appendix A at the back of this book.
Click the Page tab. Click Alert Me in the Share & Track group, and then, from the drop-down list, click Set an alert on this page.
The Site Pages: Home.aspx – New Alert dialog appears. You are given several options on the frequency of alerts, as well as when to be alerted.
Retain the default values for this exercise and click OK.
Troubleshooting
If your server is not configured to send an email message, an Error page will appear. If this page appears, you cannot complete the rest of the steps in this section. Check with your server administrator before you proceed.
You are returned to the home page of your Team site.
Click the Edit icon that is displayed to the left of the Browse tab.
Place the cursor in the content area to the left of the Welcome pane, press CTRL+A to select all the content in the top area, and then press DELETE.
The contents of the header area are deleted.
Click Save & Close.
After a few minutes, you should receive two email messages. The first message indicates that an alert was successfully created. The second message indicates that home.aspx has been modified.
Click the Page tab. Click Alert Me in the Share & Track group, and then, from the drop-down list, click Manage My Alerts.
The My Alerts On This Site page is displayed.
Click the check box to the left of Site Pages: Home.aspx, and then click Delete Selected Alerts.
Click OK to confirm the deletion of the selected alerts.

Adding a Web Part from the Web Part Pane
As you customize your site, you might decide to add information other than static text and images. This information may be stored in lists or libraries or in some other data source. You can do this by adding Web Parts. You can insert Web Parts on multiple pages and also insert a Web Part multiple times on the same web page. SharePoint Foundation provides built-in Web Parts for each website created. Two types of Web Parts are most commonly used via the browser:
XSLT List View (XLV) Web Parts. Web Parts that display the contents of lists and libraries. These Web Parts are displayed in the Lists and Libraries category. Each time that data in the list or library changes, the changes are reflected in the XLV Web Part. SharePoint Foundation introduced this new version of the List View Web Part (LVWP), which uses Extensible Stylesheet Language Transformation (XSLT) to define how to display the data from lists or libraries.
Built-in Web Parts. Web Parts that display other content. There are 13 built-in Web Parts displayed in five categories.
The 13 built-in Web Parts available on websites created from the Team site, Blank site, or Document Workspace template are summarized in the following table.
Tip
In addition to built-in Web Parts, you can create your own Web Parts by using tools, such as SharePoint Designer and Visual Studio 2010. You can also import custom Web Parts.
SharePoint Designer allows you to add a Data Form Web Part (DFWP), also known as the Data View Web Part (DVWP). The DFWP is very similar to the XLV Web Part. Not only does it allow you to view data, but it can provide you with a form to enter data using XSLT. The DFWP can be used with a variety of data sources such as SQL Server databases, XML files, web and Representational State Transfer (REST) services, as well as data held in SharePoint lists and libraries. SharePoint Designer provides a “What You See Is What You Get” (WYSIWYG) XSLT editor to format the DFWP and XLV Web Parts. For example, you can create a DFWP or XLV Web Part that applies a style to a selected HTML tag or data values when the data meet specified criteria. If you use SharePoint Designer with the Furniture Sales list, you could highlight items when there are no units in stock.
In this exercise, you will customize the home page of a SharePoint site. You will add an XLV Web Part and restore a Web Part from the Web Part Page Gallery.
Set Up
Open a SharePoint site that contains a list with data, for example, the Furniture Price list that is created in Chapter 14. Alternatively, you can create a practice site for this chapter based on the Chapter06_Starter.wsp site template located in the Documents Microsoft PressSBS_SPFChapter06 folder. See Using the Practice Files at the beginning of this book for more information.
Note
BE SURE TO verify that you have sufficient rights to edit the home page in this site. If in doubt, see the Appendix A at the back of this book.
Click the Edit icon that is displayed to the left of the Browse tab.
Place the cursor in the top content area, if it is not already there, and then click the Insert tab.
Click Existing List in the Web Parts group.
The Web Parts pane is displayed at the top of the page below the Ribbon. A Web Part for each list or library created for this site is displayed.
In the Web Parts pane, click the list that contains data, such as Furniture Price List, and then click Add.
A Loading dialog briefly appears, and then the Furniture Price List Web Part is added to the page.
Place the cursor in the top content area in front of the Furniture Price List Web Part, if it is not already there, and then, on the Insert tab, click New List.
The Create List dialog appears.
In the List Title box, type Financial Links. Under Tracking, click Links, and then click OK.
The Financial Links list is created, and a Financial Links Web Part is displayed on the page.
Place the cursor in the top content area, if it is not already there, and then, on the Insert tab, click Web Part.
The Web Parts pane is displayed at the top of the page below the Ribbon.
Under Categories, click Media and Content, and then, under Web Parts, click Picture Library Slideshow Web Part.
Click Add.
The Picture Library Slideshow Web Part is placed above the Furniture Price List Web Part.
On the Page tab, click Save & Close.


Removing a Web Part
When created, SharePoint sites can contain a number of libraries, lists, and one or more web pages that can contain one or more Web Parts. As you customize your site, you might decide that you do not need all the Web Parts on your pages and might want to remove them.
In this exercise, you will delete and close Web Parts to remove them from a website’s home page. You will then restore a closed Web Part.
Note
BE SURE TO verify that you have sufficient rights to edit the home page in this site. If in doubt, see the Appendix A at the back of this book.
Click the Edit icon that is displayed to the left of the Browse tab.
In the top content area, hover the mouse over the title of the Financial Links Web Part and select the check box that appears.
The List Tools and Web Part Tools contextual tab sets appear in the Ribbon.
Click the Options tab in the Web Part Tools contextual tab set, and then click the Delete command in the State group.
Click OK to confirm that you wish to delete the Web Part permanently.
In the top content area, hover the mouse over the title of the Furniture Price List Web Part, click the down arrow that appears, and then click Close, which temporarily removes the Web Part from the page.
The browser redisplays the page with only one Web Part—the Picture Library Slideshow Web Part.
Click the Insert tab, and then click Web Part in the Web Parts group.
The Web Parts pane now includes a category Closed Web Parts, which holds Web Parts that are temporarily removed from a web page by using the Close option. Currently, the Closed Web Parts category contains only one Web Part—the Furniture Price XLV Web Part that you removed in step 5.
Under Categories, click Closed Web Parts, and then, under Web Parts, click Furniture Price List.
The Furniture Price List Web Part is displayed on the page.
Click the Insert tab, and then click Web Part in the Web Parts group.
Note that the Closed Web Parts category is not displayed now. This category is displayed only when your page contains closed Web Parts.
Note
You can liken the Closed Web Parts category to the Recycle Bin; however, Web Parts are placed here only when the Close option is used. When the Delete option is used, the Web Part is permanently deleted from the page. Web Parts placed in other categories act like templates. Web Parts from the other categories can be placed on a web page multiple times. Once a Web Part is placed on a page, it can be uniquely customized, but the template from which the Web Part is created remains in the category displayed in the Web Part pane.
Click Save & Close.


Tip
Web Parts can be badly written. If they are not tested thoroughly, you might find that a web page does not display when you add a Web Part to it. In such situations, append ?Contents=1 to the URL of the Web Part page, such as http://wideworldimporters/SitePages/home.aspx?contents=1. The Web Part Page Maintenance page is displayed, which can be used to delete the offending Web Part. The Web Part Page Maintenance page can be very useful in determining if a page has any closed Web Parts and can be used to delete any closed Web Parts quickly. Having closed Web Parts on a page can cause the browser to take some time to display the page, which can be very annoying to users who frequently visit the page.
Customizing a Web Part by Using the Web Part Tool Pane
Once you add a Web Part to a web page, you might find that you have to customize it to display the content that you want visitors to your website to see. You might also have to tailor the Web Part’s properties for it to take on the look and feel that you want.
In the following exercise, you will customize the Picture Library Slideshow Web Part and a SharePoint XLV Web Part.
Set Up
Open the SharePoint site that you used in the previous exercise, if it is not already open. Be sure to complete the previous exercise in this chapter before beginning this exercise.
Note
BE SURE TO verify that you have sufficient rights to edit the home page in this site. If in doubt, see the Appendix A at the back of this book.
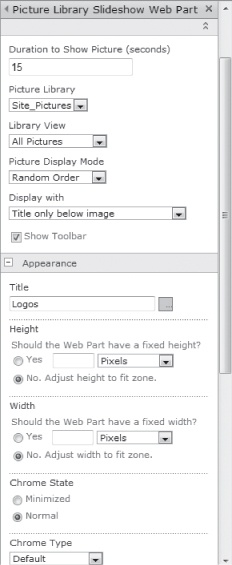
Hover the mouse over the title bar of the Picture Library Slideshow Web Part, click the down arrow that appears, and then click Edit Web Part.
The Picture Library Slideshow Web Part tool pane is displayed to the right of the page.
From the Picture Library list, select the picture library whose images you wish to display in the Web Part, such as Site_Pictures, and then, under Appearance in the Title box, delete Picture Library Slideshow Web Part and type Logos.
In the Chrome Type drop-down list, click None, and then scroll to the bottom of the Web Part tool pane and click OK.
Images from the chosen picture library are displayed at the top of the page, and the tool pane disappears. The title of the Web Part is not displayed.
Tip
When a Web Part title is not displayed, to customize the properties of a Web Part, display the page in Edit mode. The Web Part title is then visible. You can either use the Web Part menu to edit the Web Part or select the check box on the Web Part title and, on the Options tab in the contextual Web Part Tools tab set, use the Web Part Properties command in the Properties group to open the Web Part tool pane.
Place the cursor over the title bar of the Furniture Price List Web Part, click the down arrow that appears, and click Edit Web Part.
The Furniture Price List Web Part tool pane is displayed.
In the Furniture Price List tool pane, below the Selected View list, click the Edit the current view link. The Edit View of the Furniture Price List page is displayed.
In the Columns area, clear the Attachments, In Stock, Unit Price, and Total check boxes.
Tip
In this exercise, you will display only Bianca furniture; therefore, you will use the Furniture Range column to filter data. When the filter is applied, in the XLV Web Part, the Furniture Range column always contains the text “Bianca.” Hence, you could choose not to display the Furniture Type column. However, when you first customize a view, it is good practice to leave the filter column, such as the Furniture Type column, in place so you can check that the filter is configured correctly.
Scroll down the page until the Filter area is visible. Select the Show items only when the following is true option.
On the Show the items when column list, click Furniture Range. In the Value box, type Bianca.
At the bottom of the page, click OK.
Your web page is displayed. The Furniture Price List tool pane is no longer visible.
Place the cursor over the title bar of the Furniture Price List Web Part, click the down arrow that appears, and click Edit Web Part. The Furniture Price List tool pane is displayed.
Click the expand (+) icon to the left of Appearance, and then, in the Title text box, type Sale – Bianca Furniture at half price.
Click the expand (+) icon to the left of Advanced and clear the Allow Minimize check box.
At the bottom of the Furniture Price List tool pane, click OK.
Place the cursor over the title bar of the Sale – Bianca Furniture at half price Web Part, click the down arrow that appears, and notice that the Minimize option is no longer available.


Editing Web Part Pages
Web Part pages are the default type of page on sites such as group work sites, Meeting Workspaces, and blog sites. In addition, they are the type of pages used by lists and libraries to display their contents. Web Part pages consist only of Web Part zones. They do not contain wiki page content areas and, therefore, can contain only Web Parts. To add static text or images to a Web Part page, you must first add either the Content Editor Web Part or the Image Web Part, and then use the Web Part tool pane properties to add text or images.
Tip
Using a tool such as SharePoint Designer, you can add Web Parts outside of Web Part zones on a Web Part page.
There are two versions of a Web Part page:
Shared Version. This version is the Web Part page that every user with the appropriate permissions on a site can view. To edit the Shared version of a Web Part page, place the page in Edit mode by using the Site Actions, Edit Page command.
Personal Version. This version of a Web Part page is available only to you and not to others. To edit the Personal version of a Web Part page, click the down arrow to the right of your name in the top corner of the page, and then click Personalize This Page. When you have a Personal view of a Web Part page, then it will be displayed by default when you first visit the page.
To customize the Shared version of any Web Part page for a list or library, you must have the following rights, all of which are included in the Design and Full Control permission levels by default:
Manage Lists
Add and Customize Pages
Apply Themes and Borders
Apply Style Sheets
A member of a website’s Site Owners group has Full Control permissions and, therefore, is able to customize the Shared version of Web Part pages.
To customize the Personal view of any Web Part page, the Web Part page must be designed to be personalized. You must have the following rights, all of which are included in the Contribute, Design, and Full Control permission levels by default:
Manage Personal Views
Add/Remove Personal Web Parts
Update Personal Web Parts
A member of a website’s Members group has Contribute permissions and, therefore, is able to customize the Personal version of Web Part pages if they are designed to be personalized.
Tip
When a Web Part page is designed to be personalized, editors of the page can disable the personalization of Web Parts on an individual basis by configuring the Web Part properties by using the Web Part tool pane.
Web Parts within Web Part zones can be connected to one another to provide interactive dashboards displaying related data from a number of data sources. A Ribbon command in SharePoint Foundation makes it easy to create a Web Part connection when two lists have a related column. For example, on a blog site, the Posts list has a lookup column to the Comments list. On a page where you are displaying the Posts XLV Web Part, on the Options tab in the Web Part Tools contextual tool set, you can click the Insert Related List command. This will add the Comments XLV Web Part to the page and connect the two Web Parts. Then, when users click a blog post in the Posts Web Part, the comments related to that post will be shown in the Comments Web Part. Using a tool such as SharePoint Designer, you can also connect Web Parts on one page with Web Parts on another page.
See Also
For more information on connecting Web Parts, see Chapter 6, “Working with Data Sources,” in Microsoft SharePoint Designer 2010 Step by Step by Penelope Coventry (Microsoft Press, 2010).
In the following exercise, you will familiarize yourself with editing a Web Part page.
Note
BE SURE TO verify that you have sufficient rights to edit views in the Shared Documents library. If in doubt, see the Appendix A at the back of this book.
On the Quick Launch, under Libraries, click Shared Documents. The All Documents view of the library, Shared Documents, is displayed.
Click Site Actions, and then click Edit Page.
Tip
Web Part pages do not display the Edit icon or the Save & Close icon to the left of the Browse tab.
The browser redisplays the Web Part page in Edit mode. The Web Part page displays one Web Part zone denoted by a blue border labeled Main. At the top of each Web Part page zone is a white rectangle surrounded by a blue line containing the text “Add a Web Part”.
On the Page tab, click Stop Editing.
In the top right corner of the page, click the arrow next to <your name> and click Personalize this Page.
The browser redisplays the Web Part page in Edit mode. A yellow status bar states that this is the Personal version of the page. Any changes that you make to the Web Part page affect only your view of this web page.
Tip
When a Web Part page is not in Edit mode, there is no visible indication as to whether the page shows the Shared version or the Personal version. If the Show Personal View option is displayed on the <your name> drop-down menu, you are viewing the Shared version of the page. If the Show Shared View option appears, you are viewing the Personal version of the page. You can remove the Personal version of the page by clicking Reset Page Content on the <your name> drop-down menu. The Shared version of the page, then, is your default version. As an Administrator or web designer, you cannot customize the Personal views of specific users; you can customize only the Shared view and your own Personal view.
On the Page tab, click Stop Editing.


Moving Web Parts
As you customize your web page by adding and removing Web Parts, you might find that the Web Parts are not located where you would like them to be. In this situation, you can move the Web Parts around on the page to obtain the layout that you want.
In this exercise, you will move Web Parts on the home page of a SharePoint site.
Note
BE SURE TO verify that you have sufficient rights to edit the home page of this site. If in doubt, see the Appendix A at the back of this book.
Click Site Actions, and then click Edit Page.
The browser displays the home page of your site in Edit mode.
Move the mouse over the title bar of the Sale – Bianca Furniture at half price Web Part so that the pointer changes to a hand. While holding down the mouse button, drag the Web Part to the content area to the left of Getting Started.
Click Save & Close.

Key Points
In SharePoint Foundation 2010, a website is a collection of web pages.
There are two types of web pages—wiki pages and Web Part pages. On a Team site, blank site, or Document Workspace, the default web pages are wiki pages that are stored in a SharePoint Foundation–based wiki library named Site Pages.
Both wiki pages and Web Part pages can contain Web Parts.
A page can contain static and dynamic content, which is typically limited to no more than two or three screens of information.
Create forward links to pages by using double square brackets around a WikiWord. For example, type [[BedRoom]] to create a link to the page named BedRoom. The page does not have to exist when the forward link is created.
The easiest way to create a new wiki page is to create a forward link to a nonexistent page.
Major versioning is enabled on wiki page libraries, and therefore no amendments are lost.
Web Parts are reusable components that can contain any type of web-based content. They can display the contents of lists and libraries, as well as other content, such as the results of database queries, websites, web pages, files, and folders.
Web Parts are organized by categories.
The Lists and Libraries category contains an XLV Web Part for each list or library created in the site.
The Closed Web Parts category is a temporary storage space for Web Parts that have been removed from a web page by using the Close button.
A Web Part page can have two versions: a Shared version and a Personal version. All users can see changes made to the Shared version. Changes made to the Personal version are visible only to the user who altered his or her Personal version of the Web Part page. A user can reset the Personal view to the Shared view setting if desired.