
Chapter 12. Working with Workspaces and Blogs
Chapter at a Glance

In this chapter, you will learn how to | |
✓ | Create a Document Workspace. |
✓ | Access an existing Document Workspace. |
✓ | Publish a document back to a document library. |
✓ | Delete a Document Workspace. |
✓ | Create a Meeting Workspace. |
✓ | Understand the Home page of a Meeting Workspace. |
✓ | Add items to a Meeting Workspace. |
✓ | Customize a Meeting Workspace. |
✓ | Create a blog site. |
✓ | Create a blog post. |
✓ | Add a blog comment. |
✓ | Use RSS feeds. |
Every company holds meetings. These meetings often have a specific agenda; if they don’t, the company would benefit if they did. Sometimes participants need to prepare for a meeting by completing a task or two in advance. The task may be simply reviewing a document, assembling a list of questions, or perhaps creating a prototype of something to bring to the meeting. A meeting can become inefficient or even ineffective because the preparation tasks that participants are expected to complete are not communicated effectively. All too frequently, when participants do make preparations, they use an outdated version of a document or complete the wrong tasks because they are confused by the barrage of tasks sent through numerous emails. In addition, after the meeting is over, meeting notes or follow-up steps may need to be provided to the participants. Wouldn’t it be nice if all the notes, documents, tasks, and other meeting details could be kept in a centralized location that was easy to find? A bonus would be if all the content in this centralized store could be searched.
Microsoft SharePoint Foundation provides a site template called a Meeting Workspace that helps improve communication before and after a meeting by supplying a common place to store information that is relevant to the meeting. By providing a single point of communication, Meeting Workspaces can help make meetings more efficient—something every organization, both large and small, can use.
Another template provided by SharePoint Foundation is the blog site template. Wikis and blogs are methods that enable anyone, including nontechnical users, to write web pages and publish them on Internet, extranet, and intranet websites for other users to see. Both allow users the freedom to publish content for broad consumption. Blogs are personal journals or observations, whereas anyone can contribute to content on a wiki. When making changes, wiki users are responsible for ensuring accuracy and relevance. In Microsoft SharePoint 2010, you can create a wiki on any site by creating a wiki library. To create a blog, you must create a blog site. Most wikis and blogs can use Really Simple Syndication (RSS) feeds to notify users when site content changes.
See Also
For more information on wiki libraries refer to Chapter 5. For more information on wiki pages, refer to Chapter 6.
In this chapter, you will learn how to work efficiently with Workspaces by both creating Document and Meeting Workspaces and accessing existing Workspaces. You will also learn how to publish a document back to a document library and delete a Document Workspace. After the Meeting Workspace is created, you will learn how to add items, such as objectives, agendas, and attendees, to the Workspace. You will also learn how to use blogs, as well as how to enable an RSS feed on a blog.
Important
Remember to use your SharePoint site location in place of http://wideworldimporters in the following exercises.
Creating a Document Workspace
There are two ways to create a document library. The first method is to create it through the SharePoint web interface, and the second method is to create it using a Microsoft Office 2003 or Office 2007 application. When using either method, the resulting Document Workspace is the same; only the procedure that you use to create it differs.
A Document Workspace centers around one particular document. It is important to stress this fact. You want to have only one document per Document Workspace, because a Document Workspace is linked back to the original document when it is created from an existing document in an existing library. This enables you to copy the document easily from the Document Workspace back to its original source location. This unique feature of Document Workspaces is not shared by any other type of SharePoint site. In this way, you and your team members can work on the document without interfering with the main site or allowing others to read the document before it is complete.
In the following exercise, you will create a Document Workspace from an existing document by using the browser.
Set Up
Open the SharePoint site that contains the document that you wish to collaborate on using a Document Workspace, such as the site you used to complete the Adding Documents exercise in Chapter 5.
Note
BE SURE TO verify that you have sufficient rights to a Document Workspace. If in doubt, see the Appendix A at the back of this book.
On the Quick Launch, click the document library that contains the document, such as Oak Furniture.
The All Documents view of the document library is displayed.
Move your mouse over the document, such as OakWood.docx, and click the arrow that appears. Point to Send To, and then click Create Document Workspace.
The Create Document Workspace page is displayed.
A new Document Workspace is created as a subsite below the original site and populated with the OakWood.docx document.


Tip
You can also create a Document Workspace using New Site on the Site Actions menu. However, this method does not provide the same integration with an existing document as does the process outlined in the previous exercise. To obtain the full benefits of a Document Workspace, you should create it from an existing document or from an Office 2003 or Office 2007 application.
Accessing an Existing Document Workspace
After creating a Document Workspace, you will need to navigate to it to work on the document. However, unless you know specifically where to look, it can be difficult to locate the Document Workspace once you have created it, especially if you created the Workspace several days or weeks ago and now don’t remember exactly where it is. Moreover, if you create a large number of Workspaces, it can become problematic to remember the Uniform Resource Locator (URL) for each one.
Having a built-in method for finding Workspaces is very helpful when you need to return to them quickly and easily.
In this exercise, you will browse to the Document Workspace for OakWood.docx, which you created in the previous exercise.
Note
BE SURE TO verify that you have sufficient rights to view the Document Workspace. If in doubt, see the Appendix A at the back of this book.
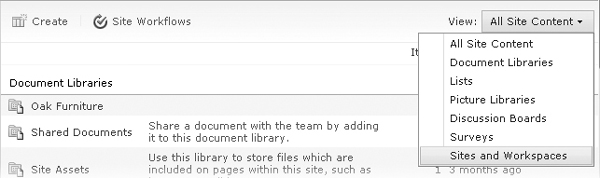
Click Site Actions, and then click View All Site Content.
The All Site Content page is displayed.
To the right of View, click All Site Content, and then click Sites and Workspaces.
The All Site Content Page redisplays, showing only sites and Workspaces.
Under Sites and Workspaces, click the Document Workspace that you would like to open, such as OakWood.
The OakWood Document Workspace appears. You can work with this site as you would any other SharePoint site.

Publishing a Document Back to a Document Library
The ability to publish a document back to its original source document library is a unique feature of Document Workspaces. If the Document Workspace was created from a document in a document library, then the Publish to Source Location link will be available. If the Document Workspace was not created from a document in a document library, then the link will not be available. The reason that we use Document Workspaces is that we can keep the source document free of changes while we edit and update the document in the Workspace.
The Publish to Source Location link essentially copies the updated document from the Document Workspace back into the source library, thereby replacing the existing parent copy. It prevents you from having to recall the original location of the document while still keeping the source document up to date.
In the following exercise, you will publish a document from the Document Workspace back to the document library.
Set Up
Open the Document Workspace in which you’d like to publish a document from a document library back to the parent site, if it is not already open.
Note
BE SURE TO verify that you have sufficient rights to write to the document library where you are going to publish the document. If in doubt, see the Appendix A at the back of this book.
Move your mouse over OakWood.docx. When an arrow appears to the right of the document name, click the arrow, point to Send to, and then click Publish to Source Location.
The Publish to Source Location page appears.
Click OK. The Operation Completed Successfully page appears.
Click OK. You are returned to the home page of the Document Workspace.
This action copies the latest version of OakWood.docx from the Document Workspace back to the document’s original document library (in this case, Oak Furniture). Confirmation that the operation has completed successfully appears.

Deleting a Document Workspace
You can think of a Document Workspace as a temporary SharePoint site. It is a collaborative environment for discussing, editing, and writing a single document, and it enhances content creation. The Document Workspace typically has a short life—several months at most—because its main purpose is to help with content creation. Once the document is finished, it should be stored in a document library for others to access and read. The Document Workspace for that specific document can then be deleted. Because the life cycle of a Document Workspace is short, you can expect to create and delete Document Workspaces fairly often. Deleting Document Workspaces will also save space on your server running SharePoint and reduce the clutter that numerous Workspaces can cause.
In this exercise, you will delete the OakWood.docx Document Workspace.
Note
BE SURE TO verify that you have sufficient rights to delete the Document Workspace. If in doubt, see the Appendix A at the back of this book.

Creating a Meeting Workspace
There are three methods that can be used to create a Meeting Workspace:
In the browser, select New Site from the Site Actions menu of a SharePoint site.
Select the Meeting Workspace check box when you create a Calendar list.
See Also
The process of creating lists is detailed in Chapter 4.
Click Meeting Workspace on a new meeting request in Outlook 2007 or Outlook 2010. When you create a meeting request in Outlook, you can create a Meeting Workspace site or link the meeting to an existing Workspace site.
The first method creates a Meeting Workspace, just like creating any other site. The power of a Meeting Workspace is revealed when you use either of the two other methods. You can then create recurring meetings to be managed by one Meeting Workspace, and, using Outlook, you can view attendees’ schedules using your Microsoft Exchange Server installation and identify a time for the meeting that suits all attendees. Using Outlook to add or remove attendees will register the meeting in Exchange Server and automatically modify the site permissions of the Meeting Workspace.
See Also
Chapter 13, contains a section that creates a Meeting Workspace from an Outlook 2010 calendar appointment displayed on the Ribbon when inviting others to join the meeting.
When you create a Meeting Workspace by using the Basic Meeting Workspace template, three default lists are added automatically: Objectives, Agenda, and Attendees. A document library is also created to house meeting documents. These lists and the library function just like any other list or library. Each list has a Web Part on the front page of the Meeting Workspace, making it easy to interact with the information within any of them. In addition, the Attendees list identifies the user who created the Meeting Workspace as the meeting organizer.
In the following exercise, you will create a recurring event for a series of public workshops and associate a Basic Meeting Workspace with that recurring event. Many people are involved with the public workshops, and having details in a Meeting Workspace on a SharePoint site makes it easier to communicate information, including changes, to everyone involved. You will be adding information to this Workspace in the next several exercises.
Note
BE SURE TO verify that you have sufficient rights to create a Meeting Workspace. If in doubt, see the Appendix A at the back of this book.
On the Quick Launch, under Lists, click Calendar.
The Calendar view of the Calendar list is displayed for the current month.
On the Events tab, click New Event in the New group.
The Calendar – New Item dialog opens.
In the Title box, type Public Workshops, and then, in the Recurrence section, select Make this a repeating event. When the page refreshes, select Weekly.
In the Workspace area at the bottom of the page, select the Use a Meeting Workspace to organize attendees, agendas, documents, minutes, and other details for this event check box, and click Save.
The New Meeting Workspace page is displayed. All of the information is already filled out for you. You might want to remove the spaces from the URL Name field or change the permissions to be unique, but neither action is required.
See Also
See the sidebar entitled Naming a URL, in Chapter 3, for details about good naming conventions for the URL Name field.
Click OK. The Template Selection page is displayed.
In the Select a template list, select Basic Meeting Workspace, if it is not already selected.
Click OK.
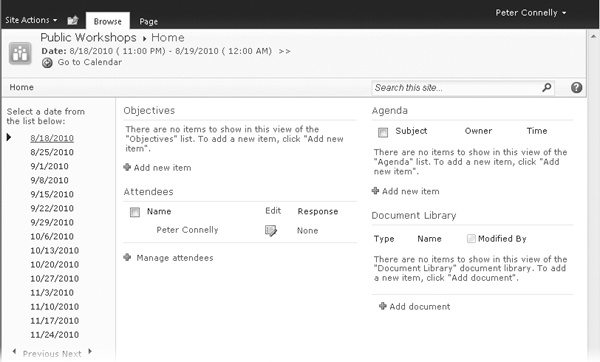
The home page, default.aspx, of the newly created Public Workshops site is displayed. In the left pane, there is a link for each recurrence of the event. Most Meeting Workspaces are used to manage one meeting date; however, with a recurring meeting, one Meeting Workspace manages all of the meeting dates. Additional events can then be linked to an existing Meeting Workspace, in which case, other event dates would also be displayed in the left pane. When no event is linked to a Meeting Workspace, the left pane is not displayed.


Understanding the Home Page of a Meeting Workspace
Once you have created a Meeting Workspace, you can familiarize yourself with the home page layout. The first obvious difference is that there isn’t a Quick Launch, which means that you need to use the Site Settings page to find the links to the Recycle Bin and All Site Content, which are typically found at the bottom of the Quick Launch of a Team site.
Tip
Clicking the title of any default Web Part (Objectives, Agenda, Attendees, or Document Library) takes you to that list’s default list view. From any list view, you can find the familiar All Site Content and Recycle Bin links in the left navigation pane.
The home page of a Basic Meeting Workspace contains four Web Parts, one for each list or library created within the site:
Objectives list
Attendees list
Agenda list
Document Library
These four Web Parts contain information for each meeting that is managed by the Meeting Workspace. A meeting should typically have at least one objective, as well as an agenda to inform people about the meeting. The Meeting Workspace is organized in a way that makes it easy for the organizer to communicate the reason for holding the meeting. Also, there should typically be a list of meeting attendees. The document library does not necessarily need to be used, but it is a convenient place to store documents, such as information that attendees might need to read before the meeting, meeting minutes after the meeting concludes, or Microsoft PowerPoint presentations used during the meeting. At the top of the page, if the site was created from within Outlook or from a calendar event, the date and time of the meeting, as well as the location (if specified), is found.
If you create a Meeting Workspace from a recurring event using Outlook or a calendar event, additional information is provided on the Meeting Workspace page. On the left side of the page is located a list of dates that includes each instance of the recurring meeting. Each date has its own view of the home page, enabling you to establish different objectives, agendas, attendees, and documents for each specific instance of the meeting.
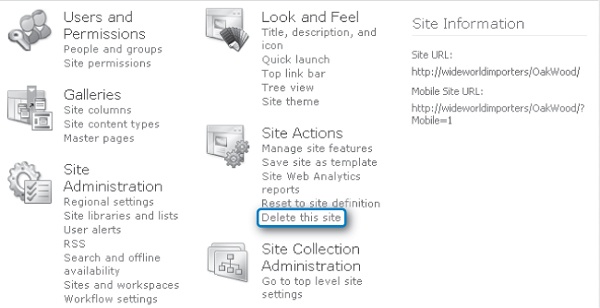
The Sync to SharePoint Workspace, New Page, and New Site options are missing from the Site Actions menu, which means that you cannot sync a Meeting Workspace with a SharePoint Workspace. The page structure is also different on a Meeting Workspace; therefore, there is no New Page link on the Site Actions menu. However, the Site Actions menu does have two new links: Add Pages and Manage Pages.
Tip
Although you cannot create a site below a Meeting Workspace using the Site Actions menu or the Create page, you can still create a subsite by creating a Calendar list and creating a Meeting Workspace associated with an event. Only Meeting Workspace sites can be created in this manner.
In this exercise, you will add another page to the Meeting Workspace.
Set Up
Open the Meeting Workspace that you created in the previous exercise, if it is not already open.
Note
BE SURE TO verify that you have sufficient rights to add a page. If in doubt, see the Appendix A at the back of this book.
On the Site Actions menu, click Add Pages.
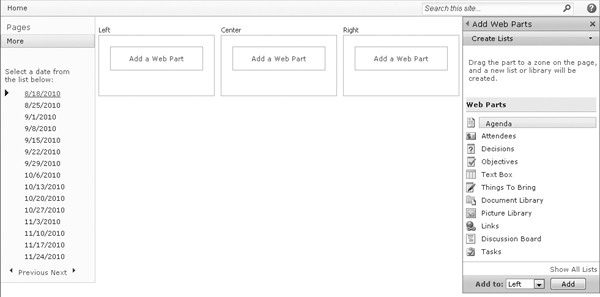
The default.aspx page is displayed in Edit mode. Three Web Part zones, Left, Center, and Right, are displayed. The Pages tool pane opens.
In the Page Name box, type More. Leave Appears for all meetings selected.
In the Pages tool pane, click Add. The Add Web Parts tool pane opens.
The new page is displayed in Edit mode, with three empty Web Part zones. In the left navigation pane, above the recurring meeting dates, there is a Pages link, under which there is a link to the new page.
Tip
Although only one date is selected when you add a Web Part to a page in a Meeting Workspace, that Web Part will be displayed no matter what date you select. Similarly, when you add a list or library Web Part to a page, the list or library Web Part is displayed for each date. However, by default, only list items or documents relevant to a specific meeting date are displayed in the list or library Web Parts. If you want all list items in a list or all documents in a library to be displayed no matter which date is selected, navigate to the list’s List Settings, navigate to the Advanced Settings page, and then, from the List Settings page, select the Share List Items Across All Meetings (Series Items) option. Note, however, that once items become series items for a list, you cannot change the setting back—so make sure that’s what you want.
In the Web Parts tool pane, click Text Box. At the bottom of the Add Web Parts tool pane, leave Left selected in the Add to list, and then click Add.
The Text Box Web Part is displayed in the Left Web Part zone. A list that will hold the information presented by the Web Part is also created. This Web Part typically is used to take notes during the meeting.


Adding Items to a Meeting Workspace
To get the most use from a Meeting Workspace, you must add information and relevant details to it so people are motivated to visit the Workspace.
Tip
To associate a list item or document with a specific meeting date, you must select the date in the left navigation pane prior to creating the list item or uploading the document.
In this exercise, you will create an objective and four agenda items and add a new user as an attendee to the Meeting Workspace.
Set Up
Open the Meeting Workspace that you created in the previous exercise, if it is not already open.
Note
BE SURE TO verify that you have sufficient rights to create items in the Objectives and Agenda lists and rights to add a new user to the Meeting Workspace. If in doubt, see the Appendix A at the back of this book.
On the left side of the page, under Select a date from the list below, click the date of the next meeting. (In this example, the date is 8/18/2010. The dates that are listed on the left side of the page are populated based on when you complete this exercise.)
If you didn’t use a repeating event, there won’t be a list of dates from which to choose. Simply use the default instance.
In the Objectives Web Part, click Add new item.
The Objective new item page is displayed.
In the Objective box, type the meeting objective, such as How to efficiently sell imported items.
Click Save.
The home page of the Meeting Workspace is displayed. The new objective appears in the Objectives Web Part. Because objectives are simply items stored in a list, you can create as many objectives as you want per meeting.
In the Agenda Web Part, click Add new item.
The Agenda new item page is displayed.
In the Subject box, type a subject for the agenda, such as Introduction, and then, in the Owner box, type the name of a person who is responsible for this agenda item, such as Todd Rowe.
In the Time box, type the time for this agenda item, such as 5:00-5:15 PM, and then, if you want, enter some text into the Notes area (not illustrated in this exercise).
The home page of the Meeting Workspace is displayed. The new agenda item appears in the Agenda Web Part.
Repeat steps 5-8 to create three agenda items for the workshop using the information in the following table:
Subject
Owner
Time
Establishing an International Vendor
Todd Rowe
5:15-5:30 PM
Buying in Bulk
Olga Kosterina
5:30-5:45 PM
Questions and Answers
Olga Kosterina
5:45-6:00 PM
In the Attendees Web Part, click Manage attendees.
The Manage Attendees page is displayed.
On the Items tab, in the List Tools tab set, click New Item in the New group.
The Attendees – New Item dialog appears.
In the Name box, type the email address or user name of the attendee, such as Todd Rowe, and then click the Check Names icon.
Troubleshooting
If you enter a user name, SharePoint automatically prefixes the user name with a domain name, such as wideworldimporters. If the user name is not recognized, SharePoint displays a “No Exact Match Was Found Click The Item(s) That Did Not Resolve For More Options” message below the Name box.
In the Response drop-down list, select Accepted, and in the Attendance drop-down list, leave the default set to Required.
Todd is added as an attendee for this public workshop, and you are returned to the Manage Attendees view of the Attendees list. If you want, you can add other attendees by repeating steps 11-14.
Using the Navigate Up icon, click Public Workshops to return to the home page of the Public Workshops Meeting Workspace.
Tip
When you select a different date, under Select A Date From The List Below, than the one that you selected in step 1 of this exercise, the objective, the four agenda items, and the attendee Todd Rowe that you added in this exercise will not be displayed. To add Workspace items for other meeting dates, you must repeat this exercise, selecting the new meeting date in step 1.


Customizing a Meeting Workspace
Now that you have added all the information to the default Meeting Workspace, you might want to add more information for the attendees. You can accomplish this by creating new lists and libraries and by adding Web Parts that display their contents to the Home page or other pages, if you have created them.
See Also
For more information on Web Parts, see Chapter 6.
In this exercise, you will create a new list that you will use to tell attendees what they are expected to bring with them to the meeting. You will then add a Web Part to the Home page to display the contents of that list.
Set Up
Open the Meeting Workspace that you created previously in this chapter, if it is not already open.
Note
BE SURE TO verify that you have sufficient rights to create a list and edit the home page. If in doubt, see the Appendix A at the back of this book.
Click Site Actions, and then click More Options. The Create dialog appears.
Under Filter By, click Tracking, and then, in the middle of the page, click Things to Bring.
In the Name box, type Homework.
Click Create.
The All Items view of the Homework list is displayed.
On the Items tab, in the List Tools tab set, click New Item in the New group.
The Homework – New Item dialog appears.
In the Item text box, enter a value, such as International Vendor List. Leave the Comment and Owner fields blank, and then click Save.
The All Items view of the Homework list is displayed.
On the Browse tab, click Home to display the default page of the Meeting Workspace.
Click Site Actions, and then click Edit Page.
In the Left Web Part zone, click Add a Web Part.
The Web Parts pane is displayed at the top of the page.
Under Categories, click List and Libraries, and then, under Web Parts, click Homework.
Click Add.
The Web Parts pane disappears, and the Homework Web Part is added to the Left Web Part zone, above the Objectives Web Part zone.
On the Pages tab, click Stop Editing.


Creating a Blog Site
A web log, known as a blog, is a personal journal or commentary shared on a website. Blogging refers to publishing thoughts, in formal essays or more informal formats, on a blog website; a person who does this is called a blogger. The thoughts shared on the blog website are called posts or articles. Each post or article is displayed in reverse chronological order, with the most recent additions featured most prominently and older items grouped in archives organized by the month in which they were created.
Blog posts can be categorized to help users find past conversations. Also, blogs are indexed so that a visitor can search through old blogs and learn from past conversations. Bloggers write blogs frequently, often on a daily basis. Some allow visitors to comment on the blog, provide feedback, and ask questions.
Note
When using SharePoint Server 2010, the logical location for a blog site is a user’s personal site, or My Site, where a link exists that you can use to create a blog.
In this exercise, you will create a blog site and then establish categories for your blog posts.
Note
BE SURE TO verify that you have sufficient rights to create a site. If in doubt, see the Appendix A at the back of this book.
From the Site Actions menu, select New Site. The Create page appears.
Under Filter By, click Content, and then click Blog.
In the Title box, type Olga’s Blog, and then, in the URL name box, type OlgaBlog.
Click Create.
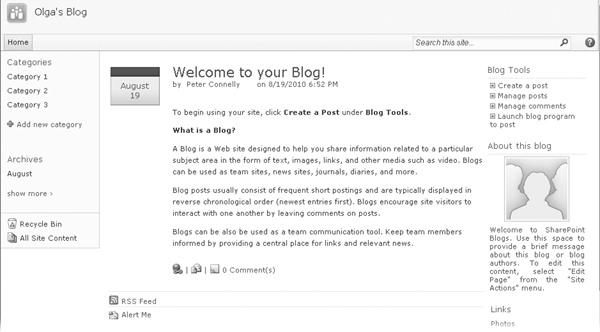
The Operation in Progress page is displayed, which is then replaced by the home page of the Olga’s Blog website, which consists of four Web Parts, called Posts, Blog Tools, About This Blog, and Links, each of which contains one link to a Photos picture library. You can use the Links list to add link items to point to other users’ blogs. Two additional Web Parts can be found on the Quick Launch:
Categories, where three sample categories are listed: Category 1, Category 2, and Category 3.
Archives, which redirects users to the Archive view for the Posts list. This view displays only those posts that are approved.
On the Quick Launch, click Categories.
The All Categories view of the Categories list is displayed.
Click the Edit icon to the right of Category 1 to display the Categories - Category 1 dialog.
In the Title box, delete Category 1 and type Office. Then click Save.
Repeat steps 6 and 7 to replace Category 2 with Bedroom and Category 3 with Garden.
Click the Browse tab, and then click Home to display the home page of the blog site.
Under the Categories area are listed Bedroom, Garden, and Office.
Under Categories, click Add new category.
The Categories - New Item dialog is displayed.
In the Title box, type General, and then click Save.
Under the Categories area are listed Bedroom, Garden, General, and Office.
On the blog site’s home page, in the Blog Tools Web Part, click Manage posts. The Posts list is displayed using the All Posts view.
Move the mouse over the Welcome to your Blog list item, and then select the check box that appears. On the Items tab, click Delete Item.
A Message From Webpage dialog box appears.
Click OK to send the blog post to the Recycle Bin.
The Posts list is redisplayed. The Welcome to your Blog list item is not listed.

Creating a Blog Post
A blog post is the method by which you share your opinions and knowledge. You must remember that, as a blogger, you are responsible for the commentary you post and can be held personally liable if your posting is considered defamatory, obscene, proprietary, or libelous. Similar to posting information on a wiki, you should practice good manners and understatement.
You can create a blog post by using many tools, including Microsoft Word 2007 or Word 2010, Microsoft OneNote 2007 or OneNote 2010, Microsoft Live Writer, and the browser. On the blog website in the Blog Tools Web Part, there is a link that allows you to start a blog program, such as Word, quickly in order to create a blog post. The New SharePoint Blog Account dialog box appears. The web address of the blog site is listed in the Blog URL box.

A Word dialog box then opens, warning that when Word sends information to the blog service provider, it may be possible for other people to see that information, including your user name and password. If you choose to continue, another Word dialog box opens, stating that the account registration was successful.
Once a blog post is opened in Word, the Blog Post tab is active. The Blog group provides easy access to the home page of your blog site, where you can assign a category to the blog post, open an existing blog, manage accounts, and publish the blog. Any pictures that you insert into the post using Word are automatically copied to the Photos picture library when the blog post is either published or published as a draft.

In the following exercise, you will create and modify a blog post by using the browser.
On the blog site’s home page, in the Blog Tools Web Part, click Create a post.
The Posts - New Item dialog is displayed. Notice that the Posts list has content approval enabled.
In the Title box, type Welcome, and in the Body box, type Welcome to my blog! It will be devoted to furniture. Please use comments to provide feedback to posts.
In the Category list, select General, and then click Add.
On the Edit tab, click Publish.
The blog site’s home page is displayed with the Welcome posting as the first posting on the page. The post states the time that the post was published, together with its category. Clicking the Category link on this line displays a page where all similarly categorized posts are listed. This behavior is the same as clicking a selection under Categories on the Quick Launch.
In the Blog Tools Web Part, click Manage posts. The Posts list is displayed using the All Posts view.
Move the mouse over the Welcome post, and then select the check box that appears. On the Items tab, click Edit Item. The Posts – Welcome dialog appears.
In the Category section, click Bedroom, and then click Add.
Click Publish, and then, on the Browse tab, click Home.
The blog site’s home page is displayed. Two categories are listed for the Welcome post: General and Bedroom.


Adding a Blog Comment
To interact with a blogger, you can leave comments on a blog post. As a blogger, you must review comments left on your posts, not only to respond to comments, but also to delete comments that are either off-topic or are used to advertise websites or broadcast spam. If the aim of a blog post is to start a discussion and you receive virtually no responses, then you could use a comment to post a question to your own blog post.
In this exercise, you will add a comment to a blog post and then delete the comment.
Set Up
Open the blog SharePoint site that you used in the previous exercise, if it is not already open.
Note
BE SURE TO verify that you have sufficient rights to add a blog post to the Posts list and to delete a comment from the Comments list. If in doubt, see the Appendix A at the back of this book.
On the blog site’s home page, below a post, click 0 Comment(s). The post is displayed with a Comments form.
In the Title box, type Re: Welcome to your blog, and, in the Body box, type Welcome Olga!
Click Submit Comment.
The post is redisplayed with both a Comments and an Add Comment area. Below the post, 1 Comment(s) is displayed.
To the right of the Re: Welcome to your blog comment, click Edit.
The Comments - Re: Welcome To Your Blog dialog is displayed.
On the Edit tab, click Delete Item. A dialog box appears.
Click OK to send the comment item to the Recycle Bin.
The Comments page is displayed with no comments.


Using RSS Feeds
An RSS feed is a data format that provides users with a means of keeping up to date with content that is added to a website. (Originally, the data format was known as RDF (Resource Description Framework) Site Summary, and then it became known as Rich Site Summary. Today, however, RSS is known as Really Simple Syndication.) By using SharePoint Foundation, you can decide to syndicate content. This means that you can create an RSS feed for any list or library, thereby allowing users to subscribe to it by using an RSS feed aggregator such as Outlook 2007 or Outlook 2010 and Internet Explorer 7.0 or later. The blog site and Blog Posts list are enabled by default to offer RSS support.
In the following exercise, you will view the RSS field for the blog posts in your browser and disable RSS support for a blog.
Set Up
Open the blog SharePoint site that you used in the previous exercise, if it is not already open.
Note
BE SURE TO verify that you have sufficient rights to manage the Posts list. If in doubt, see the Appendix A at the back of this book.
On the blog site’s home page, below all the posts, click RSS Feed. The RSS feed for the blog posts is displayed.
In the browser, click Back. The home page of Olga’s Blog site is displayed.
In the Blog Tools Web Part, click Manage posts. The Posts list is displayed using the All Posts view.
On the List tab, in the List Tools tab set, click List Settings. The List Settings page is displayed.
Under Communications, click RSS settings. The Modify RSS Settings page is displayed.
Troubleshooting
If the RSS Settings link is not available, then RSS support is not enabled either in the SharePoint 2010 Central Administration website or at the site collection level. See Chapter 3 for more information.
In the List RSS section, under Allow RSS for this list, click No.
Scroll to the bottom of the page, and click OK. The List Settings page is displayed.
Click Home to redisplay the blog site’s home page. The RSS Feed link is no longer displayed.


Key Points
You can create a Document Workspace from an existing document in a document library so that you can use the Publish to Source Location feature to update the original document with the latest version.
Meeting Workspaces communicate key information about a meeting.
You can create a Meeting Workspace from a recurring event if you want to present different information each time that the meeting occurs.
After the Meeting Workspace is created, add relevant information to the Objectives, Agenda, and Attendees Web Parts.
Use the document library in a Meeting Workspace to store presentations, documents, pictures, meeting minutes, or other material relevant to the meeting.
You can customize a Meeting Workspace by adding new pages, lists, and Web Parts.
Blogs are personal journals or observations that are usually maintained by one person.
Blog posts can be categorized to help users find past conversations.
To interact with a blogger, you can leave comments on a blog post.
Bloggers should review comments on their posts for objectionable or inappropriate content.
The Blog Posts list is enabled for RSS support, thereby allowing users to syndicate content.