
Chapter 7. Working with List Settings

In this chapter, you will learn how to | |
✓ | Set the list title, description, and navigation. |
✓ | Configure content approval and versioning. |
✓ | Work with advanced list settings. |
✓ | Create a content type. |
✓ | Associate a content type with a list. |
✓ | Use list validation. |
✓ | Delete and restore a list. |
✓ | Manage users and permissions. |
✓ | Grant list item permissions. |
✓ | Configure incoming email settings. |
✓ | Configure RSS feeds for a list or library. |
✓ | Create indexed columns. |
✓ | Prevent duplicate list items. |
In this chapter, we focus on list settings. In Chapter 4, we discuss how to create and use Microsoft SharePoint lists, how to add and remove content, and how to sort and filter them. Now that we have a good grasp of SharePoint lists, this chapter will explore the list settings available to manage and configure the lists.
List settings allow us to configure the options for the list, including name, navigation, content types, versioning, validation, email settings, Really Simple Syndication (RSS) feeds, and indexing options, as well as permissions for the users who may require access to the list. You can also delete lists that are no longer needed.
The options for a list are configured using the List Settings page. You can navigate to this page by clicking the List tab from the List Tools tab set on the Ribbon that appears when you open a list, and then clicking the List Settings button in the Settings group on the right side of the Ribbon.

The List Settings page groups configuration settings in six sections, as follows: General Settings, Permissions and Management, Communications, Content Types, Columns, and Views.

The General Settings section, for example, provides the ability to change the Title, description and navigation, Versioning settings, Advanced settings, and Validation settings.
In this chapter, we will discuss configuration options, available on the List Settings page, that allow you to manage the lists on your site.
Important
Remember to use your SharePoint site location in place of http://wideworldimporters in the following exercises.
Setting the List Title, Description, and Navigation
As discussed in Chapter 4, it is important to give the Name and Description And Navigation settings some thought when you create a list. The default names for lists are descriptive, but they could be made more descriptive within an organization. For example, if a Contacts list contains only employees, then Employees or Staff may be a better name for it. Concerning the list navigation, some list types, such as Contacts, do not display on the Quick Launch by default, while you may need to display your new list on the Quick Launch. However, if you have added a list as a List View Web Part on the page of your site, you may find it unnecessary to have a link to it on the Quick Launch as well. With the Title and Description And Navigation options, you can turn the Quick Launch link on or off for the list in question.
See Also
To make navigation to a list easier, avoid using spaces within the list name when the list is created. A space in the name shows as %20 within the Uniform Resource Locator (URL). For more information, refer to the sidebar entitled Naming a URL, in Chapter 3. You can also rename the list after setting up its URL when it is created. For more information, refer to the exercise in the section entitled Creating a New List, in Chapter 4.
In this exercise, you will modify the Name and Description of a Links list, allowing the name to be more descriptive of the contents.
Set Up
Open the SharePoint site in which you would like to rename a Links list. The exercise will use the http://wideworldimporters site, but you can use whatever site you want. If prompted, type your user name and password, and click OK
Note
BE SURE TO verify that you have sufficient rights to manage a list. If in doubt, see the Appendix A at the back of this book.
On the Quick Launch, click the Lists hyperlink.
The All Site Content page is displayed in the Lists view.
Under the Lists section, click Links.
The Links list is displayed.
On the Ribbon, from List Tools, select the List tab, and then, in the Settings group, click the List Settings button to display the List Settings page.
Click Title, description and navigation from the General Settings section.
In the Name and Description section, replace the text “Links” with Useful Web Sites in the Name field. Remove the default text from the Description field.
In the Navigation section, click Yes to Display this list on the Quick Launch?
Click Save.
Navigate to the home page and verify that the Useful Web Sites list is displayed on the Quick Launch under Lists.
On the Quick Launch, click the Useful Web Sites list. Using steps 3–7 as a guide, remove the link to this list from the Quick Launch.
On the Quick Launch, click Lists and verify that the Useful Web Sites list is displayed under Lists on the All Site Content page.

Configuring Content Approval and Versioning
The Versioning settings option under General Settings provides Content Approval, Item Version History, and Draft Item Security options. Turning on Content Approval allows list items to be created as draft items that are not displayed to other users unless the item has been approved. This means that you can work on the item in draft mode and then submit the item for approval when you are ready to do so. An approver (that is, a user with Approve permission) can then approve the item, which allows the list item to show for all users with Read permission.
Tip
When a list item is submitted for approval, a notification email is not sent automatically to the approver. The approver should visit the list periodically to see if list items are waiting for approval. Alternatively, you could use an Approval Workflow or consider configuring alerts for this list. For more information, refer to Chapter 11.
Draft Item Security is an option that is specific to draft items. It provides additional user permissions to the Permission settings on list items. Using the Draft Item Security settings, you can choose who is allowed to view the item in draft form. The default setting is Any User Who Can Read Items, but you can also choose Only Users Who Can Edit Items or Only Users Who Can Approve Items. Users with Contribute permissions or higher will see the draft version, while users with less than Contribute permissions will see the last approved item and not the more recent draft item. Therefore, users with different permissions are likely to see different list items and different versions of those list items.
The Item Version History provides you with the benefit of being able to track the editing history of a list item. If enabled, a new version of the list item will be stored upon each edited version of the list item. This allows you to view the history, as well as restore a previous version so that it becomes the latest version of the list item. You may specify how many versions to keep in the history. The Item Version History is available only if versioning is enabled.
See Also
SharePoint lists allow you to use Major versions only, whereas libraries allow you to use Major and Minor versions. More information on major and minor versioning can be found in Chapter 8.
In this exercise, you will configure the Versioning settings and set up the content approval for an Announcements list.
Set Up
Open the SharePoint site in which you would like to configure an Announcements list, if not already open. The exercise will use the http://wideworldimporters site, but you can use whatever site you wish. If prompted, type your user name and password, and click OK.
Note
BE SURE TO verify that you have sufficient rights to manage a list. If in doubt, see the Appendix A at the back of this book.
On the Quick Launch, click Lists.
Under Lists, click Announcements.
On the Ribbon, under List Tools, click the List tab, and then click List Settings in the Settings group.
Under General Settings, click Versioning Settings.
The Versioning Settings page is displayed.
You will now set up content approval. In the Content Approval section, under Require content approval for submitted items?, click Yes.
Notice that in the Draft Item Security section, under Who should see draft items in this list?, the selected option is Only users who can approve items (and the author of the item).
You will now configure versioning. In the Item Version History section, click Yes to Create a version each time you edit an item in this list?
Click OK to save the changes.
The List Settings page is displayed.
Click Announcements in the breadcrumb trail. The All Items view of the Announcements list is displayed.
The Approval Status column has been created within the list, and any existing announcement items are set to Approved.
Click Add new announcement.
In the Title field, type New Product Announcement. Notice the warning that the items on this list require approval. Click Save to save the announcement.
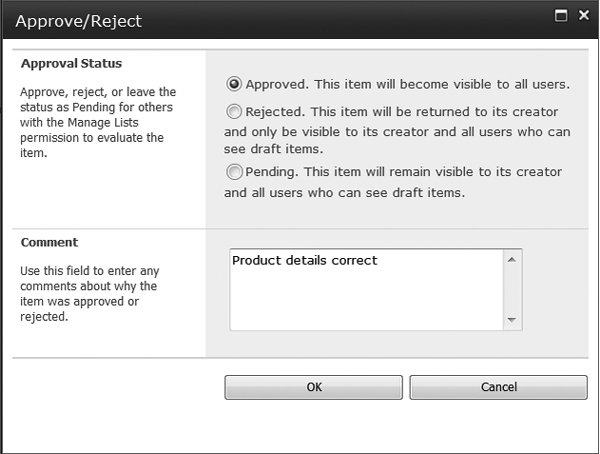
A new item has been created. It has an Approval Status of Pending. Hover the mouse over the title of the new announcement, click the down arrow that appears to the right of the title, and then click Approve/Reject from the drop-down menu. The Approve/Reject dialog appears.
In the Approval Status section, select Approved. In the Comment section, type a comment, such as Product details correct, and then click OK.
The Announcements list is displayed, and the Approval Status for this list item is now Approved.
Hover the mouse over the title of the new item, click the down arrow that appears, and then click Version History to see the current version number of the list item in the Version History dialog.
Close the Version History dialog to display the Announcements list page.
Using steps 3–5 as a guide, disable the requirement for content approval for the Announcements list.


Working with Advanced List Settings
In this section, we will look into configuration options that are available on the Advanced Settings page, with the exception of content type settings, which we will cover in the next section in this chapter, Creating a Content Type.
On the Advanced Settings page, you will find the following settings:
Item Level Permissions. This option allows you to refine the default permissions levels, such as Read, Contribute, Design, and Full Control, for a list item. For example, you can use this option to set up what the creator of the list item is allowed to do. This option allows you to set whether people with Read access may read all items or only those that they created. You may also set whether users with Create and Edit access can edit all items or just those that they created, or they can be prevented from creating and editing any list item by selecting the None option. By selecting the None option, you are effectively making users with Contribute permissions readers for this list. However, users with rights to manage this list are able to read and edit all items.
Attachments. Using this option, you can allow or disallow attachments to list items. By default, the attachments to list items are enabled.
See Also
Refer to the section entitled Attaching Files to List Items, in Chapter 4, for an exercise on attaching documents to list items.
Folders. This option provides the ability for you to disable the New Folder command in the list. This command is enabled by default.
An alternative to using folders is using the custom columns. Since the introduction of SharePoint, users have been taking advantage of custom columns to organize their content. This means that through the use of custom columns, you can organize content into views using filters rather than folders. If you prefer this method to using folders within lists, you can turn off the use of folders so that users do not become confused as to which they should use. If you do use folders, you should consider carefully training your users on how to use them effectively.
See Also
For a debate on when to use columns or folders to organize your content, refer to http://www.endusersharepoint.com/2010/01/29/sharepoint-folders-vs-metadata/.
Tip
In SharePoint 2010, the recommended number of items within a view or folder is limited to 5,000. This limitation is related to the time that it takes to display the number of items in a view or folder. Therefore, if you have 6,000 list items in a list, it would be better to create views or folders to display 5,000 or fewer list items.
See Also
More information on recommended limits with lists and libraries can be found at http://technet.microsoft.com/en-us/library/cc262787.aspx#ListLibrary.
Search. Searching content in SharePoint Foundation will return search results from any list or library by default. All the items that the current user has permission to view will display within the results, and no users will see content that they do not have permission to view. You may exclude an entire list from displaying within search results by setting the Allow Items From This List To Appear In Search Results option to No.
See Also
For more information on searching, refer to Chapter 16.
Offline Client Availability. This setting defines if the list is available for offline viewing in client applications, such as SharePoint Workspace 2010, that allow you to synchronize data for offline use so that you have access to the SharePoint content while in a disconnected environment. Microsoft Outlook 2010 also can be used for offline access to list and library content. The default setting is to allow items to be downloaded to offline clients. If the list contains sensitive information, you can ensure that it is available only in an online environment and switch off the offline availability.
See Also
For more information on taking lists offline, see Chapter 13.
Datasheet. This setting defines whether editing of the list using the datasheet is allowed. It is enabled by default. The Datasheet view of a list provides a spreadsheet-type view of the list content, allowing you to enter data more quickly and use operations such as Fill Down. The updates are provided in bulk, all at once, which is convenient for making modifications quickly. However, using such operations can result in accidentally overwriting content, and the disadvantage is that it is difficult to undo a mistake that has been made in bulk. Therefore, you can decide not to allow the editing of the list using the datasheet, and then the Datasheet View button on the Ribbon in the List tab will be disabled.
Note
Some lists or libraries, such as external lists and picture libraries, do not allow the use of Datasheet views.
See Also
For more information on the Datasheet view, see Chapter 9.
Dialogs. SharePoint Foundation 2010 in conjunction with Microsoft Silverlight, provides the New, View, and Edit forms within the Silverlight dialog when accessing an item. The Silverlight dialog is displayed within the web page, and the rest of the web page is dimmed. This is a much better way of manipulating list items than in the previous version of SharePoint because it does not require reloading of the page. If your work environment has desktops that do not have Silverlight installed, you may consider either installing Silverlight or disabling this option.


In this exercise, you will disable the Datasheet and Attachments options for an Announcements list. Because this list contains only two columns besides the Body column, using the Datasheet view is not of much benefit. Formatted content can appear within the Body field, and therefore it would be better to type the content than link to an attachment.
Note
BE SURE TO verify that you have sufficient rights to manage a list. If in doubt, see the Appendix A at the back of this book.
Under Lists, click Announcements.
On the Ribbon, under List Tools, click the List tab and then click the List Settings button in the Settings group.
On the List Settings page, in the General Settings section, click Advanced Settings.
In the Attachments section, set Attachments to this list are to Disabled.
In the Datasheet section, set the Allow items in this list to be edited using the datasheet? option to No.
Click OK. If the confirmation message appears that notifies you that disabling attachments will remove all existing attachments within the list, click OK.
You have disabled attachments in the Announcements list and also disabled editing the Announcements list using the datasheet.

Creating a Content Type
Often, we need to redesign a list and add a new column. For example, in Chapter 4, you added new columns to a list. You would add a new column to a list if you needed to collect more information from the user than what is there by default within the list template. Consider the Announcements list, for example. It has three visible columns; Title, Body, and Expires. You may want to create a new column to store the type of announcement, providing choices, such as Sales, Product, Employee, and General. Collecting the type of announcement would be useful when creating a view and filtering by type, and also if you decide to roll up the announcements using an aggregation Web Part. You would then want to ensure that all Announcements lists have the option of using this new column, but it would be tedious adding that new column to every Announcements list. You could get around the tediousness of creating the list with the additional column by using a custom list template. However, what would happen if the choices for the type of announcement changed? You may want to add another choice to the type of announcement column, such as Internal and External announcement. That is where site columns and content types are useful. A site column could also be described as a shared column. You create a site column once, and it resides in a gallery at Site or Site Collection level. It is inherited by the all sites in the collection that are beneath the site in which it was created. A content type is made up of site columns as well as other configurations such as workflows. This enables you to reuse a group of site columns and perhaps have a workflow associated with the content type, which you would then add to an existing list. Lists can use more than one content type.
In this exercise, you will create a custom content type.
Set Up
Open the SharePoint site in which you would like to create a custom content type. The exercise will use the http://wideworldimporters site, but you can use whatever site you wish. If prompted, type your user name and password, and click OK.
Note
BE SURE TO verify that you have sufficient rights to create a content type. If in doubt, see the Appendix A at the back of this book.
Click Site Actions, and then click Site Settings.
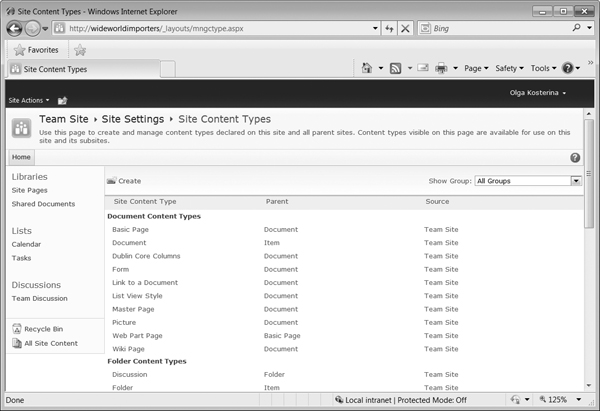
On the Site Settings page, under Galleries, click Site content types. The Site Content Types page is displayed, showing a list of existing content types for this site.
At the top of the page, click Create.
The New Site Content Type page is displayed.
In the Name box, type a name for the content type, such as Wide World Announcements.
From the Select parent content type from list, choose List Content Types. From the second drop-down list, select Announcement, if not already selected.
In the Group section, leave the Existing Group setting as Custom Content Types, and then click OK.
The Site Content Types – Wide World Announcements page is displayed.
In the Columns section, click Add from new site column. The New Site Column page is displayed.
In the Name and Type section, in the Column name box, type Type of Announcement.
Set The type of information in this column is to Choice (menu to choose from).
In the Additional Column Settings section, in the Type each choice on a separate line box, delete the existing text and type Products on the first line, Sales on the second line, General on the third line, and Other on the fourth line,
Leave the other options as the defaults and click OK.
The Wide World Announcements content type page is displayed. The new site column that you have just created, Type of Announcement, has been added to the content type and is listed under the Columns section.
Navigate back to your Team Site home page, using the breadcrumb on top of the page.


Associating a Content Type with a List
Now that you have created a custom content type, you can add that content type to any list or library within the current site or any site within the hierarchy of the site collection below where the content type is stored.
In this exercise, you will add a content type to the Announcements list.
Note
BE SURE TO verify that you have sufficient rights to associate a content type with a list. If in doubt, see the Appendix A at the back of this book.
On the Quick Launch, click Lists, and then under Lists, click Announcements.
On the Ribbon, in the List Tools, click the List tab, and then click List Settings.
On the List Settings page, in the General Settings section, click Advanced Settings.
On the Advanced Settings page, make sure that in the Content Types section, Allow Management of Content Types is set to Yes. Click OK. The List Settings page is displayed.
In the Content Types section, click Add from existing site content types. The Add Content Types page is displayed.
In the Select Content Types section, from the Select site content types from drop-down list, choose Custom Content Types.
In Available Site Content Types, scroll down to see the Wide World Announcements content type. Click this content type to select it, and then click Add.
The Wide World Announcements content type is now displayed under Content types to add. Click OK.
The List Settings page is displayed. The Wide World Announcements content type has been added and is listed in the Content Types section.
In the Content Types section, click Change new button order and default content type. The Change New Button Order and Default Content Type page is displayed.
Clear the Visible check box for the Announcement content type, and click OK.
The List Settings page is displayed.
Click Announcements on the breadcrumb to navigate to the Announcements list.
Click Add new announcement.
The Announcements – New Item dialog opens. The new Type of Announcement field has been added, with selections of Products, Sales, General, and Other in the drop-down list. Type a title for a new announcement, such as My Announcement, select General in the Type of Announcement field, and then click Save. The new item has been created based on the Wide World Announcements content type.
Note
You can now add this new content type to any Announcements list within this site or any child of this site. Modifying the choices in the site column will also populate all lists that use this content type with the new choice. Before creating a custom content type, you may want to explore the existing content types available, such as Timecard and Resources, to see if they offer similar functionality to what you want to create.


Using List Validation
The list validation options provide you with the ability to validate user entries into each column in a list. When a user enters a value that does not meet the requirements that you have defined, a custom message is displayed, allowing the user to correct the value.
Note
Validation Settings is a new option in SharePoint Foundation. Previously, SharePoint 2007 allowed only basic validation criteria such as Age Is Required, but not Age Must Be Between 18 and 50.
Tip
Validation of user entry can be configured in two places. You can configure validation using validation settings for a list, and you can also do it at column level when creating or modifying the column properties. The difference between the two methods is that using the column properties does not provide ability to compare two columns in the same list, whereas the List Settings validation option does. The column properties validation settings are useful when comparing a column value with a static value.
In this exercise, you will add validation to an Announcements list to ensure that only future dates are added to the Announcement Expires column.
Set Up
Open the SharePoint site that you used in the previous exercise and navigate to the Announcements list, if it is not already open.
Note
BE SURE TO verify that you have sufficient rights to manage a list. If in doubt, see the Appendix A at the back of this book.
Click Add new announcement to create a new list item.
Type Past Announcement in the Title field. In the Expires field, click the calendar icon to open a calendar, and then choose a date before today’s date.
Click Save.
You have created an announcement with an expiration date set in the past. You will now create a validation rule to check that the expiration date of a new announcement is in the future. On the List Tools, click the List tab, and then click the List Settings item in the Settings group.
The List Settings page is displayed.
Under General Settings, click Validation Settings.
The Validation Settings page is displayed.
In the Formula section, in the Formula box, type =[Expires]>=[Created].
In the User Message section, in the User Message box, type an error message, such as Expiration date must be in the future.
Click Save. The List Settings page is displayed.
You will now verify the validation rule. On the breadcrumb, click Announcements to navigate to the list.
Using steps 1–3 as a guide, add a new announcement with the title Validated Announcement, and then select a past date using the calendar in the Expires field.
Click Save. The error message that you have set up is displayed, indicating the date is invalid.
In the Expires field, set the date in the future. Click Save. The new Validated Announcement item has been created and is shown in the Announcements list.
Using steps 4–7 as a guide, remove the validation settings by deleting the formula for validating the Expires date that you have created.


Deleting and Restoring a List
When a SharePoint list is no longer required or was perhaps created by mistake, you may want to delete the list. Deleting the list will also delete all the list items (content) within that list, so this should be used with caution. For reassurance, note that sufficient permissions are required to delete the list. For example, a user with the Contribute permission level for a site or a list will not be able to delete the list. If a list is deleted accidentally, it will be placed within the site Recycle Bin for 30 days and can be restored, just like the list items.
In this exercise, you will delete and restore a SharePoint List.
Important
Do not use a list for this exercise that contains data that you wish to keep. If you get through half the exercise and come back to it after 30 days, your list will not be available for restoring.
Set Up
Open the SharePoint site in which you would like to delete the list, and navigate to this list, if it is not already open. The exercise will use the http://wideworldimporters site, but you can use whatever site you want. If prompted, type your user name and password, and click OK.
Note
BE SURE TO verify that you have sufficient rights to delete and restore this list. If in doubt, see the Appendix A at the back of this book.
If it is not already open, navigate to the Announcements list by choosing Lists on the Quick Launch, and then clicking Announcements.
On the Ribbon, in the List Tools, click the List tab, and then click List Settings.
On the List Settings page, in the Permissions and Management section, click Delete this list.
Click OK in the message that appears, confirming that you want to send the list to the Recycle Bin. You have now moved the Announcements list into the site’s Recycle Bin.
On the Quick Launch, click Lists. Verify that the Announcements list no longer appears under Lists.
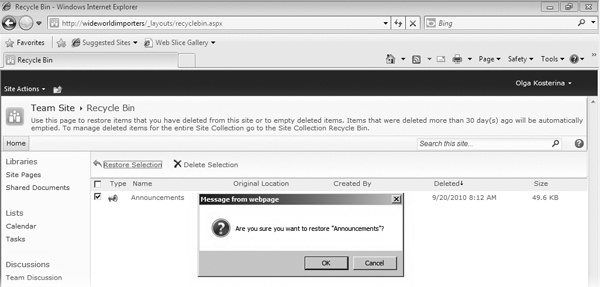
You will now restore the list. In the left navigation area, click Recycle Bin.
Select the Announcements list by selecting the check box to the left of its name, and then click Restore Selection.
Click OK to restore the Announcements list.
On the Quick Launch, click Lists. Verify that the Announcements list is now displayed under Lists. Navigate to the Announcements list to verify that it has been restored successfully.
Managing Users and Permissions
Within an organization, you are going to find that there are many different roles, and therefore, different levels of permissions are going to be required on sites, lists, and list items. Consider a Team site for a sales team, for example. There may be a sales manager and sales executives who use the site. The sales manager is likely to have different permissions from the sales executives.
There are multiple permissions that can be granted to users and groups in SharePoint Foundation. To make life simpler, these permissions are grouped into permission levels such as Full Control, Design, Contribute, and Read. Each user or group of users is then assigned a permission level, which in turn provides all the included permissions.
As we discussed in Chapter 3, when you first create a site, you have the choice of setting unique permissions on the newly created site or inheriting the permissions from the parent site. When you inherit the permissions from the parent site, you have to manage the permissions at the parent site. Lists automatically inherit their permissions from the site in which they reside. This means, for example, that users who are assigned Contribute permissions to the site will also have Contribute permissions to the list.
Users within an organization may play different roles within a site. For example, Olga is responsible for making announcements in the Announcements list, whereas Todd is responsible for assigning tasks. Therefore, the permission inheritance of those two lists must be stopped, and unique permissions assigned.
See Also
You can find more information on permission levels at http://technet.microsoft.com/en-us/library/cc721640.aspx.
In this exercise, you will open a SharePoint site, navigate to the Tasks list, and stop permission inheritance for this list. You will then configure unique permissions for a group. We will use a group called Sales, but you can use any group or user from your environment.
Set Up
Open the SharePoint site in which you would like to assign permissions, if not already open. The exercise will use the http://wideworldimporters site, but you can use whatever site you wish. If prompted, type your user name and password, and click OK.
Note
BE SURE TO verify that you have sufficient rights to manage permissions. If in doubt, see the Appendix A at the back of this book.
On the Quick Launch, under Lists, click Tasks.
The Tasks list appears.
On the Ribbon, in the List Tools, click the List tab, and then, in the Settings group, click List Permissions.
Tip
Alternatively, you can click List Settings, and then, on the List Settings page, in the Permissions and Management section, click Permissions For This List.
The Permissions page is displayed, showing a yellow bar across the top that states that the permissions for this list are inherited from its parent.
On the Edit tab, in the Inheritance group, click Stop Inheriting Permissions.
Click OK to confirm that you are about to create unique permissions for this list.
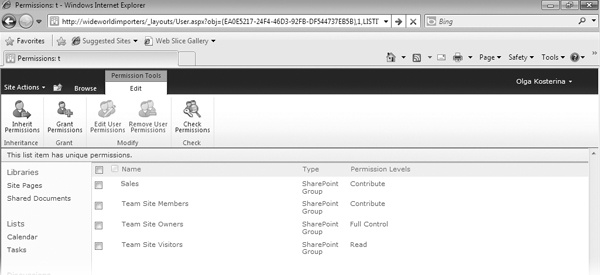
Notice that the yellow bar now contains the text “This list has unique permissions.”
On the Edit tab, click Grant Permissions to display the Grant Permissions dialog.
In the Grant Permissions dialog, in the Select Users section, click the address book icon below the Users/Groups box.
The Select People and Groups dialog opens.
Select the group or user to which you would like to grant permissions, such as Sales, and then click Add. Click OK.
Tip
You can type the first few characters of a group name in the Find box, and then click the magnifying glass icon to search for the group.
The Select People and Groups dialog closes, and the selected name appears in the Users/Groups box.
In the Grant Permissions section, click Grant users permission directly, and then select Contribute.
Click OK. The Grant Permissions dialog closes.
You will now verify that the Contribute permissions have been granted.
On the Permissions page, on the Edit tab, in the Check group, click Check Permissions to ensure that the group has been granted Contribute permissions to the list.
The Tasks: Check Permissions dialog is displayed.
Type the group or user name, such as Sales, and then click Check Now.
The permission level granted to this user or group account is displayed.
Click Close in the Tasks: Check Permissions dialog.


Granting List Item Permissions
Permissions may be granted to a list item or a folder contained within a list. List items and folders in the root of the list inherit permissions from the list itself. In other words, the same inheritance rules that apply to lists also apply to the list items. A list item or a subfolder that is stored within a folder inherits permissions from the parent folder. Permission inheritance can be stopped for any list item or folder at any level.
In this exercise, you will modify the permissions of a list item within the Tasks list.
Set Up
Open the SharePoint site in which you would like to assign list item permissions, if not already open. This exercise will use the http://wideworldimporters site, but you can use whatever site you wish. If prompted, type your user name and password, and click OK.
Note
BE SURE TO verify that you have sufficient rights to manage permissions for the list. If in doubt, see the Appendix A at the back of this book.
On the Quick Launch, click the Tasks list.
You will now create a new list item. Click Add new item.
In the New Item dialog, in the Title box, type My Task, and then click Save. The new item has been created.
Hover the mouse over the title My Task in the Tasks list, click the drop-down arrow that appears to the right of the title, and then select Manage Permissions.
Tip
Alternatively, select the list item by hovering the mouse over it, clicking its check box on the left, and then clicking the Item Permissions button on the Ribbon.
The Permissions page for this list item is now displayed, with a yellow bar stating that this list item inherits permissions from its parent. You will now create unique permissions for this list item and remove all permissions to it from the Sales group.
On the Edit tab, click the Stop Inheriting Permissions button in the Inheritance group. Click OK in the warning message box that appears.
Select the user or group that you assigned list permissions to in the previous exercise, such as Sales, by clicking the check box at the left of its name.
Click the Remove User Permissions button on the Ribbon, and then click OK to confirm removal of all permissions from this group.
The Sales group now has Contribute permissions to the Tasks list but does not have Contribute permissions to the My Task list item that you created in this list.

Configuring Incoming Email Settings
SharePoint Foundation allows list managers to assign an email address to several of the built-in lists. Once configured, you can send an email to the list. At first, emailing a SharePoint Foundation list seems like an odd thing to do; yet, consider the following ways that this capability could be used:
You have an announcement to make to the entire company. Emailing a distribution list in Outlook creates a lot of email traffic. So rather than sending everyone within your company an email, you can simply email one message to the Announcement list instead.
You are on an airplane working with a Microsoft Word document. When you are finished, you email the document to a specific list or a document library. This email sits in your outbox until the next time you connect to the Internet, at which time it is sent to the list or document library automatically. When SharePoint Foundation receives the document, it is inserted into the list or the document library for you.
An email distribution group is set up that includes all the members of your team. The email address of a discussion board is also included in the distribution group. Every message sent to the group is also inserted into the list. When team members visit the SharePoint Foundation site that contains the list, they see the entire conversation that took place via email. They can even use the list to reply to the messages posted to the list.
See Also
Enabling a discussion board for email is covered in Chapter 10.
The following table differentiates between those lists that can and cannot be email-enabled in SharePoint Foundation (lists are in alphabetical order).
Email-Enabled Lists | Lists That Are Not Email-Enabled | |
Announcements | Agenda | Phone Call Memo |
Blog Posts | Attendees | Project Tasks |
Calendar | Circulations | Resources |
Discussion Board | Contacts | Survey |
Document Library | Custom List | Tasks |
Form Library | Decisions | Text Box |
Picture Library | Issue Tracking | Things To Bring |
Group Calendar | Links | Wiki Page Library |
Objectives | Whereabouts | |
Tip
Before a list can be configured to get the incoming email, the SharePoint Foundation farm administrator must configure the Web application to enable incoming email. This can be done in SharePoint 2010 Central Administration using the System Settings, Configure Incoming E-Mail Settings, and selecting the Yes option in the Enable Incoming E-mail section.
See Also
For more information on how to configure the email settings in SharePoint Central Administration, refer to http://technet.microsoft.com/en-us/library/cc262947.aspx.
In this exercise, you will configure the Announcements list to accept incoming emailed announcements.
Set Up
Open the SharePoint site in which you would like to email-enable a list. The exercise will use the http://wideworldimporters site, but you can use whatever site you wish. If prompted, type your user name and password, and click OK.
Note
BE SURE TO verify that you have sufficient rights to manage lists. If in doubt, see the Appendix A at the back of this book.
Navigate to the Announcements list by choosing Lists on the Quick Launch, and then clicking the Announcements list.
On the Ribbon, on the List Tools, click the List tab, and then click List Settings.
On the List Settings page, in the Communications section, click Incoming e-mail settings.
In the Incoming E-Mail section, click Yes to allow this list to receive email.
In the Incoming E-Mail section, in the E-mail address box, type a unique email address for this list, such as SalesAnnouncements.
The email address for this list will now be [email protected].
Leave the other options unchanged and click OK.
Open Outlook 2010 and send an email to [email protected] or to an email address that you’ve just configured.
Set the Subject in your email message to My Announcement, and, in the body of the message, type Wide World Importers hits the sales target. Send the email.
In the browser, navigate to the Announcements list to see a newly created My Announcement list item. You might need to wait a minute for the mail to arrive and the item to be created.

Configuring RSS Feeds for a List or Library
Each list and library within SharePoint Foundation has the option of displaying its content in an RSS feed. RSS feeds are enabled by default for a site collection and all sites within it, but they can be disabled by a site collection administrator.
In this exercise, you will verify that the RSS settings for the site and the site collection are enabled.
Set Up
Open the top-level SharePoint site in which you would like to verify that the RSS feeds are enabled. The exercise will use the http://wideworldimporters site, but you can use whatever site you want. If prompted, type your user name and password, and click OK.
Note
BE SURE TO verify that you have sufficient rights to manage site collection. If in doubt, see the Appendix A at the back of this book.
On the Site Actions menu, click Site Settings.
On the Site Settings page, in the Site Administration section, choose RSS.
The RSS settings page is displayed.
In the Site Collection RSS section, make sure that the Allow RSS feeds in this site collection check box is selected.
In the Enable RSS section, make sure that the Allow RSS feeds in this site check box is selected.
You have now verified that RSS feeds are enabled for the site collection.
Using the breadcrumb, navigate back to the home page of your site.

Now that you have ensured that RSS feeds are available for your site and the site collection, you can enable RSS feeds for a list or a library. Within SharePoint, RSS feeds are especially useful within the Announcements list. Using RSS feeds, users can read announcements using an RSS viewer such as Outlook 2010 or the browser.
Tip
The Data View Web Part in SharePoint Designer 2010 can be used as a good RSS reader Web Part in SharePoint Foundation.
In this exercise, you will configure the RSS feed for an Announcements list and then subscribe to this RSS feed using the browser.
Note
BE SURE TO verify that you have sufficient rights to manage lists. If in doubt, see the Appendix A at the back of this book.
Navigate to the Announcements list by choosing Lists on the Quick Launch, and then clicking the Announcements list.
On the Ribbon, on the List Tools, click the List tab, and then click List Settings.
In the Communications section, click RSS settings.
In the List RSS section, make sure that Allow RSS for this list? is set to Yes.
In the RSS Channel Information section, leave the Truncate multi-line text fields to 256 characters? option set to No, so all text is sent to everyone that subscribes to the feed. If you anticipate a great deal of data in the feed, but the first few sentences are all that most people need to read, you want to change this option to Yes. Anyone viewing the feed item has the option to browse the entire contents.
The Title, Description, and Image URL settings are used as part of the feed details. Change Title to Sales Announcements.
Change Description to Wide World Importers Sales Announcements.
In the Columns section, check the Created By column to make sure it is included in the feed.
Leave the Item Limit as the default, and click OK.
Tip
The Item Limit area helps control the cost to your site’s bandwidth and your farm’s network when thousands of people subscribe to hundreds of lists and come to the site every hour to check for updates. (60 minutes is the default Time To Live setting in the RSS settings on the Site Settings page for each site.) The Maximum Items to Include field indicates how many list items to include in the feed, and the Maximum Days to Include field indicates how long a list item should be included. This example includes up to 25 items for any items modified in the last week (7 days). The default value for Maximum Items to Include is 25, and the default value for Maximum Days to Include is 7.
The RSS feed has been configured. You will now subscribe to this RSS feed using the browser. Using the breadcrumb, navigate to the Announcements list.
On the Ribbon, in the List Tools, click the List tab, and then click the RSS Feed button in the Share & Track group.
The Announcements RSS feed page is displayed. It isn’t much to look at or interact with, but viewing it in the browser is not the intent of the page. Click Subscribe to this feed on the top of the page, and then, in the Subscribe to this Feed message that appears, click Subscribe.
The confirmation is displayed that you’ve successfully subscribed to this feed. Verify that you’ve subscribed to this feed through your browser by choosing Favorites, clicking the Feeds tab, and selecting the Sales Announcements RSS feed that you have just configured.


Creating Indexed Columns
We tend not to use a telephone directory much these days unless we are using it to raise the height of something, such as a computer monitor. However, everyone is familiar with the concept of a telephone directory. Imagine trying to find someone’s phone number in a telephone directory for Wide World Importers if the names in the directory were not stored in alphabetical order. You would eventually find what you were looking for, but it would take a very long time. Therefore, an organization’s telephone directory is organized by the column in which it is most likely to be searched, such as the last name. Indexing on one column isn’t always enough, since there could be thousands of people with the same last name, so there is a secondary index on the first name column. Organizing the telephone directory by these two columns makes it much faster to find the telephone number that you are looking for.
All content in a site collection is stored within a SQL database that could contain thousands of items. When you create a view with a filter for a list, SharePoint needs to organize the content by finding all the list items for that list in the content database and then finding all the list items that match the filter and sort options. To improve performance, you can create indexed columns. You may think that creating an index on every column would be wise; however, these indexes also require resources and you would never search a telephone directory to find the person by looking up his or her telephone number. Therefore, you should use indexing wisely. For example, within an Announcements list, you can create an index on the Title column but not on the Body column. Once you have created an indexed column, you will see a performance gain when viewing information within a list with a large number of items.
In this exercise, you will create an indexed column within an Announcements list.
Set Up
Open the SharePoint site in which you would like to configure an indexed column. The exercise will use the http://wideworldimporters site, but you can use whatever site you wish. If prompted, type your user name and password, and click OK.
Note
BE SURE TO verify that you have sufficient rights to manage lists. If in doubt, see the Appendix A at the back of this book.
Navigate to the Announcements list by choosing Lists on the Quick Launch, and then clicking the Announcements list.
On the Ribbon, in the List Tools, click the List tab, and then click List Settings.
On the List Settings page, scroll to the bottom of the Columns section and click Indexed Columns.
On the Indexed Columns page, click Create a new Index.
In the Primary Column section, select Title from the drop-down list of available columns. The Title column is likely to be the most commonly sorted and searched column.
The Secondary column is dimmed because it wouldn’t make sense to index Body or Expires—they are Rich Text and Date type columns, respectively.
Click Create. After some processing identified by a processing page, a confirmation page is displayed, saying that the index is now created. You can create multiple indexes for a list if required.
Using the breadcrumb, navigate to the Announcements list.

Preventing Duplicate List Items
SharePoint list items could be duplicated quite easily by human error, by an error in a workflow, or by copying and pasting using Windows Explorer (if you are using a library). It is possible to stop the duplication of list items within a list and a library by setting a column’s property to Enforce Unique Values. Enforce Unique Values should be set to Yes only on columns where duplicate values would clearly indicate that an item is duplicated. For example, you would not set the Status column of a Tasks list to enforce unique values; otherwise, that would mean that you could only ever have one completed task at a time. However, it would also mean that you could have only one task that was not started, which could be seen as a benefit.
In this exercise, you will enforce unique values for items in the Announcements list.
Set Up
Open the SharePoint site in which you would like to enforce unique values for a list column. The exercise will use the http://wideworldimporters site, but you can use whatever site you wish. If prompted, type your user name and password, and click OK.
Note
BE SURE TO verify that you have sufficient rights to manage lists. If in doubt, see the Appendix A at the back of this book.
Navigate to the Announcements list by choosing Lists on the Quick Launch, and then clicking the Announcements list.
On the Ribbon, in the List Tools, click the List tab, and then click List Settings.
On the List Settings page, in the Columns section, click the Title column link.
On the Change Column page, in the Additional Column Settings section, click Yes in the Enforce unique values option.
Click OK.
You have now enabled the Enforce Unique Values option for the Title column in the Announcements list.
You will now verify that duplicate items are prevented. Using the breadcrumb, navigate to the Announcements list. Click Add new announcement and, in the Title box, type the title of an existing list item, such as My Announcement. An error message appears, saying that this title already exists in the list.
Change the title to a unique value, such as My New Announcement, and click Save. The new announcement with the unique title is created and displayed in the list.


Key Points
List configuration settings are accessed via the List Settings page. There are six groups of settings: General Settings, Permissions and Management, Communications, Content Types, Columns, and Views.
Versioning enables you to view the history of a list item and restore previous versions of it if required.
Adding validation to list columns helps to create more consistent and accurate content.
Content types give you the ability to group custom columns and other configurations together and make these combinations available to any list within the current site or child site.
Lists inherit permissions from the site that contains them. However, you can stop that inheritance and configure unique permissions for lists and list items by granting access to individual users or groups.
Setting an RSS feed provides an easy way to view list content outside SharePoint in the browser or any other RSS reader.
You can email-enable SharePoint lists.
Indexed columns improve the performance of SharePoint lists.
If a list is deleted by accident, you can restore the list from the site’s Recycle Bin.