1 Getting Started

In this chapter, you learn how to perform specific tasks on your iPad to become familiar with the interface.
→ Generations of iPads
→ The iPad Buttons and Switches
→ Screen Gestures
→ Learning Your Way Around
→ Virtual Buttons and Switches
→ Entering Text
→ Talking to Your iPad with Siri
→ Using Control Center
Before you learn how to perform specific tasks on your iPad, you should become familiar with some basic concepts. If you have used an iPhone or iPod touch before, you already know how to use a touchscreen device. But if the iPad is your first such device, you need to take time to become accustomed to interacting with it.
Generations of iPads
The first thing you may want to do is identify which iPad you have and what features are available to you. There have been many versions of the iPad since the original appeared in 2010.
Identifying Your iPad
The following table shows the major differences between these iPads:
iPad Comparison Chart
Model |
Released |
Display (inches) |
Retina Display |
Processor |
Connector |
iOS 11 Compatible |
iPad |
4/2010 |
9.7 |
|
A4 |
30-pin |
|
iPad 2 |
3/2011 |
9.7 |
|
A5 |
30-pin |
|
3rd Gen |
3/2012 |
9.7 |
✔ |
A5X |
30-pin |
|
iPad mini 1st Gen |
11/2012 |
7.9 |
|
A5 |
Lightning |
|
4th Gen |
11/2012 |
9.7 |
✔ |
A6X |
Lightning |
✔ |
iPad Air |
11/2013 |
9.7 |
✔ |
A7 |
Lightning |
✔ |
iPad mini 2 |
11/2013 |
7.9 |
✔ |
A7 |
Lightning |
✔ |
iPad Air 2 |
10/2014 |
9.7 |
✔ |
A8X |
Lightning |
✔ |
iPad mini 3 |
10/2014 |
9.7 |
✔ |
A7 |
Lightning |
✔ |
iPad mini 4 |
9/2015 |
7.9 |
✔ |
A8 |
Lightning |
✔ |
iPad Pro 12.9-inch |
11/2015 |
12.9 |
✔ |
A9X |
Lightning |
✔ |
iPad Pro 9.7-inch |
3/2016 |
9.7 |
✔ |
A9X |
Lightning |
✔ |
iPad (5th Gen) |
3/2017 |
9.7 |
✔ |
A9 |
Lightning |
✔ |
iPad Pro 12.9-inch (2nd Gen) |
6/2017 |
12.9 |
✔ |
A10X |
Lightning |
✔ |
iPad Pro 10.5-inch (2nd Gen) |
6/2017 |
10.5 |
✔ |
A10X |
Lightning |
✔ |
iPad displays vary not only in size, with the iPad mini models being smaller than the other iPads, but also in pixel density. The retina display has four pixels for every one of a regular display. Whereas a non-retina display is 768х1024 pixels, a retina display is 1536х2048 pixels. This means photographs and text are crisper and clearer on the retina display. In fact, you can’t even distinguish the individual pixels with your eye unless you hold the iPad very close. The iPad Pro 12.9-inch has even more pixels at 2048х2732.
Time for a New iPad?
Most earlier model iPads are not compatible with iOS 11, the version of iOS discussed in this book. Because these models can’t run iOS 11, some of the latest third-party apps might not work, or won’t work very well. Every iOS 11-compatible iPad has a Lightning connector, retina display, and an A7 or better processor.
Another difference between iPad models is the camera. Since the first model in 2010, the cameras on the iPad have improved, with higher quality and picture resolution.
Each iPad has also become a little more powerful with a faster processor at its heart. Other parts have picked up speed and power as well, processing graphics and accessing memory faster. Early models aren’t powerful enough to use features like voice dictation and advanced 3D game graphics.
>>>Go Further: The Need For Speed
With each generation of iPad, the processor changes. Each iPad is faster and more powerful than its predecessor. It is hard to quantify, but by some metrics the iPad Pro has more processing power than many desktop computers. This also helps apps to run smoother, games to display faster with more detailed graphics, and makes performing taxing tasks like editing video or flipping through hundreds of high-resolution photos work faster.
iOS 11 New!
The primary piece of software on the iPad is the operating system, known as iOS. This is what you see when you flip through the screens of icons on your iPad and access default apps such as Mail, Safari, Photos, and iTunes.
This book covers iOS 11, the version released in September 2017. There have been 11 generations of the software that runs iPhones and iPads. The original iPhone OS was developed for the first iPhone. The third version, iOS 3, worked on iPhones and the iPad. This latest version, iOS 11, works on iPads introduced in 2013 and later. If you have an older version of the iPad, you will not be able to install iOS 11 and will be stuck with an earlier version. Many of the things you see on your older iPad will look different than what you see in this book, and some features will be missing entirely.
Some features and tasks in this book work the same in iOS 5 through 10, but you will not be able to use the latest features. To find out which version you are using and to learn how to update, you use the Settings app. In the Settings app, under the General settings, tap the About item. The About screen shows you information about your iPad, including its model number, serial number, version of iOS currently running, and available memory. You learn how to use the Settings app when you get to Chapter 2, “Customizing Your iPad.”
New to iOS 11
There are some changes in iOS 11 you will notice. For features that have changed significantly, or are completely new, we have added an indicator to the text and table of contents to help you easily locate them. When you see New!, be sure to check out those tasks to quickly get up to speed on what’s new in iOS 11.
The iPad Buttons and Switches
The iPad features a Home button, a Wake/Sleep button, and a volume control.
The Home Button
The Home button is probably the most important physical control on the iPad and the one that you will use the most often. Pressing the Home button returns you to the Home screen of the iPad when you are inside an application, such as Safari or Mail, and you want to get back to your Home screen to launch another app. You can also double press the Home button to switch between apps, as described in the section titled “Viewing Currently Running Apps” in Chapter 15, “The World of Apps.”

Where’s the Quit Button?
Few, if any, apps on the iPad have a way to quit. Instead, think of the Home button as the Quit button. Pressing it hides the current app and returns you to your Home screen. The app is actually still paused and hidden in the background. It is usually unnecessary to truly “quit” an app. But if you really want to completely quit an app, see “Quitting Apps” in Chapter 15.
The Wake/Sleep Button
The primary function of the Wake/Sleep button (sometimes called the On/Off or Power button) at the top of your iPad is to quickly put it to sleep. Sleeping is different than shutting down. When your iPad is in sleep mode, you can instantly wake it to use it. You can wake the iPad from sleep by pressing the Wake/Sleep button again or by pressing the Home button.
Peek a Boo!
If you are using the Apple iPad Smart Cover, Smart Case, or the iPad Pro Smart Keyboard (see Chapter 18, “iPad Accessories”), your iPad goes to sleep when you close it and wakes up when you open it, as long as you use the default settings. Many third-party cases and covers also do this.
You can also use the Wake/Sleep button to shut down your iPad, which you might want to do if you leave your iPad for a long time and want to preserve the battery life. Press and hold the Wake/Sleep button for a few seconds, and the iPad begins to shut down and turn off. Confirm your decision to shut down your iPad using the Slide to Power Off button on the screen.

To start up your iPad, press and hold the Wake/Sleep button for a few seconds until you see the Apple logo appear on the screen.
When Should I Turn Off My iPad?
It is normal to never turn off your iPad. In sleep mode, with the screen off, it uses little power. If you plug it in to power at night or during longer periods when you aren’t carrying it with you, you don’t need to ever shut it down.
The Volume Control
The volume control on the side of your iPad is actually two buttons: one to turn the volume up, and the other to turn it down.
Your iPad keeps two separate volume settings in memory: one for headphones and one for the internal speakers. If you turn down the volume when using headphones and then unplug the headphones, the volume changes to reflect the last settings used when the headphones were not plugged in, and vice versa. A speaker icon and a series of rectangles appear on the screen to indicate the current level of volume.

Orientation and Movement
In addition to the physical switches you see on your iPad, the entire iPad is a physical control.
Your iPad knows which way it is oriented, and it knows if it is being moved. The simplest indication of this is that it knows whether you hold it vertically with the Home button at the bottom or horizontally with the Home button to one of the sides. Some apps, especially games, use the screen orientation of the iPad to guide screen elements and views.
Shake It Up!
One interesting physical gesture you might perform is the “shake.” Because your iPad can sense movement, it can sense when you shake it. Many apps take advantage of this feature and use it to set off an action, such as shuffling songs in the Music app, erasing a drawing canvas, or as an “undo” function.
Screen Gestures
Any way to tap, swipe, drag, or otherwise interact with the screen with one or more fingers is a possible gesture that you can use to control your iPad’s main screens and any apps you use. Here is a list of some of the most common gestures and some examples of their use.
![]() Tap: Use one finger to quickly touch the screen in one location. You use this gesture to launch apps on the Home screen.
Tap: Use one finger to quickly touch the screen in one location. You use this gesture to launch apps on the Home screen.
 Double-Tap: With one finger, tap two times quickly in the same location. You use this gesture to zoom in on maps.
![]() Tap-and-Hold: Sometimes you get a different reaction if you tap and hold a spot as opposed to quickly tapping and releasing. For instance, if you tap a link on a web page you will go to that link. But if you tap and hold the link, you get a list of options such as Open in New Tab, Add to Reading List, and Copy.
Tap-and-Hold: Sometimes you get a different reaction if you tap and hold a spot as opposed to quickly tapping and releasing. For instance, if you tap a link on a web page you will go to that link. But if you tap and hold the link, you get a list of options such as Open in New Tab, Add to Reading List, and Copy.
 Drag: Touch the screen with one finger, keep it pressed against the screen, and move it to another location. This is used to reposition elements in apps like Keynote or to draw in graphics apps. Dragging vertically is used to scroll documents and web pages.
![]() Double-Drag: Touch the screen with two fingers close together, keep them pressed against the screen, and move them to another location. This is used in apps to reposition an entire document or image.
Double-Drag: Touch the screen with two fingers close together, keep them pressed against the screen, and move them to another location. This is used in apps to reposition an entire document or image.
Swipe: Touch the screen with one finger and move it quickly left, right, up, or down. This is used to move between pages of the Home screen.
![]() Pinch Close: Place two fingers, usually your thumb and index finger, far apart on the screen and move them together. This is used to zoom out on maps and images.
Pinch Close: Place two fingers, usually your thumb and index finger, far apart on the screen and move them together. This is used to zoom out on maps and images.
![]() Pinch Open: The opposite of a pinch, where you start with two fingers close together and move them apart. This is used to zoom in on maps and images.
Pinch Open: The opposite of a pinch, where you start with two fingers close together and move them apart. This is used to zoom in on maps and images.
Rotate: Touch the screen with two fingers far apart, and rotate them both around a point in between. This is used to rotate maps and objects in graphics apps.
Swipe from Edge: Start with your finger outside of the screen, either above, below, to the left, or to the right. Drag your finger onto the screen and toward the middle. This is used to bring notifications down from the top of the screen, or the Control Center up from the bottom.
![]() Four-Finger Swipe: Place four fingers together and close to the middle of the screen and swipe in one direction. In most apps, a four-finger swipe to the right switches you back to the previous app.
Four-Finger Swipe: Place four fingers together and close to the middle of the screen and swipe in one direction. In most apps, a four-finger swipe to the right switches you back to the previous app.
![]() Five-Finger Pinch Close: Place all fingers on the screen and pinch in to the center. This takes you from your current app to the App Switcher, which is covered in Chapter 15.
Five-Finger Pinch Close: Place all fingers on the screen and pinch in to the center. This takes you from your current app to the App Switcher, which is covered in Chapter 15.
This list isn’t complete. There’s really no limit to the types of gestures that apps can use. The Files app, for instance, allows you to drag a file, and then while you’re dragging, you can tap a second file with another finger to group the two files and drag them together.
Learning Your Way Around
When you pick up your iPad and touch either the Wake/Sleep button or the Home button to activate the screen, you see what is called the Lock screen. From there, you unlock your iPad and return to the last screen you were using—either the Home screen or an app’s screen.
Let’s look at the different types of screens you see every day on your iPad, and how to navigate between them.
The Lock Screen
When you first wake up your iPad, you’re on the Lock screen. This shows a colorful picture with some very basic information. The largest element is the time. Under that is either the battery level or the date. It alternates between them every few seconds. The battery status is at the top right, and your Wi-Fi status is at the top left.
From the Lock screen there are four places you can go. You can swipe left to right to go to the Today View. You can swipe from the very top of the screen down to go to the Notifications screen. Those two screens are covered in more detail shortly. You can also swipe right to left to bring up the Camera app to take a quick picture. Read about the Camera app in Chapter 9, “Taking and Editing Photos.”
You can also press the Home button to exit the Lock screen and go to the Home screen. When you do this, you are prompted to enter your passcode or rest your thumb or other finger on the Home button to verify your identity using Touch ID. See “Make Access Easier with Touch ID” in Chapter 2.

The Home Screen
Think of the Home screen as a single screen but with multiple pages that each features different app icons. At the bottom of the Home screen are app icons that do not change from page to page. Find out how to add more apps to your iPad in the tasks in Chapter 15.
The number of pages on your Home screen depends on how many apps you have. The number of pages you have is indicated by the white dots near the bottom of the screen, just above the bottom icons. The brightest dot represents the page you are currently viewing. You can move between pages on your Home screen by dragging or flicking left or right.

In addition to jumping into an app by tapping the app icon, there are three other screens you can get to from the Home screen. If you swipe left to right from the initial Home screen, you go to the Today View. If you swipe down from the very top of the screen, you go to the Notifications screen. If you swipe down from the center of the screen, you go to the Search screen.
The Search Screen
If you are on your Home screen looking at page one of your app icons, you can drag from the center of the screen downward to bring up a Spotlight Search field at the top and a keyboard at the bottom. This allows you to search your iPad for apps, contacts, events, and other information.
You can type in anything to search for a contact, app, email message, photo, and so on. You don’t have to define what type of thing you want to search for.
1. From the Home screen, tap in the center of the screen and drag down. If you’ve been using your iPad for a while and have Siri enabled, you will see suggestions for apps, contacts, and other content on this screen even before you type a search term.
Drag from the Center, Not the Top
Don’t start at the very top of the screen, as dragging from there brings up Notifications Center instead. This can be a bit tricky; so if you do accidentally open Notifications Center, just tap the Home button to go back to the Home screen and try again.
2. Type a search term using the on-screen keyboard.

3. You see suggested search terms based on the letters you have typed so far. You can tap one of these to fill in the search field.
4. You see a list of items on your iPad that match the search term. The search results show apps, calendar events, email messages, reminders, or even web search results.
5. Tap the Search button on the keyboard to dismiss the keyboard and complete the search.
6. Tap the X in the search field to clear the search and start again.
7. Tap any of the items to go to the appropriate app and view the content.

How Do I Get Out of Here?
To exit the Search screen instead of completing a search, just tap outside of the search results or press the Home button. This takes you back to the Home screen.
Today View New!
You can get to the Today View, also called the Widgets screen, one of three ways: swipe left to right on the Lock screen, swipe left to right on the Notifications screen, or swipe left to right on the first page of the Home screen. The first two show you the time and date at the top, whereas the third method shows only the widgets themselves.
The Today View is filled with useful widgets or modules that present information and allow you to take simple actions.
1. Swipe from the left to the right from the left-most page of apps on the Home screen.

What Are Widgets?
Underneath the weather and date, the rest of the screen is filled with widgets. You can completely customize these, removing ones you don’t need and adding new ones. The four shown in this task are four default widgets. The default widgets may vary in future updates to iOS.
2. The Calendar widget shows you your next scheduled event.
3. Tap an event to open the Calendar app and go right to it.
4. The Siri App Suggestions widget usually shows your recently used apps. Tap any of the icons to go directly to that app.

5. A variety of other widgets are shown, depending on which ones you have chosen to appear. You can usually tap most widgets to jump to the corresponding app for more information.
6. If you have more widgets than can fit on the screen, swipe up to see them.
7. At the top of the Widgets screen is a search field that you can use to search for anything on your iPad. It is another way to access the Search screen mentioned earlier in this chapter.
8. At the bottom of the list is an Edit button that enables you to customize what you see on the Widgets screen. Tap it.

9. Tap the red – buttons next to any item to remove that widget from the Widgets screen.
10. Tap the green + buttons next to items to add them to the Widgets screen.
11. Tap the handles to the right of any item and drag up or down to rearrange the order of items on the Widgets screen.
12. Tap Done to save your changes and return to the Widgets screen.

Results May Vary
You might find that some widgets work differently, or show different information, depending on whether you accessed the Widgets screen from the Lock screen or Home screen. From the Lock screen you haven’t entered your passcode or used Touch ID to log in to your iPad so that might restrict what is allowed.
The Notifications Screen
If you swipe down from the very top of the Lock screen or Home screen, you go to the Notifications screen, which is a list of recent notifications, such as calls, messages, emails, or app alerts.
For Your Eyes Only
If you don’t like the idea of your notifications being shown on the Lock screen, before you need to enter a passcode to get into your iPad, you can turn off Lock screen notifications in Settings, Notifications, Show Previews. Using the Settings app is covered later in this chapter.
In most cases you can tap the notification to take appropriate action. For instance, tapping a notification that you have a text message takes you into the Messages app and right to that conversation so you can respond.

From the Notifications screen you can press the Home button to return to either the Lock screen or the Home screen, depending on where you came from originally.
If you happen to be using your iPad when a notification arrives, you also see the notification pop up as an overlay on part of your screen. You can tap the notification to take action, drag it up to dismiss it, or ignore it so it goes away after a few seconds.

If you iPad is nearby but you are not using it and it is locked, then you might also notice notifications appearing on the screen as they happen. When the iPad is locked, the screen turns on and you see the notification on the Lock screen.
For notifications on the Lock screen, you can swipe right to left across it to see View or Clear buttons. You can also swipe left to right to see an Open button. Or, you can tap and hold the notification to perform a relevant action, such as a quick reply to a message. If you do nothing, the screen simply turns off again after a few seconds. When you go to wake up your iPad later, you see the notification on the Lock screen again.

Virtual Buttons and Switches
Several interface elements are more complex than a simple button. In typical Apple style, these elements are often self-explanatory, but if you have never used an iPad before, you might find some that give you pause.
Switches and Option Lists
A switch is a simple button that allows you to turn something on or off. You just tap the switch to change it—no need to slide it. The background of a switch turns green when the switch is “on.”
For example, the switch in the figure indicates whether labels in the Maps app are displayed in English. Tapping the switch changes the position of the switch.
But the Distances setting above that offers another way to switch between options that works better when the setting isn’t as simple as on or off/yes or no. In that case, you would tap the option you want, which would then display a check mark like the one next to In Miles.

Toolbars
Some apps have a set of controls in a toolbar at the top of the screen. Buttons shown there are sometimes nothing more than a word or two that you can tap to trigger an action. The toolbar might disappear or the buttons might vary depending on the mode of the app. If a toolbar disappears, a tap on the screen brings it up again.
An example of a toolbar is in the iTunes Store app. When you are viewing the music section of the iTunes Store, it has a button to access Genres, a title in the middle, a button that brings up more controls, and a search field. But, this toolbar can change. For instance, if you switch from viewing the Music screen to viewing Top Charts, you get a set of buttons that let you switch between Music, Movies, TV, or Audiobook charts.
Menus
Often tapping a single button in a toolbar brings up more buttons or a list of choices, which are like menus on your computer. The choices in the list are usually related. For example, a button in Safari gives you many different ways to share a web page.

Tab Bars
Sometimes you see a row of buttons at the bottom of the screen that function similarly to toolbars, but each button represents a different mode for the app. For instance, at the bottom of the iTunes Store app, you see a tab bar that you use to switch between various screens: Music, Movies, TV Shows, Top Charts, Genius, and Purchased.
Entering Text
Entering text on your iPad means interacting with an on-screen keyboard or speaking to your iPad. Even if you are not a writer, you need to enter text quite often to input addresses in the web browser or to compose messages and emails.
Using the On-Screen Keyboard
The on-screen element you might interact with the most is the keyboard. It pops up from the bottom of the screen automatically whenever you are doing something that requires entering some text.
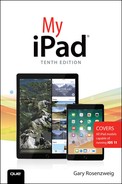
Keyboard Modes
An on-screen keyboard can have many different modes. With the default keyboard, the first mode shows you letters and a few punctuation marks. There are two Shift keys that enable you to enter uppercase letters. You also have a Backspace key and a Return key.

Is There a Quicker Way to Capitalize?
To capitalize a word, you tap the Shift key, and then type the letter, right? You can. But a faster way is to tap the Shift key; then, without letting your finger off the screen, drag it to the letter and release in a single tap-slide-release action.
You can do the same with numbers and punctuation by tapping the .?123 key and sliding and releasing over the key you want.
New! In iOS 11 you can get to numbers and special characters in a new way. Notice that there are secondary characters above the letters on the keyboard. To type those, tap a key, drag down slightly, and then release. For instance, tapping the Y key, dragging down, and releasing results in the number 6 instead of a Y.
Another way to get to special characters is to tap the .?123 key to switch your keyboard into a second mode for numbers and punctuation. To return to the letters, just tap the ABC key.

From the numbers and punctuation mode, you can tap the #+= key to go to a third keyboard mode that includes less frequently used punctuation and symbols.
There are other keyboard variations. For instance, in some cases if you type in a location that needs a web address, a keyboard that doesn’t have a spacebar appears. Instead it has commonly used symbols such as colons, slashes, underscores, and even a .com button.
Not only are there other keyboard variations, there are completely different keyboards you can use. The iPad has many non-English language keyboards, and even a keyboard composed of little images (smiley faces and other pictures) called Emoji. Plus, you can add third-party keyboards from developers. Adding new keyboards is covered in the task “Modifying Keyboard Settings” in Chapter 2. Find out more about typing emoji characters when you read about the Messages app in Chapter 8, “Communicating with Email and Messaging.”
Undocking and Splitting the Keyboard
You can also split the keyboard and/or move it away from the bottom of the screen. This can make it easier for you to type if you are holding your iPad with two hands. Grasp it with your hands on either side of the iPad, and type with your thumbs.
1. Undock or split your keyboard by tapping and holding the keyboard button at the bottom-right corner.

2. Select Undock to move the keyboard up from the bottom of the screen and have control of its vertical position.
3. Select Split to undock the keyboard and also split it in half so you can reach all the keys from either side with your thumbs. You can also do this by tapping the keyboard button and dragging up.

4. When the keyboard is undocked or split, you can tap and hold the keyboard button to drag it vertically to find the best position for you. If you tap and hold but do not drag, then you get the option to Merge, or Dock and Merge.
5. Tap Merge to merge the two halves of the keyboard into one. You can also do this by tapping in the middle of the keyboard and pinching inward.
6. Tap Dock and Merge to merge the halves and also lock the keyboard to the bottom of the screen. You can also do this by dragging the keyboard all the way down to the bottom of the screen.

Using the Keyboard Shortcut Bar
Above the letter and number keys on the on-screen keyboard is the shortcut bar. This narrow horizontal strip can contain a variety of buttons and some predictive text shortcuts. We look at predictive text in the next section.
The buttons in the shortcut bar vary depending on which app you are using and even what type of text you are typing within the app.
If you don’t see the shortcut bar, but instead see a narrow line with a smaller white line in the center, then tap and drag that small white line up to reveal the shortcut bar.
So far, we’ve been looking at the keyboard as it appears in the Notes app. Let’s take a tour of the shortcut bar as it appears when typing in Notes.
1. Tapping this button brings up Undo and Paste from the clipboard buttons. If you have text selected, it instead brings up Cut, Copy, and Paste buttons.
2. This undoes the last insertion or edit.
3. This redoes the last undo.
4. You can paste text you may have previously copied into the clipboard. This is similar to using Command+v or Control+v on a desktop computer.
5. In Notes, you get a button to begin writing a checklist.

6. You can also choose from a variety of other text styles such as Title, Heading, Body, and so on.
7. You can tap this button to take a picture with your iPad’s camera or insert a photo from your library.
8. Notes includes a special sketch function that lets you add a drawing to your note. We take a closer look at that in Chapter 6, “Organizing Your Life.”

>>>Go Further: More Keyboard Variations
If you bring up the on-screen keyboard in the Mail app while composing a message, you get a slightly different set of buttons. Instead of the Undo, Redo, and Paste buttons being combined into one button on the left, you get each as its own button. In addition, you get a style button on the right that lets you choose bold, italic, or underline and an attach button that lets you choose a file to attach to your message.

Another example of a shortcut bar is the one you get when typing a URL or search term in the address field in the Safari web browser. Here, you only get Cut, Copy, and Paste buttons.

Using Predictive Text
You might have noticed that while you are typing, three buttons with words in them appear on top of the keyboard in the shortcut bar. This is the predictive text feature of the keyboard, also sometimes referred to by Apple as QuickType.
As you’re typing, you can use these three buttons to complete a word with just one tap. For instance, you might be typing the word “Clever.” As you type, the three buttons change to represent what comes closest to the letters you have typed so far. When you have typed “Cle,” you might get “Clearer” and “Clear” as suggestions. But when you get to “Clev,” you will probably see “Clever” as one of the buttons. Simply tap that button and the word is completed without you needing to type “r.” Notice that a space is automatically inserted as well. If the word you inserted was the end of your sentence, simply tap the spacebar two times, and a period is inserted and the app is ready to start a new sentence.

Predictive text does more than look at the letters in the word you are typing; it also considers the context of the whole sentence. For instance, if you type “pur,” you might get “put” and “pure” as suggestions. But if you type “color pur,” you will get “purple” as a suggestion.
Also note that the leftmost button of the three usually displays the text exactly as you have typed it, but with quotes around it. This allows you to type a name or unusual word without having autocorrect get in the way.
Predictive text also looks at which app you are using and what the situation involves. For instance, it might suggest different words based on the person whom you are emailing, whether it is a work colleague or friend. When you respond to text messages in the Messages app, you might see “Yes” and “No” appear automatically when you are responding to a question. If someone messages you to ask whether you want to meet at 6:00, 7:00, or 8:00, those three options are offered before you even type the first letter of your response.
Dictating Text
You can also dictate text using your voice rather than typing on the keyboard. Almost any time you see a keyboard, you should also see a small microphone button to the left of the spacebar. Tap that and you are prompted to speak to your iPad. You need to be connected to the Internet through a Wi-Fi or cellular connection for this to work.
1. Tap the microphone button on the keyboard to begin dictating. If this is the first time you are doing it, you might be asked for permission to enable the feature.

2. The keyboard is replaced with a waveform line that vibrates as you speak. Speak a few words or a sentence or two. As you speak, the text appears in your document or text field, though it may lag behind by a few seconds.
3. If you need to pause dictation quickly, you can tap the mute button.
4. Tap the keyboard button when you are finished speaking. You can now edit the dictated text as needed before sending it.

Speak Clearly
Speak somewhat slowly and clearly, and in segments about the length of a sentence for best results. Of course, this feature isn’t perfect. Pay careful attention to what is transcribed and correct any mistakes using the keyboard. Over time you will get better at speaking in a way that minimizes mistakes.
>>>Go Further: Dictation Tips
The dictation button appears any time a standard keyboard is present in any app. You can use it in Notes, Pages, or any writing app. You can use it in search fields and text entry fields on the Web. You cannot use it when there are specialty keyboards, like the ones used to enter email addresses, web URLs, and telephone numbers. So, for instance, you can use it in the Contacts app to speak a name or address but not to enter an email address.
You need to be connected to the Internet for dictation to work. Your iPad sends the audio to Apple’s servers, which handle the transcription and send the text back to your iPad. If you are not connected, it does not work.
Dictation works according to your language set in Settings, General, Language & Region. Not all languages are supported, but Apple is adding more all the time.
You can indicate the end of a sentence by saying “period” or “question mark.” You can also speak other punctuation like “comma” or “quote.”
You can speak commands like “new line,” or “cap” to capitalize the next word. There is no official list of what the dictation feature supports, and because the transcription takes place on Apple’s servers, it can change how it handles commands at any time.
Editing Text
Editing text has its challenges on a touchscreen device. Even though you can touch any portion of your text on screen, your fingertip is too large for the level of precision you usually get with a computer mouse and cursor. To compensate, Apple developed an editing technique using a magnifying glass area of the screen that you get when you touch and hold over a piece of text.
For example, if you want to enter some text into a field in Safari, touch and hold on the field. A circle of magnification appears with a cursor placed at the exact location you selected.

When you find the exact location that you want to indicate, release your finger from the screen. A variety of options then display, depending on what kind of text you selected, such as Select, Select All, and Paste. You can ignore the options presented and start typing again to insert text at this location.
Copying and Pasting
You can copy and paste text inside an app, and between apps, on your iPad. Here’s how you might copy a piece of text from one place in a document to another in the Notes app.
1. Launch Notes. If you don’t have any notes yet, create one by typing some sample text.

2. Touch and hold over a word in your note. The Select/Select All pop-up menu appears.
3. Choose Select.

4. Some text appears highlighted surrounded by dots connected to lines. Tap and drag the dots so the highlighted area is exactly what you want.
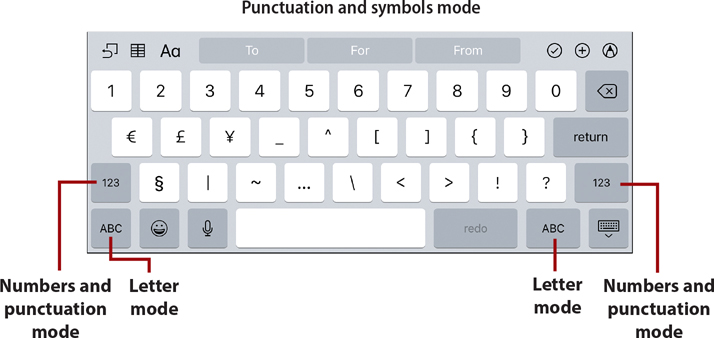
5. Tap Copy.

6. Alternatively, you can tap this icon on the keyboard shortcut bar to bring up Cut, Copy, and Paste icons, and then choose the Copy icon.
Variations
In other apps, you might find the Cut, Copy, and Paste icons already visible on the keyboard shortcut bar; and in still other apps, you might not find this alternative at all.
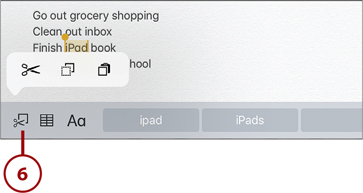
7. Tap one time at the bottom of the document to bring up a pop-up menu with the Paste command.
8. Tap Paste to insert the copied text. Alternatively, you can use the same method as in step 6 to paste.
>>>Go Further: Your Key Board as a Trackpad
You can use the keyboard to precisely position the text cursor in apps where you work with text, such as Notes, Pages, Mail, and so on. With the on-screen keyboard visible, tap it with two fingers and keep your fingers pressed to your iPad. Then drag your fingers around, and you can move the cursor as if you were using a trackpad or mouse on a computer. Notice that the keyboard letters disappear when you are doing this to indicate that you are in trackpad mode.
You can also tap quickly with two fingers to simply select the word that currently contains the text cursor. Two taps with two fingers selects the whole paragraph. Then you can tap and drag with two fingers to expand the selection.
This takes some getting used to. If you plan to use this feature, you might want to practice with a sample document first.
Talking to Your iPad with Siri
Siri is another way to communicate with your iPad. You can use your voice and speak commands to your iPad, and Siri responds. It either gives you information or takes action using one of the apps on the iPad.
To use Siri, you need to make sure you have Siri turned on in the Settings app. Then, you use the Home button to activate Siri. Chapter 2 explains how to work with the Settings app.
Asking Siri Questions
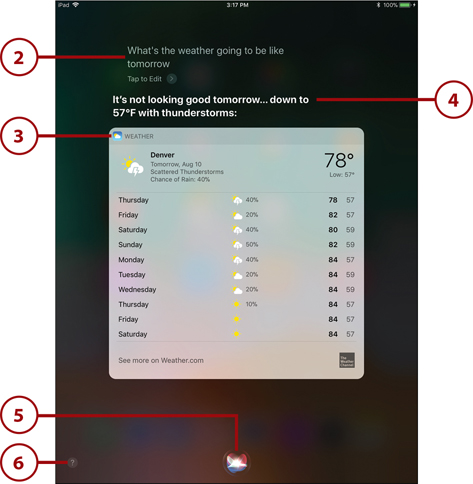
1. Press and hold the Home button for about a second. The Siri interface pops up, showing a waveform line at the bottom of the screen that reacts to the sound of your voice.

If you hesitate for a few seconds, you are shown a list of examples of things you can ask Siri.
2. Speak clearly at a normal pace and say, “What’s the weather going to be like tomorrow?” As you speak, the words appear near the top of the screen. When you stop speaking, Siri attempts to perform an action based on those words.
3. In this case, a short weather forecast appears.
4. Siri also responds with a statement and speaks it audibly. The text of the response typically appears above the screen content.
5. You can ask Siri another question by tapping the colorful button at the bottom of the screen.
6. If you wait for the list of suggestions to appear, you also see a question mark appear at the bottom left. Tap it to get a detailed list of apps that Siri can interact with, and things you can say for each app.
Siri Tips
To use Siri, you must have a connection to the Internet. It can be a Wi-Fi connection or a mobile connection. When you speak text, the audio is transmitted to Apple’s servers to convert it to text and interpret the command. The results are sent back to your iPad.
It is best to speak clearly and to limit background noise. Using Siri in a quiet room works better than in a crowded outdoor space or in a car with the radio on, for instance.
Because Apple’s servers control Siri, they can update Siri’s capabilities at any time. For example, originally Siri did not understand a request for local sports scores, but after an update this functionality was added.
You can use Siri to perform many tasks on your iPad without typing. For example, you can search the Web, set reminders, send messages, and play music. Throughout the rest of this book, look for the Siri icon for tips on how to use Siri to perform a task related to that section of the book.
>>>Go Further: Hey Siri!
You can activate Siri without pressing the Home button. In the Settings app, under Siri & Search, is a switch labeled Allow Listen for Hey Siri. Turn that on so that any time you utter the words “Hey Siri” followed by a question, Siri will respond.
There’s an initial setup sequence when you first turn Siri on. You need to speak a few phrases so Siri can distinguish your voice from other people and react only to you. Because having the Hey Siri feature turned on means your iPad needs to leave your microphone on to constantly monitor input, it works only when your iPad is plugged into AC power. Otherwise, it would drain your battery very quickly.
Using Control Center New!
The Control Center is a set of buttons and switches that you can bring up from the bottom of your screen in almost any mode and in almost any app while using your iPad. It has been redesigned for iOS 11.
The exact controls shown depend on which iPad model you own, which capabilities you have enabled or disabled in Settings, and even what other devices you have available on your network.
1. To bring up the Control Center, swipe up from the very bottom of the screen. If you are having trouble, try starting below the screen and swiping up onto the screen area all the way to the top.
2. The top of the Control Center features a set of switches. The first one allows you to quickly switch into Airplane Mode, which turns off Wi-Fi and Bluetooth (as you might be asked to do during takeoff and landing on an airplane). The other three switches in this group are individual switches for AirDrop, Wi-Fi, and Bluetooth. You can turn on Airplane Mode and then re-enable Wi-Fi only if your flight has Wi-Fi service. AirDrop is covered in Chapter 3, “Networking and Syncing.”
3. This section gives you control over whichever app is currently, or most recently, playing audio. The main button toggles between play and pause, and the upper-right corner brings up output options for switching to Bluetooth or AirPlay speakers. If you tap and hold this whole section, it brings up a larger control area.

4. The larger area shows album artwork, a playback timeline, volume controls, and more depending on the app.

5. You can tap and drag vertically in this area to adjust your screen brightness.
6. You can tap and drag vertically in this area to adjust the volume.
7. Tap here to access AirPlay controls, so you can mirror your screen to an Apple TV connected to the same network. AirPlay is discussed in Chapter 4, “Playing Music and Video.”
Customizable Buttons
The next section contains buttons you can customize. You look at picking the buttons that appear here in Chapter 2, in the section “Customizing the Control Center.” Here is a look at some of the buttons you might find there.
8. This button locks your iPad’s orientation, so when you turn your iPad 90 degrees, the screen does not rotate.
9. This button puts your iPad into silent mode, muting all sound.

10. You can quickly switch to Do Not Disturb mode, which silences all notifications.
11. This is a shortcut button to jump to the Clock app and set a timer.
12. Another shortcut button to jump to the Camera app so you can quickly take a photo.
13. Dismiss Control Center by tapping the screen to the left of the Control Center or simply pressing the Home button.

More Than One Route
There’s not much that Control Center does that cannot be done in the Settings app or the Home screen. Control Center simply provides quick access to a variety of functions.