2 Customizing Your iPad

In this chapter, you learn how to change some of the settings on your iPad, such as your background images, sounds, passcode, and the way some apps behave.
→ Changing Your Wallpaper
→ Setting Alert Sounds
→ Password-Protecting Your iPad
→ Modifying Keyboard Settings
→ Adjusting Do Not Disturb Settings
→ Setting Parental Restrictions
→ Making Text Easier to Read
→ Controlling Automatic Downloads
→ Customizing the Control Center
→ Working with Other Useful Settings
As with any relationship, you fall in love with your iPad for what it is. And then, almost immediately, you try to change it. It’s easier, though, to customize your iPad than it is to customize your significant other because you can modify various settings and controls in the Settings app.
Changing Your Wallpaper
The wallpaper is the image behind the icons on the Home screen and on the Lock screen. You’ll see it often, so make sure it’s something you like.
1. Tap the Settings icon on your Home screen.

2. Choose Wallpaper from the Settings app on the left side of the screen.
3. Tap Choose a New Wallpaper.

4. Now you have three choices. The first, Dynamic, is if you want to use one of Apple’s dynamic wallpapers. Dynamic wallpapers have patterns that slowly animate.
5. A second choice is to use a photo from your photo library—either a photo you took with your iPad or one you synced from your computer. Tap one of the groups of photos listed.
6. A third choice is Stills, which is a collection of Apple’s default wallpaper images.

7. Choose an image from the category you selected in step 4, 5, or 6.

8. You see the full image in a preview covering the entire screen.
9. Choose Set Lock Screen to set this image as the background of your Lock screen.
10. Choose Set Home Screen to set this image as the background for your Home screen.
11. Choose Set Both to make the image the background for both the Lock screen and the Home screen.
12. Perspective Zoom is an option that appears when you choose one of Apple’s stills or your own photo. When it is on, the image is slightly enlarged and seems to sit in a 3D space below your Lock screen text or Home screen icons. As you move your iPad, you see the image move slightly behind the other elements. You can turn this off by tapping the Perspective Zoom: On button.
13. Tap Cancel at the bottom-left corner of the screen to go back to the wallpaper icons.

Adjusting the Wallpaper Image
When you select one of your own photos as a wallpaper, you can touch and drag in a photo to move to other areas of the image so you can choose the part of the image you want as your wallpaper. You can also pinch to zoom in and out on your photographs.
If Lost, Call…
In later chapters, you find out about apps that allow you to create and edit images. Some apps make it easy to create an image that includes information like an emergency contact phone number on your iPad’s Lock screen. Then if you lose your iPad, someone could see the number on the Lock screen and be able to contact you to return it. You can check out Sticky Notes by TapFactory in the App Store as one option for creating this type of image.
Setting Alert Sounds
Your iPad can be a noisy device with various events that trigger alert sounds. Just typing on the on-screen keyboard can produce a series of clicks. Here’s how to adjust your iPad’s sound settings.
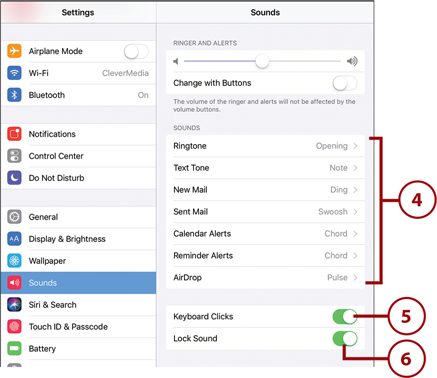
1. Tap the Settings icon on your Home screen (not shown) to launch the Settings app. Then, tap Sounds from the list of settings on the left.
2. Adjust the volume of system sounds, like FaceTime ringtones and notification alerts. This does not affect the volume of music or video.
3. When this is turned on, the volume in step 2 can be changed by using the buttons on the side of the iPad. If you turn this off, you can still use the buttons to adjust the volume of music and video when those are playing; otherwise, the side volume controls won’t affect the system sound volume.

4. Tap any of these settings to set the sound that plays when an event occurs. You can choose ringtones, alert tones, or custom tones for any of the events. Ringtone refers to FaceTime calls and Text Tone refers to the Messages app.
5. Switch Keyboard Clicks on or off.
6. Switch the Lock Sound on or off. When this setting is on, a sound plays when you unlock the Lock screen.
How About Custom Sounds?
Any sound event can play a ringtone rather than a plain alert sound. You’re offered a list of alert tones that are built into iOS, as well as a list of ringtones, which include the built-in ringtones and any custom ringtones. You can add your own custom ringtones in iTunes on your Mac or PC and then sync them with your iPad. After the sync, you see them listed when you select an alert sound. See “Syncing with iTunes” in Chapter 3, “Networking and Syncing.” By obtaining or creating your own custom ringtones, you can set your alert sounds to anything you want.
Password-Protecting Your iPad
Password-protecting your iPad is very important. By using a passcode, you can make sure that someone else can’t access your information or use your iPad. It is so important, in fact, that Apple includes setting up a passcode as part of the welcome screens you go through when you first use your new iPad. If you skipped that, you should set it up now.
1. Open the Settings app and tap Touch ID & Passcode from the list of settings on the left. If you have previously set a passcode, you are required to enter it before moving into the Passcode settings. If you have an older iPad without Touch ID, the button on the left is labeled Passcode instead of Touch ID & Passcode. See the “Make Access Easier with Touch ID” section later in this chapter to learn more about Touch ID.
2. Tap Turn Passcode On to activate this feature. You then are prompted to enter a passcode.

Changing a Passcode
If you already had a passcode set and you want to change it, tap Change Passcode in step 2 instead of tapping Turn Passcode On.
3. Type in a six-digit passcode that you can easily remember. Write it down and store it in a safe place. You can run into a lot of trouble if you forget the passcode—most likely needing to erase your iPad and restore it from your last backup.
4. Re-enter your passcode when prompted.
5. Tap Passcode Options to switch from the default six digits to something else, like four digits or a longer alphanumeric passcode.

6. Tap Require Passcode and choose the delay before a passcode is required. If you choose anything other than Immediately, someone else using your iPad can work on it for that period of time before needing to enter the code.
7. Some features of your iPad’s Lock screen can be accessed even without a passcode. You can allow viewing of today’s calendar events and reminders, notifications, and ask Siri questions without your passcode. Turn off any options you don’t want to be accessible from the Lock screen.
8. Turn on Erase Data if you want to erase the iPad data after 10 failed passcode attempts. This is a good idea from a security standpoint, but not so good if you think a mischievous child might grab your iPad and try guessing the passcode. If you use the Erase Data feature, be very sure you back up your iPad very often.

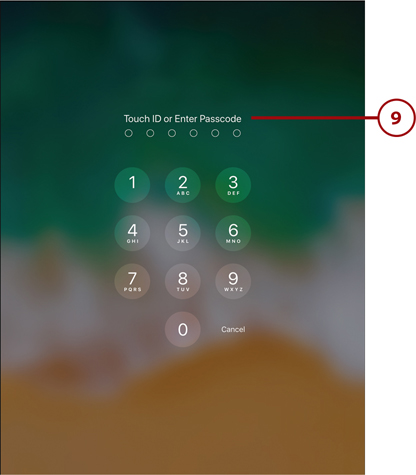
9. Press the Wake/Sleep button to confirm your new settings work. Then press the Home button and slide to unlock the iPad. The Enter Passcode screen displays.
Use a Real Password
Would you rather use a real password with letters and numbers instead of a set of digits? If so, good for you! That’s much more secure. And you can set one easily. Just follow steps 1 and 2 in the preceding task. In step 3 tap Passcode Options. You can set an alphanumeric code, a custom numeric code that can be as many digits as you like, or a four-digit numeric code.
It’s Not All Good: You Forgot Your Passcode?
Well, it wouldn’t be secure if there were a way to get around the passcode. So, you’re out of luck until you can connect your iPad to your Mac or PC and use iTunes to restore it or erase the iPad using your Apple ID. Hopefully, this never happens to you. For the gory details on what to do in this dire situation, see http://support.apple.com/kb/ht1212. The one ray of hope is that if you have backed up your iPad recently, you’ll be able to restore your data from that backup after you reset the iPad.
Making Access Easier with Touch ID
After you set a passcode for your iPad, you can make it easier to get access to your iPad by using Touch ID on newer iPads. Touch ID allows you to touch your fingertips to your Home button instead of typing the passcode.
1. Tap Touch ID & Passcode on the left side of the Settings app. If you see only Passcode instead of Touch ID & Passcode, then your iPad doesn’t have a Touch ID sensor.
2. Tap Add a Fingerprint.

3. You are instructed by your iPad to repeatedly place a finger on the Home button and then lift it off. Follow the instructions carefully as your iPad continues to ask until it has enough information from your fingerprint. Remember to use only one finger while doing this. You will have the opportunity to add more fingers later.

4. When you are done, you see your first fingerprint listed as Finger 1. You can tap here to change the name of this fingerprint or delete it.
5. Tap Add a Fingerprint to add other fingerprints. You might want to add both thumbs and both index fingers so you can use Touch ID while holding your iPad in different ways.

Buy with Touch ID
Touch ID not only makes it quicker and easier to unlock your iPad; it also can be used by some third-party apps and in the iTunes Store. Instead of needing to confirm your identity in those places, you might be asked to place your finger on the Home button to get access to data or purchase an item.
>>>Go Further: Making Touch Id Work For You
If your iPad supports Touch ID, you are prompted to set it up while going through the welcome screens. You can always add more fingerprints, or redo the one you entered, in the Settings app. It can be useful to have both your thumbs and perhaps your index fingers recorded in the Touch ID settings. This makes it easier to unlock your iPad in different situations, depending on how you are holding it at the moment. Also, if it seems that Touch ID is often having trouble with one finger or another, you can erase that finger and re-record it.
Modifying Keyboard Settings
If you use your iPad for email or word processing, you will use the on-screen keyboard often. The keyboard does several things to make it easier for you to type, but some of these might get in the way of your typing style. Use the following steps to modify the keyboard settings to your preferences.
1. Open the Settings app and tap General.
2. Scroll through the General Settings list and tap Keyboard.

3. Tap Keyboards to choose a different keyboard layout. In addition to keyboards commonly used in other countries, you can switch to a Dvorak keyboard or one of several other alternatives to the traditional QWERTY keyboard. You can also select a keyboard installed by a third-party app.
4. Tap to add your own text shortcuts. For instance, you can set it so “omw” is instantly expanded to “On my way!” Add your own replacements for things you commonly type.
5. Turn Auto-Capitalization on to automatically make the first character of a name or a sentence a capital letter.
6. Turn Auto-Correction on to have mistyped words automatically corrected.
7. Turn Check Spelling on to have incorrectly spelled words underlined in red.
8. Turn Enable Caps Lock on. When Caps Lock is turned on, you can double-tap the Shift key to lock it.
9. In Chapter 1, “Getting Started,” you learned about the shortcut bar. You can disable it with this switch if you prefer.
10. Turn on or off Predictive Text. See “Using Predictive Text” in Chapter 1 for more about this time-saving feature.
11. Smart Punctuation automatically replaces straight quotes and apostrophes with curly ones, pointed in the right direction. This is good for writers, but could be problematic for programmers.

12. If you want to lock the keyboard so it can never be split and moved up vertically, then switch this to off. See “Using the On-Screen Keyboard” in Chapter 1 for more details on using a split keyboard.
13. Key Flicks are a new feature in iOS 11 that allow you to tap and drag downward on keys to access other characters, such as numbers and punctuation.
14. Turn on the “.” shortcut if you want a double-tap of the spacebar to insert a period followed by a space.

15. Tap the key to the left of the spacebar to change keyboards. Note that this key sometimes looks like a globe, sometimes an emoji smile, and sometimes other things. It depends on which keyboard is currently showing. Tap it to move to the next keyboard in your list, or tap and hold to get a list of keyboards so you can select one. You can go directly to the Keyboard settings portion of the Settings app.

>>>Go Further: Keyboards Galore
You can add all sorts of keyboards created by third-party developers to your iPad. Doing this is just a matter of installing the developer’s app on your iPad. Keyboards you add appear in the list in step 3 of the “Modifying Keyboard Settings” task.
Some third-party keyboards allow you to type in different ways. For instance, the Gboard, Swype, and TouchPal apps give you keyboards that allow you to tap the first letter of a word, and then swipe with your finger across the keyboard to the other letters to form the word instead of tapping for each letter. The TextExpander 3 app gives you advanced capabilities for creating shortcuts to type long pieces of text. See Chapter 15, “The World of Apps,” to learn how to search for and install apps.
Adjusting Do Not Disturb Settings
Your iPad is trying to get your attention. It beeps and rings with notifications, FaceTime calls, messages, and event alarms. In fact, it might be hard to have it nearby when you’re trying to sleep, attending a meeting, or enjoying some time “offline.”
Do Not Disturb is a mode where your iPad quiets down. Most audible alerts are silenced. You can set your iPad to enter this mode manually with the Do Not Disturb settings, or set a predefined block of time each day.
1. Launch the Settings app and tap Do Not Disturb.
2. You can turn on Do Not Disturb mode manually with this switch. (You can also turn Do Not Disturb on and off from the Control Center.)

3. Tap Scheduled for Do Not Disturb mode to automatically start and end at a specific time. For instance, you can set it to start at 10:00 p.m. and end at 7:00 a.m. so you aren’t disturbed while sleeping.
4. Tap here to use time and date controls to set the start and end times.
5. You can choose to have Do Not Disturb only affect sounds when your iPad is locked, instead of at all times, including when you are actively using your iPad.
6. Tap Allow Calls From to allow FaceTime calls and messages from specific people by selecting a group in your contacts list.
7. Turn on Repeated Calls so that someone can reach you in an emergency by calling twice within three minutes.

Setting Parental Restrictions
If you plan to let your kids or grandkids play with your iPad, you might want to set some restrictions on what they can do.
1. Open the Settings app and tap General.
2. Tap Restrictions.

3. Tap Enable Restrictions to turn restrictions on.

4. Type in a four-digit code, and then re-enter the code when prompted. It is important to remember this code, or you can’t turn off or change restrictions later!

5. The Restrictions settings are a long list of apps and functions that you can allow or disallow. The switches you use depend on how much you want to restrict your iPad’s use.
6. Continue to scroll down the list and review all the possible settings. Some settings, like the ones for movies, TV shows, books, and apps, allow you to set a maximum content rating. For instance, for apps you can set this to 4+, 9+, 12+, 17+, Allow All Apps, or Don’t Allow Apps.

It’s Not All Good: Settings Not Remembered
It would be nice if you could just switch restrictions on and off so that you could hand your iPad to Junior after quickly turning them on. But the settings are reset each time you switch Restrictions to off. So you need to set the switches again each time after turning Restrictions back on. Once they are on, however, you can go back any time and adjust the individual settings.
Making Text Easier to Read
If you find that text in standard apps like Calendar, Reminders, and Notes is difficult to read because it is too small or the letters are too thin, you can change that in the Display & Brightness settings.
1. Open the Settings app and tap Display & Brightness.
2. You can make the letters of standard text thicker and easier to read. Changing this setting requires your iPad to restart.
3. Tap Text Size to make the default text larger or smaller.

4. Tap and drag the dot along the line to change the size of text. Because the Settings app is one of the apps affected by this, you see the changes in most of the text on the screen as you drag.


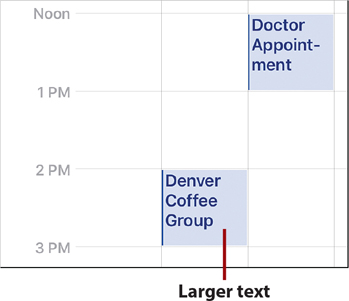
Text Size Isn’t Universal
Changing the text size doesn’t affect all apps. It works on some of the Apple preinstalled apps, but even in those, it works only in some places. With the Calendar app, you can see the change in Week and Day view but not Month view.
Controlling Automatic Downloads
You iPad can automatically download app updates when they become available. This saves you from missing an update to your favorite apps. You can also set your iPad to download new content that you purchase from iTunes on another device.
1. Open the Settings app and tap iTunes & App Store on the left.
2. There are three switches that control automatic content downloads. Turn these on if you want your iPad to automatically get music, apps, or books when you purchase them on another device, such as your computer or an iPhone.
3. Turn on Updates if you want updates to Apple and third-party apps to automatically download and install.
4. New! A new option in iOS 11 is the ability to let your iPad automatically offload apps. So if you have a large app taking up a lot of space and you haven’t used it in a long time, iOS 11 removes the app from storage but maintains its settings and data. The app icon is dimmed on your Home screen; you can tap it at any time to have the app redownloaded and restored.

Cellular Data
Note that if you have an iPad with mobile wireless capability, you see another setting here for Use Cellular Data. Turn this off to prevent these automatic downloads from happening while you are away from a Wi-Fi connection.
Customizing the Control Center New!
The Control Center in iOS 11 can be customized. You can use the Settings app to add and remove some buttons, and change their order.
1. In the Settings app, tap Control Center.
2. Tap Customize Controls.

3. Tap the red – button next to any item in the Include list to remove it from the Control Center.
4. Tap the green + button next to any item in the More Controls list to add it to the Control Center.
5. Tap and drag these handles up and down to change the order of appearance for the included buttons.
6. Some buttons, like Notes, are just shortcuts to take you quickly to that app.
7. Tap Text Size in the Control Center to display a slider for adjusting the system text size. This is the same setting covered earlier in this chapter in “Making Text Easier to Read.”
8. The Magnifier button launches a camera-like app that enables you to use your iPad’s camera as a magnifying glass.

Watch for More Updates
As iOS 11 evolves with future minor releases, Apple may add more buttons to this list that you can add to your customized Control Center.
Working with Other Useful Settings
The Settings app contains too many controls to go into detail on each one. It is worth taking the time to explore each section of the Settings app to see what is possible. The item to tap on the left side of the Settings app screen is listed first in each of the following bullets, followed by the items you tap on the right side. For example, in the first bullet you open the Settings app, tap General on the left side, and then tap iPad Storage on the right side. When the settings appear, tap Available to see your available storage.
• General, iPad Storage: See the remaining amount of storage space you have on your iPad.
• General, About, Version: Quickly find out which version of iOS you are using.
• General, About, Model: Get the model number of your iPad. This could come in handy if you ever need to figure out if an accessory will work with your specific model.
• Wi-Fi, Ask to Join Networks: Regardless of whether this switch is on, your iPad looks for and connects to any Wi-Fi network you have previously signed on to. If you switch this setting on and the iPad can’t find any familiar network, you see a dialog asking if you want to join the strongest network it can find. Because you don’t want to join networks you don’t know or trust, leave this setting off and simply go to the Wi-Fi settings to join a new network.
• Siri & Search: Here you can turn on and off different types of content you see when you search the contents of your iPad. You can also set the order by dragging the items in the list up or down.
• General, Reset: Here is a set of potentially dangerous switches that allow you to erase your settings and content. If you ever decide that your iPad’s Home screens are too disorganized, you can use the Reset Home Screen Layout to move the Apple default apps back to their original positions and your other apps out of folders into alphabetical order starting on screen two. The other reset options should be used only if you understand their end result.
• General, Shut Down: You rarely need to do it, but you can shut down your iPad. If you plan to be away from your iPad for a long period of time—such as several weeks, for example—then you might want to shut down to preserve the battery for when you return.
More Apps, More Settings
The Settings app adds new items as you add new apps to your iPad. Some apps have settings inside the app, whereas others have all their settings as an item along the left side of the Settings app. Still others put some settings in the app and some in Settings. It is a good idea to periodically check the Settings app to see what new items have appeared, and then look to see which settings are available for that app.
Search Your Settings
You can also search at the top of the left sidebar in the Settings app. Drag the list all the way down to see the search field at the top above Airplane Mode. Then type into that field the name of an app to find its settings, if there are any. You can also type the name of subcategories, such as “Storage” to find the Storage & iCloud Usage settings inside the General category.