11 Writing with Pages

In this chapter, you begin to get work done on the iPad by using Pages to create and format documents.
→ Creating a New Document
→ Styling and Formatting Text
→ Creating Lists
→ Inserting Images
→ Document Setup
→ Sharing and Printing Documents
The iPad is great as a personal media device, with your music, pictures, and videos. But it can also be used to get some work done. If you write for work or leisure, you’ll want to download the Pages app from the App Store. Pages is a basic word processor, which you can use to write anything from short essays to long novels. You can also use images and formatting tools to build simple reports and newsletters.
Word Processing Alternatives
Microsoft Word: Although many apps will display Word documents, and a few allow you to edit Word documents, it is worth getting the official Microsoft Word app if you are already an Office 365 user. However, if you don’t subscribe to Microsoft’s Office 365 cloud service, then you won’t be able to really use the app.
Google Docs: Google also has a suite of office tools that are usually accessed in a web browser. But they have an iPad app that lets you access and work on your documents directly.
iA Writer: This is a word processor designed for simplicity. The idea is to let you focus on writing, not styles and formatting.
Creating a New Document
Let’s start off simple. The most basic use of Pages is to create a new document and enter some text.
1. Tap the Pages app icon on the Home screen.

2. If this is the first time you have run Pages, you go through a series of screens welcoming you to Pages and asking if you want to set up iCloud as the storage space for Pages documents. This is the best way to use Pages, Numbers, Keynote, and other apps. All of your documents will sync with all of your iOS and Mac devices, so you will have one collection of documents available everywhere. If you have worked in Pages before, you can skip to step 5.

3. The next screen asks if you want to create a new document right away. Instead, tap Use iCloud to go to the documents screen that lists all your iCloud documents. If this is your first time using Pages with iCloud, then it shows that you have no documents.

4. Tap My Documents.

5. Tap Create Document.

6. You are then faced with the template choices display. You can scroll vertically to see more. Tap the Blank template to go into the main editing view.

7. Type some sample text in the document just to get the feel for entering text.
8. Return to your documents list by tapping Documents.

9. You can now see the new document. Tap the name of the document, Blank, to assign a proper name to it.
10. Tap the document to open it later to continue working with it.
11. Tap Edit to move into Edit mode where you can delete or duplicate any selected document.

A Real Keyboard
If you plan on using Pages on your iPad often, you might want to invest in a physical keyboard for your iPad. You can use the Apple Wireless keyboard or almost any Bluetooth keyboard. Apple also has a version of the iPad dock that includes a keyboard. See Chapter 18, “iPad Accessories,” for details.
Styling and Formatting Text
One of the most basic things you’ll need to do in a word processor is to change the style and format of text. This example shows how to use the built-in paragraph styles of Pages, how to set the font and style of text, and how to set text alignment.
1. Create a new document and type some text. In this example, the first line is the title of a poem, the second is the author’s name, and the rest is the body of the poem.

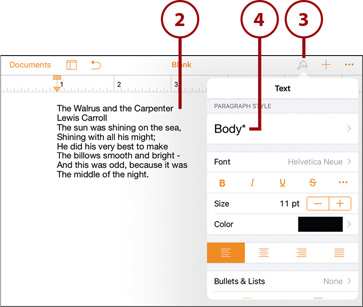
2. Tap in the first line of text to place the blinking cursor there. It doesn’t matter where in the line of text the cursor appears—you are about to set the paragraph style, which applies to an entire line of text.
3. Tap the paintbrush button. This brings up controls to adjust the appearance of text.
4. The Body style is indicated under Paragraph Style. Tap it to choose a new style.
5. Tap Title to assign this style to the line of text.
6. Tap outside the controls to dismiss them.
7. Place the cursor in the second line of text and repeat steps 3–5, but this time apply the Subtitle style to the second line.

8. To style the remaining text, you need to select it. Double-tap any word in the text so the word is highlighted in blue and has selection markers on the side. Then drag the selection markers so the entire set of lines is selected.

9. The highlighted area should now encompass all the lines.
10. Tap the paintbrush button.
11. Tap the + button next to the size of the font several times to increase the size of the font.
12. Tap the color chip next to the word Color.

13. Since the text is currently black, you see black, white, and gray text colors. The current color has a check mark.
14. Notice that the dots at the bottom indicate there are four pages of colors. Swipe left to right to move to the first page.

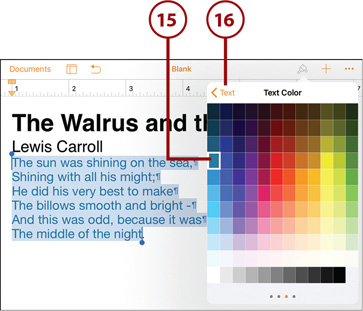
15. Select a color.
16. Tap Text to return to the previous set of controls.
17. Tap the font name.

18. Select a different font for this text. You can drag the list up and down to see all of the available fonts.
19. Tap outside the controls to dismiss them.

20. Select all the text, including the title and author lines. You’re going to center all this text.
21. You could use the alignment buttons in the style tools, but instead use the handy buttons that appear right above the keyboard at the bottom of the screen. Tap the Alignment button there.
22. A menu of alignment settings appears. Tap Center to center all the text.

Notice that there are two ways to access most style and alignment settings in Pages. The first way is to tap the paintbrush button at the top of the screen and then go to the Styles section of those controls. The second is to use the toolbar that appears above the keyboard.
You can also access the basic text styles of bold, italic, and underline using either method.
Undo Mistakes
At the top of the Pages screen, there is an Undo button. Use that to undo the last action you took—whether it is typing some text or changing styles. You can use Undo multiple times to go back several steps.
>>>Go Further: No Custom Paragraph Styles
It would be nice to define your own Title, Subtitle, and Body styles. Pages for iOS doesn’t have any way to do this. You are stuck with the predefined paragraph styles, and you need to set your own font, size, and format if you don’t like these.
One way around that works if you are a Mac user and use Pages on your Mac. There, you can alter and create new paragraph styles. Then when you save the document in iCloud and open it in Pages for iOS, you see those paragraph styles.
You can also select text in Pages for iOS, tap the Style option in the context controls that appear above the selection, and select Copy Style. Then you can repeat the process with another selection and select Paste Style. This is a quick way to take specific styles and formatting from one piece of text and apply it to others.
Creating Lists
You can easily create lists in Pages, just like in a normal word processor.
1. Create a new document in Pages using the Blank template.
2. Type a word that could be the first item in a list. Don’t tap Return on the keyboard.
3. Tap the paintbrush button on the toolbar.
4. Tap Bullets & Lists.

5. Tap the Bullet option to turn the text you just typed into the first item in a bulleted list.
6. Tap outside the controls to dismiss them.

7. Use the on-screen keyboard to tap Return and type several more lines. Tapping Return always creates a new line in the list. Tapping Return a second time ends the list formatting.
8. Select the entire list.
9. Tap the paintbrush button.
10. Tap Bullets & Lists.

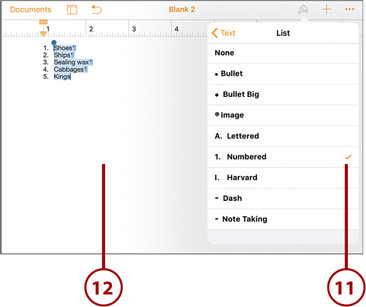
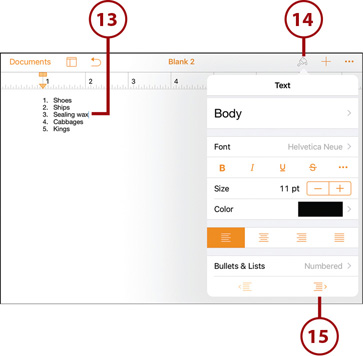
11. Tap Numbered to change the list to a numbered list.
12.Tap outside the controls to dismiss them.
13. Tap one line of the list to place the cursor in it.
14. Tap paintbrush again.
15. Tap the Move Right button that is right under the Bullets & Lists item to indent the line and create a sublist. You can create sublists as you type or by selecting lines and using the arrow buttons to format after you type.
16. Alternatively, you can use these buttons in the toolbar above the keyboard to indent items in the list without bringing up the paintbrush controls. Tap here to bring up a menu that lets you Indent, Outdent, or add another Tab character.

Inserting Images
You can place images into your Pages documents. You can even wrap text around the images.
1. Start with a document that already has some text in it. Tap to place the cursor where you want to insert the image.
2. Tap the + button.
3. Select the Pictures icon to insert a picture, and give Pages permission to access your media (if this is the first time you’ve inserted a picture).
4. You see your photo albums. Tap to select the album that contains the image you want to insert, and find the image in that album and tap it. Then tap outside the controls to dismiss them.

But I Don’t Want To Use a Photo
You can insert any image that lives in your photo library. But, it doesn’t have to be a photograph you took. You can import images and clipart from the web, email messages, and other apps. For instance, in Safari if you tap and hold an image, you get the option to Save Image. This puts it in your photo library, and you can now insert it into a Pages document. You can also use AirDrop to send images from other iOS devices or Macs.
5. Tap the image to select it.
6. You can delete the image with the context menu that appears.
7. Drag any of the blue dots around the edges of the image to resize it.

8. Double-tap the image to scale and mask it.
9. Use the slider to resize the image. Notice that as you enlarge the image, the parts outside the visible area are dimmed. This gives you an idea of which parts of the image will be visible after you are done scaling.
10. You can drag and position the image so a different area is visible.
11. Tap Done when you are finished.

12. With the image selected, tap the paintbrush button.
13. Tap Style.
14. Choose a frame style.
15. Use Border, Style, Scale, and Shadow to further customize the frame.

16. Tap Arrange.
17. Change the text wrapping setting to Around to make sure the text wraps around the image.
18. Tap outside the controls to dismiss them.

19. Wrapping text around images works well with multiple columns of text. So, make the text layout two columns so the text wraps around the image. Select all the text except the title and author line.
20. Tap the paintbrush button.
21. Scroll up to get to the Columns setting.
22. Increase the number of columns to two.

23. Notice that the text now wraps around the image on both sides. Also notice that you only converted the paragraphs of the poem to two columns; the title and author lines are still a single column.

Rearranging Images
After you place an image in your document, you can drag it around and resize it as much as you want. Pages automatically snaps the edges of the image to the margins and center lines of the page as you drag it around.
>>>Go Further: Shapes, Tables, and Charts
In addition to inserting images, you can also add three other types of graphic elements: shapes, tables, and charts. With Shapes, you can choose from a variety of types, such as rectangles, circles, arrows, and stars. Each shape can have a different border and fill color. You can also put content inside of shapes, such as text or images.
Tables are like little spreadsheets inside your documents. You can fill cells with information or numbers, and even perform basic calculations with formulas. You can also represent numbers as charts, selecting from line, bar, or pie charts of many different types and styles.
Create a sample document and try adding each of these elements by tapping the + button. Play around with all the different styles by selecting the element and tapping the paintbrush just as you did with images.
Document Setup
You can change a variety of your document’s properties in Pages.
1. Open a document or create a new one.
2. Tap the … button.
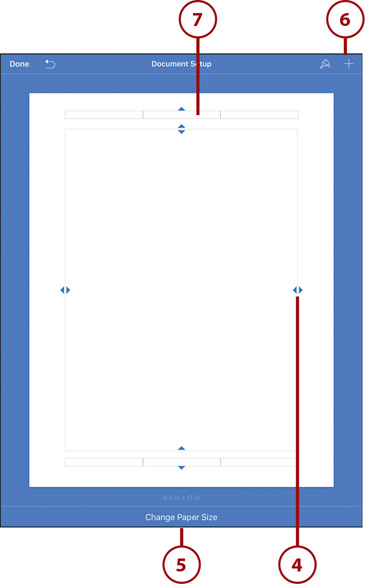
3. Choose Document Setup.

4. Drag the arrows at the four edges of the page to adjust the width and height of the page.
5. You can change the paper size from Letter to A4.
6. Tap the + button to add content that will appear in the background of every page in the document. For instance, you could add a rectangle shape, fill it with a texture, and stretch it to fill the entire page to add a textured background. Or, you could use an image as the background.
7. Tap in the header or footer to add text to the top or bottom of every page in the document. There are three sections to the header and footer that you can add text to: left, middle, and right.
8. You can add any text to these boxes. For instance, you can put the name of your document or your name in one of these sections.
9. You can also choose to add a page number that automatically increments for each additional page.

10. Tap one of the page number options to add that element. Tap Done when you are finished.

Sharing and Printing Documents
Thanks to iCloud, sharing documents with Pages, Numbers, and Keynote among your own devices is very easy. Any document you create on any device is available to the other devices. But you can also share your document with another person by emailing it, printing it, or sending it to a network server.
1. Tap the … button.
2. You can invite someone else to view or collaborate using iCloud. You can send invitations via email, messages, and other methods. You can also upload the document to iCloud and create a link that can be used by anyone to view the document.
3. You can export your Pages document to third-party apps that can accept PDF or ePub-formats.

4. Choose a format. Using PDF, Word, RTF, or ePub exports the document in that format. Choose Pages to send the original document.

5. You can send the document to another device using AirDrop.
6. Tap Mail or Message to send the document as an attachment using those methods.
7. To print the document, tap here.

8. Tap to select a printer. The name of the printer will now appear here and should be selected by default the next time you print. AirPrint is used to print wirelessly from your iPad. See “Printing from Your iPad” in Chapter 18 to set up AirPrint.
9. You can select a range of pages to print.
10. You can also select the number of copies.
11. Tap Print to send the document to the printer.

Pages Does Word
You can put more than just Pages documents into the iTunes list to import. Pages can also take Microsoft Word .doc and even .docx files.
Pages Is Not Pages
The Pages on your iPad and the Pages on your Mac are not the same. You can do a lot more with Pages on your Mac. So, sometimes you might receive a Document Import Warning message telling you what didn’t work as you import your file to your iPad.