16 Must-Have Apps

In this chapter, you take a look at various apps that you should add to your iPad to make it even more useful.
→ Connecting with Friends on Facebook
→ Reading the News
→ Reading and Collecting Documents
→ Adding a Dictionary
→ Making Phone Calls with Skype
→ Handwriting Notes with WritePad
→ Sketching Ideas with Paper
→ Adding a Calculator with PCalc Lite
→ Finding Recipes with Epicurious
→ Checking the Weather
→ Learning New Things with iTunes U
→ Other Useful Apps
Ask almost anyone what the best feature of the iPad is and you’ll get the same answer: all the apps! The App Store is not only a source of more than one million useful, interesting, and fun apps, but it grows each day as third-party developers and Apple add more. Here’s a look at how to use some of the most popular apps for the iPad to perform various useful tasks.
Connecting with Friends on Facebook
Many people now spend more time on Facebook than the rest of the Internet combined. If you are one of those people, the official Facebook app is probably the first third-party app you should put on your iPad.
With the Facebook app, you can browse your wall, post status updates, send messages, post photos, and do most things that you can do on the Facebook website, but the environment is designed for iPad users.
1. Search the App Store for the Facebook app. Tap Get to download and install it. After the app has downloaded, the button changes to Open. Tap it to launch the app.

2. When you first run the Facebook app, you need to sign on with your email address and password.
3. If you don’t have a Facebook account yet, you can sign up within the app.
4. Scroll up and down to view your News Feed.

5. Like posts just as you would on the Facebook website.
6. Tap Comment to add a comment to a post.
7. View and handle friend requests.
8. Tap to find out whether you have any direct messages. However, you cannot use the Facebook app to view or respond to Facebook messages. Frustrating, right? Facebook insists that you use their Messenger app for that. Search the App Store for “Facebook Messenger,” which you can install for free.
9. See your list of Facebook notifications.
10. Tap the More button to access different parts of Facebook.

11. Tap your name to examine your own timeline and edit your profile.
12. Tap Most Recent to see recent items in your Facebook feed instead of just what Facebook deems important.
13. See a list of your friends and view their information and their timelines.

14. Post to Facebook by tapping the empty post field. You can also use the Photo button to jump right to your photo library to choose a photo to post. If you don’t see this empty post here, drag the screen downward until you are at the very top of your News Feed and it will appear.
15. Type the text of your update.
16. Add friends who are with you to the update.
17. Add a photo from your photo library, or take a new photo using your iPad’s cameras.
18. Tap to include your location in the post.
19. Tap to start streaming live video using your iPad’s cameras.
20. Post the update to Facebook.

It All Looks Different
If there is one consistent thing about Facebook, it is change. Facebook loves to change how its website and apps look. So if the Facebook app looks different than what you see here, it could simply be that Facebook has, once again, decided to redesign the interface.
Post from Outside
You don’t need to use the Facebook app to post pictures. You can do it right from the Photos app and other image-handling apps. You need to have the Facebook app installed and you need to have signed in, but other apps allow you to post directly to Facebook without needing to switch to the Facebook app. You can do things like post pictures from the Photos app, post links from Safari, and ask Siri to “update my Facebook status.”
MORE SOCIAL MEDIA APPS
Facebook is undoubtedly the primary social media platform for most people. Other platforms do exist, and they also have apps you might want to try. If you use any of these services, the app is worth adding to your iPad.
 Twitter: Twitter is a hugely popular app for sharing short messages with others and following the tweets of friends and public figures.
 LinkedIn: For many business professionals and job-seekers, LinkedIn is even more important than Facebook.
 Pinterest: A fun way to visually share your interests with others.
 Google+: Google’s social network is similar to Facebook, but part of the Google ecosystem.
 Instagram: A very popular way to share photos and videos with friends. Unfortunately, this app is still optimized for iPhone screens, though you can use it on your iPad as well.
 Snapchat: Snapchat is very popular, especially with teens. Unfortunately, the Snapchat app is iPhone-only. You can still get the app for your iPad, but it is simply the iPhone app enlarged to fit the iPad screen. It’s maybe not a great way to post snaps, but it is useful for following others.
Reading the News
With the News app that comes with your iPad, you can read news stories from hundreds of newspapers, magazines, blogs, and other sources, all in one place. The articles are presented in a nice design that makes it easy to browse through stories and bookmark some for later reading. Better still, you can pick which news sources you see and which interests you have, so you are essentially getting a newspaper customized for you.
1. Launch the News app. It is a default app that comes with your iPad.

2. If this is the first time you are running News, you see a series of welcome screens. Tap the buttons at the bottom of these screens to continue through the sequence.

3. When you are done, you land on a screen that looks like a newspaper with various news stories and pictures. This is the For You screen.
4. Tap and drag vertically to scroll through more news stories.
5. Tap any story to jump into it and read more.
6. Tap Following to add more news sources that you like.

7. Tap any news source you see to go to a screen that shows articles exclusively from that source.
8. Tap Browse to see more news sources and topics.
9. Tap the Favorite button (the heart) to add that source or topic to your Favorites. News from that publisher also now appears more often on your For You page.

10. Tap the search field to search for news sources and general categories of news by keyword or name.
11. Tap Edit to view what you have added.

12. Tap the – button next to a source to remove it.
13. Tap Done to finish editing.
14. Tap Search to look for news by keyword.
15. Tap an article on any page, as you did in step 5, to expand the article to full screen.
16. Tap this button to adjust the font size in most articles.
17. Tap the Like button to see more articles like this. You can also tap the Dislike button to tell the News app you aren’t interested in articles like this.
18. Tap the Share button to share the article via Messages, Mail, and other methods.

19. Tap to save an article to read later.
20. You can find saved articles by tapping the Saved button at the bottom of many News app screens.

>>>Go Further: LOCAL NEWS AND MORE
Using search in step 10 enables you to quickly find sources that don’t show up easily when browsing. For instance, you can search for the name of your city, state, or country to see if any local news sources appear. Sometimes there are topics that pertain to your location, such as a sports team.
>>>Go Further: MORE NEWS READING APPS
For reading news, you have two types of apps: ones like News that aggregate news from many sources, and apps from a single news source.
 USA Today: This daily newspaper features concise news stories and other articles in an easy-to-browse format.
 Flipboard: This third-party app is very similar to Apple’s News app, but it has been around a lot longer.
 Feedly: This news reader lets you subscribe to any syndicated (RSS) content.
 Zinio: Although some magazines have their own apps, many others can be found inside the app called Zinio. It is kind of a clearinghouse for hundreds of magazines that publish with a standard format. Browse sample articles for free, and then look for magazines you can purchase either as a single issue or as a subscription. You can even get European and Asian magazines that are hard to find in the U.S.
Reading and Collecting Documents
Although iBooks is great for basic document viewing, and iCloud Drive can be used to view some documents if they are saved to iCloud, those more serious about collecting documents to read on their iPad have looked to apps that have even more features. Mac users are familiar with the Preview app, but no equivalent built-in viewer exists for iOS.
So, it is useful to get an app such as Documents by Readdle. It enables you to create a library of viewable files such as PDFs, Word, images, text, and so on. You can then access these documents any time.
1. After the app has downloaded, tap Open to launch the app.

2. In order to see how the app works, let’s take a look at a simple way to bring a PDF into it. Open Safari and go to a page that contains a PDF file. Tap that PDF file and it loads in Safari. You could read it there if you want, but this example shows you how to add it to your Documents collection.
3. Tap once in the center of the document to reveal a small toolbar at the top.
4. Tap the Share button to bring up a set of sharing controls.
5. Tap Copy to Documents. When you installed the Documents app, this button was added to appropriate sharing controls such as this one. You’ll also find it if you are viewing a PDF or other document in Mail, for instance.

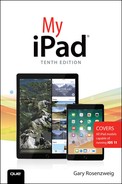
6. Now open the Documents app you downloaded in step 1. You might see some introductory screens, but eventually you’ll get to a screen with a sidebar on the left. Tap Documents.
7. You see your imported document. You also see a number of example documents. Documents of all different types, such as PDF, Pages, Word, text, images, and audio files, can be viewed.
8. Tap the Select button to select and delete documents.
9. On the left, there are other ways to import documents into the app.
10. Tap a document to read it.
11. Tap the Text button to highlight passages.
12. Tap the Search button to search the text.
13. Tap the Bookmark icon to add bookmarks.
14. Tap the … button to export, print, or open in another app.
15. Tap Documents to exit and return to your list of documents.

>>>Go Further: MORE DOCUMENT-VIEWING APPS
 Dropbox: This is a very popular cloud storage service. The iPad app not only allows you to see what files you have stored in your account, but is a very good document viewer as well, enabling you to view a wide variety of file types. In iOS 11, if you use the Dropbox app, you also see your files appear in the new Files app.
 GoodReader: This is very similar to Documents by Readdle, but it’s not free. However, it has even more features and has been the gold standard for these kinds of apps.
 Adobe Reader: The official PDF-viewing app from the company that is behind the format. It also enables you to fill out PDF forms on your iPad.
Adding a Dictionary
It would be a crime to have to carry a dictionary with you in addition to your iPad. Of course, the solution is to get a dictionary app for your iPad. The Merriam-Webster Dictionary HD app is a free download from the App Store. There is also a premium version that removes the ads and includes illustrations and other features for a few dollars.
1. Find the Merriam-Webster Dictionary HD app in the App Store. Tap Get to download and install it.

Use Any Online Dictionary
Of course, if you prefer another dictionary that doesn’t have an iPad app, you can always just bookmark its site in Safari. You can also create a Home screen bookmark as explained in Chapter 6, “Organizing Your Life.”
2. Tap in the Search box and enter a word to look up.
3. Tap the Microphone button to speak the word and look it up. This is handy if you don’t know how to spell the word.
4. The word and definition appear.
5. Tap the speaker icon to have the word spoken so you can hear its pronunciation.
6. The app can also be used as a thesaurus. A list of synonyms appears at the bottom. Tap any one to jump to that word. In fact, you can tap any blue word in the definition to jump to that word for further clarification.

>>>Go Further: MORE DICTIONARY APPS
 Oxford English Dictionary: An alternative to the Merriam-Webster dictionary is, of course, the Oxford. The app is comparable, with a similar set of features.
 Urban Dictionary: Sometimes a standard dictionary isn’t enough. If you want definitions for slang words and text message abbreviations, this app can help. Note that this dictionary also includes lots of modern profanity.
 Wikipedia: If you want an encyclopedia instead, you can use Wikipedia’s official app for access to entries in their huge user-created database.
Don’t forget about using a Google search as another alternative to a dictionary. Google can often take the oddest misspelling and come up with the correct word. Then, the search results include definitions, as well as Wikipedia entries and links to articles about the subject that might help even more.
Siri: Define It For Me
You can ask Siri to define a word, too. Naturally, that works best in situations where you know how to pronounce the word.
“Define existential.”
“What is the definition of existential?”
Making Phone Calls with Skype
Your iPad works quite well as a phone when you use a VoIP (voice over IP) app. Skype is probably the most well-known. Of course, you can use FaceTime to make both video and audio calls, but that only works if the other person is part of the Apple ecosystem using an iOS or Mac device. If they are on an Android, Windows, or Linux device, Skype is a good alternative.
1. Search for Skype in the App Store. Make sure you look for the iPad app, not the iPhone/iPod touch app of the same name. Tap Get to download and install it, and then tap the Open button to launch the app.

2. Tap Skype Name, Email, or Mobile to sign in using your Skype account. You can also sign in with a Microsoft account. Complete the sign-in process by entering your ID and password.Alternatively, if you do not have a Skype account, enter your email address to start the process to create one.

Get a Skype Account
You need a Skype account to use the Skype app. You can get a free one at https://www.skype.com/. If you find the service useful, you might want to upgrade to a paid account, which lets you call landlines and other phones. The free account lets you call only other Skype users.
3. On the main Skype screen, you can view recent calls, your contacts list, and your Skype info. Tap Calls.
4. Tap the Keypad button at the top of the screen.
5. Use the on-screen keypad to enter a phone number. You need a country code, too, which means using a 1 for U.S. calls. It should be there by default.
6. Tap the Call button.

7. While placing a call, you see the status, and eventually the elapsed time.
8. Additional buttons are available across the bottom for things like mute, keypad (for touch-tone menus), add callers, and hang up.
9. Tap the End Call button to hang up.

How Do You Hold Your iPad to Talk?
The microphone is at the top of your iPad. The speaker is at the bottom on the back. The best way to hold it during a call might be to just put the iPad in front of you and ignore the locations of both. Or, you can get a set of iPhone EarPods, which include the speakers and the microphone.
How About Skype Video?
You can also make video calls with Skype using your iPad’s cameras. But you must be connecting to another Skype user who also has a video camera connected to their computer, or perhaps they are using an iPad as well.
Handwriting Notes with WritePad
You’d think with a touchscreen that the iPad could recognize your handwriting instead of making you type on an on-screen keyboard. The WritePad app enables you to take notes by typing or by using the touchscreen to write with your finger.
1. Search for WritePad in the App Store. Tap the price (currently it’s $4.99) to download and install it, and then tap the Open button to launch the app.

2. The first time you use WritePad, you are guided through some setup screens.

3. After setup, you are taken right to an empty document. Instead of typing to add text, draw the text with your finger. Note that the cursor is at the upper left, but you don’t need to write there. Write anywhere on the screen.
4. The text appears at the cursor.

5. Tap the Documents button to see all of your WritePad notes.
6. Tap on a note document to open it.

7. Tap the + button to add a new note.
>>>Go Further: MORE ALTERNATIVES TO TYPING
 MyScript Memo: This app keeps your notes in handwritten form, but lets you convert them to text later. It works well when you need to combine text and drawings.
 Dragon Anywhere: iOS does a good job understanding speech and converting it to text using the built-in speech recognition (see “Dictating Text” in Chapter 1, “Getting Started”). But to take things to the next level, you can use this app from the leader in dictation software. It responds to dictation commands and spelling out words for a completely hands-free solution.
Sketching Ideas with Paper
Perhaps you don’t want your handwriting converted to text, but instead want to sketch out ideas or doodle on your iPad. Probably the most popular app for that is the simple Paper by FiftyThree.
1. Search the App Store for Paper by FiftyThree. Tap Get to download and install it, and then tap the Open button to launch the app.

2. When you first run Paper, you go through a series of introductory messages. After that, there are already several groupings of pages called “grids.” You can create a new one by tapping New Grid.
3. Tap a grid in the list to open it.
4. You’ll be able to preview some of the pages in the grid on the right. In this case this is a new one, so nothing is there. Tap in that area to open it to the first blank page.
5. After you open it, you see the three buttons on the bottom that represent three different types of pages: notes, picture, and sketch. Tap the Sketch button.

6. Anything you sketched previously appears on the current page.
7. Tap in the middle or pinch out to zoom in on a page so you can sketch. Pinching in far enough returns to the previous screen showing all the pages of the grid.
8. Tap a pen tool to draw.
9. Tap and drag your finger to draw lines.
10. Tap a color to change colors.

11. Tap the eraser tool and drag your finger on the page to erase.
12. Tap the X or pinch in to zoom back out to view the whole grid of pages.
>>>Go Further: MORE SKETCHING APPS
 Autodesk SketchBook: Unlike Paper by FiftyThree, SketchBook is specifically for illustration. Professional artists have used it to create some amazing pieces.
 Adobe Illustrator Draw: This sketching app uses vector-based tools, so it can be a good starting point for artists who need to take their sketches into other Adobe software later. It also has some interesting color tools.

 Brushes Redux and ArtStudio: Two other excellent drawing tools with layers, and lots of brush and color options.
Adding a Calculator with PCalc Lite
Your iPad is a powerful computer, capable of processing data and performing calculations. So, how do you calculate a simple restaurant tip? There’s no calculator built in to your iPad, but you can easily add one with a third-party app. Let’s look at using the free PCalc Lite app. If you search for “calculator” in the App Store, you can find dozens of other different free and paid calculator apps.
1. Find the PCalc Lite app in the App Store and tap Get; then tap the Open button to launch the app.

2. You can enter numbers just like with a real calculator. For instance, enter 68.52, the cost of dinner for two at a nice restaurant. No wine, but desserts.
3. Tap X to multiply by the next number.
4. Tap 20 to indicate 20 percent. Good service with a smile. And then tap % to indicate that 20 is a percent (0.20).
5. The answer appears in the display. By all means, round up to $14. The waiter refilled your water three times without being asked.
6. Tap AC (all clear) to begin your next calculation.
7. In many ways, an app calculator is better than the real thing. For instance, there is an Undo button.

8. Tap the Settings button.
9. You can choose to customize the look of the calculator by changing the theme and the look of the digits. Some calculator apps feature tons of options.
10. If you are a scientist, mathematician, or engineer, you might want to use the calculator in Reverse Polish Notation mode; tap the RPN switch to turn it on. If you don’t know what Reverse Polish Notation is, then you don’t want to use Reverse Polish Notation mode.

MORE CALCULATOR APPS
 MyScript Calculator:This app allows you to actually write your numbers as you would on a sheet of paper. You can use operations and mathematical symbols and it calculates what you are asking and gives you an answer. It can even find the value of variables in short algebraic equations.
 The Calculator: This alternative to PCalc includes both standard and scientific calculator modes.
 Calculator HD: This other alternative lets you see your results history in a list.
Siri: Calculations
You can ask Siri to do math for you as well.
“What is 6 times 7?”
“What is 20% of $73.80?”
“What is the square root of 99?”
Finding Recipes with Epicurious
One application for early personal computers was to store and recall recipes. With the Internet, we can also share those recipes. And now with the iPad, there is finally a way to easily have these recipes with you in the kitchen while cooking. The Epicurious app is a favorite for such tasks.
1. Search for Epicurious in the App Store. Tap Get to download and install it, and then tap the Open button to launch the app.

2. Tap here to create an account that lets you store your favorites.
3. Tap Search to look for a specific recipe.

4. Tap to browse using categories. For instance, you can list recipes by their main ingredient or dietary considerations.
5. Search for a specific dish.

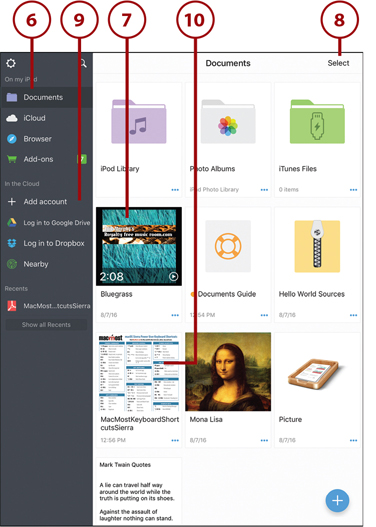
6. When you dig down to a recipe page, you see a picture and other information.
7. Read a summary of the dish and preparation time estimates.
8. Review the ingredients list.
9. Review the preparation instructions.
10. Return to the main screen.
>>>Go Further: MORE COOKING APPS
 Food Network In the Kitchen: This app gives you more than just recipes. You get videos featuring the TV network’s stars showing you how to make the dishes.
 Yummly: An alternative recipe database to Epicurious.
 Allrecipes Dinner Spinner: Another alternative—this one includes videos as well.
Checking the Weather
The iPhone comes with a Weather app preinstalled, but the iPad does not. However, you can find many good weather apps in the App Store. Download any one of those to add this important information to your iPad. As an example, let’s look at the Yahoo Weather app.
1. Search the App Store for Yahoo Weather. Tap Get to download and install it, and then tap Open to launch the app.

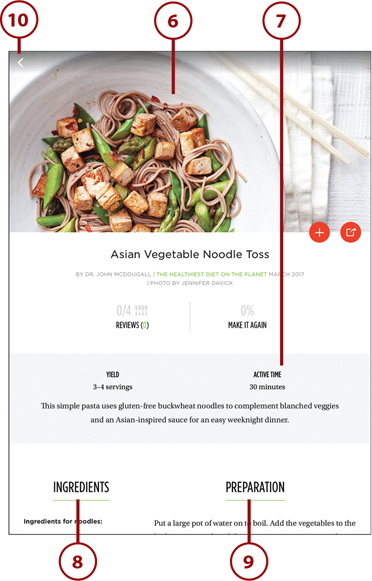
2. If this is the first time you have used the app, you might be asked if you want to enable daily weather notifications. You are also asked if you want to allow the app to use your location, which allows it to focus on your local weather without requiring you to enter your location. After that, the first screen you see shows you the current conditions for your location.
3. Tap and slide up to reveal more weather information.
4. You can view the hourly forecast for the rest of the day.
5. You also see a 10-day forecast.

6. Swipe up again to reveal more information.
7. You can find more detailed information about the current conditions.
8. You can see basic information like sunrise, sunset, and moon phase.
9. At the bottom, you can see the current radar map. To the right of the map, you can use buttons to switch between satellite, heat, wind, and radar maps.
10. Tap the + button to add another location. When you have more than one location, you can swipe left and right to switch between locations to check the weather in different places.

>>>Go Further: MORE WEATHER APPS
 The Weather Channel: This is a comprehensive weather app from the cable network.
 Weather Underground: This app from one of the most well-respected weather sites predicts the weather based on numerous sources and user reporting.
 WeatherBug: Another good alternative weather app.
 Living Earth: View a 3D globe showing conditions and forecasts.
Learning New Things with iTunes U
You have an entire school in your iPad—many universities, in fact. Apple’s iTunes U app is your gateway to free educational content provided by many of the world’s top colleges.
1. Search the App Store for the iTunes U app. Tap Get to download and install it, and then tap Open to launch the app.

2. If you start with a blank library of courses, tap the button at the bottom to enter the Featured courses screen.
3. Tap the More button for a complete list of categories.
4. Tap in the search field to search the catalog for a course.
5. Tap a course to view more information.

Don’t Stop with iTunes U
If you search the App Store, you can find apps that teach you just about anything. Want to learn to play guitar? How to bowl? How to repair your car? There are all sorts of apps for these. And when you can’t find an app, you can use the YouTube app to search for tutorial videos.
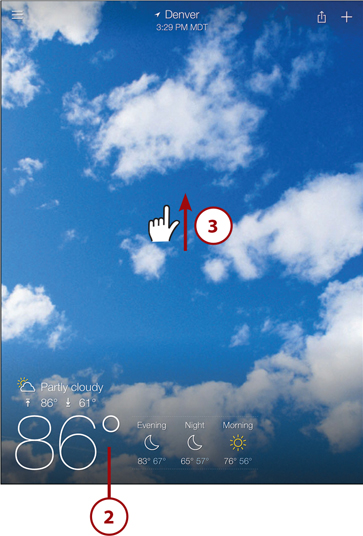
6. Read the description of the course.
7. Swipe up the page to move down and see all the course materials. Icons to the right of the names indicate what type of material: audio, document, video, and so on.
8. Tap to download an individual item.
9. Tap to subscribe to the whole course, which will put it in your library and take you to your library screen.
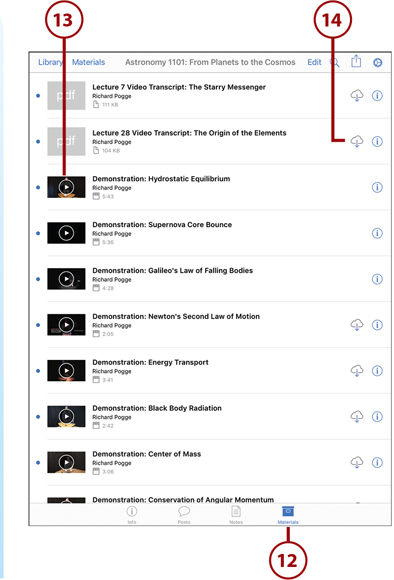
10. Tap My Courses to go to the My Courses screen

11. Tap a course in your library.
12. Tap Materials to see a chronological list of the course materials.

13. Tap an item to view or listen to it.
14. You can download an item to listen/read/view it later.
Is It Really Free?
Yes, for the most part. Many major universities provide these courses for free. However, just like with a real course, you sometimes need to purchase extra materials to follow along. For instance, there may be a book, app, or other item listed. Sometimes you can purchase the item right on your iPad, such as a book in the iBookstore.
>>>Go Further: MORE EDUCATIONAL APPS
 Craftsy: You can purchase video courses for things like crochet, knitting, quilting, baking, weaving, and other crafts. You browse their catalog and buy the course with an in-app purchase. Then you follow along with video tutorials. You can also take notes and ask questions of your instructor.
 TED: This app gives you access to thousands of educational and inspirational videos from TED conferences around the world.
Other Useful Apps
So many useful apps are in the App Store that it is impossible to cover them all in a book. Here are some quick mentions of others you can check out. Some are free; others you have to pay for.
 1Password: Mac users already know about the popular 1Password for Mac, which gives you a place to securely store passwords and other important information and conveniently access them through Safari.
 MindNode: If you use mind-mapping software to organize your ideas and plan projects, then you’ll be happy to know there is a pretty advanced tool that lets you do this on the iPad.
 WordPress: This app lets you write, edit, and maintain your blog posts. It works for the WordPress.com blogging service and for WordPress blogs set up on independent sites. Blogsy is an app that also lets you work with your WordPress blog, as well as many other popular blogging platforms.
 Day One Journal: For those who like to keep journals, your iPad can replace physical paper ones with apps like Day One Journal. You can include photos and keep it completely private with a password. Momento is another journaling app to check out. And Heyday is one with a focus on keeping travel journals.
 StarWalk 2: This is a must-have app for anyone even vaguely interested in astronomy. Even if you aren’t, the beautiful, up-to-the-minute renderings of the night sky on your iPad will impress your friends. You can see what the sky looks like right now, right where you are, and use it as a guide to identifying what you see.
 WolframAlpha: Want to compare two stocks, see the molecular structure of sulfuric acid, or calculate the amount of sodium in your breakfast? Would you believe that one app does all three and has hundreds of other interesting answers to all sorts of questions? It is also the answer engine behind a lot of what the iPhone’s Siri feature does, so you get a little bit of Siri on your iPad.
 Bloomberg: The iPhone comes with a weather app, a calculator app, and a stocks app. The first two have good alternatives mentioned earlier in this chapter. For the last one, you also have good options. The Bloomberg app lets you track your stocks and keep up with financial news. Yahoo Finance is a decent alternative, as well. If you use an online broker, search for their app—most of them produce one.
 VNC Viewer: You can use your iPad to share your computer’s screen. With VNC viewer, or any similar tool such as iTeleport or Mocha VNC Lite, you connect to a Mac using OS X’s screen sharing or a PC using a VNC server. Then you not only can see what is on your computer’s screen, but you can tap and type to control it.