
9 Taking and Editing Photos

This chapter explains using the Camera and Photo Booth apps to take pictures. Then you learn how to view, edit, and share photos.
→ Working with Photos
→ Understanding Photo Sources
→ Working with Albums
→ Creating a Slideshow
→ Viewing Photos as Memories
→ Marking Up Photos
→ Capturing the Screen
In addition to replacing books, the iPad replaces physical photo albums. You can literally carry thousands of photos with you on your iPad. Plus, your iPad’s screen is a beautiful way to display these photos. It can also replace your camera, as long as you don’t mind the iPad’s size compared to a smaller camera.
In addition to photos you take using your iPad, you can sync photos from your computer to your iPad, or use the iCloud Photo Library. Then you can use the Photos app to browse and view your photos.
Working with Photos
All iPads after the first generation include two cameras you can use to take a variety of photos that you can then edit and adjust as you need. One camera is located on the front, and one on the back. The primary app for taking pictures is the Camera app. Let’s take a look at the things you can do with this app.
Taking Photos
1. Tap the Camera app icon on the Home screen. This brings up the Camera app, and you should immediately see the image from the camera.

Quickest Way to the Camera
If your iPad is locked and you want to take a picture quickly, no need to unlock it. Just swipe right to left on the Lock screen and you go right to the camera app interface. Take a picture and then tap the Home button to go back to the main Lock screen.
2. The camera app has six modes: Time-Lapse, Slo-Mo, Video, Photo, Square, and Pano. The first three are for video filming mode, and the other three take rectangular, square, and panoramic photographs. To switch between modes, you can tap and drag up and down in this area. Or, you could tap the word representing the mode you want, and the app switches to it. The option in yellow is the mode you are currently using. Switch to Photo mode if you are not in that mode already.
Mode Support
Not all iPad models support each mode. Pano requires at least an iPad with a Retina display (like the iPad Air). Slo-Mo requires an iPad Air 2 or newer model.
3. Tap to switch between front and rear cameras.
4. Tap anywhere on the image to specify that you want to use that portion of the image to determine the focus and exposure for the photo. A yellow box appears at that spot.
5. After you have tapped on the image, and if you are using the rear-facing camera, you can zoom in. To do that, tap and drag the dot up and down along this line.
6. Tap the HDR button to turn on High Dynamic Range Imaging. See the “High Dynamic What?” note for more information about this setting.
7. Tap the time delay button to set a timer for 3 or 10 seconds. This allows you to set your iPad down on a stand or lean it against something and get into the shot.
8. Tap the large shutter button at the right side of the screen to take the picture. Alternatively, press one of the volume buttons on the side of your iPad to take the picture. If you hold either button down, your iPad continues to take pictures in rapid succession.
9. Tap the thumbnail photo to go to the Camera Roll and see the pictures you have taken. You can edit and adjust the photo you have just taken, as described in the next task.

The Focus and Exposure Area
When you tap the screen as in step 4, the yellow box appears. This area is now used for both focus and exposure. After you tap the screen, you can tap and drag your finger up and down to make further exposure adjustments. The little sun icon next to the box moves up and down along the line as you do so.
If you hold your finger down for a few seconds, the box pulses and the text AE/AF Lock displays at the top of the screen. This means the focus and exposure are now locked and won’t change as you move your iPad to point it at something different.
High Dynamic What?
High Dynamic Range Imaging is a process where multiple pictures are taken in quick succession, each using a different exposure. Then the multiple images are combined. For instance, if you are taking a picture of a person with a bright sky behind them, one picture will do better with the person, and the other with the sky. Combining the multiple images gives you a picture that shows them both better than a single shot would.
When you use HDR, be sure to hold your iPad steady so each shot captures the same image. They will be taken a fraction of a second apart, so HDR does not work well with moving objects or a moving camera.
It’s Not All Good: You’re Holding It Wrong
It is natural to hold your iPad vertically. You might use a majority of apps that way, so when it comes time to take photos or video, it is easy to forget and to continue to hold it vertically. This drives professional and amateur photographers crazy when they see a good photo ruined because a phone or iPad user forgot to turn the device before shooting the picture.
Although portrait photos have their uses, most pictures are best taken in horizontal orientation. Cameras are usually held horizontally, and when you view your photos on a computer screen or television, a horizontal photo fits nicely whereas a vertical photo needs to shrink to fit, with vertical space wasted on the left and right. Never shoot video in portrait orientation.
Editing and Adjusting Photos
You can start editing photos by tapping the photo icon, as in step 9 of the previous task. Or, you can enter the Photos app and edit photos from there. We look more at the Photos app later in this chapter.
1. If you don’t see buttons at the top and bottom of the photo, tap the middle of the photo to bring up controls on the top and bottom of the screen.
2. Use the thumbnails at the bottom to select a specific picture to view your photos. Or just swipe left and right through the thumbnails to flip through all your photos. You can also swipe left and right on the photo itself to move through them one-by-one.
3. If you are editing a photo you just took using the Camera app, you can tap the back button on the left to exit viewing this one image and jump back to the camera interface. Otherwise, continue on to step 4.
4. Tap the Trash icon to delete the photo. Deleted photos are stored for 30 days in a special Recently Deleted photo album, where you can rescue them if the deletion was a mistake. You can also tap and hold in the middle of a photo and then select Hide to hide the photo from Years, Collections, and Moments views, though it is still shown in any album you have added it to.
5. Tap the Share icon to send the photo to someone else via message, email, AirDrop, or a variety of other methods depending on which apps you have installed. This is also where you can copy the image so you can paste it into an email or another app.
6. Tap the Favorites button to mark this photo as one of your best. You’ll be able to find it quickly in the Favorites album in the Photos app.
7. Tap Edit to enter Editing mode and bring up controls on the side of the screen. The controls will appear on the side of the screen next to your Home button, either left or right depending on how you rotated your iPad.
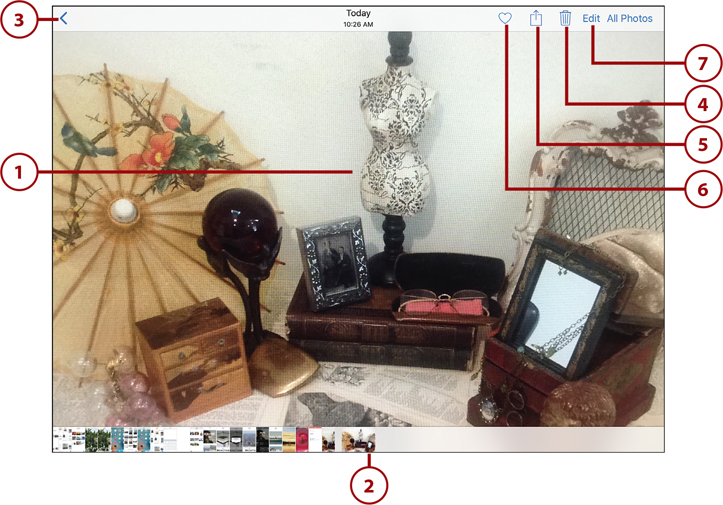
8. Tap Enhance to have the app examine the brightness and contrast in the photo and try to bring out the best image.
9. Tap the Crop button.

10. In this example, notice that the image automatically rotates slightly. The accelerometer in your iPad recorded the orientation of your iPad at the moment you took the photo, so it can now straighten the photo to be level. Tap and drag this angle dial up or down to rotate the photo manually.
11. Crop the photo by dragging any one of the four corners. Drag as many corners as you like to get the cropping just the way you want it.
12. Pinch in or out to zoom, or drag the photo to reposition it within the crop frame.
13. Tap Reset to set the rotation to 0 degrees and the cropping back to the full image size. Tap Reset again to rotate the photo automatically as it first appeared after step 9.
14. Tap this button to set the cropping rectangle to a specific size, such as 3:2 or square.
15. Tap the Rotate button to rotate the photo by 90 degree increments. This is useful when a photo is upside down or the wrong orientation.

16. Tap the Filters button to apply a color filter to the photo.
17. Tap one of the filters in the list to preview the changes immediately.
18. Tap Original to remove the color filter.

19. Tap the Color Adjustments button.
20. Tap one of the three color adjustment types: Light, Color, or B&W.
21. Each type of adjustment has a filmstrip you can drag up and down to position the red line to indicate the level of adjustment you want. The main image on the screen shows you a preview of the result.
22. Use the List button to dig deeper into each adjustment and modify only one subsetting. For instance, you can adjust the contrast, brightness, or exposure.
23. Tap Cancel to leave the editor without saving the changes.
24. Tap Done to exit the editor and apply the changes to the photo.

>>>Go Further: Extending Photo Editing
You can add extensions to the Photos app that allow you to edit photos without leaving the app. When you install many third-party photo-editing apps, they add more functionality to photo editing. Look for a small button with three dots on the Photo app edit screen. You can see it just below step 19 in the screenshots. Tap that button, and then tap the More button to switch on an extension.
After it is switched on, tap the small three-dot button when editing a photo to select the extended functionality and apply interesting effects to your photo. Hundreds of third-party apps are available to give you all sorts of photo-editing fun.
Taking Panoramic Photos
If you have an iPad Pro, iPad Air, or an iPad mini with a retina display, the Pano option is available in the Camera app. This option allows you to take wide panoramic shots, covering a larger area than you could normally fit into a photo.
1. In the Camera app, slide the available capture types up until Pano is yellow.
2. Hold your camera in vertical orientation. Look at the rectangle in the middle of the screen. You will be filling this rectangle with images from the camera. Position it so the left side of the rectangle contains the portion of the scene you want to be on the left side of the finished panoramic photo.
3. Tap the camera shutter button, or the physical volume buttons, on your iPad to start taking the photo.

4. Slowly and steadily turn your body and your iPad from left to right to allow the camera to take in more of the image. As you move, the rectangle fills with the scene. Small parts of the top and bottom may remain empty if you tilt the iPad a little up or down. Try to keep these areas to a minimum, but a little of this is typically unavoidable.
5. You don’t need to fill the entire rectangle. Most panoramic photos don’t need to use the full horizontal area. Just get as much as you need to make a good photograph.
6. Tap the shutter button again to finish.

7. The result is just like a regular photo in your photo library, except that it is wider. You view it and edit it just like in the previous task.

>>>Go Further: Panoramic Tips
Use these tips when you’re shooting a panoramic photo:
• Before you start taking the panorama, tap the arrow on the screen to reverse direction and take the photo from right to left.
• You don’t need to restrict yourself to horizontal panoramas. You can hold your iPad in horizontal orientation and take a vertical one. This could be used to capture a skyscraper, or to get both the ground and a plane in the same shot.
• Panoramas don’t have to be of scenery. For instance, you can capture a wide painting in an art museum even if there is not enough space to back up and get it in one shot. Or you can capture everyone sitting around a dining table in one shot.
• If there are moving objects in your panorama, such as soccer players running on a field, you might not get a clean shot. Sometimes a player who is moving fast might appear twice in the same panorama.
Using Photo Booth
In addition to the basic picture-taking functionality of the Camera app, you can also use the included Photo Booth app to take more creative shots using one of eight special filters.
1. Launch the Photo Booth app.

2. You see all the filters you can choose from. Tap one of the filters to select it. The screen changes to reflect the effect of that filter.

3. Tap the button at the bottom right to switch between the front and rear cameras.
4. Tap the button at the bottom left to return to the nine-filter preview.
5. Tap the shutter button at the bottom to take a picture.

6. Some filters also allow you to tap the live video image to adjust the filter. For instance, the Light Tunnel filter enables you to set the position of the center of the tunnel.

A Kind of Flash
When you take a picture with the camera on the front of the iPad, you get a kind of flash effect from the screen. It simply turns all white for a second. This helps in low-light situations.
Understanding Photo Sources
Your iPad’s Photos app can display photos from many different sources. You can then view them chronologically by Years, Collections, and Moments, which are covered in the next task. You can also organize them by albums that you create. Before we look at how to view your photos, it is important to understand where the photos come from. Here are all the possible sources:
• Photos you take with your iPad’s camera: When you use the Camera app or the Photo Booth app to take a picture, it is added to your library with easy access through an album named Camera Roll.
• Images from apps: Many apps allow you to export images into your iPad’s photo library. These photos are also available in the Photos app, and screen shots are included in this category. (Screen shots are covered later in this chapter.)
• Synced from your computer: iTunes on Mac and Windows computers can sync photos to your iPad. See “Syncing Photos” in Chapter 3, “Networking and Syncing.” You can take pictures with a dedicated camera device, organize them on your computer, and then sync the ones you like to view on the iPad.
• Transferred over a network: You can use AirDrop on an iPod, iPhone, or Mac to send images to an iPad. You can also save some images you see on the web by tapping and holding over them, then selecting Save Image. You can save images attached to emails or messages. Sometimes third-party apps allow you to access images stored on other photo services and transfer these to your photo library as well.
• iCloud Photo Library: You can choose to store all your photos on Apple’s cloud server and access them from all your iOS devices and Macs. When you use this option, you can no longer sync with iTunes on a computer because the two methods are mutually exclusive. You can turn this on in the Settings app, under Photos & Camera.
• Photo Stream: If you enable Photo Stream, every picture you take is automatically sent to iCloud’s Photo Stream, where it also appears on your iPad, Mac, and even your Apple TV, if you have Photo Stream enabled on those devices. Think of this as a temporary email inbox for photos. Only the most recent 1,000 pictures from the last 30 days are stored in Photo Stream. You could take a picture on your iPhone and see it on your Mac and iPad, choosing to then move it to your main library if you want to keep it permanently. You can turn this on in the Settings app, under Photos & Camera.
• iCloud Photo Sharing: You can create iCloud photo albums and share them with others. Likewise, you can subscribe to someone else’s shared album. Then you can view these shared album photos in the Photos app.
The big choice you need to make is whether to use iCloud Photo Library or sync photos using iTunes.
iCloud Photo Library is a great way to manage your photos as they will simply be available to you everywhere. But if you have a slow Internet connection at home, then you might want to stick with the old system of storing your photo library on your computer. (Although this might be a good excuse to call your service provider and get a faster connection.)
Browsing Your Photos
The Photos app on your iPad organizes your photos chronologically and breaks time into three levels: Years, Collections, and Moments. The photos taken on your iPad are combined with photos you synced from your computer or photos in your iCloud Photos Library. Let’s take a tour of the Photos app to learn how to browse through your photos.
1. Launch the Photos app to view your photos.

2. Tap Photos at the bottom to browse your photos.
3. You resume viewing your photos at the same level you were viewing them the last time you looked. The three levels are Years, Collections, and Moments. You can see where you are by looking at the top of the screen.
4. You can swipe vertically to scroll through your photos.
5. To move up a level, from Collections to Years or from Moments to Collections, tap the label in the upper-left corner. If you are viewing Collections, the label says Years to indicate that is the view you are moving back to.
6. Dig down to the next level by tapping one of the strips of photos. You can also tap and hold your finger over any photo until it pops out of the strip, and then release to jump right to viewing that photo.

7. At the Moments level, you see the individual photos. Tap one to view it. (The next task covers viewing photos in more depth.) Note that Moments groupings are based both on time and location. So photos taken at a park in the afternoon and then at dinner later that day on the other side of town could be grouped into different Moments.
8. Tap Collections to go back up to the Collections level.
9. At the Moments or Collections level, tap any location name to go to a screen dedicated to that one moment.

10. The top of the screen shows a large title banner that fades through the pictures in the moment. Tap the Play button to start a full-screen slideshow. See “Viewing Photos as Memories” later in this chapter.
11. Below the banner are some of the pictures in the Moment. Tap one to view it.
12. Tap Show More to see all of the photos in a more uniform grid.
13. Swipe up to see more features on this screen.

14. The People section is a list of the people identified in the photos of this Moment. Tap one to view just those photos.
15. The Related section includes other moments that are related to this one based on time or location.
16. Tap the map to go into a map view of the moment.

17. The map resizes to contain all the photos in the Moments or Collections you are viewing. If the photos are all taken in the same city, you might get a city map. If they are taken across the world, you might see the whole planet. You can pinch to zoom, or tap and drag to move the map.
18. Tap any single photo to view it, or tap a group of photos to see a screen that shows each one so you can scroll through them.
19. Tap at the top left to return to Moments or Collections.

It’s Not All Good: Where in the World Are You?
When you take pictures with a mobile phone like the iPhone, the location is automatically added to the photo. But most dedicated digital cameras, even expensive ones, do not have any GPS feature, so they don’t know your location. iPads without a live Wi-Fi connection won’t know, either. So your photo collection might have a lot of photos with no location information. These photos don’t appear on maps and can’t be accurately divided into Moments by location.
Searching Your Photos
Think back to a time before digital photos when you had to look in a physical photo album to find an old picture. You had to remember which album it was in and then flip through the pages to find it.
Until recently, finding a photo in your digital photo library wasn’t much better. If you titled and tagged your photos, it was a bit easier. Using the Faces feature of Photos, which is now called People, was a big plus, too. Now, though, the Photos app can actually identify objects in images. So you can search for something in a photo by typing the name of an object, and get results without ever having tagged or otherwise indicated that the object was in the photo.
1. In the Photos app, tap the Search button.

2. Start typing a search term. Hundreds of terms are recognized. Examples include boat, bus, dog, tree, fence, house, water, hat… you get the idea. You might need to do a little trial and error to find a word that comes up with results.
3. The list that appears shows Category next to groups of photos that it finds that match the keyword you typed. In this case, I typed water and that matched Water, Waterloo, Waterfronts, Watercraft, and Waterways.
4. Next to each category you see the number of photos that match. Tap the result to see the photos.

5. You can view these search results just like an album or any grouping of photos. Tap the photo to view it.
6. Tap Search to return to the previous screen.

>>>Go Further: Photo Search Tips
Use these tips when you’re searching your photos:
• This feature is very new and the entire concept of having computers recognize objects in photos is new, too. Don’t expect perfect results, but do expect it to get better with each update to iOS.
• You can combine terms. Searching for mountains water returns photos that appear to have both mountains and water in them.
• You can also search for dates (July 2015), people (Gary), or places (Colorado). However, combining these in a single search gives mixed results.
Viewing Your Photos
Whether you are viewing a photo you tapped on at the Moments level, or you are viewing a photo in an album or from the Camera app, the interface is basically the same.
1. Tap in the middle of the photo to remove the buttons and text at the top and bottom of the screen so you can enjoy the photo. Tap again to bring the interface elements back.
2. Pinch out to zoom in on the photo. Once zoomed, you can tap and drag to see different areas of the photo.
3. When zoomed out to view the entire photo, you can swipe left or right to view the previous or next photo in the Moment or album.
4. Alternatively, you can tap or drag in the strip of photos at the bottom to move through the photos in the Moment or album.
5. Tap the Edit button to edit or adjust the photo. See “Editing and Adjusting Photos,” earlier in this chapter.
6. Tap Moments to exit viewing this photo and return to the Moments level. If you are viewing a photo from the cameras after taking a picture, a Done button is available at the right to return to the camera screen, plus there’s an All Photos button to the left to open the Photos app.
7. Tap the Share button to share via AirDrop, email, social networks, and a variety of other methods. See the next section for more information about sharing.

>>>Go Further: Zoom and Rotate
Here are a few tips on how to navigate your photos as you view them:
• Pinch or unpinch with two fingers to zoom out and in.
• Double-tap a photo to zoom back out to normal size.
• While a photo is at normal size, double-tap to zoom in on a spot of the photo.
• If you pinch in far enough, the picture closes, and you return to browsing mode.
Sharing Your Photos
You can share photos while viewing an individual photo, such as in step 8 of the previous task. You can also share from the Moments screen by tapping Share next to any photo.
Let’s pick up from step 8 of the previous task, as if you have just tapped the Share button while viewing a photo.
1. At the top of the Sharing screen, you see your selected photo—plus you can choose others in the same Moment or album to share. Tap any photo to include it. You see a check mark on photos that you have set to share.
2. You can share via AirDrop, sending the photo to another iOS or Mac user near you. See “Sharing with AirDrop” in Chapter 3.
3. You can send the photos using either the Messages or Mail apps.
4. You can also post directly to Facebook, Twitter, or Flickr, as long as you have configured these services in your Settings app.
5. You can copy a photo to use it in another app. You can also tap and hold in the middle of a photo while editing it, and select Copy.
6. You can use AirPlay to show the photo on an Apple TV connected to the same Wi-Fi network. See “AirPlay Mirroring with Apple TV” in Chapter 18, “iPad Accessories.”
7. You can send the photo to a printer on your network. See “Printing from Your iPad” in Chapter 18.
8. You can export the photo to your iCloud Drive space, which puts it in your Files app and also into your iCloud Drive folder on your Mac. This is the iPad’s equivalent to exporting the photo as a file. You can also select other locations accessible to your Files app, such as third-party cloud services.
9. You can use iCloud Photo Sharing to add the photo to an online shared album.

10. Set the online album where the photo should be placed. You’re also given the chance to create a new album and to invite others, by email address, to see the album.
11. Add a comment that appears online with the photo.
12. Tap Post to send the photo to iCloud.
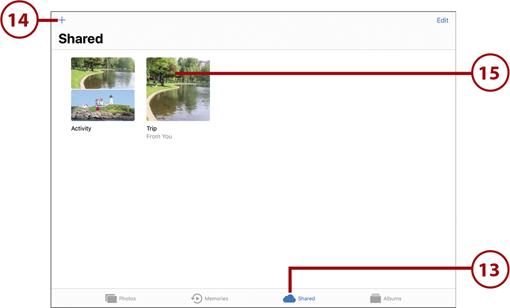
13. Tap Shared to see these online albums in the Photos app.

14. You can also create a new shared album from this screen by tapping the + button.
15. Tap a shared album to view it.
16. You see all the photos in that album. Tap a single photo to view it.
17. When looking at an individual photo, you can “like” the photo.
18. You can also add a comment. If you have been invited by someone else to share their album, then you can use steps 15–18 to view, like, and comment on their photos.
19. Tap the name of the album in the upper-left corner to go back to the previous screen.
20. Tap the blank space with the + sign to add more photos to the shared album. You can then browse your Photos list or other albums, or perform searches to find other photos to add.


21. While viewing a shared photo album that you have created, tap the People button to change the sharing options.
22. If you have invited others to share this album, you see their names here. You can also tap Invite People to add more people.
23. You can also turn on the Public Website option to let anyone view these photos. Then, tap the Share Link button to send people a link to the web page.

Results May Vary
You can share your photos in many ways, and it is likely that more ways will be added in the future. What you can use depends on what you have set up on your iPad. For instance, if you have Messaging and Twitter set up, you can use the Message and Tweet buttons to share using those services.
Working with Albums
Using the chronological Years/Collections/Moments views of the Photos app is a great way to find the photos you want to view. But, if you would rather organize your photos yourself, you can do so by creating albums.
You can make albums using the photo library software on your Mac, Photoshop Albums or Photoshop Elements on Windows, or file system folders on Mac and Windows. When you sync to your iPad with iTunes, you’ll see these albums using the steps that follow. Or, if you are using iCloud Photo Library, you can create the albums on any device, and the albums also show up on all your other devices.
The important thing to realize about photo albums is that the photos aren’t really in the album. Think of them as a list of references to photos, the same way a playlist in iTunes refers to songs stored in your music library.
A photo appears once in your photo library, and you can see it once in the Years/Collections/Moments views, but you can put a reference to that photo in multiple albums. For instance, you can have a photo appear in an album named “My Best Pictures” and also in an album named “Summer 2014.” If you delete it from one or both, the photo is still in your library—it just doesn’t happen to be in any album.
Viewing Albums
1. In the Photos app, tap Albums.
2. You see many preset albums that serve different purposes. For instance, the Camera Roll album contains all of the photos you have taken on your iPad, as opposed to ones synced via iCloud or iTunes.
3. You also see albums that group together panoramas, screenshots, videos, selfies, and other picture types.
4. The People album allows you to view groups of photos according to who is in them and to edit and customize those groups.
5. The Places album shows you a map and allows you to see groups of photos by location.
6. The Recently Deleted album contains photos you have deleted in the last 30 days. You can go in here to undelete these photos if you have made a mistake.
7. The rest of the albums are ones you have built yourself on your iPad or on another device and then the album has come over to your iPad as part of iCloud or iTunes syncing. Tap an album to expand it to see all the photos.

8. Tap any photo to view it.
9. Tap the album name to return from viewing the photo, and then tap the Albums button on the next screen to return to the list of albums.

Getting Back to the Album
After you finish digging down into an album, you can go back to the list of albums by tapping the Albums button, or a similarly named button, at the top left. But you can also pinch in all photos to group them in the middle of the screen and then release to move back to the albums list.
Creating Albums
You can create new albums on your iPad. If you are using iCloud Photo Library, these albums appear across all your devices. The process involves naming a new album and then selecting the photos to appear in the album.
1. In the Photos app, tap Albums at the bottom to view your albums, and then tap the + button to create a new album.
2. Enter a name for the album.
3. Tap Save.

4. You see all your photos appear in the Moments view, just as they did in step 7 of the task “Browsing Your Photos,” earlier in this chapter.
5. Tap and drag vertically to flip through your photos to locate the ones you want to include in this new album.
6. If you prefer Albums view, tap Albums to switch to that view.
7. Tap photos to add them to the album. Tap again to undo the selection.
8. Tap Select next to a Moment name to add that entire Moment to the album.
9. Tap Done when you have added all the photos you want to the album. You can always add more by viewing that album, tapping the Select button at the top, and then tapping the Add button at the top.

Creating a Slideshow
Another way to look at your photos is as a slideshow with music and transitions. You can quickly and easily create a slideshow with any group of photos in the Photos app that shows a Slideshow button at the top—for example, an album synced to, or that you created on, your iPad.
1. In the Photos app, tap Albums.
2. Tap an album to select it.

3. Tap the Slideshow button at the top of the album.

4. The slideshow immediately starts playing with default options. To customize it, first tap in the middle of the screen to bring up controls at the top and bottom.
5. Tap the pause button to stop playback while you adjust the settings. The button changes to a Play button.
6. Tap Options at the bottom right.
7. Select from one of many themes for the slideshow.
8. Change the music to one of many presets, or use a song from iTunes.
9. Tap to set the slideshow to loop.
10. Use the slider to change the speed.
11. Slideshows can be played on your iPad’s screen, or on any connected AirPlay video devices, such as an Apple TV connected to the same Wi-Fi network.
12. Tap the Play button that took the place of the Pause button to start the slideshow.
13. Tap Done to exit the slideshow.

Stopping a Slideshow
Tap on the screen anywhere to stop a slideshow. This takes you into the album. Start with the current photo. Then you can continue to browse that album normally swiping left or right and using the strip of thumbnails at the bottom.
Viewing Photos as Memories
Memories is a Photos app feature that groups together photos taken at the same place and time. You can use these groups to play a different type of slideshow.
1. In the Photos app, tap the Memories button to bring up the list of Memories. If none appear, you need to add more photos to your library for Memories to work.
2. Scroll vertically through the page to see all memories.
3. Tap a memory to view it.

4. You can scroll down to see all the photos included in the memory, as well as people and places associated with the memory.
5. Tap the Play button on the large photo to start the Memories slideshow.

6. The slideshow starts playing. Tap in the center of the screen to bring up controls.
7. Slide this bar to change the mood of the slideshow by changing the music and transitions used.
8. Tap one of the length options to shorten or lengthen the slideshow.
9. You can see the photos in the slideshow, and tap and drag them to move the slideshow forward or backward.
10. Tap the Play/Pause button to start or stop the slideshow.
11. Tap the Edit button to customize the Memories slideshow further.

Creating Memories from Moments
You can create a Memory from any Moment in the main Photos view. As you are viewing the Moment, scroll all the way to the bottom and tap the Add to Memories button.
12. Tap the items on the left to edit them: the title, music, duration, and even the list of photos and videos to include.
13. With Title selected on the left, you can edit the title and subtitle. If you select Music, you can choose the music, even using something from your Music library.
14. You can also edit the font used by the title.
15. Tap Done when you finish changing things and are ready to save the changes.

16. You can share the slideshow as a video.
It’s Not All Good: Sharing Slideshows
Want to share a slideshow via a social network or YouTube? You can, but not by using the Photos app’s Slideshow feature. Instead, use iMovie. See “Adding Photos to Your Video in iMovie” in Chapter 10, “Recording Video,” to learn how to make a video that is a series of photos. See “Combining Clips in iMovie” in that same chapter to learn how to share a movie. You can also use one of many slideshow and photo-sharing apps from the App Store.
Marking Up Photos New!
In addition to editing photos to adjust color and light and to fix imperfections, you can also draw on photos with the Photos app Markup tool.
1. While viewing a photo, tap the Edit button.

2. Tap the … button.
3. Tap Markup.

4. To draw on the image, select one of the three drawing tools on the left. You can also select the fourth tool, an eraser, to erase drawing marks.
5. Select a color.
6. Use your finger to draw.
7. The Lasso tool lets you circle marks you have made on the image and then drag them around. It won’t affect the photo itself, just the lines you have drawn.
8. Tap the + button to bring up more tools.
9. Tap to add a text field on the image and type some text. This is great for adding captions or watermarks.
10. Tap Signature to draw your signature on the screen, and then place it on the image. For example, you can take a photo of a document, and then you can sign it and send the signed version on to someone via email, messages, and so on.

11. Tap Magnifier to place a circle on the image, which you can move to magnify and draw attention to an area of the photo.
12. Tap any of the shape tools to draw that shape on the photo.
13. Tap Done to finish and leave the marks on the photo. Like with other editing tools, you can always Revert to Original to get rid of the marks and go back to the original photo.

Capturing the Screen New!
You can capture the entire iPad screen and send it to your Photos app. This feature is useful if you want to save what you see to an image for later. This works differently in iOS 11 than in previous versions.
1. Make sure the screen shows what you want to capture. Try the Home screen, as an example.
2. Press and hold the Wake/Sleep button and Home button at the same time. The screen flashes and you hear a camera shutter sound (unless you have the volume turned down).

3. An image of the screen capture appears at the bottom left for a few seconds. During this time, you can tap the image to go directly to editing it with the markup tools. Then tap the Done button at the top of the screen, which gives you the option to Save or Delete the screenshot.

4. Go to the Photos app.

5. Tap Albums and then go to the Camera Roll album. You can also go to the Screenshots album.
6. The last image in this album should be your new screen capture. Tap it to open it.

7. The screen shot displays just like any other photo. You can edit it or delete it with the buttons on the top right and bottom right.
8. Tap the Share icon to email the photo or copy it to use in another application. Or you can leave the photo in your photo library for future use.
