
CHAPTER 3
Managing Items
In Oracle Manufacturing, items are used to represent products, services, components of an assembly, and indirect materials. Oracle Manufacturing provides you with many features that will help you in managing your item information. There are many tools that can help you to maintain your item information during the lifecycle of a product.
Product Lifecycle Management
The various modules within Oracle Manufacturing provide a means of modeling and recording activity during all phases of a product’s life, starting with the design stage. Figure 3-1 shows a typical product’s lifecycle phases, including the design phase with revenue on the y-axis and time on the x-axis. In the design and development phase, however, revenue is negative.

FIGURE 3-1. The phases in a product lifecycle
Although it might seem that the investment that is made during the design phase is very little when compared to the revenue that is generated in the other phases, not all concepts are successfully developed and launched. So, it’s very important that you only pursue the most promising concepts from a financial and operational standpoint. The product lifecycle (PLC) shown in Figure 3-1 has the following phases:
![]() Concept & Design The conception phase is where the product idea is conceived and proposed to the product approval committee. This concept is evaluated with respect to a set of criteria, before the committee endorses the concept and allocates budget. At this point, a product development project is started. The team gathers requirements, identifies the features, and designs and develops the prototypes, before field-testing them. Test results are compiled, and this iterative cycle goes on until the product is proved and is ready to be produced on a mass scale.
Concept & Design The conception phase is where the product idea is conceived and proposed to the product approval committee. This concept is evaluated with respect to a set of criteria, before the committee endorses the concept and allocates budget. At this point, a product development project is started. The team gathers requirements, identifies the features, and designs and develops the prototypes, before field-testing them. Test results are compiled, and this iterative cycle goes on until the product is proved and is ready to be produced on a mass scale.
![]() Launch In the launch phase, you have to make sure that you have built capacity to satisfy the forecasted demand. You have to lay out your production lines and plan your distribution chain so that you can deliver your products in the least possible time. You may have to carry some inventory, as a safety stock against unforeseen fluctuations in demand and production problems. You also have to plan the marketing structure of your product to enable your customers to easily choose the various options that are available in your product.
Launch In the launch phase, you have to make sure that you have built capacity to satisfy the forecasted demand. You have to lay out your production lines and plan your distribution chain so that you can deliver your products in the least possible time. You may have to carry some inventory, as a safety stock against unforeseen fluctuations in demand and production problems. You also have to plan the marketing structure of your product to enable your customers to easily choose the various options that are available in your product.
![]() Growth This phase is very important from the point of view of supply chain management. You need to expand your capacity to meet the growing demand without losing your customers to your competitors, yet without building up excessive inventory. Features to manage this phase, such as line design, are covered Chapter 7.
Growth This phase is very important from the point of view of supply chain management. You need to expand your capacity to meet the growing demand without losing your customers to your competitors, yet without building up excessive inventory. Features to manage this phase, such as line design, are covered Chapter 7.
![]() Maturity In this phase, typically you concentrate on improving margins on the product by cutting costs. You can use the various intelligence reports that are available with the manufacturing products to help you in your cost-cutting efforts in this phase.
Maturity In this phase, typically you concentrate on improving margins on the product by cutting costs. You can use the various intelligence reports that are available with the manufacturing products to help you in your cost-cutting efforts in this phase.
![]() Maintain/Decline During this phase, based on the course of action that you take, you may have to cut costs and allow the product to die slowly or you may invest heavily in promotion, anticipating the decline phase and trying to prolong the maturity phase as much as possible. Most of the software tools to manage a product in this phase such as marketing and promotional activities are available in the CRM Suite of Oracle Applications.
Maintain/Decline During this phase, based on the course of action that you take, you may have to cut costs and allow the product to die slowly or you may invest heavily in promotion, anticipating the decline phase and trying to prolong the maturity phase as much as possible. Most of the software tools to manage a product in this phase such as marketing and promotional activities are available in the CRM Suite of Oracle Applications.
The item attribute Item Status allows you to control the availability of an item to the various business functions during the different phases of a product’s lifecycle with the help of eight other item attributes. In this chapter and the following few chapters, we discuss the features that are available in Oracle Manufacturing to manage an item during the different phases of its lifecycle.
>Items
The items in Oracle Applications represent products or services that you sell and their components. If necessary, items can be used to represent other aspects of a product such as product requirements and product features. The difference between a product and a product requirement is that a product is sold in the market, whereas a requirement is just for internal tracking purposes.
Item Master Organization
Item master organization is an inventory organization that holds the definition of the items that are used in your system. The item master organization is defined and maintained just like any other inventory organization.
All the organizations that use the items defined in a master organization are referred to as the child organizations. You define this relationship by choosing the master organization in the organization parameters of the child organization. Unless you have strong reasons to do otherwise, you should use a single item master for your installation. It’s a good idea to treat the item master organization as a repository of item definitions and not use that organization to conduct regular business. This way, an item in the master organization will be available as a reference, whereas you would have changed the attributes in all the other organizations.
Master Items Versus Organization Items
When you define an item, the item will be created in the context organization’s item master organization. You have to enable the item in all the organizations where you intend to use the item. The item definition in the master organization is like a reference item.
Some of the item attributes (covered later in this chapter) are controllable only at the master organization level, while others can be controlled at the organization level. The master level attributes have a single value across all child organizations. The organization level attributes may have different values in each of the organizations where the item is enabled.
Defining an Item
You define items in the Master Items window. When you define an item, the item is always defined in the master organization. When you define an item, you can copy the attributes from another item or from an item template.
You can apply multiple templates to an item, and you should recognize that template application is additive. So, if you apply a template to an item and subsequently apply another template, the item will have retained the values of all the attributes that were not enabled in the second template and the values of non-updateable attributes from the first template, which may not be your intention. Figure 3-2 shows the Master Item window.

FIGURE 3-2. Define new items using the Master Item window
After defining an item, you use the Organization Assignment window from the Tools menu to enable the item in all the organizations where the item will be used. When you enable the item in multiple organizations, all the item attributes are copied in the enabled organization. After that, if you modify an organization level attribute in the Organization Items window, the change will be visible only in the organization where it is modified. This also applies to the item master organization. All the master level attributes can be edited only in the master organization, but they will be visible in all the organizations where the item is enabled.
If necessary, you can change item numbers after you have defined them. This capability is often useful in a pilot environment, where you want to keep an item number consistent with a test script, for example, but may need to change some item attributes that are now difficult to change without a lot of data cleanup (e.g., Primary Unit of Measure or BOM Item Type). In this case, you might rename the existing item and then re-create the item with the correct attributes. The profile option INV: Updateable Item Name controls this process. If it is set to Yes, you can query the existing item on the Master Items form, change the item number, and save. Note that this does not create a new item with the same attributes; it actually changes the item number just as if you changed the item’s description, planning method, or cost. And the new item number now appears throughout the system—bills of material, forecasts, plans, and transaction history.
CAUTION
To avoid the possibility of accidentally changing item numbers, you should carefully control access to this profile option. You may want to create a separate responsibility for this activity, with the profile set only for that responsibility.
You define engineering items in the Master Engineering Items window. For an engineering item, the item attribute Engineering Item is automatically checked. You will not be able to update this attribute, although you can see it. You will not be able to view an engineering item using the Master Items or Organization Items window that is available through Oracle Inventory. Engineering items are covered in Chapter 5.
Item Templates
Templates allow you to define an item easily. A template contains a list of item attributes with predefined values. You should consider defining templates for each of the item types in your scenario. Oracle Applications comes with 16 predefined templates; you can define additional templates if you need more in the Item Templates window. Enter a name and description and choose an organization if you want to make the template local to an organization. Navigate to the attributes region. Choose the attributes that you want to be part of the template by enabling them and define the attribute values for those attributes.
CAUTION
Organization level templates cannot be applied to an item in the Master Items window, unless the organization is the master organization itself.
If you only have a few different types of items, you can define a template for each type of item. On the other hand, if you have numerous combinations, it may be easier for you to define templates for a subset of attributes and apply a series of templates to an item. For example, imagine that you have raw material, subassemblies, and finished goods, any of which can be under lot control, serial control, or both. Rather than defining nine templates to cover all the permutations, you can have three base templates (raw material, subassembly, and finished goods) and then two more templates that add lot and serial controls.
NOTE
Templates are simply tools to help you define an item; there is no link maintained between an item and the templates you used to create it. So, if you modify a template, the items that were defined with that template will not recognize the change. If you make any changes to a template, and if you want this to be reflected in all items that used the same template, you have to reapply the template again.
Item Attributes
Item attributes are additional information about an item. Some of the item attributes identify critical item information such as the planning method for an item. Some other attributes such as the Default Shipping Organization provide defaulting information. In this section we discuss item attribute setup and a few attribute groups.
Item Attribute Controls
You specify the control level for your attributes in the Item Attribute Controls window. If the control level of an attribute is Master Level, the attribute is maintained at the item master organization level and can only be edited in that organization. The value of an attribute at the item master organization defaults to the child organizations when the item is enabled and can be changed at the organization level, if the control level is Org Level.
CAUTION
If the control level is organization, and if you change an attribute in the item master organization, it won’t reflect in the child organizations. You are only changing the value of that attribute in the master organization.
You can safely switch the control level of an attribute from master to organization. But if you attempt to change the control level of an attribute from organization to master, you will get a warning that your change may cause data inconsistencies. This is because the attribute you are trying to change might already have different values in the individual organizations than it has in the master.
Changing the control level will affect the creation of all items in the future, but it will not change values in any items that are already in the database. If you need to make this kind of change after you have begun defining items, you should take care to ensure that the affected attribute first does have the same value in all the functional organizations as it has in the master, to avoid potential errors or confusion.
Status Attributes
The following eight attributes, known as the Status Attributes, have additional controls other than the organization control level discussed earlier in this chapter:
![]() BOM Allowed
BOM Allowed
![]() Build in WIP
Build in WIP
![]() Customer Orders Enabled
Customer Orders Enabled
![]() Internal Orders Enabled
Internal Orders Enabled
![]() Invoice Enabled
Invoice Enabled
![]() Transactable
Transactable
![]() Purchasable
Purchasable
![]() Stockable
Stockable
These status attributes can be controlled by the value of the attribute called Item Status. If you specify a Status Setting as Sets Value, you won’t be able to modify that attribute individually; the attribute is controlled by the item’s status. If the status setting is Defaults Value, the item status defaults to the value for the attribute, but the attribute can be changed individually. If the status setting is None, the attribute has to be maintained individually and not by changing the item’s status.
Item-Defining Attributes
An item-defining attribute describes the nature of an item and identifies the functional areas that are associated with the item. There are seven functional areas in Oracle Applications, for which you have item-defining attributes as listed in Table 3-1.

TABLE 3-1. Item-Defining Attributes
All the item-defining attributes with the exception of MRP Planning Method are check boxes. You enable an item to the Planning functional area by having any value other than None for MRP Planning Method. The user cannot explicitly set the attribute Engineering Item; this attribute is set automatically if the item is defined using the Master Engineering Items window.
Attribute Groups
There are over 180 item attributes, and these attributes are arranged into meaningful groups, for better control and usability. Each attribute group relates to a business function in most cases. Sometimes, a group is just a broad classification. We will take a look at these attribute groups in this section.
TIP
Each attribute group is controlled by a security function of the form “Items: group name,” where group name represents the name of the attribute groups. You can restrict access to an attribute group by excluding the associated security function from a responsibility. For example, if you want the purchasing manager to update the item, but only the purchasing and inventory groups, you can exclude all the attribute groups except purchasing and inventory. When you do so, you should make sure that you also take away the function “Items: Copy From.” Otherwise, the purchasing manager can always update everything by applying templates or copying from other items.
Main Attribute Group
The Primary Unit of Measure (UOM) is the UOM in which on-hand balances are held. The primary UOM is defaulted from the profile option INV: Default Primary Unit of Measure. You also select what type of conversions you want to use for an item during transactions using the Conversions radio group. When you transact an item, you can specify any UOM that has an item specific or a standard conversion with the item’s primary UOM, based on your selection in the Conversions radio group. Oracle Inventory will always convert the transactions into the primary UOM, before posting the transactions to on-hand balances. You cannot update the primary UOM for an item, once it is saved the first time.
TIP
You should probably not set the primary UOM in the profile INV: Default Primary Unit of Measure or in your templates, because you cannot change the primary UOM once defined. This will force you to think about the item’s UOM and prevent you from inadvertently saving an item with the wrong unit of measure.
User Item Type is a code to identify the type of item from your business’s perspective. A number of reports have this attribute as a parameter, allowing you to compile reports for specific groupings of items based on the user item type. You can define your item types in the Lookup Codes window.
As discussed before, Item Status potentially controls the eight status attributes, based on your attribute controls. The Item Status window allows you to define new status codes and specify the setting of each status attribute for your status codes.
Item Status allows you to manage your item’s transactional behavior during its life-cycle. You can set an item’s status in one of two ways. You can make an immediate status change by entering a new status code on the Master Items or Organization Items window, or you can specify a pending status (to become effective at a future date) using Tools I Pending Status when you are on the Item window. The concurrent program Update item statuses with pending statuses makes these pending statuses effective; if you are using this functionality, you should run this program at the beginning of every day.
The Pending Status function also lets you view a history of an item’s status changes, whether these changes were made immediately or as pending changes.
Invoicing Attribute Group
You turn on an item for the receivables function by checking the Invoiceable Item attribute. You should make an item as an Invoice Enabled, if you want to include this item in an invoice. You can make an item Invoice Enabled only if it is an invoiceable item. Invoice Enabled could optionally be set by the Item Status.
Accounting Rule determines the number of periods and percentage of total revenue to record in each accounting period. This attribute enables you to identify revenue recognition rules for the item. Invoicing Rule lets you determine the period in which to send an invoice for invoices that span more than one accounting period.
The Tax Code attribute identifies the tax code to use for the item when calculating tax based on location and tax codes. Sales Account provides the general ledger account code combination to record the revenue when a customer is invoiced. Payment Terms identifies payment terms for an item and is for reference information only.
Service Attribute Group
To distinguish between a product and a service, you use the Support Service attribute. If this option is checked, the item represents a service. On the other hand, if you want to indicate that support service is available for an item, you do that using the Serviceable Product attribute. These attributes are mutually exclusive. In other words, a service cannot be a serviceable product.
You can choose a Coverage Template for your service, such as round-the-clock, six-to-six, etc. from a list of predefined coverage schedules in Oracle Service. You can specify the estimated duration of your service using the attributes in Service Duration.
When you have warranty on your product, you indicate that using the Warranty attribute. Enabling this attribute automatically adds an entry in the item’s bill of material to include a warranty component. Only serial number controlled items can have warranty enabled, since it will not be possible to trace a claim to a sold item otherwise.
NOTE
The attributes from the other groups are covered in the respective functional chapters.
Item Relationships and Cross-References
You can define item relationships in the Item Relationships window. The relationship types supported are Related and Substitute. Related items include generic relationships and are for information and reporting purposes only. Substitute items can be received from suppliers, if the item attribute Allow Substitute Receipts is checked for an item.
You can define manufacturer part numbers for items, which can be used in catalog search and for reporting purposes. You define manufacturer part numbers in the Manufacturer Part Numbers window that you can access directly from the navigator or through Tools I Manufacturer Part Numbers. You can associate an item with multiple manufacturer part numbers.
Item cross-references can be used to create custom cross-reference types and use those to relate items. For example, you can track succession of assemblies using a cross-reference type called Superceded By. You define cross-reference types in the Cross-Reference Types window. You assign cross-references to an item using Tools I Cross References.
Customer items can be defined in the Customer Items Summary I Detail windows. Your customer item can be related to your item at the customer level, the address category level, or the address level. You can also associate a commodity code with a customer item. Once you have defined customer items, you can select customer items while entering a sales order.
Item Revisions
When you make slight modifications to your item, without changing the form, fit, or function of the item, you may want to define a new revision for that item for tracking purposes. You can define any number of revisions for an item. A new revision should be greater than the previous revision according to the ASCII format. To avoid confusion, alphabetic characters are always in uppercase and the revision itself can be alphanumeric.
You define your revisions in the Item Revisions window. The starting revision for an item is defined at the organization level. You can have multiple revisions effective at the same time, and in that case, you will be able to choose a revision from the available set during inventory/manufacturing transactions.
Figure 3-3 presents you with the logical data model of an item and the related entities. This will help you to understand the bigger picture of the item management features provided in Oracle Inventory.

FIGURE 3-3. Item management logical data model
Categorizing Items
Category sets and item categories in Oracle Inventory let you look at your items from different points of view. Category sets represent the point of view, and the individual item categories inside the category set represent the classification scheme within a point of view. For example, the accounting department might look at items by product line, whereas an inventory analyst might look at items as raw materials, subassemblies, and finished goods.
Category Codes and Category Sets
Category Code or Item Category is a multiple structure key flexfield (KFF). You define your category codes in the Categories window and your category sets in the Category Set window. Starting with Release 11i, you can assign an item to multiple category sets within a category set by checking Allow Multiple Item Category Assignments.
NOTE
When you allow multiple category assignments within a category set, you should realize that this could lead to double counting. For example, if you run an inventory value report by a category set that allows multiple category assignment, the same item can be reported many times.
A category set can be controlled at the master level or the organization level. You must also identify the Flex Structure of the category codes that you want to include in a category set. In the category sets window, you can select and associate all the category codes of that structure. You should specify a Default Category for this category set, which will automatically be added to your list of categories. If you choose to Enforce List of Valid Categories, you can assign items to only the categories that were associated with the category set. If you don’t, you can assign an item to any category that has the same Flex Structure as the category set.
Category Set Assignment
You assign items to category sets in the Item Assignment window, when you navigate from the category sets window, and in the Category Assignment window if you navigate from the item window. These windows are reverse views of each other; the first allows you to assign a single category to multiple items, the latter lets you assign multiple categories to a single item. Use whichever is more convenient. Figure 3-4 shows the Item Assignment window.

FIGURE 3-4. Assign items to categories using the Item Assignment window
Default Category Sets
There are eight default category sets in Oracle Inventory that map to eight functional areas. With the exception of Product Line Accounting, all the functional areas are associated with a corresponding item-defining attribute.
NOTE
The item-defining attributes and the default category sets should have the same organization control level.
When you define an item, you can enable it for a functional area by enabling the item defining attribute that is associated with the functional area. If you do so, the item will be assigned to the default category within the default category set for the functional area. The defaulting chain is illustrated by Figure 3-5.

FIGURE 3-5. Default Category Assignment
TIP
Create a category code called “Unassigned” or “To be determined” and use this as the default category for each of the default category sets, so that you can distinguish between user assignments and default assignments.
When you enable an item to another organization after assigning categories in the master organization, the master level category sets and the default category sets (irrespective of organization control level) will be copied over. After enabling an item in an organization, if you disable an item for a functional area, the defaulted category assignment will not be removed automatically. You should delete the assignment explicitly, if that is what you want.
NOTE
When you create an item by copying from an item, the category assignments are not copied. Even in the case of default category sets, the default category code will be assigned instead of the category code value from the copied item.
Figure 3-6 identifies the important entities in the item category feature and the relationships between them.

FIGURE 3-6. Item Category Logical Data Model
Item Catalogs
Item catalogs let you assign an unlimited number of descriptive elements to your items, and use those descriptive elements to search for items throughout the applications. You can use the catalog to help locate items, to avoid duplicating parts that already exist. And the item catalog also lets you generate a more meaningful item description for configured items; this will be described in Chapter 6. Figure 3-7 shows the item search window using item catalog descriptive elements.
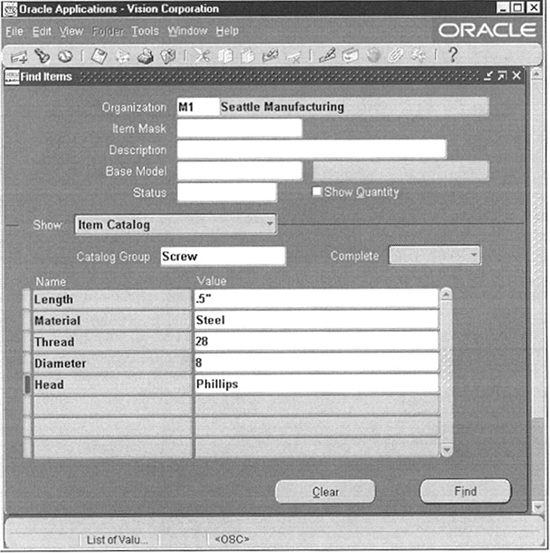
FIGURE 3-7. Search Items using Catalog Descriptive Elements
You define item catalog groups in the Item Catalog Groups window. You can specify a name for the catalog and a description. You can disable a catalog by putting an end date to the catalog. You can add descriptive elements to a catalog group by pressing the Details button and navigating to the Item Catalog Group Details window. In the Descriptive Elements region, you will be able to add the descriptive elements.
TIP
You can use item catalogs to implement a variety reduction program at your company. For example, you can have a group called Screws, which has the thread pitch, thread length, etc. as attributes. When an engineer wants to use a screw in his design, he can search the Screws catalog and if possible, could use a screw that already exists rather than creating another item for the exact same specification.
You can add aliases in the Aliases region and specify categories in the Categories region for reporting purposes.
Item Deletion
You can delete an item by including an item in a deletion group in the Deletion Groups window. Once you include an item in a group, you can delete the items in the deletion group by pressing the Delete Group button. The delete group process checks for deletion constraints and deletes the items that were included in the group. If there are any violations, the delete group process updates the Status to Error on the Results tab. You can press the Errors button and view all errors and the associated deletion constraints.
If you just want to check if you can delete, you can do so by pressing the Check Group button. The check group process checks for deletion constraints and updates the Status to Error on the Results tab.
Oracle Inventory seeds about 50 item deletion constraints. You can define custom deletion constraints in the Deletion Constraints window. The deletion process checks all the Enabled constraints for the Delete Entity, before deleting the entity. During the check process, it runs the SQL Select Statement that you associate with the constraint and decides to delete or not delete, depending on your setting of the Delete If field.
Items Open Interface
Open interfaces are tables provided for you to put in your information while interfacing with home-grown or third-party applications. A standard process will pick up the rows in the open interface table, validate them and then import the validated rows into Oracle Applications tables. This section will provide you with the tables that are to be used to import items and some of the related objects.
Item
You import item definitions using the Import Items concurrent program. Before running the concurrent program, you should populate the interface table MTL_SYSTEM_ITEMS_INTERFACE (MSII) with the appropriate values for your new item(s). You can define the item, all the item attributes, and the cost details in this table. You can import cost information by specifying the appropriate cost values in MSII. You can also import the revisions of an item along with the item itself, by populating corresponding records in the table MTL_ITEM_REVISIONS_INTERFACE for each row in MSII.
Item open interface supports multi-threaded import. So, you can divide the items that are to be imported using a Set ID and launch multiple item import processes, each with a different set ID.
Starting from 11i.3, you will be able to import category assignments along with items. You cannot create category sets or category codes through this interface. Populate the interface table MTL_ITEM_CATEGORY_INTERFACE with your category assignments and make sure that the process set ID for your category assignments and items are the same. You must make sure that the category sets and category codes have already been defined.
NOTE
APIs for creating and updating items and related information will be available in a future release.
Customer Item
Import customer item definitions using the interface table MTL_CI_INTERFACE. You must make sure that customers, address category and the customer address information are already defined. To define cross-references between customer items and existing inventory items, use the interface MTL_CI_XREFS_INTERFACE.
Summary
This chapter covered the aspects of creating and maintaining items. Items can be used to represent your products, service, components, and indirect materials. Items are always defined in the item master organization and later on enabled in the using organizations. Item templates help you in defining and maintaining your items.
Item relationships allow you to capture the relationship between items such as substitute items. Item cross-references allow you to define cross-references between your items and items from your trading partners.
Categorize your items using category sets and item categories. Category sets represent the viewpoint and item categories represent the classification scheme. Item catalogs allow you to capture descriptive information about your items, which can be used for searching later on.
Items open interface and the customer item open interface provide you with the capability to import item definitions and customer item definitions into Oracle Applications.
