![]()
Arduino Development and Social Coding
Improve the world through sharing your code. Participating in a community of coders brings professionalism to your hobby. The Arduino world is a community that values the free flow of knowledge and recognizes the benefit of the community to problem solving.
While sharing code might seem to be an unsolvable puzzle at first, many tools have been used to accomplish the task of code collaboration. In this chapter, you will learn to use the online code-sharing community called GitHub. Along the way, this chapter will also explore how the Arduino open source community uses modern social-coding practices to contribute to projects.
Social coding is the idea that any code you create begins with and contributes to the work of a community of coders and active users who want to assist you as well as to improve their own projects.
Arduino is a fast-changing platform, and its development and best practices are set not by industry standards alone, but also by the emergent interaction between industry makers and an open source community of software and hardware hackers. How you participate in the open source community demonstrates how you are a professional. In the field of Arduino and open hardware, pro means using emergent techniques in social-coding communities, alongside making and testing in open, entrepreneurial communities. Open hardware, like open source software, even if created by a single person, is used and lives on in communities of use. So contribute your Arduino IDE source code for the good of the world and move along.
Because Arduino is open source, it is always under revision by its community of developers. Your code can undergo quite a bit change when starting a project, and when people begin to work collaboratively with you. The fast pace of change in a project needs to be matched by fast updates to the documentation. You and your collaborators will all need to have the same shared idea, and learn to describe that shared concept via documentation in a collaborative wiki environment. Even if you work alone, documenting your process will enable you to quickly return to projects once set aside, keep track of multiple projects at a time, or publish the software to run a kit you want to sell. To document your project, you need to know how to create pages, and edit a project Wiki using the Markdown syntax. This will be covered in the Documentation section of this chapter.
Components of Social Coding and Project Management
Project description, issue management, code version control, and documentation are the main components of social coding and project management. We will dig into each one, including a description of what each is and how you manage it through GitHub. Instead of these features all being hosted in different systems, they can all be found on GitHub. Centralizing these features in one place helps your community of users and developers keep up to date with the project and automatically watch for changes. The project repositories you host at GitHub can be created as public or private repositories. You choose whether you are hosting a private project for a small team, or a public open source project. On GitHub, you can host as many public open source repositories as you like, but you have to pay for the ability to have a private project.
The first example in this chapter will be a Hello World GitHub example that you can use as a template for structuring typical projects. All the examples for the book will be organized in a GitHub project repository: http://github.com/proard. As we learn the tool, you will be able to not only get your own copy of the code for the book, but you will be able to submit your changes back to the main project.
What Is a Project and How Is It Organized?
A project is the story of what you are working on, and then the hardware and code that make your physical project blink, move, or communicate. You can’t put physical electronics on your site, so you have to put the description of the electronics. For our purposes, these files will count as code. and how is it defined?
The basic unit of a project is the code repository. This is where the code lives. Every project is required to have a name and a description. A readme file is strongly encouraged as well, as it is commonly used as a quick starting point for people to pick up key concepts and examples of your project. When you use a social-coding tool like GitHub, it derives a starter page for the project and generates the project’s own unique URL, so users of the project can find it the project page easily. Hosting a project so that it is public and findable is a good start, but you want to encourage even more usage and participation. When someone watches, stars, or joins a project, GitHub tracks the changes in the repository. These changes are then emailed to them, or listed as part of their main page in GitHub.
There are two common patterns for project directory layouts. If you are creating a plain Arduino sketch, then the folder and the sketch name are the same. So, a sketch called HelloGithub.ino would be placed in a directory called HelloGithub. As seen in Figure 2-1 for HelloGithub.
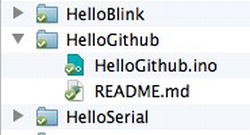
Figure 2-1. Example HelloGithub directory layout from Arduino sketches folder
That directory would be the repository name. This way, when the project is cloned or downloaded from GitHub, it unpacks as a valid sketch and then can be easily placed in your Arduino sketches folder as in Figure 2-1.
The second pattern is for hosting Arduino libraries you create. In Chapter 13 we go over the details for writing libraries. In this case there is a pattern to create a repository for the Arduino library you are writing. If you were to write a library called “HelloLibrary” you would call your repository HelloLibrary. The repository name would automatically be the directory name that the holds the typical files in an Arduino library. However, the name of the project and the directory should not include a “_” because Arduino doesn’t allow that in a library name. That way you do not have to change file names when you want to download or clone the library into the Arduino sketches libraries folder, like in Figure 2-2.

Figure 2-2. Example HelloLibrary directory layout
The Hello Library directory layout contains the required header file, implementation file, and the common sub directories for examples, documentation, and utility code.
Once the code is in GitHub it can be accessed in several ways from your GitHub project page. Figure 2-3, the GitHub menu bar, shows that you can download a zip file of the project. “Clone in Mac” triggers the GitHub GUI tool to clone or copy the project to your local computer. This option is also available for Windows and Linux.
![]()
Figure 2-3. GitHub access repository options
Figure 2-3 also shows you can also do a manual copy or clone of the project via secure Hypertext Transport Protocol (HTTPS), or secure shell (SSH). When you use these secure protocols GitHub will allow you to not just read data from the project, but write your changes back to the project securely. Finally, each of these techniques will allow for your sketches to be in your Arduino sketch folder or in you Arduino sketch libraries folder, where you can use or edit your project code.
In Arduino 1.0.5, there is now a new “Add Library” feature used to install your zipped library projects. This feature allows you to download the zip archive version of the project directly from GitHub, and it will extract, then install, the project into your user sketches libraries folder for you. This is very convenient for those developing Arduino libraries.
Many projects use GitHub for project and code management. There are many projects organized in this fashion. The Arduino project and examples in this chapter are using the same principles.
- Arduino (http://github.com/arduino/arduino): The Arduino IDE source code.
- ProArduino TiltSpirit (http://github.com/proard/tiltspirit): A simple Arduino game with LCD and tilt sensors.
- ProArduino HelloGithub (http://github.com/proard/HelloGithub): The example Hello World GitHub for Pro Arduino.
From these project repositories you can find out the source code status, the current issues, and documentation wiki for a project. Each example represents a project that you can use or help with.
In the code repository is the source code for the project. This code will change depending on project progress, features, and issues. A project that is alive changes and is revised regularly. Version control provides a method for multiple people to use, and edit the code simultaneously, and allows you to track the beginning and growth of a project over time. The basic unit of change in version control is the commit, which contains the list of all modified files, plus the code changes inside of them. In our case, version control can be thought of as a list of changes that are committed to the project by yourself or by other collaborators.
Issues are the features, bugs, and change requests for a project. A new project has goals and requirements. These are translated into issues for which the code delivers the functionally. Tracking issues can be quite difficult. For small projects that are about tiny tasks, a programmer can simply remember what needs to be done, but when a project takes you a couple days or more, your community starts giving you feedback and people start wanting to help you. In these cases, issue-tracking becomes critical. When you track issues, you keep a written list of new features and improvements. This public list is critical, in that users of your software can add feature requests or describe a problem in detail. A way to handle this is to assign a unique number, description, and category to each issue; this number can then be tracked from when a new issue is reported to when the issue is closed. Even more importantly, the code changes related to the issue need to be collected together. Every code commit should have a message describing the collection of changes. This way there is accountability for who made the changes and when the changes were made, and you will have a good chance of figuring out why the changes were made the way they were. In order to ensure that the code and issue are hyperlinked together, many users write something like, “This was fixed by #issue_number.” The good news with GitHub is that every code commit can be connected to the issue it resolves.
When working with issues it is typical to take the following steps.
- Look for the issue in the issue list.
- If it does not exist, file a new issue, including a concise subject, a description that includes a way to reproduce the problem, and, if possible, a source code example or test that fails due to the noted issue. Then the issue number is generated.
- People watching and maintaining the project will get an automatic e-mail when you generate your issue. If you need to discuss the issue, you can send an e-mail to the develop list with the issue number and a hyperlink to the issue.
- Someone may claim an issue, or you can assign it to a programmer, and that connection between issue and programmer can be seen in the issue list. If not claimed, you can update the code yourself to address the issue, and then create an official request that your code fix be added to the main project. This request is officially called a “pull request.”
- Once the issue is confirmed fixed, the issue can be marked “closed” using either the commit, pull request, or issue manager interface.
- If for some reason the issue is not truly resolved, you can reopen it.
This pattern helps everyone coordinate their work strategies, and divide up the effort of fixing project issues as well as project feature goals.
Documentation
Project documentation is the identity of your wiki project. It is where code experts, and people who are not source code experts and only want to use the project, go to find out what your project is about. It is like a Wikipedia entry for your project. In fact, the type of documentation we will be looking at is wiki documentation. We will use GitHub’s wiki documentation to provide a statement of purpose; a description of assembly; a link to step-by-step images of the project; and a link to the schematics, Eagle, or Fritzing files to the printed circuit boards. Sometimes people check only the wiki documentation and never see the source.
The GitHub wiki uses what is called Markdown formatting in order to display the text of the pages. The details of Markdown syntax are found at https://help.github.com/articles/github-flavored-markdown. These pages can be edited online in the wiki interface. Additionally, other people can use the wiki and help you keep information about your project up to date.
Project Management for Social Coding
In this section, I describe one way to set up your development environment using the version control system Git and the online code-sharing repository GitHub. Git is the distributed version control software that GitHub uses as a basis for their social code management website.
Version Control with Git and GitHub
This section will provide one way to set up your development environment using Git and GitHub. It will drill into the details of how to perform project management in a social-coding world. GitHub at its core is the code repository that allows for version control.
Version control, or revision control, tracks every change made to software, including who made the change and when it occurred. This allows for multiple people to work on software simultaneously and merge the changes into the master code base. The tool at the heart of this is Git.
Git is a powerful version control system that is used with many open source projects, including Linux Kernel, which has thousands of contributors and projects. Among the projects tracked with Git are Arduino software projects and projects from Adafruit Industries. The Git tool, which is a version control system that is completely distributed, allows for a massive amount of code hacking by multiple developers across the world. Everyone with a copy of the repository has a complete copy of the entire project with its entire revision control history. What is really unique with this is that developers are encouraged to fork the project and make their own changes to it.
Each copy of the software is either a clone or a fork. A clone is a copy of the master online repository on http://github.com/proard/hellogithub; you will use a clone of your project locally on your computer. A fork is an online official copy of the repository, one that you maintain on your own GitHub account, at http://github.com/youraccount/hellogithub. Git allows for a highly trackable and secure communication process between repositories. You can send cryptographically signed changes between you local repository and your remote repository. This supports secure development and accountability for who, where, when, and what changed.
Here, I will cover the basic starting commands and the preferred development process supported by the Arduino community. GitHub provides a nice starting guide at http://help.github.com, as well. The steps presented here will be similar to those from the guide, but they will be geared toward starting your own Arduino projects.
First, you must install Git locally and create an account on GitHub. Check out the “Get Started” section on GitHub, at https://help.github.com/articles/set-up-git. The command-line version of Git can be obtained from http://gitscm.org/ and should be installed as you would any software. I recommend selecting the shell options for Windows. The Git shell makes it easy to access Git on the command line. There is also a GitHub GUI tool for managing Git repositories which is helpful, but not a replacement for all of the features that come with the Git command line software.
One additional feature of Git is that it is cryptographically signed, and every commit and change clearly trackable, and makes programmers accountable for the changes they make. You will need to configure a unique key for your system. To get started, you’ll need to do the following:
- 1. Install Git.
- 2. Create GitHub account at http://github.com.
- 3. Generate a key pair to authorize your commits.
- Mac OS X: Go to https://help.github.com/articles/generating-ssh-keys#platform-mac
- Linux: Go to https://help.github.com/articles/generating-ssh-keys#platform-linux
- Windows: Go to https://help.github.com/articles/generating-ssh-keys#platform-windows
- 4. Set your user and e-mail in Git at http://help.github.com/git-email-settings.
Here is the command-line option for setting your global user information:
$ git config --global user.name "Your Name"
$ git config --global user.email[email protected]
With these settings in place, your system is ready to start working with the Git repositories, and GitHub. Your system will now properly indicate the code changes you make, and the changes you submit will be cryptographically accountable. This makes working with GitHub seemless.
GitHub Tools
Now that you have Git installed, and a GitHub account, you have your own area for repositories and account management on GitHub. I prefer to install the Git command line software prior to the GitHub GUI tools. That way, there is a command-line tool and GUI access for your project files. This lets you experience the best of both worlds.
Figure 2-4 shows the GitHub GUI configured to display projects on the local system. This shows your repositories and what organizations they belong to, as well as their overall status. It is possible to drill down into each project and examine individual files. Importantly, the Git GUI will generate the security keys for you.

Figure 2-4. GitHub GUI on Mac OS X
You are now up and running with GitHub. GitHub GUI will list your repositories on GitHub and synchronize changes from both your local repositories and your GitHub repositories. It provides a nice level of convenience, but learning the command line version of Git will offer better access to the revision control features, and showing the code differences between versions.
Version Control, Basic Workflow
In this section we introduce a basic work process for version control. This starts with creating your own example project in GitHub, then expands to working with projects other people have created, and then reviews the necessary Git commands that allow you to manage a version controlled project. This includes finding out what changed, and moving your code from your local repository to your remote repository on GitHub. It is possible to have more than one remote repository, but for this chapter your repository on GitHub will be the remote repository we use.
Go to GitHub and select “New repository.” Call the repository HelloGithub. Then fill in the new repository information, as shown in Figure 2-5. Once finished, select “Create repository.”
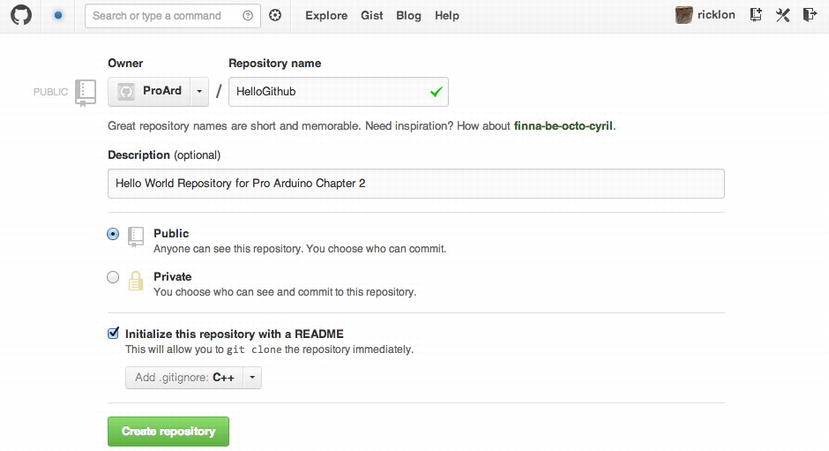
Figure 2-5. HelloGithub project configuration page
You want to indicate that this is an Arduino project. All Arduino projects are by default C++ projects. Select the .gitignore option for C++. This automatically keeps Git from tracking temp files and extraneous files common to C++ and text editors. Once you have selected “create repository,” you are presented with the default view of the project. the interface should look like Figure 2-6. This view shows you the source code for your project, and links to the many features of GitHub.

Figure 2-6. Initial project page after creation
An initial Readme.md file is created, but you will have to manually edit the Readme.md file with a description of your project, and how you would like people to configure the hardware, and modify the code to support different configuration for usage. This edit can be done after you clone your repository to your local machine, or can be done by live editing the file directly on GitHub. GitHub has a feature where you can browse your source code online and select a file for editing. When you save a change it will be saved as a standard code commit. Just click on the file “README.md” in Figure 2-6 to try it.
From Figure 2-6 you can clone the project locally. By cloning the project, you are in fact downloading the repository from GitHub using the “git clone” command. This is your copy of the entire repository on your local computer. Cloning can be done with the GitHub GUI application or on the command line, as follows:
$ git clone[email protected]:username/HelloGithub.git
In this case the “username” is your username on GitHub, and the command will copy all the files and version control information to your local machine. This is your local repository; all changes stay in the local cloned repository until you push your changes back to your original online repository on GitHub. “Origin” is the official name for your repository on GitHub. Your local code changes do not automatically move to the “origin.” You will have to “push” your change to your origin. Also, changes that you edit online directly to your GitHub project or if new code is merged into your GitHub project from other code contributors. Those changes have to be “pulled” to your local repository.
Editing Code and Checking for Changes
Once you now have a complete copy, or local clone, of your project, the process of working with and modifying code begins. Through the work process you will manage the changes to the project, and eventually send those changes back to your remote repository at GitHub. You will need to know how to check to your project for changes, commit those changes, and send them back to you GitHub repository. Then you will want to be able to get new changes form your GitHub repository and add them to your local repository.
Code can be changed in many ways:
User git clone [email protected]:username/HelloGithub.git
Make changes to code:
- Use the Arduino IDE to edit a sketch like HelloGithub.ino.
- Add or delete files.
- Move files to various places in the project.
- Edit files in libraries with your favorite text editor.
View changes
When you do make changes, you will want to know how to review them. Any time a change is saved, you can issue the following commands to check your work:
$ git diff
Or show a summary of changes with:
$ git diff --stat
Saving and committing changes
Once you are ready to commit to the changes you made, you can now commit these changes to your local code repository. Only staged changes are committed without the “-a”, to commit all changes, use “-a”, like so:
$ git commit –a –m "Changed the files and fixed issue #1"
To commit only certain changed files list the named files, use the following:
$ git commit HelloGithub.ino "Update HelloGithub.ino and changed blink rate for issue #1"
Each of these commits are are identified by SHA-1 hash that represents all the changes in the commit. These commits are saved code transferred from one repositoy or another. Also, you can check out different commits and recreate the exact file structure and changes in their code. “HEAD” is an alias for the latest commit you have made. The indicator “∼1” is the equivalent of “-1”; they can be combined to read “HEAD∼1”. It’s also possible to say “HEAD∼2” which is two commits back from HEAD. For instance, if you want to check out the previous commit you could issue the following command:
$git checkout HEAD∼1
Once that checkout succeeds, the code and files match that exact commit. If you look at the file system, you will see your old files and old changes, but all will precisely match the first commit back form “HEAD”. The syntax “HEAD” and “^” can be used with the diff command as well. To return to your latest status, issue the command:
$git checkout HEAD
Now your files and code match the official version.
One extremely useful use case is to check out just one file. You may have make changes you are not happy with, and you will want to only grab an early version or the current version of file. You can use:
$git checkout – filename
This immediately checks out the previous version of the file. You can checkout the file from two versions ago by using “HEAD∼2”
$git checkout HEAD∼2 filename
If the file didn’t exists two version back it will complain file is not part of the commit.
You can also checkout what is called a branch:
$git branch HelloBranch
This command automatically creates a branch called “HelloBranch”, but does not switch to it.
$git checkout HelloBranch
This command will check out that branch. If you want to return to your “master” branch you can use:
$git checkout master
At some point you will want to know what branches you have. The command is:
$git branch
The result will list all the branches in your repository.
In our examples we don’t cover branching, but you should learn about branching as you use GitHub. A branch allows you to test out new ideas, create different versions of your project, or fix code without making changes in your master branch. In this chapter, I only cover making changes to your “master” branch.
Move changes to your GitHub repository
Now that the changes are committed to the local repository, you need to push them to your GitHub repository, which you can do by using the following command:
$ git push
If you are working on multiple machines, or multiple people are working with you, then your project on GitHub could have changed. You may have even accepted a “pull request”. In this case, you will want to bring those changes, or collection of commits, to your local repository. One method is to “fetch” the changes from GitHub. This grabs the changes as a set, but does not merge them into your code automatically. The command would be as follows:
$ git fetch
At this point, you have all the changes from the GitHub repository. You do not have to fetch until something changes on Github again. At this point you can use “git diff” and examine the changes that were made on the server from a local copy. Once you are ready, merge the changes from fetch into your local repository. This is the merge command:
$ git merge master
The “master” key term is for the master branch of the code that was fetched. Most changes can be merged without a conflict. The pull command combines the fetch of changes with a merge. This is a very convenient way to get changes from your GitHub repository. The full command is:
$ git pull
Once you have successfully pulled your changes to from your GitHub repository. You can immediately begin editing, changing code, and working on your project. As needed, use the above commands to help you complete these common tasks. The options I have outlined are just for getting started with Git; it is a very complex and powerful tool. This chapter should get you started, but for more detail on the commands, see the Apress book called Pro Git, which can help you dig in deeper.
Workflow Summary: Creating Your Own Project
We walked through the creation of the HelloGitHub project to demonstrate GitHub’s commands, but there is a pattern in the steps we took. Follow these same steps for any project you create and you have workflow that ensures version control for one or multiple creators. Summarizing the steps we already took, we see the common steps for working on any project:
- Create the project on GitHub.
- Clone the project to your local machine.
- Make changes to the code.
- Add or remove files.
- Commit changes to your local Git repository.
- Push those locally committed changes to your “origin” repository on GitHub.
- Repeat steps 2–6 as needed.
These steps allow you to work locally and keep up to date with your project. You can use git diff, and git diff –stat or any of the many Git commands to check the difference in code version, and the changes over time for the project.
Workflow Summary: Forking Another Project
Frequently there are existing projects that you want to use, but you might want to change the configuration for your hardware, or want to add a feature to the project. Since I work with many different kinds of Arduino compatible boards, not every project is designed to work with one I’m using. For instance, between the Arduino Uno, and the Arduino Mega, the SPI pins are numbered differently. I will typically fork the project, and then make the needed changes to my forked copy of the project. Once I’m sure the code changes are working, I can do a pull request that allows the maintainer of the main project to merge those fixes to their project.
We will use the HelloGithub project at the Pro Arduino GitHub site, https://github.com/ProArd/HelloGithub , and run through the fork process with it. Once you find the HelloGithub project, you can select fork. This copies the project into your own GitHub area. Then you will want to make a copy to your local machine by cloning it.
These are the steps for forking another project:
- Log into http://github.com.
- Visit http://github.com/proard/HelloFork. You will find an example of what you’ll find there in Figure 2-7.

Figure 2-7. The HelloFork project you want to fork
- Select the “Fork” option, in the list of buttons highlighted by Figure 2-8.

Figure 2-8. The “Fork” button in context
- GitHub will tell you it is forking the project, with the processing sceen in Figure 2-9.

Figure 2-9. GitHub’s forking page
- Go to your fork of the project, as in Figure 2-10.
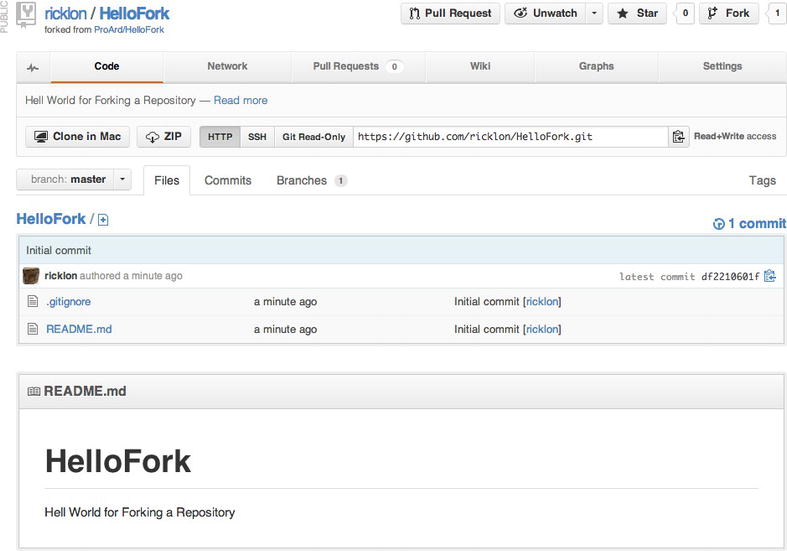
Figure 2-10. Your fork of the project
- Clone your project with the following:
$ git clone [email protected]:YourUsername/HelloFork.git - Set the official HelloFork repository as the upstream repository:
$ cd HelloFork
$ git remote add upstream [email protected]:proard/HelloFork.git - Since you just cloned it there are no changes, but once changes have been made you will want to fetch and merge changes from upstream with these commands:
$ git fetch upstream
$ git merge upstream/master - You can do a test of the merge by doing a dry run, using the following commands:
$ git merge --no-commit --no-ff upstream/master
$ git diff upstream/master –stat
If you want to see the difference between the changes that are being made, you can compare your code with the code on your GitHub repository with the “diff” command:
$ git diff origin/master
You can get a quick summary of the file changes by using “—stat”
$ git diff origin/master --stat
Given this list, we need to define a couple of new concepts. First, an upstream repository is typically the project that you forked into your GitHub repository. Secondly, every so often you will want to go back to the original project and pick up new files and code changes, so that you can synchronize your work with the main project. Your original project on GitHub is called “origin.” The latest version of code is called “master.” So you can compare the latest versions of “origin/master,” or “upstream/master,” with your local repository. Over time, projects can get further out of sync. If you fetch the changes from the upstream repository, you can bring the changes to your local machine without clobbering your own code, without breaking existing work by hitting it with a write over. The upstream master code will not automatically update your working area in the local master. After a fetch, you have to take specific action to merge those changes into your own project. git merge defaults to merging the fetched master with your local working master repository. The merge process will combine those changes into your local project.
Creating a Pull Request
In the section we will modify the HelloFork.ino sketch to have your Arduino username and submit the change as a pull request to the official Pro Arduino repository for the HelloFork project. At this point you will already have the forked from Pro Arduino, and cloned to your local system. So now edit the HelloFork.ino sketch to include your GitHub username. The code will look like:
/*
* Hello Fork Github Example Arduino Sketch
* Just add your GitHUb account ID and I'll add your pull request to the project.
*/
void setup() {
  Serial.begin(9600);
}
void loop() {
  Serial.println("Add your GitHub name to the code to test creating a pull request");
  Serial.println("Hello Github from:");
  Serial.println("@Ricklon");
  Serial.println("@ProArd");
  Serial.println(“@YourGitHubUsername”);
}
Once you save this code you can check the repository for the change by issuing the command:
$ git status
Result:
# On branch master
# Changes not staged for commit:
#   (use "git add <file>…" to update what will be committed)
#   (use "git checkout -- <file>…" to discard changes in working directory)
#
#        modified:   HelloFork.ino
The status result shows that you modified HelloFork.ino. This change needs to be committed to your local repository with the following command:
git commit -m "Added a new username to the HelloFork.ino sketch." HelloFork.ino
Result:
[master f6367cf] Added a new username to the HelloFork.ino sketch.
 1 file changed, 1 insertion(+)
The commit uses the “-m” to specify the message. After the message can be a list of files, paths, and or wildcards to specify the file names and directories to include in the commit. If you want to commit all changed, added, and deleted files, you can use the “-a” flag. This flag stands for “all.” The message can contain the Markdown shortcuts we described in the documentation section, like @username to mention a user and link to their account. Now that the file is committed, it is time to push the commit to your GitHub repository. That can be done be issue the command:
$ git push
Result:
Counting objects: 5, done.
Delta compression using up to 4 threads.
Compressing objects: 100% (3/3), done.
Writing objects: 100% (3/3), 408 bytes, done.
Total 3 (delta 1), reused 0 (delta 0)
To [email protected]:ricklon/HelloFork.git
   4e28d3f..f6367cf  master -> master
The push result summarizes all the changes and commit information that is sent to you GitHub repository. The “To” section. The “4e28d3f..f6367cf” in the result is shorthand for the hash that represents the commit being pushed to your GitHub repository.
Take a look at the HelloFork menu, as in Figure 2-11. Clicking on the file views the file. In our case we want to look at the commit and see what was changed as shown in Figure 2-12.
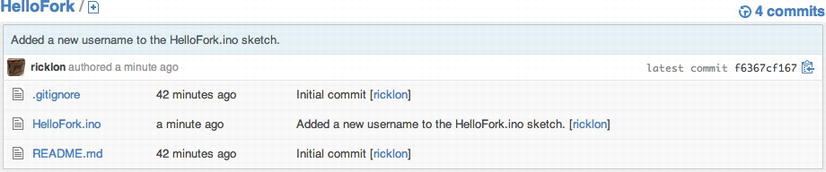
Figure 2-11. HelloFork.ino changes are now on your GitHub

Figure 2-12. View of the changes in the commit
The “+” indicates the new line of code you added. A minus, “-“ represents the removal of code.
Now your project is up to date; all changes between your local repository and your GitHub repository are now synchronized.
Creating a Pull Request
Once all the changes you want to make are bundled in your repository it’s time to create a “pull request” that will move your changes to the project you forked your project from. In this case we are using your HelloFork repository. Go to the your GitHub project for HelloFork. It should appear similar to Figure 2-13.
![]()
Figure 2-13. Your fork of the HelloFork project
The summary shown on Figure 2-13 shows your username, what project is selected, and where the project is from. At the same level are the project options. We are about to use the “pull request” option. You can also “Watch,” “Star,” or “Fork” the project from this menu. With “Fork” it shows you the number of forks of the project. If anyone wants to make a fork of your project, they can select “Fork.” For now just select pull request button, as in Figure 2-14.
![]()
Figure 2-14. Pull Request button
After the pull request is selected, you are shown the “pull request” management screen as shown in Figure 2-15. Here you can decide the details of the pull request. In our case, we’re just going to ask to pull the latest changes from our project in the master branch, to the Pro Arduino master branch.
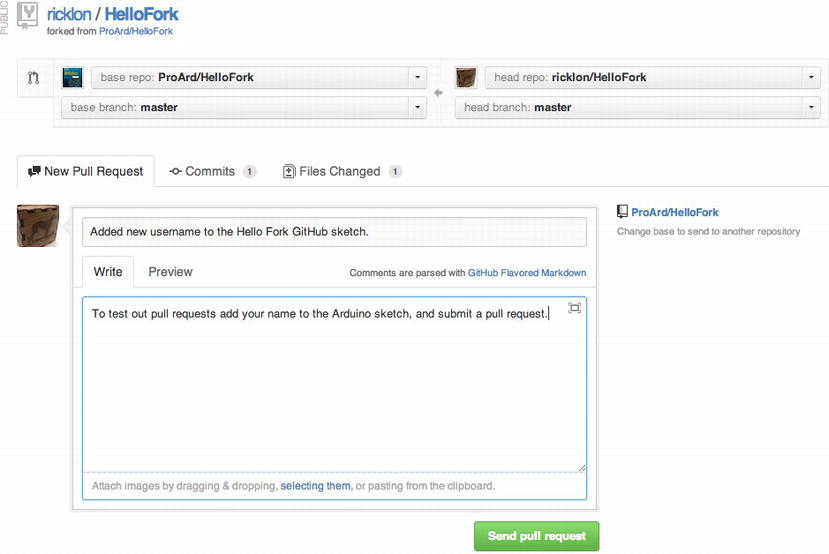
Figure 2-15. Pull Request screen
The pull request we created appears in in Figure 2-15, where we give it a title and description. Sometimes the title is descriptive enough, but there are times when you need to explain more about what you are doing, and what issues it addresses, then you can put that information in the main message area. The message area accepts Markdown, as we described in the documentation section of this chapter. Now that you’ve got your message entered, select the “Send Pull request” button shown in Figure 2-16.

Figure 2-16. Send pull request button
Once the pull request is done, it is filed as a request with the maintainer of the project you forked from. So for most purposes, you are finished. You are just waiting for the maintainer to implement your changes, or for the maintainer to ask for more clarification. The good news is that while this process is documented in the GitHub system, the communication between you and the maintainer can be extended in email, and those emails get tracked in GitHub, too, so that nothing is lost.
How To Merge a Pull Request
Now let’s look at the flip side: What happens when you get a pull request? Once someone has submitted the pull request, you, as the maintainer, get a message and can immediately check the pull status from the pull request screen as shown in figure 2-17.
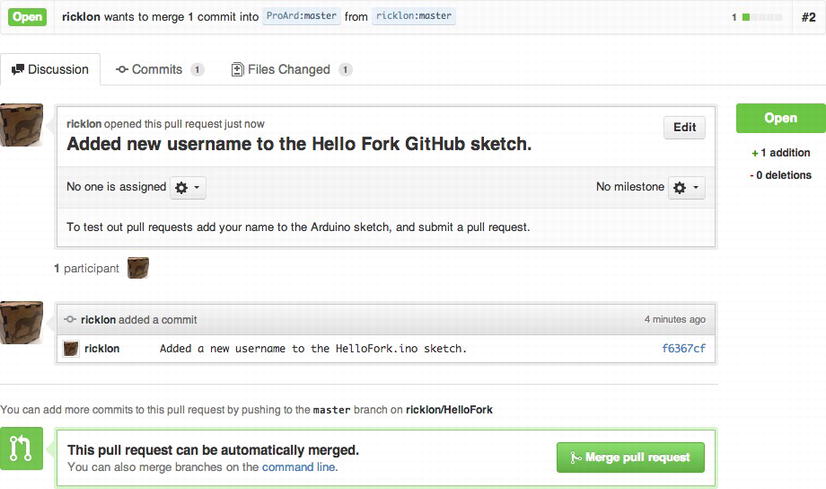
Figure 2-17. Receiver of the Pull Request screen
The summary of this pull request identifies who made the request, and identifies the commit that you are being asked to merge into your project. GitHub does a quick check to see if the new code can be added to the original automatically. In our case, the merge request can be automatic. Figure 2-18 shows a close up of that portion of the screen.

Figure 2-18. Automatic pull requst merge option
In this example, the maintainer selects to “merge pull request” and then is presented with confirmation and the opportunity to add a note about the merge as shown in Figure 2-19.
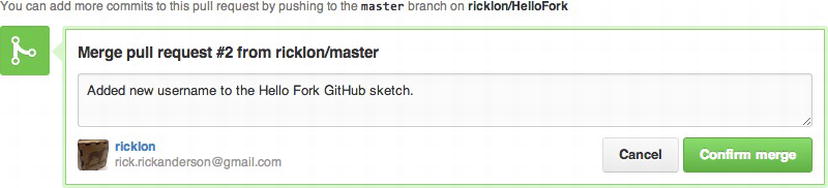
Figure 2-19. Confirm that you want to make this pull request
Once that merge is confirmed, then a summary screen is show as in Figure 2-20. The entire merge discussion is listed, so that you can review the comments. You can also review the commit status before and after the merge. If there is information about the merge that needs changing, it is possible to edit information about the merge from this screen.

Figure 2-20. The completed pull request summary showing request closed
Figure 2-21 shows the summary of the merge. It indicates which repositories were merged, and gives an idea of how much changed, by saying, in this case 1 commit was merged. There are times where multiple commits can be merged at once.
![]()
Figure 2-21. Notification of merged pull request
Figure 2-20 also shows that the merge is “closed”; this merge was identified as “#2” in the issue system. If you select “#2” you will be sent to the issue system, where you can see that the issue was closed as in Figure 2-21.
Since the HelloFork project currently has two issues, both pull requests that were completed are shown. These pull request are in the Pro Arduino project that accepted your request. In Figure 2-22 the screen from GitHub shows that two closed issues exist, and 0 open issues exist. If you made a pull request earlier to the project, then you would see them as one or more open issues. Since pull requests are integrated into the issue system, it is easy to find out who fixed issues, what issues were resolved, and where the changes came from. This leads us directly to issue management.

Figure 2-22. Project issue list shows pull request issue closed
GitHub provides an issue-tracking system. Issues include new features, problems with existing code, and code review requests. Each issue is classified in detail by this issue-tracking system. An issue can either be open or closed. It’s possible to comment on open and closed issues, as well as to reopen a closed issue.
When working with a forked project, the official issue list is maintained on the project you forked your copy from, not your forked copy.
Watching a project gives you all project updates and information. Starring a project only shows that you like the project, but doesn’t update you on every detail.
You can sort issues by the following categories:
- Everyone’s issues
- Issues assigned to you
- Issues created by you
- Issues in which you are mentioned
It’s possible to create milestones as well. These are project-specific goals that you can create and customize. You can also create your own labels that help organize the issues for your project. Example labels are:
- Priority
- Defect
- Feature
- Enhancement
- Code review
- Bug
- Duplicate
- Won’t fix
- Question
These project labels can be a quick way of prioritizing, because they visually identify the kinds of problems in the project.
Figure 2-23 shows the GitHub Issue Manager main page. In one view, you can get an idea of the “open” issues for a project. From here you can create new issues, and find issues that you have experienced. It also let’s you search not just the “open” issues, but the “closed” issues as well.
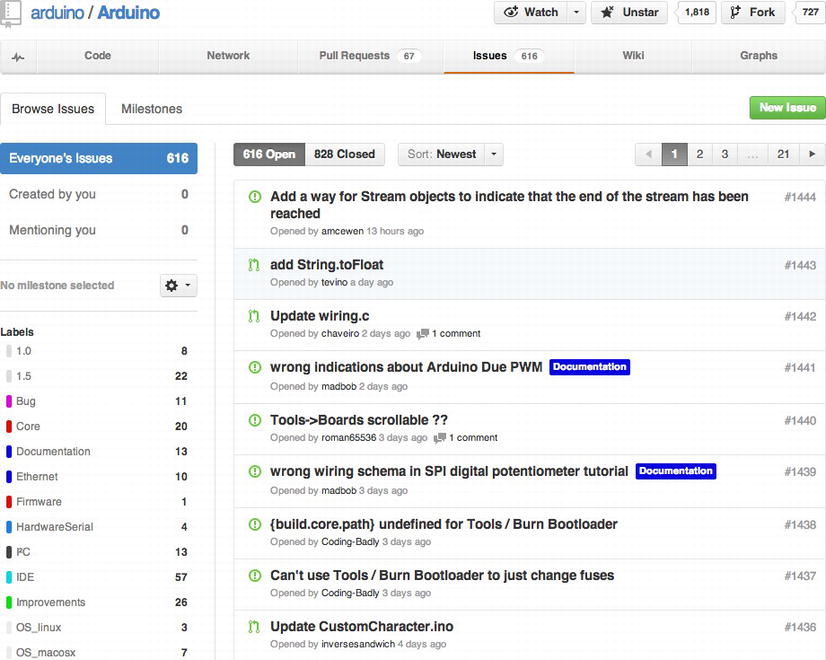
Figure 2-23. Arduino GitHub Project
For a quick way to think about issue tracking you can follow the following process:
- Look for the issue in the issue list as shown in Figure 2-23.
- If it does not exist, file a new issue and include a concise subject, a description that includes a way to reproduce the problem, and, if possible, a source code example or test that fails due to the noted issue. GitHub automatically e-mails the creation of new issues to maintainers.
- Make your modification to the project files to fix the issue and submit a pull request from GitHub.
- Confirm the issue is fixed by testing it.
- Lastly, close the issue in the issue system, which will update its status.
Connecting Version Control with Issue Management
The ways you change your code and files to address an issue are collected in the message portion of a commit. These commits represent progress towards adding features or resolving issues. Connecting this progress to the issue tracking system is critical because you want to know what the code changes are for and you want to make it easy to track what code fixed which issue. GitHub has added some automatic linking features that automate part of this process. If you refer to issues by “#” pound issue number like “#1” in the commit message, or the issue comment GitHub will automatically link to the corresponding issue number. Every code commit should have the issue number and description of the code changes. When the issue number is used, GitHub automatically lists the commit in the issue history. In one issue discussion, you can follow the entire set of changes to code. issue management
Commit hashes are also automatically linked. Every commit has a Secure Hash Algorithm 1 (SHA-1). This hash is not a sequential number, but a 160 bit unique string, which looks like “f9bf52794286cd2acf664f8ffd7d7547c1b4dfea,” and which is automatically linked to the commit by GitHub. This makes it easier to discuss multiple commits and peak at what was changed.
Documentation
Documentation is important. It is critical that you document what you do. When a project moves from one person who can control everything to a community of users and developers, it is important that people can find out how to use what you do, and the best way to help improve or enhance your work. It is possible to put all of your documentation into a readme file or into a documentation directory for the project, but it can be more convenient to use the GitHub wiki. Here is the quick and dirty way to use GitHub. Select the Wiki Tab on the project as shown in Figure 2-24.
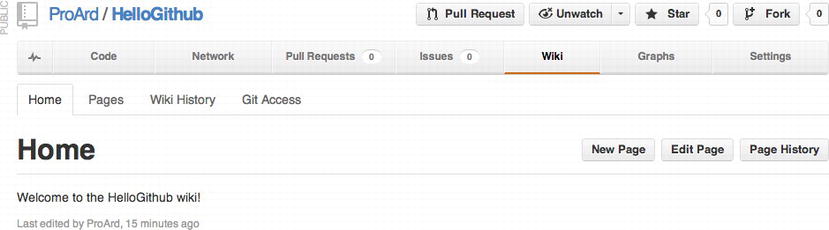
The default page is called Home and is automatically filled with the text “Welcome to the HelloGithub wiki!” From here, you can select Edit Page, and enter a main description and provide links to other important project pages.
The Create and Edit buttons are located on the left side of the wiki page. To create pages, click the New Page button, and you'll be presented with the Create New Page dialog, as shown in Figure 2-25.

Figure 2-25. The GitHub Create New Page dialog
In the dialog in Figure 2-25, you give your page a title. After selecting “OK” the “Edit Page” screen appears and you can use the minimal web GUI or just write the new page using markdown syntax as shown in Figure 2-26.
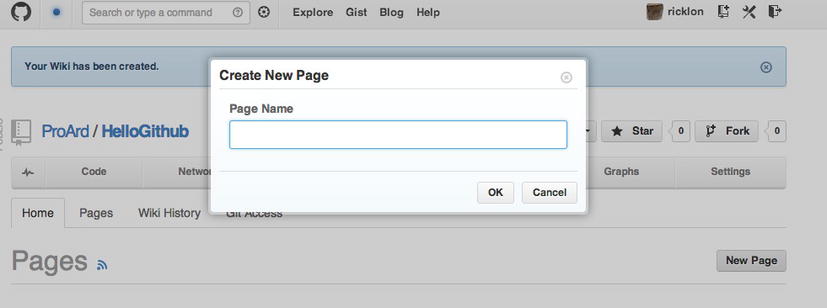
Figure 2-26. Editing the page
After entering the text in Figure 2-26, select the “save” option and the completed page appears. Figure 2-27 shows the published page you just saved.

Figure 2-27. Reviewing the completed page
Finally, you need to link the new page back to the home page by editing it and adding the line:
[Home](wiki/Home)
Anything between the brackets will be the hyperlink text. Then anything between the parentheses will be the link. In our case, we link the “wiki” and the page called “home.” Anywhere this code appears will link back to the main “Home” page.
Markdown is an efficient syntax for quickly generating wiki pages. GitHub-flavored markdown is very code friendly and easy to use. More details of GitHub markdown are found here: https://help.github.com/articles/github-flavored-markdown. Also, the HelloGitHub project has an interactive version of this file here: https://github.com/ProArd/HelloGithub/wiki/Markdown. The following are the basic code and page formatting options to get started quickly:
Code Blocks
We work with a lot of code in documentation, and showing examples quickly and easily is critical. To indicate a code section, we use three back ticks “```” to start a code block and we use three more back ticks “```” to close a code block. This makes it simple to add code into your documentation and examples. You can also specify the type of highlighting for your project. In the case of Arduino projects, you would be using C++ or C as the formatting and coloring options. You can choose not to show highlight with “no-highlght”.
Markdown:
```C++
/*
* Code goes here.
*/
void setup() {
}
void loop() {
}
```
Display:
/*
* Code goes here.
*/
void setup() {
}
void loop() {
}
Linking to files.
The label for the hyperlink is placed between square brackets “[ ]”, and then the link is placed between the parentheses “( )”, as in the example. When linking external documents or images, the full link can go inside the parentheses. When linking to pages or files in the wiki, the the entry needs to begin “(wiki/”, and everything after that is a page name or filename completed by the last “)”.
Markdown:
[Link to remote site](http://github.com/proard)
[Link to remote file](https://github.com/ProArd/attinysecretknock/blob/master/ATtinySecretKnock/ATtinySecretKnock.ino)
[Link to wiki files](wiki/TestLink)
Output:
Link to remote site
Link to remote file
Link to wiki files
The results are hyperlinks with the link to labels.
Headings
Heading values are determined by the number of hash “#” symbols. A level 1 header would be one “#”, level 2 “##”, and level 3 “###”.
Markdown:
# H1
## H2
### H3
#### H4
Output:
H1
H2
H3
H4
Lists
Lists can be ordered or unordered. It is possible to mix and match ordered and unordered lists. These shortcuts appear just like html ordered and unordered lists.
Ordered lists
Ordered lists just need to start with a number. GitHub wiki will substitute the correct sequence number.
Markdown:
10.  item 1
9.  item 2
Output:
    1.  item 1
    2.  item 2
Unordered lists
Unordered lists can use *, -, or, + as symbols. It doesn't matter which as long as there exists a space between the symbol and the start of the list value.
Markdown:
* item a
+ item b
- item c
Output:
- item a
- item b
- item c
Linking to Images
Linking to images is just another version of linking. Except the brackets “[]” denote the alt text for the image. The parentheses hold the link to the image. If the image is in your project you can hyperlink to the raw file. It is possible to add the image to your project wiki by checking out the project's GitHub wiki, adding an image, committing, and then pushing it back into your GitHub project wiki. The HelloGithub project wiki can be found here: https://github.com/ProArd/HelloGithub/wiki/_access
Here’s the syntax of Markdown code to place an image, followed by a specific example:

Markdown:

Output:

Normal Text
For normal text you can type standard sentence structure. Paragraphs will automatically break at the new line. This combination of links, code formatting, and basic information structuring can get you started documenting your project. More importantly, effective documentation can help people understand why project is important, how they can help support it, and when to join in with you to document it.
Contributing to Arduino Development
Now that you're comfortable with the concepts and tools of social coding, I'll present an example workflow that sets up an Arduino social development environment, using the concepts and tools discussed in the preceding sections of this chapter.
The proper way to contribute code and fixes to the Arduino project is to fork the repository to your own area on GitHub. Then you can make changes to your repository and commit those changes to your repository. Next, you create a pull request on GitHub for those changes to be merged into the main project. This pull request can be reviewed, and then rejected or accepted into the project.
Forking Your Own Copy of Arduino
Here are the steps you would use to configure your own repository from Arduino’s official repository on GitHub. Figure 2-28 shows Arduino GitHub project page.
- Log into GitHub at http://github.com.
- Go to the Arduino project:
http://github.com/arduino/Arduino.
- Select Fork for the Arduino project on the GitHub interface. This places a copy of the Arduino repository into your own GitHub area. Now that you have that in place, you need to clone your copy of Arduino to your local machine. This process is called cloning your fork of Arduino, and can be accomplished with the following command:
$ git clone[email protected]:username/Arduino.git
- If you don’t need the entire project history, use this instead:
$ git clone [email protected]:arduino/Arduino.git --depth 1 - Set the official Arduino repository as the upstream repository. The upstream repository is needed so that you can pull down new code that other people add to the Arduino project. Here are the commands to do so:
$ cd Arduino
$ git remote add upstream [email protected]:arduino/Arduino.git - Now that you have this in place, you can start editing the code. After a while, you'll want to fetch and merge changes from Arduino every time new code is added. This is done with the following commands:
$ git fetch upstream
$ git merge upstream/master
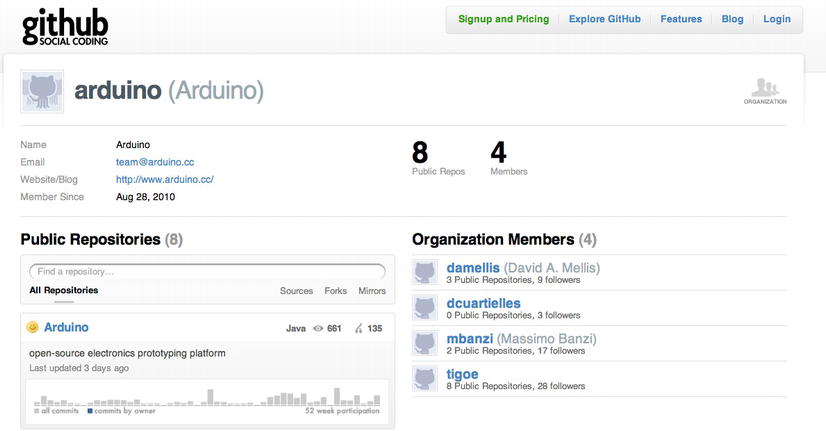
Figure 2-28. Arduino organization Arduino repository
Once you have the your own fork, and have cloned it locally you will want to compile and run the Arduino IDE from source code. Arduino has documented this process here: https://code.google.com/p/arduino/wiki/BuildingArduino. Once you are able to run the software using “ant run” you can now make changes to the source code. It is now possible to find issues in the Arduino project’s issue list and fix them. Using the social coding techniques you will be able to make changes to the software, and submit your changes as pull requests back to the Arduino project. It’s a big challenge to get this far with a large project, but it is really worthwhile to be able to make a great project even better with the power of the open source community.
The combination of tools allows for complete issue tracking and code management.
How to build the Arduino IDE from source
Now that you have the source code, you will want to run the code to identify the changes and test that everything is working. There is a straightforward process for doing this, but installing the toolkit is a little bit tricky. The process is different for the Windows, Mac OS X, and Linux platforms.
- Install Cygwin:
- Install JDK
- Install ANT
- Configure ANT home directory
- Install GIT (you may have already installed it)
- Clone your fork of Arduino or Clone Arduino
- Go to project directory
- Go to build directory
- Type “ant clean”
- Type “ant run”
- Install ANT
- Configure ANT home directory
- Install GIT (you may have already installed it)
- Clone your fork of Arduino or Clone Arduino
- Go to project directory
- Go to build directory
- Type “ant clean”
- Type “ant run”
- Install JDK:
- Install ANT
- Configure ANT home directory
- Install GIT (you may have already installed it)
- Clone your fork of Arduino or Clone Arduino
- Go to project directory
- Go to build directory
- Type “ant clean”
- Type “ant run”
Any Java compilation errors will stop the run. Any updates to the core files must be tested by compiling and uploading.
Community Resources
The Arduino community is a great source for both beginning and experienced developers. The community allows for users to share their experiences and help one another learn new skills and troubleshoot difficult problems. The following list provides some valuable resources offered by the Arduino community:
- The Arduino blog (http://arduino.cc/blog)
- The Twitter feed for the Arduino team (http://twitter.com/arduino)
- The Arduino forums (http://arduino.cc/forum/)
- The developer mailing list (https://groups.google.com/a/arduino.cc/forum/?fromgroups#!forum/developers)
- The Arduino Playground (http://arduino.cc/playground/)
- The Arduino Style Guide for Coding (http://arduino.cc/en/Reference/StyleGuide)
- The Arduino Style Guide for Writing Libraries (http://arduino.cc/en/Reference/APIStyleGuide)
Summary
Using the social-coding practices outlined in this chapter, you’ll be able to create projects that can transition from personal projects, to group projects, to professional projects that use version control, issue tracking, and documentation. By using these processes, you can also join other open source projects and contribute feedback, documentation, issues, and code fixes. If you follow these procedures, your code and ideas can find there way into Arduino projects as features, fixes, and new libraries.
The patterns outlined in this chapter will be used throughout the book and code examples. All the code examples can be found at and forked from http://github.com/proard.