
Using the Project Center

The Project Center provides access to project and resource information, as defined by your administrator. For the purposes of this discussion, it is assumed that the Project Server administrator has granted you permissions to view project and resource data for the entire organization.
You can access the Project Center from either Microsoft Project Web Access (by selecting Projects from the main menu) or from Microsoft Project Professional (by selecting Collaborate, Project Center).
Four primary functions are associated with the Project Center:
Viewing projects— The project views provide a 30,000-foot perspective of each project stored in the Project Server, so you can see and compare project progress, cost, variance, or other user defined information at a glance. From the project views you can select and open individual projects, change the way projects are filtered and grouped, and change the type of data displayed in the view.
Modeling projects by using the Portfolio Modeler— The Portfolio Modeler allows you to model changes to projects or resource assignments and view the impact of the changes online, without affecting the project schedules. The Portfolio Modeler is useful for performing what-if analysis on projects and project teams.
NOTE
For the purposes of this chapter, modeling is defined as creating information about a project schedule or group of schedules from data about those schedules, by applying user-controlled parameters to test the effect of the changes on the model’s overall duration and resource usage.
For example, one model might show the results (in terms of schedule duration and resource utilization) if Denver Project A is the highest priority in the portfolio and the other projects are of equal priority, and a different model might show the results if Denver Project B is the same priority as the other projects in the portfolio.
Analyzing projects in the Portfolio Analyzer— The Portfolio Analyzer enables you to display and manipulate project and resource information from data stored in an OLAP cube. The OLAP cube contains a snapshot of all information associated with published projects (that is, projects of the version Published), and is created on a regular basis or an ad hoc basis by the administrator. The Portfolio Analyzer is useful for looking at and manipulating an organization’s project and resource plan-of-record data.
Managing personal to-do lists— You can manage personal to-do lists in the Project Center. To-do lists are useful for tracking personal tasks that don’t require formal scheduling.
The first three of these topics are described in more detail in the following sections.
Viewing Projects
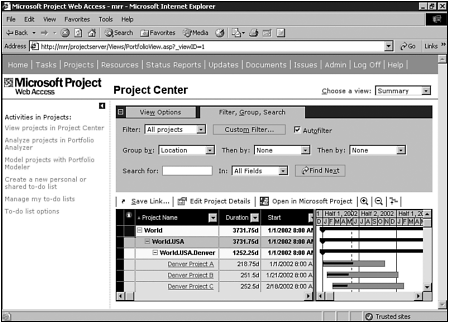
You should use the project views when you want to get an overview of all projects stored in the Project Server, as shown in Figure 27.1.
Figure 27.1. You can use the Project Center’s project views to get an overview of project information.

Here are descriptions of the key fields and information shown in Figure 27.1:
Using the Project Center’s View Options
You use the Project Center’s View Options tab to refine the contents of the display. You can click on the View Options tab to see the list of View Options that are available, or you can click on the + and - icons on the left side of the tab to expand or collapse the View Options display.
There are three Project Center view options:
Show To-Do Lists— If the Show To-Do Lists check box is checked, to-do list items are included in the display.
Show Summary Tasks— This option appears only if you clicked on a project to see the project’s details. You should check the Summary Tasks check box if you want to display summary tasks.
Show Summary Rollup— This option appears only if you clicked on a project to see the project’s details. You should check the Summary Rollup check box if you want to display tasks or milestones on their summary taskbars. This applies only when a summary task is rolled up (that is, there is a + next to the summary task).
Using the Project Center’s Filter, Group, Search Tab
You select the Filter, Group, Search tab to display or hide the Project Center’s filtering, grouping, and searching options. The following sections describe how Filter, Group, and Search work for Project Center and Resource Center views, although the examples are for projects.
Using Project Center Filters
You can use Project Center’s Filter option to filter the project list. There are three options for filtering the project list:
Filter— The Filter drop-down list box contains two options: All Projects and Custom Filter. If the Custom Filter option is selected (or the Custom Filter button is selected), the More Filters pull-down appears at the top of each column of schedule data.
Custom Filter— The Custom Filter button provides the opportunity to use up to three criteria statements to filter the list of projects, as shown in Figure 27.2.
Figure 27.2. You can use custom filters to limit which projects are displayed.

Autofilter— You check the Autofilter check box to have the standard Autofilter arrows appear next to the column names in the Project Center view, and then click the Autofilter arrows to define and apply the Autofilters.
Using Project Center Groups
You use the Group By function to sort the Projects in the Project Center into groups. The Group By function provides three drop-down list boxes, each of which defines a data field to group on. The Group By execution order is from left to right for each Group By field that is defined, with the results of each operation nested within the previous group’s results.
Grouping projects by an enterprise project outline code can provide useful information. Suppose, for example, that you want to see projects grouped by location. If the Location enterprise outline code has been added to one of your project views, you can group the projects by location by performing the following steps:
1. |
In Project Web Access, navigate to Projects and select the view that has the Location code added (in this example, the Location code has been added to the Summary view). NOTE It is not possible to group on any field that is not currently defined for the view. If you want to group (or filter) a view with fields that aren’t currently defined for the view, you need to have the administrator modify the view or create a new view for you. |
2. |
Select Filter, Group, and then select the Search tab. Select Location from the Group By pull-down list. Your projects should be grouped by location, as shown in Figure 27.3. Figure 27.3. You can group the project view information by enterprise project outline codes (for example, Location).
|
Using Project Center Searches
You use the Search For option to locate projects by entering a text string to search for, and the fields in which you want to search for the text. After the search criteria are specified, you click Find Next to display each project that matches the search criteria.
As with the Group By function, the only fields available for searching are those that are defined as part of the view.
Modeling Projects with the Portfolio Modeler
 | With portfolio modeling you can interactively make changes to projects or resource staffing and immediately view the impact of those changes on a group of projects without affecting the actual schedules involved. This is known as modeling changes to schedules. See the section “Transferring Portfolio Models to Actual Schedules,” later in this chapter, for information on how to migrate models to actual schedules. |
Modeling different project and resource scenarios provides a fast and powerful way to find overallocated resources, determine the feasibility of new projects, and identify the best staffing strategies to support projects across an organization.
Remember from the earlier example that Elkhart Software Company manages projects and resources in its Denver and Seattle offices. The Denver office has four projects currently underway, Denver Projects A–D, with Denver Project E about to be added to the Denver portfolio.
To illustrate the usefulness of the Portfolio Modeler and Portfolio Analyzer, we use them throughout the rest of this chapter to answer the following questions about Elkhart Software Company’s Denver projects and resources:
What is the Denver office’s capacity for work?
What resource bottlenecks are associated with Elkhart’s Denver office?
What resource skills in the Denver office are underutilized?
What is the impact if you add a new project to the Denver office?
To answer those questions, you can use the following approach (each of these steps is described in detail later in this chapter):
You can access the portfolio modeling features by logging in to Microsoft Project Web Access, clicking Projects, and then selecting the Model Projects with Portfolio Modeler link.
All existing models are listed on the initial Portfolio Modeler page, as shown in Figure 27.4.
Figure 27.4. The five portfolio models described in this chapter have been created for the Denver office projects.

From this screen you can add, open, modify, analyze, delete, or unlock portfolio models. Each of these functions is described in the following sections.
Creating New Portfolio Models
When you look at the Elkhart company’s Denver projects by using a traditional Gantt Chart view (refer to Figure 27.1), you see the current schedules for the Denver projects. How viable are these schedules?
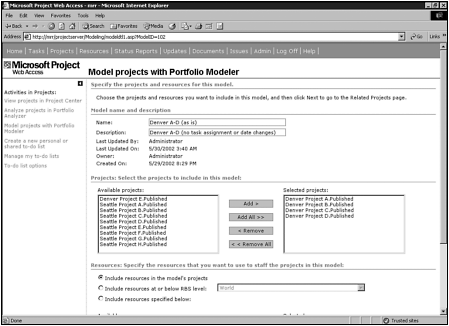
To find out how viable these schedules are from a resource allocation perspective, you create a new portfolio model called Denver A–D (as is).
To create the new portfolio model you need to follow these steps:
1. | |
2. |
Select the projects to be included in the model, as shown in Figure 27.5. Figure 27.5. The Denver A–D (as is) portfolio model includes Denver Projects A through D.
Because you want to create a model of the Elkhart Denver projects as they are currently scheduled, choose Include Resources in the Model’s Projects (although it doesn’t matter which radio button you choose for resources to include in the model; in the next step you’ll be specifying that the model not make any changes to existing resource assignments or dates). For other types of modeling, you need to choose from one of these three mutually exclusive ways to define the resources available to the modeler when creating the model:
|
3. |
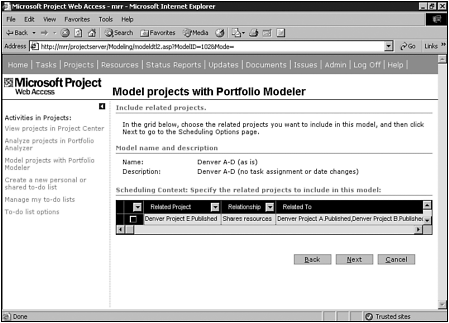
As shown in Figure 27.6, the second step in creating a new portfolio model is to decide which, if any, related projects to include in the model. Figure 27.6. By not selecting the a particular project, you keep its data out of the model.
The Relationship column specifies whether the related project shares an external dependency (that is, a cross-project link) or shares resources with the projects in the Related To column. For the Elkhart Denver example, you want to include only the currently active Denver Projects (A–D) that you specified in step 1, so you click Next without including the new Denver E. Project. |
4. |
Define the three scheduling options—Priority, Scheduling Options, and Start No Earlier Than Date—as shown in Figure 27.7. These options are described as follows: Figure 27.7. You need to choose the scheduling options for the model.
|

You have created an as-is model of the Elkhart company’s Denver projects called Denver (as is). To learn about modifying portfolio models that you have created, see the next section, “Modifying Existing Portfolio Models.” To learn about creating new portfolio models using what-if resources, see the section “Building a Portfolio Model Using What-If Resources,” later in this chapter.
To continue with the Elkhart company example, you need to create two additional portfolio models, using the following parameters:
Create a portfolio model called Denver A–D (optimized), using the following configuration options:
Include only projects Denver A through D (published).
Include resources at or below the RBS level .Denver.
Leave each project’s priority at 500.
Specify the Scheduling option Reassign Resources in Model’s Pool for all projects.
Use the default Start No Earlier Than Date setting.
Create a portfolio model called Denver A–C (optimized), using the following configuration options:
Include only projects Denver A through C (published).
Include resources at or below the RBS level .Denver.
Leave each project’s priority at 500.
Specify the Scheduling option Reassign Resources in Model’s Pool for all projects.
Use the default Start No Earlier Than Date setting.
After you have created the four Denver portfolio models—Denver (as is), Denver A–D (optimized), Denver A–C (optimized), and Denver A–E (optimized)—you need to open the models (see the section “Opening Portfolio Models,” later in this chapter) and compare them against each other (see the section “Comparing Portfolio Models,” later in this chapter).
Modifying Portfolio Models
After you have created a portfolio model, you might want to change its parameters or create a new model, using the parameters of an existing model.
There are two ways to modify an existing portfolio model: by going through the Model Projects with Portfolio Modeler screens again and via the Model Property toolbox (see the section “Opening Portfolio Models”, later in this chapter).
The model-modification process prompts you with the same configuration screens that are used to create a model (see the section “Creating New Portfolio Models,” earlier in this chapter), with the current parameters remembered.
You can modify the desired parameters as you move through the model definition screens to generate a model with the same name or a different name.
Opening Portfolio Models
To open a portfolio model, select Projects, Model Projects with Portfolio Manager and either double-click the model name or select a model and click Open.
As shown in Figure 27.8, the opened model screen displays projects using color-coded Gantt Chart bars to identify the degree to which project resources are overallocated over time. The Gantt Chart bars can display red, yellow, or green to show the time periods where the total resource demand meets or exceeds the available capacity. For each time period:
Figure 27.8. The Denver A–D (as is) portfolio model Gantt Chart with each modeled project showing overallocated resources.

If the demand is less than the capacity, the bar is set to green.
If the demand exceeds the capacity by less than 10%, the bar is set to yellow.
If the demand exceeds the capacity by more than 10%, the bar is set to red.
You can analyze or modify a portfolio model from the initial Model Projects with Portfolio Modeler screen, but you must open a model before you can use the Compare function or use the Model Property toolbox.
The Portfolio Modeler toolbox allows you to modify some of the model’s parameters without going through all the screens associated with modifying a model. See the section “Using the Portfolio Model Property Toolbox,” later in this chapter, for details.
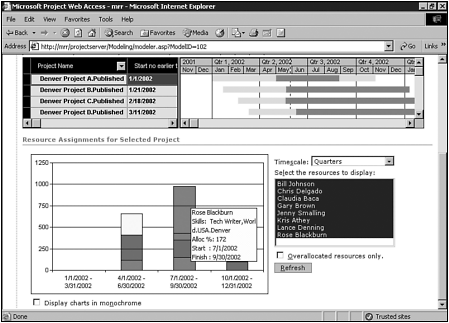
When you open a portfolio model, you see a portfolio model Gantt Chart and you also see a Resource Assignments chart, as shown in Figure 27.9.
Figure 27.9. The Denver (as is) portfolio model Resource Assignments chart shows Rose Blackburn overallocated by 72% in the Denver Project A project.
CAUTION
The Resource Assignments for Selected Project chart displays resource availability for one project only, the project selected in the Gantt Chart, and not for the portfolio of projects in the model.
Each block in the Resource Assignments chart represents one resource, and the scale used on the chart’s vertical axis represents the total number of hours worked, based on the timescale. The unit for each period on the graph is controlled by the Timescale drop-down list box. The options are Day, Week, Month, Quarter, Year, and Auto. The option that is selected defines the timescale at the bottom of the chart. The Auto option allows the Portfolio Modeler to determine which of the timescale options provides the best view and granularity.
If you use the mouse pointer to hover over blocks in the Resource Assignments chart, a ScreenTip window pops up, giving information about the resource represented by the block.
By changing the Resource Availability chart’s timescale to Years and hovering over the red and yellow blocks, you get your first clues about which Denver resources and skills are overallocated and underallocated during 2002 and by how much.
The block representing each resource for a time period can appear in red, yellow, or green, to show the time periods where the demand for that resource meets or exceeds the resource’s available capacity. The color coding is the same as the color coding used with the Portfolio Modeler’s Gantt Chart.
Using the Portfolio Model Property Toolbox
The advantage of using the Portfolio Model Property toolbox is that you can bring up the toolbox while you have a model open, make changes to a project in the model, and then view the changes you have made immediately after you apply the changes. The disadvantage is that you can’t modify all of a model’s parameters with the toolbox.
To use the toolbox, open a portfolio model, select a project, and then click the Toolbox icon. Figure 27.10 shows the portfolio model parameters that can be changed via the toolbox. Each of these parameters is described in detail in the section “Creating New Portfolio Models,” earlier in this chapter.
Figure 27.10. When you click the Toolbox icon, the Model Property Toolbox is displayed, prepopulated with the model’s current parameter values.

Click Apply when you have finished making changes in the toolbox to see the changes applied to the open model.
Comparing Portfolio Models
After you create portfolio models, you often want to compare models to see what effects changes produce.
To compare models, you need to open a portfolio model and click the Compare icon. For example, in Figure 27.11 the three Elkhart Denver portfolio models created earlier in this chapter are selected.
Figure 27.11. Three portfolio models are selected for comparison.

NOTE
The order in which the portfolio models are selected is the order in which they are displayed.
After you have selected the models to be compared and their order of display, click OK to see the portfolio models compared.
Analyzing Portfolio Models
You can use the Portfolio Modeler’s Analyze feature to quickly and easily identify resource availability and bottlenecks for projects in a portfolio model.
NOTE
Don’t confuse the Portfolio Modeler’s Analyze feature with the Portfolio Analyzer (see the section “Using the Portfolio Analyzer,” later in this chapter).
Selecting a portfolio model and clicking the Analyze icon displays the screen shown in Figure 27.12.
Figure 27.12. This screen displays the model’s name and description, summary statistics, Demand/Capacity/ Utilization chart, and scheduling options.

This model analysis screen provides useful information about the model you are working with.It provides a chart that plots resource demand, capacity, and utilization for the entire model over time, and it tells you the scheduling options used per project to create the model.
The model analysis screen consists of four parts, which are described in the following sections.
Model Name and Description
The Model Name and Description section of the portfolio modeler analysis screen specifies the model’s name, description, owner, created date, last updated date, and who the last person was to update the model (see Figure 27.12).
Summary Statistics
The Summary Statistics section provides two sets of analysis data, the Shortest Schedule and the Modeled Schedule, for the selected model (refer to Figure 27.12).
The shortest schedule is calculated by the scheduling engine in the Portfolio Modeler to be the minimum time in which the scheduled projects could possibly be completed, given an unlimited number of resources.
The modeled schedule is calculated by the scheduling engine in the Portfolio Modeler to be the current time, based on the options selected when the model was created, in which the scheduled projects could possibly be completed.
For the shortest schedule and the modeled schedule, the reported data includes the following:
Start Date— The earliest start date from all projects in the model.
Finish Date— The latest finish date from all projects in the model.
Resource Utilization— The ratio between Demand and Capacity. That is, how much of the available resources are being utilized.
Total Work— The total work from all assignments in the model.
Resource Overhead— The spare capacity within the model. That is, the total capacity minus the total work.
The Demand/Capacity/Utilization Chart
The Demand/Capacity/Utilization chart contains three separate line graphs (refer to Figure 27.12). Each line on the graph shows a cumulative position since the start of the model. Following are the definitions of each line on the graph, and the two parameters that control the chart:
Capacity— The cumulative capacity for the resources in the model. It is the total amount of time available for work associated with each resource across all the projects in the model, given each resource’s units and calendar. For example, two work resources, each with calendars that define 8-hour workdays with units of 100%, have a capacity of 16 hours per work day.
Demand— The amount of work that the tasks in the model require in order to successfully complete before the model has been modified by the modeling engine.
Utilization— The amount of work that the tasks in the model require in order to successfully complete after the model has been modified by the modeling engine, using the current model’s options (choice of resources, scheduling options, and so on).
Skill Profiles— The Skill Profiles drop-down list box contains a list of all the skill profiles that have been used in any of the projects in the model. Selecting any one of them causes the demand for that skill to be displayed across all the projects in the model.
Timescale— The Timescale drop-down list box contains a list of the time units for the graph. Valid options are Day, Week, Month, Quarter, Year, and Auto. No matter which time unit is selected, the whole model is always displayed, which might result in some chart entries not being legible. The Auto option automatically selects the best option for the chart.
The following are some suggestions you can use to interpret the Demand/Capacity/Utilization chart:
If demand is greater than capacity and utilization, the requirement for work (demand) is greater than the ability of the resources to meet the demand. For the skill profile being analyzed, your model’s schedule(s) is resource constrained, and adding resources will help bring in the schedule.
If demand is less than capacity, there is excess capacity of resources. For the skill profile being analyzed, your model’s schedule(s) is not resource constrained, and adding resources will not help bring in the schedule.
If capacity is greater than demand and utilization, the available resources (capacity) is greater than the amount of work required (demand). For the skill profile being analyzed, your model’s schedule(s) is limited by task dependencies or constraints, and adding resources will not help bring in the schedule.
If capacity is greater than utilization, the resource(s) in the skill profile being analyzed is being underutilized.
The following are some items that you need to be aware of when using the Demand/Capacity/Utilization chart:
The Demand/Capacity/Utilization chart is cumulative, which can make it difficult to see resource over- or underallocations for specific time periods.
Although you can use the Portfolio Analyzer to obtain detailed schedule and resource data for comparison with as-is types of models (that is, models in which the tasks and assignments haven’t changed), no detailed schedule and resource data exists for portfolio models using other scheduling options.
Skill profile data comes from tasks having associated skills based on resource assignments. You can see these skills associated with tasks by opening the modeled schedule in Project Professional, selecting the Resource Usage view, and inserting the enterprise resource code field. If tasks don’t have these skill codes assigned correctly, the skill profile charts will not be accurate.
Generic resources that are included in a schedule increase the capacity value in the Demand/Capacity/Utilization charts, and if they are assigned to tasks, they increase the utilization value.
Model Scheduling Options
The Model Scheduling Options section displays the scheduling parameters used to create the model for each project that is included in the model.
Building a Portfolio Model Using What-If Resources
In the section “Analyzing Projects in the Portfolio Analyzer,” later in this chapter, we determine that the skill bottlenecks for the Elkhart company’s Denver office are most likely the tech writer, operations, project manager, and tester. To validate this we can add four what-if resources to the enterprise resource pool, include those what-if resources in our model, and verify the results.
Follow these steps to build the portfolio model by using what-if resources:
Adding the what-if resources accomplishes the goal of meeting the original project completion dates while resolving the resource overallocations.
Additional modeling iterations might be appropriate, depending on the level of planning granularity and detail that your organization is interested in. In addition, the portfolio modeling is only providing high-level information. The detailed costs and time frames associated with adding these new what-if resources will not be known until actual schedules are updated.
Adding a New Schedule to an Existing Portfolio Model
In the section “Analyzing Projects in the Portfolio Analyzer,” later in this chapter, we determine that the skill bottlenecks for the Elkhart company’s Denver office are most likely the tech writer, operations, project manager, and tester. To validate this we can add four what-if resources to the enterprise resource pool, include those what-if resources in our model, and verify the results.
Follow these steps to build the portfolio model by using what-if resources:
Adding the what-if resources accomplishes the goal of meeting the original project completion dates while resolving the resource overallocations.
Transferring Portfolio Models to Actual Schedules
An initial reaction to finding a desired model by using the Portfolio Modeler is to want to automatically transfer that model to the actual projects by using the Resource Substitution Wizard.
Although the scheduling options between the Portfolio Modeler and the Resource Substitution Wizard support this, as shown in Table 27.1, the Resource Substitution Wizard might significantly change resource assignments across projects, which could negatively affect project schedules due to factors such as new learning curves, morale issues, and the overall impact of constant change.
You should use portfolio models to demonstrate what is possible, but then ask portfolio and project managers to come up with new plans that meet or beat the models within an agreed-upon timeframe.
→ For information on the Resource Substitution Wizard’s scheduling options, see “Using the Resource Substitution Wizard,” p. 1048.
Analyzing Projects in the Portfolio Analyzer
The Portfolio Analyzer gives executives and managers easy access to summary information about the Published versions of projects and resources. The data can be grouped in a variety of ways, and the user can choose which data and which grouping to display in the view, by using PivotTable controls like those in Microsoft Excel.
Before you can look at a Portfolio Analyzer view, the administrator must first create the view.
The primary difference between the Portfolio Modeler and the Portfolio Analyzer is that the Portfolio Modeler provides a broad view of the portfolio data, whereas the Portfolio Analyzer provides the detailed data required to “slice and dice” the portfolio data to the level of detail required. Table 27.2 lists additional differences between the Portfolio Modeler and Portfolio Analyzer.
| Comparison Area | Portfolio Analyzer | Portfolio Modeler |
|---|---|---|
| Data source | Portfolio Analyzer uses data from the selected OLAP cube. | Portfolio Modeler gets data directly from the Project Server database. |
| Data currency | The data in a Portfolio Analyzer view is current as of the date and time the OLAP cube was generated. | The data in a Portfolio Modeler view is current as of the date and time the model was generated. |
| Data specification | The data in a Portfolio Analyzer view always includes the Published version of all projects in the Project Server, as well as all resources in the enterprise resource pool, when the OLAP cube is generated. You can specify date ranges for the data included in the Portfolio Analyzer. |
You can specify which projects (and their versions) to include in a portfolio model.
You can specify which resources to include in a portfolio model. You can specify different resource modeling options for each project included in the model (for example, you might choose to have all projects in the model be as-is, except for a new project to examine the impact of the new project on the current project portfolio). |
| Modeling tools | The SQL Server 2000 Analysis tools are available through Web Access. | The Analyze option in the Modeler is available through Web Access. |
→ See “Building OLAP Cubes and Updating Resource Tables,” p. 1095, for the parameters that are available when creating OLAP cubes, and see “Creating New Portfolio Models” p. 1066, for the parameters available when specifying portfolio models.
The data and functionality available in each Portfolio Analyzer view depends on the data and options that the administrator has allowed when creating the view, in combination with the level of Office Web Components that the user has (for example, full interaction or just viewing capability).
Data is presented in the Portfolio Analyzer in one of three ways:
PivotTable— PivotTables enable users to analyze information by sorting, grouping, filtering, and pivoting on data in a spreadsheet format.
Chart— Charts graphically display information from a PivotTable.
Combination PivotTable and chart— Data is presented in both a PivotTable and chart format.
To demonstrate the power and value of the Portfolio Analyzer, this section continues with the Elkhart company’s Denver office example.
From the Portfolio Modeler, you know that, as currently scheduled, the projects being worked on in the Denver office have serious resource overallocation and underallocation issues. To find out more about resource allocation in the Denver office, the administrator has created an OLAP cube (named Elkhart OLAP Cube) and a new Portfolio Analyzer view (named All Elkhart Projects).
To look at the All Elkhart Projects view, you need to log in to Microsoft Project Web Access, navigate to Projects, Analyze Projects in Portfolio Analyzer, and choose the All Elkhart Projects view. The screen shown in Figure 27.13 appears.
Figure 27.13. You can use the Portfolio Analyzer to ‘slice and dice’ portfolio data.

Figure 27.13, though, contains all Elkhart project data. To reduce the data to just the four current Denver projects (Denver Project A–D), you need to use the Projects filter to deselect all projects other than the four current Denver projects, as shown in Figure 27.14, and use the Resource RBS filter to deselect all Elkhart resources except those in Denver.
Figure 27.14. You can use each data item’s pull-down menus to filter or expand the data you want to look at.

CAUTION
Resources that have not been assigned to any tasks do not show up in the OLAP cube. You should make sure there are no resources in the enterprise resource pool that are being overlooked because they are currently assigned to no tasks.
As a result of looking at the Denver resources, by using the All Elkhart Projects portfolio analyzer view shown in Figure 27.13, you can determine the following:
The business analyst (Kris Athey) is underallocated by 1,096 hours during 2002 (976 work hours out of 2,072 available hours), yet he is overallocated by 44 hours during Q1, 2002. The Business Analyst skill is probably not a resource bottleneck for the Denver office because the overallocation is so small.
The Web developer (Bill Johnson) is overallocated by 104 hours during 2002 and, more seriously, he is overallocated by 624 and 520 hours during Q2 and Q3 2002, respectively. There are three other resources (Jenn Rollins, Mimi Radley, and Tom Smith) in the enterprise resource pool who have the Web Developer skill, and there is an RBS of Denver, so additional Web developers are not needed and the Web Developer skill is not a resource bottleneck for the Denver office.
The operations resource (Gary Brown) is underallocated by 1,152 hours during 2002, but he is overallocated by 192 hours during Q4 2002. The Operations skill is probably a resource bottleneck for the Denver office because of the overallocaton.
The project manager (Chris Delgado) is underallocated by 440 hours during 2002, but she is overallocated by 292 and 172 hours during Q1 and Q2 2002, respectively. The Project Manager skill is probably a resource bottleneck for the Denver office because of the overallocation.
The tech writers (Jenny Smalling and Rose Blackburn) are underallocated by 2,128 hours during 2002, but they are overallocated by 232 and 376 hours, respectively, during Q3 2002. The Tech Writer skill is probably a resource bottleneck for the Denver office because of the overallocation during Q3 2002.
The tester (Lance Denning) is overallocated by 200 hours during 2002 and, more seriously, by 268 and 408 hours during Q3 and Q4 2002, respectively. The Tester skill is probably a resource bottleneck for the Denver office because of the size of the overallocation during Q3 and Q4 2002.
The trainer (Claudia Baca) is underallocated by 472 hours during 2002 but overallocated by 100 hours during Q3 2002. The Trainer skill is probably not a resource bottleneck for the Denver office because of the overallocatons of other project team members. The trainer might become the bottleneck if new team members are added to the project.
Assuming that schedule is more important than cost, adding one new tech writer, one new project manager, one new operations person, and one new tester resource to Denver should resolve the overallocation issues and bring the project schedules in line.
Also assuming a $100/hour average cost for the additional tech writer (for 3 months, or 500 hours), tester (for 6 months, or 1,000 hours), project manager (for 6 months, or 1000 hours), and operations (for 3 months, or 500 hours) resources, an upper boundary cost estimate for the additional resources is approximately $300,000.
Note that this $300,000 might be lowered or avoided completely if other Denver resources have the skills and are willing to take on the extra work. We’re also assuming (to keep the example simple) that it isn’t feasible to bring Seattle resources to Denver to solve this problem. The schedules might also be able to be reduces just as much with fewer resources being added, saving significant sums of money, so be sure that you model different combinations of added resources.
To validate that the $300,000 will enable you to have all the Denver projects scheduled to complete as originally scheduled, with no resource overallocations, you need to create a new model to compare to the Denver (as is) model. The steps for creating a portfolio model using what-if resources are described in the section “Building a Portfolio Model Using What-If Resources,” earlier in this chapter.