8
CUSTOM CLASSES AND STRUCTS

Up to this point, the variables and constants you’ve been using were simple Int, Double, and String data types. You’ve also learned how to work with collections of data like arrays and dictionaries. In this chapter, you’ll learn how to create your own type of data by writing a custom class that can be anything you want!
A class is a package that contains different types of data and functions that use that data. A custom class is a new data type that you can use to create objects. In the real world, an object is something that can be seen and touched, like a backpack, a cat, or a car. In Swift, objects can either represent these real-world objects, or they can be objects that don’t exist outside your application, such as a view controller object that controls what is shown on an iPhone. An object in programming is defined as something in a program that can have state and behavior. The state describes the current condition of the object. If we made an object in our code to represent a backpack, its state could be its size, color, or whether it is full of books. The behavior is what the object does or can do. If we made a cat object, its behaviors could be to chase mice, purr, or scratch a tree.

The class is like a blueprint for creating objects. For example, say you have an Airplane class that represents different planes. The class is a structure to make a new Airplane object, but it isn’t an object itself. An individual object that you create with a class is called an instance of that class. For example, we could use the Airplane class to create a specific boeing787 airplane that flies from Boston to San Francisco and holds a certain amount of jet fuel and a specific number of passengers. In this case, boeing787 would be an instance of the data type Airplane.
The Airplane class could include data like a Double specifying the amount of jetFuel that is left in the tank and an Int for the numberOfPassengers. In Swift, the data inside a class are the class’s properties. Properties make up the object’s state. The properties of a class (like jetFuel and numberOfPassengers) are variables and constants, just like the ones that you’ve seen before. Likewise, the functions in a class are called the class’s methods, and they are exactly like the functions you’ve already learned about. The Airplane class could have a method called fly(from:to:) that is used to make the airplane fly from one airport to another.
MAKING A CLASS
Let’s create a BirthdayCake class. This class will have properties for the size of the cake and the lucky birthday person’s name and age. There will be a method in the BirthdayCake class to display a greeting on the top of the cake. Before we add these things, though, we need to write the class definition.
WRITING A CLASS DEFINITION
First let’s open a new playground and call it BirthdayCakes. In Xcode, you can create a new playground using the Xcode menu by selecting File ▸ New ▸ Playground. In the dialog that follows, name your playground BirthdayCakes. Type the following into your new playground to make your BirthdayCake class:
class BirthdayCake {
}
You start by writing the keyword class followed by your class’s name. Your class name should always start with an uppercase letter and then be in camel case after that. This is different from constant, variable, and function names, which always start with a lowercase letter. This is because we’re creating a new Swift data type, BirthdayCake, and data types always start with an uppercase letter (like Double or String).
After the class name, you type an opening brace, {, and then, at the end of the class, you type a closing brace, }. All the properties and methods of this class will be written inside those two braces. That way Swift knows that they belong to that class.
The class definition for BirthdayCake is like a blueprint to make birthday cakes. Once we create that blueprint by writing the BirthdayCake class, we can use it to make as many instances of cakes as we want with the same or different properties.
STORING INFORMATION IN PROPERTIES
Now let’s add some properties to our BirthdayCake definition. A property of a class can either be a constant or a variable and is created with the keywords let or var, just like regular constants or variables. Add these three property definitions inside the braces of the BirthdayCake class:
class BirthdayCake {
➊ let birthdayAge = 8
➋ let birthdayName = "Jude"
➌ var feeds = 20
}
Here we created constants for the birthdayAge ➊ and the birthdayName ➋ of the birthday person as well as a variable for the number of people that the cake feeds ➌.
When you create a property, you can assign it a default property value, which is the value that you give to the property in its definition. In our case, we’ve given birthdayAge the default value of 8, birthdayName the default value of "Jude", and feeds the default value of 20.
When we create instances of a class (which we’ll do next), all the properties inside the instance must be set to some initial value. In other words, the properties need to be initialized. That’s why we’re setting default property values here, but we can also initialize the values by using a custom initializer. We’ll get to custom initializers in “Customizing Each Cake with Initializers” on page 100.

NOTE
If you won’t know the value of a class property until after the class is created, or if that class property won’t always exist, then you should make that class property an optional. You learned about optionals in Chapter 5.
CREATING AN INSTANCE OF A CLASS
After you’ve written a class definition, you can create an instance of that class with let or var, same as with any other data type. Create a BirthdayCake instance and store it in a constant called myCake by adding the following line of code in your playground:

You use the keyword let and then declare the constant by writing its name. To create a BirthdayCake instance, you need to use an initializer. An initializer is a special method that’s called to create a new instance of a class and to set the instance’s properties. In this case, we’re creating the cake using the default initializer, which is the pair of empty parentheses at ➊. This means that the new myCake instance’s properties will use the default properties we initialized it to earlier in the class definition.
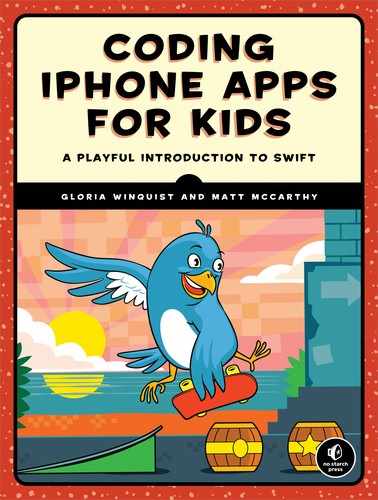
We just made a cake! Great! Now let’s see who this cake is for and how many candles the cake will need by accessing the values of its properties.
ACCESSING THE PROPERTIES OF A CLASS
After you create an instance of your class, you can access its properties using dot notation, which just means that you write the instance name, followed by a dot, followed by the property name. The dot tells Swift that the property we want to access is inside the instance. Use dot notation to print some output about myCake by adding the following code in your playground:
After creating myCake, we can use the properties of the BirthdayCake class to find out whom the cake is for and how old that person is. To print the number of candles we need on the cake, we store myCake.birthdayAge in an Int constant called age ➊. Then we use age in a string that we output to the console.
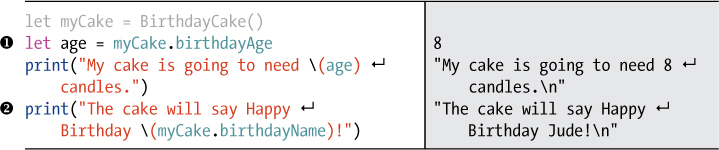
You can also use an object’s properties directly in print() instead of storing them in a constant, just as you would any variable. We put myCake.birthdayName ➋ right into the string that is output to the console. If a property of a class is a variable like our BirthdayCake property feeds, then you can change its value by setting it to something else as long as the new value is the same data type as the old value. Say that your friends can really eat a lot and you cut extra-large slices of cake. Changing the number of people that the cake can feed is easy! Add this code to the playground:
You change the value of the feeds property of myCake simply by setting it to a new value of the same data type ➊. Just remember that you can only do this if the property of your class is a variable and not a constant. Only variables can change, and trying to change a constant like birthdayAge or birthdayName will give you an error. For example, if you try to change birthdayName from "Jude" to "Kevin", you’ll get an error like the one in Figure 8-1.

Figure 8-1: You can’t change a constant property like birthdayName, so Xcode will suggest a Fix-it like changing let to var.
When this happens, you can click the red circle next to the error to get a pop-up with more information. Xcode will often try to help you by making a Fix-it suggestion, which in this case is to change let to var.
Xcode has also shown us where it wants us to make that change by putting a light gray var in front of the birthdayName property inside the BirthdayCake class. If you wanted to accept the change, you could double-click the Fix-it line and have Xcode automatically make the change for you. In this case, we don’t want to change the birthdayName to a var, so just click outside of the Fix-it pop-up to make it go away. Also, if you added the line of code that caused the error, myCake.birthdayName = "Kevin", remove it before continuing.
You may be wondering why we’re using constants for the birthdayAge and the birthdayName. Shouldn’t we be able to make lots of cakes and use different names and ages? The answer is yes! When you make a birthday cake, you know whom it’s for and how old they are, and those facts won’t change for that cake. That’s why those two properties are constants. But other cakes will be for other people with different ages. Right now, our birthday cake instances will always be for someone named Jude who is eight years old.
If we want to make customized cakes for lots of people, we need to add some code that lets you create an instance of a new BirthdayCake with any birthday person’s name and age. We can do that by writing a custom initializer for our BirthdayCake class.
CUSTOMIZING EACH CAKE WITH INITIALIZERS
As we covered earlier, an initializer is a special method inside the class definition whose job is to create an instance of a class. By default, classes always have a hidden initializer that creates an instance of the class with the default properties, if there are any. This is the initializer that we used when we created myCake using BirthdayCake(). The pair of empty parentheses represents the default initialize. The properties in myCake were set to the default values when we created it.
If you want to initialize an instance of a class to custom values, you can do this in the default initializer in your class definition. Since the initializer is a method, you can add code to the initializer and it will execute that code when the instance is created. Before, if we wanted a BirthdayCake instance, it always had to start out as a cake with the default properties. The birthdayName and birthdayAge would always start out as "Jude" and 8. But with a custom initializer, we’ll be able to set each instance to whatever value we want. Let’s add some functionality to this initializer in BirthdayCake.
Setting Property Values Using an Initializer
The simplest initializer takes no input parameters and is written with the keyword init followed by a set of parentheses. Let’s add this initializer to BirthdayCake and use it to set the values of birthdayAge and birthdayName, and then output a statement when the instance is created saying that the cake is ready. Change the code inside your BirthdayCake class so that it looks like this:
class BirthdayCake {
➊ let birthdayAge: Int
➋ let birthdayName: String
var feeds = 20
➌ init() {
➍ birthdayAge = 6
➎ birthdayName = "Dagmar"
➏ print("(birthdayName)'s cake is ready!")
}
}
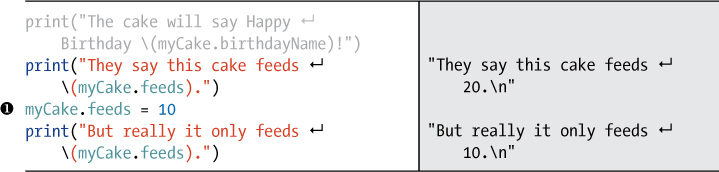
At ➊ and ➋, we change our property declarations of birthdayAge and birthdayName to no longer include a default value. We’re going to set the values of these two property constants inside our initializer instead. This is required because all the properties must have a value when an instance of the class is created. If you create a property without giving it a value, you need to specify the data type of the property by putting a colon after its name followed by the type. In this case, we say that birthdayAge is an Int and birthdayName is a String.
At ➌, we add our initializer, a special type of function whose name is always just the init keyword. It can contain any number of input parameters, but it never has a return value. You don’t write the func keyword before an initializer because it’s special. Inside the init(), we set birthdayAge to 6 ➍ and birthdayName to "Dagmar" ➎. Even though we declared that our birthdayAge and birthdayName are constants created with let, we’re allowed to assign a value to them one time (and one time only) in an initializer because we haven’t assigned them values yet. If you had assigned a value to birthdayAge before assigning it inside the initializer, you would get an error. Finally, we output a statement that the cake is ready ➏.
Insert the following lines of code to test out creating a cake using this new initializer:
As soon as you create the new cake ➊, you should see "Dagmar's cake is ready!" displayed in the debug console. And when you access the birthdayAge and birthdayName properties, you can see their new values in the results panel of the playground at ➋ and ➌.
Creating an Initializer with Input Parameters
We can also write our own custom initializers to create cakes with different values for the birthdayAge and birthdayName properties. Let’s add a second initializer that takes two input parameters, one for birthdayAge and one for birthdayName. Add the following code to your BirthdayCake class so it looks like this:
init() {
--snip--
}
➊ init(age: Int, name: String) {
➋ birthdayAge = age
➌ birthdayName = name
print("(birthdayName)'s cake is ready!")
}
}
Now we can make a birthday cake for anyone! At ➊, we create a second initializer to take two input parameters just as though we were creating a regular function. We place the input parameters in the parentheses after the function name, which is just the keyword init. We give each input parameter a name, followed by a colon (:) and the parameter’s data type. If there is more than one parameter, they are separated with commas. Notice that it’s fine to have multiple init functions, but they have to take different input parameters. Otherwise, Swift wouldn’t know which one you were trying to use!
Inside the second initializer, we set the BirthdayCake class properties to the parameters by simply assigning them. At ➋, we assign birthdayAge to the age parameter that is passed in to the initializer, and at ➌ we assign birthdayName to the name parameter.
Now that we have our new initializer, let’s use it to make a birthday cake!
Calling an Initializer with Input Parameters
To create an instance with a custom initializer, pass input values between its parentheses with their labels. Add the following code after the BirthdayCake class definition:
class BirthdayCake {
--snip--
}
let twinsCake = BirthdayCake(age: 11, name: "Colin and Brenna")
Did you notice that Xcode helped you with autocomplete? When you type in the first parenthesis after BirthdayCake, Xcode offers you the template seen in Figure 8-2.

Figure 8-2: The drop-down autocomplete template for an initializer
Once autocomplete pops up, press the down arrow and then RETURN (or double-click the second initializer suggestion with the new parameters), and Xcode should write the argument labels for you, leaving you to fill in each value (see Figure 8-3).
Figure 8-3: Hit RETURN on the second suggestion, and Xcode will write the argument labels with placeholders showing each argument’s data type.
Autocomplete is a huge help when you’re writing code. If you want to create a BirthdayCake but don’t remember the initializer’s parameters, you don’t have to look at the BirthdayCake class definition. Just start typing BirthdayCake, and Xcode will show you all the initializers and their parameters.
Next, you’ll learn how to write a method so you can do things to your birthday cakes!
ADDING A BIRTHDAY GREETING METHOD
Let’s add a method to our BirthdayCake class that will write a customized message on a cake. We’ll call this method message(shouldIncludeAge:), and it will take one input parameter to decide whether the person’s age should be displayed in the greeting. The method will return a greeting as a string. Write the following code inside your BirthdayCake class definition after the second initializer:
init(age: Int, name: String) {
--snip--
}
➊func message(➋shouldIncludeAge: Bool) -> ➌String {
if shouldIncludeAge {
return "Happy (birthdayAge) Birthday (birthdayName)!"
}
return "Happy Birthday (birthdayName)!"
}
}
As you can see, writing a method is exactly like writing any other function except that it’s nested inside a class. The keyword func comes before the function name ➊, followed by a pair of parentheses that contain the input parameters ➋. If the function has a return value, then an arrow (->) is added, followed by the return value data type ➌. In this case, we’re going to return a string.
A method written inside a class body has access to the properties of that class. This is because both the method and the properties are contained inside the class and therefore have the same scope (which we covered in “Constant and Variable Scope” on page 55). This is why you can use birthdayAge and birthdayName inside message(shouldIncludeAge:) without having to pass them in as parameters.
Now that we’ve written this method, let’s use it! Enter the following code outside of your BirthdayCake class.

After creating brownieCake ➊, we call the method using dot notation ➋. We pass in true to print the age on the cake. The message(shouldIncludeAge:) method is an instance method because it will work only when it’s called on a BirthdayCake instance. If you tried to use this method outside of the BirthdayCake class without calling it on a BirthdayCake instance using dot notation, you would get an error. Try writing this outside of BirthdayCake:
class BirthdayCake {
--snip--
}
message(shouldIncludeAge: false)
As you can see, this doesn’t work. You should get an error message like "Use of unresolved identifier 'message'". What’s more, you should notice that autocomplete isn’t helping you out by finding the method like it usually does when you start typing. Swift recognizes message(shouldIncludeAge:) only when it’s called on a BirthdayCake instance.
WRITING A HELPER METHOD
It’s great having a method that will display a nice message, but "Happy 11 Birthday" isn’t quite right. We need to output the age as an ordinal number, as in "Happy 11th Birthday". This will be a little tricky. Since we also have to account for birthday numbers that don’t end in th, like 1st, 2nd, and 3rd, we can’t just add a th to the birthday age.
To solve this problem, let’s write a helper method called ordinalAge(). A helper method is just a method that is used inside of a class. We’ll create the method ordinalAge() and have it turn the birthdayAge into the correct ordinal number to display as a string. This method will be used inside message(shouldIncludeAge:) to display the perfect birthday message.
Since most of our birthday ages will end in th, we can set up a suffix variable to hold that string and stick it onto the end of the birthdayAge. We’ll need to handle some special cases, though, since numbers that end with a 1, 2, or 3 don’t have a th suffix. On top of that, there are other special cases, like the ages 11, 12, and 13, which all end in 1, 2, or 3 but use the th suffix like other numbers. We’ll need to figure out a good way to handle all of these.
Add the following code inside the BirthdayCake class, right after the message(shouldIncludeAge:) method:
func message(shouldIncludeAge: Bool) -> String {
--snip--
}
func ordinalAge() -> String {
➊ var suffix = "th"
➋ let remainder = birthdayAge % 10
➌ switch remainder {
case 1:
if birthdayAge != 11 {
suffix = "st"
}
case 2:
if birthdayAge != 12 {
suffix = "nd"
}
case 3:
if birthdayAge != 13 {
suffix = "rd"
}
➍ default:
break
}
➎ return "(birthdayAge)" + suffix
}
Our new method ordinalAge() takes birthdayAge and returns an ordinal number with the correct suffix as a string. To set this up, we create a variable suffix and set it to "th" ➊. Next, we use the modulo operator to find out what the remainder would be after dividing birthdayAge by 10 ➋. That will tell us if the birthdayAge ends with a 1, 2, or 3, since the remainder will be the same as the last digit in birthdayAge. We’ll use this information to figure out what the suffix after birthdayAge should be. At ➌, we use a switch statement and set suffix to "st", "nd", or "rd", depending on the remainder. If remainder is 1, then suffix is "st"; if remainder is 2, then suffix is "nd"; and if remainder is 3, then suffix is "rd".
Since the birthday ages 11, 12, and 13 all end with remainders 1, 2, and 3 but use the "th" suffix, they’re exceptions to the case statements we set up. In order to handle these, we’ve included if statements in each case. If remainder is something other than 1, 2, or 3, the default case of the switch statement will be called ➍.
In Swift, a switch statement must be exhaustive and include all possible cases, so this default case is required even though we don’t want to do anything for these values of remainder because suffix should keep its value of "th". You must write at least one line of code for each case in a switch statement, or you’ll get an error. When you don’t want to do anything for a case, you can just use the break keyword, which skips the program to the next block of code. Forcing you to fill out every case and to explicitly call break when you don’t want to execute code in a switch is one of the ways in which Swift is a safe language. It gives you less room for error.
After we figure out what value suffix should be, we create a string out of the birthdayAge at ➎ and return this with the correct suffix added to it.
To use this new method inside of message(shouldIncludeAge:), change the way the age is displayed like this:
func message(shouldIncludeAge: Bool) -> String {
if shouldIncludeAge {
return "Happy (ordinalAge()) Birthday (birthdayName)!"
}
return "Happy Birthday (birthdayName)!"
}
Because we’re calling ordinalAge() from inside the BirthdayCake class, we can call it without using dot notation.
Now when you look at the code that displays the brownieCake message, you should see a perfectly formatted age!
You call message(shouldIncludeAge:) in the exact same way as you did before, but the return value has changed because the age is now being displayed as an ordinal number.
A SPECIAL PROPERTY CALLED SELF
Every class instance comes with a special property called self, which refers to the class itself. You can think of it as an instance’s way of saying this is my property or method. You really don’t need to write self very often, but there are some occasions where it’s necessary so that Xcode knows exactly what you’re referring to.
For example, you may need to use self inside initializers or other methods in a class that take parameters. If those parameters have the same names as properties in your class, then you need to use the self keyword to tell Swift you want to use the property in your class and not the parameter that you passed in with the same name. Let’s look at a simple RocketShip class as an example.

Enter the following into your playground:

At ➊, we create a Rocketship class with a destination property. At ➋, we make an initializer that takes a parameter with the same name, destination. The initializer creates an instance of RocketShip with that destination parameter value.
At ➌, we set the destination property of our RocketShip instance to the value of the destination parameter that we are passing into init() at ➋. We do this by putting the self keyword and a period in front of the destination property inside the initializer. This tells Swift that self.destination is the destination we defined at ➊ since it’s the RocketShip class’s property. When there is no self in front of destination, Swift knows that it is the parameter that has been passed to init() at ➋. When a property has the same name as a local variable or parameter, Swift will always assume that you are referring to the local variable or parameter that was passed in unless you add the self keyword. In the last two lines of code, we create a rocket ship called myRocketShip that is destined for the moon.
You only need to use the self keyword if your parameter name is the same as your property name. You can avoid writing self by writing initializers that have different parameter names, like this:
class RocketShip {
var destination: String
init(➊someDestination: String) {
destination = someDestination
}
}
In this case, we call the destination parameter of the init function someDestination ➊. Now, in the init() method, there can be no confusion between the property destination and the passed-in parameter someDestination, so the self keyword isn’t necessary anymore. However, you can still write self.destination without getting an error.
CLASS INHERITANCE
One neat thing that a class can do is inherit from another class. Class inheritance means that you can create a new class using an existing class as a starting block. The class that other classes inherit from is called a superclass, and the classes that inherit from the superclass are its subclasses.
When a subclass inherits from a superclass, it gets all of that superclass’s properties and methods, which you can tweak to suit your needs. The subclass can also have its own properties and methods that didn’t come from the superclass. Every subclass can have only one superclass, but there’s no limit to the number of subclasses that a superclass can have.
CREATING A SUPERCLASS
Let’s make a superclass called FarmAnimal as an example. We can give our FarmAnimal class two properties: a String for a name, and an Int for the number of legs. We’ll also give the FarmAnimal class two methods—one called sayHello(), which will return a greeting, and one called description(), which will output a simple description of the animal. First let’s open a new playground to work in and call it FarmAnimals. Do you remember how to do that using the Xcode menu? If you need a refresher, flip back to “Writing a Class Definition” on page 96. After you’ve opened a new playground, enter the following code into it:
class FarmAnimal {
var name = "farm animal"
var numberOfLegs = 4
func sayHello() -> String {
➊ return "Hello I'm a farm animal!"
}
func description() {
➋ print("I'm a (name) and I have (numberOfLegs) legs.")
}
}
The FarmAnimal class is intended to be used as a superclass, which is why at ➊ it returns "Hello I'm a farm animal!" from its sayHello() method even though we know farm animals wouldn’t actually say this. They’d say "oink oink" if they’re a pig or "moo" if they’re a cow or "neigh" if they’re a horse. The line at ➋ in the description() method will display a string stating the farm animal’s name and how many legs it has.

CREATING A SUBCLASS
Now that we have a FarmAnimal superclass, let’s make a Sheep subclass. Write the following code underneath your FarmAnimal class to create this subclass:
class FarmAnimal {
--snip--
}
➊ class Sheep: FarmAnimal {
➋ override init() {
➌ super.init()
➍ name = "sheep"
}
➎ override func sayHello() -> String {
return "Baa Baa"
}
override func description() {
➏ super.description()
➐ print("I provide wool to make blankets.")
}
}
To create a subclass from another class, add a colon after the subclass name, followed by a space and the name of the superclass that you want your class to inherit from, just like we did at ➊. You can make a subclass from any class that exists in Swift, even from a built-in class.
In our Sheep subclass, we want to set the name property inherited from the FarmAnimal superclass to "sheep" instead of "farm animal". To do this, we need to override the default initializer of the FarmAnimal superclass, which the Sheep subclass has inherited. In Swift, when a subclass overrides a method it inherits, it means that the subclass uses its own definition of a method that also exists in a superclass.
If you take a look at the FarmAnimal class, you won’t see any init() method. Remember, if you don’t create your own init(), there’s always a hidden init() that’s added by default.
In our Sheep class, we override this hidden init() method by writing the keyword override before init() at ➋. When we override the init() method, we first need to call the init() method of the FarmAnimal class because it sets up the properties and methods that the Sheep class needs to inherit. We do this at ➌ by using the keyword super, followed by dot notation and init(). The keyword super refers to the superclass of the instance in the same way that self refers to the instance itself. After super.init(), at ➍, we can set the name property that is inherited from the FarmAnimal superclass from "farm animal" to "sheep".

The Sheep class also overrides the two methods provided in the FarmAnimal superclass, sayHello() and description(). We want the sayHello() method of a Sheep to return "Baa Baa", so we override sayHello() to do just that. You override an instance method the same way that you override an initializer: you just write the keyword override before the func keyword, as we did at ➎. Then we tell the function to return the string "Baa Baa".
Next, we’ll override the description() method so it says something about sheep. We want the Sheep class’s description() method to do what the FarmAnimal class’s description() method does and then print something extra. To do this, we call super.description() ➏, which displays "I'm a sheep and I have 4 legs." in the debug console. Then we have our Sheep description ➐, which prints the extra sentence "I provide wool to make blankets." when description() is called on a Sheep object.
Test out your new subclass by creating a Sheep and then calling its sayHello() and description() methods to see what it can do:
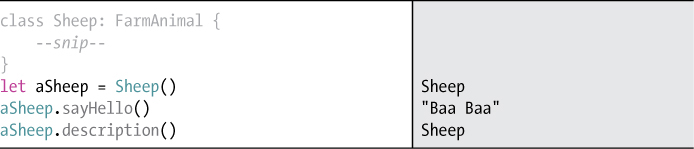
If you did everything correctly, you should see this output in your debug console:
I'm a sheep and I have 4 legs.
I provide wool to make blankets.
As an exercise, create another subclass of FarmAnimal to create a pig that will output a custom greeting in sayHello() and print an appropriate description of itself!
DETECTING THE DATA TYPE BY TYPECASTING
There may be times when you know only the superclass data type of an instance but you also want to know what subclass it is. To find out, you’ll need to use typecasting. Typecasting lets you see what data type an instance is, and it also lets you downcast an instance from its superclass into one of its subclasses.
For example, say that Farmer John has an array of FarmAnimal objects that consists of a few sheep, chicken, and pig objects. When he steps through his array, he wants to know what kind of animal each FarmAnimal is, and, if it’s a Chicken, he wants to collect its eggs.
There are two operators used in typecasting: is and as. The is keyword is used to check if an instance is a particular data type, and the as keyword is used to downcast an instance to one of its subclasses.
Let’s begin by creating a Chicken class for Farmer John. Enter the following into your FarmAnimals playground after your Sheep class:
class Sheep: FarmAnimal {
--snip--
}
class Chicken: FarmAnimal {
➊ var numberOfEggs = 0
override init() {
super.init()
name = "chicken"
➋ numberOfLegs = 2
}
override func sayHello() -> String {
return "Bok Bok"
}
override func description() {
super.description()
print("I lay eggs.")
if numberOfEggs == 1 {
print("I have one egg for you now.")
} else if numberOfEggs > 0 {
print("I have (numberOfEggs) eggs for you now.")
}
}
➌ func layAnEgg() {
numberOfEggs += 1
}
➍ func giveUpEggs() -> Int {
let eggs = numberOfEggs
numberOfEggs = 0
return eggs
}
}
The Chicken class is similar to the Sheep class, but at ➊, we add an extra property to keep track of the Chicken’s eggs: numberOfEggs. We also change the Chicken’s numberOfLegs to 2 at ➋ in the initializer, because who’s ever heard of a chicken with four legs?!
At ➌ and ➍, we add two new methods: layAnEgg(), which increases the chicken’s egg count, and giveUpEggs(), which returns the number of the Chicken’s eggs and resets numberOfEggs to 0. Notice that we don’t put the keyword override in front of these two functions. You only put override in front of a function that you are overriding from the superclass.

Create two Chicken objects and have them lay some eggs by entering the following into your playground:
class Chicken: FarmAnimal {
--snip--
}
let chicken1 = Chicken()
chicken1.layAnEgg()
let chicken2 = Chicken()
chicken2.layAnEgg()
chicken2.layAnEgg()
Now you’re ready to make Farmer John’s animals array. We’ll put three Sheep objects, three Chicken objects (including the two with eggs that we just created), and a Pig object into animals. If you didn’t create a Pig class in the previous section, then feel free to leave the pig out!
let chicken2 = Chicken()
chicken2.layAnEgg()
chicken2.layAnEgg()
let animals = [Sheep(), chicken1, chicken2, Sheep(), Chicken(), ![]()
Sheep(), Pig()]
Remember that in Swift, an array can only contain items of the same data type. We didn’t specify the type of the animals array, so Swift will use its type checker to discover that each item is a subclass of FarmAnimal, and it will make the array type [FarmAnimal].
Now, when Farmer John goes around his farm to check on his animals, he can use the keyword is to find out which type of FarmAnimal each one is. Let’s help him do this by looping through the animals array and printing various strings depending on what type of FarmAnimal each animal is:
let animals = [Sheep(), chicken1, chicken2, Sheep(), Chicken(), ![]()
Sheep(), Pig()]
for animal in animals {
➊ if animal is Sheep {
print("This is what my sheep says: (animal.sayHello())")
➋ } else if animal is Chicken {
print("My chickens say: (animal.sayHello())")
➌ } else if animal is Pig {
print("And here is my pig: (animal.sayHello())")
}
}
For each animal in the animals array, we check whether it matches a data type using the keyword is followed by the specific data type. For instance, at ➊, we check whether the animal is of the Sheep class with if animal is Sheep. This condition will evaluate to true if the animal is a Sheep and false if it isn’t.
In the else-if block at ➋, we check whether animal is of the Chicken class and, if it is, we print "My chickens say: Bok Bok". Lastly, if the animal isn’t a Sheep or a Chicken, then it’s a Pig ➌. If you didn’t write a Pig subclass, don’t worry—you can still make this code work by removing the final if-else clause that checks if animal is Pig and the braces and print statement that go along with it.
When the playground is done running (be patient—it might take a minute or two!), you should see something like this in your debug console:
This is what my sheep says: Baa Baa
My chickens say: Bok Bok
My chickens say: Bok Bok
This is what my sheep says: Baa Baa
My chickens say: Bok Bok
This is what my sheep says: Baa Baa
And here is my pig: Oink
Now Farmer John can tell which subclass his animals are!
REFINING THE DATA TYPE BY DOWNCASTING
Now we know the subclass of each animal in the animals array. Next, we want to have Farmer John collect eggs from his chickens, but we’ll need to do a bit more work to get Swift to let him do that. First, we’ll need to have the chickens lay some eggs.
Let’s try to get our chickens in the for-in loop to lay some eggs. Add this line of code to the for-in section for a Chicken and see what happens:
} else if animal is Chicken {
print("My chickens say: (animal.sayHello())")
animal.layAnEgg() // error FarmAnimal has no member layAnEgg
} else if animal is Pig {
In our for loop, even if we know a specific animal is of type Chicken, Swift still treats it as a FarmAnimal class and not as a Chicken class. That means if we try to get this animal to lay an egg here, we’ll get an error because it’s a FarmAnimal and FarmAnimal doesn’t have a layAnEgg() method.
To get this animal to lay eggs, we first have to downcast the animal from the FarmAnimal class to the Chicken subclass. We do this by using the as keyword. Change the code for a Chicken to the following:
} else if animal is Chicken {
print("My chickens say: (animal.sayHello())")
➊ let chicken = animal as! Chicken
chicken.layAnEgg()
chicken.description()
} else if animal is Pig {
In this for-in loop, when we find out that the animal is a Chicken data type, we downcast it into a chicken constant using the as keyword ➊. Swift also makes us include a ! after as to force-downcast the animal into a Chicken class. This is similar to using a ! to force-unwrap an optional, which you learned about in Chapter 5. In this case, it’s safe to force the FarmAnimal into a Chicken because we know that the animal is a Chicken class after our check if animal is Chicken.
If you are unsure whether the animal is a Chicken, then you should put a ? after the as keyword. For example, when Farmer John goes around his farm to collect the eggs, he only wants to get them from his Chicken objects. Here is a good way for him to do it without bothering to check for Sheep or Pig objects:
let animals = [Sheep(), chicken1, chicken2, Sheep(), Chicken(), ![]()
Sheep(), Pig()]
➊ var gatheredEggs = 0
for animal in animals {
➋ if let chicken = animal as? Chicken {
chicken.layAnEgg()
print("Picking up (chicken.numberOfEggs) eggs.")
➌ gatheredEggs += chicken.giveUpEggs()
}
}
➍ print("I gathered (gatheredEggs) eggs today!")
At ➊, Farmer John starts with 0 gatheredEggs. This time, when Farmer John steps through his animals array, he first wants to know if he can downcast animal into a chicken so that he can gather its eggs. If he can’t downcast animal, then the animal isn’t a chicken, so Farmer John doesn’t need to gather any eggs. This happens with the if-let statement at ➋. Only animals that are Chicken objects can be cast into a chicken using as? Chicken. If the animal is a sheep or a pig, then the if-let statement is skipped.
In this case, we must use as? to downcast instead of as! because when we’re stepping through the animals array, we don’t know if the animal can be turned into a chicken or not. If you tried to force-downcast a Sheep into a Chicken with as!, you would get an error. Downcasting using as? will also give you an optional value, so that’s why we use an if-let statement to unwrap animal as? Chicken into chicken.
Once Farmer John has his chicken, he takes its eggs by using the Chicken class’s giveUpEggs() method, and he adds those eggs to his gatheredEggs at ➌. Finally, after the for loop is finished at ➍, he prints the number of eggs that he has gathered from his animals.
VALUE TYPES AND REFERENCE TYPES
Classes let you create your own data types in Swift, and they can be used much like any other data type (such as an Int, Bool, Double, String, or Array). There is, however, one big difference between a class and these other types of data: all of the data types that you have worked with until now are value types. But classes are reference types. That means the way that you store them in variables is a little different. Let’s see how.
If you create a variable that holds an Int value type and then assign it to a new variable, the value is copied into the new variable behind the scenes. This means that if you change the value of the new variable, the original variable doesn’t change. To get a better understanding of this, open another new playground, call it KidsAndCouches, and enter the following:
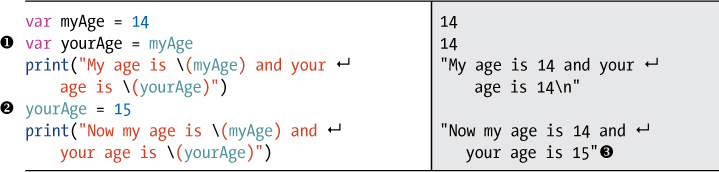
We first set a variable myAge to 14. Next, we create a new variable called yourAge and assign myAge at ➊. When you print the values of both variables, they are both 14.
After that, we change the value of yourAge to 15 ➋. This time, when you print the values of both variables, you can see in the output at ➌ that yourAge is 15, but myAge is still its original value of 14. This is because when we assigned myAge to yourAge at ➊, just the value of myAge was copied and put into yourAge. This is what happens when you assign a variable or constant of one value type to another variable or constant.
Classes behave differently because they are reference types. This means that when you create a variable instance of a class, an object is created and stored in a location within the computer’s memory. So, if you create another new variable instance and assign it to the first variable, what you are really doing is making the new instance point to the same location in the computer’s memory as the first instance, so the variables are both referring to the same object. If you change one variable, the other one will change, too, since they both refer to the same object. To see this in action, add this to your KidsAndCouches playground:
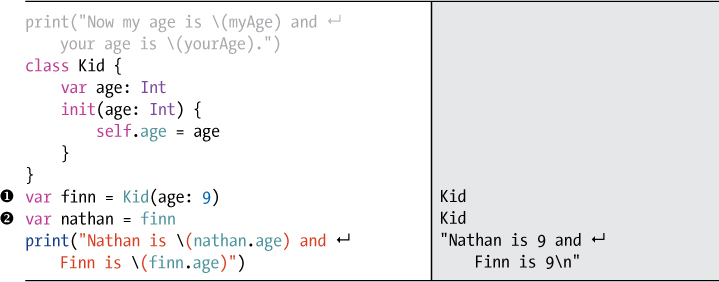
To see what happens when we assign one instance of a class to another instance, we create a Kid class with one property, age. Next, we create a Kid named finn with an age of 9 ➊. Then we create a Kid named nathan and assign finn to nathan ➋. Because we’re dealing with classes, this means we’re doing more than just assigning the value of finn to nathan. The variables finn and nathan point to the exact same Kid object (see Figure 8-4).
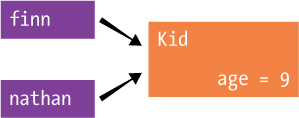
Figure 8-4: The variables finn and nathan point to the same Kid, age 9.
When you write nathan = finn, you’ve just told Swift nathan and finn are the same object. We can see this if we change Nathan’s age to 10. Enter the following code.

We set Nathan’s age to 10 ➊. When you print the age of both Nathan and Finn, you can see that changing Nathan’s age also changed Finn’s age ➋. This is because nathan and finn are just two names for the same object.
It’s often useful to have different variables referring to the same object, but in this case, these are two different people. So, rather than assigning nathan equal to finn, it would make more sense to create a new Kid instance for nathan, like this:

Now we have a new, separate instance of a Kid class, nathan, that can be changed without affecting the other instance, finn. Figure 8-5 shows that finn and nathan now each refer to a separate Kid object.
That’s something to keep in mind when you’re working with variables and classes! If you need multiple objects, make sure that you initialize them as new objects.
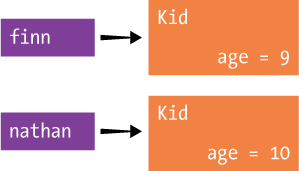
Figure 8-5: The finn and nathan variables now refer to two separate objects that can have their ages changed without affecting each other.
USING STRUCTS
A struct looks a lot like a class and is used in many of the same ways. Structs have properties and methods, just like a class. However, there are two key differences between a struct and a class. First of all, structs don’t have inheritance. You can’t make a substruct from a superstruct like you can make a subclass from a superclass. Second, a struct is a value type, not a reference type like a class.
Let’s take a look at an example of a simple struct that has one property and one method. Write the following code in your playground:
➊ struct Couch {
var numberOfCushions = 3
func description() -> String {
return "This couch has (numberOfCushions) cushions."
}
}
Creating a struct is just like creating a class, except you use the struct keyword in front of the name instead of the class keyword, as we did at ➊. We’ve created a Couch struct with a variable property for the numberOfCushions. We have also added a description method to our Couch struct that will tell us how many cushions it has. Now let’s create two Couch instances with the following code:

We create myFirstCouch as an instance of the Couch struct ➊. This instance has the default value of 3 for numberOfCushions. Next, we create mySecondCouch by assigning it to myFirstCouch ➋. Since we’re dealing with a struct, mySecondCouch now contains a copy of the value in myFirstCouch. At ➌ and ➍, we look at the description of each couch and see that they both have 3 cushions as expected. Let’s change the number of cushions on mySecondCouch:

Now we set a new number of cushions on mySecondCouch at ➊ and then take another look at the description of each Couch at ➋ and ➌. This is the interesting part. The first Couch still has 3 cushions, but mySecondCouch has 4 cushions. So the two Couch instances are not the same thing, as they would be if we were dealing with classes. The second Couch is just a copy of the first Couch, so when we change the second Couch, the first one doesn’t change.
If we define Couch as a class instead of a struct, the output would change to show that modifying one Couch instance modifies both Couch instances, because they’re the same object, not a copy of each other. Test this out by changing the word in front of Couch from struct to class.

class Couch {
var numberOfCushions = 3
--snip--
}
After you make that change, you should see that changing the numberOfCushions value of mySecondCouch also changes the numberOfCushions value of myFirstCouch.

When should you use a struct instead of a class? Apple recommends using structs when you need to store a group of related values that are okay to pass around by value (copying) instead of by reference. For example, you’ll see that when we start building our Schoolhouse Skateboarder app in Chapter 14 and need to deal with x- and y-coordinates, we use a CGPoint, which is a simple struct that holds an x value and a y value.
WHAT YOU LEARNED
Congratulations! Now you know how to create your own data types using classes! You learned how to create a class with its own properties, initializers, and methods. You also learned how to create a subclass of a superclass and how to override the superclass methods.
Now you’re ready to start working on your first app. The next few chapters will focus on creating BirthdayTracker, an iPhone app that lets you input your friends’ birthdays and notifies you when to wish them a happy birthday.