1
Hello, World!

In this chapter, we’ll walk you through creating your very first app. But what exactly is an app? Short for application, an app is a computer program, which is a set of written instructions for a computer to follow. An app performs a task for the user, like giving driving directions, predicting the weather, or even just providing entertainment with a game. The apps that run on a phone or a tablet, often called mobile apps, have a lot in common with the programs that run on regular computers. After reading this book, you’ll be able to use your new programming skills on way more than an iPhone or iPad! A computer is a computer, after all—whether it’s in your pocket, on your lap, or on your desk. You’re sure to impress your friends and family with the unique and fun new apps you’ll create!
Besides being a cool thing to show to your loved ones, however, your apps can be submitted to the Apple App Store and shared with users all over the world. Over 140 billion apps have been downloaded from Apple so far. You don’t need to own a company or be a big shot to get an app into the App Store. Anyone with a good idea and some decent programming skills can have a best-selling app.
This book is going to teach you how to develop an app for iOS, the mobile operating system developed by Apple that makes the iPhone and all of its apps work. Some other common operating systems are Apple’s macOS and Microsoft Windows, which both run on desktop computers. iOS is designed specifically for Apple devices like the iPhone, iPod touch, and iPad.
iOS and macOS programs have long been written in a language called Objective-C. In the summer of 2014, Apple introduced a new and exciting language for writing apps called Swift. This is the language you’ll learn in this book. Apple engineers have spent years making Swift a fast and powerful computer language that’s also fun and easy to use. Swift is a great first computer language to learn because it works like the English language. For example, you can output the words “Hello, world!” with just one line of code:

print("Hello, world!")
We’re excited to teach you Swift, but first we’ll need to get your tools ready. Then we’ll walk you through creating your first app, which will display “Hello, world!” onscreen.
INSTALLING XCODE, YOUR CODE EDITOR
To write your first iOS app, you’ll need a relatively recent Mac computer. Specifically, you’ll need a Mac running OS X 10.11.5 (El Capitan) or later. To find out which version of macOS you’re running, click the Apple icon in the top-left corner of your Mac’s screen, and then select About This Mac.
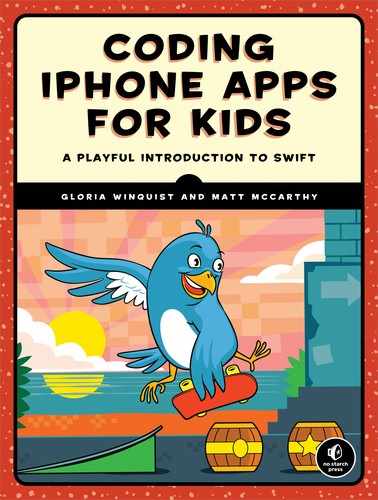
You’ll also need Xcode and the iOS Software Development Kit (SDK). Xcode is a fancy code editor known as an integrated development environment (IDE). It lets you write code and also includes a simulator that you can use to see how your code will run on any type of Apple device. The iOS SDK is a suite of prebuilt programming libraries that help you write apps quickly and in a way that Apple expects. A programming library is a collection of related software modules that you can use in your programs. The iOS SDK is included with Xcode, so a single download will get you both. To open the App Store, click the Apple icon in the top-left corner of the screen and then select App Store. Search for Xcode, which should be the first search result, and click the Get button to install it (see Figure 1-1).
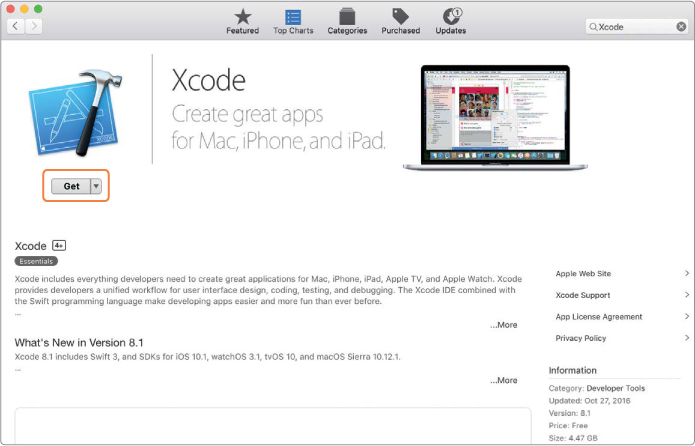
Figure 1-1: Install Xcode from the App Store.
You’ll need to sign in with your Apple ID to install Xcode. If you’ve bought anything on iTunes or installed an app on your iPhone, you already have an Apple ID. If you don’t already have an Apple ID, create one by clicking the Create Apple ID button. Installing Xcode may be the trickiest part of this process, so don’t be shy—ask an adult for help if you need it.

YOUR FIRST APP!
Now you can get started creating your first app. Open Xcode by double-clicking the Xcode icon in the Applications folder in your Finder window. The first time you do this, you might see Xcode and iOS Terms and Conditions. If you do, click Agree and then wait for Xcode to install its components (Figure 1-2). It may take a little while, so be patient.
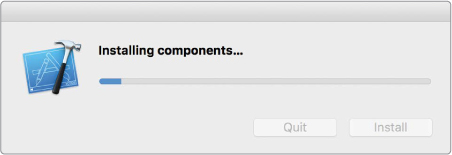
Figure 1-2: The first time Xcode launches, it needs to install its components.
Select Create a new Xcode project from the Welcome to Xcode dialog shown in Figure 1-3.
Figure 1-3: Select Create a new Xcode project. When you start working on your projects, you’ll also see a list of projects to choose from here.
Select iOS in the upper-left corner of the dialog, and then select the Single View Application template on the main screen (Figure 1-4). Click Next.
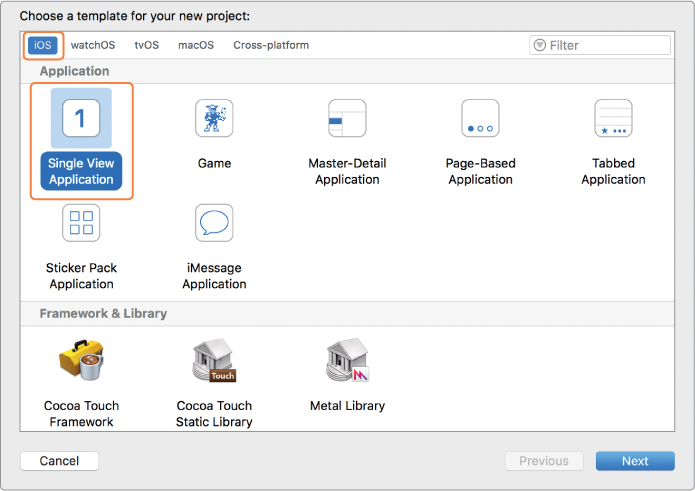
Figure 1-4: Select Single View Application. This is the simplest kind of project.
Next, Xcode will ask you to set a few options for your new app (see Figure 1-5).

Figure 1-5: You can change these options in the Project Settings menu even after you set them here.
For Product Name, give your app the name Hello World.
If you have an iPhone, iPod touch, or iPad and would like to run the app on that device, Xcode needs to know the information for your Apple account. Click the Add account… button, and you’ll see the sign-in form shown in Figure 1-6.
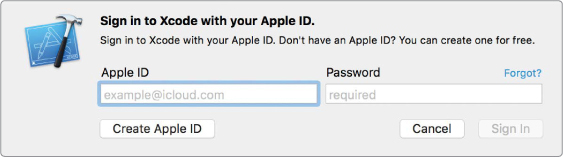
Figure 1-6: Sign in to Xcode using an Apple ID to allow your apps to run on a real device.
Enter your Apple ID and password. If you created an Apple ID earlier, you can use that here. Or, if you use iCloud on your iPhone, iPod touch, or iPad, you can use that login information.
Once you’ve successfully signed in with your Apple ID, you’ll see the Accounts window, as shown in Figure 1-7.
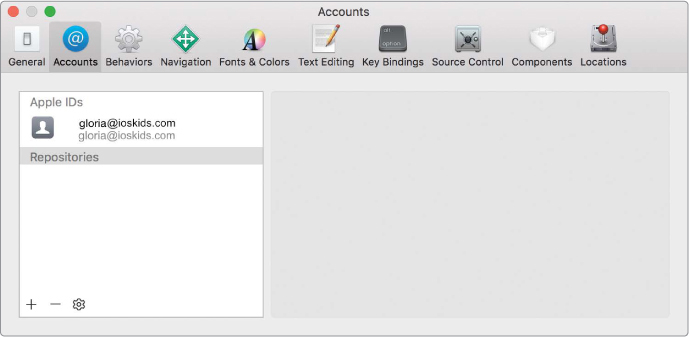
Figure 1-7: After signing in, you’ll see your account under Apple IDs in the Accounts window.
Close this window by clicking the red close button in the upper-left corner, and you’ll see the New Project window again. But now it shows your Apple account under Team, as you can see in Figure 1-8.
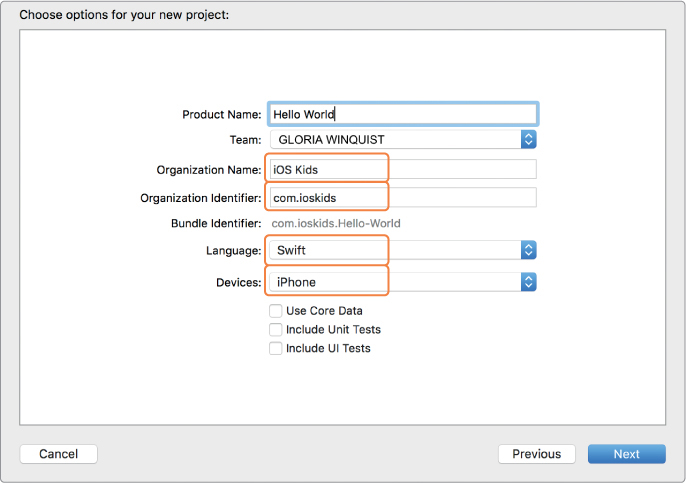
Figure 1-8: The New Project window now shows your Apple account under Team.
Next, add an Organization Name. You can invent your own company name, use your real name, or choose anything else you want. The Organization Identifier needs to be a unique name, so it’s common to format this like a backward website address. (Don’t worry—an actual website is not required!) The Bundle Identifier combines the names you entered in the Organization Identifier and the Product Name fields, and it is created automatically.
Set the Language option to Swift and the Devices option to iPhone. Make sure the checkboxes for Use Core Data, Include Unit Tests, and Include UI Tests are not selected. Click Next and then Create, which will save the application and launch Xcode.
Your new Hello World Xcode project will open.
INTRODUCING THE STORYBOARD
On the left side of the Xcode window, you’ll see a pane that contains the files and folders that make up your project. This is called the Navigator pane. Select Main.storyboard from the Navigator pane. This will open the project’s storyboard, which gives us a picture-book view of the device screens when we run our app (see Figure 1-9). We can use the storyboard to design all of the screens and the connections between them. You don’t necessarily have to use a storyboard when building an app, since you can write all of your app’s design elements in code. However, using the storyboard is much easier, so that’s what we’ll do in this book.

Figure 1-9: The project’s main storyboard.
When we created this project, we selected the Single View Application template. This starts us off with an app that displays one empty, white screen. You can see this screen in the storyboard in Figure 1-9—it’s the box with an arrow pointing to its left side. That arrow indicates that it’s the starting screen of the application. This box is called the view controller scene. In Swift, a view controller manages the views that are displayed on the screen when an app is running. A scene in the storyboard is a visual representation of a view controller and all the views it contains.
You can hide or show the different parts of Xcode using the three buttons in the upper-right corner. Each button represents a different part of the screen that you can toggle on or off by clicking it. When the button is gray, that part of Xcode is hidden. When the button is blue, that part of Xcode is shown. Click these buttons until they look like Figure 1-10, where the two left buttons are gray and the right button is blue.
Figure 1-10: These buttons are used to show or hide different parts of Xcode.
This hides the Navigator pane (the list of files on the left) and the debug area (the bottom area that shows us messages about the app while it’s running) and gives us a little more screen space to work with on the storyboard. The pane on the right side of the screen that we left on (represented by the blue button) is the Utilities pane. We’ll use this to find objects to add to our storyboard.
ADDING USER INTERFACE ELEMENTS WITH THE OBJECT LIBRARY
Inside the Utilities pane, select the Object Library icon, which is a square inside a circle, as shown in Figure 1-11.
Scroll up and down inside the Object Library to see the kinds of user interface elements you can use in your app. You’ll see labels, buttons, text fields, image views, and also elements that aren’t visible to the user, such as gesture recognizers. If you want additional information on any of these objects, just double-click one and a dialog will pop up.
Let’s start by adding a label to the screen. Select Label from the Object Library and drag it onto the view controller in the editor (see Figure 1-12).
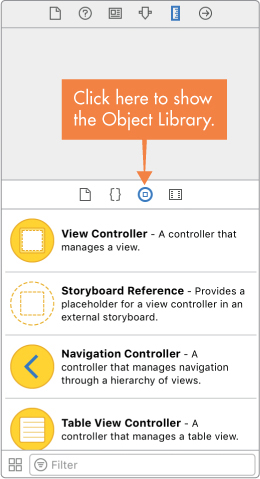
Figure 1-11: The Object Library contains the elements you can drag into your storyboard to design your user interface.
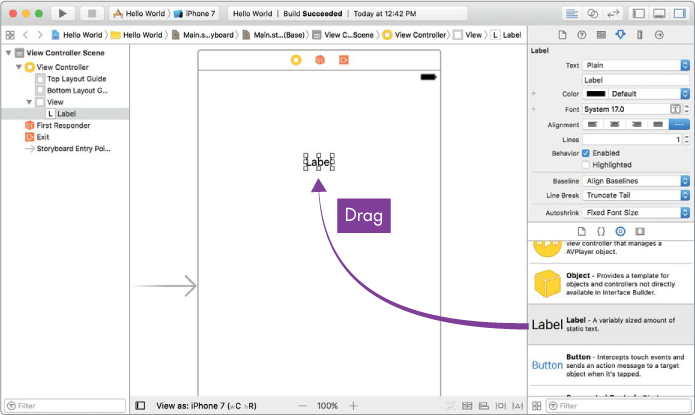
Figure 1-12: Drag a label from the Object Library and drop it onto the view controller.
Once you’ve placed the label, click the Size Inspector icon (it looks like a ruler) at the top of the Utilities pane, as shown in Figure 1-13. The Size Inspector allows us to change the size of an object in the storyboard.
The label you added to your view controller isn’t big enough to display a nice “Hello, world!” message, so let’s make it bigger. In the Size Inspector, change the Width of the label to 200 pixels and the Height to 40 pixels.
Now move the label to the upper-left area of the view controller screen. You can do this by clicking the label and dragging it to the desired position or by entering the x- and y-coordinates in the Size Inspector. The x-coordinate specifies the label’s horizontal position, and the y-coordinate specifies the label’s vertical position. Set values of 80 for X and 40 for Y. Now your values should match those shown in Figure 1-13.
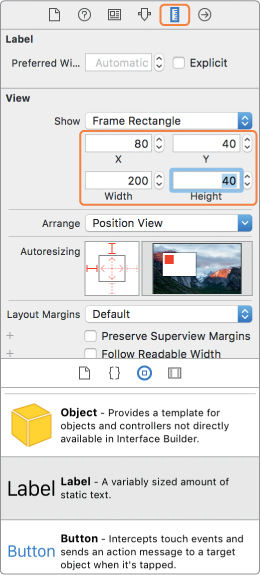
Figure 1-13: Setting new width, height, and x- and y-coordinates for our label with the Size Inspector
To change the text of the label, switch to the Attributes Inspector, as shown in Figure 1-14.
Enter Hello, world! into the Label text field. You can also enter text directly into the label by double-clicking the label on the storyboard and typing the text you want it to display. Let’s also make our “Hello, world!” message bigger and bolder by changing the font. Click the T icon in the Font field, select Bold from the Style drop-down menu, enter 30 into the Size field, and then click Done. Figure 1-14 shows all of these settings.
Finally, choose center alignment for the text, as shown in Figure 1-15, by selecting the second icon next to Alignment.
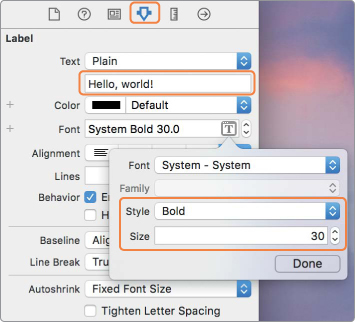
Figure 1-14: Change the label so it reads “Hello, world!” Make it bold and set the font size to 30.

Figure 1-15: Center-align the text of the label.
Try running the app and see what happens. You can run your app in a lot of different ways. You can click the play button in the upper-left corner of Xcode, choose the menu option Product ▸ Run, or use the keyboard shortcut ⌘-R.

The first time you run the app, it takes a while for the simulator to turn itself on and load. Be patient. You may also find that the iPhone simulator is too large to fit on your screen. If this is the case, you can adjust the size using the simulator menu, as shown in Figure 1-16. Go to Window ▸ Scale and then select a smaller size that will fit on your screen.
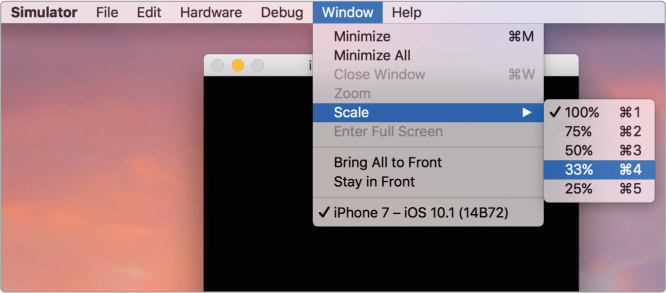
Figure 1-16: Sizing down the simulator so that it fits on your computer screen
When your app loads and is running, you’ll see something like Figure 1-17.
Not only are there a lot of ways to run your app, but there are also several ways to stop it. You can click the square stop button in the upper-left corner of Xcode, go to Product ▸ Stop, or use the keyboard shortcut ⌘-period.

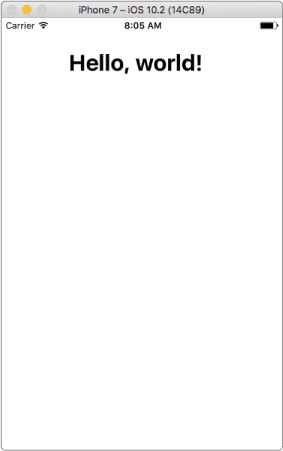
Figure 1-17: This is what success looks like!
SAVING YOUR WORK
Xcode will autosave your work every time you run your app, but you can also save your project at any time by pressing ⌘-S. To open your project again, you have two options. The first is just to launch Xcode. Your recent projects will show up on the right side of the Welcome to Xcode dialog, and you can open your app directly from there. The second is to find and double-click the Hello World.xcodeproj project in Finder (see Figure 1-18).

Figure 1-18: Double-click the Hello World.xcodeproj file in Finder to open your app in Xcode.
RUNNING THE APP ON A REAL DEVICE
If you own an iPhone, iPod, or iPad and would like to run your app on it, you’ll learn how to do that in this section. Otherwise, you can skip to Chapter 2 and test and run your apps on the Xcode simulator.
In order to run an app that you’ve developed on a real device, you need to do a couple of things: you need to let Xcode know about your device so it can keep track of which devices it’s allowed to run apps on, and you need to tell your device to trust Xcode so it will allow Xcode to install apps to it.
To let Xcode know about your device, log in with your Apple ID in Xcode, and then connect your device to your computer’s USB port. You should have already logged in to Xcode earlier in this chapter when you created the Hello World project. If you didn’t, go to Xcode ▸ Preferences, select the Accounts tab, click the +, and then click Add Apple ID…, as shown in Figure 1-19.
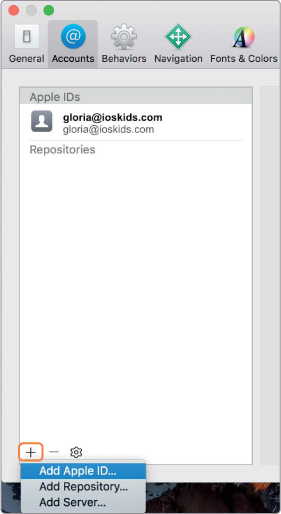
Figure 1-19: Adding an Apple ID to Xcode in Preferences under the Accounts tab
Once you’ve logged in with your Apple ID in Xcode (you should only have to do that once because Xcode will remember your login info from now on), plug your device into your computer. The very first time you plug your device in, your device will ask if you trust your computer, as seen in Figure 1-20. Tap Trust.

Figure 1-20: Your device will ask if you trust the computer you’ve plugged into.

Note that you have to unlock your device to get this message. Once you’ve tapped Trust, you’ll need to wait about 30 seconds, unplug your device from your computer, and then plug it back in again. When you plug it in the second time, the Trust This Computer? alert shouldn’t come up. This means that your device already knows to trust this computer when it’s connected to it.
Now take a look at Xcode. The status bar at the top of Xcode should tell you that it’s processing symbols for your device. This is a one-time process that Xcode has to complete before it can run an app on your device. You just have to sit tight for a couple of minutes while this is done. Once the process is complete, change Xcode’s run option to your device by clicking the iPhone simulator label next to Hello World and the play button in the upper-left toolbar. This will bring up a menu where you can choose what to run your app on. Your device will be at the top of the list of simulators, as shown in Figure 1-21.
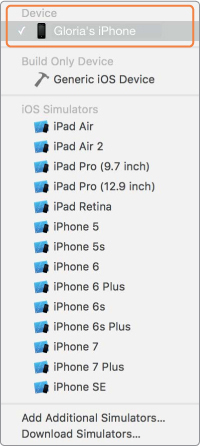
Figure 1-21: Selecting your device so you can run the app on it
Now click the play button in Xcode (or press ⌘-R) to run the app on your device. If you see a message pop up like the one shown in Figure 1-22, wait a few minutes longer and try again.

Figure 1-22: Xcode isn’t ready to run an app on this device.
If you see a message like the one shown in Figure 1-23, there’s one more step you need to take to get your phone to trust your computer.

Figure 1-23: This message means your phone isn’t quite ready to install apps yet.
If you got this message, go into the Settings app on your device, choose General, and then choose Device Management (see Figure 1-24).
Inside the Device Management settings, you’ll see a message that apps from your developer account are not trusted on your device. Tap the Trust “email” button, and then tap Trust again in the pop-up that appears (see Figure 1-25).
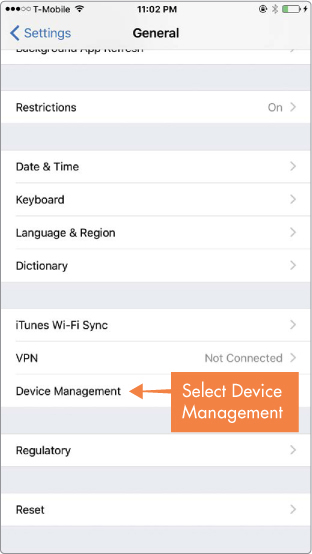
Figure 1-24: Selecting Device Management in the General settings on your device

Figure 1-25: The final step in making your device trust your computer so you can install apps
That should do it! Now go back to Xcode and click the play button again. This time, after a minute or so, the Hello World app should run on your device.
WHAT YOU LEARNED
You installed Xcode and created your first app. In doing so, you learned how to add a label to a view controller in the storyboard and how to run your app in a simulator or on a real device. In Chapter 2, you’ll learn how to create expressions in Swift, which is just like writing sentences.