14
SETTING THE STAGE

Over the next several chapters, we’ll put your new skills to good use to build a game called Schoolhouse Skateboarder, where the player controls a skateboarder who has to jump over obstacles and collect gems.
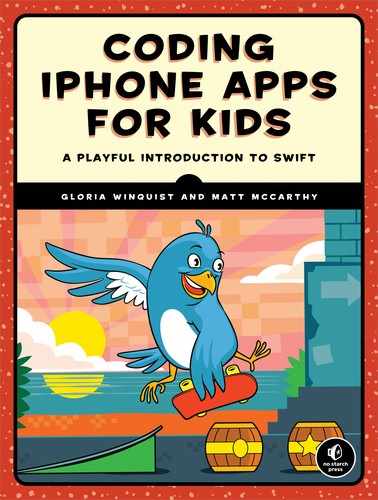
In this chapter, you’ll set up your Xcode project file, add images for the player, and display a schoolyard background. Figure 14-1 is a preview of how the game will look on an iPhone. Players try to survive as long as possible by tapping to jump over obstacles, collecting gems and scoring points along the way. They lose when they tip over or fall down a hole.

Figure 14-1: The finished game
WHERE DO I GET ART AND SOUND EFFECTS?
We’ve already created all the art and sound effects you need to make Schoolhouse Skateboarder (available from https://www.nostarch.com/iphoneappsforkids/). You don’t need anything else to follow along. If you want to customize it, you can make the game your own by replacing the skateboarder image with a character of your choosing, or you might have someone grabbing hamburgers instead of gems.
Hopefully, by the end of this book, you’ll be inspired to design your own games. It can be rewarding to create the entire game by yourself, including the artwork and sound effects. You have complete control over every aspect of your game.
There are also plenty of places on the web where you can find free game art to use:
http://opengameart.org/ Free game art, sounds, and music
http://freetems.net/ Free game art and music
http://www.bfxr.net/ Free retro game sound creation tool
MAKING GAMES WITH XCODE’S SPRITEKIT
SpriteKit is iOS’s built-in game engine for making two-dimensional, or 2D, games. A game engine is a set of tools that lets you quickly and easily make animations, use audio and sound effects, create a menu system, and more. Programmers use game engines so they can focus on what’s truly important—making the game fun.
Typically, a game consists of many sprites. A sprite is a 2D image used in a game. Sprites can be full-screen images that provide the backdrop for the game, or they can be smaller images that move around and do things. Background sprites set the stage. For example, in a space shooter game, the background sprites might show a space scene with stars and planets, and there would be smaller sprites for the player’s spaceship, enemy ships, bullets, asteroids, and power-ups.
As far as game engines go, SpriteKit is top notch. Tasks that would take many lines of code in other game engines can be accomplished with just a line or two in SpriteKit, and it’s fun to use!
NOTE
iOS also has a 3D game engine called SceneKit, but since we’re building a 2D game, we’ll stick with SpriteKit.
CREATING THE GAME PROJECT
The first thing we need to do is create a new SpriteKit project for our game. Open Xcode and select File ▸ New ▸ Project…. In the project template dialog, select iOS, choose the Game template, and then click Next.
Now, name your project SchoolhouseSkateboarder in the Product Name field. Choose SpriteKit as the Game Technology. Since our game will run only on iPhones (and iPod touches), select iPhone as the Devices setting. Then click Next to create your game project.
Without changing a thing, you can run this project and you’ll see a black screen with a label that says Hello, World!. Each time you click your mouse anywhere in the simulator, a spinning box will appear on the screen (see Figure 14-2), and the label will shrink for a second. If the label appears sideways, you can rotate the simulator window by selecting Hardware ▸ Rotate Left from the simulator’s menu.
Whenever you make a new project using the Game template, Xcode adds this simple interaction so you can make sure everything’s working.

Figure 14-2: Running the project created by the Game template before making any changes
Since we don’t want a giant Hello, World! label in our game, let’s remove that first. That label exists in the scene editor, a tool used to visually design a SpriteKit scene, similar to the way storyboards are used to design UIKit views. You can drag objects into the scene editor, move them around, and change their size, color, and other properties. This can be a useful tool, but it has many limitations compared to what can be done in code. Therefore, apart from removing the Hello, World! label, we won’t be using the scene editor for Schoolhouse Skateboarder. To open the scene editor, click the file named GameScene.sks in the Project navigator. Once it loads, you should see a black scene with the Hello, World! label. Click the label, and then press DELETE. See Figure 14-3.

Figure 14-3: Deleting the Game template’s Hello, World! label
Now that we’ve created the project and removed the Hello, World! label, we can get down to business—the business of fun, that is!
ADDING IMAGES
First, you’ll want to add all of the images to your project as assets. (An asset is just a thing in your game, such as a sprite or a sound effect.)
Download the ZIP file from https://www.nostarch.com/iphoneappsforkids/. Once the download is complete, you’ll have a folder named ch14-images inside your Downloads folder with all the image files you need.
To add the image files to your project, you’ll need to drag them from Finder into Xcode and drop them into an asset catalog. (An asset catalog is a special type of folder in an Xcode project that holds and organizes project resources such as image files and icons.) It is helpful for images because it groups together related image files. Once the files are in the asset catalog, you can use them anywhere in your code by referring to their filenames. The Game template we used comes with one asset catalog already, called Assets.xcassets, which is the catalog we’ll use.

Click Assets.xcassets in the Project navigator. You should see the existing assets, AppIcon, and spaceship image. You can delete the spaceship image, since we won’t be using it. Click it and then press DELETE.
Now open Finder and navigate to the folder where the image files were downloaded. Press ⌘-A to select them all. Once they’re highlighted, drag them into the Xcode asset catalog, as shown in Figure 14-4.
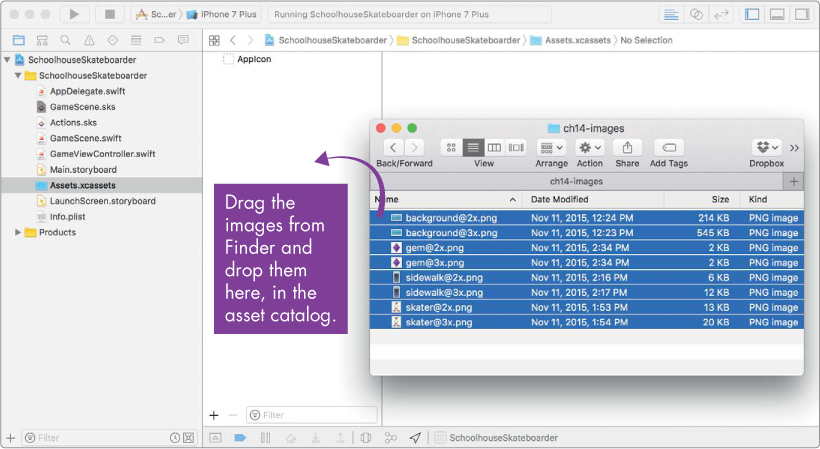
Figure 14-4: Adding the image files to your project’s asset catalog
You might have noticed that all of the image files are .png files. PNG stands for Portable Network Graphics, and it is the most common image file type used in iOS applications because it has the smallest file size for the best quality image. You could use .jpg files, but .png files are recommended.
THE SCENERY: DISPLAYING A BACKGROUND IMAGE
Now that you’ve added all the images to the project, let’s write some code to display the background image in our app.
When you created a new project using the Game template, some helpful code was automatically added to your project. Click the file named GameScene.swift in the Project navigator. You should see a bunch of code already there. This code is there for two reasons. First, it gives you an example of how to create a shape (the spinning box) and how to perform an action (making the box spin). Second, it lets you immediately run a new project and make sure that everything is set up properly.
At this point, we’re going to remove most of that code and add our own code. Go ahead and delete everything in GameScene.swift, except for the declaration of the didMove(to:) function and the update(_:) function, so that it looks like this:
GameScene.swift
import SpriteKit
class GameScene: SKScene {
override func didMove(to view: SKView) {
}
override func update(_ currentTime: TimeInterval) {
// Called before each frame is rendered
}
}
Most of the logic in our game will be in the GameScene class. Think of a scene as one view or screen in your app. The GameScene class will manage everything that happens within the scene—how the sprites should be displayed, how the player will interact with the game, and how scoring will happen. Complex games may have many separate scenes—for example, a title scene, a menu scene, a game scene, and a settings scene. Our game will have just one scene: the game scene.
Scene classes will usually have setup functions (stuff that happens once), a game loop or update functions (stuff that happens over and over again during the game), and user interaction functions (stuff that happens only when the user taps or swipes).
The setup function didMove(to:) is called when your game first starts. It’s great for code that sets up the scene, such as the code that adds the initial sprites or sets the player’s score and lives. It’s similar to the viewDidLoad() method that you used to set up the date picker in the AddBirthdayViewController in Chapter 10, and it’s called just once.
Before we add the background image to the scene, we have to set the anchorPoint of the scene. Add this line of code to the didMove(to:) method (the gray lines indicate some of the existing code, for placement):
override func didMove(to view: SKView) {
anchorPoint = CGPoint.zero
}

Setting the scene’s anchor point determines how sprites will be positioned in the scene. When you pin a piece of paper to a corkboard with a pushpin, the pushpin is the anchor point. The piece of paper will be positioned where you put the pushpin, and if the paper rotates, it will rotate around the pushpin. This is exactly how the anchorPoint property works with sprites and scenes in SpriteKit. The Game template’s GameScene has its anchor point in the middle of the scene, but we want the anchor point to be in the lower left of the scene, so we set it to CGPoint.zero, or (0, 0). For some games, such as a space shooter, it’s better to have the anchor point in the middle of the scene. But for our game, where the ground is on the bottom of the screen, moving the anchor point to the lower left will make it easier to work with. See Figure 14-5 for an illustration of various anchor points.
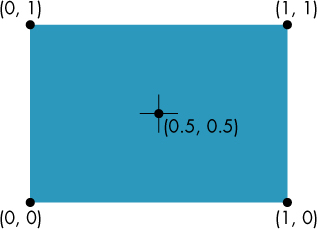
Figure 14-5: Various locations of anchor points ranging from (0, 0) to (1, 1)
In our scene, when we place a sprite at an x-position of 0, it will be at the left edge of the screen. And when we place a sprite at a y-position of 0, it will be at the bottom edge of the screen.
NOTE
We’ll be building each code file for the projects step-by-step. The final versions are available from https://www.nostarch.com/iphoneappsforkids/.
ANCHOR POINTS FOR SPRITES
You can also set the anchor point of a sprite, changing how that sprite gets positioned and how it rotates. See Figure 14-6 for an example of rotating a sprite with different anchor points.

Figure 14-6: The anchor point of a sprite determines how it will rotate.
Sprites normally have their anchor point in the center. We won’t be changing any sprite anchor points, so we will always position sprites using their center point.
Now, to load our background image, add the following lines of code to the didMove(to:) function:
override func didMove(to view: SKView) {
anchorPoint = CGPoint.zero
➊ let background = SKSpriteNode(imageNamed: "background")
➋ let xMid = frame.midX
➌ let yMid = frame.midY
➍ background.position = CGPoint(x: xMid, y: yMid)
➎ addChild(background)
}
Let’s walk through the five lines of code we just added. The line at ➊ creates a sprite called background, using either the [email protected] file or the [email protected] file. Both files were added to the asset catalog earlier and Xcode will choose the right file automatically. You simply have to refer to it in code as "background" or "background.png". To understand how Xcode picks the right file, see “Sizing Images for Different Screen Resolutions” on page 213. Note that the variable name does not have to match the image name—you can use whatever you want for the variable name. The image name, however, must match a file that you added to an asset catalog in your project. SKSpriteNode is the sprite class in SpriteKit, so when we create a sprite in our game, we’ll be creating an SKSpriteNode, as we did here.
The lines at ➋ and ➌ create the constants xMid and yMid, which will represent the middle position of the screen. frame is a property of GameScene—it’s a CGRect (a rectangle) that represents the entire screen. Every scene and sprite has a frame that describes where it is on the screen. A frame has an x-position, a y-position, a width, and a height (see Figure 14-7). The midX property gives us the middle x-position of the screen’s frame, and midY gives us the middle y-position.
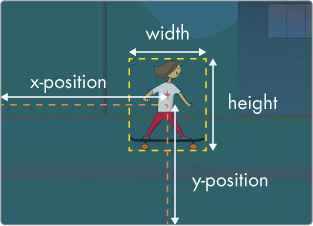
Figure 14-7: A frame describes the position and size of a sprite.
The line at ➍ sets the position of our background image to the middle of the screen by creating a CGPoint using xMid and yMid and assigning it to the sprite’s position property.
A CGPoint is a struct that holds two CGFloat values, which represent x- and y-coordinates. When you’re dealing with screen coordinates, you typically use CGFloat as the data type instead of Float or Double. A single CGPoint can hold two values, one for x and one for y, which makes it convenient for dealing with screen coordinates in a 2D game where everything is positioned using both x- and y-positions.
NOTE
Anything that begins with CG comes from the Core Graphics framework, an Apple framework used for graphics. You’ll notice this kind of naming system a lot in Swift—the first two or three letters of a class or struct often tell you what that object is used for or where it comes from. For example, all the SpriteKit classes, such as SKSpriteNode , start with SK .
The line at ➎ adds the background image to the scene by calling the function addChild(_:). This sprite is now a child of the scene, which means it is attached to this scene. For instance, if the scene grows, shrinks, or goes away, this child sprite will, too. In a SpriteKit game, the scene is always the parent object, and every sprite is added as a child of that scene or as a child of another sprite. Whenever you add a sprite, it’s important to think about what that sprite’s parent should be. For example, the skater sprite is a child of the scene, but if we wanted to add interchangeable hats onto the skater, we would use a hat sprite that is a child of the skater sprite. That way, whenever the skater jumped, the hat would stay on the skater, and we wouldn’t have to also move the hat separately.
HOW IT WILL BE PLAYED: SCREEN ORIENTATION
It takes more work to create a game that runs in both portrait and landscape modes, so it’s often best to decide which orientation is best for your game and just pick that one. Since our game is an action game that scrolls horizontally, landscape orientation (where the device is on its side, as shown in Figure 14-8) makes the most sense.

Figure 14-8: How our game looks in portrait versus landscape orientation
Try running the project now, using the iPhone 7 simulator, and you’ll notice it may default to portrait orientation. Let’s change the project settings so the game runs only in landscape. Go to the Project navigator and click the SchoolhouseSkateboarder project—it’s at the top of the Project navigator with a blue icon next to it, as you can see in Figure 14-9.
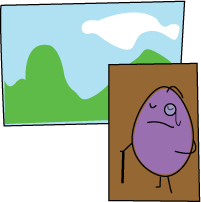
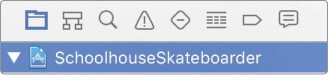
Figure 14-9: Access the project settings by clicking the project entry in the Project navigator.
In Figure 14-10, you can see a list of projects and targets.

Figure 14-10: Uncheck the Portrait option, leaving both Landscape orientation options checked.
If you don’t see the list of Projects and Targets on your screen, click the square icon in the upper-left corner of the window, as shown in Figure 14-10. This list will appear and the icon will turn blue to indicate that the list area is now being shown. Make sure the SchoolhouseSkateboarder target is selected. Now find the Portrait checkbox and uncheck it. Leave the Landscape orientation options checked.
Run the game again, and you’ll see it launches in landscape orientation. We’re getting closer, but the background image doesn’t yet fill the screen. We’ll see how to fix this in a bit.
With the game now running in landscape orientation, you need to make sure that your simulator is also in landscape orientation. To rotate it, select Hardware ▸ Rotate Right from the simulator’s menu, as shown in Figure 14-11.
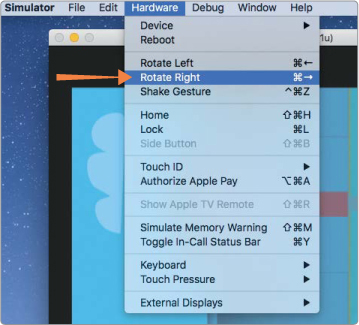
Figure 14-11: Rotating the simulator orientation to match the game
SIZING IMAGES FOR DIFFERENT SCREEN RESOLUTIONS
Before we dive into the code, we should decide which devices and screen resolutions we’ll support. The more devices you support, the more you’ll have to deal with different screen sizes, which means you need to do extra work to ensure the artwork assets you create will display properly on each device. Games tend to require more effort in this area than UIKit-based apps like our Birthday Tracker because game artwork will look stretched out if you just scale it up or down. To avoid that problem, you’ll have to work with a different set of images for each device you want to support.

Xcode has a system for naming image files to help you tell which images are for which devices. For example, suppose you wanted to add an image of a skater to your game, and you had a skater image file that was 100 pixels wide and 100 pixels tall (100×100). You would name that image skater.png. You’d also need to create an image named [email protected] that is 200×200 pixels, and another image named [email protected] that is 300×300 pixels. These three files should be the same image in three different sizes. If the game is run on an iPhone 4, the @2x file will automatically be used thanks to the handy @2x suffix. If the game runs on an iPhone 6 Plus, the @3x file will automatically be used. In your code, you can just refer to the file as skater, and as long as you’ve correctly named the images in your project, Xcode will display the correct image.
For Schoolhouse Skateboarder, we’ll support everything from the iPhone 4 on. That means we’ll need to support the following four screen resolutions: 960×640, 1136×640, 1334×750, and 1920×1080.
NOTE
All the images we’re using have a suffix, such as @2x or @3x. An image without a suffix, such as skater.png, is considered to be a 1x image. You only need to include 1x-sized images for older devices that have a non-retina display, such as an iPhone 3GS or a first-generation iPad mini. Therefore, all of our image files will have the @2x or @3x suffix.
Our background image files are named [email protected] and [email protected]. If you look at the Assets.xcassets asset catalog, you’ll notice that Xcode grouped these two images together. If you drag images at the same time into an Xcode asset catalog, Xcode automatically recognizes that they are different sizes of the same image because of how they are named and groups them together. See Figure 14-12.

Figure 14-12: Images with multiple sizes are grouped together in the asset catalog.
We have one last bit of prep to take care of before moving on from the background image. You may have noticed that when you run the game using the iPhone 7 simulator, the background image doesn’t fill the entire screen, as shown in Figure 14-13. This is because of the way the Game template handles sizing a game scene. The game scene’s size will be set based on the settings in the GameScene.sks scene editor file that was included in our project. We won’t be using the scene editor in this project, so we need to add code in order to make sure our scenes are sized properly.
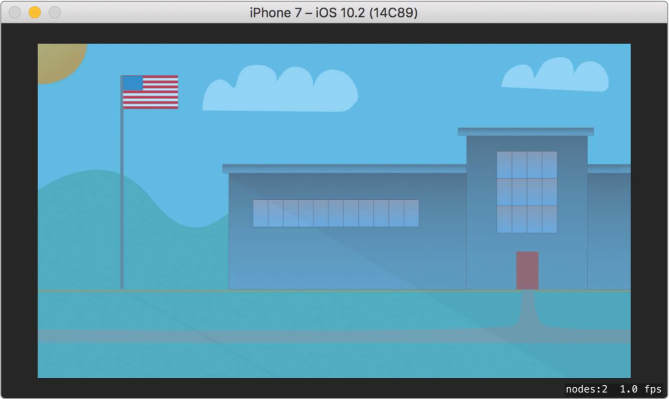
Figure 14-13: The background image doesn’t fill the entire screen.
Click the GameViewController.swift file in the Project navigator and find the viewDidLoad() method. Add the following lines of code that set the scene’s size:
GameViewController.swift
override func viewDidLoad() {
--snip--
scene.scaleMode = .aspectFill
// Adjust the size of the scene to match the view
let width = view.bounds.width
let height = view.bounds.height
scene.size = CGSize(width: width, height: height)
// Present the scene
view.presentScene(scene)
--snip--
}
The code in the viewDidLoad() method creates an instance of the GameScene class and displays it. Since the GameScene is the main scene of our game, we want it to always fill the entire screen. The code that we added here determines the size (width and height) of the view being displayed, and sets the size of the new scene so that it fills the entire view.
Run the project again. The background image should fill the entire screen now.
WHAT YOU LEARNED
In this chapter, you started making the Schoolhouse Skateboarder game and learned about SpriteKit. You learned how to create a game project in Xcode and import assets, such as images, into the project. You also learned about supporting various device screen resolutions through standard file naming practices and about how to pick what image types you’ll need in a game. Finally, you created and displayed a background image sprite.
Now that we’ve set up a SpriteKit game project with the resources we need and tackled the questions of screen orientation and resolution, it’s time to program some action. In Chapter 15, we’ll add our hero and the ground that she skates on, make everything move, and let the player tap on the screen to make her jump.
