15
MAKING SCHOOLHOUSE SKATEBOARDER A REAL GAME

In this chapter, we’ll add our hero, the skateboarder. We’ll use a little trick to make it look like she’s moving: we’ll move the ground beneath her. Then we’ll add jumping to the game so that when the player taps on the screen, the skater jumps. To do all of this, we’ll create our own custom sprite subclass, and we’ll add a game loop where all the action happens.
OUR HERO, THE SKATEBOARDER
It’s time to add the skater to our game. As we did with the background image, we’ll create a sprite, position it on the screen, and then add it to the scene. To make a sprite, we use the SKSpriteNode class.
Our skater will need some additional properties to keep track of things, such as her current velocity (speed) and whether she is on the ground. Since SKSpriteNode doesn’t have these properties, we’ll create our own subclass of SKSpriteNode called Skater. This will allow us to add whatever extra properties we want to this sprite, in addition to all of the built-in SKSpriteNode properties.
CREATING A SKATER SPRITE CLASS
To create the Skater class, right-click the SchoolhouseSkateboarder folder in the Project navigator and choose New File…. On the next screen, choose the template called Cocoa Touch Class in the Source section of the iOS templates, and then click Next. Type Skater for the class name and SKSpriteNode for the class we want to subclass.
Click Next, and then on the final screen, click Create to confirm the file location. Now you’ll see your new Skater class has appeared in both the Project navigator and the Editor pane.
IMPORTING SPRITEKIT
When you create a subclass of a SpriteKit class, such as SKSpriteNode, you need to add a statement at the top of your code to import SpriteKit for this class instead of UIKit. To import the SpriteKit library, change the line at the top of your new Skater class (Skater.swift) from this:
import UIKit
to this:
import SpriteKit
Importing SpriteKit makes all the SpriteKit classes and methods available within the Skater.swift file. If you try to use SpriteKit classes or methods in a file without first importing SpriteKit, you’ll see errors like “Use of undeclared type.”
ADDING CUSTOM PROPERTIES TO THE SKATER CLASS
Now that we’ve imported the SpriteKit library, let’s add some properties to our new Skater class inside the existing braces:
Skater.swift
import SpriteKit
class Skater: SKSpriteNode {
➊ var velocity = CGPoint.zero
➋ var minimumY: CGFloat = 0.0
➌ var jumpSpeed: CGFloat = 20.0
➍ var isOnGround = true
}
Soon we’ll be adding code to our game scene to make the skater jump, so we need these properties to keep track of the skater’s movements.
The variable named velocity, a CGPoint, is initialized with CGPoint.zero at ➊. This is a shortcut to specify a point with x and y values both equal to 0.0. It’s the same as using CGPoint(x: 0.0, y: 0.0). Velocity means speed, so this variable will keep track of the skater’s speed in both the x-direction (right-left) and y-direction (up-down). For example, when the skater jumps up, the velocity’s y value will determine how fast she is moving upward.
The variable minimumY is a CGFloat that we’ll use to specify the y-position of the ground ➋. So when the skater jumps, we know what y-position she should stop at when coming back down.
The variable jumpSpeed is a CGFloat that we’ll use to specify how fast the skater can jump ➌. We’ve given it an initial value of 20.0. This is just a guess for now. We may have to change this value later if we find that the skater jumps too quickly or too slowly.
NOTE
Notice that we specified the type CGFloat when we wrote var minimumY: CGFloat = 0.0 and var jumpSpeed: CGFloat = 20.0. You will always need to do this when creating a CGFloat variable or constant, or else Xcode will infer that the type is Double.
Finally, the variable isOnGround is a Bool that we’ll use to keep track of whether the skater is currently on the ground ➍. If she’s on the ground, she can jump. If she’s not on the ground (that is, if she’s already jumping), she can’t jump again until she comes back down.
CREATING AN INSTANCE OF THE SKATER IN THE SCENE
Now it’s time to switch back to our GameScene.swift file and add a skater sprite. Add the following code just inside the GameScene class’s braces, above the didMove(to:) method:
GameScene.swift
import SpriteKit
class GameScene: SKScene {
// The hero of the game, the skater, is created here
let skater = Skater(imageNamed: "skater")
override func didMove(to view: SKView) {
This line creates a new class property named skater, which is an instance of our new class Skater. It uses the image skater.png, which you should have already downloaded and added to your asset catalog in Chapter 14. Since skater is a class property (created inside the class declaration but outside of any function), it will be available to use inside any method within the GameScene class.
Note that creating a sprite doesn’t make it show up on the screen. You’ll always need to add the sprite as a child of the scene or as a child of another sprite, which we’ll do soon. You’ll see this common pattern with sprites: 1) create the sprite, 2) position the sprite and set any initial values, and 3) call the addChild() method to add the sprite to the scene. So far we’ve just created the sprite. Next, we’ll set the sprite’s position and values before calling the addChild() method to add the skater to our scene.
SETTING UP THE SKATER
To set our skater sprite’s position and other initial values, we’ll create a separate method called resetSkater(). We want to have this setup code in a separate method so that any time we need to reset the skater to her initial position (such as when the game has to restart), we can reuse this method.
Write the following method below the existing didMove(to:) method:
GameScene.swift
override func didMove(to view: SKView) {
--snip--
}
func resetSkater() {
// Set the skater's starting position, zPosition, and minimumY
➊ let skaterX = frame.midX / 2.0
➋ let skaterY = skater.frame.height / 2.0 + 64.0
➌ skater.position = CGPoint(x: skaterX, y: skaterY)
➍ skater.zPosition = 10
➎ skater.minimumY = skaterY
}
override func update(_ currentTime: TimeInterval) {
// Called before each frame is rendered
}
}
This method performs some basic setup for the skater sprite. First, we determine the skater’s x-position, skaterX, by finding the x value at the middle of the scene’s frame with frame.midX and dividing that by two ➊. This will put the skater in the left side of the scene, which will give the player time to respond to obstacles that come from the right side. If we position the skater exactly in the middle of the screen, the player might not have enough time to see the obstacles before they have to jump over them. Remember, the skater will stay in the same x-position on the screen since we will be animating the ground beneath her to make it look like she’s moving.

At ➋, we calculate the y-position for our skater by adding half of the skater sprite’s height to 64. In SpriteKit, y-positions increase as you go up the screen (unlike in UIKit apps, where a y-position of 0.0 represents the top of the screen). Also, when we set a sprite’s position, we’re actually setting where the center of that sprite should be. Therefore, if we place a sprite at a y-position of 0.0, half of it would be on the screen, and half would be off. So to place an object at the bottom of the screen (but not hanging off the screen), we need to set its y-position to half of its height. Finally, to account for the height of our sidewalk, which will be 64, we add 64 to the y-position of the skater. Figure 15-1 shows how y-positions work in SpriteKit.

Figure 15-1: Setting the y-position of a sprite
Now that we’ve calculated the skater’s x- and y-positions, we set our skater’s starting position by creating a CGPoint that uses these values ➌.
The zPosition of the skater sprite is set to 10 ➍. To understand zPosition, imagine you’re assembling a stack of papers. Papers that are higher up in the stack have a higher zPosition and will be on top of anything that has a lower zPosition. It’s possible for two or more sprites to have the same zPosition, in which case the sprite that was added later would be on top.
When we added our background sprite, we didn’t set a zPosition, so it’s at the default zPosition of 0 (the bottom of the stack). Since we want our skater to be on top of the background image, we’re setting a zPosition of 10. This way, we still have some room to put other objects in between the skater and the background (unlike if we’d set the skater’s ZPosition to just 1). If we wanted to add a dog walking around the scene, we could put it at a zPosition of 5, and it would be behind the skater but in front of the background image.

Finally, at ➎, we set the skater sprite’s minimumY variable to be the same as her y-position. Over the course of playing the game, the skater will jump, so her y-position will change, but now we’ll always have this minimumY variable to indicate what the skater’s y-position should be when she’s on the ground.
SEEING THE SKATER ON THE SCREEN
Now we’re ready to add the skater to the scene! Add these lines inside the didMove(to:) method, below the existing code in that method:
override func didMove(to view: SKView) {
--snip--
addChild(background)
// Set up the skater and add her to the scene
resetSkater()
addChild(skater)
}
Now when the game scene is first presented, our skater sprite will be set up and added as a child of the scene. Your entire GameScene class should now look like this:
GameScene.swift
import SpriteKit
class GameScene: SKScene {
// The hero of the game, the skater, is created here
let skater = Skater(imageNamed: "skater")
override func didMove(to view: SKView) {
anchorPoint = CGPoint.zero
let background = SKSpriteNode(imageNamed: "background")
let xMid = frame.midX
let yMid = frame.midY
background.position = CGPoint(x: xMid, y: yMid)
addChild(background)
// Set up the skater and add her to the scene
resetSkater()
addChild(skater)
}
func resetSkater() {
// Set the skater's starting position, zPosition, and minimumY
let skaterX = frame.midX / 2.0
let skaterY = skater.frame.height / 2.0 + 64.0
skater.position = CGPoint(x: skaterX, y: skaterY)
skater.zPosition = 10
skater.minimumY = skaterY
}
override func update(_ currentTime: TimeInterval) {
// Called before each frame is rendered
}
}
Now, using the iPhone 7 simulator, run the game by pressing ⌘-R. You should see something like Figure 15-2.
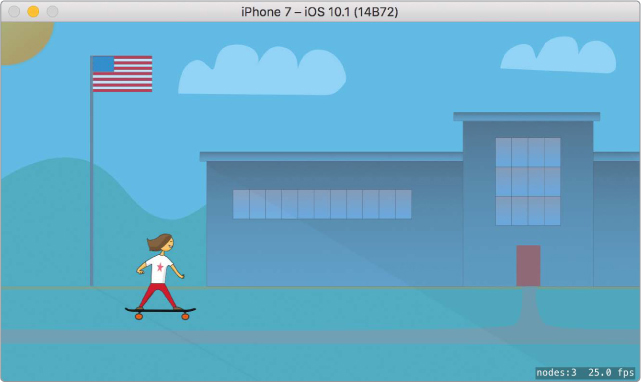
Figure 15-2: Our hero makes her first appearance!
Congratulations! You have set up the skater sprite and the skater’s starting position. Looks great, right? We’ll add the sidewalk and make her skate along it pretty soon, too, but first let’s talk about SpriteKit’s debugging tool.
UNDERSTANDING SPRITEKIT’S DEBUGGING INFORMATION
Notice the small text in the bottom-right corner of your simulator? It should say something like nodes:3 25.0 fps. This is helpful information about what’s happening in your game. In SpriteKit, most things that are displayed on the screen are called nodes. This display is telling us there are currently three SpriteKit nodes being displayed. This makes sense, since we have our GameScene itself, the background image, and the skater sprite.
Knowing how many nodes are currently displayed can help you debug problems with your code. For example, if your game is slowing down, you might look at the debugging info and see that the number of nodes keeps going up. This would tell you that perhaps you’re adding too many sprites and not removing them when you’re done with them.
The display is also telling us that the game is currently running at 25 frames per second (your actual number may differ depending on your computer’s speed). Movies are made up of many frames, or images, that give the appearance of animation or movement when they are played back quickly. The same is true of games! Our game is updating the scene and its nodes 25 times per second. None of our nodes are moving, so you can’t actually tell, but every second the screen is being completely redrawn 25 times. When we add our sidewalk bricks and make them move in the next section, the magic of animation will make this very clear.
HITTIN’ THE BRICKS
As the skater skates along the sidewalk, she won’t actually move to the right. Rather, we’ll keep adding bricks onto the right side of the screen that move to the left side. This is a nice trick to create the illusion that the skater is moving to the right.
CREATING SIDEWALK BRICKS
Each time we add a brick into the scene, we’ll also add it into an array that we’ll be using to keep track of all our bricks. Once a brick moves off the left edge of the screen, we’ll remove it from the array and also remove it from the scene. It’s important to remove sprites that you no longer need, or your node count will keep going up and up. Your game will slow down because the game engine is still keeping track of every node in the scene!
Add the code to create this class property at the top of GameScene, just above where we created the skater:
GameScene.swift
class GameScene: SKScene {
// An array that holds all the current sidewalk bricks
var bricks = [SKSpriteNode]()
// The hero of the game, the skater, is created here
This creates a class variable named bricks and assigns to it an empty array of sprites (since our bricks will be sprites). Just below that, add the following code:
class GameScene: SKScene {
--snip--
var bricks = [SKSpriteNode]()
// The size of the sidewalk brick graphics used
var brickSize = CGSize.zero
// The hero of the game, the skater, is created here
This brickSize variable does exactly what its name says and sets up each brick’s size. It will come in handy later when we’re moving our bricks around. We set brickSize to CGSize.zero now, since we don’t know yet what the actual brick size will be. Once we create the brick sprites, we’ll set the brickSize to the actual size of those sprites.
We need one more class property, scrollSpeed, to keep track of how fast the bricks are moving. Add the following code below the brickSize declaration:
--snip--
var brickSize = CGSize.zero
// Setting for how fast the game is scrolling to the right
// This may increase as the user progresses in the game
var scrollSpeed: CGFloat = 5.0
// The hero of the game, the skater, is created here
Again, remember that you need to specify the CGFloat data type. Otherwise, Xcode will infer that the variable is a Double.
Now we’re going to add a method that will create a new sidewalk brick. Since we’ll be displaying a lot of sidewalk bricks, this method will be a timesaver. In games, when something new comes on the screen, it is said to have spawned, so we’ll use that word to refer to our method. Just below the resetSkater() method, add the following method:
➊ func spawnBrick(atPosition position: CGPoint) -> SKSpriteNode {
// Create a brick sprite and add it to the scene
➋ let brick = SKSpriteNode(imageNamed: "sidewalk")
➌ brick.position = position
➍ brick.zPosition = 8
➎ addChild(brick)
// Update our brickSize with the real brick size
➏ brickSize = brick.size
// Add the new brick to the array of bricks
➐ bricks.append(brick)
// Return this new brick to the caller
➑ return brick
}
At ➊, our spawnBrick(atPosition:) method takes a CGPoint for input (so it knows where to place the brick) and returns the newly created brick sprite. Note that we are using a custom parameter label of atPosition for the position parameter. This is so when we call the method, it’s more readable—we can see that we’re asking for a brick to be spawned at a specific position.
We create the brick sprite as an SKSpriteNode using an image named sidewalk.png ➋. At ➌, the new brick sprite is placed at the position that was passed in to the method. At ➍, the brick sprite is given a zPosition of 8. Remember that we put our background image at a zPosition of 0 and our skater sprite at a zPosition of 10, so these sidewalk bricks will always be on top of the background image but behind the skater.
After that, our brick is added to the scene ➎ (or it won’t show up). The line at ➏ sets our brickSize class property equal to this new brick’s size based on the actual size of sidewalk.png, which will be helpful to have a bit later in our code. At ➐, our brick sprite is added to the array of bricks we created earlier. Finally, at ➑, the new brick sprite is returned to the code that called this method.
UPDATING SIDEWALK BRICKS
Now that we have some code to create bricks, we need a method that will go through all the onscreen bricks and move them to the left. This method will be called a lot (25 times per second or more), so it only needs to move the bricks by a tiny bit each time. We’ll pass in the amount the bricks move as a parameter so it can be adjusted as the skater speeds up. (This is how we’ll make the game harder over time!) Add the following method declaration below the spawnBrick(atPosition:) method:
GameScene.swift
func updateBricks(withScrollAmount currentScrollAmount: CGFloat) {
}
This method will be our largest yet, so we’ll walk through it one chunk at a time. Inside the method’s braces, add the following:
func updateBricks(withScrollAmount currentScrollAmount: CGFloat) {
// Keep track of the greatest x-position of all the current bricks
var farthestRightBrickX: CGFloat = 0.0
}
This is a variable we’ll use to keep track of the x-position of the brick that is farthest to the right. That way we’ll know when it’s time to add another brick on the right edge, and where to position that new brick. Below that, add the following block of code:
func updateBricks(withScrollAmount currentScrollAmount: CGFloat) {
--snip--
var farthestRightBrickX: CGFloat = 0.0
➊ for brick in bricks {
➋ let newX = brick.position.x - currentScrollAmount
// If a brick has moved too far left (off the screen), remove it
➌ if newX < -brickSize.width {
➍ brick.removeFromParent()
➎ if let brickIndex = bricks.index(of: brick) {
➏ bricks.remove(at: brickIndex)
}
➐ } else {
// For a brick that is still onscreen, update its position
➑ brick.position = CGPoint(x: newX, y: brick.position.y)
// Update our farthest-right position tracker
➒ if brick.position.x > farthestRightBrickX {
➓ farthestRightBrickX = brick.position.x
}
}
}
}
This code loops through our array of bricks at ➊ using a for-in loop. The line at ➋ calculates a new x-position for the brick sprite by subtracting the passed-in currentScrollAmount from its x-position. This newX represents a new spot that’s a little to the left of where this brick is currently positioned.
Next, at ➌, we use an if statement to see if this newX position would move the brick offscreen by checking if it is less than the negative of the brick’s width (-brickSize.width). Why not just check if the newX is less than 0.0? Remember that when you set a sprite’s position, you’re telling the computer where to put the center of the sprite. So at an x-position of 0.0, the brick is still partially on the screen. Checking that the brick’s position is less than -brickSize.width ensures that the brick is fully offscreen before we remove it. Figure 15-3 illustrates how the bricks are moving.

Figure 15-3: The bricks are moved to the left until they are off the screen.
Sprites that are no longer needed should be removed so the app won’t have to waste resources keeping track of extra nodes. Line ➍ does just that. To remove any sprite from the scene, we call the removeFromParent() method on the sprite. When removed from the scene, the sprite will disappear. That’s why we want to be sure it’s completely offscreen before removing it, or it would look like it just vanished.
There is one more bit of cleanup we need to do when removing a brick sprite: we need to remove it from our bricks array, because we want this array to contain only onscreen bricks. The line at ➎ checks if this brick sprite is in our bricks array by testing if its index in the array is found. Then, the line at ➏ uses this index to remove the sprite from the bricks array.
Now that we’ve taken care of bricks that have moved offscreen, we can use an else block at ➐ to deal with bricks that are still onscreen. The line at ➑ sets a new x-position for the brick sprite by creating a CGPoint using the newX that we calculated. We want the bricks to move only to the left, not up or down, so we won’t be changing their y-positions.
The last thing we need to do inside the else block is to update our farthestRightBrickX variable. To do this, we check if the current brick sprite’s new x-position is greater than the value of farthestRightBrickX at ➒. If it is, we set farthestRightBrickX equal to this brick sprite’s x-position at ➓. This way, when the for-in loop is finished and we’ve iterated through all the bricks in our array, the value of farthestRightBrickX will be equal to the x-position of whichever brick was found to be farthest to the right.
FILLING THE SCREEN WITH BRICKS
After repositioning all the bricks, we need to see if it’s time to add any new bricks. Since our bricks scroll from right to left, we’ll continually have bricks that go offscreen to the left and are removed, and new bricks that need to spawn on the right side of the screen. If we didn’t keep spawning new bricks, our skater would quickly run out of sidewalk!
To spawn new bricks on the right, we need to add one more chunk of code to our method update Bricks(withScrollAmount:). Add the following below the for-in loop you just added:
GameScene.swift
func updateBricks(withScrollAmount currentScrollAmount: CGFloat) {
--snip--
for brick in bricks {
--snip--
}
// A while loop to ensure our screen is always full of bricks
➊ while farthestRightBrickX < frame.width {
➋ var brickX = farthestRightBrickX + brickSize.width + 1.0
➌ let brickY = brickSize.height / 2.0
}
}
We already know the x-position of the farthest-right brick from our previous chunk of code. Now we use a while loop at ➊ to spawn a brick any time we find that our farthest-right brick position is less than the scene’s width. This loop will keep executing until we have sidewalk bricks that fill the screen, all the way to the right edge. Inside the while loop, we need to create a new brick sprite and add it.
First, we calculate the new sprite’s position. The line at ➋ determines the new brick sprite’s x-position by adding one full brick’s width to the current farthest-right position, plus an extra one-point gap. This extra one-point gap will leave a tiny space between each brick, which makes the movement of the bricks easier to see. (Later, try seeing how the sidewalk looks without the + 1.0 gap.) The line at ➌ calculates the new brick sprite’s y-position by dividing the brick’s height in half. This will place the brick at the bottom edge of the screen. Later on, we’ll vary this y-position so the player has to jump up to reach higher sidewalks. For now, we’re just going to place all the bricks on the bottom edge, like a normal sidewalk.
LEAVING GAPS TO JUMP
While we’re positioning the bricks, let’s make the game more fun for the player. The next bit of code adds some random gaps in the sidewalk that the player will have to jump over. Add this code inside the while loop, below the let brickY line:
GameScene.swift
let brickY = brickSize.height / 2.0
// Every now and then, leave a gap the player must jump over
➊ let randomNumber = arc4random_uniform(99)
➋ if randomNumber < 5 {
// There is a 5 percent chance that we will
// leave a gap between bricks
➌ let gap = 20.0 * scrollSpeed
➍ brickX += gap
}
// Spawn a new brick and update the rightmost brick
➎ let newBrick = spawnBrick(atPosition: CGPoint(x: brickX, y: brickY))
➏ farthestRightBrickX = newBrick.position.x
}
}
Adding random elements to games is important to keep the gameplay from being predictable. We achieve randomness by asking the computer to generate a random number, which is like rolling a die. The function arc4random_uniform() is a good way to create random integers by simply passing in an integer representing the maximum value for your random number. The line at ➊ creates a random integer between 0 and 99 using this function. This is like rolling a 100-sided die because there are 100 possible numbers between 0 and 99. Next we use an if statement at ➋ to check if this number is less than 5. This means the code inside the if statement will have a 5 percent chance of executing.
The line at ➌ calculates how large of a gap to create. As the skater’s speed increases, we want the gaps to get bigger and bigger, so this gap amount is set to 20.0 times the scroll speed. As the speed increases, the gaps will get larger. Finally, the line at ➍ adds this gap to our brickX variable. Now when we set the brick’s position, instead of being right next to the previous brick, it will be placed a good amount farther to the right, creating a gap.
After determining the x- and y-positions of the new brick, we spawn a new brick at ➎. Since we’ve added this new brick to the right of any existing bricks, we set farthestRightBrickX at ➏ to this new brick’s x-position. This will create our exit condition for the while loop. Figure 15-4 shows how the while loop works.

Figure 15-4: The while loop keeps adding bricks until the width of the screen is filled.
Once enough bricks have been added and the farthestRightBrickX is greater than or equal to the scene’s width, the while loop will stop executing.
THE GAME LOOP
It’s time to bring it all together by writing the main game loop. The game loop is a block of code that the game engine (SpriteKit) will execute over and over whenever the game is running. It’s where we’ll update all of our sprite’s positions, creating the actual animation in our game. All SpriteKit scenes have a method called update(_:), which we must override to update our sprite positions.
TRACKING THE UPDATE TIME
Before we write the main game loop code, however, we need to add a class property to keep track of when the last update happened. Add an optional lastUpdateTime property to GameScene, right below scrollSpeed:
GameScene.swift
var scrollSpeed: CGFloat = 5.0
// The timestamp of the last update method call
var lastUpdateTime: TimeInterval?
// The hero of the game, the skater, is created here
Our update(_:) method will be called very often, about 30 times per second. Notice I didn’t say exactly 30 times per second. The game engine will attempt to call the update(_:) method 30 times per second, but it’s not guaranteed to run exactly that number of times. And on some devices it will actually be targeting 60 times per second. So we need to keep track of how much time has actually passed between each update in order to make sure everything animates smoothly. We don’t want our skater to look like she’s constantly speeding up and slowing down just because this method isn’t called at an exact time interval. By keeping track of how much time has passed, we can adjust how much we move our sprites in each update and keep them moving smoothly.
CALCULATING ELAPSED TIME FOR EACH UPDATE
When we first created this project using the Game template, an empty update(_:) method was added automatically. Inside this method, add the following code to calculate how much time has passed since the last update:
GameScene.swift
override func update(_ currentTime: TimeInterval) {
// Determine the elapsed time since the last update call
➊ var elapsedTime: TimeInterval = 0.0
➋ if let lastTimeStamp = lastUpdateTime {
➌ elapsedTime = currentTime - lastTimeStamp
}
}
The line at ➊ creates an elapsedTime variable of the TimeInterval data type. TimeInterval is a Double data type used to track time intervals in seconds. Just like when we create a CGFloat, we need to specify that this is a TimeInterval, or Xcode will use type inference to assume this is a plain Double. The line at ➋ unwraps the lastUpdateTime, if it exists. It is an optional because at the start of the game there will be no last update. So, the first time the update(_:) method is called, lastUpdateTime will be nil. If we’re able to unwrap it, then the line at ➌ calculates the elapsedTime, which is how much time has passed since the last update call.
Now add the following line to the update(_:) method, to set lastUpdateTime equal to the currentTime:
override func update(_ currentTime: TimeInterval) {
--snip--
elapsedTime = currentTime - lastTimeStamp
}
lastUpdateTime = currentTime
}
This ensures that the next time the update(_:) method is called, our lastUpdateTime variable will be accurate.
ADJUSTING SCROLL SPEED USING THE ELAPSED TIME
Next, we will calculate our scroll speed. Add the following to your update(_:) method:
GameScene.swift
override func update(_ currentTime: TimeInterval) {
--snip--
lastUpdateTime = currentTime
➊ let expectedElapsedTime: TimeInterval = 1.0 / 60.0
// Here we calculate how far everything should move in this update
➋ let scrollAdjustment = CGFloat(elapsedTime / expectedElapsedTime)
➌ let currentScrollAmount = scrollSpeed * scrollAdjustment
}
The line at ➊ calculates the expected time lapse. About 1/60 of a second should pass between each call to update(_:) since the app will probably run at 60 frames per second on an actual iOS device (though it will probably run at less than 60 frames per second in the iOS simulator). The code we’re adding here will ensure that the skater appears to move at the same speed, regardless of which device (or simulator) is used.
The line at ➋ calculates a scroll adjustment factor by dividing the actual elapsed time by the expected elapsed time. If more time has passed than expected (greater than 1/60 of a second), this factor will be greater than 1.0. If less time has passed than expected, this factor will be less than 1.0. The line at ➌ determines what our scroll speed should be for this update by multiplying scrollSpeed by this adjustment factor.
UPDATING THE BRICKS
Add the following line of code to finish the update(_:) method:
GameScene.swift
override func update(_ currentTime: TimeInterval) {
--snip--
let currentScrollAmount = scrollSpeed * scrollAdjustment
updateBricks(withScrollAmount: currentScrollAmount)
}
Now that we’ve calculated the correct scroll amount for this update, we call our udpateBricks(_:) method and pass in the calculated scroll amount.
We’ve now reached a good time to test out the app. Press ⌘-R to run the app and see what happens! Your screen should look something like Figure 15-5.

Figure 15-5: Our skater is now skating along the sidewalk!
It should now look like the skater is skating along the sidewalk. You can see the sidewalk bricks moving from right to left, and every now and then (a 5 percent chance every time a brick is spawned) a gap appears. Notice that the count of nodes in the lower right should stay fairly consistent. This tells us that we are properly removing the bricks that went offscreen. If this number kept going up, we’d know that we forgot to remove them. It’s starting to look more like a game, but the skater just slides right over the gaps. Let’s give her the ability to jump.
UP, UP, AND AWAY—MAKING THE SKATER JUMP
We’re going to add code so that when the player taps on the screen, the skater jumps. To know when the player taps, we’ll use a tap gesture recognizer. Table 15-1 shows some common types of gesture recognizers you can use to know when the user has performed certain actions.
Table 15-1: Common Gesture Recognizers
Gesture |
Gesture recognizer |
What it detects |
Tap |
UITapGestureRecognizer |
One or more fingers tapping on the screen one or more times |
Pinch |
UIPinchGestureRecognizer |
Pinches with two fingers, typically used for zooming in or out |
Swipe |
UISwipeGestureRecognizer |
Swipes across the screen with one or more fingers |
Pan |
UIPanGestureRecognizer |
One or more fingers moving across the screen in any direction |
Long press |
UILongPressGestureRecognizer |
One or more fingers being held down on the screen for a certain amount of time |
We want to know about taps, so we’ll use the UITapGestureRecognizer. The tap gesture recognizer will call a method of our choosing any time the user taps a finger anywhere on the screen.
USING A TAP GESTURE RECOGNIZER
To use a gesture recognizer, you simply create it and then add it to the view. Add this code at the bottom of the didMove(to:) method to create and add the tap gesture recognizer:
GameScene.swift
override func didMove(to view: SKView) {
--snip--
addChild(skater)
// Add a tap gesture recognizer to know when the user tapped the screen
➊ let tapMethod = #selector(GameScene.handleTap(tapGesture:))
➋ let tapGesture = UITapGestureRecognizer(target: self, action: tapMethod)
➌ view.addGestureRecognizer(tapGesture)
}
With this code, any time the user taps on the screen, the handleTap(_:) method will be called on our game scene. First, we create a selector called tapMethod ➊. A selector is a reference to the name of a method. Soon we’re going to add a new method called handleTap(_:), and this constant, tapMethod, is just a reference to that method. This will allow us to tell the tap gesture recognizer which method it should call when the user taps on the screen.
At ➋, we create the tap gesture recognizer. Its initializer takes a target and a selector. The target tells the gesture recognizer what class the selector will be in, and the selector is the method to call. Since we’re going to add the handleTap(_:) method to the GameScene class that we’re already in, we use self to refer to this class.
Finally, the line at ➌ adds the new gesture recognizer to the scene’s view. A gesture recognizer must be added to the view, or it won’t do anything. We put this code inside the didMove(to:) method because a gesture recognizer only needs to be added to a view once and it will keep handling gestures until you remove it.
Now we just have to add this handleTap(_:) method! Add this new method just below the existing update(_:) method:
override func update(_ currentTime: TimeInterval) {
--snip--
}
func handleTap(tapGesture: UITapGestureRecognizer) {
// Make the skater jump if player taps while the skater is on the ground
➊ if skater.isOnGround {
// Set the skater's y-velocity to the skater's initial jump speed
➋ skater.velocity = CGPoint(x: 0.0, y: skater.jumpSpeed)
// Keep track of the fact that the skater is no longer on the ground
➌ skater.isOnGround = false
}
}
When the user taps on the screen, we need to make sure the skater is on the ground, so we check for this using an if statement at ➊. If the skater is already in the air, she can’t jump again (without a jetpack, anyway). The line at ➋ sets the velocity of the skater sprite so that the x velocity is still 0.0 and the y velocity is equal to the sprite’s jumpSpeed (which we defined in the Skater class). This allows us to make the skater jump straight up. Next, we set the skater sprite’s isOnGround property to false at ➌ because once she starts a jump, she is no longer on the ground and shouldn’t be allowed to jump again until she lands.
SIMULATING GRAVITY IN A SIMPLE WAY
Setting the skater’s velocity doesn’t make her jump, though. We need to use this velocity, in the update(_:) method, to update the skater’s y-position. First, we need to add one more class property, gravitySpeed, right under the declaration of var scrollSpeed at the top of the class, as follows.
GameScene.swift
var scrollSpeed: CGFloat = 5.0
// A constant for gravity, or how fast objects will fall to Earth
let gravitySpeed: CGFloat = 1.5
// The timestamp of the last update method call
We’ll use this constant to determine how fast the skater should come back down when jumping. Now add the following method declaration just below the updateBricks(_:) method:
func updateSkater() {
}
We’ll use this method to update the skater’s position when she jumps. Add the following code inside this method:
func updateSkater() {
➊ if !skater.isOnGround {
// Set the skater's new velocity as it is affected by "gravity"
➋ let velocityY = skater.velocity.y - gravitySpeed
➌ skater.velocity = CGPoint(x: skater.velocity.x, y: velocityY)
// Set the skater's new y-position based on her velocity
➍ let newSkaterY: CGFloat = skater.position.y + skater.velocity.y
➎ skater.position = CGPoint(x: skater.position.x, y: newSkaterY)
}
}
First, at ➊, we use an if statement to make sure we’re moving the skater up or down only if she’s not already on the ground. If she’s not on the ground, then she must be jumping. So we need to move her up (if she’s jumping up) or down (if gravity is pulling her back down).

The line at ➋ calculates a new y velocity by subtracting gravitySpeed from the current y velocity. When she jumps, she’ll start at a fast, positive velocity. Then gravity will slowly decrease that velocity until she reaches the peak of her jump. After that, the velocity will become negative as she falls back to Earth. Picture throwing a ball straight up into the air: it will have a positive speed as it rises, slowing down until it comes to a complete standstill, for an instant, at the top of its arc. Then it will fall back to you, gaining speed until you catch it or it hits the ground. This one line of code simulates that effect of gravity.
Next, the line at ➌ updates the skater’s velocity with this new value (but keeps her x velocity unchanged, as this sprite doesn’t actually move left or right). Now that we have the skater’s velocity updated, we can calculate her new y-position by using this velocity ➍. We add the skater’s velocity to her current y-position, and this gives us what her new y-position should be. The line at ➎ sets the skater’s new position.
CHECKING FOR LANDINGS
The last thing we need to do in the updateSkater() method is to check if the skater has landed. Add the following code to the end of the method:
GameScene.swift
func updateSkater() {
--snip--
skater.position = CGPoint(x: skater.position.x, y: newSkaterY)
// Check if the skater has landed
➊ if skater.position.y < skater.minimumY {
➋ skater.position.y = skater.minimumY
➌ skater.velocity = CGPoint.zero
➍ skater.isOnGround = true
}
}
}
The line at ➊ checks if the skater’s y-position is less than her minimumY, which we already gave a value for in the resetSkater() method. If it is true, then she is on the ground (or below it).
Whenever the skater lands back on the ground, we need to do three things. At ➋, we set her y-position equal to her minimumY position to make sure she doesn’t fall through the sidewalk. At ➌, we set her velocity to zero since the ground should stop her from falling any farther. Finally, at ➍, we set her isOnGround property to true so she can jump again.
Now, all we have to do is add a method call for our new updateSkater() method. Inside the update(_:) method, at the very end, add this code:
updateBricks(withScrollAmount: currentScrollAmount)
updateSkater()
}
Once again, run your game by pressing ⌘-R, and try tapping the screen to jump (when using the iOS simulator, clicking the mouse on the screen is the same as tapping). Your skater will jump, as shown in Figure 15-6.

Figure 15-6: Like any self-respecting skateboarder, our hero can finally ollie!
Now when you tap on the screen, the skater jumps! Tapping the screen triggers a call to handleTap(_:), thanks to our tap gesture recognizer. In that method, we set a positive y-velocity. Then in the ensuing calls to our game loop, or update(_:) method, the skater sprite’s velocity is used to update her y-position until gravity pulls her back to Earth.
WHAT YOU LEARNED
In this chapter, you made the Schoolhouse Skateboarder app feel more like a game. You created a subclass of SKSpriteNode so that it could be a specialized Skater sprite, and then you added a skater to the game scene. Next, you added a whole bunch of sidewalk bricks and had them spawn, move, and then go away, all to give the appearance that our skater is skating along the sidewalk. Finally, you learned how to use velocity and position updates to make the skater jump.
You may have noticed that when the skater gets to a gap in the bricks, she just glides right over them. To make her fall in the gap, we would have to detect when the skater is moving over it and adjust her y-position accordingly. This approach can start to get complicated, but there’s a better way: SpriteKit comes with a built-in physics engine that can do the hard work of velocity and position updates for you. In Chapter 16, we’ll use SpriteKit’s physics engine to bring the Schoolhouse Skateboarder game to life.