16
USING THE SPRITEKIT PHYSICS ENGINE

In this chapter, we’ll use SpriteKit’s physics engine in our skateboarder game. A physics engine handles physical actions in games, such as how gravity works, objects’ speeds, how things bounce off one another, and more so that you can make more complex games with less code. When coding a game, you define how the game elements (the skater, the bricks, the gems) should behave, and then the physics engine takes care of moving everything around.
For example, rather than changing the skater’s velocity when she jumps, we’ll simply tell the computer how heavy she is and then apply an upward force. This tells the physics engine to push the skater upward and lets gravity pull her back down. We don’t have to do anything else. The physics engine takes care of changing the skater’s velocity and position as she jumps, and it makes sure her wheels collide with the sidewalk bricks when she comes back down to land.
But first, the physics engine needs you to tell it a few things about the game’s physics world. For example, if your game takes place in outer space, you’d tell it there is no gravity. For a game on Earth, you’d tell it to use a downward gravity. You also need to define physics bodies for each sprite or node in your world. This helps the computer determine how each item should behave based on its weight, whether it’s affected by gravity, and its bounciness. Once you’ve done that, the sprites will automatically move around and behave like real-world objects when you run your game.
Now that you understand what the physics engine does, let’s see it in action. We’ll set up our physics world, create physics bodies for our sprites, apply forces, and check for collisions.
SETTING UP THE PHYSICS WORLD
Every SKScene comes with an SKPhysicsWorld property called physicsWorld. This is where we set global properties that apply to everything in this scene, such as gravity. Add the following line to the top of your didMove(to:) method inside the GameScene class:
GameScene.swift
override func didMove(to view: SKView) {
physicsWorld.gravity = CGVector(dx: 0.0, dy: -6.0)
anchorPoint = CGPoint.zero
--snip --
}
This sets the gravity of the world using a CGVector, a data type that holds an x and a y value. It’s just like a CGPoint, except that these values represent the components of a vector instead of the coordinates of a point. A vector is a speed combined with a direction that is determined by horizontal (x) and vertical (y) components. In other words, when we set the x and y values, we’re setting the speed in the x-direction and the speed in the y-direction, which are then combined to make a vector. In our game, we set an x value of 0.0 and a y value of -6.0. This means there’s no gravity in the horizontal direction and moderate gravity in the down direction. Normal Earth gravity has a y value of -9.8, so our value of -6.0 should make for a lighter, cartoony world. If we wanted gravity to pull everything upward, we could set a positive y value for the gravity.
The other physicsWorld property we can set is speed, which tells the physics engine how fast everything should run. The default value is 1.0, which means everything runs at normal speed. Setting a speed of 2.0 would make the entire physics simulation run twice as fast. This property can be useful for special effects in your game, such as slow motion or fast forward. For Schoolhouse Skateboarder, we’ll leave the speed at the default value.
PHYSICS BODIES
When you add a sprite (like your skater) to a scene, the computer knows what that sprite should look like, but that’s about it. It doesn’t know if the sprite is light or heavy, rough or smooth, and whether it should bounce off other objects. SpriteKit has a class called SKPhysicsBody that we add to sprites to give them physics bodies.
GIVING SHAPE TO THE PHYSICS BODIES
All sprites are rectangles. An image file of a baseball, for example, is a rectangular image with a baseball drawn in the middle. When you create a sprite using that baseball image, the computer won’t know it’s round unless you tell it that information. If you want that sprite to bounce around like a real baseball, you need to add a circular physics body to the sprite.
Before you can apply a physics body to a sprite, you need to create one using the SKPhysicsBody class. This example code shows three different ways of creating physics bodies:
➊ let ballBody = SKPhysicsBody(circleOfRadius: 30.0)
➋ let boxBody = SKPhysicsBody(rectangleOf: box.size)
➌ let skaterBody = SKPhysicsBody(texture: skaterTexture, size: skater.size)
The first example creates a circular physics body with a radius of 30.0 points ➊. This would be perfect for a ball. The second example creates a rectangular body for a box-shaped sprite ➋. If you have a sprite you’ve already created, you can just use the size of the sprite for the physics body’s size. In this case, we have a hypothetical box sprite that we use to set the size.
The final example creates a physics body by supplying a texture ➌, an image format commonly used in game development. Every SKSpriteNode you create has a property, texture, that you can use to access the sprite’s texture, no matter which file type was used to create the sprite (PNG, JPEG, and so on). When you use a sprite’s texture to create its physics body, SpriteKit automatically inspects the texture and creates a physics body that approximates the image’s actual shape by finding any edges and ignoring the transparent parts of the image. In this case, we’re using the texture skaterTexture, which we would have defined earlier in the code (you’ll learn how to access the texture of a sprite in “Giving the skater Sprite a Physics Body” on page 244; don’t worry about it for now). A texture doesn’t define the size of a physics body, so we’ve also set the body’s size to the skater sprite’s size.
A sprite’s texture is what gets displayed on the screen, and the physics body defines how that sprite will behave. The two don’t need to line up exactly. You could use a circular physics body for a skater sprite, and that sprite would look like a skater but would roll around like a ball. While that would be funny to see, it’s usually best to create a physics body that most closely matches the look of the sprite.
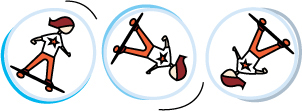
Figure 16-1 shows a skater sprite with different physics bodies applied. The figure shows the physics bodies in gray, but you won’t actually see them on your screen. They are completely invisible and are only used by the computer to determine how that sprite should behave.

Figure 16-1: Various physics bodies applied to a skater sprite
The skater with the circular physics body would roll around like a ball. The one with the rectangular body would behave like a box. And the third one, with a physics body based on the actual texture, would behave much more like we would expect a real-world skater to behave. If the tip of her hand hits something, it will look like that’s exactly what happened.
SETTING PROPERTIES OF PHYSICS BODIES
You set properties on physics bodies in order to describe them to the computer. A cloud would have a very low mass, meaning it’s lightweight and wouldn’t be affected by gravity. A bowling ball would be heavy and have a high mass, and it would definitely be affected by gravity. Table 16-1 lists some common properties of physics bodies.

Table 16-1: Common Properties of SKPhysicsBody
Property |
Description |
mass |
Defines how heavy something is. You can use any valid CGFloat value for this. The actual values used are not important as long as you are consistent throughout your app. |
friction |
Defines how rough the surface is. For example, ice would have low friction, and objects touching it would tend to keep sliding. Values range from 0.0 to 1.0. |
restitution |
Defines the bounciness of an object. It’s used when objects collide with each other. Values range from 0.0 to 1.0, where higher values mean bouncier. |
affectedByGravity |
Defines whether this object should be affected by gravity. |
allowsRotation |
Defines whether something should be allowed to rotate. |
Let’s see how we would use these properties. Since we won’t actually use these examples for our game, you don’t need to enter this code. Here are some examples:
let bowlingBall = SKPhysicsBody(circleOfRadius: 10.0)
➊ bowlingBall.mass = 100.0
➋ bowlingBall.friction = 0.3
➌ bowlingBall.restitution = 0.1
➍ bowlingBall.affectedByGravity = true
➎ bowlingBall.allowsRotation = true
let basketball = SKPhysicsBody(circleOfRadius: 10.0)
basketball.mass = 12.0
basketball.friction = 0.5
basketball.restitution = 0.7
basketball.affectedByGravity = true
basketball.allowsRotation = true
let iceCube = SKPhysicsBody(rectangleOf: CGSize(width: 1.0, height: 1.0))
iceCube.mass = 7.0
iceCube.friction = 0.1
iceCube.restitution = 0.2
iceCube.affectedByGravity = true
iceCube.allowsRotation = false
let cloud = SKPhysicsBody(texture: cloudTexture, size: cloudSize)
cloud.mass = 1.0
cloud.friction = 0.0
cloud.restitution = 0.0
➏ cloud.affectedByGravity = false
cloud.allowsRotation = false
In these examples, the bowling ball is heavy ➊, has low friction ➋, and has low restitution (bounciness) ➌. The basketball’s code is the same, but its values are set so that it is light, has moderate friction, and is very bouncy. The ice cube is light, has low friction, and isn’t very bouncy. And the cloud is very light, has no friction, and has no bounciness. All of the physics bodies are set to be affected by gravity ➍ except the cloud ➏ (since we don’t want it to fall to Earth). Also, the bowling ball and basketball physics bodies are set to allow rotation of the object ➎, while the ice cube and the cloud are not.
When you’re setting up physics bodies for your game sprites, it will take some trial and error to find the right values that make your objects behave the way you want.
GIVING THE SKATER SPRITE A PHYSICS BODY
Earlier, we talked about the various ways to assign a shape to a physics body. For our skater sprite, we’re going to use the sprite’s texture so that the physics body is shaped exactly like our skater. Switch to the Skater.swift file and add the following method to the Skater class:
Skater.swift
class Skater: SKSpriteNode {
-- snip --
var isOnGround = true
func setupPhysicsBody() {
➊ if let skaterTexture = texture {
➋ physicsBody = SKPhysicsBody(texture: skaterTexture, size: size)
➌ physicsBody?.isDynamic = true
➍ physicsBody?.density = 6.0
➎ physicsBody?.allowsRotation = true
➏ physicsBody?.angularDamping = 1.0
}
}
}
In order to create a physics body based on the skater sprite’s texture, we first need to check that the texture exists, since texture is an optional property of SKSpriteNode. The line at ➊ unwraps the texture as skaterTexture. The line at ➋ sets the skater’s physicsBody to a new SKPhysicsBody created using the texture and size of the skater sprite.
Next, we set some properties of the physics body in order to get it to behave the way we want. Setting the body’s isDynamic property to true ➌ indicates that we want this object to be moved by the physics engine. Sometimes you want an object to be part of the physics simulation so that you can know when it contacts something, but you don’t want the object to be moved around by the physics engine’s forces, gravity, or collisions. In that case, you would set isDynamic to false.
At ➍, we set the density property of the skater sprite’s physics body to 6.0. Density is how heavy something is for its size. A bowling ball is much more dense than a volleyball—in other words, it’s the same size but much heavier. Setting the density tells the physics engine how this object should behave when it bumps into other objects or when forces are applied to it. If a bowling ball bumps into another object, it’s more likely to push the other object away than a volleyball would be, because of the bowling ball’s high density.
Setting the allowsRotation property to true ➎ tells the physics engine that this physics body may rotate, or spin. If we wanted the skater to never tip over, we could set this to false.
Finally, we set an angularDamping value ➏. Angular damping is how much a physics body resists rotating. A lower value allows the object to spin more freely, while a higher value means the object is less likely to tip over. Right now we’ll set angularDamping to a value of 1.0, but later we may discover that the skater tips over too easily or not easily enough, and we may come back to change this value.
Now that we have a method on the Skater class to set up the skater sprite’s physics body, we just need to call this method after the skater is created. Switch back to GameScene.swift and add this line inside the didMove(to:) method:
GameScene.swift
override func didMove(to view: SKView) {
-- snip --
addChild(background)
// Set up the skater and add her to the scene
skater.setupPhysicsBody()
resetSkater()
Since our skater sprite is created as a property of the GameScene class, it will already exist when didMove(to:) is called on the scene, so this is a good spot to set up the skater’s physics body.
Next, we’ll set up physics bodies for the sidewalk bricks as well so that the skater will be able to bump into them.
ADDING PHYSICS BODIES TO BRICKS
We need to add physics bodies to the bricks where they’re created. Inside the spawnBrick(_:) method, add the following to the end of the method but before the last line, return brick:
GameScene.swift
func spawnBrick(atPosition position: CGPoint) -> SKSpriteNode {
-- snip --
bricks.append(brick)
// Set up the brick's physics body
➊ let center = brick.centerRect.origin
➋ brick.physicsBody = SKPhysicsBody(rectangleOf: brick.size, center: center)
➌ brick.physicsBody?.affectedByGravity = false
// Return this new brick to the caller
For the bricks, we want to specify the physics body as a simple rectangle. Therefore, we’ll need to know the size and the center point to place the rectangular body. The line at ➊ finds the center point of the newly created brick. The line at ➋ creates and assigns the brick sprite’s physics body by specifying a rectangle the same size as the brick and placing it at the brick’s center. Now that this physics body is set, it’s attached directly on top of the brick sprite. The line at ➌ tells the brick sprite’s physics body that it shouldn’t be affected by gravity. We don’t want the sidewalk to fall through the bottom of the screen.
CONTACTS AND COLLISIONS
The next thing the computer needs to know about your physics bodies is which ones should collide with each other. For example, we want the skater to collide with the sidewalk bricks so she won’t pass through them. Some objects shouldn’t collide, though. Later we’ll add gems for our skater to collect. We don’t want her to bounce off of the gems, so we’ll tell the computer that the skater and gems do not have collisions. We’ll want to know when the skater touches a gem, however. This is called contact. When any two objects contact each other, a special SpriteKit method is called to let us know so we can handle it. When the skater makes contact with a gem, we’ll want to remove the gem so it looks like she collected it.
HANDLING CONTACTS AND COLLISIONS
Now that we’ve set up the world’s gravity and given physics bodies to some sprites, try running the game and see what happens. Pay close attention when the app first starts or you’ll miss it. You should see something like Figure 16-2, but the skater will disappear quickly.
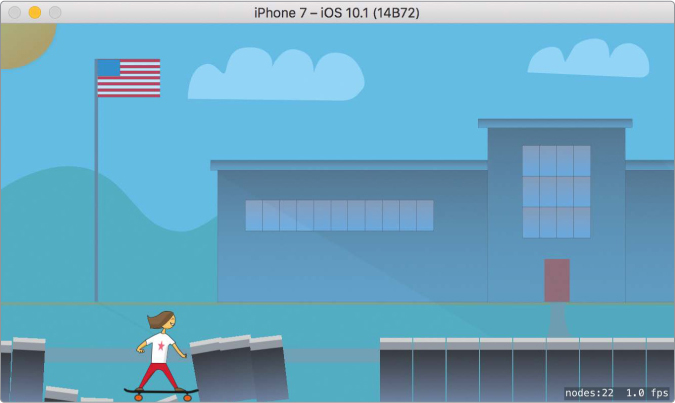
Figure 16-2: She looks a little too happy for what’s happening.
What’s going on here? The skater and the bricks are all part of the physics simulation now, so the skater falls due to gravity, and we’re moving the bricks to the left, so they bump into her. To fix this, we need to tell SpriteKit which objects should collide with one another and which ones shouldn’t. In order to do that, we need a way to classify each object as a skater, a brick, or a gem (we won’t add gems until later, but we’ll create a category for them now).
In GameScene.swift, add the following struct at the top of the file after the import statement but before the GameScene’s class definition:
GameScene.swift
import SpriteKit
/// This struct holds various physics categories, so we can define
/// which object types collide or have contact with each other
struct PhysicsCategory {
static let skater: UInt32 = 0x1 << 0
static let brick: UInt32 = 0x1 << 1
static let gem: UInt32 = 0x1 << 2
}
class GameScene: SKScene {
This PhysicsCategory struct defines a few different categories to which physics bodies can belong. The values must be of type UInt32, a special type of unsigned 32-bit integer SpriteKit uses for physics categories. Unsigned means that the integer has no positive or negative sign. Unsigned integers must always be zero or positive, never negative. A 32-bit integer is a type of integer that can hold a very large number. Integers may be specified as 8-bit, 16-bit, 32-bit, or 64-bit. In Swift, we normally don’t have to specify how many bits to use for an integer because the Swift type Int automates this. But since SpriteKit physics categories specifically require a UInt32, we need to specify this type or we’ll get an error later when we assign these physics categories to our physics bodies.
We assign these PhysicsCategory values using a bitmask (0x1 << 0). It’s not necessary at this point to understand what a bitmask is. It’s enough to know that each physics category needs a unique bitmask number that distinguishes it from other categories. Each new category you add should have a value after the << that is 1 higher than the previous one—but all the values must be less than 32. Now that we’ve defined this struct, we can put each physics body into the appropriate category.
For the bricks, add the following code inside the spawnBrick(atPosition:) method, just after the line of code that sets the affectedByGravity property:
func spawnBrick(atPosition position: CGPoint) -> SKSpriteNode {
-- snip --
brick.physicsBody?.affectedByGravity = false
➊ brick.physicsBody?.categoryBitMask = PhysicsCategory.brick
➋ brick.physicsBody?.collisionBitMask = 0
// Return this new brick to the caller
The line at ➊ sets the physics body’s categoryBitMask to the brick category we created. This tells SpriteKit what type of object this body is. Next, we set the physics body’s collisionBitMask to 0 ➋. Setting one of the physics body’s bitmasks to 0 means it should not be assigned to any categories for that bitmask property. So setting the collisionBitMask to 0 tells SpriteKit that bricks shouldn’t collide with anything. In SpriteKit, when a physics body hits and bounces off another physics body, that’s called a collision. When we want something to collide with other physics bodies, we define collisionBitMask. But since we don’t want the bricks to ever bounce off anything, including the skater, we don’t want them to collide with anything. They should stay where they are. The collisionBitMask tells SpriteKit only how the current object should behave for collisions. It doesn’t tell other objects how they should behave when hitting the bricks—that’s up to the other objects’ physics bodies.
For the skater, open Skater.swift and add the following code inside setupPhysicsBody() at the end of the method:
Skater.swift
func setupPhysicsBody() {
-- snip --
physicsBody?.angularDamping = 1.0
➊ physicsBody?.categoryBitMask = PhysicsCategory.skater
➋ physicsBody?.collisionBitMask = PhysicsCategory.brick
➌ physicsBody?.contactTestBitMask = PhysicsCategory.brick | ![]()
PhysicsCategory.gem
}
}
First, we set the category of the skater equal to the skater physics category we created ➊. Next, we set the collisionBitMask equal to the brick category ➋. This tells SpriteKit that we want the skater to be affected by collisions with bricks—she should bounce off the bricks.

Finally, we set the contactTestBitMask to be both the brick and the gem categories ➌. This tells SpriteKit that we want to know when the skater has contacted, or touched, either of these types of objects. The vertical line (|), or pipe character, is a way of specifying multiple bitmask values for a property. Since we defined the PhysicsCategory struct using a bitmask, we can set one or more values for any of the physics category properties using this pipe character to separate the values. We could string together as many different categories as we wanted here using pipes. Setting the contactTestBitMask doesn’t affect how the objects behave in the physics simulation. It simply means we’ll be notified when these objects touch. We want to know when the skater touches a brick because that tells us whether she is on the ground. We also want to know when she touches a gem so that she can collect the gem and get points for it.
If you run the project now, you should see the skater skating along the top of the bricks. If you watch closely, you should also see that she dips into the gaps in the bricks, thanks to the physics engine. If you make the skater jump a bunch of times, you may even be able to get her to tip over.
RESPONDING TO CONTACTS
Now that we’ve set the categories of the physics bodies, and set a contact bitmask for the skater’s physics body, we can have the physics engine tell us when the skater touches a brick. We’ll use this information to know when the skater sprite is on the ground. If she’s touching any brick objects, then she is on the ground. The physics engine reports contacts to us through a protocol called SKPhysicsContactDelegate. Let’s make our GameScene class implement this protocol.
First, in GameScene.swift, add the protocol to the class definition by typing a comma followed by the protocol name, like this:
GameScene.swift
class GameScene: SKScene, SKPhysicsContactDelegate {
Next, we have to set our GameScene as the contact delegate of the physics world. This means that our GameScene class is where contacts will be reported. Inside the didMove(to:) method, add this line just below the existing line where we set the gravity of the physics world:
override func didMove(to view: SKView) {
physicsWorld.gravity = CGVector(dx: 0.0, dy: -6.0)
physicsWorld.contactDelegate = self
anchorPoint = CGPoint.zero
Finally, we have to add the method that will be called whenever two physics bodies come into contact with each other. SKPhysicsContactDelegate defines a method called didBegin(_:) to do this. Add this method inside GameScene.swift at the bottom of the GameScene class:
func handleTap(tapGesture: UITapGestureRecognizer) {
-- snip --
}
// MARK:- SKPhysicsContactDelegate Methods
➊ func didBegin(_ contact: SKPhysicsContact) {
// Check if the contact is between the skater and a brick
➋ if contact.bodyA.categoryBitMask == PhysicsCategory.skater && ![]()
contact.bodyB.categoryBitMask == PhysicsCategory.brick {
➌ skater.isOnGround = true
}
}
You may have noticed that when you start typing func didBegin ➊, Xcode autocomplete suggests this method declaration. Xcode is expecting you to add this method since you added the SKPhysicsContactDelegate protocol to the class definition. The contact object passed in to this method has two physics bodies as properties called bodyA and bodyB. By checking the categories of the bodies ➋, we can test if this contact occurred between the skater and a brick. If so, at ➌ we set the skater sprite’s isOnGround property to true because we know the skater is on the ground. We’ll add code to handle gem contacts in Chapter 17.
APPLYING FORCES TO PHYSICS BODIES
To make objects move around, we can apply forces to them. Earlier, we used the example of applying an upward force to the skater to make her jump, but forces can be applied in any direction. Think of a force as an unseen hand pushing on something in our game. Forces can also be applied as a continuous force or as an impulse. A continuous force is one that keeps pushing on something, like the thrust of a rocket. An impulse is a one-time force that is applied instantaneously to an object, such as kicking a soccer ball. There are two different functions we could use on a physics body to apply an upward force: applyForce(_:) for continuous forces, and applyImpulse(_:) for impulses.

Before implementing the physics engine, we handled jumping by setting a velocity on the skater when the player tapped on the screen. But now that we have physics bodies, we want to make her jump by applying a one-time force. To make our skater jump, we’ll apply an impulse by calling applyImpulse(_:).
Remove the existing code from the handleTap(_:) method, and add the following code so that the entire method looks like this:
GameScene.swift
func handleTap(tapGesture: UITapGestureRecognizer) {
// Make the skater jump if player taps while she is on the ground
if skater.isOnGround {
➊ skater.physicsBody?.applyImpulse(CGVector(dx: 0.0, dy: 260.0))
}
}
Now, we apply an impulse force to the skater sprite’s physics body ➊. When you apply a force to a physics body, you have to supply a CGVector to determine how much that force pushes in the x-direction (dx) and how much it pushes in the y-direction (dy). We want this jump to go straight up, so we give it a positive y value only. Through trial and error, we already found a value that works—260.0, the second parameter. You can try other values and see how they affect the jump. In fact, run the game now and test it out!
Notice that we are no longer setting skater.isOnGround = false in this handleTap(_:) method. Now that we’re using the physics engine to make the skater jump, applying an upward force doesn’t necessarily mean she’ll be off the ground. For example, what if there are bricks just above her head that block her from jumping up? Even though an upward force was applied, she wouldn’t leave the ground. For this reason, it’s not always right to set skater.isOnGround = false after applying an upward force to the skater sprite. Instead, we will inspect her velocity in the updateSkater() method to determine whether she’s on the ground. We’ll update that method in “Ending the Game” on page 254.
STARTING AND ENDING THE GAME
Now that we have the SpriteKit physics engine working in our game, we can use it to determine when the game is over. For example, when the skater tips over, the game should end. But before we end the game, we need a way to start a new game. Currently, when you run the app, the game starts because the code we put into the didMove(to:) function is called. But we don’t have a way to make the game end and start over. We need to arrange our code so the work done in didMove(to:) is everything that we want to happen only once (like adding the skater sprite to the scene). Also, we’ll need to create a startGame() method that does the work that should be done at the start of every game (like moving the skater sprite into her starting position).
STARTING THE GAME
In this game, the skater will go faster and faster as the game goes on. But when the game starts over again, she needs to go back to her slower starting speed. So the first thing we need to do is create a class property to store her starting speed. Near the top of your GameScene class, next to the line where we declared the scrollSpeed class property, add the following line:
GameScene.swift
var scrollSpeed: CGFloat = 5.0
let startingScrollSpeed: CGFloat = 5.0
// A constant for gravity, or how fast objects will fall to Earth
Now as we increase the scrollSpeed, we’ll always know what the starting speed should be when the game starts over.
Next, after the existing resetSkater() method, add the following new method:
func resetSkater() {
-- snip --
}
func startGame() {
// When a new game is started, reset to starting conditions
➊ resetSkater()
➋ scrollSpeed = startingScrollSpeed
➌ lastUpdateTime = nil
➍ for brick in bricks {
brick.removeFromParent()
}
➎ bricks.removeAll(keepingCapacity: true)
}
This method’s job is to reset the game so that everything is back to how it should be at the start of a new game. First, we call the method to reset the skater ➊. This will move her back into the starting position. Then we reset a few class variables. The scrollSpeed is set to the starting speed ➋, and the lastUpdateTime is set back to nil ➌.
Finally, we need to remove all the brick sprites from the scene. At the end of a game, the bricks could be all over the place (especially later when we add higher bricks that the skater needs to jump to reach), so it’s best to just remove them all and let the updateBricks(withScrollAmount:) method take care of adding them back in at the right place. At ➍, we loop through all the brick sprites in our bricks array and remove each one from the scene by calling removeFromParent(). Then we have to remove the brick sprites from the bricks array. The easiest way to do this is to call removeAll(_:) on the bricks array ➎.
Now that we have a startGame() method, we need to call it when the scene first appears. Add the following line to the end of the didMove(to:) method:
override func didMove(to view: SKView) {
-- snip --
view.addGestureRecognizer(tapGesture)
startGame()
}
Since the startGame() method now calls resetSkater(), we no longer need to call it in didMove(to:). Remove the following line from the didMove(to:) method.
// Set up the skater and add her to the scene
skater.setupPhysicsBody()
resetSkater() // ← Remove this line of code
addChild(skater)
Your didMove(to:) method should now look like this:
override func didMove(to view: SKView) {
physicsWorld.gravity = CGVector(dx: 0.0, dy: -6.0)
physicsWorld.contactDelegate = self
anchorPoint = CGPoint.zero
let background = SKSpriteNode(imageNamed: "background")
let xMid = frame.midX
let yMid = frame.midY
background.position = CGPoint(x: xMid, y: yMid)
addChild(background)
// Set up the skater and add her to the scene
skater.setupPhysicsBody()
addChild(skater)
// Add a tap gesture recognizer to know when the user tapped the screen
let tapMethod = #selector(GameScene.handleTap(tapGesture:))
let tapGesture = UITapGestureRecognizer(target: self, action: tapMethod)
view.addGestureRecognizer(tapGesture)
startGame()
}
The last thing we need to take care of when starting a new game is to reset some extra properties of the skater sprite that may have changed because of the physics simulation. Add the following code to the end of your resetSkater() method:
func resetSkater() {
-- snip --
skater.minimumY = skaterY
➊ skater.zRotation = 0.0
➋ skater.physicsBody?.velocity = CGVector(dx: 0.0, dy: 0.0)
➌ skater.physicsBody?.angularVelocity = 0.0
}
The line at ➊ sets the skater sprite’s zRotation back to 0.0. The zRotation is how far the sprite is rotated to the right or left. Setting this to 0.0 will make the skater stand up straight in case she tipped over. The line at ➋ sets the velocity of her physics body to 0.0. If she was jumping or falling, this will make her stand still again. The line at ➌ sets her angularVelocity, or rotational speed, back to 0.0. It’s one thing to set the sprite’s zRotation to 0.0 so she appears to be standing up straight, but the physics body may still be rotating, so we need to zero that out as well.
ENDING THE GAME
If you run the game now and don’t make the skater jump at all, you should see that she just tips over and then slides along like that or falls down a hole, but nothing else happens. Let’s add some code to detect if she tipped over and end the game when she does. Add the following method after the existing startGame() method:
GameScene.swift
func gameOver() {
startGame()
}
When the game ends, we can call the gameOver() method now, and it will start a new game. Next, replace the entire contents of the updateSkater() method to look like the following code:
func updateSkater() {
// Determine if the skater is currently on the ground
➊ if let velocityY = skater.physicsBody?.velocity.dy {
➋ if velocityY < -100.0 || velocityY > 100.0 {
skater.isOnGround = false
}
}
// Check if the game should end
➌ let isOffScreen = skater.position.y < 0.0 || skater.position.x < 0.0
➍ let maxRotation = CGFloat(GLKMathDegreesToRadians(85.0))
➎ let isTippedOver = skater.zRotation > maxRotation || ![]()
skater.zRotation < -maxRotation
➏ if isOffScreen || isTippedOver {
gameOver()
}
}
The updateSkater() method needs to do two things. First, it needs to check if the skater is jumping, because she can’t jump while she’s already in the air. Second, it needs to see if she has tipped over or has been pushed off the screen. If so, then the game should be over.
To check if the skater is on the ground, we will inspect her y velocity. In order to use the y velocity, we need to unwrap it, which we do at ➊. When the skater is jumping or falling, her physics body will have a large velocity—it will be positive if she’s jumping up and negative if she’s falling down. In either case, she should not be allowed to jump again. So the line at ➋ checks if her physics body’s y velocity is either less than -100.0 or greater than 100.0. If so, the skater sprite’s isOnGround property is set to false.
If the skater falls off the bottom of the screen, her y-position will be less than zero, and if she gets pushed off the left side of the screen, her x-position will be less than zero. The line at ➌ sets a Bool called isOffScreen to true if either of these conditions is true.
To figure out whether the skater tipped over, we need to check her sprite’s zRotation. If it’s greater than 85 degrees or less than -85 degrees, we’ll say she has tipped over, since she’d be flat on her side at 90 degrees. Using 85 degrees as the check instead of 90 gives a little buffer in case she hasn’t quite tipped all the way over but has tipped far enough that she’s not getting back up. The zRotation property is measured in radians, which are another way of measuring angles. Since it’s easier to think about angles in degrees, we use a math function to create a maxRotation constant in radians that is equal to 85 degrees ➍. The line at ➎ sets a Bool called isTippedOver to true if the skater’s rotation is greater than 85 degrees or less than -85 degrees.
Now that we have these Bool variables representing the game-over conditions, we simply check if either is true ➏, and if so, we call the gameOver() function. That’s it! Now every update frame we’ll check if the skater has gone off the screen or tipped over, and the game will end if she has. Right now, ending the game will automatically start a new game. In Chapter 18, we’ll add a simple “game over” screen where the player has to tap to start a new game.
WHAT YOU LEARNED
In this chapter, you learned how to use SpriteKit’s physics engine to do some of the heavy lifting for game development. You did this by setting up physics bodies for your sprites to define how each sprite should behave in the physics simulation. You learned how to make sprites collide with each other, how to detect contact between two sprites, and how to apply a force to a sprite to make it move. Finally, you learned how to cleanly start and stop your game by making separate methods for each process.