17
ADJUSTING DIFFICULTY, COLLECTING GEMS, AND KEEPING SCORE
In this chapter, we’ll add a whole bunch of game elements to make Schoolhouse Skateboarder more challenging and fun. We’ll speed the game up and add multilevel platforms, gems to collect, and a scoring system.
SPEEDING THINGS UP
We don’t want our game to be too easy, or the player will get bored. One way to ramp up the difficulty is to have the game speed up. (Also, when you’re playing on your iPhone or iPad, a game that lasts a couple of minutes is more practical than a game that lasts an hour.) We can speed up the game by increasing the scrollSpeed variable by a little bit in our game loop method. Add the following code to the update(_:) method in the GameScene class.
GameScene.swift
override func update(_ currentTime: TimeInterval) {
// Slowly increase the scrollSpeed as the game progresses
scrollSpeed += 0.01
// Determine the elapsed time since the last update call
This line increases the scrollSpeed by 0.01 every time update(_:) is called. Now the further the player makes it in the game, the faster it’ll go, making things more challenging.
ADDING MULTILEVEL PLATFORMS
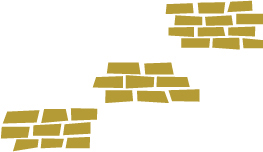
Another way we can increase the game’s difficulty is by varying the y-position of the sidewalk bricks. We’ll make some sections of brick higher so that the player will have to jump up to reach them, as shown in Figure 17-1.

Figure 17-1: Multilevel sidewalk platforms
In order to do this, we’ll have two categories of bricks: low and high. The bricks at the usual y-position, like those on the left side of Figure 17-1, are the low bricks, and the raised bricks, like those on the right side of the figure, are the high bricks. We’ll need to assign each brick one of these categories as well as a y-position based on the category it’s in. We could make CGFloat variables with the y-positions and assign them to the bricks, but using CGFloat variables in that way might become confusing. If we had a lot of other variables, it would be harder for us to read the code and find those CGFloat variables if we needed to change them. So instead of using regular variables, we’ll use something new called an enumeration to make our brick categories.
An enumeration, often called an enum for short, is a way to make a new data type that groups related values. Once you define an enum, you can use it just as you would any other data type when defining new variables, constants, and functions. By making an enum for the brick level, we can create a new data type that stores all the brick levels together so that our code will be easier to read.
DEFINING MULTIPLE BRICK LEVELS
We’re going to create an enum to describe two different brick levels. Each value in an enum is called a case, which is what our low and high brick levels will be. We’ll assign each brick an enum case, and then we’ll set the y-position of each brick to be the same as its enum case value. In order to do this, we need the enum to be a CGFloat to match the y-position’s data type.
To make the enum, add the following code inside the GameScene class declaration at the top of the class:
GameScene.swift
class GameScene: SKScene, SKPhysicsContactDelegate {
// Enum for y-position spawn points for bricks
// Ground bricks are low and upper platform bricks are high
➊ enum BrickLevel: ➋CGFloat {
➌ case low = 0.0
➍ case high = 100.0
}
// An array that holds all the current sidewalk bricks
We start by defining the enum. An enum definition is similar to a class or struct definition. The line at ➊ starts with the keyword enum, followed by the enumeration name. Like a class or struct, the enum name should always start with an uppercase letter. We’ll call this enum BrickLevel because it describes the two different types of brick levels we’ll have in our game.
At ➋, we add a colon (:) after the enum name, followed by the data type CGFloat, which makes the enum the same data type as the y-position of the bricks. When you define an enum, you can give it a raw value (as we’ll do next), but enums don’t have to have raw values. The raw value can be of any data type, but that data type must be the same for all of the enum cases. We defined the enum to be a CGFloat, so all the enums’ raw values will be CGFloats. We’ll access the values later using the enum’s rawValue property.
The enum definition sits inside a pair of braces where you define the cases of the enumeration. For BrickLevel, we have just two cases, low and high, but an enum can have an unlimited number of cases. Our normal sidewalk will be made of low bricks that spawn with a y value of 0.0, so at ➌ we define our low case and set its raw value to 0.0. Our upper platform will be made up of high bricks that spawn with a y value of 100.0, so at ➍ we create a high case with a raw value of 100.0.
Next, we’ll access the value of an enum by creating a property to hold the current brick level. Add this to the GameScene:
var brickSize = CGSize.zero
// The current brick level determines the y-position of new bricks
var brickLevel = BrickLevel.low
// Setting for how fast the game is scrolling to the right
Here we create a variable called brickLevel and set it to BrickLevel.low. The brickLevel property will track the current state of our sidewalk as it changes from low to high and back. We want to always start with low bricks, so we give brickLevel a starting value of low. You can access an enum’s case using dot notation by writing the enum name, followed by a period, followed by the case.
There’s one other spot where we need to set the brickLevel before we can start using it. Add this line of code to the method startGame():
func startGame() {
-- snip --
scrollSpeed = startingScrollSpeed
brickLevel = .low
lastUpdateTime = nil
-- snip --
}
Now whenever the game starts over, the brickLevel will reset to low. You may have noticed here that we left off the BrickLevel part before .low. What gives? When we created the brickLevel property, Swift used type inference to figure out that brickLevel must be of type BrickLevel. When we use brickLevel here, Swift knows what data type it is, so we don’t need to write out BrickLevel. We can access the case by just typing a period followed by low. Swifty!
CHANGING HOW BRICKS SPAWN
Now that we’ve established a way to track the brick level, let’s use it to determine the y-position where each brick will be spawned. Find the updateBricks(withScrollAmount:) method, and change the line of code for brickY to this:
GameScene.swift
while farthestRightBrickX < frame.width {
var brickX = farthestRightBrickX + brickSize.width + 1.0
let brickY = (brickSize.height / 2.0) + brickLevel.rawValue
Now when new sidewalk bricks are spawned, the y-position will be adjusted by the CGFloat raw values we set up in the BrickLevel enum, depending on what the current brickLevel is. Notice how easy it is to access the raw value of an enum. It’s contained in the property called rawValue, so you just put a period after the enum variable, followed by rawValue. When brickLevel is .low, this will be 0.0. When brickLevel is .high, it will be 100.0.
Lastly, we need brickLevel to change every now and then. We could randomly change brickLevel every time a new brick spawns, but that would look a bit odd, as Figure 17-2 shows.
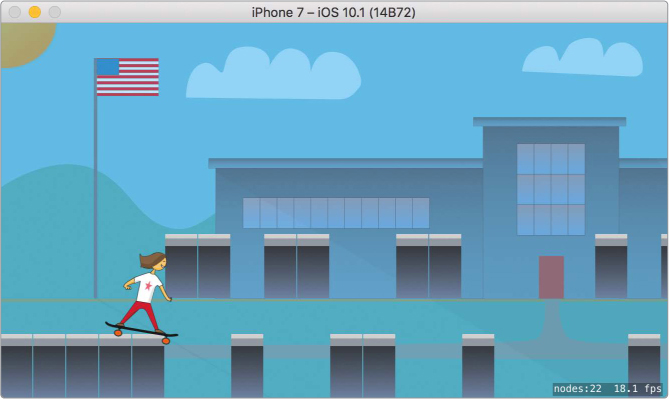
Figure 17-2: How it would look to randomly spawn low and high bricks
As you can see, that setup might be a little too hard for the player. It’s not going to work if we randomly switch back and forth between low and high bricks. We do want to introduce a bit of randomness here, but we need to be smarter about how we do it. What we’ll do is add a 5 percent chance that brickLevel will change every time a brick spawns. Once brickLevel changes, it’ll stay in the new position until that 5 percent chance is encountered again. This means the sidewalk will stay at the low level for a while, then at the high level for a while, then go back to the low level, and so on, without so many jumps. Add the following else-if block to the updateBricks(withScrollAmount:) method, incorporating the randomNumber constant that we generated there earlier:
func updateBricks(withScrollAmount currentScrollAmount: CGFloat) {
-- snip --
if randomNumber < 5 {
-- snip --
}
➊ else if randomNumber < 10 {
// There is a 5 percent chance that the brick level will change
if brickLevel == .high {
brickLevel = .low
}
else if brickLevel == .low {
brickLevel = .high
}
}
// Spawn a new brick and update the rightmost brick
Now, every time a new brick spawns, there is a small chance that the sidewalk level will switch from low to high or high to low. You may be wondering why the line at ➊, which checks if randomNumber is less than 10, results in a 5 percent chance of a brick level change. The randomNumber constant was created to be a random number between 0 and 99, so there are 100 possible values. On the first line of the if statement that we added previously, the code checks if randomNumber is less than 5, so there are 5 possible values out of 100 that will create a gap in the bricks. The else-if condition that we added at ➊ will only be checked if randomNumber was not less than 5. This means the code in the else-if block will be run only if randomNumber is between 5 and 9, or 5 values out of the possible 100, which results in a 5 percent chance of a brick level change. Run the game now and try it out, and then read on to learn about another way to increase the game’s difficulty!
ADDING GEMS TO COLLECT
Adding a collectable item to a game can also give the player more of a challenge. Let’s add some gems for the player to collect. Instead of just jumping over the gaps in the sidewalk, the player also will have to decide when it’s worth the risk to try to grab a gem. We’ll start by adding an array to hold the gem sprites, and then we’ll write some code to spawn, move, and remove gems.

SPAWNING AND TRACKING THE GEMS
As we spawn the gems, we’ll need an array to keep track of each gem that’s currently on the screen. Add this gems array declaration to the GameScene class, as shown here:
GameScene.swift
var bricks = [SKSpriteNode]()
// An array that holds all the current gems
var gems = [SKSpriteNode]()
// The size of the sidewalk brick graphics used
Each gem will be a sprite, so gems is an array of SKSpriteNode elements. Now that we have an array to hold gems, we can create our method to spawn new gems. Add this method after the existing spawnBrick(atPosition:) method:
func spawnBrick(atPosition position: CGPoint) -> SKSpriteNode {
-- snip --
}
➊ func spawnGem(atPosition position: CGPoint) {
// Create a gem sprite and add it to the scene
➋ let gem = SKSpriteNode(imageNamed: "gem")
gem.position = position
gem.zPosition = 9
addChild(gem)
➌ gem.physicsBody = SKPhysicsBody(rectangleOf: gem.size, ![]()
center: gem.centerRect.origin)
➍ gem.physicsBody?.categoryBitMask = PhysicsCategory.gem
➎ gem.physicsBody?.affectedByGravity = false
// Add the new gem to the array of gems
➏ gems.append(gem)
}
The line at ➊ defines the method to spawn gems, which is very similar to the method to spawn bricks. It has a CGPoint passed in for position so that the gem can be placed there. Just like most of our other sprites, we create the gem sprite using the SKSpriteNode(imageNamed:) initializer ➋. The image name, gem, matches the name of the graphic file (gem.png) we added to the asset catalog in “Adding Images” on page 206. Once the gem sprite is created, we set its position equal to the position that was passed in to the method. Then we set a zPosition of 9, so it’ll be behind the skater but in front of the bricks. Next, we add the gem sprite as a child of the scene so it’ll show up on the screen.
The player collects gems by touching them, so each gem sprite needs to be added to the physics simulation so we’ll know when the skater has made contact with a gem. To do this, we set the gem sprite’s physicsBody equal to a new SKPhysicsBody ➌, which we create using a rectangle equal to the size of the gem sprite, positioned at its center. Then at ➍, we set the categoryBitMask for the gem sprite’s physics body equal to the .gem value that we defined in the PhysicsCategory struct. This way we can tell when the skater contacts a gem by inspecting the categoryBitMask of the bodies in the didBegin(_:) method. The last thing we need to do for the physics body is make sure it won’t be affected by gravity ➎, since we want the gems to float in the air.
Now that the gem sprite is all set up, we simply add it to our gems array ➏ that keeps track of all the gems currently being displayed. This method is now ready to be called any time we want to spawn a new gem.
DECIDING WHEN TO SPAWN A GEM
Inside the updateBricks(withScrollAmount:) method, just below the code that adjusts the brickX to add gaps, add this code:
GameScene.swift
func updateBricks(withScrollAmount currentScrollAmount: CGFloat) {
-- snip --
➊ if randomNumber < 5 {
// There is a 5 percent chance that we will leave a gap between bricks
let gap = 20.0 * scrollSpeed
brickX += gap
// At each gap, add a gem
➋ let randomGemYAmount = CGFloat(arc4random_uniform(150))
➌ let newGemY = brickY + skater.size.height + randomGemYAmount
➍ let newGemX = brickX - gap / 2.0
➎ spawnGem(atPosition: CGPoint(x: newGemX, y: newGemY))
}
The method that updates the bricks already has code for determining when to make a gap in the bricks that the skater has to jump over. We’re going to use this code to spawn a gem every time there’s a gap in the bricks. Since the player is already jumping over the gap, this is a natural spot to put a gem. We do this inside the if statement ➊ that includes our code to create a 5 percent chance of something happening. At ➋, we calculate a randomized y-position for the new gem by generating a random number between 0 and 150 and converting it to a CGFloat. Then at ➌, we add the brickY and the skater sprite’s height to that random amount. This will give us a y-position for the gem that is up above where the skater is so that the player has to jump to reach it.

Next, we calculate an x-position, newGemX, that places the gem in the middle of the sidewalk gap ➍. Then at ➎, we call the spawnGem(atPosition:) method, passing in the newGemX and newGemY values we just calculated. Now that we’re creating gems, let’s add a way to remove them when needed.
REMOVING GEMS
When a gem goes off the screen or is collected by the skater, we’ll need to remove the gem sprite from the screen and also from our gems array. Add the following method right after the spawnGem(atPosition:) method you just added.
GameScene.swift
func spawnGem(atPosition position: CGPoint) {
-- snip --
}
func removeGem(_ gem: SKSpriteNode) {
➊ gem.removeFromParent()
➋ if let gemIndex = gems.index(of: gem) {
➌ gems.remove(at: gemIndex)
}
}
This method allows you to pass in the gem sprite that should be removed. At ➊, we call removeFromParent() on the gem sprite to remove it from the scene we previously added it to as a child when it spawned. This makes it disappear from the screen, but it’s still taking up space in our gems array. In order to remove it from the array, we need to find its position in the array.
At ➋, we use an if-let statement to create the gemIndex constant. If the gem sprite is found in the array with the array’s index(of:) method, then the if-let statement will assign gemIndex the index of the gem sprite. An if-let statement must be used here because the index(of:) method returns an optional index—it’s possible the item we’re looking for in the array won’t be found there. In our case, we’re sure the gem sprite is in the array, but Swift requires you to check first, just to be safe. If the gem sprite isn’t found in the array, then the gemIndex will be nil, and the code inside the braces of the if-let statement won’t be called. If the index is found, then the array’s remove(at:) method is called with the gemIndex we just discovered as an argument ➌. This method removes the gem sprite from the gems array at the index it’s given.
Now that we have an easy way to remove gems, we should add some code to remove all the gems whenever a new game starts so that gems from the previous game don’t stick around. Add this code to the startGame() method:
func startGame() {
-- snip --
bricks.removeAll(keepingCapacity: true)
for gem in gems {
removeGem(gem)
}
}
This for-in loop simply loops through all the gem sprites (if there are any) in the gems array and calls our handy removeGem(_:) method on each gem.
UPDATING GEMS
Now that we can spawn and remove gems, we need a method to handle updating their position so they move to the left and match the speed of the bricks. We’ll also need to remove any gems that move off the left edge of the screen. Add this method just after the updateBricks(withScrollAmount:) method:
GameScene.swift
func updateBricks(withScrollAmount currentScrollAmount: CGFloat) {
-- snip --
}
➊ func updateGems(withScrollAmount currentScrollAmount: CGFloat) {
for gem in gems {
// Update each gem's position
➋ let thisGemX = gem.position.x - currentScrollAmount
➌ gem.position = CGPoint(x: thisGemX, y: gem.position.y)
// Remove any gems that have moved offscreen
➍ if gem.position.x < 0.0 {
removeGem(gem)
}
}
}
The updateGems method ➊ takes the currentScrollAmount as an input parameter so we know how much to move each gem. We loop through the gems array and do some work for each gem. At ➋, we calculate a new x-position, thisGemX, by subtracting the scroll amount from the gem’s current x-position. Then, at ➌ we set a new position on the gem using this newly calculated x-position, but we keep the same y-position. This will make the gem sprite move to the left at the same speed as the bricks.
Next, at ➍, we check if this new x-position is less than 0.0. If so, it has moved too far to the left and is about to go offscreen, so we remove the gem by calling our removeGem(_:) method. Now that we have the code to update the gems, we need to use it by calling updateGems(withScrollAmount:) from our main game loop, which is the update(_:) method.
Add the following line of code to the existing update(_:) method:
override func update(_ currentTime: TimeInterval) {
-- snip --
updateBricks(withScrollAmount: currentScrollAmount)
updateSkater()
updateGems(withScrollAmount: currentScrollAmount)
}
Now, every time our update(_:) method is called, the gems will move just like the bricks. Try running the game now, and you should see the gems appearing over sidewalk gaps, as shown in Figure 17-3.

Figure 17-3: Gems now appear over the sidewalk gaps.
If you make the skater jump and hit any of the gems, you’ll notice they just get pushed around. That’s not quite right—we want the gems to disappear when the skater touches them so it’ll look like she collected them.
COLLECTING GEMS
Writing the code to collect the gems is simple because we already added them to the physics simulation, and we already added a method to remove them. Inside the existing method didBegin(_:), add the following code to collect gems that are touched:
GameScene.swift
func didBegin(_ contact: SKPhysicsContact) {
// Check if the contact is between the skater and a brick
if contact.bodyA.categoryBitMask == PhysicsCategory.skater && ![]()
contact.bodyB.categoryBitMask == PhysicsCategory.brick {
-- snip --
}
➊ else if contact.bodyA.categoryBitMask == PhysicsCategory.skater && ![]()
contact.bodyB.categoryBitMask == PhysicsCategory.gem {
// Skater touched a gem, so remove it
➋ if let gem = contact.bodyB.node as? SKSpriteNode {
removeGem(gem)
}
}
}
When two physics bodies touch each other, this method gets called. So all we have to do is have the method check if the physics bodies that touched are the skater and a gem. Line ➊ adds an else-if to our existing if statement and checks if bodyA is a skater and bodyB is a gem by comparing their categoryBitMask properties.
In order to remove the gem, we need to get a reference to the actual gem sprite. The contact object in this method has a reference to the two physics bodies, bodyA and bodyB. We already know that bodyB is our gem’s physics body and that the sprite is attached to it, so we can get the physics body’s sprite reference via the physics body’s node property. The node is an SKNode object, which is the superclass of SKSpriteNode. The if-let statement at ➋ gives us the reference to the gem sprite by downcasting the node to an SKSpriteNode. Now we can pass this gem into our removeGem(_:) method and it’ll disappear.
If you run the game again now, you should find that when the skater jumps into a gem, it disappears!
ADDING SCORING AND LABELS
What’s even better than collecting gems for fun? Collecting gems for a high score! It’s fun to see if you can beat your high score or your friends’ scores. Adding a score-keeping mechanism will make players want to play your game again and again. In this section, we’ll add a simple scoring system and labels to display the player’s current score and all-time high score.
CREATING LABELS
Before we start keeping track of the player’s score, we need to add some labels to display the current score and the high score on the screen. We’ll add four labels, as shown in Figure 17-4.
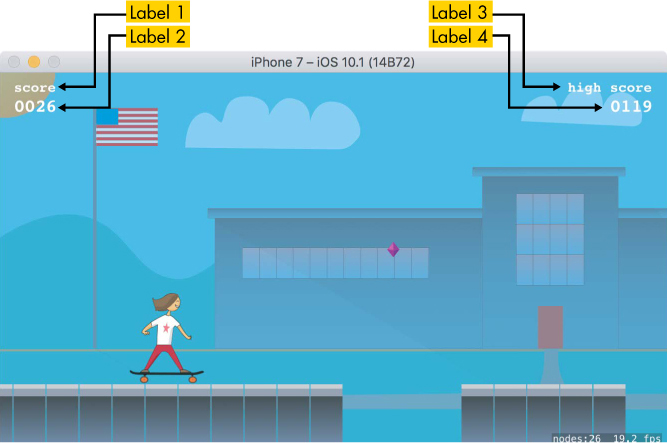
Figure 17-4: The four scoring labels
The player’s current score will be at the top left of the screen, and the high score will be at the top right. We’ll use two labels for each score. Label 1 is the string "score" and will never change. Label 2 is the actual score for the current game. This label will keep changing to reflect the player’s score. Label 3 is the string "high score" and will never change. And finally, label 4 displays the player’s high score. At the end of each game, that label should be updated if the player got a new high score.
To create these labels, we’ll add a method, setupLabels(), just after the resetSkater() method. We’ll only need to call this method once, when the game is first run. It will create the four labels, set them up properly, and add them as children of the scene. Let’s start by creating the first label. Add the following code now:
GameScene.swift
func resetSkater() {
-- snip --
}
func setupLabels() {
// Label that says "score" in the upper left
➊ let scoreTextLabel: SKLabelNode = SKLabelNode(text: "score")
➋ scoreTextLabel.position = CGPoint(x: 14.0, y: frame.size.height - 20.0)
➌ scoreTextLabel.horizontalAlignmentMode = .left
}
Let’s go over everything that’s new here. First, we’re creating an SKLabelNode, which is the label class in SpriteKit. It’s similar to a UILabel, but it’s a type of SpriteKit node, so it can be used in SpriteKit scenes with animations and physics. We won’t be animating these particular labels or adding them to the physics simulation. They’re just going to hang there in the sky. At ➊, we use the initializer SKLabelNode(text:), which creates the label and gives it a starting text string. This is the string that the label will display on the screen. Since we decided this label would always just display the word score, we’ll never have to change this text again.
At ➋, we set the position of the label by creating a CGPoint with an x-position of 14.0 and a y-position of the scene’s height minus 20.0. This will position the label in the upper left of the screen. If we set the y-position equal to the height of the scene’s frame, then the label would be just off the top of the screen. Subtracting 20.0 from the height positions it near the top of the scene instead. At ➌, we set the label’s horizontalAlignmentMode to .left. This makes the label’s text hug the left side, so it will always be lined up properly. See Figure 17-5 for examples of left and right text alignment.

Figure 17-5: Labels that are left-aligned and right-aligned
Now add the following code to finish setting up this first label:
func setupLabels() {
-- snip --
scoreTextLabel.horizontalAlignmentMode = .left
➊ scoreTextLabel.fontName = "Courier-Bold"
➋ scoreTextLabel.fontSize = 14.0
➌ scoreTextLabel.zPosition = 20
addChild(scoreTextLabel)
}
At ➊, we set up the font for the label. You’ve got a lot of choices with iOS, but we picked Courier Bold. To see the full list of available fonts, visit http://www.iosfonts.com/. At ➋, we set the font size to 14.0. This makes the label pretty small but still easily readable, which is what we want. It’s not recommended to use font sizes any smaller than about 10.0, or the label may be too hard to read.
Notice that we never set a frame for the label. We didn’t set a width and height, just a position. An SKLabelNode is sized automatically based on the font size you pick and the text you need to display, which in this case is score.
At ➌, we set a zPosition of 20 so that the label will always be on top of everything else we’ve added in the game scene. And finally, don’t forget to add the label as a child of the scene, or it won’t show up on the screen.
The other three labels are created and set up in a very similar way to the first one, so we won’t walk you through each line of this code. For the other three labels, add this code:
func setupLabels() {
-- snip --
addChild(scoreTextLabel)
// Label that shows the player's actual score
➊ let scoreLabel: SKLabelNode = SKLabelNode(text: "0")
➋ scoreLabel.position = CGPoint(x: 14.0, y: frame.size.height - 40.0)
➌ scoreLabel.horizontalAlignmentMode = .left
scoreLabel.fontName = "Courier-Bold"
scoreLabel.fontSize = 18.0
➍ scoreLabel.name = "scoreLabel"
scoreLabel.zPosition = 20
addChild(scoreLabel)
// Label that says "high score" in the upper right
let highScoreTextLabel: SKLabelNode = SKLabelNode(text: "high score")
highScoreTextLabel.position = CGPoint(x: frame.size.width - 14.0, ![]()
y: frame.size.height - 20.0)
➎ highScoreTextLabel.horizontalAlignmentMode = .right
highScoreTextLabel.fontName = "Courier-Bold"
highScoreTextLabel.fontSize = 14.0
highScoreTextLabel.zPosition = 20
addChild(highScoreTextLabel)
// Label that shows the player's actual highest score
let highScoreLabel: SKLabelNode = SKLabelNode(text: "0")
highScoreLabel.position = CGPoint(x: frame.size.width - 14.0, ![]()
y: frame.size.height - 40.0)
highScoreLabel.horizontalAlignmentMode = .right
highScoreLabel.fontName = "Courier-Bold"
highScoreLabel.fontSize = 18.0
➏ highScoreLabel.name = "highScoreLabel"
highScoreLabel.zPosition = 20
addChild(highScoreLabel)
}
Each label is initialized with a different text string ➊ and given a different position ➋. Notice that the labels we placed on the left side of the screen have a horizontalAlignmentMode of .left ➌ while the labels we placed on the right have .right ➎.
There’s one new step: we set a name property on the scoreLabel ➍ and highScoreLabel ➏. Giving a label a name doesn’t change anything about how the label is displayed. It simply gives you, the programmer, an easy way to get a reference to that particular label later in the code. Any object in your scene that is a type of SpriteKit node, such as an SKSpriteNode or SKLabelNode, can be given a name. Instead of keeping a class property for every node in your scene, you can assign names to the nodes and then get references to them later by using their name properties. You’ll see how this works in the next section, when we update the text of these labels.
Now that we have a method to create and set up the four labels, we just need to call this method within our didMove(to:) method. Add this line:
override func didMove(to view: SKView) {
-- snip --
addChild(background)
setupLabels()
// Set up the skater and add her to the scene
-- snip --
}
Now when the game first starts, the labels will be created and added to the scene. Run the game now to make sure they show up.
TRACKING THE SCORE
As the player’s score changes, we’ll need a way to update the labels to reflect the new score. First, let’s add some new class properties to keep track of the score. Add the following code near the top of the GameScene class:
GameScene.swift
let gravitySpeed: CGFloat = 1.5
// Properties for score-tracking
➊ var score: Int = 0
➋ var highScore: Int = 0
➌ var lastScoreUpdateTime: TimeInterval = 0.0
// The timestamp of the last update method call
This creates a score integer we’ll use to track the current score ➊, a highScore integer we’ll use to track the player’s highest score ➋, and a TimeInterval called lastScoreUpdateTime ➌. A TimeInterval is a type of Double used to track how much time has passed in seconds. Inside our game loop, we’ll be updating the score label, but we don’t want to update the label every single time our game loop runs (remember, that’s usually 30 or 60 times per second). Instead, we’ll update the label once a second using this TimeInterval to track the elapsed time between updates.

UPDATING LABELS
Since we’ll be using the score variable to update the score label’s text, let’s write a quick method to do that update. Add the following new method just after the existing setupLabels() method:
GameScene.swift
func setupLabels() {
-- snip --
}
func updateScoreLabelText() {
➊ if let scoreLabel = childNode(withName: "scoreLabel") as? SKLabelNode {
➋ scoreLabel.text = String(format: "%04d", score)
}
}
The line at ➊ finds a child node of the scene that has the name "scoreLabel". When we created the score label, we set its name property to "scoreLabel". Then, as with the other labels, we added the label as a child of the scene. We can call the childNode(withName:) method on any node (whether it’s a scene, sprite, or label) to find a child node that has a particular name. Doing this means we didn’t have to create a class property to keep track of this label. We simply look it up by name when we need to use it. It’s good practice to keep the number of class properties you create to a minimum, and using this technique for nodes that we won’t need to refer to very often does just that.
The line at ➋ sets the text of the scoreLabel to a new string that we create using our score variable. The String initializer, String(format:), creates a new string using a string format specifier to display variables in a specific way. In this case, we want to display the score always as four digits, adding zeros to the front of the string when needed, such as 0230 instead of 230 when the player has 230 points. In the format string %04d, the % specifies that we’ll be inserting a variable here, the 04 specifies that we want the string to always be four digits long with zeros in front, and the d specifies that the variable we’re inserting is an integer.
Table 17-1 lists some examples of common string format specifiers.
Table 17-1: Common String Format Specifiers
Specifier |
Description |
%d |
Used to insert an Integer |
%f |
Used to insert a Double, Float, or CGFloat |
%@ |
Used to insert a String or other object |
%% |
Used to insert a percent sign into the string |
Table 17-2 lists a few examples of string format specifiers used to get different number formats.
Table 17-2: String Format Specifiers in Action
Specifier |
Input |
Output |
%05d |
123 |
00123 |
%.2f |
1.0 |
1.00 |
%.3f |
33.0 |
33.000 |
Using the String(format:) method is a handy way to get labels to look the way you want them to. Forcing our score label to always show four digits ensures that it will look consistent as the score changes.
UPDATING THE PLAYER’S SCORE
First things first: whenever a new game starts, the score should be 0. Add this line to the startGame() method:
GameScene.swift
func startGame() {
// When a new game is started, reset to starting conditions
resetSkater()
score = 0
scrollSpeed = startingScrollSpeed
Next let’s create a method that can add some points to the player’s score based on how long they’ve survived. Add the following method after the updateSkater() method:
func updateScore(withCurrentTime currentTime: TimeInterval) {
// The player's score increases the longer they survive
// Only update score every 1 second
➊ let elapsedTime = currentTime - lastScoreUpdateTime
if elapsedTime > 1.0 {
// Increase the score
➋ score += Int(scrollSpeed)
// Reset the lastScoreUpdateTime to the current time
➌ lastScoreUpdateTime = currentTime
updateScoreLabelText()
}
}
Since we only want to update the score label once per second, we’ve declared this method to take a parameter of the currentTime. The currentTime is passed automatically by SpriteKit into the update(_:) method, so we’ll just pass that currentTime into this scoring method when we call it. We use the currentTime to calculate how much time has elapsed since the last time we updated the score label ➊. If more than one second has elapsed, then we increase the player’s score by adding the scrollSpeed ➋. We could just add an amount like 10 to the score, but using the scrollSpeed makes the player’s score go up faster as they get further into the game, because the scrollSpeed keeps increasing.
Then at ➌, we set our lastScoreUpdateTime tracker equal to the current time. This way, next time we calculate the elapsed time, we’ll be able to check if one second has passed since the current time. Finally, we make a call to our updateScoreLabelText() method, which will make the score label display the new score.
Now all we have to do is call the updateScore(withCurrentTime) method from within our main game loop, or update(_:) method. Add this line of code into the update(_:) method:
override func update(_ currentTime: TimeInterval) {
-- snip --
updateGems(withScrollAmount: currentScrollAmount)
updateScore(withCurrentTime: currentTime)
}
This will call the new method to update the score every time update(_:) is called. Run the game now, and watch the score go up! You may notice that collecting gems doesn’t increase the score. Let’s fix that!
MAKING THE GEMS VALUABLE
Now that all of our score tracking and updating is set up, adding new scoring elements is simple. We already know when the player collects a gem because of the work we did in the didBegin(_:) method. Add this code to the didBegin(_:) method:
GameScene.swift
func didBegin(_ contact: SKPhysicsContact) {
-- snip --
// Skater touched a gem, so remove it
if let gem = contact.bodyB.node as? SKSpriteNode {
removeGem(gem)
// Give the player 50 points for getting a gem
score += 50
updateScoreLabelText()
}
}
}
Simple, right? At the point in the code where we know the player got a gem, we just add 50 to the score variable and call our updateScoreLabelText() method. Now collecting gems pays.
One final thing you may have noticed is that our high score just sits there at 0. Let’s fix that now.
TRACKING THE HIGH SCORE
To update the high score label, add the following method just after the updateScoreLabelText() method:
GameScene.swift
func updateScoreLabelText() {
-- snip --
}
func updateHighScoreLabelText() {
if let highScoreLabel = childNode(withName: "highScoreLabel") ![]()
as? SKLabelNode {
highScoreLabel.text = String(format: "%04d", highScore)
}
}
This method is exactly the same as the updateScoreLabelText() method you added before, but it handles the high score. We only need to check if the player got a new high score at the end of every game. The gameOver() method we created is perfect for that. Add this code to it:
func gameOver() {
// When the game ends, see if the player got a new high score
if score > highScore {
highScore = score
updateHighScoreLabelText()
}
startGame()
}
This code is pretty straightforward. When the game is over, we check if score is higher than the current highScore. If it is, then we set the highScore equal to the new score, and we update the high score label text. Try playing the game a few times now, and you should see the high score being tracked and displayed.
TWEAKING THE GAMEPLAY
Right now the game is pretty difficult. What if we wanted to make it easier? It’s our game, and we can change whatever we want, so let’s do it! The first thing we need to address is that when you start a game, there are sometimes gaps and multilevel platforms right away, so it’s impossible to survive more than a few seconds in the game.
Let’s change our code that determines when to add a gap in the sidewalk so that there will be no gaps during the start of the game. The player’s score starts at 0, so we can add a check for the player’s score being greater than 10 before we start adding gaps. Let’s also make it so the player’s score has to be greater than 20 before we start changing the platform level. And while we’re changing that code, we’ll also decrease the 5 percent chance for the gaps and the level changes to a 2 percent chance. Modify the updateBricks(withScrollAmount:) method to look like this:
GameScene.swift
func updateBricks(withScrollAmount currentScrollAmount: CGFloat) {
--snip--
let randomNumber = arc4random_uniform(99)
if randomNumber < 2 && score > 10 {
// There is a 2 percent chance that we will leave a gap between
// bricks after the player has reached a score of 10
let gap = 20.0 * scrollSpeed
brickX += gap
--snip--
}
else if randomNumber < 4 && score > 20 {
// There is a 2 percent chance that the brick Y level will change
// after the player has reached a score of 20
if brickLevel == .high {
brickLevel = .low
}
--snip--
}
Now there will be fewer gaps and level changes, and they won’t show up right at the start of the game anymore. Run the game and see if it’s easier.
Another quick change that will make the gameplay even easier is keeping the skater from being able to tip over. In the Skater.swift file, change the allowsRotation property of the physics body to false:
Skater.swift
physicsBody?.density = 6.0
physicsBody?.allowsRotation = false
physicsBody?.angularDamping = 1.0
If you run the game now, you will probably survive a lot longer and get a higher score than before!
WHAT YOU LEARNED
In this chapter, you learned how to add a whole bunch of game elements. You added varying sidewalk levels to force the player to jump up, gems the player can collect, a scoring system, and high-score tracking. You also learned about using random numbers to add variation to the gameplay and how to use labels to display information for the player.