11
DISPLAYING BIRTHDAYS

Time to show off those birthdays! In Chapter 10, you created the Add Birthday view controller so that you could add new Birthday objects into your app with the Birthday class. In this chapter, you’ll create a Birthdays table view controller that can display your added birthdays in a table view, which shows a list of items the user can scroll through and select. Then you’ll learn how to make the Add Birthday view controller tell the Birthdays table view controller when a Birthday object is added so that the new birthday can be shown in the table view.
MAKING THE BIRTHDAY LIST
It’s one thing to be able to add birthdays, but you’ll also want to display a list of birthdays. For that you need to create another class, BirthdaysTableViewController, which will subclass UITableViewController, a special kind of view controller with a table view. UITableViewController contains several built-in methods that allow you to code things like how many rows the table view should have and what should be displayed in each row. We’ll want to have as many rows as we have birthdays and to display one birthday in each row.
CREATING THE BIRTHDAYS TABLE VIEW CONTROLLER
CONTROL-click the BirthdayTracker folder in the Project navigator and choose New File… from the menu. In Chapter 10, we created the Swift file Birthday.swift, which Xcode prepared for us with nearly nothing in it. To create a new file this time, we’ll tell Xcode we want to subclass an existing iOS class. Depending on the base class, Xcode will create a file containing some code that you’ll customize to your needs. To create the file, select iOS at the top of the window and then select the Cocoa Touch Class template, which will automatically format the new class file (see Figure 11-1).
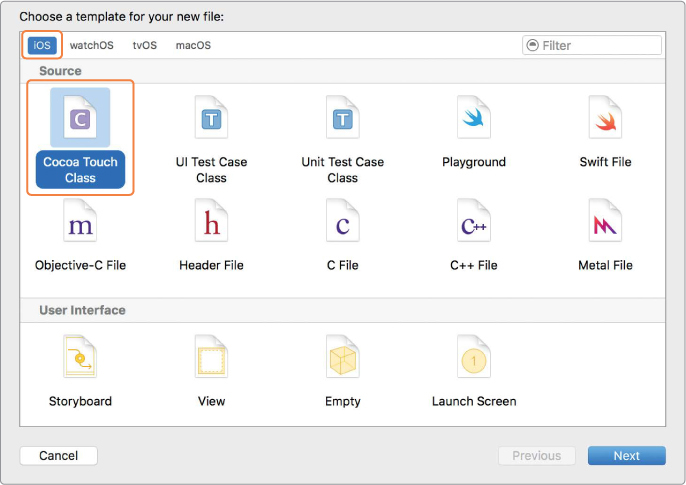
Figure 11-1: To subclass an existing class, choose iOS and then Cocoa Touch Class.
When you choose this option, you’ll see a second dialog where you can name your new class and specify which class you’ll subclass. First, in the Subclass field (the second field in the dialog), type UITableViewController. This will automatically fill in the class field with the subclass name. Once that happens, type Birthdays in front of TableViewController so that the whole class name is BirthdaysTableViewController. This is a shortcut so you don’t have to type as much. Make sure to choose Swift in the Language drop-down menu as well, and then click Next. Then select Create in the final dialog to create your new file.
In BirthdaysTableViewController.swift, Xcode has provided a template with several commented-out methods. You can clean up the code by getting rid of methods we won’t use. Delete just the comments in viewDidLoad(), and then delete the entire didReceiveMemoryWarning() method and the methods tableView(_:moveRowAt:to:) and tableView(_:canMoveRowAt:), which have to do with moving rows in the table view. When you’re finished, the contents of BirthdaysTableViewController should look like Figure 11-2. There are still several commented-out methods, but we’re keeping those to use later!

Figure 11-2: The BirthdaysTableViewController cleaned up!
Next, you need to make the Birthdays table view controller the BirthdaysTableViewController class. To do this, go to Main.storyboard and select the Birthdays scene. Using the Identity Inspector in the right pane, change the class from UITableViewController to BirthdaysTableViewController, as shown in Figure 11-3.
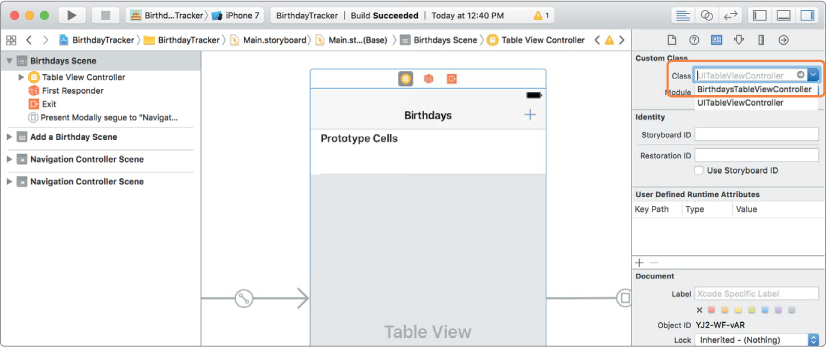
Figure 11-3: Setting BirthdaysTableViewController as the class of the Birthdays scene
Now that you have the Birthdays table view controller set up in the storyboard, the next step is to make cells in your table that will display each birthday.
ADDING CELLS TO THE TABLE VIEW
Each birthday will be displayed in a UITableViewCell in the Birthdays table view controller. A table has boxes organized into rows and columns that contain information. These boxes are called cells. Similarly, a table view also has cells that are all instances of, or a subclass of, the UITableViewCell class. We’ll put each birthday into its own cell in our table view.
We’ll start by creating those cells in the storyboard, and then we’ll fill them with our Birthday objects later. In the left outline menu, click the triangle by Birthdays and then click the triangle by Table View to open those sections. Then select Table View Cell ➊, as shown in Figure 11-4.

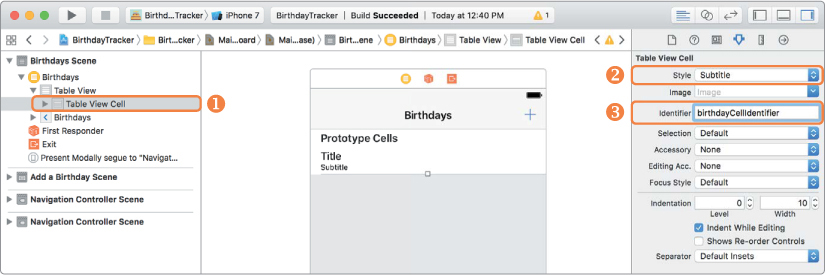
Figure 11-4: Creating a Subtitle style table view cell and setting its identifier
Next, open the Attributes Inspector. Using the drop-down menu under Style, set the cell’s style to Subtitle ➋ so that the cell now has a Title label and a Subtitle label. You’ll display each person’s name in the Title and birthday in the Subtitle.
Finally, enter birthdayCellIdentifier in the Identifier field ➌. You’ll use this identifier later when you fill in the cell contents.
That’s it! You’ve finished your work in the storyboard.
You may be wondering why we have just one cell in our table view in the storyboard when we’ll have more than one birthday to show in the list. If you look at Figure 11-4 again, you’ll notice that the cell is labeled Prototype Cells. This means that the cell you just customized is a template for all the cells you want to appear in your table view. The identifier you gave the cell is how your code will tell the table view to produce each cell for you to put birthdays in. You’ll see how this works soon.
WORKING WITH DATES
Swift has a special data type called Date that is used for storing date values. A Date object is actually a date and a time. Open your playground and enter the following:

We’ve just assigned the current date and time the code was run to the variable today. When you print today, it’s in the format "2017-11-21 10:45:31 +0000 ". What if you wanted it to display as Tuesday, November 21, 2017, instead? Or just 11/21/17? To display a date in a particular way, you use a date formatter, which is a DateFormatter object that you create and give a date format style. DateFormatter is a helper object that is used to create a display string from any date, and a date format style is a property of DateFormatter that tells the formatter what style to use. You can create your own date format styles manually, but there are also styles that are included in Swift and ready to use. Add the following to your playground:

At ➊ you create a formatter. Then at ➋, you set the style of the formatter to Style.full, which will print the day of the week as well as the full month name, date, and year. Finally, you create a string from the date using the string(from:) method of the DateFormatter class ➌. You can see that you now have turned the date into the nicely formatted string "Tuesday, November 21, 2017". Table 11-1 shows the different strings that are created from the five DateFormatter.Style options available in Swift.
Table 11-1: Date Formatter Styles and Their Date Strings
DateFormatter.Style |
Date string |
none |
"" |
short |
"11/21/17" |
medium |
"Nov 21, 2017" |
long |
"November 21, 2017" |
full |
"Tuesday, November 21, 2017" |
You can also specify your own custom way of displaying a date using the dateFormat property of the DateFormatter. Perhaps you only want the month and day. Or maybe you want a four-digit year displayed in the short style. Doing either is really easy, and you don’t even have to create a new DateFormatter—you can just change the dateFormat on formatter and then ask it for a new string. Add the following code to your playground to display dates with a specific format:

At ➊, you specify that you only want the month and the date in an MM/dd format—that is, a two-digit month followed by a two-digit date. If you want to display the month as three letters, then use MMM. To display the full name of the month, use MMMM. At ➋, we change the date format to use a four-digit year. A two-digit year would be yy. Here are a few other ways to use a dateFormat to display a custom date string.
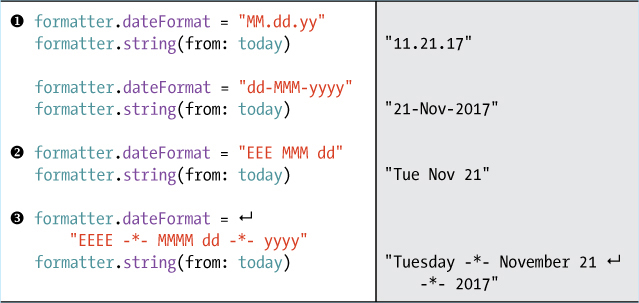
If you want to include separators, you add them to your dateFormat string. For example, if you want periods as separators, then you can create a dateFormat like "MM.dd.yy" ➊. To display an abbreviated day of the week, use EEE ➋. For the full day, use EEEE ➌. These are only a few examples. By using combinations of M, d, y, and E, you have an endless number of ways to display a date!
SETTING UP THE BIRTHDAYS TABLE VIEW CONTROLLER
The Birthdays table view controller will display a list of all the birthdays stored in the app. Do you remember what you use to store a list of items? That’s right—an array! You’ll create an array in the BirthdaysTableViewController to store all the birthdays. To do this, give the BirthdaysTableViewController a birthdays property that is an array of Birthday objects. At the top of the class, right above the viewDidLoad() method, insert this line to add a variable array property called birthdays:
BirthdaysTableViewController.swift
class BirthdaysTableViewController: UITableViewController {
var birthdays = [Birthday]()
override func viewDidLoad() {
This line creates an empty array of Birthday instances. It needs to be a variable and not a constant because you’ll want to add a saved Birthday to this array every time the user adds a Birthday with the Add Birthday view controller. You’ll see how to do that in “Making the Birthdays Table View Controller Conform to Protocol” on page 168.
NOTE
Remember that the final versions of the project files are available from https://www.nostarch.com/iphoneappsforkids/.
The BirthdaysTableViewController will also need a dateFormatter property to display the birthdate as a nicely formatted string. Add a dateFormatter right underneath the birthdays array:
var birthdays = [Birthday]()
let dateFormatter = DateFormatter()
override func viewDidLoad() {
Note that the dateFormatter is a constant that is created with let. Even though you’ll change the dateFormatter’s properties, like the dateStyle and timeStyle, you’ll never change the dateFormatter itself.
You’ll also need to set up the dateFormatter so that it will display the birthdates as fully formatted strings like "Tuesday, December 17, 2008". As you saw in Chapter 10, a good place to do this is the viewDidLoad() method, which is called when the Birthdays table view controller is loading its view. This is the perfect place to do any setup that is needed for this class.
override func viewDidLoad() {
super.viewDidLoad()
➊ dateFormatter.dateStyle = .full
➋ dateFormatter.timeStyle = .none
}
At ➊, you set the dateStyle of the dateFormatter so that it will display a formatted date string for each Birthday. Did you notice how we just wrote .full instead of DateFormatter.Style.full? Swift knows what type to expect for the dateStyle of a DateFormatter, so it lets us take this little shortcut. At ➋, you set the timeStyle of the dateFormatter to .none so that the time won’t be shown.
DISPLAYING BIRTHDAYS IN A TABLE VIEW
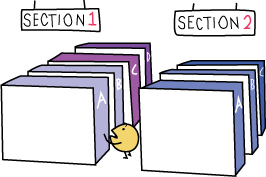
The BirthdaysTableViewController class has a table view that is used to display a list of items in a single column. The table view has one or more sections containing rows, and each row contains a cell. A section in a table view is a grouping of rows that can be displayed with or without a header. An example of an app that shows a table view with several sections is the Settings app, as shown in Figure 11-5. It displays a list of rows that have been broken up into different sections.
Each section and row of a table view is identified with an index number. These numbers start at 0 and then increase by 1 as you go down the table view. For example, the Privacy line in the Settings app is found at section 0, row 1. The News setting is at section 1, row 3.
In the middle of the BirthdaysTableViewController class, there is a section called Table view data source with three methods. The table view controller uses these methods to determine what’s going to be displayed inside its table view.
numberOfSections(in:) Tells the table view how many sections it should have
tableView(_:numberOfRowsInSection:) Tells the table view how many rows will be displayed in each section
tableView(_:cellForRowAt:) Sets up each cell that’s going to be displayed in each row of the table view

Figure 11-5: The Settings app uses sections to group rows of different device settings.
The table view data source methods are called by the table view controller every time the table view is reloaded. Xcode automatically gives you these method templates when you make a subclass of a UITableViewController. You need to implement all three methods for the app to work, even though you’ll never call them directly in your code. The UITableViewController class implements the UITableViewDataSource protocol, which comes with these data source methods, to determine what will be displayed inside the table view. We’ll discuss protocols in “Delegation” on page 166. For now, you just need to know that a UITableViewController uses these methods to display its content, and it automatically calls these methods so you don’t need to call them.
Let’s start with the method numberOfSections(in:). The Birthdays table view controller is a list that just displays Birthday instances, so it doesn’t need multiple sections. To set the number of sections in the table view, we just need to return 1.
BirthdaysTableViewController.swift
override func numberOfSections(in tableView: UITableView) -> Int {
return 1
}
This method takes a UITableView called tableView as a parameter, which is the table view that uses this class as its data source. We don’t need to worry about making this connection because the UITableViewController comes with a built-in table view that is automatically hooked up to these methods. Each birthday will be displayed in its own row. So in tableView(_:numberOfRowsInSection:), in order to have the right number of rows for all of your birthdays, you need to return the number of Birthday instances that you have in your birthdays array. Do you remember the count property of an array? It’s an integer that tells you how many items are in that array, and it’s perfect for this situation! Change this method to the following:
override func tableView(_ tableView: UITableView, ![]()
numberOfRowsInSection section: Int) -> Int {
return birthdays.count
}
In addition to the tableView parameter, tableView(_:numberOfRowsInSection:) also takes an Int called section. When the table view is loading itself, this method is called for each section in the table view. In our case, we have only one section, so we don’t need to bother checking which section of the table view is being displayed here. We know it’s section 0, and we want it to have as many rows as there are birthdays, so we write return birthdays.count.
Finally, you need to implement tableView(_:cellForRowAt:) so that the table view will know what to put inside each cell. Since this method is commented out, you need to uncomment it by deleting the /* and */ that surround it. (Be careful not to accidentally uncomment the other methods after it!) After you’ve done that, change it to the following code:
override func tableView(_ tableView: UITableView, cellForRowAt ![]()
indexPath: IndexPath) -> UITableViewCell {
➊ let cell = tableView.dequeueReusableCell(withIdentifier: ![]()
"birthdayCellIdentifier", for: indexPath)
➋ let birthday = birthdays[indexPath.row]
➌ cell.textLabel?.text = birthday.firstName + " " + ![]()
birthday.lastName
➍ cell.detailTextLabel?.text = dateFormatter.string(from: ![]()
birthday.birthdate)
➎ return cell
}
You don’t call the method tableView(_:cellForRowAt:). It’s called when the table view is loaded onto the screen. It’s called for each cell on the screen and takes two parameters, tableView and indexPath. You already know what the tableView parameter is for. An IndexPath is a Swift struct that’s used to represent a row’s position in a table view. An IndexPath instance has a section property and a row property. Since this method will be called many times (once for every row in the table), we need the indexPath to know which section and row we’re currently configuring. The indexPath.section property gives the section number, and the indexPath.row gives the row of the table view cell. The five lines of code inside tableView(_:cellForRowAt:) will do the following:
• Create a UITableViewCell
• Figure out which Birthday in the birthdays array will be displayed inside the cell
• Make two labels to display the birthday person’s name and birthdate in the cell
• Return the cell ready for display in the table view
Let’s go through this code line by line.
First, create the UITableViewCell. The code at ➊ does this using the method dequeueReusableCell(withIdentifier:for:). Before you can start using this method on a cell, though, you need to tell the method which cell you want to use from the storyboard. Earlier, when you were in the storyboard, you gave your cell the identifier birthdayCellIdentifier (see Figure 11-4). This identifier links your code to the cell and tells your method that it’s using the right cell. The string for when you call this method needs to be exactly the same as the string you set in the storyboard, or you’ll get an error and the app will crash when you run it.
In the method dequeueReusableCell(withIdentifier:for:), did you notice the words Reusable Cell? The cells inside a table view are created once and then can be reused over and over. This helps everything run faster and smoother because creating the cell is what takes the most time. If you had 200 birthdays in your app, but only 10 would fit on your screen at one time, then you need only 10 cells to show your birthdays. When you scroll down to reveal more birthdays, the cells that scroll off the top of the screen are reused. They are filled with new information and show up again at the bottom of the screen. The UITableView automatically does this work. When the table view is loaded, tableView(_:cellForRowAt:) is called for every visible row. When the user scrolls to look at more cells, it’s called again for each row just as it is about to appear on the screen.
Next, we need to find out which Birthday should be displayed inside the cell. We want to display one birthday from the birthdays array in each row. The first birthday, which is at birthdays[0], should be displayed in row 0. The second birthday, at birthdays[1], should be displayed in row 1, and so on, which means the indexPath’s row is the same as the position in the birthdays array that we want to access. The code at ➋ accesses the correct Birthday object from the birthdays array by using indexPath.row. Once we have the right Birthday object, we assign it to a constant named birthday so we can set up the labels in this cell.
Notice that we’re using let to assign the birthday to a constant instead of a variable. We can use let because each time tableView(_:cellForRowAt:) is called, a new birthday constant is created. Each cell gets its own birthday constant that is assigned its own Birthday object. Since we’re not going to change any of the birthday constants—we’re just going to read their properties—we don’t want to make them variables.
Now that you have your cell and your birthday, it’s time to fill in the details. You need two labels for each cell to show the birthday person’s name and birthdate. You set the cell to the Subtitle style so that it has a Title label and a Subtitle label. Each cell will already contain these labels, so now you don’t have to create any labels yourself.
The labels exist as properties of UITableViewCell and are called textLabel and detailTextLabel. The code at ➌ sets the text of the textLabel to a string made up of the firstName and lastName of the birthday with a space between them. At ➍, you use the string(from:) method of the dateFormatter to display the birthdate in the detailTextLabel.
When your cell is completely configured, tableView( _:cellForRowAt:) returns the cell at ➎ so that it can be displayed at that indexPath of the table view.
PUTTING IT ALL TOGETHER
Now you can add Birthday instances to the app using the Add Birthday view controller, and you have a table view to list each Birthday in the Birthdays table view controller. But when you try running the app and adding a Birthday, it doesn’t appear. To make each Birthday you add appear in the table view, you need to make the Add Birthday view controller communicate with the Birthdays table view controller. You do this by using delegation.
DELEGATION
Delegation can be used when one view controller needs to get information from another view controller. Say you have two view controllers: A and B. The first view controller, A, creates B and presents B on top of itself. A knows about B because it created and presented B, so A can pass information along to B. But B doesn’t know about A—it’s just popped into being and doesn’t know where it came from or how it got there. So how can B talk to A? Through delegation!

Delegation is when someone gives a job or a task to someone else. A delegate is like a boss who tells a delegating employee what to do. When the delegating employee is done with their task, sometimes they’ll report information back to the delegate boss.
Delegation in Swift is pretty similar, but instead of having a boss and employee, we have a delegate and a delegating object. Since class B is the one being told what to do by class A, it’s the delegating object. We give class B a special property called a delegate to tell it who its delegate is—that way, it knows who to communicate with. The delegate can be any class that has a set of methods that have been defined in a protocol. A protocol is like an agreement between the two classes that tells them what the delegate can ask the delegating object to do. It has a list of method and property names that the delegate can use with the delegating object.
Class A creates class B, makes itself the delegate of class B, and gives class B a job to do that’s in the protocol. Once class B is done with its job, it reports back to class A. Let’s see how this works in our app.
The Birthdays table view controller is view controller A, and the Add Birthday view controller is view controller B. We’ll create a protocol called AddBirthdayViewControllerDelegate and a method for that protocol, addBirthdayViewController(_:didAddBirthday:), which the Add Birthday view controller will use to report back.
Take a look at Figure 11-6. When the user taps the Add button ➊, the Birthdays table view controller creates the Add Birthday view controller ➋ and sets itself as the Add Birthday view controller’s delegate.
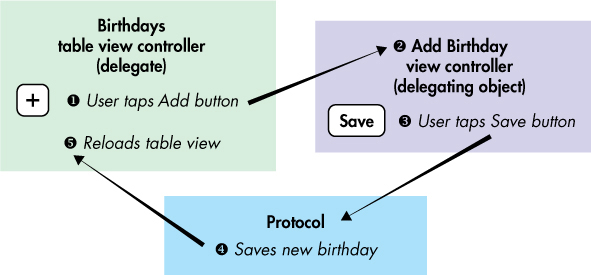
Figure 11-6: A new birthday is added and passed from the Add Birthday view controller to the Birthdays table view controller using delegation.
The AddBirthdayViewControllerDelegate protocol is defined to have one method, addBirthdayViewController(_:didAddBirthday:). When the user taps Save ➌, the Add Birthday view controller calls this method ➍ and passes the new birthday to its delegate, the Birthdays table view controller. The Birthdays table view controller takes that birthday, adds it to its birthdays array, and then reloads its table view ➎ so that the new birthday will show up in the table.
We’ll show you how to make an AddBirthdayViewControllerDelegate protocol with the method addBirthdayViewController(_:didAddBirthday:) that the Add Birthday view controller can call whenever a birthday is added to the app. The Birthdays table view controller will implement that protocol method so that whenever a birthday is added with the Add Birthday view controller, the Add Birthday view controller can just say to its delegate, “Hey! Someone just added this birthday,” and the Birthdays table view controller will hear the message and say, “Oh! I’ll add that to my list and refresh my display so the new one shows up.”
So now let’s do this in code!
Creating a Protocol
First, we need to create the protocol. In the AddBirthdayViewController.swift file, above the AddBirthdayViewController class, add this code defining the AddBirthdayViewControllerDelegate protocol:
AddBirthdayViewController.swift
➊ protocol AddBirthdayViewControllerDelegate {
➋ func addBirthdayViewController(_ addBirthdayViewController: ![]()
AddBirthdayViewController, didAddBirthday birthday: ![]()
Birthday)
}
class AddBirthdayViewController: UIViewController {
--snip--
You define the protocol at ➊ by typing the keyword protocol followed by the name AddBirthdayViewControllerDelegate. That’s a long name, but Swift programmers usually name their protocols after the calling classes and add the word Delegate on the end. This is so you’ll be able to tell which class is using the protocol by looking at the protocol’s name. Since you’re a Swift programmer now, you should use the same naming conventions.
In this protocol, addBirthdayViewController(_:didAddBirthday:) is the only function, and it’s used to pass the Birthday object back to the delegate class ➋. Notice that you’re including AddBirthdayViewController as a parameter in this function. Again, Swift programmers do this based on convention when they implement protocol methods, so you should stick to doing it, too. It’s useful to know who sent back a message and for the delegate to have access to that object and its class.
When the Add Birthday view controller calls this method, it will pass itself in as the addBirthdayViewController parameter. You’ll see how this is done very soon. The other thing to note is the external parameter name didAddBirthday. Many delegate protocol methods contain the words did and will because they’re used to describe something that the calling class has either just done or will do.
Now that you have your protocol defined, you need to tell the Birthdays table view controller to adopt this protocol and use the protocol’s method.
Making the Birthdays Table View Controller Conform to Protocol
To adopt the protocol, the Birthdays table view controller needs to make itself an AddBirthdayViewControllerDelegate. To allow for this, you need to add AddBirthdayViewControllerDelegate to the class definition right after the UITableViewController superclass. At the top of the class, add a comma after UITableViewController and then type AddBirthdayViewControllerDelegate:
BirthdaysTableViewController.swift
class BirthdaysTableViewController: UITableViewController, ![]()
AddBirthdayViewControllerDelegate {
As soon as you do that, a red error appears. This happens because BirthdaysTableViewController says it’s an AddBirthdayViewControllerDelegate, but it hasn’t implemented the protocol yet! In order to do that, it needs to implement the AddBirthdayViewControllerDelegate protocol definition. Not to worry—we’ll fix this soon.
It’s important to note here that the BirthdaysTableViewController is subclassing the UITableViewController superclass. A class can have only one superclass, and that superclass name must be written before any protocols. But while a class can have only one superclass, it can adopt as many protocols as it wants—these will all be listed after the superclass and separated by commas.
Now, to conform to the AddBirthdayViewControllerDelegate protocol and fix the error, we need to add the addBirthdayViewController(_:didAddBirthday:) method to Birthdays TableViewController. A good place to add that is at the end of the class, right after the navigation section:
➊ // MARK: - AddBirthdayViewControllerDelegate
func addBirthdayViewController(_ addBirthdayViewController: ![]()
AddBirthdayViewController, didAddBirthday birthday: Birthday) {
➋ birthdays.append(birthday)
➌ tableView.reloadData()
}
When you start typing the function name, Xcode autocomplete suggests this entire method declaration. This is because it knows this class adopts the AddBirthdayViewController Delegate protocol, and it’s expecting you to add this method. Note that unlike with a subclassed method, you don’t use the override keyword before addBirthdayViewController(_:didAddBirthday:) because there is no original method to be overridden.
In this method, you need to do two things. First, you need to add the Birthday that was passed in by the Add Birthday view controller to the birthdays array. You do this by using the append(_:) method for an array ➋. Next, you need to refresh the table view so that it shows this new birthday by calling the reloadData() method on the tableView property ➌. When reloadData() is called, the table view data source methods will be called again, and the newly added Birthday will be displayed at the bottom of the birthday list.
You might have noticed that we added a comment above the method to mark this section: // MARK: - AddBirthdayViewControllerDelegate ➊. This isn’t necessary, but it’s good coding style to mark off different sections of your class, and it helps to keep your code clean and readable. The first part of the comment, MARK: -, is a special keyword that Xcode recognizes for code comments, and it adds the AddBirthdayViewControllerDelegate section to a drop-down table of contents menu that you can use at the top of your class. This drop-down menu helps you find methods and lets you jump to different places in your code. To use this menu, click Birthdays TableViewController at the top of the editor pane, as shown in Figure 11-7.

Figure 11-7: Your class has a built-in table of contents for quickly jumping to a section.
Giving the Add Birthday View Controller a Delegate
BirthdaysTableViewController has adopted the AddBirthdayViewControllerDelegate protocol. Now it’s time to make the Add Birthday view controller use the AddBirthdayViewControllerDelegate protocol to tell the Birthdays table view controller when it has added a birthday. To do this, the Add Birthday view controller first needs to define a delegate. We arrange for this by adding an optional delegate property of type AddBirthdayViewControllerDelegate to the AddBirthdayViewController class by inserting the following line right below the outlets:
AddBirthdayViewController.swift
class AddBirthdayViewController: UIViewController {
--snip--
@IBOutlet var birthdatePicker: UIDatePicker!
var delegate: AddBirthdayViewControllerDelegate?
override func viewDidLoad() {
The delegate has to be an optional because you can’t set it until after the Add Birthday view controller has been created. You’ll learn where to set the delegate shortly.
Now that the Add Birthday view controller has a delegate, in the saveTapped(_:) method, you can pass a Birthday to the delegate using the addBirthdayViewController(_:didAddBirthday:) method. Change saveTapped(_:) to the following:
@IBAction func saveTapped(_ sender: UIBarButtonItem) {
--snip--
let newBirthday = Birthday(firstName: firstName, ![]()
lastName: lastName, birthdate: birthdate)
➊ delegate?.addBirthdayViewController(self, didAddBirthday: newBirthday)
dismiss(animated: true, completion: nil)
}
After the birthday object is created, the code at ➊ passes it back to the delegate using addBirthdayViewController(_:didAddBirthday:).
Great! You’re done making changes to the Add Birthday view controller. It now has a delegate that will listen for the call that a Birthday was saved. Run the app to see what happens.
Hmm . . . not much has changed. When you add a Birthday, you still aren’t seeing it show up in the Birthdays table view controller. What gives?
CONNECTING THE TWO CONTROLLERS BY SETTING A DELEGATE
There’s one last thing you have to do. The Birthdays table view controller is an AddBirthdayViewControllerDelegate, and the Add Birthday view controller has an AddBirthdayViewControllerDelegate property that holds the delegate it talks to when a Birthday is saved. But we never specifically set the delegate property to be the Birthdays table view controller. So it’s time to connect the communication pipeline between our two view controllers.
In the Navigation section of the BirthdaysTableViewController class, there’s a method that’s been commented out called prepare(for:sender:). Uncomment that method by deleting the /* and */ that surround it.
This method is automatically called whenever the Birthdays table view controller gives up its screen and the app transitions to another view controller using a storyboard segue. We’ll use this method to pass the Birthdays table view controller in to Add Birthday view controller to set itself as the Add Birthday view controller’s delegate. Write the following in the prepare(for:sender:) method:
BirthdaysTableViewController.swift
override func prepare(for segue: UIStoryboardSegue, sender: Any?) {
// Get the new view controller using segue.destination
➊ let navigationController = segue.destination as! ![]()
UINavigationController
➋ let addBirthdayViewController = ![]()
navigationController.topViewController as! ![]()
AddBirthdayViewController
➌ addBirthdayViewController.delegate = self
}
It takes three lines of code to set the Add Birthday view controller delegate to the Birthdays table view controller. First, you need to be able to get to the AddBirthdayViewController object from the segue parameter. Xcode has left in a comment hinting at how you can do that. A UIStoryboardSegue has a property called destination at the other end of the segue that is being prepared in this method, but the destination for this app isn’t the AddBirthdayViewController.
In Chapter 9, you embedded the Add Birthday view controller into a navigation controller so you could have a navigation bar with Cancel and Save buttons. So you don’t expect to find the Add Birthday view controller at the other end of the segue. Instead, the destination is a UINavigationController that contains the Add Birthday view controller. The line at ➊ gets you navigationController. The code segue.destination will return a UIViewController, but since our navigationController is a specific type of ViewController, we need to typecast it to a UINavigationController using as.
Next, you can get the Add Birthday view controller, which is the topViewController of the navigationController ➋. The topViewController is just the view controller that’s being displayed in the navigationController, but its property is of type UIViewController, so this has to be typecast to an AddBirthdayViewController to indicate that this controller is a specific subclass of UIViewController. Finally, when you have an AddBirthdayViewController, you can set the delegate to self, which is currently the Birthdays table view controller ➌.
Now run the app and add some birthdays! What do you see in the Birthdays table view controller? Birthdays! Birthdays! Birthdays! We’re not quite done yet, though. If you quit the app and then run it again, the previous birthdays will disappear. We still need to save the birthdays to the device, which we’ll do in Chapter 12.
WHAT YOU LEARNED
In this chapter, you learned how to make a table view controller to display your list of birthdays. You also learned how to add a Birthday in the Add Birthday view controller, and then how to use a delegate to add the Birthday to the birthdays array in the Birthdays table view controller so that it could be displayed.
In Chapter 12, you’ll learn how to save the birthdays to your device so that they show up even after you quit the app and then run it again. To save the birthdays, you’ll use Core Data, which we set up at the very beginning of our project.