10
ADDING A BIRTHDAY CLASS AND HANDLING USER INPUT

In Chapter 9, you set up the visual interface for your app by creating view controllers, buttons to navigate between them, and the screen that takes user input. Now it’s time to dig into the programming! In this chapter, we’ll show you how to code your app and connect it to your storyboard. You’ll write Birthday and AddBirthdayViewController classes so you can add birthdays using the input controls that you created in the previous chapter.
THE BIRTHDAY CLASS
In this section, you’ll write a temporary Birthday class that will store your birthdays but won’t permanently save the birthday data on the device. We’ll replace it later with a better solution, but this approach will let us test our input controls.

NOTE
Sometimes when you’re programming, you’ll need to write apps with many parts that will work together. You may write one part of the app first, like we did with the input controls, but to test that part, you might need some other code you haven’t written yet. When that happens, you can quickly write some temporary test code that you’ll rework after you’ve finished making the rest of your app work. That’s what we’re doing with the Birthday class—we’ll replace it in Chapter 12.
If you don’t already have it open, open your BirthdayTracker app in Xcode. Make sure you can see the Project navigator (⌘-0).
CREATING A NEW FILE
First, you’ll create a file where you’ll write the Birthday class. A file in Xcode is just like any other computer file—it’s a type of document. When you write an app in Swift, you’ll write your classes and functions in Swift files. Just like how Word files have the extension .doc or .docx and PDF files end with .pdf, a Swift file has the extension .swift after its name.
If you want to add a new class to your application, create a new Swift file to write that class. You can write as many classes as you want in the same file, but it’s easier to organize your project if you keep classes in separate files with filenames that match each class’s name. CONTROL-click the BirthdayTracker folder in the Project navigator and choose the New File… option from the menu, as shown in Figure 10-1.

Figure 10-1: Creating a new file in Xcode
This brings up a dialog like the one in Figure 10-2. Here you’re asked to select the kind of file you want to create, which is a generic, empty Swift file. Select iOS at the top of the dialog, select Swift File, and then click Next.

Figure 10-2: Choose Swift File for the template.
Finally, name the file Birthday and click Create. You should see Birthday.swift listed in the BirthdayTracker folder of the Project navigator. Click it and you should see an empty Birthday.swift file, as shown in Figure 10-3.

Figure 10-3: The Birthday.swift file
Notice that at the top of the file, Xcode has automatically written some copyright information in code comments. The name that comes after “Created by” is pulled from your Contact Card in your computer’s Contacts application. After the copyright year, you should see the Organization Name that you used in Chapter 1 when you created your first Xcode project. Every time you create a new file in Xcode, this commented header is automatically included.
Now that you have your Birthday.swift file, you can create the Birthday class to store your birthdays.
WRITING THE BIRTHDAY CLASS
Your Birthday class will have three constant properties: firstName, lastName, and birthdate. The properties firstName and lastName should be of type String, but birthdate will be a special class built into Swift called Date, which is specifically made to handle dates and times. We’ll use the Date class’s functionality to alert the user about birthdays. Enter the following into Birthday.swift under the import Foundation statement.
Birthday.swift
class Birthday {
let firstName: String
let lastName: String
➊ let birthdate: Date
➋ init(firstName: String, lastName: String, birthdate: Date) {
➌ self.firstName = firstName
self.lastName = lastName
self.birthdate = birthdate
}
}
You can see the new Date data type at ➊. A Date is declared just like any other variable.
At ➋, you add an initializer to the Birthday class that takes a firstName, lastName, and birthdate as input parameters. Then, using the self property, you set them to the class properties ➌. This will let you pass names and dates to the Birthday class to store a birthday.
NOTE
We’ll be building each code file for the projects step-by-step. The final versions are available from https://www.nostarch.com/iphoneappsforkids/.
PROGRAMMING USER INPUT
At this point, you have a Birthday class that can hold a friend’s name and birthdate, and you have input fields in the storyboard that you set up in Chapter 9. But the Birthday class and the input fields aren’t connected, so the user’s input isn’t stored as a Birthday. It’s time to write code to make the interface add birthdays. To do that, you’ll create a new AddBirthdayViewController class to manage the input fields in the Add a Birthday Scene in the storyboard. (Remember that a view is controlled by a view controller, which is what you’ll make next.)
CREATING THE ADD BIRTHDAY VIEW CONTROLLER
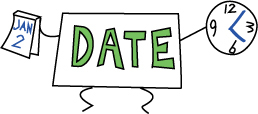
When you make an app and start with a Single View Application template, Xcode automatically creates a file called ViewController.swift, which contains a ViewController class that represents and controls a view with code. The view controller in the storyboard is managed with this ViewController class, which we’ll rename AddBirthdayViewController so that the class’s name describes what it will be doing.
To change the name of the file ViewController.swift, select it and click inside its name in the Project navigator so that it’s highlighted (see Figure 10-4). Then type the new filename, AddBirthdayViewController.
Next, you need to change the name of the ViewController class to AddBirthdayViewController. You do this inside the file by changing the line:

Figure 10-4: Changing the filename of ViewController.swift
class ViewController: UIViewController
to the line:
class AddBirthdayViewController: UIViewController
You won’t need the built-in method didReceiveMemoryWarning(), so you can clean up your code by deleting that method. Now your class should look like this:
AddBirthdayViewController.swift
class AddBirthdayViewController: UIViewController {
override func viewDidLoad() {
super.viewDidLoad()
// Do any additional setup after loading the view,
// typically from a nib
}
}
UIViewController is a class that comes with built-in methods for managing views that appear onscreen when you run your app. AddBirthdayViewController is a subclass of UIViewController, which lets us control the view controller in the storyboard by implementing our own versions of some of UIViewController’s built-in methods.
The UIViewController class has four useful built-in callback methods that will be called when the view controller is created and appears on or disappears from the screen. These callback methods are:
viewDidLoad() This method is called as soon as the view controller has been created but before its view appears on the screen. This is a great place to do any initial setup of the view that you want to do only once.
viewWillAppear(_:) This method is called after viewDidLoad() and before each time the view controller’s view appears on the screen.
viewDidAppear(_:) This method is similar to viewWillAppear(_:) except it is called after a view controller’s view appears on the screen.
viewWillDisappear(_:) This method is called when the view controller’s view is about to leave the screen.
You can override any of these methods in your subclass UIViewController. The first of these, viewDidLoad(), is very useful. Swift expects anyone who subclasses UIViewController to use this method, so it automatically adds a placeholder to the template for viewDidLoad() when you subclass UIViewController.
Swift doesn’t give you placeholder code for the other three methods. If you decide to use one, you can start typing it and autocomplete will fill in the details.
It’s important to note that although viewDidLoad() is called only one time—when the view controller is first created—viewWillAppear(_:) is called every time the view controller’s view is about to appear onscreen. So, if another screen is put on top of a view controller’s screen and then removed so that the view controller’s screen reappears, viewWillAppear(_:) will be called again but viewDidLoad() will not, because the view controller was already sitting there loaded behind another screen. If you want the view to be refreshed with new information every time it appears, you can override viewWillAppear(_:).
In Chapter 12, we’ll be using the viewWillAppear(_:) method to refresh our birthday list. Also, in “Setting a Maximum Birthdate” on page 149, we’ll override viewDidLoad() in AddBirthdayViewController. For right now, however, we can leave these methods alone and connect our code to the inputs we set up in Chapter 9.
CONNECTING CODE TO THE INPUT CONTROLS
In the storyboard, our Add a Birthday view controller has a First Name text field, a Last Name text field, and a Birthdate date picker. To use these input controls, we need to refer to them in the code, which we do by assigning variables to the input controls that are connected to the screen elements with IBOutlets. Add the following three properties to the top of the AddBirthdayViewController class before the viewDidLoad() method (the gray lines indicate some of the existing code, for placement):
AddBirthdayViewController.swift
class AddBirthdayViewController: UIViewController {
➊ @IBOutlet var firstNameTextField: ➋UITextField!
@IBOutlet var lastNameTextField: UITextField!
@IBOutlet var birthdatePicker: UIDatePicker!
override func viewDidLoad() {
@IBOutlet ➊ is a special keyword that is put in front of properties that can be hooked up in the storyboard. IB stands for interface builder, which is the part of Xcode where we work on our storyboard. When you put the keyword @IBOutlet in front of a property, a little circle appears in the margin next to it, as shown in Figure 10-5. This indicates that you can connect the property to an element in the storyboard. When the circle isn’t filled in, it means the property hasn’t been connected yet.
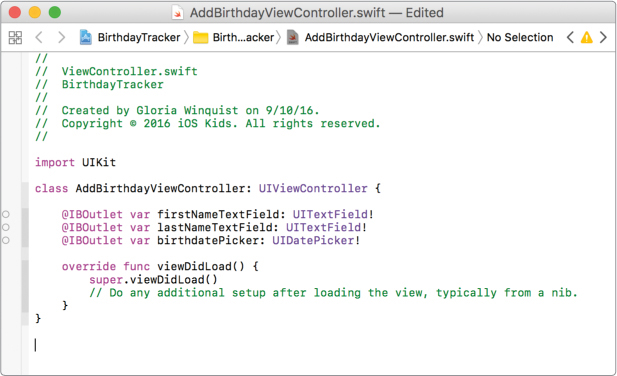
Figure 10-5: AddBirthdayViewController with IBOutlet properties for the input controls
The data type of the firstNameTextField property, UITextField! ➋, is an implicitly unwrapped optional because when the view controller is first created, IBOutlets have nil values. As soon as the view is loaded, however, IBOutlets are given the value of what they are connected to in the storyboard.
CONNECTING YOUR CODE TO THE STORYBOARD
Now that you’ve created AddBirthdayViewController and the properties for the input controls, it’s time to hook up the First Name and Last Name text fields and the Birthdate date picker.
First, change the class of the Add a Birthday view controller in the storyboard to AddBirthdayViewController so you can use that class to manage the view controller. Select Main.Storyboard in the Project navigator. Next, select Add a Birthday Scene in the left outline view and open the Identity Inspector in the right pane. You should see a Custom Class section at the top. Change the class to AddBirthdayViewController, as shown in Figure 10-6.

Figure 10-6: Change the class of the view controller to AddBirthdayViewController.
Now connect the AddBirthdayViewController’s IBOutlet properties to the text fields and date picker in Add a Birthday Scene. Click the triangle next to Add a Birthday Scene in the left outline view to expand the menu of items in that scene. Then, CONTROL-click Add a Birthday next to the yellow view controller icon to open a connection dialog.
In the connection dialog, under Outlets, you can see the birthdatePicker, firstNameTextField, and lastNameTextField. Connect the birthdatePicker by clicking the empty circle next to it and dragging to the date picker in the storyboard. When the date picker object is highlighted in blue, you can let go (see Figure 10-7).
Figure 10-7: Connecting the date picker to the birthdatePicker outlet
You’ll know that the connection was successful if you see Birthdate Picker listed next to birthdatePicker in the connection box with the connection circle filled (see Figure 10-8). You can only connect the birthdatePicker outlet to a date picker. If you try to connect it to a label or another type of view, nothing will happen. Xcode knows that the birthdatePicker has to be connected to a UIDatePicker class because that’s the data type we gave it in AddBirthdayViewController when we created the property.

Figure 10-8: The birthdatePicker outlet has been successfully connected.
Next, connect the firstNameTextField by clicking and dragging from its circle to the text field underneath the First Name label. Finally, connect the lastNameTextField to the text field underneath the Last Name label.
You’re done with the storyboard for the time being. Let’s go back to AddBirthdayViewController.swift to set a maximum birthdate in code.
SETTING A MAXIMUM BIRTHDATE
It wouldn’t make sense for a person to have a birthdate in the future, so let’s write some code to prevent birthdatePicker from selecting future dates. We can do this kind of setup by modifying the viewDidLoad() method in the AddBirthdayViewController. We talked about the viewDidLoad() method in “Creating the Add Birthday View Controller” on page 145. It’s automatically added to our view controllers, so find this method in the AddBirthdayViewController and add the following line of code to it:
AddBirthdayViewController.swift
override func viewDidLoad() {
super.viewDidLoad()
➊ birthdatePicker.maximumDate = Date()
}
viewDidLoad() is already a method of the UIViewController class, so we need to override it using the override keyword, like so: override func viewDidLoad(). Note that it’s important to leave the line super.viewDidLoad() in the method. When you create a subclass, like AddBirthdayViewController, and override a method from the original superclass, you want to make sure that you also call the method on the superclass. Apple could have some special code that runs in the UIViewController viewDidLoad() that we don’t know about, so not calling this superclass method could lead to unexpected errors.
To set the maximumDate of the birthdatePicker, all you have to do is enter birthdatePicker.maximumDate = Date() at ➊. The Date() method creates a new date that is the current date and time. Try running the app now. It should be impossible to select any date in the future!
Next, you’ll write some code so that you can save a Birthday and cancel adding a Birthday from this view controller using the buttons you made in Chapter 9.
SAVING A BIRTHDAY
Now to implement the Save button! When the user taps Save, the app should create a Birthday from the information that was entered and then save the user input.
HOOKING UP THE SAVE BUTTON
Let’s start by making a saveTapped(_:) method that is called every time the user taps the Save button. Add the following code to AddBirthdayViewController right after the viewDidLoad() method:
AddBirthdayViewController.swift
override func viewDidLoad() {
--snip--
}
➊ @IBAction func saveTapped(➋_ sender: ➌UIBarButtonItem) {
➍ print("The save button was tapped.")
}
@IBAction at ➊ is a keyword that connects a function directly to an element in a view controller and allows us to specify code that should run when the user takes an action on that element. In this case, we’re going to add a function that will run when the user taps Save. When you write an IBAction method, you should always include a parameter for the UI element that triggered the method. Typically, an underscore is used to hide the argument label and the parameter name is sender ➋, but you can call this parameter whatever you want. In this case, we want the saveTapped(_:) method to be called whenever the user taps Save, which is a UIBarButtonItem. So we specify that the type of sender is UIBarButtonItem ➌. The print(_:) method at ➍ helps us see when the Save button has been tapped as we’re testing the code.
Hooking up saveTapped(_:) to the Save button is like hooking up an IBOutlet to a storyboard element. Go back to your Main.storyboard file. CONTROL-click the Add a Birthday line to open a connection dialog. At the bottom of the connection dialog is a section called Received Actions, as shown in Figure 10-9. In that section, click and drag from the circle next to saveTapped: to the Save button in the Add a Birthday view controller to connect them.


Figure 10-9: IBActions are listed at the bottom of the connection dialog under Received Actions.
Try running your app again. When you tap the Save button, the message "The save button was tapped." should be displayed in your debug console.
READING TEXT FROM A TEXT FIELD
Let’s add code to the saveTapped(_:) method that will get the first and last names out of firstNameTextField and lastNameTextField after the user enters them.
The UITextField class has an optional String property called text. This text property has a value of whatever has been typed into the text field, so you can use it to get the user’s input in saveTapped(_:) with the following code:
AddBirthdayViewController.swift
@IBAction func saveTapped(_ sender: UIBarButtonItem) {
print("The save button was tapped.")
➊ let firstName = firstNameTextField.text ?? ""
➋ let lastName = lastNameTextField.text ?? ""
print("My name is (firstName) (lastName).")
}
At ➊, you create a constant firstName and set its value to firstNameTextField.text if it exists (that is, if the user entered a value) or to the empty string "". You can do this using the nil coalescing operator (??) that you learned about in Chapter 5. We’re using constants and not variables here because we won’t change the value of the first and last names the user enters.
Then do the same thing with lastName at ➋. After you retrieve values for firstName and lastName, print them to the console so you can see them when you run your app.
Run your app to see what happens. Try tapping the Save button without entering anything in the text fields and then try again after entering a first and last name. You should see output similar to this:
The save button was tapped.
My name is .
The save button was tapped.
My name is Dagmar Hedlund.
Cool! Now you can put a name into your app and see the computer output it in your debug console. Let’s focus on getting a date output next.
GETTING A DATE FROM A DATE PICKER
Getting a date from the birthdatePicker is just as easy as getting the text out of firstNameTextField or lastNameTextField. The UIDatePicker class has a date property, which is the date currently being displayed by the picker. For the birthdatePicker, this is birthdatePicker.date. When a user changes the UIDatePicker, the date property also changes, so you can use birthdayPicker.date to access a birthday the user inputs.
Add the following lines to your saveTapped(_:) method:
AddBirthdayViewController.swift
@IBAction func saveTapped(_ sender: UIBarButtonItem) {
--snip--
print("My name is (firstName) (lastName).")
let birthdate = birthdatePicker.date
print("My birthday is (birthdate).")
}
Run the app now and see what happens. You should see something similar to the following output:
The save button was tapped.
My name is Dagmar Hedlund.
My birthday is 2011-05-03 04:00:00 +0000
At this point, we have a firstName, a lastName, and a birthdate—the three pieces of data that we need to create a Birthday! You’ll notice that the date displayed in the debug console is in a strange format, which also includes a time and +0000 for a time zone offset. Don’t worry too much about this for now. We’ll discuss date formats and how to display a date without a time in Chapter 11.
CREATING A BIRTHDAY
Now that your code can access the firstName, lastName, and birthdate input that the user provided, you can use this information to create a Birthday using the Birthday class initializer.
First, delete the print statements from the saveTapped(_:) method since we’ll replace them with print statements that test out the newBirthday instance instead. Then add the following lines to the saveTapped(_:) method.
AddBirthdayViewController.swift
@IBAction func saveTapped(_ sender: UIBarButtonItem) {
--snip--
let birthdate = birthdatePicker.date
➊ let newBirthday = Birthday(firstName: firstName, lastName: ![]()
lastName, birthdate: birthdate)
print("Created a Birthday!")
➋ print("First name: (newBirthday.firstName)")
print("Last name: (newBirthday.lastName)")
print("Birthdate: (newBirthday.birthdate)")
}
At ➊, you create a newBirthday instance using the Birthday class initializer and pass in constants for firstName, lastName, and birthdate. After you create newBirthday, at ➋, you output its properties into the debug console using dot notation. The printed output will be the same as with the earlier print statements, but this time you’re getting the values from the newBirthday instance. Run the app, enter a birthday, and tap Save to see what happens. You should see output in your debug console similar to the following:
Created a Birthday!
First name: Dagmar
Last name: Hedlund
Birthdate: 2011-05-03 04:00:00 +0000
For now, tapping the Save button only creates a Birthday. You’ll learn how to display this Birthday in the Birthdays view controller in Chapter 11.
ADDING THE CANCEL BUTTON
When the user taps Cancel, it means they no longer want to add a Birthday, and the Add a Birthday screen should go away. Let’s implement this behavior by adding a cancelTapped(_:) method to our class, which will call a built-in UIViewController method called dismiss(animated:completion:). This method does just what it says it does—it dismisses the currently displayed view controller. Add the following method right after the saveTapped(_:) method in your AddBirthdayViewController class:
AddBirthdayViewController.swift
@IBAction func saveTapped(_ sender: UIBarButtonItem) {
--snip--
print("Birthdate: (newBirthday.birthdate)")
}
@IBAction func cancelTapped(_ sender: UIBarButtonItem) {
➊ dismiss(animated: true, completion: nil)
}
The function dismiss(animated:completion:) ➊ takes two parameters. The animated parameter is used to animate the closing screen. Pass in true so users can see the Add a Birthday screen slide down off the screen. It’ll look just like a professional app! The second parameter is an optional closure called completion. A closure is a block of code that can be passed in to the function. The completion closure can be used if there is any code that you want to run after the view controller is dismissed. Because you don’t need anything to happen here, you can just pass in nil.

The final step is to hook up cancelTapped(_:) to the Cancel button. You do this exactly the same way that you hooked up the saveTapped(_:) method to the Save button. Go to Main.storyboard and bring up the connections dialog for the Add Birthday view controller. Click and drag from the cancelTapped(_:) method listing to the Cancel button.
After you’ve done that, run the app, tap + to get to the Add a Birthday screen, and tap Cancel. You should see Add a Birthday slide down the screen and disappear.
WHAT YOU LEARNED
In this chapter, you learned how to hook up written code to your app’s visual interface. You also learned how to use the input text fields and date picker to create a Birthday object with firstName, lastName, and birthdate properties. Right now you can save Birthdays, but you can’t see them after you saved them. In Chapter 11, we’ll show you how to display a list of your birthdays in a Birthdays table view controller.