9
CREATING BUTTONS AND SCREENS ON THE STORYBOARD

The BirthdayTracker app helps you keep track of your friends’ birthdays by letting you save birthdays into a list and pinging you with reminders. We will be building this app over the next five chapters. In this chapter, we’ll show you how to set up the parts of the app that the user sees.
We’ll make two screens: one that displays the list of birthdays and one that lets you add a person’s name and birthday to the list. Then, in Chapters 10 to 13, we’ll show you how to take user input, display birthdays onscreen, save the birthdays, and ping the user with a notification when it’s someone’s birthday.
Are you ready to make an app? Let’s go!
AN OUTLINE OF YOUR APP
By the end of this chapter, we’ll have two screens for the BirthdayTracker. We’ll call these the “Birthdays” and “Add a Birthday” screens, as shown in Figure 9-1.
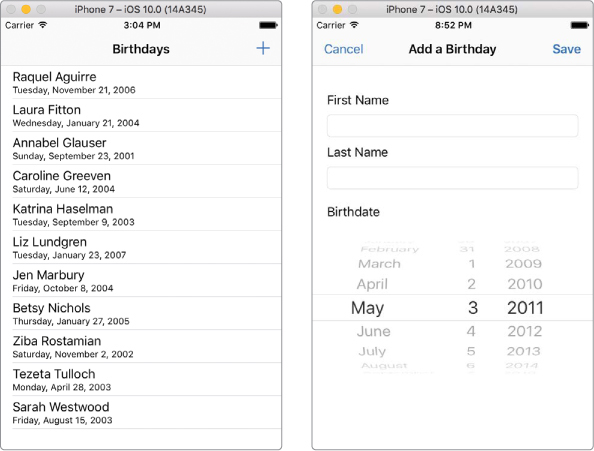
Figure 9-1: A look at the finished app we’ll build over the next few chapters
The Birthdays screen shows you a list of birthdays that you’ve added, and the Add a Birthday screen is where you can add new birthday entries.
In Xcode, a screen includes a view and a view controller. The view is what you see on the screen, and the view controller contains all your Swift code to control the view. You can see in Figure 9-1 that the Birthdays view has an Add button in the top-right corner that looks like a plus sign (+).
The Add button will bring up the Add a Birthday view, where the user can input the birthday details of a new friend. Let’s get started by creating a new Xcode project for our BirthdayTracker.
CREATING A NEW XCODE PROJECT
So far, you’ve been writing most of your code in the playground. The playground is a great place to learn to code, but to write an app that runs on an iPad or iPhone, you’ll need to create an Xcode project, like you did for the Hello World app in Chapter 1.
In the Xcode menu, go to File ▸ New ▸ Project. Select iOS at the top of the dialog and Single View Application for your project template and then click Next.
In the dialog that appears, Xcode will ask you to set a few options for your new app. Since this is just an example, you don’t need to take this part too seriously. Setting these values is much more important when you’re writing an app that you plan to sell or distribute on the App Store. Name your app BirthdayTracker, make sure that the Language is Swift and that Devices is set to iPhone, and check the box for Use Core Data. Your Organization Name and Organization Identifier should be prefilled with the values that you entered when you created the Hello World app in Chapter 1.
Click Next. In the dialog that opens, choose where you want to save your project and click Create. Your Xcode project should open automatically. Take a moment to make sure that you have a file called BirthdayTracker.xcdatamodeld listed in your Project navigator (see Figure 9-2).
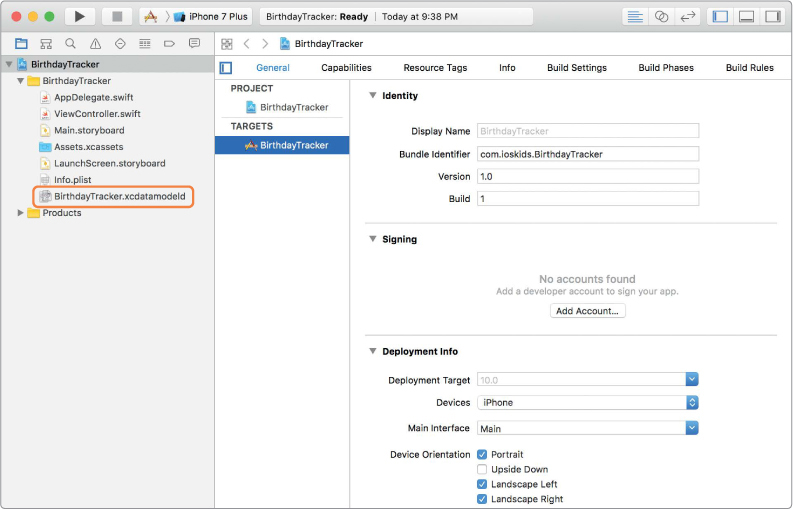
Figure 9-2: Make sure that you have a BirthdayTracker.xcdatamodeld file in your new project.
You need BirthdayTracker.xcdatamodeld to save birthdays on the iPhone. If it’s missing, that means you didn’t check the Use Core Data box when you created the Xcode project. Don’t worry—that’s really easy to fix.
If your BirthdayTracker.xcdatamodeld is missing, close your project (File ▸ Close Project) and start over again by creating a new Xcode project with the Use Core Data box checked. When you’re asked if you want to replace the BirthdayTracker project, just click Replace and you’ll be all set!
Your new BirthdayTracker Xcode project will open. If you haven’t added your Apple account to Xcode, you’ll see a message that says “No accounts found” in the Signing section of the General app settings. You don’t need to add an account unless you want to run the app on a real device. (Remember that you can also run your apps on Xcode’s simulator.) To add your Apple account to Xcode, click the Add Account button. (For more detailed instructions about adding your Apple account, see “Your First App!” on page 5.)
This General settings screen is also where you set the device orientations you want your app to run in. We want the BirthdayTracker app to run only in portrait mode. Portrait mode is the regular orientation of the phone, with the home button on the bottom. Landscape mode is when you turn the phone sideways and the screen rotates as well, so that the width of the screen is now the phone’s height and the height of the screen is the phone’s width. The BirthdayTracker app won’t look that great in landscape mode, so we won’t have the screen change when the user turns their phone sideways. The app would look fine upside down, but it can be disorienting for the user if the screen flips when they turn their phone around with the home button at the top, so we won’t support upside down either. In the Deployment Info section, next to Device Orientation, uncheck the boxes next to Landscape Left and Landscape Right and make sure that Portrait is the only box that’s checked.
Let’s take a look around Xcode. Select ViewController.swift in the left Navigator pane and you should see something like Figure 9-3.
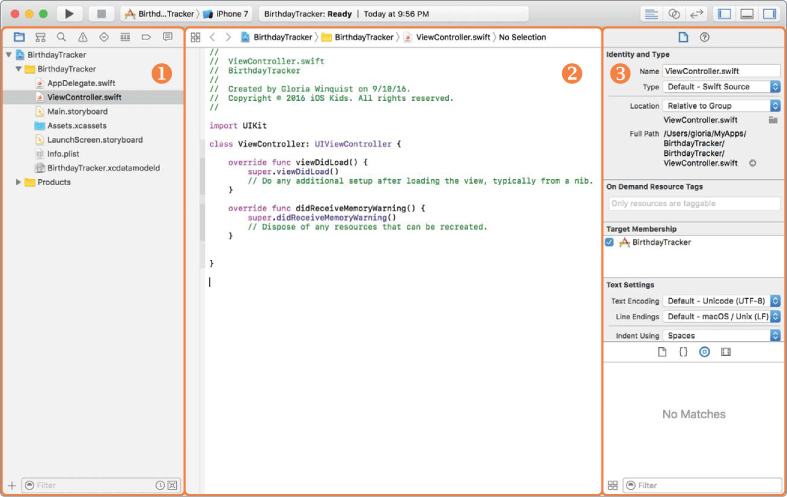
Figure 9-3: Anatomy of an Xcode project window
On the left is the Navigator pane ➊, which you can hide or show by going to View ▸ Navigators ▸ Hide/Show Navigator or by pressing ⌘-0. You’ll use the Navigator to select and view the files in your project.
The Editor pane is in the center of the window ➋. This is where you will write your code! This is also where you can change your app’s settings and lay out the items that will be displayed in the app using the storyboard, which you saw in Chapter 1. We’ll talk more about the storyboard soon.
On the right is the Utilities pane ➌, which you can hide or show by selecting View ▸ Utilities ▸ Hide/Show Utilities or by pressing ⌘-OPTION-0. When the storyboard is open, the Utilities pane will let you configure the size and placement of objects in your app.
ADDING THE APP ICON
Most apps come with some sort of icon that displays on the home screen of the user’s device. We’ll start our BirthdayTracker app by adding an app icon. You can download the two images we’ll use for the icon from https://www.nostarch.com/iphoneappsforkids/. Download the ZIP file, and you’ll have a folder named ch9-images inside your Downloads folder with the image files you need. Once you have these, select Assets.xcassets from the Project navigator. This opens the asset catalog of the app, which is where you put any assets (images, sounds, and so on) that your app is going to use, including the app icon. In fact, the asset catalog already comes with a placeholder where you can add your icon. Select AppIcon from the menu on the left of the catalog, and you should see several placeholders for images.
To add an app icon that will display on the iPhone’s home screen, you need to provide the 2x and 3x images for the icon set labeled iPhone App. The 2x size works for most iPhones, such as the iPhone 5, 6, and 7. The larger iPhones, such as the iPhone 6s Plus and iPhone 7 Plus, use the 3x size images. You’ll learn more about sizing images for different screen resolutions in Chapter 14.
Adding the icons to the asset catalog is easy! After you download the provided images, open your Downloads folder in Finder. Then simply drag the image [email protected] to the iPhone App 2x box and [email protected] to the 3x box. When you are finished, your asset catalog should look like Figure 9-4.

Figure 9-4: We now have an app icon!
In addition to an app icon, apps also have a display name that is shown under the icon on the home page. By default, this is just the app name, BirthdayTracker. However, that name is a bit too long to fit under the app icon, so let’s change it to a shorter name: Birthdays. To do this, go back to the settings page by selecting the BirthdayTracker project in the Project navigator. At the top in the Identity section, you can change the display name of the app. Simply enter Birthdays in the Display Name text field. This will just change the name that’s displayed under your app icon. The name of your project will still be BirthdayTracker.
Now that we have set our app icon and display name, let’s create the app screens!
DISPLAYING YOUR FRIENDS’ BIRTHDAYS
Select Main.storyboard from the Project navigator to bring up the storyboard. This is where we’ll design the user interface of the application. The user interface is just a fancy name for the things the user will see and use to interact with the app—the images, text, buttons, and so on. The storyboard lets you visually organize your app’s screens. We’ll use the storyboard to see all of the screens that are used and the connections between them.
Once you’ve selected Main.storyboard, hide the navigation pane by pressing ⌘-0 so that you have more screen room. Your storyboard should already contain one view controller.
Now take a look at the top of the Utilities pane. You should see a menu with six buttons. These buttons are used to toggle between six inspectors, which are tools that help you look more closely at elements in your storyboard and allow you to change the settings of those elements. When you select one of the inspectors, it will appear in the Utilities pane.
INSPECTING STORYBOARD ITEMS
Figure 9-5 shows a close-up view of the inspector selection bar that appears in the Utilities pane when the storyboard is open.
Figure 9-5: There are six inspectors that you can use in the Utilities pane of the storyboard.
Let’s go through the inspectors from left to right. The page icon opens the File Inspector. This is where you can change settings for the storyboard file. In this book and in most of your applications, you won’t use this inspector.
The next inspector, indicated by a question mark icon, is the Quick Help Inspector. This inspector will give you detailed class information about the item you have currently selected in the storyboard.
The third inspector, with the ID card icon, is the Identity Inspector. This is where you can set a custom class for a storyboard item.
The next two inspectors are the two that you’ll use most often when you work in the storyboard, and we’ll refer to them frequently in the text. The Attributes Inspector has an icon that looks like a shield. This inspector is used to set various attributes of the selected item in the storyboard. It can be used to set the text of a label, the color of a button, or the type of box displayed around a text input field, for instance. The Size Inspector, with the ruler icon, is used to set the size and screen placement of each storyboard item.
Finally, there is the Connections Inspector, which has an icon that looks like an arrow in a circle. This can be used to connect items in your storyboard to pieces of code that you write in your classes. We’ll show you how to do this in Chapter 10.
ADDING THE TABLE VIEW CONTROLLER
Our first view controller will be the Birthdays view controller. This will be a special class of view controller that displays a list, which in Xcode is called a table view controller. In our app, the table view controller will display a list of your friends’ birthdays! For now it’ll just look like an empty screen, and you’ll learn to display the birthday data in “Creating the Birthdays Table View Controller” on page 156.
Let’s add a table view controller to the storyboard. This step is easier if you first zoom out from the storyboard so that you can see the view controllers better. Double-click the whitespace outside of the view controller in the storyboard to do this. Now your screen should be zoomed out.
At the bottom of the Utilities pane is a section with four buttons at the top. Select the third button, which looks like a square inside a circle. This is the Object Library, where you’ll find items to add to your storyboard. Scroll through the Object Library list until you find the Table View Controller, or use the filter bar at the bottom of the pane to search for “table view controller.” Then click and drag that object onto your storyboard. Drop it right next to the view controller that is already there. Your story-board should look like the one in Figure 9-6.
Notice that after you add the table view controller, a Table View Controller Scene entry appears in the outline view on the left, with a Table View Controller inside of it. A scene in your storyboard represents an onscreen area in your app. For an iPhone app, there is usually only one scene on the screen at a time, and that scene fills the entire screen. An iPad app can have two or more scenes on the screen at the same time.
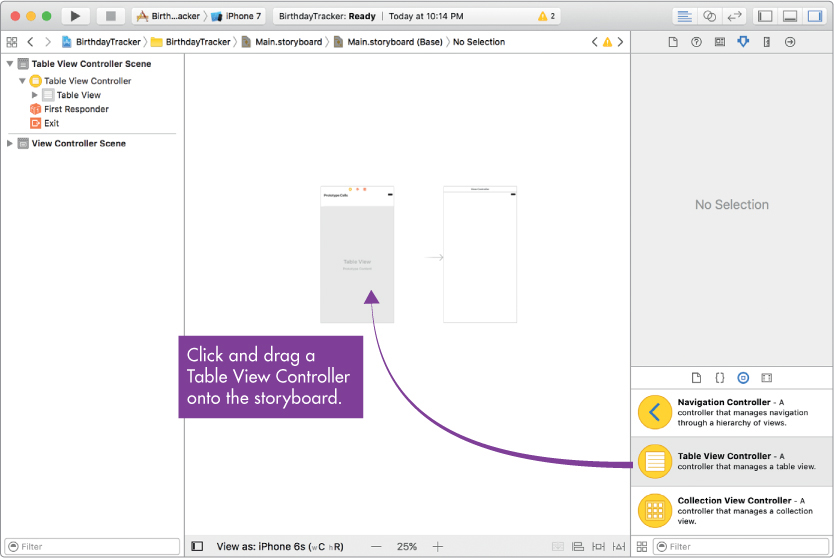
Figure 9-6: Adding a table view controller to the storyboard for the Birthdays screen
The next step is to make this new view controller the first screen that appears when you run the app, since we want the list of birthdays to appear when the user opens the app. The steps to do this are shown in Figure 9-7.
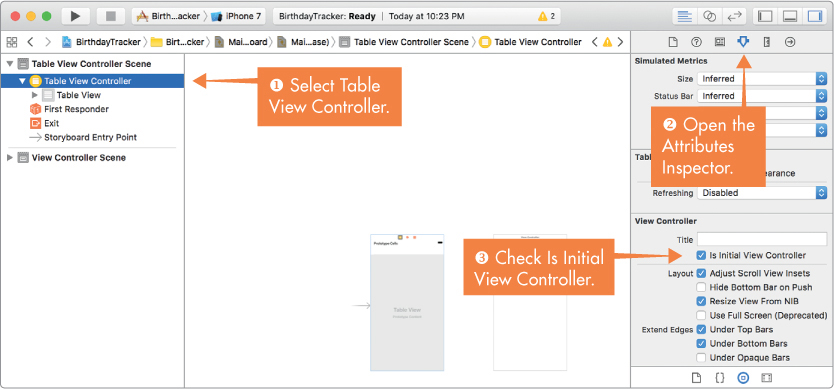
Figure 9-7: Select Table View Controller in the left outline view and make it the initial view controller.
First, select Table View Controller in the outline view ➊. Then bring up the Attributes Inspector in your Utilities pane ➋. There, check the box for Is Initial View Controller ➌. Once you do this, an arrow should appear to the left of your table view controller in the storyboard. The arrow means that the app will show this view controller when it first starts up.
ADDING THE NAVIGATION CONTROLLER
Now we’ll add a title to the view controller that says “Birthdays” and an Add button that will bring up the Add a Birthday view controller. To do this, we’ll first put the table view controller into a navigation controller. A navigation controller manages one or more view controllers. It comes with a navigation bar, which sits at the top of the view controller. The navigation bar can display a title for the view controller along with buttons to the right and left sides that navigate to other screens in the app. You see this bar at the top of the screen in several iOS apps, such as the Settings app and Messages app.
Select Table View Controller in the outline view. Once you’ve selected it, you’ll need to embed the table view controller into a navigation controller using the Xcode menu. Go to Editor ▸ Embed In ▸ Navigation Controller.
After the table view controller is embedded into a navigation controller, your storyboard should look like the one in Figure 9-8. The navigation controller will show up as a screen in the storyboard.

Figure 9-8: The navigation controller
Each view controller in a storyboard represents one screen of your app that the user will see, but a navigation controller is a bit different. Even though it looks like a separate screen in the storyboard, a navigation controller is really just a container that holds the other view controllers that user moves between in your app. Embedding a view controller inside a navigation controller means your app can navigate from one view to another and back again.
You should see gray navigation bars at the top of the navigation controller and the table view controller. When the app is run, the navigation bars tell the user the title of the screen they are on and may also contain buttons and arrows they can use to go to other screens. In order to use the navigation bar to tell the user what screen they are on, we’ll need to title our screens. Now is a good time to zoom back in on the story board. Double-click in the whitespace of the storyboard to zoom in, and then scroll the view so that you can see the table view controller. To add a title to the table view controller, click Navigation Item under Table View Controller Scene in the outline view on the left.
When this is selected, you can enter a title for the screen in the Attributes Inspector on the right. We want the navigation bar to display “Birthdays” for the title, so enter Birthdays in the Title field on the right. You should see that after you complete this step and press RETURN, the Table View Controller Scene entry in the outline view automatically updates to Birthdays Scene.
Next, we’ll make an Add button so you can add birthdays!
ADDING A BUTTON
We want users to be able to open the app, look at their list of birthdays, and add a birthday to that list. Let’s make a button that lets them do that!
We need to add a button to the navigation bar that leads to the Add a Birthday scene so that the user can input a birthday. Find the Bar Button Item in the Object Library and then drag and drop it onto the right side of the table view controller’s navigation bar, as shown in Figure 9-9.
Now we want to turn this button into an Add button. Lucky for us, Xcode has a built-in Add button we can use. In the Attributes Inspector, change the System Item of the bar button item to Add. You should see the button turn into a plus sign (+).
Next, we need to tell the button what to do when it is tapped. We want it to open up the Add a Birthday view controller, so we need to connect the Add button to that view controller. First, double-click the storyboard to zoom out, just to make sure that you can see both the Birthdays table view controller and the plain view controller that will eventually become your Add a Birthday view controller. Hold down CONTROL and drag from the + button to the middle of the empty view controller on the right side of your storyboard. Let go of the mouse when the view controller is highlighted. That will bring up a connection dialog like the one in Figure 9-10.

Figure 9-9: Drag a Bar Button Item onto the navigation bar of the Birthdays view controller.
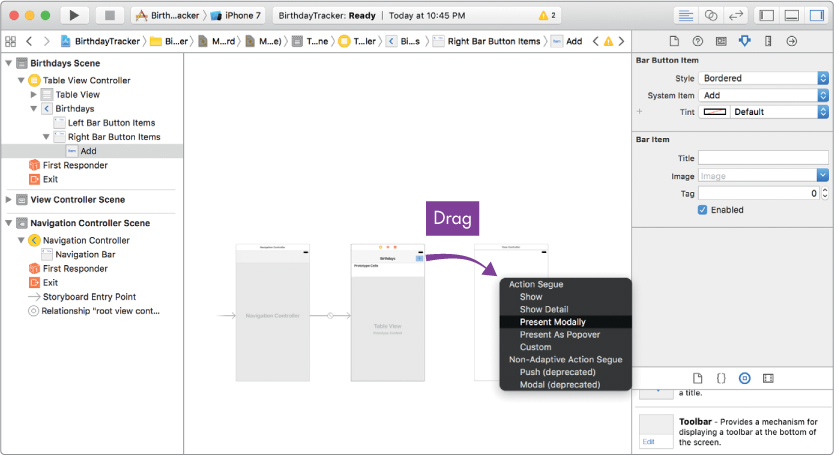
Figure 9-10: Drag from the Add button to the neighboring view controller and select Present Modally in the dialog that appears.
The connection dialog gives you several options for the kind of segue—the transition from one screen to the next—you want to make between the two view controllers. Click the Present Modally option in the connection dialog. This will make the view controller come onto the screen as a modal view controller. On the iPhone, a modal view controller comes onto the screen from the bottom of the phone, and it does not automatically come with a back button to return to the previous screen. Instead, a modal can have other buttons, like Cancel or Save. There are other types of segues, like the Show segue, in which a view controller is pushed onto the screen from the right and which has a back button on the left side of the navigation bar.
In an iOS app, when you present a screen for getting and saving user input, the screen should be shown as a modal with a Cancel button. Otherwise, if you use something like a Show segue with a back button, you could have a situation in which the user enters all of their input and then taps the back button without saving anything! With a Cancel button, the user has to tap deliberately to cancel out of the screen.
To see a good example of a modal input view controller, take a look at the Calendar app on your iPhone or iPad. When you open it up, there is a + button on the right side of the navigation bar that you can tap on to add a calendar event. Tapping the + button brings up a modal New Event view controller. This view controller has a Cancel button on the left to cancel out of the screen without saving and an Add button on the right to create the new event before dismissing the modal. You should see that the New Event modal comes onto the screen from the bottom and then goes back down when it is dismissed. We want the user to save birthdays, so we’ll also use a modal.
Now let’s try running our app to see what we’ve done so far! To run the app, first choose a device simulator by clicking the device listed next to BirthdayTracker in the upper-left corner of Xcode (see Figure 9-11).
Figure 9-11: Set the device that the simulator will run in the top left of the Xcode window next to your app’s name. Here, the device is set to iPhone 7.
This will bring up a list of device options for running your app. We’re going with the iPhone 7. After you have chosen your simulator, click the play button in the upper-left corner or use the keyboard shortcut ⌘-R.
When the simulator opens to run your app, you can adjust its size if it’s too large to fit on your computer screen. Click the simulator to select it and then go to Window ▸ Scale and select a smaller scale in the simulator menu.
So far, not too much happens when you run the app. You should see your first Birthdays screen with a + button, as shown earlier in Figure 9-1. Obviously, at this point, your Birthdays screen will be empty. Tapping the + button will bring up a second empty screen. Once you’ve finished looking at your app, close it by clicking the stop button in Xcode, which is next to the play button you pressed earlier. When you stop the app, you should now see your app icon on the home screen of the simulator! (See Figure 9-12.)
That’s it! We now need to configure that second screen so that it can be used to add a birthday!
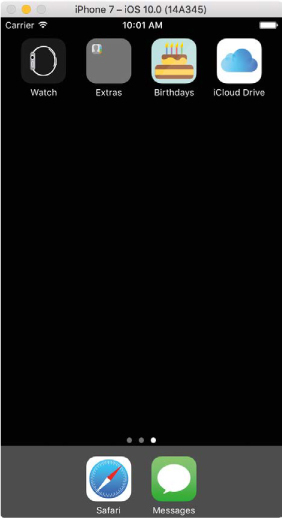
Figure 9-12: The BirthdayTracker app icon has been added to the home screen.
SETTING UP CONTROL INPUTS AND LABELS
Let’s start designing the Add a Birthday view controller by adding its title. To do this, you’ll need to embed it in a navigation controller of its own. When a view controller is a modal, it doesn’t inherit the navigation bar from the navigation controller already on our storyboard. The navigation controller is what provides a navigation bar, so we need to embed the modal view controller in its own navigation controller. Select the plain view controller by clicking it in the storyboard. Then go to Editor ▸ Embed in ▸ Navigation Controller. Now you should see that a navigation item has been added to the outline view under View Controller Scene. Click this new navigation item and then add the title Add a Birthday in the Attributes Inspector. These are the same steps that you followed when adding the title “Birthdays” to your table view controller.
Now when the Add a Birthday view controller appears in the app, it will be labeled with its title at the top.
ADDING YOUR FRIENDS’ NAMES AND BIRTHDAYS
When you enter your friends’ birthdays in Chapter 10, each entry in your app will have a first name, a last name, and a birthdate. Let’s add some input controls to the Add a Birthday view controller so that the user can enter all of that information for each person. Input controls are things like text fields or drop-down menus that let users enter data into your apps. We’ll get started by adding the input control labels for all the information users can add.
Adding and Positioning Labels
Let’s make a label that says “First Name” for your Add a Birthday view controller. This label will be next to a text field where you’ll input your friends’ first names. Find and drag a label object from the Object Library onto the Add a Birthday view controller (see Figure 9-13).

Figure 9-13: Add a label to the Add a Birthday view controller.
Next, change the display text for the label. In the Attributes Inspector, click the Label text box and enter First Name as the display text, as shown in Figure 9-14.
Now we want to set the size and position of the label using the Size Inspector. In the Xcode storyboard, width and height are measured in points. Note that 1 point is not 1 pixel. Depending on what type of device your app is running on, 1 point will translate into either 1 pixel, a 2×2 pixel square, or a 3×3 pixel square. These three scale factors are referred to as @1x, @2x, and @3x (the same sizes we talked about when we set up our app icon). Devices also don’t all have the same point resolution and can range from 320 to 1,024 points wide and 568 to 1,366 points tall.
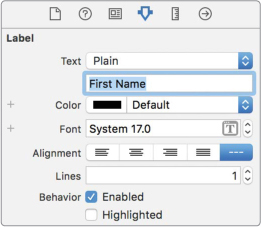
Figure 9-14: Making the label display First Name
Only the oldest models of iPhones and iPods use a @1x scale factor, and you won’t be able to run your app on those models (BirthdayTracker will support only iOS 10+). Chances are your phone or iPod uses a @2x scale factor unless it is an iPhone 6 Plus, 6s Plus, or 7 Plus, which use a @3x scale factor.
An object’s position on the screen is also based on points. The x-position of the object is the distance in points from the left side of the screen to the left side of the object. The y-position is the distance from the top of the screen to the top of the object. (See Figure 9-15.) We’ll set the x-position and y-position of every library object we add to the view controller.

Figure 9-15: Showing the x-position, y-position, width, and height of an object on the screen
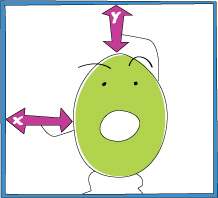
We want to position our first label so that it’s not on the edge of the screen but still leaves enough room for its text input field and the other labels and inputs. In the View section of the Size Inspector, set the x-position to 20, the y-position to 100, and the width to 100. Leave the height as 21.
After you’ve done this, repeat these steps to add two more labels to the Add a Birthday view controller: a Last Name label and a Birthdate label. We’ll need to position our other labels and inputs so that they don’t overlap. In some cases, this might get tricky and could take some time. For this app, we’ve calculated places for you to put your objects in an iPhone 7 screen. Later, we’ll explain how to make your app work with other devices. Table 9-1 lists the sizes and positions that you should give to each label.
Table 9-1: Settings for Input Labels in the View Controller
Display text |
X-position |
Y-position |
Width |
Height |
|---|---|---|---|---|
First Name |
20 |
100 |
100 |
21 |
Last Name |
20 |
170 |
100 |
21 |
Birthdate |
20 |
250 |
100 |
21 |
You can see that all of the labels have the same x-position so that they line up vertically, but they each have a different y-position. Each label has a height of 21, so the y-positions need to be at least 21 points greater than the next closest label. Since we’re adding our input controls underneath each label, too, we’ve made the y-positions larger to accommodate both the height of the label and the height of the input controls.
Great! Now your storyboard should look like the one in Figure 9-16.
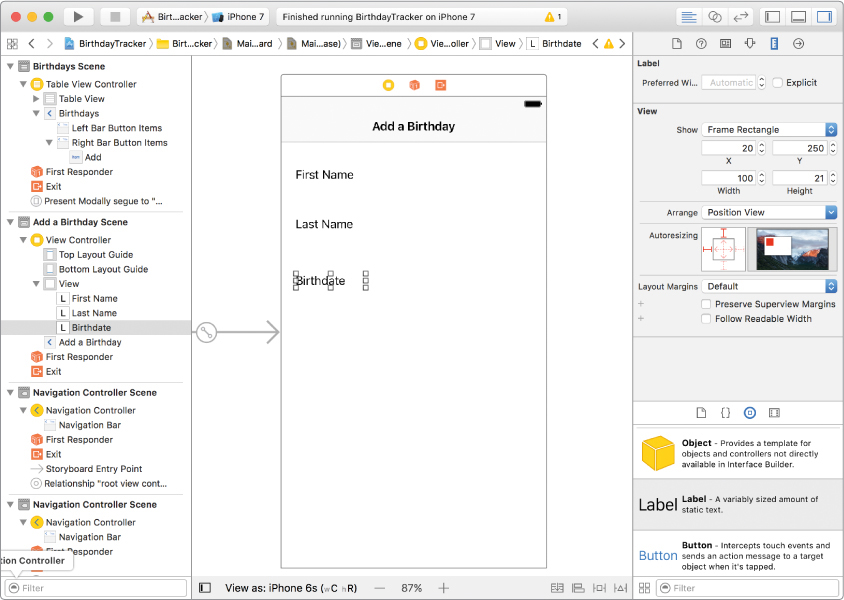
Figure 9-16: Labels for inputs have been added to the view controller.
Next you’ll add two text fields, which will let you enter first and last names. A text field is a UI element of the UITextField class, which is used to display an editable text area on your screen. When the user taps in a text field, the keyboard will automatically come up, and they will be able to enter a line of text into the field.
Adding Text Fields
Drag two text field objects from the Object Library onto your view controller. One will be used to enter first names, and the other will be used to enter last names. Give the two text fields the sizes and positions seen in Table 9-2. You do this using the Size Inspector, just as you did for the labels.
Table 9-2: Text Fields for Inputs in the View Controller
Text field |
X-position |
Y-position |
Width |
Height |
|---|---|---|---|---|
First Name |
20 |
130 |
335 |
30 |
Last Name |
20 |
200 |
335 |
30 |
The last thing you need to add is a wheel called a date picker. This will let you easily input birthdates.
Adding the Date Picker
The date picker is the standard tool used in iOS apps to allow a user to select a date or a time. It can contain both a date and a time, like the date picker used in the Calendar app (see Figure 9-17).

Figure 9-17: The date picker is used for date selection when adding an event in the Calendar app.
The date picker can also show just the time, like the date picker used for adding an alarm in the Clock app, or just the date, which is what we will use in BirthdayTracker.
Scroll through the Object Library until you find a date picker and then click and drag it onto the view controller under the Birthdate label. Using the Size Inspector, make the x-position 0 and the y-position 280.
You’ll want to tweak a couple of the date picker’s properties. Click the date picker to select it. Then, in the Attributes Inspector, set the Mode of the date picker to display Date instead of Date and Time (see Figure 9-18).
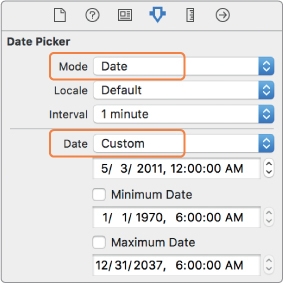
Figure 9-18: Change the date picker’s settings.
The date picker is set to display the current date by default. Let’s change this date to be your birthdate instead! Change the Date field from Current Date to Custom. When you do this, a new box will appear. Change this date to your birthdate.
Let’s test how the app works so far by running it! The sizes that we have used for our input controls fit well on an iPhone 7 screen. So select the iPhone 7 simulator and hit the play button in the top-left corner. This time, when you hit the + button on the Birthdays view controller, the Add a Birthday screen should display, as shown in Figure 9-19.
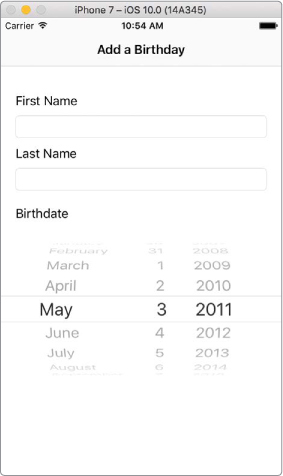
Figure 9-19: The text fields and date picker fit perfectly on the iPhone 7 screen.

This looks great on the iPhone 7, but what about other devices? Choose a smaller simulator to run the app on, like the iPhone 5s, and run the app again. You’ll see that things don’t look quite right.
All the elements that you added to the storyboard appear, but the text fields are running off the edge of the screen. Now that you have all of your elements on the screen, the next step is to make them fit correctly on any screen size. We’ll do this with a tool called auto layout.
MAKING YOUR APP LOOK PERFECT ON EVERY DEVICE WITH AUTO LAYOUT
The iPhone alone comes in three different screen sizes, and it’s possible that more sizes will be coming in the future. You’ll want to design your apps so that they look good on any device. This means that you’ll want your app to adjust the positions and sizes of everything in the app to suit the device that your app is running on. Auto layout uses something called layout constraints to place the elements on the screen. You’ll need to add these constraints in the storyboard.
First, select View Controller in the outline view in the left panel. Next, take a look at the four icons in the bottom-right corner of the Editor pane (see Figure 9-20).
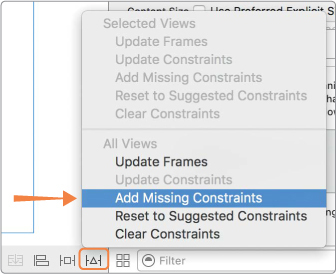
Figure 9-20: To add auto layout constraints, bring up the auto layout menu by clicking the fourth icon at the bottom of the Editor.
At the bottom of the screen’s storyboard pane is a ribbon with icons, and the rightmost icon before the Utilities pane is a triangle between two vertical lines. Hover your mouse cursor over that icon, and it should show a label that says Resolve Auto Layout Issues. Click this icon to bring up a menu of suggestions. Click Add Missing Constraints.* When you do this, you’ll see that a whole bunch of layout constraints were added to the Add a Birthday scene.
These auto layout constraints make sure that each element is sized correctly to fit onto the screen. For example, auto layout makes it so that the date picker is sized to fit the width of the screen and does not run off its edge. Auto layout will also make sure that there are 20 points before and after each text field so that they are centered nicely on the screen.
Now run the app again on the iPhone 5s simulator. This time, the Add a Birthday screen should look perfect.
ADDING SAVE AND CANCEL BUTTONS
To finish things up, we’ll show you how to make Cancel and Save buttons for the Add a Birthday view controller’s navigation bar. The buttons won’t do anything just yet. We’re just going to set them up. In Chapter 10, we’ll add some code so that they cancel out of the Add a Birthday screen and save a birthday to the app.
To add the Save button, drag a Bar Button Item from the Object Library and place it on the right side of the navigation bar. We’re going to change this button into a Save button, just like we did with the Add button. Select the button item, and then use the Attributes Inspector to turn it into a Save button.
Finally, let’s add the Cancel button. Drag another Bar Button Item from the Object Library, and this time place it on the left side of the navigation bar. Use the Attributes Inspector to turn it into a Cancel button, just like you did with the Save button. Your view controller should look like the one shown in Figure 9-21.

Figure 9-21: Input view controller with Cancel and Save buttons
Now run your app again to see the new buttons!
Tapping the + button on the Birthdays table view controller should bring you to the Add a Birthday view controller, where you can enter a person’s name and birthdate. Tapping on the Cancel and Save buttons doesn’t do anything just yet—we’ll implement both of those in Chapter 10!
WHAT YOU LEARNED
In this chapter, you started making a BirthdayTracker app by creating the basic user interface for the Birthdays and Add a Birthday screens. You also created the Birthdays screen using a table view controller and made it so that users can navigate between screens using an Add button and a navigation controller.
Now that you have the basic skeleton of your app working, you’ll spend Chapter 10 programming the Cancel and Save buttons so you can add and save birthdays in the app!