12
SAVING BIRTHDAYS

Now you can add birthdays to your app and display them in a list, which is awesome! However, when you close the app, the birthdays disappear from your device. In this chapter, we’ll show you how to save your app’s data on your device so it’s there even after you quit the app.
STORING BIRTHDAYS IN A DATABASE
Data is stored on the iPhone in a database, which is a collection of data that can be quickly saved, updated, and retrieved. You can think of it as an electronic filing system where the data is stored in tables with rows and columns. In the database for our app, there will be a Birthday table to store the birthdays. This will look something like Table 12-1.
Table 12-1: A Birthday Table in a Database
firstName |
lastName |
birthdate |
Jen |
Marbury |
October 8, 2004 |
Tezeta |
Tulloch |
April 28, 2003 |
Betsy |
Nichols |
January 27, 2005 |
Caroline |
Greeven |
June 12, 2004 |
Each row will contain one Birthday object, with the columns containing its firstName, lastName, and birthdate attributes.
Core Data is an Apple framework that you can use to save and retrieve data in a database. The objects stored in the Core Data database all have to come from subclasses of the NSManagedObject class. These subclasses are called managed objects because their lifecycles are managed by the Core Data framework. That means you can’t create a managed object using the init() methods that we covered in Chapter 8. Instead, you need to use a special NSManagedObject initializer.
The easiest way to add Core Data to your project is to have Xcode do it automatically. To do this, whenever you create a new project, start with a Single View Application and check the Use Core Data box in the new project options. You should have already completed this step when you created the BirthdayTracker project in Chapter 9. When you create a new project using Core Data, Xcode gives you a data model file and setup code in the AppDelegate.swift file. You need this code to save data, but you can adjust it to use for your own app.
Every iOS application has a special application delegate that is automatically created as an instance of the AppDelegate class. The application delegate is in charge of the application lifecycle, which refers to the various running states an app can be in. For the BirthdayTracker app, the application delegate will also manage the data storage. We’ll show you how to work with the application delegate to save and fetch data in “Saving a Birthday” on page 178.
THE BIRTHDAY ENTITY
In your app, you want to save and retrieve managed Birthday objects. To do this, you need to create a Birthday entity that will model the Birthday class. You can think of an entity as a table in the Core Data database.
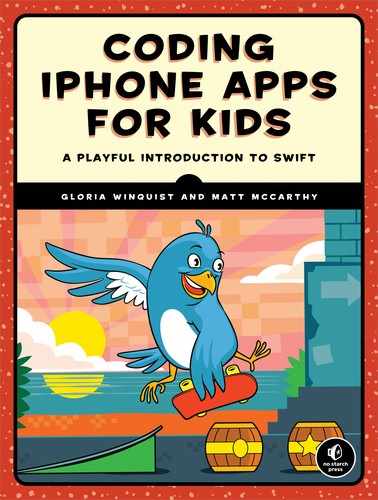
In your Project navigator, you should see a data model file called BirthdayTracker.xcdatamodeld. Click that file and you’ll see an empty data model. In the lower-left corner of the model, click the Add Entity button. This will create a new entity, which appears under Entities with the default name Entity. Double-click its name to get an editable text field, and then change its name to Birthday (see Figure 12-1).
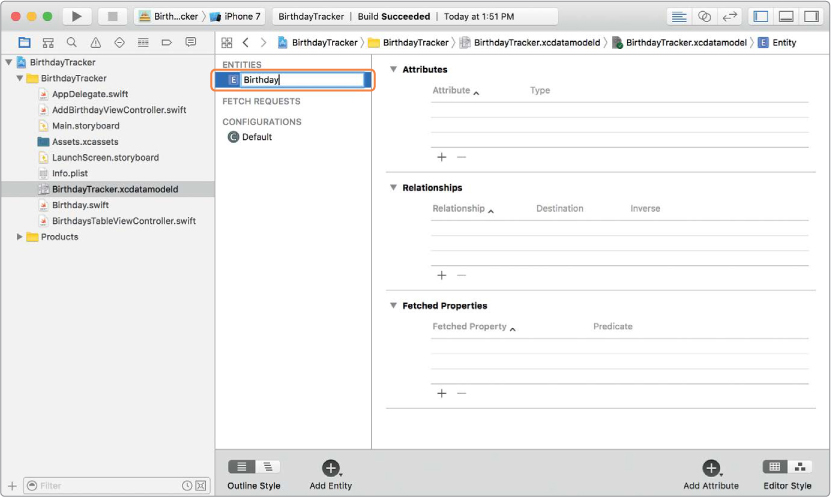
Figure 12-1: Double-click the entity to change its name.
Next, you’ll add attributes to the Birthday entity so that you can store a firstName, lastName, and birthdate for each Birthday object.
THE BIRTHDAY ATTRIBUTES
Just as a class has properties, an entity has attributes. A Core Data entity has to have a corresponding class in Swift with properties that match the entity’s attributes. Your Birthday class has three properties—firstName, lastName, and birthdate—which means that the Birthday entity needs to have three attributes with the same names. We’re also going to add a birthdayId attribute—a unique string to identify each birthday. We’ll need this in Chapter 13 when we remove a birthday and its corresponding user notification from the app.
Let’s create the attributes now. Click the Add Attribute button to add a new attribute to the Birthday entity. Call it firstName by typing firstName in its editable text field under Attribute. Next, use the Type drop-down menu to set the type to String (see Figure 12-2).
When you’ve done this, add the lastName and birthdayId attributes, also as String types. Finally, add the birthdate attribute, but make it a Date type. When you’re finished, your data model should look like the one shown in Figure 12-3.
Figure 12-2: Add a firstName attribute of type String to Birthday.

Figure 12-3: The BirthdayTracker data model with a Birthday entity
Now that your data model is set up, Xcode has created a Birthday NSManagedObject subclass behind the scenes to go with it, which will be used to store birthdays. This means that we can remove our original Birthday class from the code. We have a new Birthday class that makes managed Birthday objects to store in the device’s database, so we no longer need the temporary Birthday class that we created.
CONTROL-click Birthday.swift in the Project navigator to bring up the menu shown in Figure 12-4. Choose Delete.

Figure 12-4: Delete the Birthday.swift file.

Next, you’ll see a dialog asking if you want to Remove Reference to the file or Move to Trash. Removing a reference to your file removes the file from your project but doesn’t actually delete the file in case you need to use it for something else. Since we won’t use Birthday.swift anymore, you can delete it entirely. Select Move to Trash.
THE APPLICATION DELEGATE
We’ll show you how to save birthdays on your device soon. To do this, you’ll need to access the application delegate in your code. Remember, in our app, the code to manage Core Data is inside the application delegate.
When you create a new iOS application using Xcode, an AppDelegate .swift file is automatically created for you. This file contains the AppDelegate class, which implements the UIApplicationDelegate protocol, which in turn creates the application delegate for the app. Every app has only one application delegate, and the application delegate is in charge of the app’s lifecycle.
On an iOS device, a user typically sees and interacts with only one app at a time. This is called the foreground app. When the user hits the home button on their iOS device or switches to another app, the app they were using gets backgrounded. That means that the current app is no longer visible and another app can be brought to the foreground. A background app can still execute some code for a short time, but it will eventually be suspended, or paused. A backgrounded or suspended app can be brought back to the foreground quickly when the user switches back to it because it’s still in the device’s memory. When an app is fully closed, it is terminated. A terminated app must be relaunched from scratch if the user opens it again.
The application delegate knows when the app has finished launching, been backgrounded, come back to the foreground, or been terminated. The AppDelegate class contains six callback functions that will be called when the application goes into its different lifecycle states:
application(_:didFinishLaunchingWithOptions:) is called when the app is launched. If you want your application to do something as soon as it has launched, you can write code in this callback function.
applicationWillResignActive(_:) is called when the app is leaving the foreground state.
applicationDidEnterBackground(_:) is called when the app has entered the background state, where some code can be executed but the app can still be suspended at any time.
applicationWillEnterForeground(_:) is called when the app is leaving the background state and about to go to the foreground state.
applicationDidBecomeActive(_:) is called when the app is going to the foreground state and has become active again.
applicationWillTerminate(_:) is called when the app is running in the foreground or background and is being closed. This won’t be called if the app is suspended when it is closed.
When you create a new project using Core Data, Xcode will automatically have the AppDelegate class manage the data storage for you. In the AppDelegate.swift file, you’ll see that the AppDelegate class contains a persistentContainer property, which you’ll need to save and access data. On the persistentContainer is a NSManagedObjectContext property called viewContext. When we save and fetch birthdays in our code, we’ll need to access persistentContainer.viewContext directly. Let’s see how that is done.
Accessing the Managed Object Context
The managed object context is like a scratch-pad object that is used to create, save, and fetch data from the database. It temporarily stores the data you need. From anywhere in your application, you can access the managed object context using these two lines of code (we’ll tell you where to add them later, so for now, just focus on understanding what they do):
➊ let appDelegate = UIApplication.shared.delegate as! AppDelegate
➋ let context = appDelegate.persistentContainer.viewContext
The purpose of this code is to get the managed object context for your application and to store it into a simple constant that you can use to create and save birthdays. At ➊, you are creating a constant reference to your app’s application delegate. You do this by using the shared property of UIApplication to return your application instance (that is, your currently running app). Once you have the current application instance, you cast the delegate property in that instance as an AppDelegate and store it in the constant appDelegate. The line at ➋ retrieves the viewContext, which is in the persistentContainer of appDelegate, and stores it in a constant called context.
Now that you’ve accessed the managed object context, you’re ready to save some birthdays! You use the context to create a new birthday, and then when you want to save the birthday, you just save the context.
Saving a Birthday
Let’s save a birthday on the iPhone! Open AddBirthdayViewController.swift. The first step is to import Core Data, which you need to do for any file in which you want to use Core Data. Add the following to the top of the file.
AddBirthdayViewController.swift
import UIKit
import CoreData
Next, take a look at the saveTapped(_:) method. Delete the following lines:
➊ let newBirthday = Birthday(firstName: firstName, ![]() // ← Remove this code
// ← Remove this code
lastName: lastName, birthdate: birthdate) // ← Remove this code
➋ delegate?.addBirthdayViewController(self, ![]() // ← Remove this code
// ← Remove this code
didAddBirthday: newBirthday) // ← Remove this code
We’re not going to use the initializer to create newBirthday anymore, so you can get rid of the line at ➊. In addition, we don’t need to use a delegate to pass a birthday to the Birthdays table view controller (you’ll see why shortly), so you can also get rid of the line at ➋.
Now we’ll add code inside the saveTapped(_:) method. We need to get the managed object context to create and save a Birthday. First, add the two lines of code we talked about in “Accessing the Managed Object Context” on page 178:
let firstName = firstNameTextField.text ?? ""
let lastName = lastNameTextField.text ?? ""
let birthdate = birthdatePicker.date
let appDelegate = UIApplication.shared.delegate as! AppDelegate
let context = appDelegate.persistentContainer.viewContext
dismiss(animated: true, completion: nil)
After you’ve accessed the context, you can use it to create a Birthday. Add the following lines to saveTapped(_:) right after setting context.
let appDelegate = UIApplication.shared.delegate as! AppDelegate
let context = appDelegate.persistentContainer.viewContext
➊ let newBirthday = Birthday(context: context)
➋ newBirthday.firstName = firstName
➌ newBirthday.lastName = lastName
➍ newBirthday.birthdate = birthdate as NSDate?
➎ newBirthday.birthdayId = UUID().uuidString
➏ if let uniqueId = newBirthday.birthdayId {
print("The birthdayId is (uniqueId)")
}
dismiss(animated: true, completion: nil)
Each NSManagedObject subclass comes with a default initializer that takes a context and will create a new managed object. At ➊, we create a birthday by using a new Birthday initializer and passing in the context created in the line above. After newBirthday is created, we can set its firstName ➋, lastName ➌, and birthdate ➍ properties. Notice how this is different from our old initializer, where we passed in all of the Birthday class’s properties. Here, we first create the newBirthday and then set its properties line by line. One extra thing that we have to do at ➍ (as of Xcode Version 8.2.1) is to cast the birthdate attribute to an NSDate object. NSDate was used in older versions of Swift and has been updated to Date. However, dates in Core Data have not yet been updated to use the new Date class, so we have to cast our birthdate attribute to NSDate to ensure we get the right value from the database.

We also want to set that birthdayId field to be a unique identifier for each birthday. This is kind of like how the United States government issues each of its citizens a Social Security number. No two people can have the same number. In computer programming, objects often need to have unique identifiers, which are called universally unique identifiers (UUIDs). Swift has a UUID class that will make a UUID String for us. We use this class at ➎ when we set the birthdayId of newBirthday to UUID().uuidString. This property of the UUID class will return a new unique value every time it’s called. If you want to see the value of the birthdayId, you can add a print statement ➏, and you’ll see something like the following printed every time you add a birthday:
The birthdayId is 79E2B0EF-2AD5-4382-A38C-4911454515F1
Next, we need to save newBirthday. To do that, we call the save() method on the context. This is kind of like saving changes to a computer document after you’re done working on it. The managed object context is like your document, and you’ve added a birthday to it, so now you want to save that document. Add these lines after setting the properties:
if let uniqueId = newBirthday.birthdayId {
print("The birthdayId is (uniqueId)")
}
➊ do {
➋ try context.save()
➌ } catch let error {
➍ print("Could not save because of (error).")
}
dismiss(animated: true, completion: nil)
Now this is something new! We’ve wrapped our method to save the context inside a do-try-catch block, which is used in Swift to handle errors. In most simple applications, you’ll only use the do-try-catch block around methods called on a managed object context, so this book will just cover how to use it in that situation. When you want to call a method such as save() on a context, you need to wrap the method in a block that starts with the keyword do ➊. This tells Swift to run the code inside of the do block’s braces. Next, you need to put the keyword try in front of the method call ➋. The try keyword tells Swift that it should try to run the method, but if the method doesn’t work, it will throw an error that Swift needs to catch.
The try keyword is used only in front of methods that throw errors, like this context.save() method. A method that throws an error will have the keyword throws after the input parameters in its definition. For example:
func save() throws
If you try to call the context.save() method without using do-try-catch, Xcode will give you an error.
Finally, the last part is a catch block, to catch any errors thrown by the context.save() method ➌. If the context.save() method fails and you want to find out what happened, you can print the error that was thrown and then caught ➍.
Now you’re saving all of the birthdays that are entered into the app. But before we run the app again, we still need to have our Birthdays table view controller grab all of the birthdays out of the database to display them.
Getting the Birthdays
The Add Birthday view controller saves each birthday that is added to your app onto your device. Now let’s fetch the birthdays—that is, get the Birthday objects out of Core Data—so that they can be displayed in the Birthdays table view controller.
First, add import CoreData to the top of the BirthdaysTableViewController file, just like you did to the AddBirthdayViewController. This import statement must be included at the top of every file that uses the framework, or Xcode won’t recognize classes or methods used by Core Data.
Next, we need to write the code to fetch the birthdays we want to display. The list of birthdays should be refreshed every time the Birthdays table view controller’s view appears on the screen. That way, when you add a birthday and then dismiss the Add Birthday view controller, the Birthdays table view controller will appear showing the new birthday as part of the list.
There is a built-in method called viewWillAppear(_:) in the UIViewController class where we can fetch the birthdays and put them in the birthdays array each time the Birthdays table view controller comes onto the screen. Add the following code right after the viewDidLoad() method:
BirthdaysTableViewController.swift
override func viewDidLoad() {
--snip--
}
➊ override func viewWillAppear(_ animated: Bool) {
➋ super.viewWillAppear(animated)
➌ let appDelegate = UIApplication.shared.delegate as! AppDelegate
➍ let context = appDelegate.persistentContainer.viewContext
➎ let fetchRequest = Birthday.fetchRequest() as NSFetchRequest<Birthday>
do {
➏ birthdays = try context.fetch(fetchRequest)
} catch let error {
print("Could not fetch because of error: (error).")
}
➐ tableView.reloadData()
}
The function viewWillAppear(_:) ➊ is a UIViewController lifecycle method similar to viewDidLoad(). Whereas viewDidLoad() will be called only once when the view controller is first created, viewWillAppear(_:) will be called every time the view appears on the screen. This makes it a very useful place to put code that you want to execute each time a view appears or reappears.
If you are going to implement viewWillAppear(_:), make sure to call super.viewWillAppear(_:) ➋ so that you still get the built-in functionality of the UIViewController’s viewWillAppear(_:) method. In this case, you want to pass the animated parameter into that method as well. The animated parameter is a Boolean that tells the app whether the view will animate (that is, slide onto the screen).
To fetch data from the database, you need to access the managed object context of the app delegate. The lines at ➌ and ➍ get you the context that you’ll use to fetch the data. This is the same way that you got the context to save a Birthday in the Add Birthday view controller.
Next, you need to create an NSFetchRequest object. The line at ➎ creates an NSFetchRequest that will get all of the Birthday objects out of Core Data. It uses the class method fetchRequest() that Xcode created automatically in your Birthday+CoreDataProperties.swift file. Note that when you create the fetchRequest, you need to cast it as an NSFetchRequest<Birthday> data type so that it knows what type of objects to get out of the database.
Once you have the fetchRequest, you can have your managed object context perform its fetch(_:) method with it. The fetch(_:) method ➏ will return an array of objects of the data type specified in the fetchRequest. In this case, we’ll get back an array of Birthday objects that we can assign to the birthdays array. This line is wrapped in a do-try-catch error-handling block, much like the one we used to save the birthday in the Add Birthday view controller. Swift uses this type of error handling when fetching objects out of Core Data so that the error can tell you what happened if the fetch doesn’t work.
Finally, after the birthdays have been fetched, we need to reload the table view so that we can see the new birthdays ➐.
We still have to take care of a few more things before we can run the app and test out our saved birthdays.
CODE CLEANUP
You’ll find that when you write your apps, it’s very common to do something one way and then figure out that there is a better way to do it. When you improve code you’ve already written, that’s called refactoring your code. Let’s start by cleaning up and getting rid of old code we don’t need anymore.

In Chapter 11, we used delegation to have the Add Birthday view controller tell the Birthdays table view controller each time a Birthday was added so that it could be displayed. Now we don’t need to do that. Instead, we’ll have the Birthdays table view controller fill its birthdays array by pulling the saved Birthday objects out of the database every time it comes on the screen. This means that we can get rid of the AddBirthdayViewControllerDelegate and all of the code that goes with it!
To do so, delete the entire AddBirthdayViewControllerDelegate protocol and its function, addBirthdayViewController(_:didAddBirthday:):
AddBirthdayViewController.swift
protocol AddBirthdayViewControllerDelegate { // ← Remove
func addBirthdayViewController(_ ![]() // ← Remove
// ← Remove
addBirthdayViewController: AddBirthdayViewController, ![]() // ← Remove
// ← Remove
didAddBirthday birthday: Birthday) // ← Remove
} // ← Remove
As soon as you delete this, you’ll see a red error next to the delegate property in the AddBirthdayViewController class. Delete that line of code as well:
var delegate: AddBirthdayViewControllerDelegate? // ← Remove
Next, click the BirthdaysTableViewController to open that file. Because the AddBirthdayViewControllerDelegate protocol no longer exists, you can’t have the BirthdaysTableViewController class adopt this protocol, so there will be an error next to the BirthdaysTableViewController definition. Remove the comma and AddBirthdayViewControllerDelegate from this line of code:
BirthdaysTableViewController.swift
class BirthdaysTableViewController: UITableViewController ![]()
, AddBirthdayViewControllerDelegate ![]() // ← Remove
// ← Remove
{
so the BirthdaysTableViewController declaration should now look like this:
class BirthdaysTableViewController: UITableViewController {
Now you can remove two sections in the BirthdaysTableViewController.swift file. Remove all of the code below and including the comment // MARK: -AddBirthdayViewControllerDelegate because AddBirthdayViewControllerDelegate no longer exists and its methods will never be called:
// MARK: - AddBirthdayViewControllerDelegate // ← Remove
func addBirthdayViewController(_ ![]() // ← Remove
// ← Remove
addBirthdayViewController: AddBirthdayViewController, ![]() // ← Remove
// ← Remove
didAddBirthday birthday: Birthday) { // ← Remove
birthdays.append(birthday) // ← Remove
tableView.reloadData() // ← Remove
} // ← Remove
Then take a look at the Navigation section. In the prepare(for:sender:) function, all we are doing is setting the Birthdays table view controller as the delegate for the Add Birthday view controller. This is no longer necessary, so we can get rid of this method and the entire // MARK: - Navigation section as well:
// MARK: - Navigation // ← Remove
// In a storyboard-based application, you will often want // ← Remove
// to do a little preparation before navigation // ← Remove
override func prepare(for segue: UIStoryboardSegue, ![]() // ← Remove
// ← Remove
sender: Any?) { // ← Remove
// Get the new view controller // ← Remove
// using segue.destinationViewController // ← Remove
let navigationController = segue.destination as! ![]() // ← Remove
// ← Remove
UINavigationController // ← Remove
let addBirthdayViewController = ![]() // ← Remove
// ← Remove
navigationController.topViewController as! ![]() // ← Remove
// ← Remove
AddBirthdayViewController // ← Remove
addBirthdayViewController.delegate = self // ← Remove
} // ← Remove
Since the properties in the Birthday NSManagedObject class are optionals, we’ll need to unwrap them before we can display a Birthday in UITableViewCell. Delete these two lines inside the method tableView(_:cellForRowAt:):
override func tableView(_ tableView: UITableView, ![]()
cellForRowAt indexPath: IndexPath) -> UITableViewCell {
let cell = tableView.dequeueReusableCell(withIdentifier: ![]()
"birthdayCellIdentifier", for: indexPath)
let birthday = birthdays[indexPath.row]
cell.textLabel?.text = birthday.firstName + " " + ![]() // ← Remove
// ← Remove
birthday.lastName // ← Remove
cell.detailTextLabel?.text = ![]() // ← Remove
// ← Remove
dateFormatter.string(from: birthday.birthdate) // ← Remove
return cell
}
Next add the following to the same method, tableView(_:cellForRowAt:):
let birthday = birthdays[indexPath.row]
➊ let firstName = birthday.firstName ?? ""
➋ let lastName = birthday.lastName ?? ""
cell.textLabel?.text = firstName + " " + lastName
➌ if let date = birthday.birthdate as Date? {
➍ cell.detailTextLabel?.text = dateFormatter.string(from: date)
} else {
➎ cell.detailTextLabel?.text = ""
}
return cell
We use the nil coalescing operator to set birthday.firstName as a constant firstName if it exists and to leave firstName as an empty string if there is no birthday.firstName ➊. At ➋, we do the same thing for lastName. Finally, to display the birthdate, we use optional binding in an if let statement to set the birthday.birthdate into a constant called date if it exists and to display this date in the cell.detailTextLabel at ➌ and ➍. Note that at ➌, we need to cast the NSDate birthdate to a Date object, which is easily done with as Date?. If the birthdate doesn’t exist, we just set the detailTextLabel?.text to an empty string ➎.
Now run your app and add some birthdays! Then stop the app and run it again. The birthdays you just added should show up the second time you run the app. They’ll stay in the app forever—that is, until you delete the app.
ADDING MORE FEATURES TO OUR APP
Our app stores birthdays now, but it still seems incomplete. Even though our app does the basic thing we wanted it to do, it doesn’t function very well. For instance, the birthday list isn’t organized, so when a user wants to find a specific birthday, they have to search for it line by line. That’s annoying! And users can add as many birthdays as they want, but there isn’t any way for them to delete a birthday if they made a mistake. How frustrating!
To fix these issues, we’ll add more features to our app by building on top of our existing code. Once we’re done with that, you can even keep going and add more!
ALPHABETIZING BIRTHDAYS
Wouldn’t it be great if the birthdays were in an alphabetical list? It’s very easy to have the fetchRequest return a sorted list of objects. To return an alphabetized list of Birthday objects, add the following three lines to viewWillAppear(_:) right after the code where you create the fetchRequest:
BirthdaysTableViewController.swift
override func viewWillAppear(_ animated: Bool) {
--snip--
let fetchRequest = Birthday.fetchRequest() as NSFetchRequest<Birthday>
➊ let sortDescriptor1 = NSSortDescriptor(key: "lastName", ascending: true)
➋ let sortDescriptor2 = NSSortDescriptor(key: "firstName", ascending: true)
➌ fetchRequest.sortDescriptors = [sortDescriptor1, sortDescriptor2]
do {
birthdays = try context.fetch(fetchRequest)
We’ll alphabetize the list of Birthday objects first by last name and then by first name, in case some people have the same last names. An NSFetchedRequest comes with a property just for this purpose called sortDescriptors. This is an array of NSSortDescriptor objects. You use the NSSortDescriptor class to create a sortDescriptor, which orders a group of items for you. Each sortDescriptor has a key and a Boolean for whether the list should be ascending (true) or not, in which case it would be descending (false). The key is the attribute you want your objects to be sorted by. At ➊, we create sortDescriptor1 and pass in lastName for the key. To sort the last names in alphabetical order from A to Z, we pass in true for ascending. Similarly, the line at ➋ creates sortDescriptor2 to sort by firstName from A to Z. If we pass in a string data type as our key, Swift knows we want the strings sorted alphabetically. If we passed in "birthdate" instead, Swift would sort the birthdays by date from oldest to youngest. At line ➌, we set the sortDescriptors on the fetchRequest to be an array with sortDescriptor1 as the first element, followed by sortDescriptor2. The sortDescriptors will be sorted in the order they are listed.

Figure 12-5: An alphabetical list of birthdays
Now run the app and let’s see what you get! You should see your friends’ birthdays in an alphabetized list like the one shown in Figure 12-5.
Can you change the order of the list so that it’s sorted by the birthdates instead? Give it a try!

REMOVING BIRTHDAYS
If you get a birthday wrong, it would be nice to be able to remove it and then add it back in again with the correct information. Let’s add the capability to remove a birthday now.
In the BirthdaysTableViewController class, we left in two commented-out methods toward the bottom of the file: tableView(_:canEditRowAt:) and tableView(_:commit:forRowAt:). These methods allow us to enable the built-in “swipe to delete” functionality of a table view. We’ll make it so that when you run BirthdayTracker and look at a list of birthdays, you’ll be able to put your finger on one and slide to the left. This action will reveal a Delete button like the one shown in Figure 12-6 that you can tap to remove the birthday from the app.
Uncomment the methods tableView( _:canEditRowAt:) and tableView(_:commit :forRowAt:) by removing the /* and */ that surround them.
Next, make sure that the method tableView(_:canEditRowAt:) returns true. This just means that you’ll be able to edit the table or, in our case, remove rows. If you have it return false, then you won’t be able to swipe the table to remove a row. The function should look like this:

Figure 12-6: Swiping left to remove a birthday from BirthdayTracker
BirthdaysTableViewController.swift
override func tableView(_ tableView: UITableView, ![]()
canEditRowAt indexPath: IndexPath) -> Bool {
return true
}
You’ll have to add some code to the method tableView(_:commit:forRowAt:) to actually remove the row from the table and also remove the Birthday object from the database and the birthdays array. If you only removed the row from the table view, then the computer would be confused because the number of rows in the table would no longer match birthdays.count and the app would crash. First, remove the following lines that were provided by Xcode in tableView(_:commit:forRowAt:):
// Override to support editing the table view
override func tableView(_ tableView: UITableView, commit editingStyle: ![]()
UITableViewCellEditingStyle, forRowAt indexPath: IndexPath) {
if editingStyle == .delete { // ← Remove
// Delete the row from the data source // ← Remove
tableView.deleteRows(at: [indexPath], with: .fade) // ← Remove
} else if editingStyle == .insert { // ← Remove
// Create a new instance of the appropriate class, // ← Remove
// insert it into the array, and add a new row // ← Remove
// to the table view // ← Remove
} // ← Remove
}
Then add the following code:
override func tableView(_ tableView: UITableView, commit editingStyle: ![]()
UITableViewCellEditingStyle, forRowAt indexPath: IndexPath) {
➊ if birthdays.count > indexPath.row {
➋ let birthday = birthdays[indexPath.row]
➌ let appDelegate = UIApplication.shared.delegate as! AppDelegate
➍ let context = appDelegate.persistentContainer.viewContext
➎ context.delete(birthday)
➏ birthdays.remove(at: indexPath.row)
➐ tableView.deleteRows(at: [indexPath], with: .fade)
}
}
At ➊, we first do a safety check to make sure that the birthdays array has at least as many birthdays in it as the row number of the indexPath that we are trying to remove. To do this, we use the > operator, not the >= operator, because the birthdays.count must be greater than indexPath.row. For example, if the birthdays array only has two birthdays and we are trying to get the birthday at birthdays[2], which would be the third birthday, then the app will crash. Remember that the rows of indexPath start at 0.
The line at ➋ sets the birthday at the correct index in the birthdays array to birthday so that it can be deleted. Then we access the managed object context of the application delegate at ➌ and ➍. At ➎, the object gets deleted from the context. When we delete the object from the database, we also want to make sure to delete it from the birthdays array of the Birthdays table view controller ➏. Finally, the method deleteRows(at:with:) ➐ takes two parameters, an array of NSIndexPaths to know which rows to remove and a type of UITableViewRowAnimation. The animation specifies how you want the rows to look when they are being removed. You can choose from the options none, bottom, top, left, right, middle, or fade. We want to remove only the row that we deleted with a fade-out animation. To do this, we pass in an array with our indexpath as the first parameter enclosed with square brackets, [indexpath], and .fade as our second parameter.
Now run the app and delete some of your birthdays. You should see the rows removed from the table. However, if you quit the app and then run it again, the deleted birthdays reappear. What gives?
Well, you deleted the birthdays from the managed object context, but those changes were not automatically saved. Whenever you add, update, or remove objects in the context, you also need to save the context or the changes won’t stay on the device. Remember that the context is like a computer document that needs to be saved. To do that, add the following lines right after you remove the birthday:
context.delete(birthday)
birthdays.remove(at: indexPath.row)
do {
try context.save()
} catch let error {
print("Could not save (error).")
}
tableView.deleteRows(at: [indexPath], with: .fade)
Those lines should look familiar since they’re the same lines that saved the managed object context after you added a Birthday in the Add Birthday view controller.
This time when you run the app and delete a Birthday, it should stay deleted!
WHAT YOU LEARNED
In this chapter, you learned how to save, fetch, and remove Birthday objects in a database using the Core Data framework so that your birthdays will be there every time you run your app. Your birthdays also now display in alphabetical order.

In Chapter 13, we’ll show you how to use local notifications to ping users on their friends’ birthdays.