13
GETTING BIRTHDAY NOTIFICATIONS

Now let’s finish BirthdayTracker by adding local notifications. A local notification is an alert that is sent to your phone from an app, even when the app isn’t running. The BirthdayTracker app will use a local notification to alert the user when they should wish a friend a happy birthday.
THE USER NOTIFICATIONS FRAMEWORK
Just as you used Apple’s Core Data framework to save birthdays on your phone in a database, you’ll use Apple’s User Notifications framework to send notifications to the user. Using this framework is easy! You just need to add an import statement at the top of any class that deals with user notifications, like this:
import UserNotifications
We’ll use the framework in three files—AddBirthdayViewController.swift, AppDelegate.swift, and BirthdaysTableViewController.swift—so add import UserNotifications to each of them, below the other import statements.
REGISTERING FOR LOCAL NOTIFICATIONS
Next, you need to have your app ask the user for permission to send notifications when it’s someone’s birthday. If you don’t have permission for notifications, they won’t be sent. You can get permission by having your app request authorization for notifications in your application delegate. This needs to be done as soon as the app starts, which is when it finishes launching. Luckily, there is a method in the AppDelegate class called application(_:didFinishLaunchingWithOptions:) that we can use to do this.
First, make sure that you added the line import UserNotifications at the top of your AppDelegate.swift file. Next, add the following lines in application(_:didFinishLaunchingWithOptions:) to request permission to send local notifications.
AppDelegate.swift
func application(_ application: UIApplication, didFinishLaunchingWithOptions ![]()
launchOptions: [UIApplicationLaunchOptionsKey: Any]?) -> Bool {
➊ let center = UNUserNotificationCenter.current()
➋ center.requestAuthorization(options: ➌[.alert, .sound], ![]()
completionHandler: ➍{ (granted, error) in
➎ if granted {
print("Permission for notifications granted!")
} else {
print("Permission for notifications denied.")
}
})
return true
}
The line at ➊ gets the current UNUserNotificationCenter and stores it in a constant called center. The notification center is used to schedule and manage the notifications that you send from your app. In this chapter, we’ll use three methods from the UNUserNotificationCenter class:
requestAuthorization(options:completionHandler:) asks the user for permission to send notifications.
add(_:withCompletionHandler:) requests to add a new notification to send to the user.
removePendingNotificationRequests(withIdentifiers:) removes an existing notification.
We use the first of these methods at ➋ to ask the user to grant permission for the app to send notifications. We’ll use the other two methods later in this chapter.
The method requestAuthorization(options:completionHandler:) takes two parameters: options and completionHandler. In the options parameter, you pass in an array of the UNAuthorizationOptions that you want to be available on your notifications. There are four types of UNAuthorizationOptions that you can use for your notifications: badge, sound, alert, and carPlay. The badge option adds a badge on your app icon so the user can quickly see when there’s something new in your app. This is typically a number indicating how many new or waiting notifications are in the app. The sound option adds a sound to be played when your notification is sent to the phone. The alert option displays a notification as either an alert that pops up in the middle of the screen or a banner that comes in at the top of the screen. You, the app developer, don’t get to decide how the notification will appear or if the user will turn on the sound for their notifications. This is something that the user controls in their Settings app. The fourth option, carPlay, allows notifications on a CarPlay-enabled device in a car.

We want to display the notifications as alerts for the user and play a sound when each notification comes in, so we pass in [.alert, .sound] for our options ➌. The completionHandler parameter is a closure that is passed in and called after the user either grants or denies permission for the app to send notifications. The completionHandler closure has two parameters, granted and error ➍. The granted parameter is a Boolean value that lets you know if permission was granted (in which case it would be true) or denied (false). We’re not going to change the behavior of our app if the user refuses to let us send notifications, but we’ll print a statement in the console ➎ so you can see if permission was granted or denied when you test the app. The second parameter, error, is the Error class type and lets you know if there was an error of some sort.
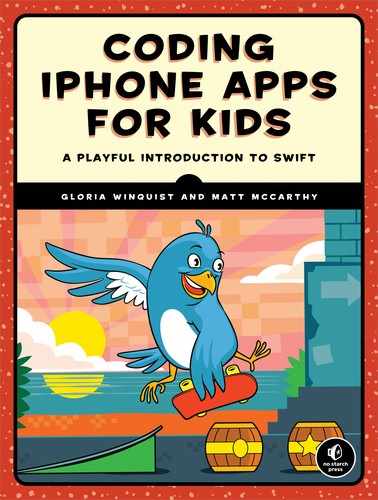
Now that you have requested authorization for notifications, the first time the user runs the app, it will display an alert dialog asking if they want to allow it to send notifications, as shown in Figure 13-1.
Figure 13-1: The app will ask permission from the user to deliver notifications.
If the user selects the Don’t Allow option here, they won’t receive any notifications on people’s birthdays. If they select Allow, they will receive notifications. The user will only be asked this the first time the app is run after a fresh installation. However, they can change the notifications settings at any time in the Settings app.
When the user opens the Settings app and scrolls to the apps section, they’ll see a listing for the BirthdayTracker app, labeled Birthdays, at the bottom of the list (Figure 13-2). You can also see this in the simulator.
Drilling down into the BirthdayTracker app settings will lead the user to the Notifications settings screen (Figure 13-3).

Figure 13-2: From the Settings app, the user can drill down to specify notification settings for their apps.

Figure 13-3: Notification settings for our app
On this screen, the user can specify whether they want to see notifications for the app and what kind of notifications they want (banner or alert).
SCHEDULING A NOTIFICATION
Each time we create a birthday, we’ll want to schedule a notification to be sent to us every year on the birthday person’s birthdate. To do this, we’ll add some code to the saveTapped(_:) method in the AddBirthdayViewController class.
In that method, first we need to create a message string to be sent in the notification. Our message will be a string that says, "Wish firstName lastName a Happy Birthday today!" Add the following code right after a birthday is saved in the saveTapped(_:) method in AddBirthdayViewController.swift:
AddBirthdayViewController.swift
do {
try context.save()
let message = "Wish (firstName) (lastName) a Happy Birthday today!"
} catch let error {
print ("Could not save because of (error).")
}
Now that we have our message, we need to create and schedule the notification that will be sent to the user’s device on their friend’s birthday. First, make sure that import UserNotifications is at the top of the file. Then add the following right under the message constant you just wrote:
let message = "Wish (firstName) + (lastName) a Happy Birthday today!"
➊ let content = UNMutableNotificationContent()
➋ content.body = message
➌ content.sound = UNNotificationSound.default()
} catch let error {
print("Could not save because of (error).")
}
The line at ➊ creates a UNMutableNotificationContent that is stored into a constant called content. A UNMutableNotificationContent contains data for a user notification, such as a message or sound. At ➋, we set the content.body property to the birthday reminder message called message. Then, at ➌, we set content.sound to be the default notification sound, which is the same sound that occurs when you receive a text message.
After we create the content of the notification, we need to create the notification’s trigger. Triggers are of the UNCalendarNotificationTrigger class and let the app know when and how often to send the notification. We’ll schedule the birthday notification to be sent at 8 AM every year on the person’s birthday. Swift lets us get just the month and day of the triggerDate by using the Calendar and DateComponents classes.
Add the following code to create a trigger after setting content.sound:
let content = UNMutableNotificationContent()
content.body = message
content.sound = UNNotificationSound.default()
➊ var dateComponents = Calendar.current.dateComponents([.month, .day], ![]()
from: birthdate)
➋ dateComponents.hour = 8
➌ let trigger = UNCalendarNotificationTrigger(dateMatching: dateComponents, ![]()
repeats: true)
} catch let error {
To do this, first we get the month and the day DateComponents from birthDate by using the Calendar method dateComponents(_:from:). We pass in just [.month, .day] for the components ➊, and not the year. This is because we want the trigger to go off every year, not just on the year the person was born—which is in the past, so it would never happen anyway! We want to send the birthdate notification at 8 AM, so next we set dateComponents .hour to 8 ➋.
At ➌, we create the UNCalendarNotificationTrigger with its initializer. This initializer takes two parameters: the dateComponents and a Boolean that says whether you want the trigger to be repeated or not. We want the trigger to be repeated every year, so we pass in true. Swift is smart about how often you want a trigger to be repeated. If you passed in DateComponents that were just an hour and a minute, for example, it would fire the notification every day at that hour and minute. Because we passed in a month and a day, the trigger will repeat every year.
THE CALENDAR AND DATECOMPONENTS CLASSES
The Calendar and DateComponents classes make it super easy to create dates and times. DateComponents has integer properties that you can set for the year, month, day, hour, minute, and second of a date and time, or a time interval. The Calendar class has methods to convert DateComponents into a Date or vice versa. To try creating a date, open your Swift playground. We’ll create a date and time of May 10, 1971, at 8:23 AM:

First, we create a variable called myDateComponents ➊, which we’ll use to create our date. After creating myDateComponents, we can set integers for its various properties. The months of the year are all represented by integers in numeric order, from 1 for January to 12 for December. For May, we set myDateComponents.month to 5 ➋. For 8 AM, we use 8 for myDateComponents.hour ➌. The myDateComponents properties use a 24-hour clock so that each hour of a 24-hour day is labeled in numeric order, starting with 0 for midnight. So all the hours before noon would be the same as on a 12-hour clock, but for 2 PM, which is two hours after noon, we would count two hours past 12 and set myDateComponents to 14. For another example, 11 PM would be 23. Finally, we can make a date from myDateComponents by using the date(from:) method on the Calendar class ➍. To use this method, we first need a Calendar instance. We use Calendar.current, which returns the type of calendar being used by the device. In most Western countries, this is the Gregorian calendar, which has 12 months and a 7-day week.
To get DateComponents out of a Date, we use the Calendar method myDateComponents(_:from:). This method takes two parameters: the first is an array of the DateComponents that you want out of the Date, and the second is the Date itself. The myDateComponents(_:from:) method is useful if you want to create a new Date object that is today’s date, but at 8 AM, for example.
Write the following in your playground:

The line at ➊ creates the current date and time and assigns it to a constant called today. Next, we get the myDateComponents for the month, day, and year out of today ➋. Note that we pass in only the DateComponents properties that we care about. We don’t need the hour, minutes, or seconds, for example. We make myDateComponents a variable instead of a constant because we are going to set the hour property, which we do at ➌. Finally, we create a new date called todayEightAm using myDateComponents ➍. You should see that the new Date is the same as today, except the time is 8:00 AM.
Now that we have our notification content and trigger, we are almost ready to create a UNNotificationRequest object to schedule the notification. But to create a UNNotificationRequest, first we need an identifier. This is a string that can be used to identify the notification.
We’ll also use this identifier to remove a scheduled notification if we delete a birthday from the app. After all, you wouldn’t want to be getting notifications for birthdays that you deleted!
In Chapter 12, we added a birthdayId property to Birthday, so we’ll use birthdayId as the identifier of our notification. First, we need to unwrap the optional birthdayId property and store it in a constant called identifier. Then, we can create a notification request using the identifier and the trigger. Add the following code right after trigger is created:
AddBirthdayViewController.swift
do {
--snip--
let trigger = UNCalendarNotificationTrigger(dateMatching: dateComponents, ![]()
repeats: true)
if let identifier = newBirthday.birthdayId {
➊ let request = UNNotificationRequest(identifier: identifier,![]()
content: content, trigger: trigger)
➋ let center = UNUserNotificationCenter.current()
➌ center.add(request, withCompletionHandler: nil)
}
} catch let error {
At ➊, we create the UNNotificationRequest using the identifier, content, and trigger. After request is created, it must be added to the UNUserNotificationCenter. To do this, we create a constant called center ➋, which is the current UNUserNotificationCenter of the app. Then we use the method add(_:withCompletionHandler:) to add the request for our scheduled notification ➌. This method takes two parameters, a UNNotificationRequest and a closure as a completionHandler that performs some action after the notification has been added. We pass in our request for the first parameter, and since we don’t need to do anything when the request has been added, we pass in nil for the completionHandler.
Whew! We’ve just finished writing the method to schedule a notification! Now if you run your app and create Birthday objects, you’ll receive a notification when it’s someone’s birthday!
To test your notifications, you’d need to add a birthday for the next day and wait until 8 AM for your notification to appear. But waiting a whole day to test your code is too long! To test your code right now, tweak it to make the notification go off much sooner. Set the hour and minute of myDateComponents to be 10 minutes from the present time. So if it’s 1:35 PM, change the code that you just wrote to the following:
var dateComponents = Calendar.current.dateComponents([.month, .day], ![]()
from: birthDate)
dateComponents.hour = 13
dateComponents.minute = 45
let trigger = UNCalendarNotificationTrigger(dateMatching: dateComponents, ![]()
repeats: true)
--snip--
}
Then run the app, add a birthday with today’s date, turn off the app by clicking the stop button (but keep the simulated iPhone’s window open), and wait 10 minutes. You should see a notification appear like the one in Figure 13-4. After testing, don’t forget to change your code back so that the notifications go off first thing in the morning!

Figure 13-4: A banner-style birthday notification
REMOVING A NOTIFICATION
When we remove a birthday from the app, we’ll also want to cancel its corresponding notification, which we can do in the BirthdaysTableViewController by adding some code. A good place to do this is right after the user selects a birthday to delete, in tableView(_:commitEditingStyle:forRowAtIndexPath:). Add the following lines to that method:
BirthdaysTableViewController.swift
let birthday = birthdays[indexPath.row]
// Remove notification
➊ if let identifier = birthday.birthdayId {
➋ let center = UNUserNotificationCenter.current()
➌ center.removePendingNotificationRequests(withIdentifiers: [identifier])
}
let appDelegate = UIApplication.sharedApplication().delegate as! AppDelegate
let context = appDelegate.managedObjectContext
To remove the notification for a birthday, first we unwrap the birthdayId to use it as an identifier ➊. Next, we get the UNUserNotificationCenter ➋ and remove the notification ➌. The remove method takes an array of identifiers so that you can remove more than one notification at a time, but since we want to remove only one, we pass it [identifier], which is an array but has only one value.
NOTE
The BirthdayTracker app is now complete! Remember that the final project files are available from https://www.nostarch.com/iphoneappsforkids/, so you can compare yours to double-check that everything is in the right place.
WHAT YOU LEARNED
In this chapter, we showed you how to use the User Notifications framework to ping your users on their friends’ birthdays. You learned how to add a notification that will be sent at a specific time every year and also how to remove that notification if the user removes a birthday from the app.
In Part 3, you’ll build another exciting app—a game called Schoolhouse Skateboarder, which features graphics, sounds, and more!
