2
LEARNING TO CODE IN A PLAYGROUND

A “Hello, world!” app is no small accomplishment, but now it’s time to really learn how to write some code. Xcode provides a special type of document called a playground, which is a great place to learn how to program. In a playground, you can write and run code immediately to see the results, without going through the trouble of writing a whole app, as we did in Chapter 1.
Let’s open a playground. Open Xcode and select Get started with a playground, as shown in the Welcome to Xcode dialog in Figure 2-1. If this window doesn’t automatically open, select Welcome to Xcode from the Window option in the menu or press ⌘-SHIFT-1.

Figure 2-1: Getting started with a playground
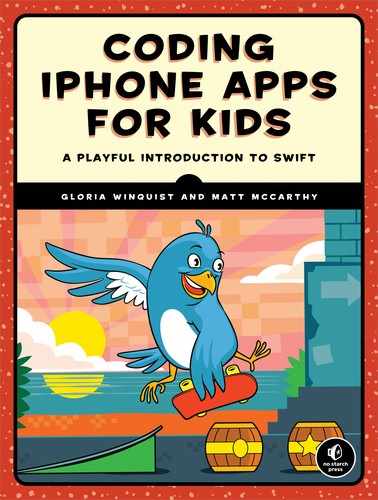
You’ll be asked to name your playground (Figure 2-2). In this example, we’ll keep the default name MyPlayground. Make sure that you choose iOS as the platform to run the playground.
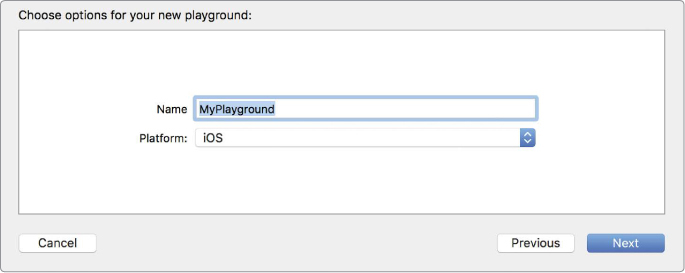
Figure 2-2: Naming the playground and selecting the platform
When the playground first opens, you’ll see two panels in the window, just like in Figure 2-3. On the left is the playground editor, where you’ll write your code. On the right is the results sidebar, which displays the results of your code.
The line var str = "Hello, playground" in Figure 2-3 creates a variable named str. A variable is like a container; you can use it to hold almost anything—a simple number, a string of letters, or a complex object (we’ll explain what that is later). Let’s take a closer look at how variables work.

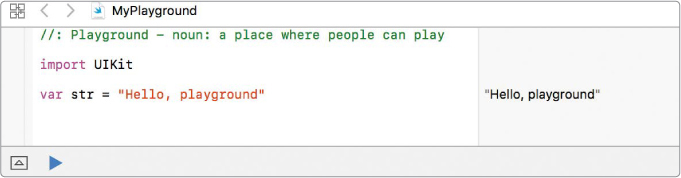
Figure 2-3: Playground editor and results sidebar
CONSTANTS AND VARIABLES
Here’s the line of code from Figure 2-3 again:
It does two things. First, it creates a variable named str. This is called a declaration because we are declaring that we would like to create a variable. To create a variable, you type the word var and then type a name for your variable—this case, str. There are some rules when naming variables, which we’ll go over later, so for now stick with this example.
Second, this line of code gives a value of "Hello, playground" to str using the = operator. This is called an assignment because we are assigning a value to our newly created variable. Remember, you can think of a variable as a container that holds something. So now we have a container named str that holds "Hello, playground".
You can read this line of code as “the variable str equals Hello, playground.” As you can see, Swift is often very readable; this line of code practically tells you in English what it’s doing.
Variables are handy because if you want to print the words “Hello, playground” all you have to do is use the command print on str, like in the following code:
This prints "Hello, playground " in the results sidebar. The is added automatically to the end of whatever you print. It is known as the newline character and tells the computer to go to a new line.
To see the results of your program as it would actually run, bring up the debug area, which will appear below the two panels, as shown in Figure 2-4. To do this, go to View ▸ Debug Area ▸ Show Debug Area in the Xcode menu or press ⌘-SHIFT-Y. When str is printed in the console of the debug area, you can see that the quotes around Hello, playground and the newline character don’t appear. This is what str would really look like if you were to officially run this program!
Figure 2-4: Viewing the real output of your program in the debug area
Variables can change (or vary!) in your programs, so you can change the value of a variable to hold something else. Let’s try that now. Add the following lines to your playground.

To change the value of a variable, type its name and use the = operator to set it to a new value. We do this at ➊ to change the value of str to "Hello, world". The computer throws away whatever str used to hold, and says, “Okay, boss, str is now Hello, world” (that is, it would say that if it could talk!).
Notice that when we change the value of str, we don’t write var again. The computer remembers that we declared str in a previous line of code and knows that str already exists. So we don’t need to create str again. We just want to put something different in it.
You can also declare constants. Like variables, constants hold values. The big difference between a constant and a variable is that a constant can never change its value. Variables can vary, and constants are, well, constant! Declaring a constant is similar to declaring a variable, but we use the word let instead of var :
Here we create a constant called myName and assign it the value of "Gloria".
Once you create a constant and give it a value, it will have that value until the end of time. Think of a constant as a big rock into which you’ve carved your value. If you try to give myName another value, like "Matt", you’ll get an error like the one in Figure 2-5.

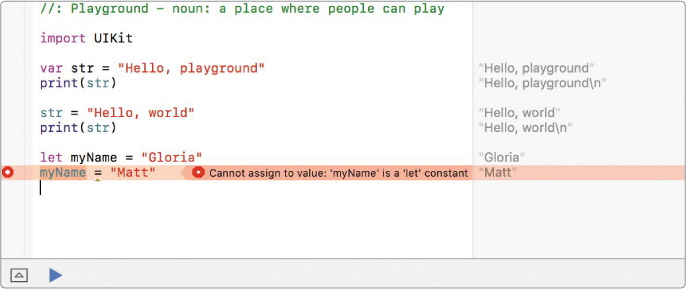
Figure 2-5: Trying to change the value of a constant won’t work.
NOTE
In the playground, an error will appear as a red circle with a tiny white circle inside it. Clicking the error mark will show the error message and tell you what’s wrong. If you have your debug area showing, you should also see information describing what happened and sometimes even how to fix it.
WHEN TO USE CONSTANTS VS. VARIABLES
Now you’ve successfully created a variable and a constant—good job! But when should you use one over the other? In Swift, it’s best practice to use constants instead of variables unless you expect the value will change. Constants help make code “safer.” If you know the value of something is never going to change, why not etch it into stone and avoid any possible confusion later?
For example, say you want to keep track of the total number of windows in your classroom and the number of windows that are open today. The number of windows in your classroom isn’t going to change, so you should use a constant to store this value. The number of windows that are open in your classroom will change depending on the weather and time of day, however, so you should use a variable to store this value.


We make numberOfWindows a constant and set it to 8 because the total number of windows will always be 8. We make numberOfWindowsOpen a variable and set it to 3 because we’ll want to change that value when we open or close windows.
Remember: use var for variables and let for constants!
NAMING CONSTANTS AND VARIABLES
You can name a variable or constant almost anything you want, with a few exceptions. You can’t name them something that is already a word in Swift. For example, you can’t name a variable var. Writing var var would just be confusing, to you and the computer. You’ll get an error if you try to name a variable or constant using one of Swift’s reserved words. You also can’t have two variables or constants with the same name in the same block of code.
In addition to these rules, there are some other good programming guidelines to follow when naming things in Swift. Your names should always start with a lowercase letter. It’s also a good idea to have very descriptive names (they can be as long as you want). When you use a descriptive name, it’s a lot easier to figure out what that variable or constant is supposed to be. If you were looking at someone else’s code, which variable name would you find easier to understand: numKids or numberOfKidsInMyClass? The first one is vague, but the second one is descriptive. It’s common to see variables and constants that are a bunch of words strung together, like numberOfKidsInMyClass. This capitalization style, where the first letter of each word is capitalized when multiple words are joined together to make a variable name, is called camel case. That’s because the pattern of lowercase and uppercase letters looks like the humps on a camel’s back.

DATA TYPES
In Swift, you can choose what kind of data—the data type—you want a variable or constant to hold. Remember how we said you can think of a variable as a container that holds something? Well, the data type is like the container type. The computer needs to know what kind of things we’ll put in each container. In Swift programming, once you tell the computer you want a variable or constant to hold a certain data type, it won’t let you put anything but that data type in that variable or constant. If you have a basket designed to hold potatoes, it’d be a bad idea to fill that basket with water—unless you like water leaking all over your shoes!

DECLARING DATA TYPES
When you create a variable or a constant, you can tell the computer what type of data it will hold. In our example about classroom windows, we know this variable will always be an integer (that is, a whole number—you can’t really have half a window), so we could specify an integer data type, like this:
The colon means “is of type.” In plain English, this line of code says, “the variable numberOfWindowsOpen, which is an integer, is equal to 3.” So this line of code creates a variable, gives it a name, tells the computer its data type, and assigns it a value. Phew! One line of code did all that? Did we mention that Swift is a very concise language? Some languages might require several lines of code to do this same thing. Swift is designed so that you can do a bunch of things with just one line of code!
You only have to declare the data type once. When we tell the computer that a variable will hold integers, we don’t have to tell it again. In fact, if we do, Xcode will give us an error. Once the data type is declared, a variable or constant will hold that type of data forever. Once an integer, always an integer!
There’s one more thing you need to know about data types: a variable or constant can’t hold something that isn’t its data type. For example, if you try to put a decimal number into numberOfWindowsOpen, you’ll get an error, as shown in Figure 2-6.
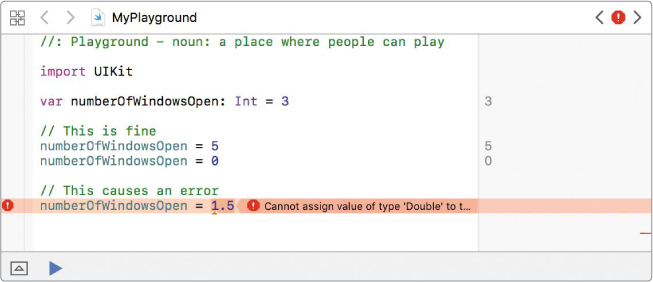
Figure 2-6: You can’t put a decimal number into a variable that is supposed to hold an integer.
Setting numberOfWindowsOpen = 5 and numberOfWindowsOpen = 0 is valid and works. But you can’t set numberOfWindowsOpen = 1.5.
COMMON DATA TYPES
As you just learned, a data type lets the computer know what kind of data it is working with and how to store it in its memory. But what are the data types? Some common ones include Int, Double, Float, Bool, and String.
Let’s dig in and see what each one of these actually is!
Int (Integers)
We already talked a little bit about integers, but let’s go over them in more detail. An integer, called an Int in Swift, is a whole number that has no decimal or fractional part. You can think of them as counting numbers. Integers are signed, meaning that they can be negative or positive (or zero).
Double and Float (Decimal Numbers)
Decimal numbers are numbers that have digits after the decimal point, like 3.14. (An integer like 3 would be written as 3.0 if you wanted it to be a decimal number.) There are two data types that can store decimal numbers: a Double and a Float (short for floating-point number). The Double data type is more common in Swift because it can hold bigger numbers, so we’ll focus on those.
When you assign a Double, you must always have a digit to the left of the decimal place or you will get an error. For example, suppose bananas cost 19 cents each:

The code at ➊ will result in an error because it doesn’t have a digit to the left of the decimal point. The code at ➋ works fine because it has a leading zero. (The phrases // ERROR and // CORRECT are comments, which are notes in a program that are ignored by the computer. See “A Few Quick Comments About Comments” on page 32.)
Bool (Booleans, or True/False)
A Boolean value can only be one of two things: true or false. In Swift, the Boolean data type is called a Bool.

Booleans are often used in if-else statements to tell the computer which path a program should take. (We’ll cover Booleans and if-else statements in more detail in Chapter 3.)
String
The String data type is used to store words and phrases. A string is a collection of characters enclosed in quotation marks. For example, "Hello, playground" is a string. Strings can be made up of all sorts of characters: letters, numbers, symbols, and more. The quotation marks are important because they tell the computer that everything in between the quotes is part of a string that you’re creating.
You can use strings to build sentences by adding strings together in a process called string concatenation. Let’s see how it works!

By adding strings together with the plus sign (+), this code creates a variable called specialGreeting with the string "Good Morning Jude" as its value. Note that we need to add a string containing a space character (" " ) between morningGreeting and friend here or else specialGreeting would be "Good MorningJude".

TYPE INFERENCE
You may have noticed that sometimes when we declare a variable, we include the data type:
And sometimes we do not include the data type:
What gives? The computer is actually smart enough to figure out the data type, most of the time. This is called type inference—because the computer will infer, or guess, the type of data we are using based on clues that we give it. When you create a variable and give it an initial value, that value is a big clue for the computer. Here are some examples:
• If you assign a number with no decimal value (like 3), the computer will assume it’s an Int.
• If you assign a number with a decimal value (like 3.14), the computer will assume it’s a Double.
• If you assign the word true or false (with no quotes around it), the computer will assume it’s a Bool.
• If you assign one or more characters with quotes around them, the computer will assume it’s a String.
When the type is inferred, the variable or constant is set to that data type just as if you had declared the data type yourself. This is done purely for convenience. You can include the data type every time you declare a new constant or variable, and that’s perfectly fine. But why not let the computer figure it out and save yourself the time and extra typing?
TRANSFORMING DATA TYPES WITH CASTING
Casting is a way to temporarily transform the data type of a variable or constant. You can think of this as casting a spell on a variable—you make its value behave like a different data type, but just for a short while. To do this, you write a new data type followed by parentheses that hold the variable you are casting. Note that this doesn’t actually change the data type. It just gives you a temporary value for that one line of code. Here are a few examples of casting between Int and Double. Take a look at the results of your code in the results sidebar.


At ➊, we cast our Int variable months to a Double and store it in a new variable called doubleMonths. This adds a decimal place, and the result of this casting is 12.0.
You can also cast a Double to an Int:

At ➊, we cast our Double, days, to an Int. You can see that the decimal place and all the digits following it were removed: our number became 365. This is because an Int is not capable of holding a decimal number—it can contain only whole numbers, so anything after the decimal point is chopped off.
Again, casting doesn’t actually change a data type. In our example, even after casting, days is still a Double. We can verify this by printing days:
The results sidebar shows that days is still equal to 365.25.
In the next section, we’ll cover some examples of where and when you would use casting. So if it’s not clear right now why you would cast a variable, just hold on a bit longer!
OPERATORS
There are a number of arithmetic operators in Swift that you can use to do math. You have already seen the basic assignment operator, =. You’re probably also familiar with addition (+), subtraction (-), multiplication (*), and division (/).
You can use these operators to perform math on the Int, Float, and Double data types. The numbers being operated on are called operands. Experiment with these math operators in your playground by entering code like the following:

If you enter this code in your playground, you’ll see the results of each math expression in the sidebar. Writing math expressions in code is not that different from writing them normally. For example, 16 minus 2 is written as 16 – 2.
You can even save the result of a math expression in a variable or constant so you can use it somewhere else in your code. To see how this works, enter these lines in your playground:

When you print sum ➊, you’ll see 7.6 in the sidebar.
So far, we’ve used only numbers in our math expressions, but math operators also work on variables and constants.
Add the following code to your playground:
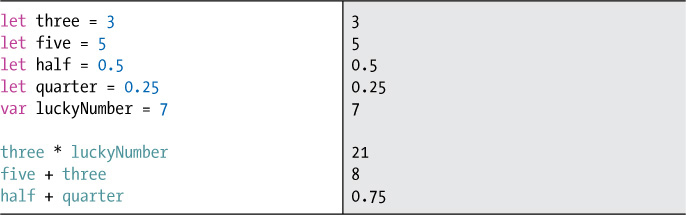
As you can see, you can use math operators on variables and constants like you did on numbers.
SPACES MATTER
In Swift, the spaces around an operator are important. You can either write a blank space on both sides of the math operator or leave out the spaces altogether. But you cannot just put a space on one side of the operator and not the other. That will cause an error. Take a look at Figure 2-7.

Figure 2-7: Make sure that you have the same number of spaces on each side of your operators.
There is one important thing to note: you can only use a math operator on variables or constants that are the same data type. In the previous code, three and five are both Int data types. The constants half and quarter are Double data types because they are decimal numbers. If you try to add or multiply an Int and a Double, you’ll get an error like the one in Figure 2-8.
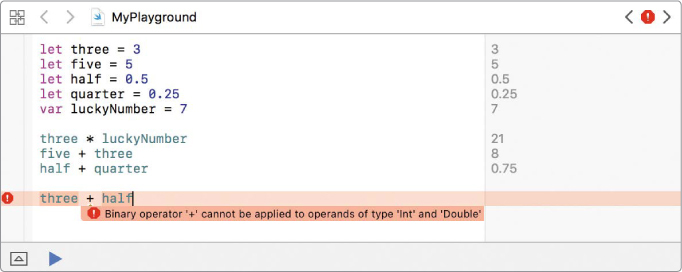
Figure 2-8: In Swift, you cannot do math on mixed data types.
But what if you really want to do math on mixed data types? For example, let’s say you want to calculate one-tenth of your age:

The last line will result in an error because we’re attempting to multiply an Int by a Double. But don’t worry! You have a couple of options to make sure your operands are the same data type.
One option is to declare myAge as a Double, like this:

This code works because we’re multiplying two Double data types.
The second option is to use casting. (I told you we would come back to this!) Casting is a great solution in this case because we don’t want to permanently change myAge to a Double, we just want to be able to perform math with it as if it were a Double. Let’s take a look at an example:

At ➊, we cast myAge to a Double before multiplying it. This means we no longer have mixed types, so the code works. But at ➋ we will get an error. That’s because myAge is still an Int. Casting it to a Double at ➊ did not permanently change it to a Double.
Could we cast multiplier to an Int? You bet! Then we are doing math on two integers, which works fine. However, this results in a less precise calculation because we’ll lose the decimal place. When you cast a variable from a Double to an Int, the computer simply removes any digits after the decimal to make it a whole number. In this case, your multiplier of 0.1 would cast to an Int of 0. Let’s cast some variables in the playground and see what we get:

At ➊, casting our Double, multiplier, to an Int gives us 0. This value is quite different after casting, because we lost the decimal place: 0.1 became 0. This could be a very bad thing in our code if we were not expecting it to happen. You must be careful when casting to make sure you aren’t unexpectedly changing your values. At ➋, there’s another example of casting a Double to an Int, and as you can see, 1.9 does not get rounded up to 2. Its decimal value just gets removed and we are left with 1.
There’s another math operator, the modulo operator (%), which might not be as familiar to you. The modulo operator (also called modulus) gives the remainder after division. For example, 7 % 2 = 1 because 7 divided by 2 has a remainder of 1. Try out the modulo operator in your playground, as follows.
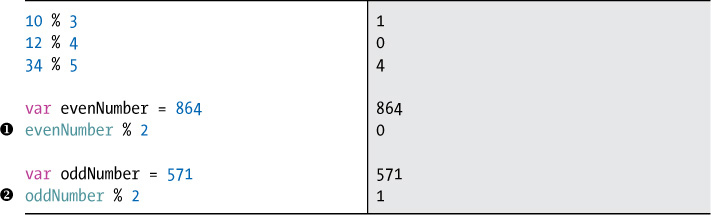
As you can see, the modulo operator is useful for determining whether a number is even (evenNumber % 2 equals 0) ➊ or odd (oddNumber % 2 equals 1) ➋.
ORDER OF OPERATIONS
So far we’ve only done one math operation on each line of code, but it’s common to do more than one operation on a single line. Let’s look at an example.
How much money do you have if you have three five-dollar bills and two one-dollar bills? Let’s calculate this on one line:
This assigns a value of 17 to myMoney. The computer multiplies 5 times 3 and then adds 2. But how does the computer know to multiply first and then add 2? Does it just work from left to right? No! Take a look at this:
We moved the numbers around and the result is still 17. If the computer just went from left to right, it would add 2 + 5 and get 7. Then it would multiply that result, 7, times 3, and get 21. Even though we changed the order of the numbers in our math expression, the computer still multiplies first (which gives us 15) and then adds the 2 to get 17. The computer will always do multiplication and division first, then addition and subtraction. This is called the order of operations.
ORDERING OPERATIONS WITH PARENTHESES
You don’t have to rely on the computer to figure out which step to do first like we did in the money example. You, the programmer, have the power to decide! You can use parentheses to group operations together. When you put parentheses around something, you tell the computer to do that step first:

At ➊, the parentheses tell the computer to multiply 5 times 3 first and then add 2. This will give you 17. At ➋, the parentheses tell the computer to add 2 plus 5 first and then multiply that by 3, which gives you 21.
You can make your code even more specific by using parentheses inside of other parentheses. The computer will evaluate the inside parentheses first and then the outside ones. Try this example:
First the computer adds 2 and 3 between the inner parentheses. Then it multiplies the result by 4, since that’s within the outer set of parentheses. It will add the 1 last because it’s outside both sets of parentheses. The final result is 21.
COMPOUND ASSIGNMENT OPERATORS
Another category of operators that you’ll use is the compound assignment operators. These are “shortcut” operators that combine a math operator with the assignment operator (=). For example, this expression
a = a + b
becomes
a + = b
You can use these operators to update the value of a variable or constant by performing an operation on it. In plain English, an expression like a += b says “add b to a and store the new value in a.” Table 2-1 shows math expressions using compound assignment operators and the same expressions in their longer forms.
Table 2-1: Short Form Assignment Operators vs. Long Form Expressions
Short form |
Long form |
a += b |
a = a + b |
a -= b |
a = a - b |
a *= b |
a = a * b |
a /= b |
a = a / b |
Let’s see the += operator in action. Imagine that we’re trying to write a program to calculate the number of animals on an ark. First we create a variable called animalsOnArk and set it to 0 because there aren’t animals on the ark yet. As the different types of animals board the ark, we want to increase animalsOnArk to count all of the animals. If two giraffes board the ark, then we need to add 2 to animalsOnArk. If two elephants board the ark, then we need to add 2 again. If four antelope board the ark, then we need to increase animalsOnArk by 4.


After two giraffes, two elephants, and four antelope board the ark, the final value for animalsOnArk is 8. What a zoo!
A FEW QUICK COMMENTS ABOUT COMMENTS
Most programming languages come with a way to write comments inline with the code. Comments are notes that are ignored by the computer and are there to help the humans reading the code understand what’s going on. Although a program will run fine without any comments, it’s a good idea to include them for sections of code that might be unclear or confusing. Even if you’re not going to show your program to anybody else, your comments will help you remember what you were doing or thinking when you wrote that code. It’s not uncommon to come back to a piece of code you wrote months or years ago and have no idea what you were thinking at the time.
There are two ways to add comments in Swift. The first way is to put two forward slashes (//) in front of the text you want to add. These comments can be placed on their own line, like this:
// My favorite things
Or they can be placed on the same line as a line of code—as long as the comment comes after the code:
var myFavoriteAnimal = "Horse" // Does not have to be a pet
The second way is used for long comments, or multiline comments, where the start and end of the comment is marked by /* and */. (Note that we’ll use --snip-- in this book to show where there are more code lines that we’ve omitted for space.)
/*
This block of code will add up the animals
that walk onto an ark.
*/
{
var animalsOnArk = 0
let numberOfGiraffes = 2
animalsOnArk += numberOfGiraffes
--snip-
}
Multiline comments are useful when you debug your code. For example, if you don’t want the computer to run part of your code because you’re trying to find a bug, but you also don’t want to delete all of your hard work, you can use multiline comments to comment out sections of code temporarily. When you format a chunk of code as a comment, the computer will ignore that code just like it ignores any other comment.
WHAT YOU LEARNED
In this chapter you learned how to write code in a Swift playground, which lets you see results right away. You created variables and constants and learned how to use the basic data types and operators that you will be seeing again and again as you write your own computer programs.
In Chapter 3, you will be using conditional statements, which tell the computer which code path you want it to go down. The code path is chosen based on a condition’s value.