
This chapter explains how to secure the corporate campus networking infrastructure. It looks at features specific to equipment provided by Cisco Systems, Inc. and explains how to configure specific devices to incorporate the following elements of a security architecture:
Identity
Integrity
Data confidentiality
Network availability
Audit
Many of these functions can also be used from other products if they are available. Many examples are given with references to commands used for the various devices most commonly found as part of the corporate network infrastructure:
Routers
Switches
Network access servers
Firewalls
The configuration examples are guidelines; in many instances, you will have to modify them to fit your specific environment. At the end of the chapter are sample configurations for Cisco IOS routers, switches, and the PIX firewall which can be used as sample templates for securing these infrastructure devices. The sample main corporate infrastructure shown in Figure 9-1 is the basis for all configuration examples in this chapter.

NOTE
A number of Cisco Press books specifically detail security configuration information for routers, switches, the PIX firewall, intrusion detection systems, and so on. Chapters 9-12 are intended to enable the reader to become familiar with the fundamental features Cisco offers with respect to security. The commands may vary slightly depending on the software version used, and readers are encouraged to verify the Command Reference documents for their specific hardware and software release for the features detailed in Chapters 9-12.
Authentication and authorization are considered together under the heading “Identity,” which in this section relates to designated personnel who have the right to access the network devices that comprise the corporate network infratsructure. Authentication pertains to users identifying themselves with specified credentials, such as a username and a password. Authorization refers to the subsequent access rights to which the successfully identified person has privileges. Many times, these processes can be taken as separate entities. In most of the cases considered in this chapter, however, authorization and access privileges are a natural second step after a person has been successfully authenticated. The two processes are therefore considered together under the topic of identity.
NOTE
Keep in mind that controlling physical access to any infrastructure device is critical. All network infrastructure equipment should be in areas accessible only by authorized personnel. Without physical access control, the rest of the control measures are useless.
Most network devices have the capability to provide for multiple levels of administartive privileges. They typically have two modes of operation:
Basic
Privileged
Both modes are password protected. The basic mode commands are used for everyday system monitoring and some basic troubleshooting. The privileged commands are used for system configuration, system maintenence, and more in-depth troubleshooting capabilities. The passwords used should be different for basic and privileged modes. For all Cisco devices, after you access the system and enter an initial login sequence, the system enters basic mode, which gives you access to only basic mode commands. You can enter privileged mode by entering the enable command followed by the privilege mode password.
NOTE
The basic mode is commonly referred to as “login” mode, and the privilege mode is commonly called “enable” mode by many network administrators.
For Cisco IOS devices, basic access mode is denoted by the > prompt after the host name; privileged access is denoted by the # prompt after the host name. Table 9-1 shows the commands accessible for basic access; Table 9-2 shows the commands for privileged access (that is, enable mode). The basic access commands are just a subset of the privileged access commands.
Table 9-1. Cisco IOS Basic Access Commands
Command | Description |
|---|---|
Session number to resume. | |
Create a temporary access list entry. | |
Apply user profile to interface. | |
Reset functions. | |
Open a terminal connection. | |
Turn off privileged commands. | |
Disconnect an existing network connection. | |
Turn on privileged commands. | |
Exit from the EXEC. | |
Description of the interactive help system. | |
Lock the terminal. | |
Log in as a particular user. | |
Exit from the EXEC. | |
Start a modem-like user interface. | |
Request neighbor and version information from a multicast router. | |
Show statistics after multiple, multicast traceroutes. | |
Trace reverse multicast path from destination to source. | |
Name an existing network connection. | |
Open an X.29 PAD connection. | |
Send echo messages. | |
Start IETF Point-to-Point Protocol (PPP). | |
Radio commands. | |
Resume an active network connection. | |
Open an rlogin connection. | |
Show running system information. | |
Start Serial-Line IP (SLIP). | |
Open a Secure Shell client connection. | |
Display information about terminal lines. | |
Open a Telnet connection. | |
Set terminal line parameters. | |
Trace the route to destination. | |
Open a tunnel connection. | |
Open a UDPTN connection. | |
Voice commands. | |
List active connections. | |
Table 9-2. Cisco IOS Privileged Access Commands
How to get initial basic level access is discussed in the section, “Line Access Controls.” Here, take a closer look at how to allow privileged level (that is, enable mode) access. The authentication of enable mode in Cisco IOS devices can take one of these forms:
A password
An encrypted password (secret)
TACACS/XTACACS
AAA
Example 9-1 is taken from a router in configuration mode to see the options for configuring authentication for enable mode.
Both the enable password and enable secret commands enable you to establish an unencrypted or encrypted password that users must enter to access the privileged enable mode.
The difference between the enable password and the enable secret commands lies in the encryption algorithm used to encrypt the password or secret. The enable password command uses a reversible encryption algorithm (denoted by the number 7 in the configuration option and sometimes referred to as type 7 encryption). This reversible algorithm is necessary to support certain authentication protocols (notably CHAP), where the system needs access to the cleartext of user passwords. However, enable secret is encrypted using the MD5 algorithm (denoted by the number 5 in the configuration option and sometimes referred to as type 5 encryption). This algorithm is not reversible and is more secure. The strength of the encryption used is the most significant difference between the two commands. It is recommended that you use the enable secret command because it has an improved encryption algorithm over the enable password command.
NOTE
The command service password-encryption encrypts all passwords that support the type 7 password algorithm. It should be enabled on all routers to ensure that none of these passwords are stored in readable text form in configuration files. Depending on which release of software you are running, all passwords may not be encrypted by this command. The passwords to consider include username passwords, RADIUS and TACACS+ keys, SNMP community strings, peer router authentication keys, and NTP authentication keys.
Example 9-2 shows the configuration options for enable password and enable secret.
Example 9-2. enable password and enable secret Command Options
Router(config)#enable password ?
0        Specifies that an unencrypted password will follow
7        Specifies that a hidden password will follow
LINE     The unencrypted (cleartext) enable password
level    Set exec level password
Router(config)#enable secret ?
0        Specifies that an unencrypted password will follow
5        Specifies that an encrypted secret will follow
LINE     The unencrypted (cleartext) enable secret
level    Set exec level password
You can enter enable password or enable secret in unencrypted form as follows:
Router(config)#enable secret 0 thisisasecret
Should you do so, however, enable password or enable secret is shown in the configuration file as follows:
enable secret 5 $1$dLOD$QR.onv68q3326pzM.Zexj1
You can also enter the secret in encrypted form, as in this example:
Router(config)#enable secret 5 $1$dLOD$QR.onv68q3326pzM.Zexj1
To do so, however, the encrypted secret would have to be copied from a previously encrypted secret. For this example, the (unencrypted) secret the user would type is thisisasecret.
WARNING
You cannot recover a lost encrypted password. You must clear nonvolatile random-access memory (NVRAM) and set a new password. Entering enable password or enable secret in encrypted form should be done with caution.
Example 9-3 shows the configuration file after both enable secret and enable password have been configured.
Example 9-3. Sample Configuration File Using enable secret and enable password
Router# show configuration
hostname Tallinn
!
enable secret 5 $1$dLOD$QR.onv68q3326pzM.Zexj1
enable password 7 047E050200335C465817
TIP
If you configure both the enable secret and the enable password commands, the enable secret command takes precedence.
It is recommended that you use enable secret rather than enable password because the former command provides a more secure encryption algorithm for the secret in the configuration. The enable secret command provides more security for your configuration files should they be stored remotely on a TFTP server. Passwords should never be seen in cleartext when you view any configuration files.
The use-tacacs command is a command that allows for TACACS and Extended TACACS authentication to be used. If this authentication method is chosen for enable mode, you can specify a backup authentication mechanism in the event that connection to the TACACS server is not available, via the tacacs-server last resort command. However, this method is not widely used because TACACS and Extended TACACS have been depracated by Cisco and it is more common to use AAA authentication mechanisms that allow for the use of either RADIUS or TACACS+.
WARNING
If you use the enable use-tacacs command, you must also specify tacacs-server authentication enable; otherwise, you will be locked out of the privileged enable mode.
AAA authentication is the more scalable way to handle password management and can be used to specify enable mode authentication. To use AAA authentication, you must use the configuration commands in Table 9-3.
The supported login authentication methods are shown in Example 9-4.
Example 9-4. AAA Login Authentication Methods for Enable Mode
Router(config)#aaa authentication enable default ?
enable     Use enable password for authentication
group      Use server-group
line       Use line password for authentication
none       NO authentication
The keyword group allows the configuration of multiple TACACS+ or RADIUS servers, as shown in Example 9-5.
The Cisco IOS Software has incorporated additional user controls through which privilege levels can be assigned to various commands to further limit administrative access. Many times, you may want to assign particular members of the staff only a subset of the privileged enable commands. Cisco IOS allows 16 privilege levels, numbered 0 through 15. Level 1 is the current basic mode, and level 15 is the current privileged mode accessible through the enable command.
NOTE
Five commands are associated with privilege level 0: disable, enable, exit, help, and logout. If you configure AAA authorization for a privilege level greater than 0, these five commands are not included.
Both enable password and enable secret can be configured to provide for the privilege-level authentication. Example 9-6 shows how to configure either enable password or enable secret to gain access to a specific privilege level.
Example 9-6. Configuring Privilege Levels with enable password or enable secret Commands
Router(config)#enable password level 10 ?
0           Specifies that an unencrypted password will follow
7           Specifies that a hidden password will follow
LINE        The unencrypted (cleartext) enable password
Router(config)# enable secret level 10 ?
0           Specifies that an unencrypted password will follow
5           Specifies that an encrypted secret will follow
LINE        The unencrypted (cleartext) enable secret
Here is a specific example of the privilege level command used in conjunction with enable secret to assign different commands to different privilege levels. In this case, network operators can log in with a secret configured for level 9 privilege access; once properly authenticated, these operators are allowed to reload the routers and look at statistics using the show command. Example 9-7 shows what such a configuration would look like.
Example 9-7. Assigining Different Commands to Different Privilege Levels
Hostname Tallinn
!
privilege exec level 9 show
privilege exec level 9 reload
enable secret level 9 5 $1$dLOD$QR.onv68q3326pzM.Zexj1
The network operators are given the secret; then, they can access the appropriate commands using the following command at the router prompt:
router> enable 9
password: <secret for level 9>
NOTE
The write terminal and show running-config commands display all the commands the current user can modify (that is, all the commands at or below the user's current privilege level). The commands do not display commands above the user's current privilege level because of security considerations.
The show config and show startup-config command does not really show the configuration. It just prints out the contents of NVRAM, which just happens to be the configuration of the router at the time the user does a write memory.
To enable a privileged user to view the entire configuration in memory, the user must modify the privileges for all commands configured on the router. This approach is not recommended because it is quite cumbersome. Instead, the following alternative configuration is suggested:
username showconfig password foo
username showconfig priv 15 autocommand write terminal
With this approach, users with lower priviledge levels can view the configuration without any other additional priviledges. Anyone who knows the foo password can show the configuration by doing an extra login on a spare vty.
AAA Authorization
AAA authorization mechanisms can be used to achieve a similar result as with the privilege level command and define varying command privileges. AAA authorization mechanisms are much more granular and provide more extensive and scalable controls. The following is a sample of what can be defined:
Router(config)#aaa authorization ? auth proxy For authentication proxy services commands For exec (shell) commands config-commands For configuration mode commands configuration For downloading configurations fromAAA server exec For starting and exec (shell) ipmobile For mobile IP services network For network services (PPP, SLIP, ARAP) reverse-access For reverse-access connections
Here is the example when using TACACS+ authorization to deny access to configuration commands which relate to crypto, aaa, and tacacs commands. On the router, you would use the following command:
aaa authorization command 15 tacacs+ none
On the TACACS+ server, you have this:
group=partner_company {
    default service = permit
    cmd = crypto {
       deny .*
    }
    cmd = aaa {
       deny .*
    }
    cmd = tacacs-server {
       deny .*
    }
    cmd = no {
       deny crypto.*
       deny aaa.*
       deny tacacs.*
    }
}
user = luser {
    login = des slslkdfjse
    member=partner_company
}
The first portion of the cmd = crypto … statement denies any crypto, aaa, and tacacs configuration commands. The second portion of the statement beginning with cmd=no does not allow the group to remove the crypto, aaa, or tacacs commands.
The Catalyst family of switches (Catalyst 4000, Catalyst 5000, and Catalyst 6000 running CatOS) also has a basic and more privileged access mode. The privileged mode has supported some form of authentication, beginning in the 2.2 code. Enhancements have been added with later versions, and listed here are the most basic commands to get started. For Cisco Catalyst switches, basic access mode is denoted by the > prompt after the system prompt; privileged access is indicated by the word (enable) in the system prompt. Table 9-4 displays the basic mode commands; Table 9-5 shows the privileged mode commands. (Both tables list the commands available when your system is equipped with a Supervisor Engine I or II module.)
Table 9-4. Cisco Switch Basic Access Commands
Table 9-5. Cisco Switch Privilege Access Commands
Command | Description |
|---|---|
Configure system from terminal/network. | |
Disable privileged mode. | |
Disconnect user session. | |
Download code to a processor. | |
Enable privileged mode. | |
Show this message. | |
Show contents of history substitution buffer. | |
Send echo packets to hosts. | |
Exit from the administration session. | |
Reconfirm VMPS. | |
Reset system or module. | |
Tunnel to ATM or router module. | |
Attach/detach Serial Line IP (SLIP) interface. | |
Telnet to a remote host. | |
Upload code from a processor. | |
Wait for x seconds. | |
To authenticate a user for privileged access on Cisco switches, multiple forms of authentication are possible:
Using a AAA server (either TACACS+ or RADIUS)
Using Kerberos
Using a locally defined password
The commands required to specify the authentication are as follows:
set authentication enable {radius | tacacs | kerberos} {enable | disable}
    [console | telnet | http | all] {primary}
set authentication enable local {enable | disable}
    [console | telnet | http | all]
set authentication enable attempt {count} [console | remote]
set authentication enable lockout {time} [console | remote]
The default is that local authentication is enabled for console and Telnet sessions. When the keyword primary is used, it specifies which authetication method is tried first. If a primary method is not specified, the authentication is tried in the order in which the authentication methods were enabled. In addition, it is possible to specify the number of login attempts and the period of time a user is locked out of the switch after unsuccessfully attempting to log in. The keyword remote applies to remote logins such as Telnet, Secure Shell (SSH), Kerberos, and HTTP.
The locally defined enable password is configured using the set enablepass command. The command prompts you for the old password. If the password you enter is valid, you are prompted to enter a new password and to verify the new password. A zero-length password is allowed. Example 9-8 shows how you would configure a locally defined enable password.
Example 9-8. Configuring a Locally Defined Enable Password
Console> (enable) set enablepass
Enter old password: <old_password>
Enter new password: <new_password>
Retype new password: <new_password>
Password changed.
Console> (enable)
TIP
In some older versions of CatOS, the passwords on the switch are not encrypted. Take care when changing or viewing configurations to ensure that no unauthorized person can view the password.
If TACACS+ is used as the enable authentication method, the switch also has the capability to authorize privileged mode session events. This is accomplished with the following command:
set authorization enable enable {option} {fallbackoption}
    [console | telnet | both]
The option can be one of three values:
Example 9-9 shows the commands required to provide enable authentication and authorization using TACACS+.
Example 9-9. Switch Privileged Mode Authentication and Authorization with TACACS+
! Make sure there is a back door available in case the TACACS+
! server is unavailable.

set authentication enable local enable

! Enable TACACS+ authentication and TACACS+ server parameters.

set authentication enable tacacs enable primary
set tacacs server 144.254.5.9
set tacacs key LetMeIn

! Set the number of console and remote login enable mode attempts to 3.

set authentication enable attempt 3

! Set the enable mode lockout time to 5 minutes for console login.

set authentication enable lockout 300 console

! Set the enable mode lockout time to 10 minutes for remote login.

set authentication enable lockout 600 remote

! Configure the switch to require enable authorization.  Allow for
! no authorization if the server is down.


set authorization enable enable tacacs+ none both
Starting in CatOS version 7.5.1, local user authentication is possible where a username/password combination can be used to authenticate/authorize users. This is accomplished using the following commands:
set localuser user username password userpassword privilege [0 | 15]
set localuser authentication enable
There are only two privilege levels for local user authentication, 0 or 15. Level 0 is the nonprivileged EXEC level. Level 15 is the privileged enable level. Note that if a user is set as using privilege level 0 but knows the enable mode password, that user can continue to authenticate for enable mode. A maximum of 25 local users can be configured on each switch. The defined user password is encrypted in the configuration file.
The Private Internet Exchange (PIX) firewall contains a command set based on Cisco IOS technologies. The unprivileged basic mode is available when you first access the PIX firewall; this mode displays the > prompt and specifies commands with privilege level 0. The basic mode enables you to view restricted settings. Privileged mode displays the # prompt and enables you to change current settings—these commands are at privilege level 15. Any unprivileged command also works in privileged mode. To show the privilege levels settings for all commands, issue the command show privilege all. Tables 9-6 and 9-7 display the basic mode and privileged mode commands for the PIX firewall.
Table 9-7. Cisco PIX Firewall Privileged Access Commands
To authenticate a user for privileged access on PIX firewalls, you can use either a privileged mode password or a AAA authentication. The privileged mode password can be specified with this command:
enable password <password> [encrypted]
The password is encrypted in the configuration file using MD5. If you use the word encrypted during configuration, you are specifying that the password you enter is already encrypted. The encrypted password must be 16 characters in length.
Example 9-10 shows an example of entering the enable password command unencrypted.
Example 9-10. Entering the Enable Password Unencrypted
enable password thisisasecret
show enable password
enable password feCkwUGktTCAgIbD encrypted
Example 9-11 shows an example of entering the enable password command encrypted.
Example 9-11. Entering the Enable Password Encrypted
enable password thisisgibberish encrypted
show enable password
enable password thisisgibberish encrypted
A more scalable authentication method is to use AAA, which is accomplished using the following command:
aaa authentication [serial | enable | telnet | ssh | http] console group_tag
When used with the console option, it enables authentication service for access to the PIX firewall console over Telnet or from the console connector on the PIX firewall unit. TACACS+, RADIUS, or a locally defined user authentication database can be specified. To use a locally defined user authentication base, the word local is specified as the group tag. Example 9-12 shows a configuration in which enable access is authenticated using a locally defined user database.
It is possible to assign different privilege levels for certain commands and then assign users to only have privilege levels to use those commands. This is done with the following command:
Privilege [show | clear | configure] level level mode [enable | configure]
    command command
Example 9-13 shows a configuration where privilege level 6 is assigned to user Cathy to perform only a specified set of show commands.
Example 9-13. Setting Up a Specified Privilege Level for Specific Commands
! Define the username with associated privilege level.

username Cathy password MySecret privilege 6

! Set up the specified commands to correspond to privilege level 6.

privilege show level 6 command alias
privilege show level 6 command arp
privilege show level 6 command conn
privilege show level 6 command block
A number of mechanisms enable users to gain basic access to a network device. Most devices have console ports that allow a physical connection to a given device. The console port is a terminal line port (tty port). A console port is extremely useful in cases where the network is down; it is often a last-resort method of communicating with the device. The virtual terminal (vty) ports are usually for remote console access. Administrators can remotely Telnet, SSH, or rlogin into a device to access and perform all commands as if they were attached to the device with a physical console connection. Auxiliary ports can be used for modem support and asynchronous connections.
Authentication and authorization capabilities for console ports, vty ports, or auxiliary lines vary by product. At a minimum, users should be authenticated before gaining device access. Consistent authentication mechanisms should be used if possible to simplify keeping track of passwords. In addition, login banners can be configured on most devices. These are essential for legal prosecution, should you ever need to prosecute an intruder for unauthorized access. Keep the following important points in mind when wording this banner:
Do not include any wording that even remotely can be construed as an invitation to access the device (such as using the word “welcome”).
Do not include any information that can divulge which operating system is being used, what the hardware is, or what logical interface has been accessed.
Include statements that advertise that unauthorized access is prohibited and violators will be prosecuted under the full extent of the law.
Include statements that advertize that access to the device will be logged and monitored.
To ensure that any legal requirements are met, it is best to consult with your corporate lawyers when constructing these device banners.
Cisco IOS devices can be accessed via console ports, auxiliary ports, and virtual terminal ports. The following sections detail how to effectively secure them.
Console ports typically provide access via a physical connection, but sometimes users connect a terminal server to this port to provide remote console access through the use of reverse Telnet. The following steps will secure console access:
Restrict access to only protocols that will be used to connect to the console port.
Cisco routers do not accept incoming network connections to asynchronous ports (tty lines) by default. You have to specify an incoming transport protocol, or specify transport input all before the line will accept incoming connections. The only protocols that should be configured to access console ports are Telnet and SSH. Telnet is not a secure mechanism and unless used in conjunction with IPsec, it should not be used. Note, however, that Cisco IOS Software currently uses only SSH version 1 and will at some future date support SSH version 2.
Example 9-14 shows the commands needed to set up SSH console access.
Example 9-14. Setting Up Console Access with SSH
! The following two commands define the router's host name and domain name.
! The RSA keys used for SSH are named using these parameters.

hostname SantaCruz
ip domain-name cisco.com

! The next command is used to generate a default 1024-bit RSA key pair.

crypto key generate rsa

! Only allow SSH access for console access.

line console 0
   transport input ssh

! You can also configure the time period when idle  SSH connections get
! cleared and the number of retry attempts.

ip ssh time-out 60
ip ssh authentication-retires 3
Set the session timeout for unattended console ports.
By default, the timeout is 10 minutes and can be modified with the exec-timeout command. Example 9-15 sets the timeout to 1 minute and 30 seconds.
Set up authentication for console access.
Anyone accessing the console port needs to be authenticated. The authentication mechanism used can consist of several methods, which include setting up passwords, using a local username/password database, or using AAA.
By using passwords, where no username has to be entered, the passwords are either cleartext or encrypted in the configuration file. Example 9-16 shows the configuration commands used to set up a password for console access.
Example 9-16. Setting Up a Password for Console Access
Router# Configure terminal
Router(config)# line console 0
Router(config-lin)# password ?
0        Specifies that an unencrypted password will follow
7        Specifies that a hidden password will follow
LINE     The unencrypted (cleartext) line password
For more restricted access control, authentication with a username and a corresponding password can be configured. The username can be set either from a database local to the Cisco IOS device or using a TACACS server. TACACS has the advantage of more flexibility and an easier database management control mechanism; however, it is being deprecated for the more flexible AAA method. If you have not yet configured the command aaa new-model, you will see what is in Example 9-17.
Example 9-17. Configuring Console Access with a Username and Corresponding Password
Router# Configure terminal
Router(config# line console 0
Router(config-lin)# login ?
local              Local password checking
tacacs             Use TACACS server for password checking
The local keyword designates using the local database for authentication. Therefore, a local database must be configured on the router. This is done by creating a list of usernames and passwords by using the commands in Example 9-18.
Example 9-18. Configuring a Local User Login Database
Router# Configure terminal
Router(config)# username staff password ?
0             Specifies that an unencrypted password will follow
7             Specifies that a hidden password will follow
LINE          The unencrypted (cleartext) line password
The most scalable mechanism is to use AAA authentication. After you have configured the command aaa new-model, the router expects to use either RADIUS or TACACS+ for authentication and Example 9-19 can be configured.
Example 9-19. Configuring Console Access with AAA Authentication
Router# Configure terminal
Router(config# line console 0
Router(config-lin)# login ?
authentication        Authentication parameters

Router(config-lin)# login authentication?
WORD                  Use an authentication list with this name
Default               Use the default authentication list
The login authentication command for console access must be used with the aaa authentication login command to configure the default or specified word authentication method(s). If this command is not used for console login, the login will succeed without any authentication checks.
The AAA authentication login methods can be any of the ones listed in Table 9-8.
Table 9-8. AAA Authentication Login Methods
Example 9-20 shows a sample configuration in which the console access is secured using AAA authentication. Note that specific RADIUS commands may vary a little depending on software versions used. (Specifically, the keyword group, which allows for a list of multiple servers to be defined, did not exist in older software versions, but this feature is backward compatible if the word is not used.)
Example 9-20. Console Connection Authentication Using AAA
! The following command turns on AAA.

aaa new-model

! The username and password that follow constitute the local
! authentication database.

username merike  password 7 082C495C0012001E010F02
username cathy  password 7 0574837212001E010F0296

! The next commands define a radius server and key.

radius-server host  144.254.5.5
radius server key LetMeIn

! The following commands define the default authentication login  method list.
! If the RADIUS server
! fails, the local database is used for authentication.

aaa authentication login default group radius local

! The following are the console-specific commands where authentication
! is specified as requiring a login
! username/password as defined by AAA authentication.

line console 0
   transport input ssh
   exec-timeout 1 30
   login authentication default
It is good practice to have the local database contain specific users' names and passwords instead of creating a group username and password. The fewer passwords that are shared, the better.
The auxiliary port should generally be disabled. If there is an absolute need to connect this port to a modem, similar mechanisms to secure this port should be used as were discussed for the console port. Interactive access can be completely prevented by applying the configuration command no exec to any asynchronous line. This command allows only an outgoing connection for a line. When a user tries to Telnet to a line with the no exec command configured, the user gets no response when he presses the Return (Enter) key at the login screen. To define which protocols to use to connect to a specific line of the router, use the transport input line configuration command:
transport input {all | lat | mop | nasi | none | pad | rlogin | telnet | v120}
NOTE
The none option became the default in Cisco IOS Software Release 11.1. Before Release 11.1, the default was all.
Example 9-21 shows a configuration where the auxiliary port does not accept any incoming connections and will not even give a login prompt.
Most versions of IOS have five virtual terminal ports, numbered 0 through 4. Some Cisco IOS Software versions may have more, and it is important to know how many vty ports you have and to configure them all securely. You can list them using the show line vty command.
The same steps for securing console ports should be used with securing the vty lines with one added step. It is possible to configure a specific access list (that is, filter) that allows vty access from only a specific network or host(s). This functionality should be used if login to vty terminals is always from a known set of IP addresses. Example 9-22 shows the commands used to restrict vty access.
You can access the switch command-line interface (CLI) from a console terminal connected to an EIA/TIA-232 port or through remote methods including Telnet, HTTP, or SSH sessions. The set authentication login command enables you to designate the authentication mechanism to use for either console or remote login access:
set authentication login {radius | tacacs | kerberos} {enable | disable}
    [console | telnet | http | all]
The deafult is local authentication and a maximum of three login attempts are permitted. If TACACS+ is used as the authentication method, the switch also has the capability to authorize session events. This is accomplished with the following command:
set authorization commands enable {config | enable | all} {option}
    {fallbackoption} [console | telnet | both]
This is similar to the authorization commands specifically for privileged access (enable mode). However, it does not replace it.
The Cisco switches also have the capability to restrict access to specified hosts through the set ip permit command. When you enable this feature, Telnet access, SSH access, and SNMP services are authorized only for the IP addresses of the hosts configured on the permit list. Up to 100 entries can be configured. The IP permit list is the first level of security for the Telnet and SNMP protocols. All other Transmission Control Protocol/Internet Protocol (TCP/IP) services continue to work for any hosts when you enable the IP permit list. Outbound Telnet, Trivial File Transfer Protocol (TFTP), and other IP-based services remain unaffected by the IP permit list. SNMP from nonpermitted IP addresses have no response—that is, the request times out. Notifications of unauthorized access attempts are available through SNMP traps and syslog options.
Before enabling the IP permit feature, be sure that you configure your IP address in the permit list, especially when configuring through SNMP. Failure to do so results in immediate disconnection from the system being configured. (I recommend that you disable the IP permit feature before clearing the IP permit entries or host addresses.)
Example 9-23 shows a configuration for allowing a switch to accept SSH connections from network 144.254.9.0 and network 144.254.19.0.
Example 9-23. Switch with SSH Access
! First generate the 1024-bit RSA public/private key pair used for SSH.

 set crypto key rsa 1024

! Define the range of ip addresses from where to allow connections.

set ip permit 144.254.9.0 0.0.0.255
set ip permit 144.254.19.0 0.0.0.255

! Restrict IP access to only allow remote login SSH connections.

set ip permit enable ssh
The PIX firewall CLI can be accessed using the serial console connector or over remote login using Telnet or SSH. The following command enables authentication using either TACACS+ or RADIUS:
aaa authentication [serial | enable | telnet | ssh | http] console group_tag
When used with the console option, this command enables authentication service for access to the PIX firewall console over Telnet or from the serial console connector on the PIX firewall unit. This command is used together with the aaa-server command:
aaa-server group-tag (interface_name) host server-IP-address shared-key
    timeout seconds
aaa-server group_tag protocol [tacacs+ | radius]
You can define 14 groups of servers with a maximum of 14 servers each. Certain types of AAA services can be directed to different servers; such as TACACS+ servers for inbound traffic and another for outbound traffic. Services can also be set up to fail over to multiple servers. The interface name defines on which interface the authentication server resides.
Telnet access to the PIX firewall console is available for both the inside and outside interface. For Telnet access to work from the outside interface, however, an IPsec client needs to be set up to initiate a VPN connection to the PIX using IPsec. Inside interface refers to the interface connected to the corporate network, whereas outside interface refers to the interface connected to the Internet, as shown in Figure 9-2.

Telnet access requires use of the telnet command:
telnet ip-address [netmask] [inside | outside]
The telnet command enables you to decide who can access the PIX firewall with Telnet. Up to 16 hosts or networks are allowed access to the PIX firewall console with Telnet, five simultaneously.
To set up a password for Telnet access to the console, you must configure the passwd command:
passwd password [encrypted]
The default password is cisco. The passwd command sets a password for Telnet and gives the PIX Firewall Manager access to the firewall console. An empty password can be used and is also changed into an encrypted string. Any use of a write command displays or writes the password in encrypted form. After passwords are encrypted, they cannot be changed back to plaintext. Consider Example 9-24.
passwd jMorNbK0514fadBh encrypted
NOTE
Default password or passwords should be changed before any network infrastructure device is put into production use.
WARNING
Authentication of the serial console creates a potential deadlock situation if the authentication server requests are not answered and you must access the console to attempt diagnosis. If the console login request to authentication times out, you can gain access to the PIX firewall from the serial console by entering the username “pix” and the enable password.
It is much more scalable to set up AAA mechanisms to authenticate Telnet access. Example 9-25 shows a configuration where Telnet access is authenticated using AAA.
Example 9-25. Restricted Telnet Access Using AAA
! Set up Telnet access for specified hosts.

telnet 144.254.9.0 0.0.0.255  inside
!Define the server group TelnetAccess and the protocol to use, RADIUS.

aaa-server TelnetAccess protocol radius

! Set up the AAA server parameters which includes IP address of RADIUS
! server and shared key.

aaa-server TelnetAccess (inside) host 144.254.5.5 ThisIsASecret timeout 60
! Configure AAA authentication for Telnet access.
aaa authentication telnet console TelnetAccess
SSH access to the PIX firewall console is available from any interface without IPsec configured, and requires use of the ssh command. Older software that does not support AAA authentication requires that the Telnet password be used to authenticate SSH access. Example 9-26 illustrates the use of SSH for secure and authenticated access using AAA.
Example 9-26. Authenticated SSH Access to the PIX Firewall
! The following two commands define the PIX host name and domain name.
! The RSA keys used for SSH
! are named using these parameters.

hostname PIX-Venice
domain-name cisco.com

! The next command is used to generate a default 1024-bit RSA key pair.

ca generate rsa key 1024

! Save the key to Flash memory.

ca save all
! Accept SSH connections from the outside interface from any host
! from a particular network and specify
! that the connection will timeout after 5 minutes of inactivity.

ssh 208.251.229.0 0.0.0.255 outside
ssh timeout 5

! Set up the AAA server parameters using a TACACS+ server.

aaa-server SSHAccess protocol tacacs+
aaa-server SSHAccess (inside) host 144.254.5.9 ThisIsAKey  timeout 10
! Configure AAA authentication for SSH access.
aaa authentication ssh console SSHAccess
NOTE
Similar to the Telnet model, if an aaa authentication ssh console [group_tag] command statement is not defined, you can gain access to the PIX firewall console with the username “pix” and with the PIX firewall Telnet password. If the aaa command is defined but the SSH authentication requests times out, you can gain access to the PIX firewall using username “pix” and the enable password. By default, the Telnet password is cisco and the enable password is not set.
If the console login request times out, you can gain access to the PIX firewall from the serial console by entering the username “pix” and the enable password.
With the variety of configurable passwords for different devices, password management can be a nightmare. The use of AAA mechanisms can greatly reduce the administrative headaches and because many current software releases support AAA authentication and authorization, it is highly recommended that this method be used. In addition, the following rules dictate good security paractices:
Privileged-level passwords should be unique from any other password.
Username/password privileges should be configured on a per-user basis and group shared keys should be avoided.
Create passwords that avoid dictionary words, dates, phone numbers, and names.
Always change any default passwords.
The Simple Network Management Protocol (SNMP) is often used to gather statistics and remotely monitor network infrastructure devices. It is a very simplistic protocol and therefore has virtually no security built in to its original version. In SNMP version 1 (SNMPv1), community strings (passwords) are sent in cleartext. These community strings are used to authenticate messages sent between the SNMP manager and the agent. These community strings can easily be stolen by someone eavesdropping on the wire.
SNMPv2 addresses some of the known security weaknesses of SNMPv1. Specifically, version 2 uses the MD5 algorithm to authenticate messages between the SNMP server and the agent.
In most devices, SNMP has two options:
Whenever possible, configure filters to allow only specified hosts to have SNMP access to devices. In addition, use just the read-only option to gather statistics because the read-write option is rarely used and creates additional security risks.
SNMPv3 has recently been added to some Cisco products. This version of SNMP added authentication through the use of the HMAC-MD5 or HMAC-SHA algorithms, as well as confidentiality through the use of 56-bit DES encryption. Specific details on how to set up SNMPv3 are available at http://www.cisco.com/en/US/products/sw/iosswrel/ps1830/products_feature_guide09186a00800878fa.html.
To facilitate configuration and management of network devices, many manufacturers are implementing HTTP servers into devices to create cross-platform, easy management solutions. Keep in mind that the communication between the HTTP client and the HTTP server embedded into the network infrastructure devices should be secured (that is, encrypted). This means that you must use some of the technologies (such as HTTPS, SSL, SSH, or possibly even IPsec) discussed in Chapter 2, “Security Technologies.”
Most Cisco IOS routers, catalyst switches, and PIX firewalls have incorporated mechanisms to authenticate and restrict access for HTTP remote access. It is extremely important that these be configured. Some versions of software will have HTTP access turned off by default. It is recommended that if there is no need for HTTP access, that the HTTP server be explicitly disabled.
You can issue most of the Cisco IOS commands using a web browser. The Cisco IOS feature is accessed by using the Cisco web browser interface, which is accessed from the router's home page. All Cisco routers and access servers running Cisco IOS Software Release 11.0(6) or later have an HTTP server, which is an embedded subcomponent of the Cisco Cisco IOS Software. The HTTP server allows users with a privilege level of 15 (or any other configured privilege level) to access the Cisco web browser interface.
Router(config)#access-class         Restrict access by access class
authentication       Set HTTP authentication method
port                 HTTP port
server               Enable HTTP server
NOTE
Before Cisco IOS Software Release 11.3, only users with privilege level 15 could use this feature, and the only authentication mechanism was the enable password.
You can use three different methods to authenticate HTTP:
Router(config)#ip http authentication ?
enable        Use enable passwords
local         Use local username and passwords
tacacs        Use TACACS+ to authorize user
To permit users to have access to the HTTP server, you must enable the Cisco web browser interface with the following command:
ip http server
After you have enabled the Cisco web browser interface, users can use a web browser to access web pages associated with the router and to issue commands. Cisco IOS Software currently allows only users with a privilege level of 15 to access the predefined home page for a router or access server. If you have a privilege level other than 15, you can issue Cisco IOS Software commands from a web page where the commands defined for your specific user privilege level are displayed.
To request a router web page for a privilege level other than the default of 15, perform the following steps:
Type the following command in the URL field of your web browser and press Enter (where mode refers to the user privilege level):
http://router-name/level/mode/commandThe browser prompts you for the password.
Type the password and press Enter. The web browser should display a web page specific to your user privilege level, mode, and the command you have requested.
The following example shows what you would type in the URL field of your web browser to request a user privilege level of 9 on a Cisco router named Tallinn:
http://Tallinn/level/9/exec
Example 9-27 shows a configuration in which HTTP access is allowed only from specific hosts and in which the enable password is the method of authenticating HTTP server users.
Example 9-27. Sample Configuration for Securing HTTP Access in Cisco IOS Software
access-list 6 permit 144.254.5.0 0.0.0.255
!
ip http server
ip http  access-class 6
ip http authentication enable
You can find more detailed configuration examples for local authentication for HTTP server users at the Cisco web site at http://www.cisco.com/en/US/tech/tk583/tk642/technologies_configuration_example09186a0080178a51.shtml.
The PIX firewall can also be accessed using a web-based configuration tool. The commands required on the PIX are as follows:
http ip_address [netmask] [if_name]
passwd password
After you have enabled the Cisco PIX web browser interface by specifying a host IP address, users can use a web browser on the specified host to access web pages associated with the PIX firewall console HTML management interface.
Integrity in the campus infrastructure requires that any software image (where image is the executable binary images of programs) running on a device must be valid, and that none of the configurations have been altered by any person other than permitted personnel. You want to ensure that only permitted devices are connected to the network, and that no one is injecting any unwanted data. Integrity is largely available through the use of data-authentication methods, such as checksums and hash functions.
When downloading images onto any network infrastructure device, you may want to ensure that the images have not been modified or changed in transit. Most devices have a checksum verification to ensure that the image will load correctly when the device is rebooted. Any time the checksum does not verify correctly, the image should be erased and replaced with an image containing a successful checksum.
All Cisco Software releases on Cisco Connection Online (CCO) and all floppy disk-based Cisco IOS Software releases subsequent to and including 10.2(5) are protected by MD5 image authentication. MD5, defined in RFC 1321, scans the image and produces a unique 128-bit checksum. The mathematics of the MD5 algorithm give you a checksum mechanism that makes it computationally not feasible to create a substitute file with the same checksum as a chosen target file and therefore helps prevent a specific, targeted attack on a specific file (in this case, the router image).
MD5 allows Cisco Connection Online users to verify that no bits in the image were corrupted during file transfer, reducing the possibility of loading corrupted software onto their routers. MD5 floppy disk verification ensures image integrity on disk-based shipments.
In corporate campus networks, there are increasingly more requests to provide integrity at the workgroup level. On the Catalyst series switches, the port security feature allows the switch to block input traffic to an Ethernet or Fast Ethernet port when the MAC address of a station attempting to access the port differs from the configured MAC address. (See Figure 9-3.)

When a port receives a packet, the module compares the source address of that packet to the secure source address learned by the port. When a source address change occurs, the port is disabled, and the LED for that port turns orange. When the port is re-enabled, the port LED turns green.
Secure port filtering does not apply to trunk ports, where the source addresses change frequently.
MAC address security is configured with the following command:
set port security modNum/portNum(s) {enable | disable} [mac_addr]
If the MAC address is not given, the address is learned. After the address is learned, the address remains unchanged until the system relearns it when you reenter the command. The MAC address is stored in NVRAM and is maintained even after a reset. When a packet's source address does not match the allowed address, the port through which the packet came is disabled, and a link-down trap is sent to the SNMP manager.
Example 9-28 shows a port security configuration where two critical web servers are connected to ports 2/1 and 2/2 on a switch. In case of a violation, the ports shut down for 1 hour (60 minutes). Although the example only shows the use of a single MAC address per port, multiple MAC addresses (up to 1024) can be used with port security on some switches.
Example 9-28. Port Security on a Catalyst Switch
! Enable the port security feature on both ports.

 set port security 2/1 enable
Set port seecurity 2/2 enable

! Specify the MAC addresses.

set port security 2/1 enable 00-60-8a-7b-8d-9e
set port security 2/2 enable 00-60-1c-2d-3e-4f

! Configure the time the port shuts down in case of violation.

set port security 2/1 shutdown 60
set port security 2/2 shutdown 60
Newer versions of the Cisco switches support 802.1x port authentication. 802.1x was discussed in detail in Chapter 2. 802.1x authenticates each user device that is connected to a switch port and assigns the port to a VLAN before making available any services that are offered by the switch or the LAN. In Catalyst switches, TACACS+, RADIUS, or Kerberos can be used as the authentication protocol, although RADIUS is generally recommended because it has built-in extensions that support EAP frames.
A thorough description and configuration guide for 802.1x port authentication is available from the Cisco website, titled “Configuring 802.1x Authentication.” You can find it at http://www.cisco.com/en/US/products/hw/switches/ps708/products_configuration_guide_chapter09186a0080121d12.html.
Secure routing encompasses all areas that ensure routing integrity. The simplest way to create complete havoc in a network is to inadvertently inject bogus routes into the core network. This problem can be minimized through the use of route authentication and route filtering.
Route authentication ensures that routing updates come from a trusted source and that none of the data has been tampered with. It uses a cryptographic checksum, the one-way hash function, to ensure the authentication of a peer and the integrity of the contents of the routing update.
All peer routers must be configured with a specific key and encryption algorithm. The typical hash algorithms used are MD5, SHA-1, and IDEA. Cisco routers use MD5. The IP routing protocols that currently support route authentication include the following:
For the IP routing protocols in Cisco routers that do not support MD5 route authentication, RIPv1, or IGRP, the command validate-update-source enables you to ensure that the source IP address of incoming routing updates is on the same IP network as one of the addresses defined for the receiving interface. This feature is on by default.
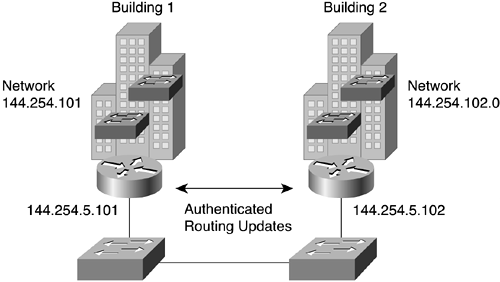
Example 9-29 shows a sample configuration for two routers using EIGRP and route authentication. (See Figure 9-4.)
Example 9-29. Sample Configuration for EIGRP Route Authentication
Hostname Building1
!
key chain To-Bldg2
key 1
key-string secretkey
accept-lifetime 08:30:00 June 6 1998 infinite
send-lifetime 08:30:00 June 6 1998 infinite
!
interface FE 1
ip address 144.254.2.2 255.255.255.0
ip authentication mode eigrp 109 md5
ip authentication key-chain eigrp 109 toBuilding1
!
router eigrp 109
network 144.254.0.0

Hostname Building2
!
key chain To-Bldg1
key 1
key-string secretkey
accept-lifetime 08:30:00 June 6 1998 infinite
send-lifetime 08:30:00 June 6 1998 infinite
!
interface FE 1
ip address 144.254.2.3 255.255.255.0
ip authentication mode eigrp 109 md5
ip authentication key-chain eigrp 109 toBuilding2
!
router eigrp 109
network 144.254.0.0
By default, all dynamic routing protocols propagate routing information. At times, you may not want certain other devices or portions of your network to learn your network topology from the routing protocol. If this is the case, you must take explicit steps to prevent route propagation.
To prevent routing updates through a specified router interface, use the following command in router configuration mode:
passive interface [interface type and number]
To prevent other routers from learning one or more routes, you can suppress routes from being advertised in routing updates. You do this to prevent other routers from learning a particular device's interpretation of one or more routes. To suppress routes from being advertised in routing updates, use the following command in router configuration mode:
distribute-list {access-list-number | name} out [interface-name]
You may want to avoid processing certain routes listed in incoming updates. This feature does not apply to OSPF or IS-IS. To avoid processing certain routes, configure the following command in router configuration mode:
distribute-list {access-list-number | name} in [interface-name]
It is also possible to filter sources of routing information. You can do this to prioritize routing information from different sources, because some pieces of routing information may be more accurate than others. For Cisco IOS routers, an administrative distance enables you to rate the trustworthiness of a routing information source, such as an individual router or a group of routers. In a large network, some routing protocols and some routers can be more reliable than others as sources of routing information. Also, when multiple routing processes are running in the same router for IP, it is possible for the same route to be advertised by more than one routing process. By specifying administrative distance values, you enable the router to intelligently discriminate between sources of routing information. The router will always pick the route with a routing protocol that has the lowest administrative distance. To filter sources of routing information, give the following command in router configuration mode:
distance weight [address mask [access-list-number | name]] [ip]
The weight argument can be an integer from 10 to 255. (The values 0 to 9 are reserved for internal use.) Used alone, the weight argument specifies a default administrative distance that the Cisco IOS Software uses when no other specification exists for a routing information source. Routes with a distance of 255 are not installed in the routing table.
WARNING
None of the preceding commands with the distribution and attributes attached to distributed routes should be played with lightly. In nontrivial networks, unpredictable and disruptive behavior can result.
Figure 9-5 shows a sample scenario in which the core network is comprised of 100BASE-T switches connected to routers. 10 BASE-T interfaces are used to connect the local LANs using the RIP routing protocol. Route filtering enables you to ensure that only default routes are announced on the local LANs and that no inadvertent, misbehaving host can source a default route to the backbone.
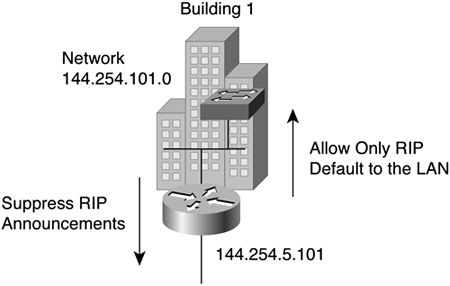
NOTE
If you are using DHCP on the LAN, the hosts on the LAN have a default router configured and there is no need to use RIP. In fact, by configuring default routes and using HSRP (HSRP is discussed later in this chapter in the section “Redundancy Features”), the need for running any routing protocols on hosts, even just to listen to updates, is no longer necessary.
Example 9-30 shows a sample router configuration illustrating the use of the passive interface, distance, and distribute list commands.
Example 9-30. Sample Configuration for Route Filtering and Route Believability
router eigrp 109
network 144.254.0.0
distance 255
distance 100 144.254.5.0 0.0.0.255
!
router rip
network 144.254.0.0
passive interface FE 1/0
distribute list 11 out
distance 255
!
access-list 11 permit 0.0.0.0
In the configuration in Example 9-30, the passive interface command is not required for the LAN interface for EIGRP because EIGRP requires a neighbor before sending out routing updates. Because no other EIGRP neighbors exist on the LAN, no routing updates will be sent out.
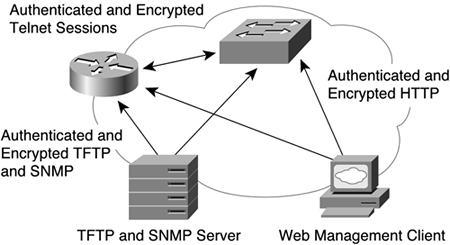
Data confidentiality pertains to encryption. Whether you encrypt traffic within the main corporate infrastructure depends largely on how sensitive the information is and how likely it is that the data can be intercepted. In many environments, encryption of sensitive data occurs mostly between dial-in access points and Internet access points.
Within the corporate network infrastructure, confidentiality is important when accessing device information. Typically, it is prudent to encrypt the following:
Telnet sessions to devices
TFTP configuration downloads
SNMP transactions to and from network devices
HTTP access to device information
Kerberos-encrypted Telnet can be used to provide confidential Telnet access. (The Cisco IOS Software has included this feature since Cisco IOS Software Release 11.2.) Figure 9-6 shows some likely traffic that would require confidentiality for corporate infrastructure devices: Telnet sessions, SNMP sessions, TFTP sessions, and HTTP sessions. SSH and IPsec offer such support. The choice of which technology to use depends largely on what is currently supported in various products. Most recent software versions of Cisco IOS routers, Catalyst switches, and the PIX firewall all have SSH and IPsec capability. IPsec configuration is discussed in more detail in Chapter 11, “Securing Remote Dial-In Access,” and Chapter 12, “Securing VPN, Wireless, and VoIP Networks.”
Network availability ensures that redundancy measures are in place and that features are configured to deter most common attacks. For critical devices, redundant power supplies are a must. (Don't forget to put them on separate circuits—not just separate power outlets—leading to a distinctly separate circuit breaker at the distribution panel.) There are two reasons for incurring the expense of this kind of redundant power supply:
Should a power supply fail, it might cause the circuit to go dead. (That is, it will cause the breaker back at the distribution panel to blow open.)
The startup inrush current of two supplies in parallel can cause a breaker to open up.
You also may want to consider uninterruptable power supplies (UPSs) as insurance against catastrophic power outages. The UPSs should be rated to carry the maximum load for at least 10 minutes, and the UPS should be able to deliver a notification or warning to the operator when the UPS senses that the primary power has failed for more than approximately 30 seconds. If there is a possibility of severe electrical outages, you may want to consider a backup generator if your network requires continuous uptime.
NOTE
To determine whether the additional cost of a UPS makes sense, consider the impact of a power loss or downtime for each piece of equipment. If a 100BASE-T switch goes down in a building and is on the same power supply as most of the building's users, it may not make sense to keep the switch operational. However, if a router is on the same power supply, and the design of the network is such that the router must stay up to continue giving valid routing information to other routers, a UPS for the router would be necessary.
Equipment redundancy is largely an issue of how quickly the outage of a piece of equipment can be resolved. Any network infrastructure device that must be available 100 percent of the time is an obvious candidate for complete redundancy to cover the worst possible scenario. Many devices have incorporated redundant processor cards in high-performance equipment to ensure a smooth, dynamic failover in the event of single-card failures. In addition, new protocols or enhancements to existing protocols have been developed to ensure that redundancy with multiple boxes have failover capability without user intervention. To have redundant coverage, make sure that failover to the backup system happens automatically.
For critical network segments that cannot have any routing outages, the Cisco IOS devices supporting these segments should be configured with the Hot Standby Router Protocol (HSRP). HSRP provides high network availability because it routes IP traffic from hosts on Ethernet, FDDI, or Token Ring networks without relying on the availability of any single router.
When HSRP is configured on a network segment, it provides a virtual MAC address and an IP address that is shared among routers in a group of routers that is running the HSRP. One of these devices is selected by the protocol to be the active router. The active router receives and routes packets destined for the group's MAC address. For n routers running the HSRP, there are n + 1 IP and MAC addresses assigned.
The HSRP detects when the designated active router fails, at which point a selected standby router assumes control of the hot standby group's MAC and IP addresses. A new standby router is also selected at that time.
Devices running the HSRP send and receive multicast UDP-based hello packets to detect router failure and to designate active and standby routers.
NOTE
When the HSRP is configured on an interface, ICMP redirect messages are disabled by default for the interface.
The HSRP feature is configured with the following interface command:
standby [group-number] ip [ip-address [secondary]]
You can configure a number of group attributes to affect how the local router participates in the HSRP. Here is an example of these attributes:
Router(config)#int e 0
Router(config-if)#standby ?
<0-255>                 Group number
authentication          Authentication string
ip                      Enable hot standby protocol for IP
mac-address             Specify virtual MAC address for the virtual router
preempt                 Overthrow lower priority designated routers
priority                Priority level
timers                  Hot standby timers
track                   Priority tracks this interface state
use-bia                 Hot standby uses interface's burned-in address
Consider the scenario shown in Figure 9-7.

The configuration of a primary router is shown in Example 9-31.
Example 9-31. Primary Router HSRP Configuration
hostname Primary
!
interface Ethernet1
  ip address 144.254.1.1 255.255.255.0
  no ip redirects
  standby priority 200
  standby preempt
  standby ip 144.254.1.3
The configuration of a standby router is shown in Example 9-32.
Switches are normally connected hierarchically, as shown in Figure 9-8. Although there still exist large flat networks built with switches, a hierarchtical architecture is much more manageable and can use features to address security issues, such as the ones discussed in this section.

In simple networks, the upper two levels of the hierarchy can be collapsed into a single backbone layer. Figure 9-8 shows the network topology after the spanning tree converges into a loop-free topology. The spanning tree has blocked the redundant links to avoid loops. Every access switch and distribution switch in the figure has a redundant uplink.
The time it takes to detect and correct failures is important. For Cisco switches, the Spanning Tree Protocol UPlinkFast and BackboneFast features reduce spanning-tree convergence times. UPlinkFast provides fast convergence after a spanning-tree topology change and achieves load balancing between redundant links using uplink groups. An uplink group is a set of ports (per VLAN), only one of which is forwarding at any given time. Specifically, an uplink group consists of the root port (which is forwarding) and a set of blocked ports, except for self-looping ports. The uplink group provides an alternative path in case the currently forwarding link fails. Be warned that the topology must not allow loops during a change. The topology must be architected so that one can turn off spanning tree's normal behavior and make the link transition without creating any loops.
NOTE
The UPlinkFast feature is most useful in wiring-closet switches. This feature may not be useful for other types of applications.
To configure a switch as the primary root switch, enter this command:
set spantree root vlans [diameter network_diameter] [hello hello_time]
This command reduces the bridge priority (the value associated with the switch) from the default (32,768) to a significantly lower value, which allows the switch to become the root switch.
NOTE
Run the set spantree root command on backbone switches or distribution switches only; do not run it on access switches.
To configure a switch as the secondary root switch, enter this command:
set spantree root [secondary] vlans [dia network_diameter] [hello hello_time]
You can run this command on more than one switch to create multiple backup switches in case the primary root switch fails.
The BackboneFast Convergence feature reduces the time needed for the spanning tree to converge after experiencing a topology change caused by indirect link failures. This feature complements the UPlinkFast feature just described. However, the BackboneFast Convergence feature is designed for all switches that experience indirect link failures.
To configure the BackboneFast Convergence feature, enter this command:
set spantree backbonefast enable
The Multiple Default IP Gateways feature enables you to configure up to three default IP gateways. Defining multiple default IP gateways provides redundancy. In the event that the primary gateway cannot be reached, the switch uses the secondary default IP gateways in the order in which they are configured. This feature is configured with the following command:
set ip route destination gateway [metric] [primary]
Use the primary keyword to give a default IP gateway higher priority than the other default IP gateway(s). If you do not designate a primary default IP gateway, the system chooses the default IP gateway based on the order in which the gateways were configured. If two or more gateways are designated as primary gateways, the system chooses the last primary gateway configured to be the default IP gateway.
The Cisco PIX firewall is usually a critical device in most corporate infrastructures. To eliminate it being a single point of failure, it is prudent to install a redundant PIX firewall and to use the failover command to ensure fast dynamic recovery in the event that the primary PIX has a power failure or some other type of failure. There are two modes of failover:
Stateless—. When the active PIX firewall fails and the standby PIX becomes active, all connections are lost and the client applications must initiate new connections.
Stateful—. When the active PIX firewall fails and the standby PIX becomes available, connection information is available at the new PIX and client applications retain their communication sessions. The TCP connection table is synchronized with the secondary PIX over an interface configured for stateful failover. The interface must be a dedicated 100-Mbps Ethernet interaface. (For the PIX 535, it can also be a Gigabit interface.) Some information that is not included and needs to be rebuilt includes IPsec SA tables, ARP tables, and routing information.
The default failover setup uses serial cable failover, where the serial failover cable is a cross-over cable. For serial cable failover, use the failover command without an argument after you connect the optional failover cable between your primary PIX firewall and a secondary PIX firewall. The default configuration has failover enabled. Enter no failover in the configuration file for the PIX firewall if you will not be using the failover feature. Use the show failover command to verify the status of the connection and to determine which unit is active.
LAN-based failover requires explicit LAN-based failover configuration using the failover lan commands. The show failover lan command displays LAN-based failover information. In addition, for LAN-based failover, you must install a dedicated 100-Mbps or Gigabit Ethernet, full-duplex VLAN switch connection for failover operations. Failover is not supported using a crossover Ethernet cable between two PIX firewall units. Although the same dedicated interface can also be used for stateful failover, it is recommended to use two separate interfaces because many times the dedicated interface does not have enough capacity to handle both the LAN-based failover and stateful failover traffic.
NOTE
The PIX 506/506E cannot be used for failover in any configuration. The primary unit in the PIX 515/515E, PIX 525, or PIX 535 failover pair must have an unrestricted (UR) license. The secondary unit can have failover (FO) or UR license. However, the failover pair must be two otherwise identical units with the same PIX firewall hardware and software.
It is possible to force a failover by using the failover active command to initiate a failover switch from the standby unit, or the no failover active command from the active unit to initiate a failover switch. This proves useful when returning a previously failed unit to service, or to force an active unit off line for maintenance.
Failover IP addresses must be configured on each interface card. The active unit of the failover pair uses the system IP addresses and the primary unit's MAC address; the standby unit uses the failover IP addresses and the secondary unit's MAC address. The system IP addresses and the failover IP addresses must be on the same subnet with no router between them.
The failover mac address command is used to configure a virtual MAC address for a PIX firewall failover pair. It sets the PIX firewall to use the virtual MAC address stored in the PIX firewall configuration after failover, instead of obtaining a MAC address by contacting its failover peer. This enables the PIX firewall failover pair to maintain the correct MAC addresses after failover. If a virtual MAC address is not specified, the PIX firewall failover pair uses the burned-in network interface card (NIC) address as the MAC address. For LAN-based failover, this command is not needed because the IP and MAC addresses do not change when a failover occurs.
NOTE
Both PIX firewall units in a failover pair must have the same configuration. To accomplish this, always enter configuration changes on the active unit in a PIX firewall failover configuration. Use the write memory command on the active unit to save configuration changes to Flash memory (nonvolatile memory) on both the active and the standby units. Changes made on the standby unit are not replicated on the active unit.
Both units in a failover pair communicate through the failover cable. The two units send special failover hello packets to each other over all network interfaces and the failover cable every 15 seconds. The failover feature in PIX firewall monitors failover communication, the power status of the other unit, and the hello packets received at each interface. If two consecutive hello packets are not received within a time determined by the failover feature, failover starts testing the interfaces to determine which unit has failed and transfers active control to the standby unit.
A multitude of types of attacks can bring a network to its knees. Many can be avoided or constrained with features that have been specifically developed to deter some of the better-known attacks. Appendix D, “Mitigating Distributed Denial-of-Service Attacks,” specifically describes some filtering techniques to use for mitigating distributed denial-of-service (DDoS) attacks. Filtering and logging any violations are by far the most effective ways to mitigate and trace many attacks. The following sections describe some additional features that you may find useful to deploy.
Although it is very difficult to actually recognize spoofed packets, you can use some mechanisms to help prevent some more obvious spoofs. Some of these packets may be caused by simple misconfigurations and routing loops. Whenever possible, filters should be put into place to ensure that only valid network addresses are permitted past the routers. All corporate infrastructure routers should have filters in place to disallow any obviously bogus traffic. For example, any edge router should deny traffic whose source address is one of the RFC reserved addresses shown in Table 9-9.
Table 9-9. RFC Reserved Addresses
Network IP Address | Mask |
|---|---|
127.0.0.0 | 0.255.255.255 |
10.0.0.0 | 0.255.255.255 |
172.16.0.0 | 0.15.255.255 |
192.168.0.0 | 0.0.255.255 |
These IP addresses are specified for special use and are therefore designated as nonroutable in the Internet infrastructure. (That is, no Internet service provider will route these networks; therefore, no edge routers connecting to the Internet should receive packets with these addresses as a source.)
Some devices also have features to assist in tracking down the source of packets with invalid source addresses. For Cisco IOS devices, this is an extension of the access list logging feature that will show the input interface for packets. (For a detailed discussion on Cisco IOS access lists, refer to Chapter 10, “Securing Internet Access.”) It is enabled by adding log-input to an access list entry:
access-list 100 permit ip any host 171.69.233.3 log-input
The output from this command looks like this:
To deter any attack based on fragments, the device must have an option to reassemble the original packet, ensure that the packet is valid, and then fragment the packet again before forwarding it. This check can severely limit system performance; think carefully before rushing off to implement this feature on every device. It is best to determine the most critical, vulnerable area and then place the deterrent there. In most instances in a large corporate network, the most vulnerable areas are at the network access points, such as Internet access or dial-in access.
Some attacks are based on flooding networks with traffic based on directed broadcast addresses, such as the Smurf and Fraggle attacks discussed in Chapter 5, “Threats in an Enterprise Network.” The Cisco IOS command no ip directed-broadcast should be configured on every interface to avoid traffic being broadcast out.
An effective mechanism to be alerted to these types of attacks is to configure filters that would permit ICMP echo requests/replies (for Smurf attacks) or UDP echo requests (for Fraggle attacks). By logging and monitoring this traffic, it is possible to detect whether such an attack is in progress. The source addresses are the addresses of the Smurf or Fraggle reflectors. By looking up the owners of these address blocks in the appropriate Internet “whois” databases, the administrators of these networks can be located and asked for their help in dealing with the attack.
It's important to remember that these reflectors are fellow victims, not attackers. It's extremely rare for attackers to use their own source addresses on IP packets in any DoS flood, and impossible for them to do so in a working Smurf attack. Any address in a flood packet should be assumed to be either completely falsified, or the address of a compromised victim. The most productive approach for the ultimate target of a Smurf attack is to contact the reflectors, either to ask them to reconfigure their networks to shut down the attack, or to ask for their assistance in tracing the attack stream.
NOTE
Temporary filters can be put in place to filter out all attack traffic or the attack traffic from specified hosts. This sort of filter shouldn't usually be left in place permanently. Temporary filters are very often used when large streams of DoS traffic is causing severe network outages. It is good practice to have a template already configured which can then be modified depending on the attack and applied to the appropriate device interface.
It is important to recognize that it is nearly impossible to stop a TCP SYN flooding attack. What can be done, however, is to constrain its impact on critical parts of the network.
Typically, a firewall is set up to act as a proxy when a TCP connection is established. A TCP proxy is a server that acts as an intermediary between a client and a destination server. Clients establish connections to the TCP proxy server, which then establishes a connection to the destination server. The proxy server sends data received from the client to the destination server and forwards data received from the destination server to the client. The TCP proxy server acts as both a server and a client.
The firewall checks for incoming TCP connection requests and then acts as the TCP proxy. (See Figure 9-9.)
In the case of bogus requests, the firewall usually also has parameters to set very aggressive timeouts on half-open connections; it also has parameters to set threshold levels for the number of both outstanding connections and the incoming rate of TCP-connection requests.
WARNING
Be careful when changing any TCP timer parameters. You don't want them so short that valid connections from slower links time out.
On the Cisco IOS devices, the command to use against TCP SYN attacks is this one:
ip tcp intercept access-list-number
ip tcp intercept mode watch
This command keeps track of the following information:
How many session requests were there in the last one minute?
How many incomplete sessions are there?
How long is the wait for the final acknowledgment?
For the PIX firewall, you can issue the following command to limit the number of half-open TCP connections and total number of TCP connections allowed:
static 172.17.1.12 10.1.1.2 [max_conns] [em_limit]
In this syntax, max_conns is the maximum number of TCP connections allowed, and em_limit is the embryonic connection (half-open connection) limit. Refer to Chapter 10 for a more complete description.
The audit element is necessary to verify that the security policy is being adhered to. This includes making sure that the network infrastructure is configured as expected and that networking activity is effectively monitored to detect any unusual behavior and possible intrusions.
WARNING
All communication between auditing servers and network infrastructure devices should be authenticated and confidential (that is, encrypted) whenever possible. Audit logs should also be saved on write-once media (for example, WORM drives) or should be sent over a network to a trusted system that is inaccessible by the administrators of the system being audited. This way, if a break-in occurs, the intruder cannot erase his tracks.
It is important to verify that network infrastructure device configurations are valid to ensure proper implementation behavior. Verification of configurations is usually performed with some kind of modeling or simulation tool that can access all the infrastructure device configurations and then provide a simulation model that can be tested. Here is a list of some areas to be modeled:
Mapping current network topology
Identifying services on hosts
Performing “what-if” scenarios to detect filtering problems
Performing sample attack scenarios to find vulnerabilities
In addition, a variety of available tools can launch well-known attacks. These are either available from vendors or as free software. Using these tools on a regular basis, usually after significant configuration changes or software upgrades, can be a proactive way to avoid finding configuration mistakes while a security breach is in progress.
This area intersects with network management; you can monitor system usage and traffic patterns to help determine what normal behavior is. There are numerous ways to accomplish this, but the main focus should be what to monitor and log. At the very least, you want to keep track of network usage and any high volumes of data traffic.
Event logging is very important in keeping track of various system information. Event logging automatically logs output from system error messages and other events to the console terminal. You may want to redirect these messages to another destination (such as syslog servers that can be used as a single destination point for all infrastructure system information). You should be able to specify the severity of the event to be logged; you also want to configure the logged output to be timestamped. The logged output can be used to assist real-time debugging and management and to track potential security breaches or other nonstandard activities throughout a network. The time stamps need to be accurate and synchronized. All Cisco devices have the capability to configure the standardized Network Time Protocol (NTP), which enables you to distribute accurate time. Many publicly available time servers can be used as sources. Refer to http://www.eecis.udel.edu/~mills/ntp/servers.html to get a complete list of them. In addition, Cisco IOS Software provides the capability to be a time source. For large networks, this should be used so as not to overly burden any publicly available NTP source. It is then also possible to set up MD5 authentication between the Cisco IOS Software time source and the other routers, switches, and firewalls that use it.
It is good security practice to use the syslog facility as well as keep a local log on the device itself, if the device supports it. This keeps some logging information available should the network be inaccessible or the syslog server itself be compromised. Once configured, verify that the time stamps match on both logs to avoid any later confusion. It is common to use the same NTP time source(s) across infrastructure devices.
NOTE
If you are using Cisco IOS routers, features such as NetFlow and IP accounting may prove useful to keep traffic statistics information. The IP accounting support also provides information identifying IP traffic that fails IP access lists. Identifying IP source addresses that violate IP access lists alerts you to possible attempts to breach security. To use this feature, you must enable IP accounting of access list violations using the ip accounting access-violations command. Users can then display the number of bytes and packets from a single source that attempted to breach security against the access list for the source-destination pair.
Syslog messages are based on the User Datagram Protocol (UDP) and are received on UDP port 514. The message text is kept under 512 bytes to ensure that the UDP packet is smaller than 576 bytes—the smallest packet that must be accepted by a host without packet fragmentation.
Syslog messages are categorized by eight priority levels, shown in Table 9-10.
Table 9-10. Syslog Priority Codes
Priority | Code | Description |
|---|---|---|
LOG_EMERG | 0 | Emergency or panic condition messages |
LOG_ALERT | 1 | Conditions that should be corrected immediately |
LOG_CRIT | 2 | Critical conditions |
LOG_ERR | 3 | Errors |
LOG_WARNIN G | 4 | Warnings |
LOG_NOTICE | 5 | Not error conditions, but may require special handling |
LOG_INFO | 6 | Informational messages |
LOG_DEBUG | 7 | Debugging messages |
Syslog messages generated by various devices can be logged locally or redirected to a log file or syslog management server. A syslog management server can be used to collect all syslog information that is deemed critical as part of the corporate network for auditing purposes.
Example 9-33, Example 9-34, and Example 9-35 illustrate how to configure syslog logging on a Cisco IOS router, Catalyst switch, and PIX firewall, respectively.
Example 9-33. Syslog Logging and Accurate Time Stamps Using NTP on a Cisco IOS Router
! These commands configure the granularity of the time stamps.

service timestamps debug datetime localtime show-timezone
service timestamps log datetime localtime show-timezone

! Allow an internal buffer to log up to 32000 bytes of data.
! When the maximum is reached, the older data will be overwritten.

logging buffered 32000 informational

! Do not allow for logging on the console interface.

no logging console

! Set up all messages with a severity of up to 6 (informational) to be
! sent to the syslog server.

logging trap informational

! Specify the facility expected by the syslog server in the messages sent to it.

logging facility local1

! Specify the syslog server IP address.

logging 144.254.5.5

! Configure multiple NTP time sources for redundancy.

ntp server 192.5.41.40
ntp server 192.36.143.150
NOTE
By default, a Cisco router will act as an NTP server if one or more NTP servers are configured. If the router is not responsible for providing time service to other networking devices, NTP should be disabled on all interfaces except for the one from where the NTP time is obtained.
Example 9-34. Syslog Logging and Accurate Time Stamps Using NTP on a Catalyst Switch
! Turn logging on.

set logging server enable

! Specify the facility expected by the syslog server in the messages sent to it.

set logging server facility local 2

! Set up all messages with a severity of up to 6 (informational) to
! be sent to the syslog server.

set logging server severity 6

! Specify the syslog server IP address.

set logging server 144.254.5.5

! Turn on NTP in client mode so that it interacts with an NTP master device.

set ntp client enable

! Configure multiple NTP master devices for redundancy.

ntp server 192.5.41.40
ntp server 192.36.143.150
Example 9-35. Syslog Logging and Accurate Time Stamps Using NTP on a PIX Firewall
! Turn logging on.

logging on

! Specify the facility expected by the syslog server in the messages sent to it.

logging  facility 3

! Set up all messages with a severity of up to 6 (informational)
! to be sent to the syslog server.

logging trap informational

! Specify the syslog server IP address.

logging host inside 144.254.5.5

! Configure multiple NTP master devices for redundancy.

ntp server 192.5.41.40
ntp server 192.36.143.150
Intrusion detection refers to the real-time monitoring of network activity and the analyzing of data for potential vulnerabilities and attacks in progress. Internal, authorized users conducting unauthorized activity on the network—such as trying to transmit confidential documents over the Internet or illegally modifying network access privileges—can be detected in real time and stopped immediately. An external intruder trying to break into the network can be handled in the same manner.
Real-time capability (as opposed to a periodic review of log files) can significantly reduce potential damage and recovery costs of an attack by eliminating the intruder from the network.
As mentioned in Chapter 8, “Incident Handling,” a good intrusion system should have the following characteristics:
It must run continuously without human supervision. The system must be reliable enough to allow it to run in the background of the system being observed.
It must be fault tolerant in the sense that it must survive a system crash and not require its knowledge base to be rebuilt at restart.
It must resist subversion. The system can monitor itself to ensure that it has not been subverted.
It must impose minimal overhead on the system. A system that slows a computer to a crawl will simply not be used.
It must observe deviations from normal behavior and immediately alert someone in the event of abnormal behavior.
It must cope with changing system behavior over time as new applications are being added.
The ability to write customized detection rules for proprietary purposes is also of interest. You may want to write customized detection rules to prevent a document labeled “confidential” from being e-mailed outside the network or to address vulnerabilities for custom or legacy systems. Such customization allows the system to be modified for use in almost any environment, even if those uses are not common enough to be included as standard features of a commercial product.
Cisco has a number of products and features that provide intrusion detection functions. The standalone IDS 4200 series sensors along with the Cisco Secure Policy Manager provide extensive capabilities to implement a robust network surveillance system. Rather than attempt a suboptimal brief summary of such an important function, the reader is referred to the Cisco Press book Cisco Secure Intrusion Detection Systems, which provides in-depth coverage of the standalone system. For many networks, a standalone network intrusion detection system should be an integral part of any secure network architecture.
In addition, Cisco IOS Software, the Catalyst 6000 IDSM (Intrusion Detection System Module) sensor, and the PIX firewall provide limited capabilities to identify and log attack signatures but can be used effectively in some environments where the cost of standalone intrusion detection systems is prohibitive. Take extreme care when configuring this functionality to ensure that the device can handle the potential traffic processing. The Cisco IOS Software and PIX firewall configurations are shown in this chapter. However, the Catalyst 6000 IDSM requires a more in-depth understanding; an excellent document titled “Catalyst 6000 IDSM Installation and Configuration Note 2.5,” on the Cisco web site provides a thorough description of its use. You can find this document at http://www.cisco.com/en/US/products/sw/secursw/ps2113/products_installation_and_configuration_guide09186a00800f24fe.html.
The Cisco IOS Image needs to include the Cisco Secure Integrated (that is, the firewall/intrusion detection system [IDS]) Software to use it as an IDS sensor. It has so far incorporated 59 of the most common attack signatures that are used to detect patterns of misuse in network traffic. They are categorized as information signatures, such as port scans and echo requests, or as attack signatures, such as common DoS attacks. The router can be configured to send an alarm, drop traffic, or perform TCP resets for any traffic it considers malicious. In addition, the router has the capability to disable the use of a specific signature if it causes too many false alarms.
NOTE
When using the IDS capability, the packets are only scanned if they are actually being routed and therefore will not detect attacks that occur between hosts on the same LAN.
Routers log the alarm events via syslog. The router can also interact with a management system using the Post Office Protocol (UDP port 45000) such as the Cisco Secure Policy Manager or the Cisco Secure IDS Director (also called Netranger Director) to receive alarm information. This communication is not confidential, and IPsec should be used to provide authentication and confidentiality for the management communication.
Configuration of the router IDS sensor requires the use of the ip audit commands. Example 9-36 illustrates a sample configuration where the logs are sent to a syslog server. Only the relevant IDS commands are shown.
Example 9-36. Cisco IOS IDS Configuration
! Specify the syslog server IP address.

logging 144.254.5.5

! Initialize the IDS facility with the following command.
! It denotes the maximum number of e-mail recipients
! in a given mail message before the mail is categorized as spam.

ip audit smtp spam 200

! Configure the IDS alerts to be sent to syslog and a buffered log.

ip audit notify log

! Define the audit rule that will be used to take action on informational
! signatures and attack signatures.
! For informational signatures only an alarm will be logged but for attack
! signatures an alarm will
! be logged and the traffic will be dropped and the TCP connection will be reset.

ip audit name E10Audit info action alarm
ip audit name E10Audit attack action alarm drop reset

! Apply the rule to the Ethernet 1/0 interface.

interface Ethernet 1/0
   description Connection to Branch Office
   ip audit E10Audit in
You can make the PIX firewall act as an IDS sensor by using the ip audit commands. The PIX does not communicate with a management console, but all alarms can be logged via syslog. Because the sensing module sits on the packet path, it inspects the packets inline. The PIX can be configured to send an alarm, drop traffic, or perform TCP resets for any traffic it considers malicious. Example 9-37 illustrates a sample configuration showing only the relevant IDS commands.
Example 9-37. PIX IDS Configuration
! Specify the syslog server IP address.

logging host inside 144.254.5.5

! Define the audit rule that will be used to take action
! on informational signatures.
! In this case, only an alarm will be logged.

ip audit name InfoAudit info action alarm

! Define the audit rule that will be used to take action on
! attack signatures – offending packets
! will be dropped and the connections will be reset.
! An alarm will also be logged.

ip audit name AttackAudit attack action alarm drop reset

! The rules are now applied to an interface.  Up to two rules can be
! applied per interface.

ip audit interface outside InfoAudit
ip audit interface outside AttackAudit
Although you may have taken every conceivable precaution to prevent security breaches, you must not be fooled into thinking that they will never occur. It is quite probable that at some point and time you may be the victim of an attack. The hope is that your corporate security policy has included the procedures for handling a security incident once it is detected.
As far as the corporate infrastructure goes, it is extremely important to keep track of all available information. Do not reboot any device because you may lose valuable information. Instead, access any potentially affected devices through console ports (assuming this is very tightly controlled) and record the entire console session. Record all volatile information, which is typically available through a variety of show commands and can include the following:
Configuration information
Routing information
ARP information
Interface statistics
NAT translation statistics
Routing cache statistics
Switching cache statistics
SNMP statistics
Logging statistics
The more information you collect in a controlled orderly manner, the more success you will have in possibly tracking down the intruder. In the unfortunate circumstances of having lost device access due to compromised passwords, port scans, and SNMP scans may provide some alternative mechanisms to obtain information pertaining to the device compromise.
Securing network infrastructure devices can seem like a daunting task with the slew of configuration options available. This section provides configuration templates for a router, switch, and PIX firewall, which show the commands that were discussed in this chapter and which should be used for most Cisco infrastructure equipment to ensure security in the devices and the network infrastructure itself. This includes providing authenticated access for any mechanism used to access the device (console ports or remote access via Telnet, SSH, SNMP or HTTP), logging data to a syslog server, and making sure you have accurate time stamps available. Some commands are shown that have not been discussed in detail in this chapter; they mostly relate to network services that are being disabled because they are not often used and can cause some security risks.
The authentication method for device access uses AAA wherever available to take advantage of a single centralized authentication database. This has the following benefits:
Passwords are stored in a single database, which is easier to modify than changing passwords on all devices on a regular basis (to follow good security practices).
All accesses are logged to the AAA server; and in some AAA software, the actions performed on the device are also logged. This provides a useful audit function.
Many freeware AAA servers are available, so cost should not be a prohibitive factor. You should use a commercial AAA server, however, because they can be more feature-rich and are supported.
The examples use the addressing shown in Figure 9-1 with the following:
The backbone network is on 144.254.2.0.
The network operators are on two networks: 144.254.9.0 and 144.254.19.0.
The TACACS+ server has the IP address 144.254.5.9.
The RADIUS and syslog servers reside on one machine with the IP address 144.254.5.5.
The SNMP manager has IP address 144.254.9.3.
The HTTP manager has IP address 144.254.9.2.
Example 9-38 shows a template for securing a Cisco router. This assumes that the router is running a software release that supports SSH authentication. Some commands may not be valid if you are using older software releases. Filters listed in Appendix D should be used in conjunction with the following template.
Example 9-38. Cisco Router Security Template
! Configure the host name and domain name.

hostname Router
domain name my.domain

! Configure password encryption to ensure that all type 7 passwords
! are stored in nonreadable form.

service password encryption

! Configure enable password and enable secret - the enable secret takes
! precedence.

enable password 0 ThisIsEnablePassword
enable secret 0 ThisIsEnableSecret

! Set local database authentication.

username merike secret 0 LetMeIn
username cathy secret 0 MeToo

! Configure ssh parameters: 1024-bit key, a 60 second timeout, and
! a maximum of 3 login attempts.

crypto key generate rsa
ip ssh time-out 60
ip ssh authentication-retries 3

! Turn off uneccessary services.

no service finger
no service pad
no service udp-small-servers
no service tcp-small-servers
no ip bootp server
no ip source route
no ip source-route

! Configure logging.

service timestamps debug datetime localtime show-timezone
service timestamps log datetime localtime show-timezone
logging buffered 32000 informational
no logging console
logging trap informational
logging facility local1
logging 144.254.5.5

! Configure NTP.  This router will get time from an external source but will
! then act as an NTP master for the rest of the corporate network. Therefore
! authentication parameters will also be configured with the key number of 665.

ntp server 192.5.41.40
ntp server 192.36.143.150
ntp master
ntp authenticate
ntp authenticate-key 665 md5 ThisIsAKey
ntp trusted-key 665

! Configure access lists to limit access to specific functions. Access list  2
! is for HTTP access, access list 3 is for SNMP access, and access list 9 is
! for all machines on the NOC network.

access-list 2 permit host 144.254.9.2
access-list 2 deny any log

access-list 3 permit host 144.254.9.3
access-list 3 deny any log

access-list 9  permit 144.254.9.0 0.0.0.255
access-list 9  permit 144.254.19.0 0.0.0.255
access-list 9 deny any log

! snmp configuration
! SNMP access is read-only and can only be accessed by devices
! associated with access-list 3

snmp-server community public RO 3

! Http configuration
! HTTP access can only be accessed by devices associated with access list 2 and
! access must be authenticated with the enable secret.

ip http server
ip http access class 2
ip http authentication enable

! Configure TACACS+ authentication as default login with enable secret as backup.
! For users logging in as merike or cathy (members of staff set up in the TACACS+ server)
! the local database will be used as backup if the TACACS+ server is unavailable.
! The enable mode authentication also uses TACACS+ and then the enable
! secret as backup.

aaa new-model
aaa authentication login default tacacs+ enable
aaa authentication login staff  tacacs+ local
aaa authentication enable default tacacs+ enable

! Authorize running EXEC shell when authenticated - if TACACS+
! server is not available, commands associated with privilege
! levels 0 and 1 don't require authentication while commands associated.
! With privilege level 15, require local authentication.

aaa authorization exec tacacs+  local
aaa authorization commands 0 tacacs+ none
aaa authorization commands 1 tacacs+ none
aaa authorization commands 15 tacacs+ local

! Interim accounting records will be sent every time there is
! new information to report.
! Accounting for all EXEC terminal sessions

aaa accounting update newinfo
aaa accounting exec start-stop tacacs+

! Configure TACACS+ server and encryption key.

tacacs-server host 144.254.5.9
tacacs-server key thisisakey

! Configure console, aux, and vty port access.
! Physical console access accessible via merike and cathy login and
! appropriate local password - the session times out after
! 2 minutes and 30 seconds of idle time.

line con 0
  exec-timeout 2 30
  login authentication staff
  transport input telnet ssh

! No login prompt and no input access allowed through auxiliary port

line aux 0
  no exec
  transport input none

! Telnet or SSH access requires default authentication (TACACS+) and
! only hosts on the NOC network are allowed access. The session
!  times out after 2 minutes and 30 seconds of inactivity.

line vty 0 4
  exec-timeout 2 30
  access-class 9 in
  login authentication staff
  transport input telnet ssh

! Set up a banner message for remote login access to the router.

banner login #
You are not authorized to access this device.  Any violators will
be prosecuted to the full extent of the law!  All access is being
monitored and logged.
#

! Configure all interafces to disable unneccessary services. This is a sample
! for a single interaface.

interface ethernet 0/0

! The router uses proxy ARP (defined in RFC 1027) to help hosts with
! no knowledge of routing determine the MAC addresses of hosts on other
! networks or subnets. This feature can cause a potential security
! hole and should be disabled.

no ip proxy arp

! Disable the forwarding of directed broadcasts to avoid
! unnecessary denial-of-service attacks.

no ip directed broadcast

! Disable the Cisco Discovery Protocol (CDP) for this interface.
! CDP could provide sensitive information such as configuration
! and routing tables to a potential attacker.

no cdp enable
Example 9-39 shows a template for securing a Catalyst switch. This again assumes that the software used will support SSH. If not, substitute the word telnet for ssh in the ip permit commands. Also, the console password (set password command) and enable password (set enable command) are not shown because they require user interaction. These also need to be configured.
Example 9-39. Catalyst Switch Security Template
: ! Configure the host name and domain name. hostname Switch domain name my.domain ! set local database authentication set localuser user merike password LetMeIn privilege 0 set localuser user cathy password MeToo privilege 0 set localuser authentication enable ! Configure login access – remote access capability only from console and ! is authenticated with TACACS+. The local database is used as the backup in case the ! server is unavailable. Telnet and HTTP access are not allowed. set authentication login local enable console set authentication login tacacs enable console primary ! Configure enable mode access – all privileged mode access is authenticated with TACACS+
Example 9-40 shows a template for securing a PIX firewall. This again assumes that the software used will support SSH.
Example 9-40. PIX Firewall Security Template
! The following two commands define the PIX host name and domain name.

hostname PIX-Firewall
domain-name my.domain

! Configure the SSH parameters – only SSH access is allowed to the device.

ca generate rsa key 1024
ssh 144.254.9.0 0.0.0.255 inside
ssh 144.254.19.0 0.0.0.255 inside
ssh timeout 5
aaa-server SSHAccess protocol tacacs+
aaa-server SSHAccess (inside) host 144.254.5.9 ThisIsAKey  timeout 10
aaa authentication ssh console SSHAccess
! Define enable password and Telnet password – although Telnet will
! not be allowed you want to change the default password.

enable password CanYouGuessMe encrypted
passwd IAmSecure encrypted

! Set up the local database with staff users with enable mode privilege level.

username merike password ThisIsASecret privilege 15
username cathy password YetAnotherSecret privilege 15

! Set up the aaa mechanism to use the local user database for console
! authentication.

aaa-server LOCAL protocol local
aaa authentication enable console LOCAL

! Disable SNMP.

no snmp-server location
no snmp-server contact

! Set up logging capabilities.

logging on
logging  facility 3
logging trap informational
logging host inside 144.254.5.5

! Configure NTP.

ntp authenticate
ntp authentication key 665 md5 ThisIsAKey
ntp server 144.254.2.2 key 665 source inside
ntp trusted key 665
This chapter explained what you should consider to secure your networking infrastructure. It is important to control all device access—both physical and logical—to ensure that no one can tamper with the network by reconfiguring the devices. General concepts and specific features used in Cisco devices were shown to incorporate additional elements of a security architecture, including integrity, confidentiality, availability, and audit. You must use all these concepts together to obtain the most effective security controls for your network infrastructure.
The following questions provide you with an opportunity to test your knowledge of the topics covered in this chapter. You can find the answers to these questions in Appendix E, “Answers to Review Questions.”