
12. Adding Frames
Normally a Web page fills an entire browser window. However, a browser window can be split into two or more smaller individual panes called frames. Each frame contains an individual Web page.
Frames are used to define areas of a page, such as a navigation bar or a masthead, that remain constant as the user moves through the site. They are also used to define content areas where the content changes each time a navigation link is clicked. Frames allow you to have a site where the navigation part of the window only loads a single time (reducing your bandwidth needs), but the content part of the window changes whenever the user requests a new page.
In this chapter you’ll learn how to create framed layouts, insert individual Web pages into the frames, and manage the navigation for a framed site.
How Frames Work
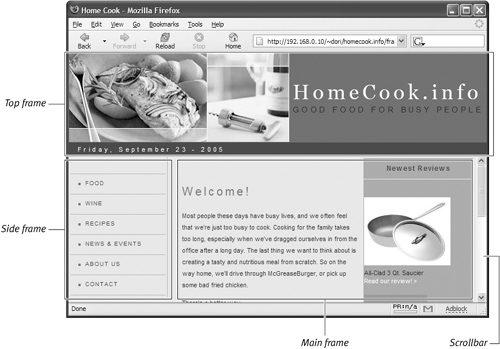
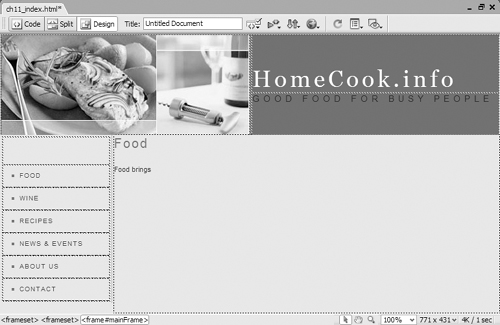
When you look at a framed site, you are actually seeing multiple pages (Figure 12.1). You’ve seen the site in Figure 12.1 before, but not in frames. At first glance you might not notice the site is framed. But once you start scrolling you’ll realize the difference. Notice the scrollbar in Figure 12.1. See how it starts about halfway down the side of the page? That’s because there are actually three framed pages shown, and only the frame on the lower right has a scrollbar.
Figure 12.1. The HomeCook.info site in a framed layout looks much like the other layout.
The arrangement of the individual frames is determined by the frameset document. The frameset document contains one or more frameset tags which set up the number of frames, how they will be arranged, and which individual Web pages will be displayed when the page is opened for the first time.
No matter how many frames a browser window displays, there is usually only one frameset document for a site. A Web page with three frames actually needs four separate documents to display correctly: the frameset document and the three individual documents that fill the three frames.
A frameset divides a window into either columns or rows, but not both at once. Luckily, framesets can be nested, or put one inside another. A frameset of columns can be nested in a row of another frameset. Or, a frameset of rows can be nested in a column of another frameset. In Figure 12.1, the frameset has two rows. The top row holds the site identification. The bottom row splits into two columns with a nested frameset. One column holds the navigation, and the other holds the content. The content frame is the one with the scrollbar.
The frameset document is invisible to the user. It sets up the arrangement of the visible pages shown in the frames. The user sees the results of the frameset document, but not the actual frameset document itself.
But wait, there’s an accessibility issue. Not all browsers work with framesets. For example, really old browsers didn’t understand frames, and even today, browsers built into mobile devices may have problems with framesets. Therefore, each frameset document contains a noframes section. Use the noframes section to provide basic information in case the user’s browser cannot display frames. Links to your content pages are an example of good information to include in a noframes section. That way every user can find your valuable content.
Dreamweaver lets you set up the frameset and then work on the individual Web pages for the frames separately. Or you can work on the individual Web pages while they are displayed in the frameset. Both are perfectly valid choices; for instance, an individual might manage a site with only a few pages inside the frameset, while a larger site might have numerous people handling different content pages.
Creating a Frameset
Dreamweaver comes with several predefined framesets that include the most commonly used frame layouts. For example, the HomeCook.info site needs a top frame for the masthead, a left frame for the navigation, and a right frame for the changing content. Dreamweaver has a predefined frameset that fits these specifications.
If you like, you could create a custom frameset from scratch, by manually drawing frames into a page. Dreamweaver gives you the tools to create and resize frames.
To use a predefined frameset
1. Choose File > New.
or
Click the Framesets link in the “Create from Samples” section of the Dreamweaver Welcome screen.
The New Document dialog appears.
2. In the left-most column, click Page from Sample, then click Frameset in the second column (if you used the Welcome screen, this was already done for you).
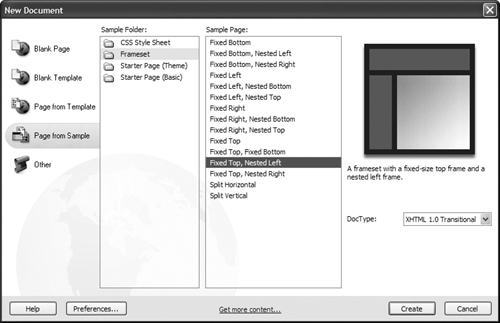
3. In the Sample Page column, select a layout. For example, you can choose Fixed Top, Nested Left (Figure 12.2). This layout uses a frameset with two rows. A second frameset with two columns is nested in the bottom row.
Figure 12.2. Dreamweaver’s New Document dialog has numerous predefined framesets.
4. Click Create.
Dreamweaver opens the new framed window, and the Frame Tag Accessibility Attributes dialog appears, if you have your Preferences set for Frames Accessibility (Figure 12.3). (You do have Preferences set for Frames Accessibility, right?)
Figure 12.3. The Frame pop-up menu lets you select each frame to give it a title attribute.

In the dialog, select each frame from the Frame pop-up menu and give a descriptive title attribute to each frame by typing it into the Title field.
In Figure 12.3, we replaced the default suggestion for mainFrame with the more descriptive title “content.” A good title for the topFrame is “site identification.” A good title for the leftFrame is “site navigation.” Remember, title attributes help users whose browsers can’t display frames understand and navigate your site, so be informative.
 Tips
Tips
• You can also create a frameset using the Layout tab of the Insert Bar. Use the Frames button there to choose the frameset layout you want (Figure 12.4).
Figure 12.4. The Insert Bar has numerous predefined framesets as well.

• You can preview a thumbnail of each frame layout by clicking its name in the Sample Page column; the thumbnail appears in the right side of the New Document dialog.
To create a custom frameset
1. Create a new HTML document by choosing File > New, then in the resulting New Document dialog, click Blank Page, then double-click HTML in the Page Type column.
2. Choose View > Visual Aids > Frame Borders (Figure 12.5).
Figure 12.5. One of the Visual Aids you can view is Frame Borders.

This turns on a dotted border around the frame edges.
3. Click and drag the dotted border to insert frames. The cursor changes to a double-headed arrow cursor to drag (Figure 12.6).
Figure 12.6. The dotted line around the outside of the document window indicates the frame borders. Drag to create frames.
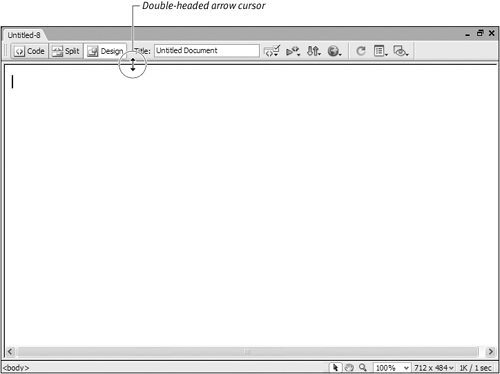
If you drag from the top or bottom, the document splits horizontally. If you drag from the left or right, the document splits vertically. If you drag from a corner, the document splits into four frames.
Tip
• You can also add frames to a frameset by choosing Modify > Frameset > Split Frame Left, Split Frame Right, Split Frame Up, or Split Frame Down.
To delete a frame from a frameset
1. Choose View > Visual Aids > Frame Borders (Figure 12.5).
2. Click and drag the dotted border to the edge of the document window to delete a frame.
or
Click the frame border and drag it until it meets another frame border.
• No spaces are allowed in a frame name.
• The name must begin with a letter or number.
• It’s okay to mix uppercase and lowercase letters.
![]()
Using the Frames Panel
You’ve probably noticed by now that Dreamweaver has a panel for everything. Frames are no exception. If the Frames panel isn’t visible, choose Window > Frames to bring it into view.
It’s a good idea to keep the Frames panel in view when working with a framed site. It gives you a miniature view of the frames within a frameset. It also gives you an easy way to select either an individual frame or an entire frameset.
To select frames and framesets with the Frames panel
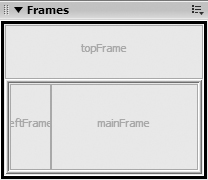
1. In the Frames panel, click the outermost border around the frameset (Figure 12.7). The selected frameset displays a thick black border.
Figure 12.7. A thick border indicates the selected frameset.
2. Do one of the following:
• To select a nested frameset, click the white border around the frameset (Figure 12.8).
Figure 12.8. The nested frameset in the bottom row is outlined with a thick border, indicating that it is selected.

The selected frameset displays a thick black border.
or
• To select an individual frame, simply click inside the frame (Figure 12.9).
Figure 12.9. The black border indicates the selected frame. Note that the border for a frame is not quite as thick as the border for a frameset.

The selected frame displays a black border, thinner than the one used for the frameset.
Tips
• When you select a frame in the Frames panel, the corresponding frame is selected in the document window. A dotted border highlights the selected frame in the document window (Figure 12.10). The Tag Selector displays the appropriate element—in this example it’s <frame#topFrame>.
Figure 12.10. In the document window, the selected topFrame is indicated by a dotted border.

• When you select a frameset in the Frames panel, the corresponding frameset is selected in the document window. A dotted border highlights the frameset (Figure 12.11). The Tag Selector displays the appropriate element—in this example, it’s <frameset><frameset>.
Figure 12.11. The dotted border indicates that the nested frameset in the bottom row is selected.

To adjust rows or columns of the frameset
1. Select the frameset in the Frames panel.
2. Make adjustments with the Property Inspector (Figure 12.12).
Figure 12.12. The Property Inspector shows a miniature frameset with rows when a frameset with rows is selected. Options to adjust the frameset are displayed.

The Property Inspector displays options for Borders, Border width, and Border color. You can also set either the row height or column width, depending on which is selected. Enter a value, and then choose pixels, percentage, or relative units.
If the selected frameset contains rows, the rows are miniaturized on the Property Inspector. The selected row is indicated in a dark gray. Clicking a row in this miniature display on the Property Inspector selects it. Set the Row Value (that is, the height) for each row as needed.
If the selected frameset contains columns, the columns are miniaturized on the Property Inspector (Figure 12.13). The selected column is indicated in a dark gray. Clicking a miniature column in this display on the Property Inspector selects it. Set the Column Value (that is, the width) for each column as needed.
Figure 12.13. The Property Inspector with a column frameset selected. You see a miniature frameset indicating which column your adjustments will affect.

Tips
• Row height and column width can be set in exact units (pixels), as a percentage of the frameset, or as relative. If you choose relative, the row or column takes up whatever space is available. Relative rows and columns can shrink or grow, depending on the size of the browser window. Relative units are considered the most accessible.
• As you work with frames, you’ll see that Dreamweaver provides many visual cues, such as dotted borders around selected framesets in the document window and thick borders around selected framesets in the Frames panel. These visual cues are important to watch because it is easy to accidentally change something you don’t intend to change in a complicated frameset if you don’t pay attention to the selected element. These cues also help you make sure you have the right element selected when it is time to save your work. Remember that these visual cues won’t show up in the Web browser.
• Selecting a frame or frameset in the Frames panel is not the same as placing an insertion point in a frame by clicking within a frame in the document window.
To adjust frame properties
1. Select the frame you want in the Frames panel.
2. The Property Inspector displays properties for that frame (Figure 12.14). Make changes in one or more of the properties:
• Frame name gives a needed identifier to the frame (see the sidebar “Frame Name vs. Frame Title”). Each frame must have a name. If you create a custom frameset, you need to supply the name for the frameset yourself. (Dreamweaver supplies a default name for each frame in the preset framesets.) A name that helps you make sense of your layout such as leftFrame, navFrame, or menuFrame is what you want here. No spaces are allowed in the name.
• Src is the URL of the page that initially is displayed in the frameset. Setting this field is covered in “Inserting Pages Into Frames.”
• Scroll options are No, Auto, and Default. No means that frame will not have a scrollbar ever, even if not all the contents of the frame are visible. Auto means a scrollbar appears automatically if the contents of the frame are larger than the frame can display. Default is the browser’s default, which is usually Auto. Scrollbars can be horizontal or vertical, depending on which is needed to see all the contents of a frame.
• Normally a frame can be resized in the browser. Checking the No resize check box means that there will be no way to resize a frame in the browser. If you leave it unchecked, users can drag the frame borders in the browser window. This is useful for users who prefer to have especially small or especially large browser windows.
• Margin width and Margin height refer to the margin surrounding an individual frame.
• Borders, which can be set at the frameset level, can also be set individually for each frame.
• Border color allows you to set the color for the frame borders. Click the color well to bring up a color picker to help you set the color.
Figure 12.14. With a frame selected, the Property Inspector displays options for adjusting and naming the frame.

Tips
• If you click inside a frame in the document window, the Property Inspector displays the standard text properties for that frame’s document. To change the properties of the frame itself, use the Frames panel to select the frame.
• Monitor size and screen resolution can vary widely among users. Some users must enlarge the text with the browser controls in order to read it. It is a good idea to test your framed site with various browser configurations. Only testing shows you whether scrollbars or resizing are needed so that all your content is viewable.
• Size issues can also lead to printing problems in some situations. You may need to provide special printer-friendly pages for a framed site.
• One of the reasons that frames got such a bad reputation was due to the tacky look of sites after frame border colors were applied. If you’re considering changing your framed site’s border colors, please reconsider unless you’ve got a darned good reason.
Inserting Pages Into Frames
Now that you’ve got your frames set up, you’ll need to create pages to fill every frame. These pages are normal Web pages in every way except that they contain just a part of what appears in the overall window. To prepare the HomeCook.info example, it took four individual pages: masthead.html (Figure 12.15), menu.html (Figure 12.16), home.html (Figure 12.17), and the frameset document.
Figure 12.15. This individual HTML page will be placed in the topFrame of the frameset.

Figure 12.16. This individual HTML page will be placed in the leftFrame of the frameset.

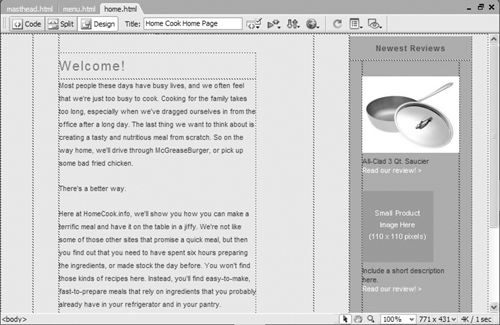
Figure 12.17. This individual HTML page will be placed in the mainFrame of the frameset.
To add a prepared page to a frame
1. Click anywhere in the frame.
2. Choose File > Open in Frame.
The Select HTML File dialog appears.
3. Browse to select the file you want to insert, then click OK (Choose).
4. Repeat the steps to add files to other frames (Figure 12.18).
Figure 12.18. The topFrame and the leftFrame have files inserted, but the mainFrame is still unfilled.

5. When every frame has its opening file, choose File > Save Frameset.
The inserted files are now the Src documents for the various frames in the frameset.
For more about saving framesets, see “Saving Framesets and Frames.”
Tip
• Naming a “home” page is slightly different with framed sites. You’d normally name the home page index.html. But in a framed site, you need that file name for the frameset. With a framed site, think of the initial set of files displayed when the frameset opens as Home. The page in Figure 12.17 is named home.html because it’s in the opening content frame before any links are clicked.
To create a page in a frame
1. Click anywhere in the frame.
2. Insert text and images with your normal Web content creation verve (Figure 12.19). If you need a refresher, take a peek at Chapter 3, “Building Your First Page” or Chapter 4, “Adding Text to Your Pages.”
Figure 12.19. You can type or insert material in a framed file while it is part of the frameset.
3. Choose File > Save Frame.
For more about saving frames, see “Saving Framesets and Frames.”
Saving Framesets and Frames
As soon as you create a frameset it’s selected in the document window. But if you’ve been working with frames and files, it can get tricky to know just what file you’re working on. Sometimes the option to save that you want is grayed out. This could mean that the file was already saved. If you know it wasn’t, then recheck all the visual clues to figure out what you have selected. Be sure you have the frame or frameset you intend to save selected.
To save a frameset
1. To select the frameset, click the outer border of the frameset in the Frames panel.
The thick border indicates the selected frameset, as in Figure 12.7.
2. Choose File > Save Frameset.
If the frameset document has never been saved before, you’ll be prompted to give the file a name. The frameset document is the file that is opened when a visitor first arrives at a URL, so frameset files are often saved as index.html.
or
Choose File > Save All.
This saves the frameset and all other open files at once. If this is the first time you are saving the files, Dreamweaver prompts you to name each file prior to saving it.
or
Choose File > Save Frameset As.
This prompts you to save the frameset with a different name from the one you might already be using, and it is useful for making a backup or saving a copy.
Tip
• Double-check the document window to verify that the frameset you want to save is what’s selected. Dotted borders outline the selected frameset (Figure 12.20). The tag selector at the bottom of the window displays <frameset>.
Figure 12.20. Check for the dotted lines indicating a selection to be sure about what you are saving.

To save a frame
1. Click anywhere in an individual frame.
2. Several File menu options related to frames are now available:
• Choose File > Save Frame to save the currently selected frame.
• Choose File > Save Frame As to save the current frame with a different name.
• Choose File > Save Frame As Template. This creates a template you can use to create similar pages (see Chapter 15, “Making Life Easier: Using Templates, Libraries, and Snippets”).
Tip
• If you’re working on an internal content page of your site while typing in a frame in the frameset document window, be careful when you save. You only want to save the file in the frame, not the entire frameset. If you inadvertently save the frameset, you’ll be accidentally changing the Src file in the frameset document to that of the file you just saved—probably not what you wanted. Make sure that you’re saving the frame file, not the frameset file.
Targeting Frames with Links
You probably surfed the Web for all of a minute and a half before you first realized that if you click a link the current page goes away and a new page fills the window. That’s a great system—except for framed sites. Often, when a link is clicked in one frame, the new file should open in some other frame entirely. You can make that happen by using a target attribute in the link. The target names the frame where the new file will open. Yep, that’s why you named the frames.
To make a target link while working in the frameset
1. Open the frameset with the page where you want the link visible.
2. Highlight the text for the link.
3. The Property Inspector link options appear.
Browse for the file you want the link to open.
or
Click the Point to File icon and point to a file in the Files panel to create the link.
Choose the target frame from the Target menu (Figure 12.21). Dreamweaver already knows which frames are in the frameset.
Figure 12.21. When you create a link while working in the frameset document, Dreamweaver provides the Target options in the Property Inspector.

4. Choose Save > Frame to save your changes.
To make a target link while working on an individual page
1. Open the page where the link will be.
2. Highlight the text for the link.
3. The Property Inspector link options appear.
Browse for the file you want the link to open.
or
Click the Point to File icon and point to a file in the Files panel to create the link. Type the frame name in the Target field (Figure 12.22). Spelling and capitalization of the frame name must be exactly right.
Figure 12.22. When you create a link in an individual document, you must manually type the target in the Target field of the Property Inspector.

4. Save your changes.
Tip
• While it’s definitely handy to have the pop-up menu of frame targets right there in the Property Inspector when making links in the frameset document window, it’s not without peril. Inadvertent improper saves can play havoc with the frameset. If you create the individual pages for the site independently, outside of the frameset document, you do have to do a bit of extra typing to get the Target field filled in. However, when you save an individual page, you can’t possibly save anything besides the individual page.
Adding noframes Content
A growing number of wireless users who access the Web with mobile phones, PDAs, or pocket PCs can’t view frames. Nor can users with disabilities who have specialized browsers. These folks need noframes content—unless you want them all to go away and leave your site alone, never to return.
The content in a noframes element could be an entire alternate Web page, providing all the information a frames-capable user would find in the framed site. A less ambitious noframes element might contain an invitation for the user to click through to a site navigation page or a site index page so that the content you offer could still be accessed.
Search engines also make use of noframes content. Use it to describe the site’s key information and provide links for the search engine robots (or other users) to follow.
To add noframes content
1. Select the frameset in the Frames panel.
2. Choose Modify > Frameset > Edit NoFrames Content (Figure 12.23).
Figure 12.23. To set what will be displayed for non-frames-supporting browsers, choose Edit NoFrames Content from the Frameset submenu of the Modify menu.

3. A blank page appears in the document window, replacing the framed pages (Figure 12.24).
Figure 12.24. The Edit NoFrames Content command brings up an empty NoFrames Content document.

Type or paste the noframes content in this blank window (Figure 12.25).
Figure 12.25. Site information and links are added to the NoFrames Content document.

4. To return to the frameset, choose Modify > Frameset > Edit NoFrames Content again.
Tip
• If you preview your site in a regular browser (which has no trouble displaying frames), you won’t see the noframes content.