
13 Working with External Resources
We saw in Chapters 10 and 11 how Final Cut Studio presents an integrated system for performing virtually all of the stages of a postproduction workflow right on the desktop. For the most part, since the introduction of Final Cut Pro, the industry has been moving toward operators needing to be generalists. It is expected in many cases that an editor will also be able to do motion graphics, mixing, and DVD authoring to boot! Truly, you can be a one-man band, and more than a few people are successful with this model.
However, the process of learning all the applications in the entire Studio and developing the skill sets that they entail can be daunting, and may not be possible for all of us. Again, this raises philosophical and strategic issues about professional roles identified in Chapter 3. Just because you can be a one-man band doesn't mean it is always a good idea. Sometimes the divide-and-conquer approach is more advantageous.
There are a number of logistical reasons that you may choose to send a project out of house—for example, a time crunch or lack of resources. However, more often than not, the main reason that you reach out to outside resources is to work with a specialist. You may have some experience using Color for color correction, or Soundtrack Pro for audio mixing, but in general, a specialist (often with equipment beyond Final Cut Studio) can do the job better and faster (though probably not cheaper, which is why they say you can pick only two).
This is another example where Final Cut Pro plays well with others. This chapter is about facilitating workflows that exit the Final Cut Studio environment. This actually blends together two concepts that are related, but essentially different:
- Working with vendors. A vendor is an outside company that you hire for a task instead of using an internal resource. This chapter gives some pointers on the nature of this business relationship and how to manage it.
- Moving projects between the Final Cut Studio environment and other postproduction environments.
Often you will be doing both of these things together: hiring an outside company specifically because they have the skills outside Final Cut Studio. However, a vendor could also be an FCP specialist who is not part of your company.
This chapter is written mostly from the point of view of a studio that needs to hire and communicate with a vendor, but in truth, we are all both clients and vendors at some point. The techniques in this chapter should be easy to translate into good practices if you are on either side of the equation.
Why Work with a Vendor?
What are your needs, and why is it a good decision to delegate them to an outside resource? Like many aspects of workflow thinking, defining your needs prior to working with a vendor is critical for ensuring the success of your project.
Your needs will be based largely on the actual project on which you are working. But there are a few things that can help define these needs clearly, and thus assist you in making a good choice as to whether or not to hire a vendor.
- Technical Resources—Are there technical things that prevent you from moving the project forward? For example, if the next step in a project is color correction and grading, do you know how to use Color? If you have to make your final output, do you need access to a deck that only a post house in your area has?
- Resource Load—If multiple parts of your workflow need to happen simultaneously, do you have depth in your equipment and staff to make this possible?
- Time—Perhaps the project you're working on has a tight schedule (don't they all?). Is there enough time for you or your team to complete all the tasks required?
- Budget—Does your budget mandate that you complete all the work internally, or can you involve vendors?
It is vital to define why you want to work with a vendor. If you are unsure, keep asking these questions. Often multiple reasons will apply. It may be that you have all of the resources that you technically need, but you have the budget to hire a freelance editor based on his or her reputation. Opening up a project to vendors will not only incur cost, it will also necessitate more communication—maybe more communication than your team is prepared for. Thinking hard about these questions and defining the work you want from a vendor are the best preparation.
Poor communication with a vendor almost always leads to two problems: first, getting overcharged; second, dramatic loss of time. In our experience, poor communication is often symptomatic of larger issues. Be honest with yourself if the following areas have previously been an issue. If so, remedying them now will be time well spent.
Technical—We know plenty of editors, designers, and producers who have gotten in over their head with a project. When it came time to communicate with a vendor to complete the work, for technical reasons—such as not knowing anything about tape formats or how to produce an audio OMF (Open Media Framework) (described later)—communication with the vendor came to a standstill. Often the vendor would have to spend an inordinate amount of time educating that person and—you guessed it—charging them even more. Further examples include:
- Improper formatting of EDLs, OMFs, and XML files
- Improper formatting of tapes (timecode, slates, audio assignments)
It is always a good idea to ask your vendor for written specifications for any project or delivery. Also, you might want to provide your own written specifications for the deliverables you need.
Bad Habits—Personal habits also tend to make communication with a vendor more difficult, and often are a big reason why costs and time budgets go wild. For example, many editors we know don't have a system of what type of audio goes on what track (VO on track 1, nat sound on tracks 2 through 5, etc.). This tends to work fine for them, but when the show goes to get mixed by a vendor, the audio mixer has to spend hours reorganizing the tracks so he or she can make sense of what's going on. Further examples include:
- Video- and audio-track layout
- Inconsistent naming conventions
Bad Business Practices—Many of us in the postproduction world like to think of ourselves as fairly savvy business folks. This is perhaps truest for those of us who do freelance work. The truth is, a lot of people in this business are not particularly good at this. Behaviors such as constantly moving around bookings or not paying vendors on time are symptomatic of bad business practices. Further examples include:
- Not respecting scheduling commitments
- Unprofessional accounting practices
- Underestimating how long the project will take to complete
- Overpromising
- Underdelivering
Having a quality set of vendors to work with—and, more importantly, working with them—successfully can really benefit any project. Remember, if you have not defined your needs and analyzed potential workflow and communication problems, you may have a less than ideal experience with a vendor (or they with you, but the vendor might be too nice to tell you!).
What Kind of Vendor Should You Work With?
It may be a bit of an oversimplification, but we divide vendors into two groups: free-lancers and companies. This is an oversimplification because often freelancers are actually small companies, whereas larger companies might actually be sending out employees to work much like freelancers. Here are some important distinctions:
A freelancer generally:
- Works on your equipment, in your space.
- Bills by the hour or by the day.
- Does their own booking or works within a very small business structure.
A company generally:
- Has its own facility, and you bring your project there for it to be worked on.
- Probably bills by the hour or the project, depending on the situation.
- Is a larger organization with different departments and roles for booking, billing, and actual creative work.
Over the past six or seven years, the infectious spread of Final Cut Studio has lead to a rapid growth of the freelance market. There are freelance editors, designers, colorists, DVD designers, mixers, and so forth. This is in no small part due to the affordable cost of Final Cut Studio. The tools are now accessible to a much broader group of people; therefore, many people have entered the freelance market.
The growth of this market does not mean that larger companies have disappeared from postproduction. Although, to a certain degree, the era of the mega post house is gone, many facilities have streamlined their operations and are able to offer a wide range of services.
In an interesting twist, many production and postproduction companies are hiring freelancers. In some cases, companies hire freelancers who only a short time ago were actually employees of those same companies! Often this is a simple matter of economics—by replacing employees with freelancers, the companies are no longer responsible for overhead such as health insurance, payroll taxes, and so on.
So how do you decide if your vendor should be a company or a freelancer?
Consider hiring a freelancer if:
- You have equipment for the freelancer to work on.
- You have a complicated schedule that you want to be able to have strong control over when the work is done.
- Choosing the talent is more important than the equipment.
Consider hiring a company if:
- You do not have equipment for a freelancer to work on.
- Your schedule requirements are flexible, and as such, you can work within a system of “will-buys” and “holds” that many companies have in place.
- You require a full-service facility.
What Kind of Terms?
One discussion that always comes up among postproduction professionals is how much to charge and how to bill your clients. In business-speak, these are the terms of a business arrangement.
How much to charge is often a loaded question because there are dozens of variables in play. Our purpose is not to discuss actual rates or specific project budgets. We do feel that it is worthwhile to discuss the “how” of charging.
When we get this question from students, we like to break it down into two fundamental ways of billing (and this applies to contract work that is much broader than just postproduction): charging for labor in increments of time versus charging a flat rate for a project. Charging for labor based on the amount of time is generally done either by the hour or by the day, and this can make a big difference in the bill.
Hourly Rate
Hourly rates from vendors often seem like a bad deal. Typically, quoted hourly rates are the highest possible rate that this work goes for—the “rate card.” Hourly rates are usually quoted only for a specific service. So, for example, if it costs $200 per hour to mix your show, but then some sound design needs be done, you're looking at a separate hourly charge—probably higher.
On the other hand, with an hourly rate, you pay only for the time that you actually use. From a vendor's point of view, hourly rates are a great way to charge what a service is really worth. Additionally, hourly rates are a great way of maximizing billables; the more services that a client requests, the more you get to charge. However, your client might have a bit of sticker shock when they see the bill. This is another area where communication is important. Giving budget updates as you move through an hourly project is a good way to alleviate the stress that would otherwise result from your presenting the final bill.
Day Rate
A day rate is also an increment of time, just a larger one. More common for freelancers, working on a day rate implies that you will be spending the whole day on-site with a client, doing what they need. Because this is considered a bulk agreement, the price of a full day is generally less than what you would get by adding up the hours with a high hourly rate.
It's important to define exactly what the day covers: eight hours or ten? And what about overtime? We've had clients who seem to think that once you are booked for the day, you need to stay as long into the evening as needed. From a freelancer's point of view, those extra hours should be charged to a client, and at a premium for overtime.
Flat Rate
Working at a flat rate is a completely different principle from billing for time, and this system has its own pros and cons. The idea is that a vendor commits to a specific set of deliverables for a price, and then is responsible to deliver—regardless of how much labor it takes. Often this means that the vendor is applying a discount based on the quantity of work that the project represents—in other words, your project is a large enough chunk of work that the vendor is willing to cut you a discount in order to get the job. Maybe they are also thinking that they can do the work more quickly than you expect, so a flat rate could be designed to get more money than the vendor thinks they will get by billing for the time. When you get a flat rate from a vendor, look closely at what you have been given. How does it line up with your expectations of what the work would cost if billed by hourly or day labor?
As a vendor, remember that it is very important to define the project exactly with a flat bid. As part of your bid, it is important to document in detail all aspects of the project that you are expecting to perform. If the client then changes these parameters (we call this scope creep), this document will be key in figuring overages.
As a client, remember that if you misrepresent a project at the outset, and sign on to a flat bid based on bad information, it is probably going to come back and bite you in the form of high overage charges.
Knowing How NOT to Get Ripped Off
How not to get ripped off … hmmm, doesn't that seem like a good idea!
With postproduction, as with many businesses, part of the trick is to make your clients feel that you are bending over backward and experiencing real hardship to give them the fantastic deal they are getting. Of course, you don't want to actually bend over backward or experience hardships; you just want them to think they are putting one over on you.
Here are some tips for making sure you're getting the best deal:
- Research, research, research! No other method is as important as researching your particular market. This includes—but is certainly not limited to—knowing current rates for services, day rates for various freelancers, and policies of vendors.
- Negotiate. Countless times we have seen companies pay overblown fees simply because they are unwilling to negotiate. If a company quotes $200 per hour for a given service, but your budget allows for only $175, why not at least ask about getting a break? And remember, a negotiation is not a negotiation unless you are willing to walk away.
- Make a vendor accountable. Holding a vendor to their deliverables, quoted time, and standards of service is mandatory. You hold a lot of leverage in the sense that you control payment.
Although it is outside the scope of this book, having your commitments on paper in the form of a contract is also an important part of not getting ripped of. If you don't want to hire a lawyer for a small project, check the Web for boilerplate contracts—it's better than nothing.
Booking a Vendor
It is a fact of postproduction that schedules shift. When working within your own studio, you handle this internally, shuffling resources to other projects, but when you are working with vendors, it can become a much bigger issue. We see a lot of problems in the area of scheduling vendors.
Many vendors have a booking system in place, based on the concepts of “hold” and “will-buy.” Although understanding that system is nowhere near as difficult as understanding chroma subsampling, it can be just as important to your project.
Hold—A hold is simply a way of reserving a day, an edit room, talent, or some other item with no hard commitment. Holds are generally stacked in the order in which they are received. For example, if you call your favorite audio post house to book a mix session, and they tell you there is already a hold on that day, you will become a second hold. Another way of looking at this is that you are next in line if the first hold should drop out.
Will-Buy—A will-buy is a commitment to a day, an edit room, talent, or some other item. By making this commitment, you are in most cases financially obligated to that vendor. For example, if changes in the project schedule now dictate that the mix day you bought for Monday now needs to be moved to Friday, you will have to pay for the Monday session regardless of whether you actually used the time. Therefore, it is extremely important that prior to making will-buys, you are sure of your schedule.
Challenge—In most cases, a hold can be challenged. What this means is that if you had a hold on a particular day, but someone else came along and committed to a “will-buy” for that same day, the vendor would ask you to either respond with your own will-buy commitment or else release the day. The hold is, in essence, a right of first refusal.
Although not every vendor works with a will-buy and hold system, smart vendors do. It is a way of protecting their interests and making sure that if and when they turn away work, they are compensated. We have all learned by this point that “time is money.”
Paying a Vendor
Have you ever been stiffed by a client? This happens for a variety of reasons—such as “We're waiting for our client to pay us first,” or (our favorite) “Oh yeah, that check is in processing”—for 110 days … come on! Really, the rules to paying a vendor come down to the Golden Rule: Do unto others as you would have them do unto you.
- If a vendor has lived up to their end of an agreement and performed services specified by your agreement, and they have sent you a bill, pay that bill! Pay it by any means necessary.
- Only if—and we stress only if—a vendor has not provided the services required should you withhold payment. Every effort should be made to make arrangements with the vendor to remedy any existing problems and issues.
Preparing Files for Your Vendor
Now that we know a little more about workflow planning and the business aspects of working with a vendor, let's take a look at some of the technical aspects of such a relationship. It's always a good idea to go over all of the technical aspects of a handoff. Make sure to allow plenty of time for questions or concerns—ahead of the start date. Every project will have a specific set of deliverables and notes for a handoff. The following section outlines many of the key elements.
Often when working with an outside vendor, there is a need to reconstruct your sequence on your vendor's equipment. This can be for any of several reasons:
- Moving a project to another digital postproduction environment such as Avid or Discreet for offline or an online editing session
- Conforming a show in a linear suite
- A color correction session
Again, getting guidelines from your vendor for this type of transfer is advisable.
There are several common methods for moving a sequence—namely, EDL, XML, and AAF.
Edit Decision List
EDLs are just what they sound like—a simple set of instructions for transferring sequences for all of the previous reasons. EDLs can take on several formats, such as CMX, Sony, and GVG. Final Cut Pro specifically supports CMX 340, CMX 3600, Sony 5000, Sony 9100, and GVG 4 Plus. Each format is named for the company that created it. Originally, these distinctions also indicated special formatting for the floppy disks on which the EDLs resided.
The difference between these formats is mainly in the formatting of the file— number of characters allowed for reel names, clip names, and even how large the spaces are between fields.
It is always best to check with your vendor about which format is appropriate for their particular equipment. That being said, CMX 3600 is the most common EDL format. The thing to remember about working with EDLs is that they are an antiquated but still widely used interchange format. Therefore, they are designed with linear edit systems in mind. Chances are, if something cannot be done in a linear edit system, you can't include it in an EDL. There are some key things to be aware of prior to exporting an EDL:
Reel Names—Generally limited to five to seven characters, depending on the format. If your reel name is longer than this, the reel name in the EDL will be abbreviated. This can cause a lot of confusion. If you know that an EDL is going to be part of your workflow, it is a good idea, for purposes of conforming a show, that you limit your reel names on ingest, or edit the reel names in the Browser prior to exporting your EDL. You should also avoid using special characters in the reel name. Use of numbers versus letters can sometimes also be an issue; it's a good idea to ask your vendor.
Number of Video Tracks—EDL formats support one video track and what's called a key track (video track 2). All other tracks are ignored. Additionally, a B-reel EDL is sometimes created as well (explained later). You can approach this limitation in more than one way. You can combine all of your video onto one track. If this is not possible, you will need to export separate EDLs for each track.
Number of Audio Tracks—EDL formats support up to four tracks of audio. If you have more than this in your sequence, you will need to either export multiple audio-only EDLs or find another interchange method for your audio (for example, OMF).
Transitions and Effects—EDL formats support only a few standard effects, such as dissolves and wipes. Other transitions and filters that you use can be included only as a note in the EDL.
To export an EDL from Final Cut Pro, use these steps:
- Select the sequence you wish to export. Go to File > Export > EDL.
- Assign a title to the EDL. By default, this title will be the name of the sequence, but it may make more sense, especially if you are exporting an EDL for each track, to attach the track name in the title (for example, “MyProjectVideoTrack1”).
- Choose your EDL format. CMX 3600 is the most common.
- Choose your sorting method: the Master, Audio Merged option will order the clips as they appear in your sequence, with audio files that start and end at the same time merged as one event in the EDL. The Source, Audio Merged option will order clips based on their original source tapes and timecode. In other words, the first item listed in the EDL will be the first shot on the lowest-numbered reel.
- Choose whether you want to target only a single video track at a time. With this box checked, key events will not be exported. You will need to have this box checked if you are exporting multiple EDLs. Final Cut Pro uses the current destination track icon in the Timeline to determine which track will be exported. So if you want to export each track as its own EDL, you would first move the “current destination track” icon to the track you want to export, and then go to File > Export > EDL and check the Target Video Track Only box (which, you will now notice, has in parentheses the track to which you moved the destination icon).
- Choose whether to include or omit transitions. Remember: EDLs support only standard transitions such as wipes and dissolves. Chances are that a transition you have decided to use will not be supported. Generally, if the purpose of the EDL is for an online session, this is a really good idea—it makes the EDL pretty simple.
- Choose what type of reel conflicts to include in the EDL. A reel conflict happens when a transition needs two clips from the same reel (something that normally is not possible to do in a linear suite). This actually becomes an issue only when a show is being reassembled in a linear suite. Here are three ways to fix the conflicts:
B-Reel Edits—Final Cut Pro creates a separate EDL that contains only the conflicts. To properly conform this in the linear suite, though, all of the B-reel shots (the second shots in the transition) must be on their own tape.
Preread Edits—Final Cut Pro adds the command PREREAD in the EDL and requires two decks, one of which must have preread capabilities. Preread is sort of a technical sleight of hand. A deck with preread can act as both a playback deck and a record deck. The deck first reads a clip off a master tape, then lays it back on the same tape, and finally transitions to the second clip, which is played back from another VTR.
Generic Edits—Final Cut Pro takes no special action if there are reel conflicts. This is the option to use if the show is going to be conformed by another nonlinear edit system—there are no limitations about using two clips from the same reel to form transitions.
- Choose what information you want to be included as notes in the EDL. You can choose to include either the filenames (as they exist on disk) or the clip names (what you've named them in FCP). You can choose which Comment fields from the Browser to include. Lastly, you can choose whether to include video levels (opacity), audio levels (volume), transitions as notes.
- Choose the starting timecode and timecode format of the EDL. This should match your sequence.
- Lastly, choose how tracks are mapped. Remember, in most EDL formats, you are limited to four tracks.
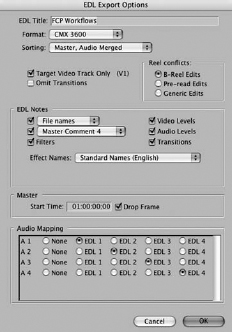
Figure 13.1 The EDL Export window.
XML
XML stands for eXtensible Markup Language. Unlike EDLs (described before) and OMF files (described later), XML is much more flexible. In fact, it is designed to be a lingua franca for the whole world of computing. Since version 4, Final Cut Pro has been an XML-compliant program. Almost every aspect of a clip, sequence, or project can be exported as part of an XML file.
XML is farther-reaching than just simple file interchange. In Part 3, we detail a project where XML was used to create a custom media-management solution on the Web. Applications such as Final Cut Server also have XML at their core. Widely used inside the Final Cut Studio, XML is a way of sending information to and from applications (more on this in Chapter 11: The Power of Final Cut Studio).
XML is also a great way of getting around project-file-version limitations (described later). This is because XML is not tied to a specific application version—only to the version of the standard. So, in other words, if you needed to take an FCP 6 project and open it on an FCP 5 system, you could export an XML file using the correct version of the interchange.

Figure 13.2 The XML Export window.
Not every postproduction tool works with XML, but more and more are becoming compatible. Without getting totally computer science about it, the thing to understand about XML is that it is an open-markup language—it can relate any data for which there is a definitions document. Anything that is defined in XML can be processed in various ways, most notably by being “translated” to a different XML definition. The actual XML definition for FCP can be found at http://developer.apple.com/documentation/AppleApplications/Reference/FinalCutPro_XML/index.html.
So any software that has an XML definition can now work with Final Cut Pro in some capacity.
To export an XML file, use these steps:
- Select the sequence, project, or clip(s) you wish to export. Pay special attention to what you have selected—all of the items that are selected will be exported.
- Choose which version of the XML interchange you want to use. Typically, this will be the latest one (version 4 for FCP 6) but if you need to export for older versions of FCP or for other software that supports only older versions of the interchange, you can choose the correct one here.
- Choose to include master clips outside the selection. With this checked, the XML file will include master clips assoiciated with a given sequence from the in point to the out point that are set on the master clip.
- Choose whether you want to save the project at the same time you export the XML file with the “Save project with latest clip metadata (recommended)” check box.
- Choose a destination for the file.
Viewing XML Files
If you are curious to learn more about XML, and you have never looked at an actual XML file, it is pretty interesting. Manipulating these raw files is a bit outside the scope of this book, but here are some simple instructions to just see what they look like.
Take the XML file that you saved and open it in a text editor. This file has an XML extension. Because, by default, this file will open back in FCP, you will need to tell your system to open it as a text file by right-clicking and choosing Open With (you can then choose TextEdit, or any other text editor or web-authoring program that is on your system), or by dragging the file icon to the icon of your text editor in the dock.
Once you open the file, you will see a lot of code. This is your FCP project described in XML. If you look closely, you will see some language familiar to you from FCP in this code: duration, rate, in and out, and things such as description and log note (these are the same fields that you fill in during logging). Essentially all of the data contained in your FCP project has been written out in this XML code, and can now be read by other software (as well as, to a certain extent, by humans).
AAF
As discussed in Chapter 5, AAF (Advanced Authoring Format) is a new format that promises to be a universal method of transferring assets to varying software applications. It contains both media and metadata “wrapped up” together in a package that should be highly transferable. Currently, Soundtrack Pro is the only application within the Studio that supports AAF import and export. Final Cut Pro does not natively support AAF interchange. However, Automatic Duck's Pro Export FCP 3.0, an export plug-in for Final Cut Pro, can be used to support the AAF interchange directly from Final Cut Pro.
OMF
Introduced by Avid in 1991, OMF stands for Open Media Framework. OMF has become the standard way that audio is passed on to a vendor for sound design and mixing. In a nutshell, when you export an OMF file from Final Cut Pro, all of your audio (media) and their timings (In points and Out points, as well as position on the Timeline) are combined into a single OMF file. When the file is opened up by your vendor, all of your tracks and their timings are reconstructed in the software that your vendor is using.
Although OMF can be used for transferring video files via OMFI (Open Media Framework Interchange), Final Cut Pro supports only the export of OMF audio files. There are also several things that you should be aware of with OMF:
- OMF files are limited to 2GB in size. Therefore, if you are exporting a very long show, you might need to export multiple OMFs. This can be accomplished easily by splitting up your export. To do this, turn off some audio tracks by using the green Audio Controls button in the track-control area of the Timeline. Final Cut Pro will respect this, and export only the tracks that are on. For example, OMF #1 might be tracks 1-6, and OMF #2 tracks 7-12.
- OMF files from Final Cut Pro 6 (not previous versions) can contain volume, pan, and cross-fade (but not filter) information. Always check with your vendor to find out if they want this information embedded in the file. Some mixers like to start with a blank slate, whereas others like to have your volume and pan key-frames included so they can use them as a reference.
- Nested-sequence audio will be exported as one file, not as the separate files that make up the nest. Also, any clips that have a speed change or have been reversed will be embedded in the OMF file that way.
- OMF files embed timecode from your sequence into the file. This means that if your sequence starts at 01:00:00;00, that will be the starting timecode of your OMF file. This is particularly important if your audio vendor is mixing to picture using a reference master (discussed later). The timecode of your OMF must match that of the reference master in order to ensure sync.
To export an OMF from Final Cut Pro, follow these steps:
- Select the sequence you want to export.
- Go to File > Export > Audio to OMF, or right-click on a sequence in the Browser and choose Export > Audio to OMF.
- When the dialogue box pops up, choose your appropriate sample rate (32kHz, 44.1kHz, 48kHz, 88.2kHz, 96kHz) and bit depth (16 bit, 24 bit). Generally this should match your current Timeline settings.
- Choose your handle length. Handles will add extra media to your clips on both the In point and Out point sides. By adding handles, you give your vendor “wiggle” room for things such as cross-fades and slipping. Two to three seconds is standard. Be aware that handles add media to the OMF file. On long projects, this can easily contribute to files being larger than 2GB, thus requiring multiple OMFs.
- Choose whether you want to include cross-fade, level, and pan information in the file.
- Save the file to your selected destination.
- Burn the file onto a CD or DVD, label it, and deliver it to your vendor—or, if bandwidth will allow, upload the file to an FTP server that you and your vendor can access.
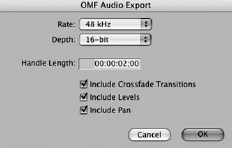
Figure 13.3 The OMF Export window.
Reference Masters
Video references often accompany OMF files going to audio mix when picture lock has been reached. The audio mixer uses the reference tape so they can mix to picture. This reference is usually on a videotape with matching timecode, but other methods—such as using a QuickTime file with embedded or burned-in timecode—are acceptable and are starting to be popular for exchange.
The important thing to understand about reference masters is that they don't necessarily have to have the final images, text, graphics, and so on, but they do have to be picture locked. Often, after an OMF and reference tape have been delivered and mixing is taking place, stock imagery is replaced, final graphics are placed, and other visual problems are fixed. What cannot change, however, are timings. If you lengthen or shorten visuals, especially items that have sync sound, you will have to re-export your OMF file to match. This is why picture lock is so important.
Project Files and Media Files
Although EDLs, XMLs, AAFs, and OMFs are great for interchange between different software applications, sometimes the vendors that you will be working with are using the same software that you are.
If this is the case, consider yourself very lucky! Final Cut Studio project files contain vastly greater amounts of information than any interchange file format can. With that said, if you are exchanging project files with a vendor, there are some issues to pay attention to.
Versions—Final Cut Studio applications can read previous-version project files, but (for obvious reasons) cannot read newer versions. This can be important if you're on the latest and greatest versions of the applications, but your vendor is working on old versions.
Media Files—By itself, exchanging a project file doesn't do a whole lot. Remember, a project file is everything about your project except the media. Your vendor will require the media. The media can reside on disk as previously captured or created files, or—as is the case for many offline/online workflows—on the original tapes, which your vendor can then recapture.
Documentation
With all the wonderful ways of exchanging media project files with vendors, one of the most overlooked aspects of these workflows is documentation. More mistakes and problems arise from improper documentation than you'd probably think. It never hurts to document things more than you need to. Let's take a look at some things you should document.
Tapes—Any tape that goes to a vendor (this should be a rule in-house too) should be properly labeled, both on the box and on the actual tape. Additionally, master tapes should also include a printout of slate information—such as segment in/outs, durations, and clean scenes. Original footage tapes should include a log of shots and or scenes included on that tape.
CDs/DVDs—Like tapes, CDs and DVDs should be properly labeled, both on the actual disc and on the packaging for the disc. It is also very helpful if, just as with a tape, a printout of the disc's contents accompanies the disc.
Comments/Notes—Many vendors and freelancers are really good at what they do; however, they are not mind readers (at least the ones we know), so documenting comments and providing notes are very important. Examples of the type of notes and comments you would want to provide are:
- Mix and sound-design ideas and/or problems.
- Color correction/grading ideas and/or problems.
- Rough-cut or edit-version notes.
- Media-related issues such as rights and licensing, and technical issues such as frame rate, progressive/interlaced, and pulldown patterns.
Next Steps
This chapter concludes Part 2. We've now covered a full range of activities expected in most Final Cut Pro workflows. In Part 3, these building blocks are put into context in a series of real-world case studies.
Moving forward into your own workflow planning, you can count on two things:
- Postproduction will continue to change. The stages and general structure of this section will hold for a little while, but the techniques and specifics will need to be updated relatively soon. It is best to remain flexible and open-minded about even what seem like the most secure aspects of workflow thinking.
- Your own experience will inform the choices you make, and will hone your sense of style for producing, editing, and managing workflows.
Part 2 shows us the conceptual and technical building blocks needed to construct effective workflows. Part 3 will give us some examples of interesting workflows that you can study and adapt. They are not always perfectly planned projects—there are plenty of examples here of thinking on the fly, and things we would have done differently.