
14 Money-Saving Digital Video Archive
This project was developed in response to the unique archiving needs of a nonprofit client. The organization accumulates a lot video material, and edits a moderate number of pieces with it each year. However, it lacks the budget or internal resources for a full-blown media-management system. Important aspects of the solution are media management at the ingest stage and using an FCP project file as a master archive (also discussed in Chapter 12).
Highlighted Concepts and Techniques
![]() FCP project-based media management
FCP project-based media management
![]() The sneakernet
The sneakernet
![]() Digitally screening footage as QuickTime
Digitally screening footage as QuickTime
Challenges
![]() Disorganized source tapes
Disorganized source tapes
![]() Limited budget
Limited budget
Overview
This workflow developed organically when the talented and thoughtful staff at an innovative independent studio recognized the long-terms needs of a new client. Their first project together led to a simple archiving solution and an ongoing business relationship.
The idea for the archive solution is the concept of a Final Cut Pro project used as a master project, described in Chapter 12. Some media management applied at the ingest stage and taking advantage of Final Cut Pro's resolution independence (particularly using the DV codec and the ProRes 422 codec as near-full-quality archiving formats), make for a robust and flexible solution.
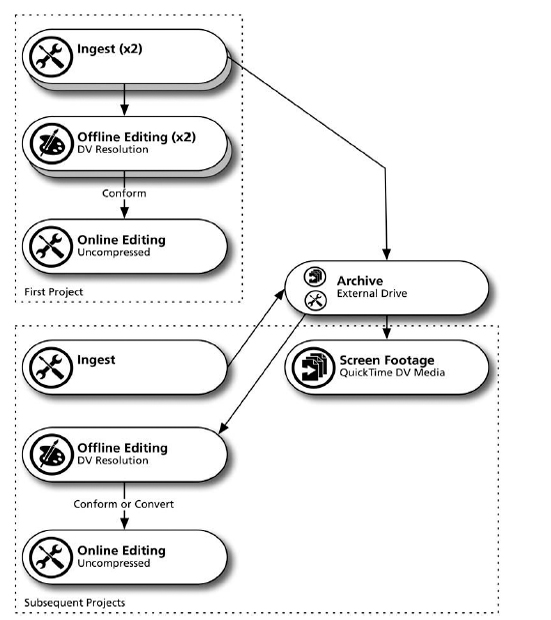
Figure 14.1 Digital video archive workflow.
Project Roles and Responsibilities
The important roles in this project are fairly typical for a corporate (read: nontelevision industry) client working with an independent studio.
Communications Director—Jill is the communications director (client point of contact) for the nonprofit organization. Her organization works on global health issues and uses celebrities to spread their message worldwide.
Frequently, they tour foreign countries with their celebrity spokespeople, and film these trips (as well as other domestic events) to be used for fund-raising and general communications. However, the organization's video experience is minimal, and their small staff is stretched thin managing all aspects of these trips and programs. Not much time or money is dedicated to producing their video content in the field.
As the communications director, the job of supervising postproduction for the organization's videos falls to Jill. She is responsible for hiring the studio, communicating the organization's goals to them, and supervising the work. In a sense, she is the executive producer (EP) of the project. The studio is working to make her happy, and she is the one responsible for getting them paid. However, this should not imply that she has much experience in this area, and Jill is counting on the studio to do good work and to look for opportunities for improvement that she is not aware of. This kind of client/EP relationship is the norm in corporate video.
Producer—Charles is the producer assigned to the project by the independent studio. In the business model of this small studio, this means that he has both creative and management responsibilities. He is the main point of contact with the client, and also works closely with the editors to develop the piece, and to think of solutions for the studio's clients.
Editor—Tommy is the senior editor at the studio. He runs the Final Cut Pro workstation, especially during supervised client sessions. He also works with junior and assistant editors, interpreting the clients’ and producers’ goals for his subordinates, and supervising their execution toward those goals. Although his main focus is creative, Tommy is very technically knowledgeable, and also participates in designing and executing media-management solutions.
Assistant Editor—Cindy is an assistant editor at the studio. She works under Tommy and supports him, especially in time-consuming tasks such as Log and Capture. Cindy is creative and talented, and she often does original creative work with Tommy's guidance.
Required Equipment
The following list describes the equipment for the specific needs of this project. However, the real keys to this basic workflow are the FCP system and the external FireWire drive. So many, many FCP users can take advantage of these concepts on some scale.
BetaSP Playback Deck—Most of the shooting that this client commissions is in BetaSP. Although this format is quickly becoming antiquated, remember that this client shoots all around the globe with local crews, making BetaSP more common, and it is still their default shooting format.
Uncompressed Final Cut Pro System with Analog Capture Card—The FCP systems used in this project have high-speed drives rated for uncompressed video playback along with analog capture cards to capture uncompressed video. It is also possible to capture at DV resolution through these cards.
External FireWire Drive—A common piece of equipment, but it is really the heart of this project. As mentioned in Chapter 1, the introduction of FireWire and the ever-dropping price of disk space are two factors that have driven the changes in the industry. This solution takes advantage of both these things.
Execution
The First Project
When Jill initially contacted Charles at the studio, she was in rush to create a video retrospective for a celebrity who had given a lot to their cause. The star's birthday was in ten days, and the nonprofit wanted to give the video to her on a DVD so she could watch it with her family as a special birthday celebration.
In the past year, the celebrity had done two major trips abroad with the organization (one to Africa and one to Asia). There was a lot of footage from these trips, but it had not been organized, or even viewed by anyone. The nonprofit also had plenty of other video material with the star in it from her ongoing participation with the charity. There was hour upon hour of good footage to work with, but none of it was organized.
So Jill showed up at the studio with an ungainly box of source tapes. After some discussion with Charles, they established that the studio would take the creative reigns of the project, and present her with ideas and cuts to review. Jill left in a rush, making it pretty clear that she had other things to do and did not intend to be looking over their shoulder during the process.
With the tight time frame, there was not a whole lot of time to make a workflow plan or do a complete review of the tapes before ingest. However, Charles and Tommy had a brief meeting, and made some decisions about media management, roles, and process:
- They decided to split the project onto two separate workstations. Tommy would handle the Africa footage on one FCP system, and Cindy would take care of the Asia footage on a separate workstation. The team felt that this would work because the footage from the different trips would be used in two separate parts of the final video. Of course, the two halves of the piece would have to be put together sometime, but a lot could be accomplished concurrently with this approach.
- They decided to capture at DV resolution. They wanted to save time by reviewing footage at the same time that they captured it, but this would likely mean capturing more than they needed. So the compromise to capture at DV meant they would not have to be too careful about how much they captured (DV footage takes up much less drive space than uncompressed does), but they would have reasonably good quality to edit with. For finishing, they could reconform from the source tapes, or up-convert to uncompressed color space in FCP if they ran short on time. (The second method would mean some quality loss, but it might be an acceptable compromise for this project.)
- They set up naming conventions for everything captured on both systems, so that regardless of which station the material was captured on, all of the metadata would follow a consistent scheme. Specifically:
- All reel names would be exactly the same as what was written on tape.
- The initial bins in the Browser would also be based on tape name, so that the root level in the Browser would have bins that matched the tape and reel names.
- A simple controlled vocabulary was created for the other metadata and clip naming. When the star was on camera, it was decided to always use her initials in the description field rather than her first or last name, for instance. Similarly, it was decided that the scene field would always contain the name of the country that the clip was shot in.
As we saw in Chapter 7, the check boxes in the Logging tab allowed the metadata information to be included as part of the filename. This turned out to be an important aspect of the workflow.
These choices, though made in a hurry, constitute a basic workflow to get started. Charles and the team did not try to lock down the endgame precisely. Rather, on the tight schedule, they decided on some workflow aspects that would get them moving in a hurry—and (they hoped) not paint themselves into any corners.
As we will see, these decisions turned out to be good ones, because the client was happy with the final product—but also because they opened doors to a long-term media-management solution and, in turn, to a long-term client relationship.
The rest of that first project went very smoothly, especially considering the short amount of time and the large amount of disorganized sources. Cindy did some amazing creative work on the Asia material. When it was time to put the two pieces back together, the two sequences were joined together on Tommy's workstation, and he recaptured only the footage that was used in the piece at full uncompressed quality for the online and DVD output. The celebrity and her family loved the video, and it was an appropriate thank-you.
The Archive
By the time the project was done, the studio had logged and captured over six hours of video at DV resolution for a piece that was only about six minutes long. Of course, this was necessary because they had started with so many disorganized tapes. Of the budget on the project, roughly a third of it had gone toward this logging and capturing work.
More to the point, this was unlikely to be the last video that the organization would need to cut with this footage. They have the need to make new videos for events and fund-raising every year, and they pull from the same collection of footage. The footage that the studio (mostly Cindy) had logged and captured at DV resolution would be very useful for these future projects. However, if the studio now erased that media from the drives (as they needed to do to start new projects), much of the work would be lost. (Of course, by maintaining the FCP project, the process of recapturing the media from the tapes could be automated, but that would still take time and require that the tapes be maintained and available.)
Having learned quite a bit about the needs of the organization during the first project, Charles brought the issue of archiving up to Jill. She readily agreed that maintaining an archive of digitized footage would be useful to the organization, but she had no desire to make an investment in their own editing system. Charles then suggested that the organization purchase their own FireWire drive to use as an archive. The studio would set it up for them (for a fee), and then they could use this archive for all of their future video projects.
Because this project was not the first time that Jill had spent the organization's money on video, she understood how much of each project budget goes toward organizing and capturing the material. Working together, Jill and Charles came up with some basic goals for a video-archiving solution for the organization:
- Avoid the expense of repeating the ingest stage for the same footage on different projects.
- Organize material at the ingest stage because it is likely to remain unorganized in the field due to the way the organization does their shooting.
- Maintain an external drive with footage that can be used in a wide range of postproduction environments, and that can also allow people to view the footage on a desktop system without nonlinear editing software.
- Archive the piece that was cut in the initial project, and continue to archive the new projects so that there is a record of these pieces, and they can be dissected and modularly reused.
Charles assured Jill that this could all be accomplished quickly and painlessly. He pointed out that the full cost of setting this up now—including buying the new drive—would be less than the amount spent on Log and Capture for the initial project. Logically, then, if the organization was going to need to do just one more project with the same footage, and they could avoid the expensive Log and Capture stage with the archive, it would pay for itself right there.
Jill agreed with this logic, but Charles stressed that the real benefit of the archive would be realized over time, as more and more footage was added and new projects were cut and also saved as part of the archive.
From having completed the piece, and with all of the captured DV footage on two separate FCP systems, it was fairly easy to create an archive that fit the goals. Mostly this was a matter of consolidating the media onto the FireWire drive and creating a master FCP project to reference those media. This was helped by the media-management decisions they had made at the outset.
Here are the steps they took to create the archive:
- Purchased a large FireWire drive.
- Used the Media Manager to move all of the media in the project that was on Cindy's machine over to the new drive. The selection for the Media Manager was all of the original bins in the project that were based on the tape names. The FireWire drive now had an FCP project with organized clips and bins and all of the media that the project refers to. This new FCP project would be the master archive project once they also added the media from Tommy's system.
- Now this drive was mounted on Tommy's computer, where the online had taken place.
- Because the decision was made to make the archive at DV resolution, all of the uncompressed footage that had been recaptured for the online could be discarded (they did, however, make a tape output of the final online piece).
- All of the DV media from Tommy's workstation were now copied onto the FireWire drive, to the same directory where they had put Cindy's media.
- With both projects open—the one from Tommy's machine and the one that had been created by the Media Manager on the FireWire drive—all of the clips in the Browser on Tommy's machine, as well as the final online sequence, were copied into the new project. Now all of the clips had been consolidated into the new master project.
- The archive was almost complete, but there was one more important step. The new FireWire drive now contained an FCP project with all of the proper clips and sequences, and a media folder with all of the required media. However, these two elements—the project and the media—were not yet properly linked together. Currently, the clips that had been captured on Tommy's workstation would still be linked to the original files, not to the ones that they had copied onto the FireWire
drive. The last issue was to properly link all of the clips in the new project to the correct media residing on the FireWire drive.
There are several good ways to accomplish this task, but Tommy suggested something that was foolproof. He took the new archive drive and mounted it on a third FCP system that had never done any work on the project. Then, he relinked everything in the project. When it all linked up, with no media missing, Tommy knew that it would be safe to erase the media on the other two systems.
Jill was given the archive drive and went on her way, but for the next several years— and, in fact, long after Jill had left the organization—the nonprofit kept coming back to the studio to do video work. And the studio kept adding to the DV archive—both new video footage and the sequences they made.
The procedure for a new project using the archive was simple:
- Open the master project and capture any new media directly into it, using the same naming conventions and the media folder on the FireWire drive as the scratch disk. (In this manner, all new media content would be added to the archive.)
- Create a new FCP project for the new project. Copy any media that you want to use from the archive project to the new project, or browse and use media in the master file by leaving both projects open.
- As with the first project, work at DV and then recapture or up-convert for the final output.
- At the end of the project, make a copy of the final sequence, and move it to the master project for safekeeping.
All of the goals that Charles and Jill had initially discussed were achieved:
- Employees at the organization used the archive to view footage nonlinearly using QuickTime Player. Without Final Cut Pro, they had to access the media directly from where it was saved on the drive. This meant looking through a long list of clips because all of the media are saved into one directory. (As the studio continued to add footage to the archive, this single directory was used as the scratch disk.) However, because of the naming conventions implemented at the beginning, even this long list of files was not hard to look at because each one had an informative and consistent name (initials for the celebrities, name of the country where the footage was taken, etc.).
- Log and Capture time was minimized, because only new material needed to be dealt with as it came in with a new project. The waste of time and money of repeated logging and capturing was eliminated. In this way, the archive paid for itself many times over.
- The organization continued to shoot in a fairly haphazard way, but they worried less about this because they had the archive system to tame this footage once they returned home with it.
- The archive of sequences became a modular library for video pieces. So the organization could call the studio and say that they wanted to try one of their standard corporate opens to lead into new footage of a new celebrity volunteer. It was easy to tailor their video pieces for different presentations. On at least one occasion, they resurrected the original birthday piece, repurposing it when another video they had planned for a big presentation fell through at the last minute. Just having the archive made the organization much more agile in all of their video work.
Discussion
This was a simple solution that came about organically. It turned out to be a win-win for both the nonprofit and the studio. The charity saved money and executed better video pieces. The vendor earned a long-term client.
Although this was a workflow solution, it was not a case where a complete plan was made and then executed. Rather, things evolved, from early media-management decisions made to deal with a tight turnaround and disorganized source tapes, to the suggestion of the archive, and finally to the integrated relationship that developed between the studio and the nonprofit.
The initial decisions by Tommy and Charles were made quickly and out of necessity on the first project. The way these decisions played out is educational, because it led to consistent media naming for the archive and easy browsing of the media files in the Finder (among other benefits). Tommy and Charles didn't know when they made these conventions exactly how things would play out, but they were basing their decisions on sound workflow principles:
- They knew that they were working on a project with a lot of disorganized media.
- They knew because of the time crunch that they needed to have two editors working concurrently.
These two things both indicated that strong attention to media management would be a good idea. And:
- They knew that it is easier to throw out organizing conventions later than it is to add them.
So they began with a fairly tight media-management setup. This had some effect on the smoothness of the first piece, but it had a larger effect in setting the stage for the archive and getting it started quickly and efficiently.
The decision to archive at DV quality is an interesting one, and some may question it. DV is good enough to view the footage and make effective cuts, and it can be your final output in a pinch. All of these things, combined with the small file size, made it a reasonable decision at the time, but there is a loss of color depth from an uncompressed capture of the BetaSP sources.
Final Cut Pro 6 added the ProRes 422 codec, which became a preferable format for the archive. The benefits of using ProRes 422 instead of DV include:
- Higher image quality largely removes the need to ever recapture or up-convert. ProRes 422 is considered a mastering format.
- The ProRes 422 codec works with both SD and HD video.
- The multiformat Timeline feature of FCP 6 allows this new ProRes 422 material to be mixed in real time on the Timeline with the older DV material.
In the final analysis, this solution is an example of how the democratization of the medium allowed a nonprofit to do more for less, to overcome some of their limitations, and to improve their video communications across the board.