
10 Final Cut Pro Finishing
We have seen a lot to this point on preparing projects, getting them into FCP, doing editorial or storytelling editing, and sharing works in progress for review and feedback. This chapter is one of three that pick up from here with instructions on how to finish a piece and get it out of Final Cut Pro.
This chapter covers finishing concepts in general, and techniques that are done from inside the FCP interface. Chapter 11 discusses integrating Final Cut Pro with other software included in Final Cut Studio. Finally, Chapter 13: Working with External Resources covers workflows that leave the Final Cut Studio environment entirely. Finishing techniques are an important part of workflows because they are highly technical, they tend to be expensive, and they often involve various handoffs from one machine or operator to another.
If we go back to the rock sculpture idea, finishing is the sandpaper and polishing cloth. A good sculptor realizes that there is a level of work that might go unnoticed by a lot of people who see the piece. However, their overall impression of the piece will benefit if all of the detail work and the polishing are done carefully.
Postproduction finishing is much the same. You will rarely get a comment that the color correction or the mix is exceptionally good (unless maybe these issues were particularly bad when you started). In fact, in a way, you don't really want those kinds of comments—they indicate that the viewer is watching the technique and not the content. The cumulative effect of finishing work should be video pieces that look and sound great, and don't draw attention to any technical aspects.
In these three chapters, we have taken a broad view of finishing as a way to bring in a wide range of activities such as DVD creation and music composition. The modern producer or editor needs to be aware of these things. DVD creation used to be a specialty; today, editors are almost expected to know how to do it. Music composition was once considered a very, very specialized skill; today, a surprising number of editors are offering some level of music-creation service. Even if you are not interested in taking on all of these skill sets, it is important to know how to interface with the people who do this work.
The choices that are made in a workflow regarding finishing have serious financial consequences. Going to an audio house or post house to do a mix or color correction session in a dedicated suite can easily run into tens of thousands of dollars. Keeping this work in-house within Final Cut Studio will save money, but will quality be sacrificed? And how long will it take? This is the same old quality-vs.-cost question that came up when talking about formats in Chapter 4.
Every project is going to be different in this regard, but planning for what finishing steps will be done where, and by whom, is an important part of any workflow. The goal of this chapter, along with Chapters 11 and 13, is to better prepare you to make and execute these decisions.
Before we look at specific techniques for finishing, it is important to understand some of the general goals and methods for this stage of postproduction. The sections that follow define these ideas in ways that will be useful regardless of whether you use the tools inside Final Cut Pro (this chapter), in Final Cut Studio (the next chapter), or even if you choose to use additional external resources (Chapter 13). The ideas are grouped here by concept, for easy reference.
Conforming and Online Editing Concepts
As mentioned in Chapter 1, the meaning of the term “online editing” has changed with the evolution of technology. One way to understand these changes is through comparison to a related term: “conform.”
To conform a show means to assemble the show at its highest-quality uncompressed format, regardless of whether this task is performed in a linear or nonlinear fashion. Different ways of conforming have led to different processes for the online phase:
- When the online editing concept was first invented, it referred to using a linear editing system to conform a show at full resolution using an EDL (edit decision list) to reference the editorial decisions made in an offline editing session.
- With the advent of uncompressed nonlinear editing, onlines could now be performed in a nonlinear environment. The process still involved conforming (now also referred to as recapturing or redigitizing) to ingest the footage at the highest possible digital quality.
- Lastly, as more projects are initially captured at full uncompressed quality, there is no longer a need to conform footage. Conforming is necessary only if the footage was previously compressed for offline editing.
When the term “online” enters the workflow conversation (or when you are being hired or hiring someone to do an online), it is a good opportunity to have some deep communication about exactly what the online process is for the particular project.
Currently in the film and video world, we see the term “online” used to mean three different, related, and all totally relevant things (and the word is used for a totally different set of concepts in the web world!):
- To conform a sequence to its highest possible quality. Today, this may involve either the linear or nonlinear methods mentioned above, or a totally digital process of moving and relinking files (think tapeless workflow).
- To check all elements of a sequence for quality and technical issues. This usually refers to footage, stills, and motion graphics, and may even refer to audio in some cases.
- As a catchall for any steps involved in finishing. So, many people refer to the online stage to include color correction, compositing, mix, and any other step that takes place between completing the editorial process and delivering the show. In this sense, it is used like a phase of the process, not to mean any specific technical task.
Of course, these are not mutually exclusive, and people often mean more than one of the above when they say online. The bottom line is that online always refers to finishing and polishing a piece, and not to editorial or storytelling.
In the final meaning listed above, all of the concepts below could be said to be part of the online phase, and we could have called this chapter Online Editing with FCP. We prefer the word “finishing” because it is more descriptive, and it reserves online for its more technical sense.
Color Correction and Color Grading Concepts
One of our favorite parts of the finishing process is color correction and grading. For us, this process is where we can make a good piece shine. Good color correction and grading are subtle arts, but done well, they can drastically improve your images.
Arguably, this aspect of postproduction has seen more growth in the desktop market in recent years than any other area of finishing. Final Cut Pro and Final Cut Studio have not been exempt from this growth. FCP boasts an impressive set of real-time color correction tools inside the interface. Additionally, with Final Cut Studio 2, Apple introduced a full-fledged color program: Color.
We've been amazed recently by how many people understand the basic goals of correction and grading. We can remember just a few years ago that color correction and grading were considered only for higher-end projects. Now they have become a standard part of most workflows.
Before we discuss the color correction and color grading toolset inside Final Cut Pro and Color, we need to look at few basics.
Color Correction
The term “color correction” is often used globally to describe the process of correction and grading. Although understood by most, we like to think of correction and grading as separate concepts. Color correction, as its name implies, is all about correction, or fixing bad color and brightness issues. Examples of color correction include correcting for color casts from improper white balance and lighting, fixing over- or undersaturation of colors, fixing under- or overexposed footage, and correcting for broadcast legality (all discussed below). Many videographers and directors of photography would like to think that the images they record are perfect. The truth is that almost every shot can benefit from some color correction.
Color Grading
Color grading shares some of the same goals as correction (broadcast legality being one), and often occurs in conjunction with correction. However, it is really a wholly different concept. Grading refers to the process of giving footage a look and style. This could be done on a shot-by-shot basis, or, more commonly, grading has a goal of giving a distinctive look to the entire piece. A number of famous instances of grading in movies and television come to mind. Traffic, The Matrix, O Brother, Where Art Thou? and Pleasantville are classic examples of grading in film, CSI, Carnival, and The Shield are great modern examples of grading for television. Grading is often used to elicit an emotional response from the audience, to create a mood, or, in extreme cases, to bend reality. Because it is subjective, grading is often a much more involved process than is correction. Often the decisions that are made during grading involve many members of the postproduction team. It's common for editors, colorists, DPs (directors of photography), producers, and directors to all work together to come up with a look and feel for the piece.
Broadcast Legality
One area that color correction and grading share in common is the idea of legality. Believe it or not, broadcasters have technical rules about the video signal. These rules dictate how bright and dark an image can be, as well as the maximum saturation of the colors. Failure to comply with these standards can possibly cause your show to be rejected by a broadcaster. If you're thinking to yourself, “My show will never be broadcast” (it is going to DVD, or the Web, or cell phones), adhering to broadcast safety standards ensures greater consistency over a larger range of display devices.
Although it's always best to check with your particular broadcaster, there are a few rules to follow to meet basic requirements.
Luma—Typically, luma should be less than 100 percent on a digital scale, or 100 IRE (a unit of measurement named after the Institute of Radio Engineers) on analog scopes. Most broadcasters will, however, allow for short peaks up to 105 percent digital, or 105 IRE. Additionally, most broadcasters require that black not be below 0 percent, or 0 IRE—what is known as superblack.
Chroma—On a digital scale, chroma levels should be less than 100 percent, and less than 100 IRE on an analog scale. Most broadcasters will allow for peaks up to about 110 percent IRE. RGB saturation should also be less than 100 percent, although some broadcasters will allow for slightly higher levels. Although most video is encoded Y′CBCR, it's a safe bet that at some point during distribution, the video will be displayed on an RGB device. Therefore, monitoring these levels is very important.
Scopes
The video scopes are your primary tool for measuring and analyzing your video. They provide you a way of seeing color casts, over- or underexposure, contrast, and so on. Video scopes existed long before Final Cut Pro, and it is worth noting generally the kinds of scopes that are available.
Hardware Scopes—These are the boxes with CRT monitors that we are used to seeing in editing rooms of all kinds.
Rasterizers—These are a newer kind of scope—one that uses hardware components to analyze the video, but then runs the information through a PC, and displays (or rasterizes) it on a dedicated RGB monitor. This is basically an updated version of the hardware scopes that run through a dedicated PC.
Software Scopes—These are virtual scopes available inside software applications. In particular, both Final Cut Pro and Color have software scopes contained in them.
Let's take a look at the various scopes available to us in FCP and in Color.
Waveform Monitor—The Waveform Monitor is your primary tool to analyze luma information in your image. In Final Cut Pro, this scale ranges from –10 to 110 percent; in Color, from –20 to 110 percent. The higher the percentage, the brighter the image. In FCP, you can also view saturation on the Waveform Monitor by right-clicking and choosing Saturation. Color has a more robust set of Waveform Monitor tools allowing you to view your signal in a variety of ways.

Figure 10.1 The Waveform Monitor in Final Cut Pro (left) and in Color (right).

Figure 10.2 The Vectorscope in Final Cut Pro (left) and in Color (right).
Vectorscope—The Vectorscope is your primary tool to analyze the chroma portion of your image. The center of the scale represents zero saturation; the farther out toward the edges of the scale, the greater the saturation. The direction out from center represents hue. The outside edges of the scale in both Final Cut Pro and Color represent 100 IRE. The color targets make it easy to see the hue the signal is pushing toward, and often are used as boundaries for saturation (although this a conservative approach). The Vectorscope also has additional markings for measurement. The first marking goes from the center of the scope, and shoots between the yellow and the red targets. This is known as the Flesh Tone line in Final Cut Pro. In Color, this is known as the –I bar (Inphase), and it appears in the same place. If someone appears on-screen, their skin tone, regardless of complexion, should fall somewhere on or around this line. The other marking on the Vectorscope that appears only on the Color Vectorscope is the Q bar (+Quadrature), and it's used in combination with the –I bar for troubleshooting the video signal.
3D Color Space Scope—This is a unique tool, exclusive to Color, that allows you to view luma and chroma portions of your signal in different color gamuts (RGB, HSL, Y′CBCR, IPT) in 3-D space.
Histogram—The Histogram shows the distribution of brightness values in your image. In Final Cut Pro, the Histogram shows a combination of RGB values. Color allows for further control in the Histogram—you can display RGB, red only, green only, blue only, or luma alone.
RGB Parade Scope—Parade scopes are separate waveform monitors for the red, green, and blue parts of the video signal. Because most video is not encoded as R′G′B′, these scopes will show you a representation of that gamut even if the video was encoded as Y′CBCR.

Figure 10.3 The 3D Color Space Scope in Color.

Figure 10.4 The Histogram in Final Cut Pro (left) and in Color (right).
Although the video scopes in Final Cut Pro and in Color are accurate to a certain degree, they should not be thought of as total replacements for hardware scopes or rasterizers (hardware-based scopes displayed on a computer monitor). Hardware scopes and rasterizers are often more accurate, and in some cases provide additional monitoring. Options such as the diamond display, which allows one to measure how Y′CBCR fits into legal R′G′B color space, and the arrowhead display, which measures legal composite signals, are primary examples.
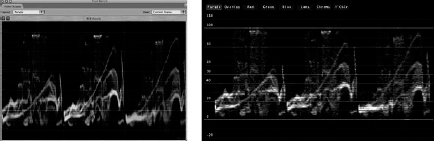
Figure 10.5 The RGB Parade Scope in Final Cut Pro (left) and in Color (right). Note that in Color, this is not a separate scope; it appears as an option for the Waveform Monitor.
Audio-Finishing Concepts
Audio finishing goes perhaps more unnoticed than color correction and grading, but arguably contributes more to the final product. Whether it's a door slamming closed with a big thud or music swelling in just the right spot, audio finishing is much like color correction and grading—when done well, it's intangible, but, subconsciously, all these things add up to the impression of a quality piece. Fortunately, we have a strong toolset for audio finishing, both with Final Cut Pro and with Soundtrack Pro. Let's take a look at several key concepts about audio finishing.
Mixing
Mixing is a broad term that often refers more to a process than to any one particular action (much like editing). In this broad sense, mixing refers to balancing levels and making things sound good. Depending on the workflow, this might also include placing final music and/or narration. To some degree, mixing is literally about blending all of the disparate audio elements together—as they say, it's all in the mix. Mixing can be broken down further into more specific terms:
Levels, Panning, and Groupings—A large part of the audio-finishing process is balancing levels (volume) between the various pieces of audio. One often overlooked aspect of levels is broadcasters’ requirements. For example, some broadcasters require that audio must average 20 decibels below full scale (–20dBFS), with peaks at –10dBFS. Adjusting panning is another large part of the mixing process. This has become increasingly important as more and more projects are being finished in surround sound, not just stereo. Audio grouping also becomes an issue for audio finishing. Today, most broadcasters have requirements for what audio should be on what channels on a master tape—for example, stereo mix of the show on channels 1 and 2; VO, sync on channel 3; music, effects, and nat sound on channel 4.
Equalization and Processing—One way to allow separate elements to blend together further is with equalization (EQ) and processing. Equalization means the boosting or cutting of frequencies; processing refers to additional processing, such as limiting, multiband compression, reverb, and special effects.
Restoration and Fixing Problems—Like video, audio material has its own unique challenges. Many of these present themselves during audio finishing. Issues such as low or superhigh levels often have to be addressed at this stage. Such problems as noise from an air conditioner or power hum can often dominate audio finishing.
Sound Design
We've always been amazed by good sound design, perhaps more than by the cumulative effect of color correction/grading and mixing. Good sound design is an incredible thing because it relies heavily on attention to the physical world, and often on the exaggeration of it. If you think about it, those creaky footsteps across a wood floor in your favorite horror movie or the boom of a massive explosion in the latest spy television drama—taken together with other aspects of the mix—really add a lot to the final product. Sound design relies heavily on the following:
Sound Libraries—Software programs such as Soundtrack Pro contain sound libraries that are at the heart of the toolset for sound design. These libraries are often chock-full of prerecorded sounds such as crashes, screams, noises found in nature, and so on. A good sound designer will develop his or her own library of favorite sounds from different sources over years of work.
Foley—When the desired sound cannot be emulated with a prerecorded sound from a library, oftentimes the only option is to record that sound. These recordings are typically done using a process known as Foley (named after the American sound technician Jack D. Foley). In this process, Foley artists employ various props and actions to create the desired sounds.
Music Creation
So you're finishing your soon-to-be-award-winning documentary—and realize that you forgot to budget for an original score for the project. Have no fear! There are quick and inexpensive ways to get a score for your film. Increasingly, part of the audio-finishing process is music “creation.” That being said, the techniques below should not be thought of as a substitute for original composition and recording a score. They are approximations only, and the highest-quality original content still uses original music.
Here are two things you can try if you lack the money or the time for original music:
Music Libraries—There are a plethora of music libraries on the market. The biggest factor when choosing a library is that it should provide you the variety that you need. We are big fans of Pump Audio (www.pumpaudio.com).
Creation via Loops—Applications such as Soundtrack Pro and GarageBand (part of iLife ’08) allow you to use modular pieces of music and sound to make original new compositions. Of course, these are not original in the sense that a real composition would be, but they are more original than what would come from a library. Composing with loops is somewhat of a compromise in that way.
Motion Graphics and Compositing Concepts
Chances are, even if you don't consider yourself a motion graphics artist or compositor, you're often called on to do these tasks. The terms “motion graphics” and “compositing” are broad concepts that today include text design and animation, simulated camera movement and lighting, greenscreen and bluescreen keying, masking, and even stabilization and tracking. Final Cut Pro and Motion together provide a robust set of tools for creating motion graphics and compositing. Let's take a look at some key concepts.
Text Effects—Creating interesting and captivating text effects is at the heart of most motion graphics and compositing workflows. These effects can be as simple as text fading up and then down for a lower third, or can be a complex set of animations of text flying about for a show open. Compositing of text also plays into the overall effect. We've all probably seen text with images or video placed inside of it (think flowing water). This combination of animation and compositing can create some pretty cool looks.
Masking and Keying—Two other areas of motion graphics and compositing that have a lot of time dedicated to them are masking and keying. Masking refers to using predefined or user-created shapes to show or hide certain areas of an image. A classic use of a mask is to create a spyglass or binocular outline for a point-of-view shot. Keying is a related subject, and is a way of removing specific chroma or luma values from an image. Keying is often used to remove subjects from a greenscreen or bluescreen background for the purpose of placing them on a different background.
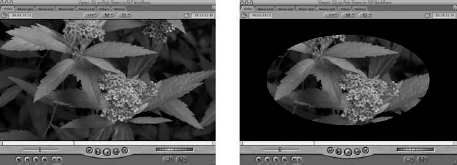
Figure 10.6 The original clip (left) and with a mask applied (right).

Figure 10.7 The original clip prior to the key (left) and after the key (middle), composited on a background (right).
Keyframing—Whether it's having a filter change properties over time or having a piece of text animate on-screen, keyframes are what make this possible. Keyframes are the way you tell Final Cut Pro to change a value over time. Almost every desktop video or motion graphics program allows keyframing. Of course, the complexity of your keyframing is dependent largely on the complexity of the effect that you are trying to create.
Stabilization and Tracking—Have you ever had the experience of having to deal with shaky footage that was so bad you wondered if the camera operator had had a few drinks before starting to shoot? Luckily, we can stabilize those shots! Stabilization is relatively new to desktop motion graphics and compositing applications, but we can now save plenty of shots that would have been discarded in the past. We can do this with stabilization tools in Final Cut Pro, Motion 3, and Shake. Additionally, we can now track masks and color corrections and other elements as they move through a shot, a process that, until recently, either had to be done manually or required additional tools.
Blending—One goal of most motion graphics and compositing tasks is to get disparate items to blend together. There is a variety of techniques that can be applied to do this, but common methods include using opacity and blend modes (sometimes called composite modes). Opacity means the relative transparency of an image. If an image has an opacity of 100 percent, it is completely opaque; if its opacity is 50 percent, the image is semitransparent. Blend modes and composite modes use different mathematical computations to combine pixels of multiple images together.
Lights, Camera, Particles—One of the more exciting aspects of motion graphics design and compositing is using virtual lights, cameras, and particle systems. By using lights and cameras, we are able to simulate and sometimes embellish real-world shooting and lighting situations. Particle systems take this simulation a step further. Using particle systems, we can create lifelike weather systems (for example, rain, snow, fire, explosions), and more abstract particle systems to create interesting effects and textures that can be used for a multitude of purposes such as lower thirds, background, and so forth.
Finishing Techniques inside Final Cut Pro
Now that we have an overview of some common techniques and concepts in the realm of finishing, let's get to the heart of this chapter: the finishing tools that are available right inside Final Cut Pro.
When the program was first introduced, many saw FCP's main strength as an offline edit solution. As desktop computers have become more powerful, and as the FCP toolset has expanded, Final Cut Pro is now being seen as a more reasonable tool for professional finishing work. Many people at all levels of postproduction use FCP for their first, last, and only step on a project.
The main advantage of doing finishing work inside the FCP interface is that all of your work is conveniently accessible to you. Most of this gets done on clips in the Viewer or even directly on the Timeline. It is definitely convenient to tweak an audio filter or color correction setting in the same place that you can make a trim.
The main disadvantage to working this way is that you are stretching outside the core functionality of the program. FCP's core strength is editing. Sure, it has some audio, color correction, and motion graphics tools, but we should not expect these toolsets to be as robust as the ones inside a program that is dedicated to a specific finishing task. In general, we like to see people use software for its core capabilities, but sometimes this is not practical or economical. As with so many new and inexpensive methods, one can get very acceptable, even exceptional, finishing work out of the FCP interface if it is used with knowledge, care, and skill.
Lastly, we don't want to imply that this is an all-or-nothing proposition— that finishing is done either inside FCP or outside. These methods are combined in many different ways for different projects. A good workflow is strategic about what finishing steps are done where, and especially about how the transfers between these steps happen.
Online Editing and Conforming within Final Cut Pro
The resolution-independent nature of Final Cut Pro and the inherent flexibility FCP brings with it really shine when doing any kind of online process. As described in Chapter 1: What Makes Final Cut Pro Special? conforming a show originally cut with Final Cut Pro does not require any sort of EDL. It is simple to perform a conform, all from within the FCP project.
Here are general instructions for a conform. Of course, the specifics may vary depending on your exact workflow, the format(s) you are using, and especially if you are working with more than one frame rate or video standard. The steps below assume that you are using a tape-based workflow. The steps start with the use of the Media Manager tool, which is covered in depth in the next chapter.
- Select the final picture-locked sequence from the offline version of the project.
- Go to File > Media Manager.
- Choose Create offline from the Media pulldown. In the Set sequences pulldown, make sure you choose the correct settings for the sequence you will be conforming to, not the one you are media managing.
- UNCHECK the “Include master clips outside selection” option—you want only the media from the clips on the Timeline.
- Next, check “Delete unused media from duplicated clips,” and add a few seconds of handles in case you need to adjust edit points in the online edit. Usually one to two seconds is enough. UNCHECK “Include affiliate clips outside selection.”
- Choose how you want to base media file names. Generally the best option is to use existing file names. Click OK. This will prompt you to save a new project file. Give the project a name and save it. After you have saved, FCP will process your clips. This might take some time as the program calculates media usage.
- Once processing is complete, the project you just saved will open in FCP. You will notice two things: your sequence and a bin called Master Clips. The sequence name will always be the name of the original sequence you media managed.
- Open the Master Clips bin. You'll notice that all of the clips are offline—exactly what you wanted! Select all of the clips, right-click, and choose Batch Capture.
- Final Cut Pro will open up the Log and Capture window with the Batch Capture dialogue box on top. Using the Batch Capture dialogue box, make sure you choose to capture all the items in the logging bin. Check Use Logged Clip Settings, but uncheck Add Handles because when you previously managed the offline sequence, you added handles. Make sure you are using the correct capture preset (this should match the settings for the online sequence).
- Take a look at the media calculations and disk space needed. If these numbers are way off, you might have accidentally chosen to include master or affiliate clips outside your selection. In this case, you will need to go back to the offline version of the project and repeat the steps to create an offline version of the sequence. If these look correct, simply click OK.
- Final Cut Pro will then present a dialogue box with all of the reels and the number of clips on each reel that will need to be captured. Insert the first tape and click OK. Repeat the process until all clips are loaded.
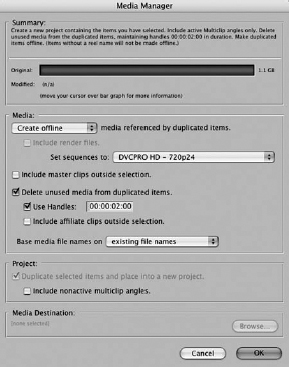
Figure 10.8 The Media Manager window with the described settings.

Figure 10.9 The Master Clips bin with offline clips and the sequence.

Figure 10.10 The Batch Capture dialogue box.
Keep in mind, this is capturing only footage used in the sequence that has timecode and reel references. Other items, such as stills, motion clips, or audio, will have to be moved to the online system and reconnected manually.
As mentioned above, many projects no longer need to be conformed because they are captured at uncompressed quality from the get-go. Chapter 16: 30-Second Spot for Broadcast is a case study of this sort of workflow. In such workflows, it is still important to define an online stage. This may include the workflow for color correction, or just the plan to prep the show for broadcast.
There is one more interesting Final Cut Pro finishing technique that we want to mention here: converting to an uncompressed (generally 10-bit) or a ProRes 422 sequence for finishing work in FCP. The reasons for wanting to do this are a bit technical, but the results can be undeniable.
The basic idea is that when working with footage that uses lots of compression and a low chroma subsampling ratio (DV or HDV), you up-convert this footage to uncompressed or ProRes 422 color space in the sequence (these have a better chroma subsampling ratio of 4:2:2). You then perform your color correction and compositing in this color space.
One place where this will be the most noticeable is when you are compositing text or graphics over moving footage. Have you ever noticed that when you do this on a DV Timeline, it does not always look so good? The reason is that in the compressed (4:1:1) color space of the DV codec, there are fewer colors that the compositing algorithm uses to create smooth edges. When you convert a sequence to uncompressed or ProRes 422, you will instantly see all of your graphics composite more cleanly. Of course, uncompressed or ProRes 422 color space will also give you more control in color correction due to its chroma subsampling.
Converting to a higher color space is not difficult. Here are instructions for going from HDV to uncompressed HD, but you could use similar steps for going from DV to uncompressed SD.
- Create a new sequence. Name it appropriately so you can distinguish it from the original sequence.
- Go to Sequence > Settings. This will open the Sequence Settings dialogue box. Make sure that your frame size, pixel aspect ratio, field dominance, and editing timebase are all the same as your orginal sequence.
- Using the Compressor pulldown, choose Uncompressed 10-bit 4:2:2 (you could also choose the Apple ProRes 422 codec if your drives were not fast enough to support uncompressed playback).
- Next, click on the Video Processing tab in the Sequence Settings dialogue box. Here, you want to choose “Render 10-bit material in high-precision YUV.” This will give you the best-looking renders, although doing so will take longer. Click OK to save your settings.
- Find your original Timeline in the Browser. Make sure your playhead is parked on the beginning of the new empty sequence. Drag your original Timeline into the new empty Timeline, but make sure that you HOLD DOWN THE COMMAND KEY. This will bring all of the clips, NOT A NEST, into the empty Timeline. Note: you can drag the original Timeline to the Canvas window as well, and do an overwrite edit while holding down the Command key. However, using this method, you must have the same number of audio and video tracks created on the new sequence as you did on the original before performing the edit.
- Finally, render the new sequence.
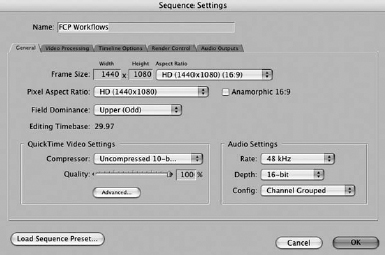
Figure 10.11 The Sequence Settings dialogue box.

Figure 10.12 The Video Processing tab in the Sequence Settings dialogue box.
It's important to note that you could have also simply opened and changed the sequence settings on the original Timeline. However, using the method described above, you did two things: (1) your original was untouched, and (2) because you started with a blank sequence, you avoided having links to bad render files. We have seen problems with FCP linking to old render files when simply switching over a sequence to uncompressed. Making a new sequence and editing the original seems to fix these types of problems.
Color Correction and Grading within Final Cut Pro
Over the years, we have been fortunate enough to participate in quite a few large (read: expensive) and complicated postproduction projects. Almost always, a large portion of the expense and complexity of those projects has to do with color correction and grading. These projects were for the most part corrected in dedicated suites with very expensive hardware.
We can remember the first time we suggested to a client that we color-correct their show using the Final Cut Pro toolset. Let's just say our client gave us one of those looks that said, “You're joking, right?” Well, after successfully completing that project, we have been color-correcting corporate and broadcast shows ever since. Using FCP's toolset to color-correct is often the fastest and most straightforward way to correct a show.
We have also used Final Cut Pro to grade shows to create unique looks, although, for many broadcast programs, this type of stylizing is generally subtle and straightforward. For documentary, feature, and music video projects, Final Cut Pro can be a perfect tool to grade, especially if you combine several techniques in the application.
Perhaps no part of color correcting and grading is as important as proper monitoring. Although computer monitors have gotten much better over the years, they are still no substitute for a calibrated NTSC, PAL, or HD monitor. These monitors do cost a lot, but there is a reason for the price: they provide consistent reproducible color and brightness. Your corrections and grades can really be trusted only if seen on a properly calibrated and maintained monitor that will allow you to get the most from your toolset. At the very least, you should set up your system to be able to view images on regular plain-vanilla TV (although the color temperature and black levels may be suspect).
This section is intended to give you a good understanding of color correction and grading; however, it is not a complete guide. For a lot more information about correcting and grading in Final Cut Pro, check out Alexis Van Hurkman's excellent Encyclopedia of Color Correction: Field Techniques Using Final Cut Pro (Peachpit Press).
The toolset for color correction and grading in Final Cut Pro is found in several places.
Range Checking
One of the first ways that people are introduced to color correction in Final Cut Pro is by trying to figure out what the big green circle with a check in the middle of it (or a yellow triangle with an exclamation point) is doing in the Viewer or the Canvas!
This is known as range checking, and can be enabled in more than one way. The first method is by going to View > Range Check. Here, we can choose from the following options: Excess Luma, Excess Chroma, or Both.
The second method is in the View pulldown in both the Viewer and the Canvas window. In this pulldown, there is an option for Show Excess Luma. Note that there is not an option for chroma; you have to enable that in the View menu.
With Show Excess Luma enabled, areas in the image that are above 100 percent on the Waveform Monitor will be marked with red zebra stripes in the viewer or on the canvas. Areas of the image that are between 90 percent and 100 percent on the Waveform Monitor will be marked with green zebra stripes. Additionally, when a portion of the image exceeds 100 percent, a yellow triangle with an exclamation point in the middle of it will be displayed, indicating illegal luma values. When a portion of the image falls between 90 and 100 percent, a green circle with a check and an upward-facing arrow will appear. If no portion of the image is above 90 percent, a green circle with a check mark will appear.
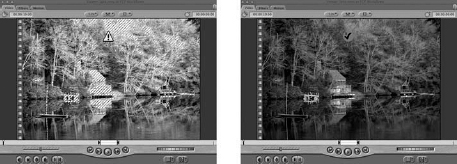
Figure 10.13 Footage with illegal luma shown by the red zebra stripes and yellow triangle with exclamation point (left). Footage with luma between 90 and 100 percent shown by a green circle with a check and an upward-facing arrow (right).
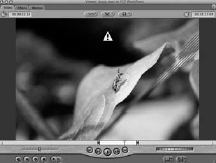
Figure 10.14 Footage with illegal chroma shown by the red zebra stripes and yellow triangle with exclamation point.
With Show Excess Chroma enabled, areas that are greater than 120 percent IRE saturation will be marked with red zebra stripes (although the exact point that this warning is enabled will depend on the luma levels of the clip). If the portions of the image contain illegal chroma values, a yellow triangle with an exclamation point in the middle of it will be displayed. If there are no illegal chroma values in the image, a green circle with a check mark will appear.
With Show Both enabled, portions of the image that have either illegal luma or chroma values will be marked with red zebra stripes, and a yellow triangle with an exclamation point in the middle of it will be displayed.
Note: for zebra stripes and other marks to show up in the Viewer or Canvas, Show Overlays must be enabled in the View pulldown of those windows.
Video Scopes
Let's first take a look at launching and using the scopes. To access the scopes, go to Choose Tools > Video Scopes (or press Option-9).
The default view is to have all four scopes up (Vectorscope, Waveform Monitor, Histogram, RGB Parade). We can control which scope or combination of scopes is displayed by using the Layout pulldown. Below this pulldown are two small buttons where we can control the brightness of the video lines, or traces (the white one on the left), and the brightness of the grid lines, or graticule lines (the orange one on the right). Additionally, we can control what the scopes are looking at by using the View pulldown menu.
The video scopes also provide a few additional features to help us. By positioning your cursor over any of the scopes, you will get a measurement percentage. In other words, with your cursor on the Waveform Monitor, for example, as you move your cursor up and down the scale, you will get a yellow line and a percentage, letting you know where you are on the scale. This is useful to pinpoint where exactly the trace is occurring on the scale.
By right-clicking in each monitor, you will also get additional options:
- Right-clicking in any of the monitors will let you change the color of the trace from white to green.
- Right-clicking in the Waveform Monitor will let you toggle saturation on or off.
- Right-clicking in the Vectorscope will allow you to magnify or zoom in to the center portion of the display.
- Right-clicking in the Histogram will allow you to choose whether black is included in the display.
- Right-clicking in the RGB Parade will let you choose if the traces of the separate colors are bright or pale.
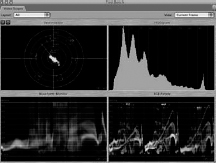
Figure 10.15 The Final Cut Pro scopes.
Frame Viewer
This is a simple and accurate comparison tool. To launch the Frame Viewer, go to Tools > Frame Viewer (or press Option-7). When the Frame Viewer launches, you may notice that it becomes a tab on something called the Tool Bench. This is a window that can contain any of the following tools when opened: Frame Viewers, Scopes, Voice Over, Audio Mixer, and QuickView (a way to preview clips you have to render).
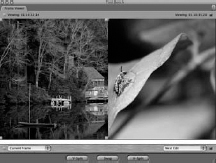
Figure 10.16 The Frame Viewer.
The top bar of the Frame Viewer has two sides—one with a green square and one with a blue square—that tell you your sequence timecode of the clips that you are comparing. The main window is the preview area where you can see the compared clips. What's neat here is that the green and blue squares are in this area as well. Grabbing and dragging the squares will let you change the relative sizes of the two sides that you're comparing.
Below the preview are controls for what the Frame Viewer will be looking at to make the comparison. One side has the green box and the other the blue. Each side has a pulldown where you can choose from Current Frame, 2nd Edit Back, Previous Edit, Current Frame w/o Filters, Next Edit, 2nd Edit Forward, In Point, or Out Point.
Finally, the lower bar has presets for vertical and horizontal splits, as well as a button that lets you swap the position of the clips you're comparing. All in all, the Frame Viewer is a great way to compare clips, but this view is not outputted to your external monitor (which, of course, is your most accurate display of color).
Color correction Filters
The last location for color correction and grading tools in Final Cut Pro is in the color correction category of video filters. These filters can be accessed in two ways. The first is the Effects tab of Browser > Video Filters > Color Correction. The second way to access these filters is to go to Effects > Video Filters > Color Correction.
Specific color correction filters available in Final Cut Pro are covered in an appendix with color pictures available at http://booksite.focalpress.com/Osder/finalcut/. We've tucked all the nuts and bolts on the color correction filters into this web appendix. You may need this info to follow some of the instructions below if you are not familiar with these tools.
Common Corrections and Grades
The more pieces that you correct and grade, the more you realize that you often find yourself doing the same type of corrections and grades. There are many books written on this subject, so we will keep it brief by looking at a few simple corrections and looks inside Final Cut Pro. All of the corrections below assume that you have already done three things:
- Applied the Color Corrector 3-way filter.
- Opened the clip in the Viewer and activated the Visual Color Corrector tab.
- Opened the scopes (press Option-9 or choose the Color Correction window layout).
Underexposed—Dark, or underexposed, footage is a very common issue to deal with, and most of the time is correctable.
- Using the Black Level slider, first adjust your black levels so that the darkest part of your image rests just at 0 percent on the Waveform Monitor.
- Next, use the Midtones slider to raise the levels of the midtones of the footage. You should see immediate improvement in the exposure of the footage (the trace in the Waveform Monitor expands upward toward 100 percent), but you will probably also see two additional problems. The first is that the apparent saturation of footage has decreased drastically. The second is that depending on the footage, you may have increased noise in the image. Don't worry—we can fix these issues.
- Let's first fix the noise issue. By dramatically raising midtone levels, we increased the noise in the footage. Let's back off a bit on the midtone level, and use the White Level slider to expand the top end of the footage toward 100 percent. As you do so, you should notice that the exposure increases, but noise does not increase as drastically as it did with the aggressive adjustment using only the Midtones slider. Be careful not to push the white level too far—you might possibly make your footage illegal.
- Next, use the Saturation slider to increase saturation in the footage. Depending on how much you stretched the levels, you may have to increase this quite a bit to get your footage to look natural.
Overexposed—Footage that is overexposed is too bright, and is generally harder to deal with because a lot of detail has been lost due to levels being pushed to extremes. Overexposed footage tends to be illegal, so one goal of correcting this footage is to bring it back into legal range.
- Using the Black Level slider, first adjust your black levels so that the darkest part of your image rests just at 0 percent on the Waveform Monitor. Depending on how overexposed the footage is, you may need to drag this down quite a bit to bring back definition in the image.
- Next, use the White Level slider to bring highlights that are over 100 percent back into the legal range. Next, using the Midtones slider, adjust the overall exposure of the image.
Improper White Balance—This is one of those annoying issues that everyone faces from time to time. The problem might be from a shooter who forgot to white-balance or from a shot that quickly goes from inside to outside. Correcting for improper white balance is easy:
- Balance the contrast of the image using the level sliders for blacks, mids, and whites.
- Looking at the Vectorscope and the RGB Parade will allow you to identify the color cast in the image. For example, if the blue channel in the Parade Scope is drastically elevated, and most of the trace in the Vectorscope pushes toward blue, you can be pretty sure that you have a strong blue cast in your image.
- As a general rule of thumb, to correct for improper white balance, you first identify the color cast in the image, then drag the color-balance controls in the opposite direction of the cast. If you identified a blue color cast in the image, then dragging the color-balance controls to yellow/red will eliminate that cast.
- Most of the time, you can use the Whites color wheel to correct for white-balance issues. So, in this case, drag the Whites color wheel toward yellow/red on the wheel.
- You may also have to use the Mids color wheel to further adjust the color cast.
Cool, Desaturated Look—Cool looks (no, not cool as in “that's cool”—we mean color temperature) are often used to express seriousness or sadness. Often cool looks are desaturated slightly to give a flatter, duller feeling. There are many ways to create this look. We'll examine the most basic. As with any technique, the severity of the cool look is up to you.
- Cool looks are often very contrasty, so balance your contrast by using the level sliders for blacks, mids, and whites—paying special attention to crush the blacks a bit and extend the midtones. Check the Waveform Monitor to see how much you are crushing the blacks and extending the mid range. Remember not to crush the blacks too much, or you'll just end up getting a muddy picture.
- Using the color-balance controls, push the whites and mids toward blue, while at the same time keeping an eye on the RGB Parade and the Vectorscope to make sure you're not pushing toward illegal values.
- After you have a color that you like, use the Saturation slider to desaturate the image. As you do so, you may have to go back to the color-balance controls to adjust the look of the image.
Warm, Saturated Look—This is a great way to show warmth (as in the emotion), excitement, anger, and other feelings. These looks are also used to heighten reality—think extra-blue sky or lush green forests. From a technical standpoint, the most dangerous thing about warm, saturated looks is that it's very, very easy to make them illegal. Let's take a look at a simple example.
- Balance your contrast in the image, paying special attention to the midtones. Often lowering the level of the midtones (and, to a lesser degree, the blacks) can give the appearance of a slightly more saturated look.
- Next, use the color-balance controls for the whites and mids, and push them toward yellow/red. You will need to do this only a little bit.
- Using the Saturation slider, raise the saturation for image (how much is your preference). Keep an eye on the Vectorscope as well as the RGB Parade to make sure you have not created illegal chroma levels. It is also very helpful when creating saturated looks to right-click on the Waveform Monitor and turn on saturation to make sure you are not producing illegal saturation.
Audio Finishing within Final Cut Pro
Although not as sophisticated a toolset for audio finishing as Soundtrack Pro, Final Cut Pro does have quite a few tools for helping us finish our audio. These tools are found in a few places in FCP, but before we explore those tools, let's first discuss the importance of monitoring.
Just as with color correction and grading, having audio monitors that have been properly set up is very important for being able to really hear what's going on with your audio. You are unlikely to pick up subtle details in your audio if you're listening on your laptop speakers. There are, of course, hundreds of different speaker and headphone manufacturers out there—the only way to find the right set is by auditioning some yourself. In addition, we find that by monitoring our audio in different ways, we are able to get a true picture of what's going on. What we mean by this is that it's a good idea to listen to your audio both on your main speakers and by using a set of headphones.
The tools to help us with audio finishing can be found in quite a few places.
Audio Meters
The audio meters in Final Cut Pro are, well … small. They are not the only way to view your levels, but they are a convenient way to do so. The audio meters range from –96dBFS to 0dBFS. (dBFS stands for “decibels full scale” and is the standard unit of measurement for digital audio; –96dBFS means 96 decibels below full scale.) On this scale, if audio reaches 0dBFS, there is a good chance that there will be noticeable peaking and distortion.
Of course, distortion and peaking should be concerns for you, but the audio meters also allow you to monitor your average and peak levels. In other words, many broadcasters dictate that average levels occur between –20dBFS and –15dBFS, with peaks around –10dBFS. For nonbroadcast projects, these levels are typically a bit higher: –12dBFS for average levels, with peaks around –3dBFS.
There is an easy way to mark audio peaks as well to ensure that you are not violating a broadcasting requirement for peak levels. By going to Mark > Audio Peaks > Mark, Final Cut Pro will automatically place markers on frames where the audio is peaking above 0dB. If the clip was in the Timeline when you marked it, the markers will appear on the clip. If the clip was in the Browser when you marked it, the marks will appear much like subclips listed sequentially under a clip. After these points have been marked, you can adjust levels at that point. You can also clear all audio-peak markers by once again going to Mark > Audio Peaks > Clear.
dB vs. dBFS
You're not likely to get in a heated debate about dB versus dBFS, but understanding the difference is a good thing. Likewise, understanding how these scales relate to VU meters (yes, we still see them from time to time) is important. Like many other technical aspects of video and audio, these terms are often used interchangeably, or simply used under the moniker dB. Although this is generally accepted, let's take a look at the difference.
There are actually three common ways to measure analog audio: dBm, dBu, and dBV. We don't need to get into the technical details of these—just know that dBu is the most common scale for analog audio, whereas dBFS is the standard way to measure digital audio. VU (which stands for “volume units”) is an older way of measuring volume on analog equipment. The important thing here is to understand the relationship of the scales.
Let's look a reference level for each of the scales: 0VU equals –20dBFS and +4dBu. We already know that 0dBFS is the top end of a digital scale, and can represent clipped audio if levels are above this. Additionally, this number equals +24dBu. With properly calibrated VU meters, this would equal maximum level.
![]()
Figure 10.17 The Final Cut Pro audio meters.
Audio Mixer
Although many users have become comfortable with keyframing audio levels directly in the Timeline using the Pen tool, some don't know about—or are intimidated by–the Audio Mixer in Final Cut Pro. The Audio Mixer can be accessed by Tools > Audio Mixer (or by pressing Option-6).
When the Audio Mixer launches, you are presented with a window that is just about full. Let's break it down.
The top bar lets you choose up to four separate views. By using the Track Visibility controls on the left-hand side of your window, you can select or deselect which tracks will be visible for each of the four views. It's common to have all of your tracks in View 1, your dialogue tracks in View 2, natural sound and effects in View 3, and music in View 4. You can, however, make any combination that you want.
The top bar also has a button bar with a default button. This button is called Record Audio Keyframes. We'll get back to this shortly.
The Source pulldown lets you choose if the Audio Mixer is looking at the Viewer or at the Canvas, or whether it automatically switches between them.
The Track Strips area contains a strip for each audio track in your view. You can manipulate the level faders by either dragging them up or down or by entering a value (from +12dBFS to –inf). If you have stereo pairs on your sequence, these are treated as such in the Audio Mixer, and both channels of a stereo pair will be adjusted at the same time.
Next to each level fader are large level meters, a unique Audio Mixer feature that helps further the mix process. Above the level faders are pan controls, which you can manipulate by dragging or entering in a value. Just as with the level meters, if you have a stereo pair, the pan controls will move in tandem. Finally, above the pan controls, there are mute and solo buttons for each track.
The Master area looks much like an individual track; however, it operates a bit differently. At the top of the Master area is a small disclosure triangle that lets you show or hide the Master area. Below that is a Master mute button that mutes all tracks. This control, however, mutes tracks only on playback, not on output.
Next, there is there is the Downmix control. When you have multiple audio outputs assigned in your sequence settings, activating this button will output all of your audio tracks down to stereo for playback, output, and exporting to a QuickTime file. This control is very useful when you have multiple outputs, but have only stereo monitoring capability.
Below the Downmix control is the Master fader, which controls overall level. Next to the Master fader are the Master audio meters. Each audio output that you've defined for your sequence will have its own meter. These meters will show only the audio assigned to that output. So, in other words, if you assign only your VO track to output 1, the Master meter for output 1 will show only that VO. If you add nat sound and, say, interviews to that output, the Master meter for output 1 will show you the cumulative effect of all of those separate pieces of audio.

Figure 10.18 The Final Cut Pro Audio Mixer.
For those of you who crave the tactile control of a real hardware audio mixer, don't fret. Using a MIDI interface and compatible mixer, you can control the Final Cut Pro Audio Mixer by using the hardware mixer. It's pretty cool! For more information on how to set this up, consult the Final Cut Pro User Manual.
Now that we've taken a look at the basic controls of the Audio Mixer, let's take a closer look at the Record Audio Keyframes button. By using this control, Final Cut Pro will automatically place level and pan keyframes on the clips for each track we adjust, in real time. You might be thinking: “What's the big deal? I can adjust levels in pan already on the Timeline or in the Viewer.” Well, think of this as another tool to add to your arsenal. In the following example, we assume that you have interview footage on channels 1 and 2, and music on tracks 3 and 4.
Multiple Outputs
Many projects have audio-assignment requirements. For example, stereo mix of the show on channels 1 and 2, primary audio (VO and sync) on channel 3, and nat sound, music, and effects on channel 4. It's easy to make these assignments. With your sequence active, go to Sequence > Settings, and click on the last tab, labeled Audio Outputs. Here, you can choose a preset (you can create presets in the Audio Outputs tab of Final Cut Pro > User Preferences) or create up to 24 outputs. The number of outputs you create and/or need will depend on the hardware you are using.
You can choose whether the output is stereo or dual mono, as well as selecting the amount of downmix. The downmix controls allow you to compensate for volume change as you combine multiple mono tracks.
For our previous example, we would have four audio assignments. Channels 1 and 2 would be stereo with 0 downmix (remember, channels 1 and 2 are the stereo mix of the show). Channels 3 and 4 would be dual mono with –3dB of downmix applied to compensate for adding multiple mono tracks together.
After we've set up our audio outputs, another thing to consider is creating submixes. These mixes allow you to group the audio necessary for specific outputs. In other words, you can export a stereo mix, all of the primary audio as a mono file, and effects, nat sound, and music as a mono file. Then import those back into FCP, and place them in your sequence.
Now we need to assign those submixes to the four audio outputs we created earlier. This can be done in two different places:
- Right-click in the track-control area in the Timeline and choose Audio Outputs. From here, you can assign that track to an output.
- Right-click in the Track Visibility area in the Audio Mixer and choose Audio Outputs. From here, you can assign that track to an output.

- Back your playhead up to the start of the sequence.
- Launch the Audio Mixer (Option-6).
- Make sure that the Record Audio Keyframes button is active.
- Start playing your sequence. As you do so, adjust your music on tracks 3 and 4 so that their levels are not competing with the levels of your interview bites. Notice how both faders on 3 and 4 move in tandem. This is because they are a stereo pair.
- In between interview bites, raise the Level slider of your music tracks. This swell in music will help keep the pace in the piece.
- Stop playback, and you will notice that Final Cut Pro automatically has placed keyframes based on your movements on each Level slider (make sure to turn on the Toggle Clip Overlays button in the Timeline).
- If you messed up, though, don't fret. One of the nice things about the Audio Mixer is that you can simply back up and do it again. The new pass will overwrite existing keyframe information.
- You can also use the Pen tool to help you fine-tune the keyframes in the Time-line or Viewer.
You can control how many keyframes Final Cut Pro creates by selecting Final Cut Pro > User Preferences, and then clicking on the Editing tab. On the left-hand side, there is an option to choose how audio keyframes will be recorded. The default is Reduced, which will average your movements on the level controls and pan controls. The Peaks Only option will record only the keyframes at the defining point of each movement, and will record a new keyframe for every minuscule movement of the controls. The All option will record any and all movements.
Audio Filters
If you've ever taken a peek at this section of the Effects tab or Effects menu, you will have noticed that there are a lot of filters. Audio filters are broken down into two categories: Final Cut Pro and Apple. The Apple filters use Apple's Audio Units specification (meant to help standardize plug-ins across multiple applications). The Final Cut Pro audio filters are ones that are native to FCP. In many cases, similar results can be obtained by using a filter from either category, but the Audio Units filters sometimes offer finer control and can be used across multiple applications such as Soundtrack Pro. We could spend a whole chapter just describing all these filters in detail. Instead, we have chosen to take a look at the different categories of filters, and then highlight a few of the most helpful ones.
EQ Filters—Put simply, an EQ (equalization) filter is a way of manipulating certain frequencies. You might want to do this for several reasons. Perhaps you're trying to match VO recorded at two different times. The first recording doesn't sound nearly as full as the second, so you might apply a three-band EQ to adjust the low end of the first recording. In a lot of cases, there are both Final Cut Pro and Audio Units equivalents, which we denote with (AU). The EQ filters include 3 Band Equalizer, Parametric Equalizer (AU), AU Graphic EQ, Low Pass Filter (AU), High Pass Filter (AU), Low Shelf Filter (AU), High Shelf Filter (AU), Band Pass Filter(AU), Notch Filter, and DC Notch.
Noise-Reduction Filters—These filters allow us to correct for problems in the audio. Issues such as hum or sibilance can be reduced or completely fixed with noise-reduction filters. These filters include Hum Remover, Vocal DeEsser, and Vocal DePopper.
Ambience Filters—Filters that provide delay, echo, or reverb to the audio are called ambience filters. For example, you might apply the Reverberation filter to the narration track to give it slightly more “breathing” room. Filters that allow us to create ambience include AU Delay, AU SampleDelay, Echo, and Reverberation.
Compression and Dynamics Filters—These filters work by controlling in some way the volume of your audio. For example, by applying the AU PeakLimiter filter to multiple clips, you can control their volume so that none of them peak above a certain level; this is very handy. You could also apply the Gain filter to quiet clips to raise their levels without having to raise their levels manually. Compression and dynamics filters include AU DynamicsProcessor, AU MultibandCompressor, AU PeakLimiter, Compressor/Limiter, Expander/Noise Gate, and Gain.
Audio Options in the Modify Menu
There is a surprising amount of control for your audio under the Modify menu.
Modify > Levels (or pressing Command-Option-L) allows you to change the levels of your selection in a sequence (single clips or multiple clips). There are two options here: relative and absolute. When you choose to alter the levels of your selection using relative, your levels will change up or down from their current position. In other words, if you had two clips selected—one at –12dBFS and the other at –20dBFS—and you entered –3dBFS, your result would be –15dBFS and –23dBFS. Using the absolute method, on the other hand, sets the selected clips level at the value you enter. So, for two clips—one at –12dBFS and the other at –20dBFS—if you were to enter –10dBFS, the result would be both clips having a level of –10dBFS. This is a great method for altering a large group of clips all at once.
Modify > Audio gives you several additional options for adjusting your audio. The keyboard shortcuts listed on this menu are even more useful than the menu itself. Using the shortcuts here, it is very easy (perhaps even easier than with the mixer) to raise and lower the levels and pan of selected clips.
Also located in this menu is a new feature in Final Cut Pro 6 called Normalization Gain. The Apply Normalization Gain command will nondestructively sample the audio to find peaks, and then raise or lower the peaks to the level that you set. This is also a great way to average peaks between multiple clips so that no one particular clip stands out.
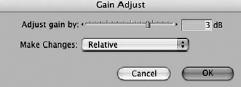
Figure 10.20 Audio Levels dialogue box.

Figure 10.21 Audio options and their keyboard shortcuts.
Motion Graphics and Compositing within Final Cut Pro
Increasingly, editors are being called on to perform ever more complicated motion graphics and compositing tasks. Oftentimes these editors are not familiar with or are not quite comfortable with applications—such as Motion and Shake—that specialize in this kind of work. Final Cut Pro, however, provides a robust set of tools for motion graphics and compositing directly inside the application. With that said, if you do have access to tools outside Final Cut Pro, it might be more efficient to use them. Let's take a look at the tools in FCP.
Text
Final Cut Pro offers a number of tools to create and adjust text. The neat thing about text in FCP is that it is treated just like any other clip. Thus, it can be color-corrected, keyframed, or have filters applied to it. Although applications such as Motion and LiveType excel at text creation, oftentimes you don't have time or don't need to use those applications to create your text. The text tools in Final Cut Pro can be found in two places:
- The Generator pop-up menu (bottom right corner of the Viewer)
- The Video Generators bin in the Effects tab of the Browser
Each location contains the built-in generators for Final Cut Pro. Among these are two categories that have text tools: Text and Boris.
The Text category contains a number of preset text generators. They include Crawl, Lower third, Outline Text, Scrolling Text, Text, and Typewriter. After you have selected the generator you'd like to use, a new tab called Controls will appear in the Viewer. Using the controls on this tab, you change and input your text. It's important to note that all of the generators have a built-in alpha channel (transparency), which makes it easy to composite over video.
The second category that contains text generators is Boris. Boris is a third-party company that has partnered with Apple to provide a robust set of vector text tools. These tools include Text Scrambler, Title 3D, and Title Crawl. Choosing one of these generators will also add a Controls tab to the Viewer. In the Controls tab, you have controls for different aspects of your text, but to be able to format (color, spacing, etc.), you must click the Text Entry and Style Button, which will launch a new window. From here, you have a lot of control over the formatting of your text, including the ability to save presets. All of the Boris generators also have a built-in alpha channel.
Keyframing
This is a way to have properties of a clip change over time. These changes could be to the attributes of a filter, animating the position of the clip, or making a piece of text fly on-screen. Although we can apply static effects with no keyframes, at least two keyframes are needed in order to have something change. There are quite a few places where we can keyframe inside Final Cut Pro. Let's briefly take a look at each.
Motion Tab—This tab gives control over motion properties of our clip. There are numerous parameters we can control here, including scale, rotation, center, anchor point, crop, distort, opacity, drop shadow, motion blur, and time remap. You can keyframe some of these parameters directly in the Video tab of the Viewer with wireframe turned on; the Motion tab, however, gives you greater control of those parameters.
Every parameter has either a slider, rotation clock, pulldown, or entry box to change its value. To the right of the parameters, there are keyframe controls (the diamond inside the circle) where you can add or remove keyframes as well as navigate between keyframes or, if you mess up, reset the parameter (using the red x).
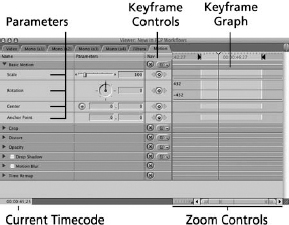
Figure 10.22 The Motion tab and keyframe controls.
To the right of the keyframe controls is the keyframe graph area. This area can be a little confusing, but it's really quite simple if you look at the details. When you load a clip into the Viewer, you'll notice on the keyframe graph that the clip is represented by the light gray area, whereas the rest of the Timeline is represented by the dark gray area. This area acts like the Timeline, where time increases from left to right. Note that if you load a clip directly from the Browser, this dark gray area will be the handles of your clip, not the rest of the Timeline.
Below the parameters and keyframe graph area is a timecode box that denotes the current timecode (of your clip or Timeline, depending on where the clip was loaded from). There is a Zoom control and Zoom slider to help you expand or contract the keyframe graph so it is easier to look at.
As you apply keyframes, they will appear in the keyframe graph in the position you specified. After you've applied keyframes, you change them further by navigating to the keyframe and using the parameter controls to adjust the value of the parameter, or you can use the cursor to reposition the keyframes in time (left and right) or change their value (up and down).
Filters Tab—Many times, motion graphics looks can be accomplished by simply animating a filter. For example, by animating the Light Rays filter on a piece of text, you can create a unique look. Keyframing in the Filters tab works just like it does in the Motion tab. The parameters that you can keyframe depend on the individual filter, but any attribute that has a numerical value is generally keyframable.
Timeline—One of the easiest places to keyframe is on the Timeline. This functionality, however, is not immediately obvious. To be able to keyframe on the Timeline, you must first do the following:
- Turn on the Toggle Clip Keyframes button (the green and blue parallel lines).
- With Toggle Clip Keyframes on, you'll notice that a gray box appears under your video and audio clips. This area is known as the Timeline keyframe editor. By right-clicking in this gray area, you can choose the specific motion or filter parameter you want to keyframe.

Figure 10.23 The Timeline keyframe editor.
Note that only parameters that have a single value (for example, scale) will show up here. Parameters that have multiple adjustments (such as center point) will not show up here.
You'll notice that at the top of the keyframe editor, there is either a green line or a blue line. The blue line represents motion keyframes; the green line represents filter keyframes. From here, you can use the cursor or the Pen tool to further adjust the position and values of keyframes directly on the Timeline, without having to load the clips into the Viewer. You can exert more control over what appears in the keyframe editor by going to Sequence Settings (for the current sequence) and User Preferences (to set the default settings for new sequences you create).
Keying and Masking
These are relatively easy ways to be able to separate a foreground subject from a background subject or vice versa. There are many reasons that you might want to mask or key footage. For example, you might mask out the top and bottom portions of 4×3 footage to create a widescreen look, or you might apply a chroma key to separate a subject from a greenscreen or bluescreen background.
Masking— Most of Final Cut Pro's masking tools are located under Effects > Video Filters > Matte. Each of these filters works slightly differently, but all contribute to the same goal of making part of the image transparent for the purpose of compositing or “masking” out a portion of the image.
Keying— Perhaps you've seen those small independent films The Lord of the Rings, Star Wars, and Spider-Man? All kidding aside, these films take advantage of keying to place characters on surreal cityscapes—or, in the case of Star Wars, spacescapes! Keying involves eliminating a color or luma range (or a combination) to make those areas transparent.
Just as with the matte category, there are several filters that allow us to pull and or assist in creating keys. All of them are located in Effects > Video Filters > Key.
Specific masking and keying filters available in Final Cut Pro are covered in an appendix with color pictures available at http://booksite.focalpress.com/Osder/final-cut/.
Stabilization
Stabilization tools, such as the new SmoothCam filter found in FCP, can really help you save shaky shots that were previously unusable. That is not so say, of course, that every shot can be saved by stabilization. The SmoothCam filter excels at fixing shots that have a minimal to moderate amount of shakiness. Don't expect the shot you got riding down a bumpy desert road on the back of a motorcycle to look like it was shot on a Steadicam (unless, of course, it actually was!). Stabilization in Final Cut Pro is the duty of the SmoothCam filter. Using this filter, you can analyze selected clips, an In point to an Out point, or whole sequences. SmoothCam first has to analyze your clip for motion changes before you can tweak how much stabilization will occur. The neat thing is that this happens in the background (called a background process), so you can continue working in FCP. You can control the background processes by choosing Tools > Background Processes. The window that pops up will allow you to stop (cancel), pause, or resume analyzing the clip. You will also notice that the Canvas (or the Viewer if the clip is loaded into it) has an overlay that indicates the status of the background process.
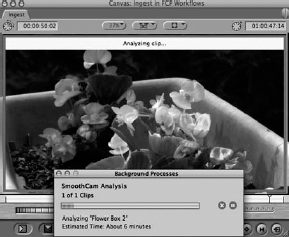
Figure 10.24 The Background Processes pop-up and the analysis overlay in the Canvas.
After the analysis has finished, you can use the controls for the SmoothCam filter in the Filters tab of the Viewer for the selected clip. For more information about these specific controls, check out the Final Cut Pro user manual, page 1240 (III-445), found by choosing Help > Final Cut Pro User Manual from within FCP.
Opacity, Composite Modes, and Layering
Three additional tools to build composites and motion graphics in Final Cut Pro are pretty straightforward to apply. They are not mutually exclusive, though; almost always, they are used together. Let's take a look at each.
Opacity— Refers to the overall transparency of the footage. A clip that has an opacity of 100 percent is completely opaque, and therefore cannot be seen through. On the other hand, a clip with an opacity value of 50 percent is 50 percent transparent. There are several places where we can adjust clip opacity:
- The Motion tab in the Viewer using the Opacity parameter.
- By turning on the Toggle Clip Overlays button in the Timeline. This places a black line on the top of each video clip in the sequence. Here, we can use the cursor or the Pen tool to adjust opacity.
- By turning on the Toggle Clip Keyframes button and right-clicking in the Timeline keyframe editor and choosing Opacity. From there, we can use the cursor or the Pen tool to adjust opacity.
Composite Modes— Also known as blending modes or transfer modes in other applications, composite modes are a way to have pixels of two or more layers interact. There is a variety to choose from—each applies a different mathematical calculation to pixels of the combined images. These calculations can work with luma, chroma, alpha, or a combination of the three. For example, the Add composite mode adds together the brightness values of pixels. For a full explanation of how each composite mode works, consult the Final Cut Pro user manual, starting on page 1182 (III-397), by going to Help > Final Cut Pro user manual.
The way most editors and designers we know use composite modes has little to do with the math. They just get a feel for the different looks each mode makes. They also might try a few combinations of composite modes and opacity levels to get their desired effect.
Composite modes work in a top-down manner. So you apply the composite mode to the clip that is higher in the track order. The easiest way to apply a composite mode is to right-click on a clip and choose from the Composite Mode submenu.
Two examples of effects that involve composite modes are a vignette, which can be created with a Feathered Shape generator on the top layer, and compositing it to the footage below with a combination of multiply and opacity, and a “silk,” or “gauze,” effect that can be achieved by making a duplicate layer of a clip, then blurring that layer a little bit, and compositing it back on top of the original at a low opacity and with a Screen composite mode.
Layering— In its most basic sense, layering is placing one piece of footage on top of another (video on top of video, text on top of video, etc.). As a general rule of thumb, Final Cut Pro works with a top-down approach. By default, when video layers overlap, 100 percent of the topmost layer of video is visible. As we have seen, there are lots of things that can change this and allow the video layers to mix together—including motion effects such as scaling or cropping, opacity changes, keys, masks, and composite modes. In fact, most video effects are created by multiple clips interacting with each other in a composite.
Motion Templates
A new and exciting feature of Final Cut Pro 6 is the integration of Motion templates directly inside FCP. Although this does provide an amazing amount of flexibility, we should note that it is not the same as working with a template directly inside Motion. Many parameters and adjustments are available only directly inside Motion. Depending on the template, there will be more or fewer options that you can control. However, you can at any point open the template in Motion for further editing and adjustment. You can make changes that will affect all instances of the template on the Final Cut Pro Timeline, or changes to an individual instance.
Motion templates can be found in three places within Final Cut Pro:
- The Generator pop-up menu (bottom right-hand corner of the Viewer) > Master Templates
- The Master Templates bin in the Effects tab of the Browser
- By choosing Sequence > Add Master Template
From any of these locations, you can choose the template of your choice. This will load the template into the Viewer and add a new tab called Controls. From the Controls tab, you can adjust the parameters for that template. This is limited text entry and size adjustment along with applying footage to Drop Zone placeholders. You can make your own original templates inside the Motion application and save them to be used in Final Cut Pro.
Mark Spencer and Jem Schofield's Motion Graphics and Effects in Final Cut Studio 2: Field Techniques for Editors and Designers (Peachpit Press) is an excellent resource for learning more about creating your own templates, and in general about Motion graphics in Final Cut Pro and Final Cut Studio 2.
Motion templates are a way to access some of the power of Motion inside FCP, but they are just the tip of the iceberg when it comes to the bigger topic of integration with Final Cut Studio. The next chapter introduces us to this greater concept. However, the concepts in finishing—what you are trying to get out of your color correction or mix, titling, or sound design—are much the same whether you are working inside Final Cut Pro, integrating with Final Cut Studio, or extending your workflow into other postproduction platforms, as is covered in Chapter 13.