
9 The Review Process
They say that writing is really rewriting.
Editing is very much the same; it's all about review and revision. We cannot overemphasize the importance of feedback and adjustment. It is the nature of any creative activity, but in postproduction especially, that the closer you are to something, the harder it is to see.
This is not meant to be some Zen koan. It's just that when you have spent days in the editing room with the same material, you are so focused on the details, and you know the footage so well, that it is literally hard to see it for what it is. In postproduction, we talk about “fresh eyes.” This simply means bringing in new people to review cuts of your piece at strategic milestones.
Sometimes the review process is with clients and stakeholders, and the goal is approval. Other times, reviews are with collaborators or members of your creative community. In this case, you may be looking for creative input and new ways of seeing challenging issues.
The review process exists as a feedback loop in most workflows. Sometimes this is an iterative process, where the same team members review and adjust until all parties are happy. Sometimes reviews need to progress up a corporate ladder—one boss must approve before the next one can see.
Some projects specify the number of reviews and exactly where they fall in the workflow and schedule. This sort of structure is useful when a project is on a very tight schedule. It is also used by some vendors to help define the scope of a project. A project-scope document might specify two rounds of review, and that any others will be charged extra.
A review can take place at any point in the project. It is best to plan several reviews at different milestones to focus on different aspects. Communicating with your reviewers about what you are trying to get out of a review is crucial.
The mechanics of the review process are the topic of this chapter. It is also understood that the feedback needs to be acted on back in the editing room. Obvious, we know, but it brings up an important point: make sure to put time in your schedule for review AND REVISION. Don't give your client their first look at the piece only two days before the final deadline!
Our discussion of the review process has two parts:
- Some general thoughts and tips on getting the most from the review process
- Detailed instruction about using the Web to facilitate the review process
Tips on the Review Process
The following is a collection of ideas that help the review process go smoothly. Like building almost any other part of the workflow, the review process has no strict rules. It is better to suit the process around the needs of the project and the team.
- Have specific reviews for specific purposes—be strategic. As mentioned above, you should plan major reviews at key milestones in the workflow. Although it may be good from time to time to bring in fresh eyes spontaneously, it is also good to include in your workflow specific times for reviews, what team members will participate, and what the goals are. Major review sessions could be held after the first assembly and before committing to the picture lock, for instance.
- Prepare the review cut so that it best suits the purpose of the review. When you are reviewing the rough cut, content and flow are the most important things. Therefore, online review with a low-quality web file might be the perfect solution to review a rough cut (visual quality is not important at this stage). Conversely, if the reviewers need to comment on graphics or titling, you need to provide a high-quality review copy. (This could still be web based, but at a higher quality.) If you need your client to approve a DVD, you must provide a working proof with menus, compression, and everything—not just a copy of the video that goes on the DVD. The point is: for each review, prepare your review screener in a way that makes it easy for your reviewers to focus on the things you want them to.
- Communicate with your reviewers about the goals of the review (and communicate with your reviewers about everything else too). Communication is key to all parts of this process. The more that you are able to explain the purpose of the review, the better notes you will get on your piece. Review and feedback can be an intimate process, and it is good to keep lines of communication as open as possible. Maybe during the review, a reviewer has additional questions about your audience. Don't let this opportunity to expand the discussion pass you by. There is probably some worthwhile feedback behind the questions. You should strive for an environment where any and all questions organically bubble up to the top with as little friction as possible. Deep and careful communication throughout will yield the best results.
- Take detailed notes using timecode reference. Anyone involved in the review should take notes, and base those notes on the timecode of the piece. Depending on the size and style of review, different reviewers might compare and consolidate notes, you may use those notes to brief the editor, or sometimes the notes themselves will just get used as a hit list for changes to the piece. There are two elements to this— they are pretty straightforward, but we want to make them abundantly clear:
- Use notes so that you can remember what you were thinking. Thoughts and ideas come quickly during a review session. Sometimes we have trouble even getting them all written down. Without notes, it would be impossible.
- Use timecode so that it is easy to find the part of the piece that your note is about. Timecode is always going to work better than trying to describe a shot in your notes. Depending on the review format, the timecode might be burned right into the image, or you may need to look at a separate readout. Chapter 6 has instructions for adding timecode using the timecode reader filter.
- If possible, watch the piece together with the whole team. The best way to do a review is all sitting together watching the piece and discussing. Notwithstanding that much of the rest of this chapter is about online reviews, there is no substitute for sitting together and watching a piece. This discussion does not remove the need for notes. You get the purest most direct feedback when you can see people's initial reaction to viewing a piece. The drawback to this is that some ideas take some time to percolate. If you begin your review with a group viewing session, it is also good to allow your reviewers to digest and then offer follow-up comments.
- Be gentle. When you are reviewing someone's work, remember that no matter what you think is wrong with it, someone has already put in a lot of time and effort up to this point. We discussed above how editing is no different from other creative activities in the need for fresh eyes. It is also no different when it comes to the thin skin of the creators. Remember to be gentle and diplomatic when delivering a critique. It is not uncommon for people to be initially resistant or defensive when receiving feedback. Sometimes you will need to work into more difficult issues slowly, or come back around to something later in the review once the communication has warmed. Remember this especially if you are writing your review in an email. Email has that special way of sometimes reading more harshly than intended.
Online Reviews
Using the Internet to facilitate the postproduction process is one of the most exciting and money-saving innovations of the past decade. Whereas the previous section was about the review process in general, this section focuses on using the Internet and web video to streamline the process of reviewing cuts with clients and team members. Although we may prefer to do our review sessions in person, the convenience, ease, and economy of moving the process online are all very compelling. Online reviews have become ubiquitous.
The advantages of online review are numerous, but the biggest one is the savings of time and money. This is particularly apparent on a project when there are a large number of reviewers, and when they are geographically distant.
For one of the last projects we did before online review became prevalent, about half a dozen executives needed to see a cut at the end of each editing day. These executives were scattered around the country, and the cost to make the VHS tapes and FedEx them ran easily into thousands of dollars.
They key to saving time and money with online reviews is providing the video files in a way that anyone (even those who are not particularly technical) can access them easily. This means taking into account many of the same factors that are considered when creating web video for a general audience, as well as concerns particular to the process on a specific project.
You don't want to force your client to get a plug-in or wait an overly long time for a download. It is also very important to communicate with your client about these things in advance so that you know how to best prepare their video for review, and so that they know what to expect. A question such as “Does everyone in your office have QuickTime installed?” can be a big help later on.
This section briefly covers some of the fundamental concepts and issues of web video in general. This discussion is tailored to the needs of facilitating online reviews of works in progress, but many of the ideas are applicable to consumer applications of web video as well. Also, Final Cut Server is a new product from Apple that will facilitate and streamline this process further. This is discussed some at the end of this chapter, and even more in two new web chapters available at http://booksite.focalpress.com/Osder/finalcut/.
Web-Video Variables
The thing that makes the Web most challenging for creators of traditional media (print and television) is the lack of control. One has to come to accept the fact that when working on the Web, your final product is produced on the user's machine, and therefore is slightly (or sometimes not so slightly) different almost every time. Unfortunately, web video has always been one of the trickier parts of the web landscape because the content is played by an additional piece of software (a plug-in) in addition to your Internet browser, and this means even more variables that can have an effect on performance.
The basic methodology in planning for a web-video project is to analyze your audience, and then choose parameters to accommodate what you know about the audience and the content. Luckily, when preparing video for online review, your audience is smaller, and you can usually get a pretty good idea what equipment your users will be using in order to view. For instance, does everyone in the office have a broadband connection?
The key variables that you want to account for in web-video projects are:
Connection Speed—This is still a factor in any web-based project. Now that broadband has become more prevalent, however, file size is not as big a concern as it once was. Often in web video produced for a wide audience, you will still see different-sized versions to accommodate different connection speeds. This is generally not a solution for online reviews because making alternate versions takes time, and image quality is often too important for a low-bandwidth review.
Operating System (OS) and Hardware—These are the next two things you should consider for any web-video project because web-video applications work differently on different platforms. Again, for online reviews, this is less of a concern, because you can find out if your client is all Mac or all PC.
Different Browsers—A central issue in designing anything for the Web is that different browsers will do slightly different things with various web-video file types. For the most part, though, if you plan for the OS and the plug-in, you will probably be okay with the browser. In the case of online reviews, it may be appropriate to tell your review group which browser to use (you can't really do this with a public web site).
Video Architecture—What architecture (or, from the user side, what plug-in)? That is the final question. Apple and Microsoft, the two major makers of operating systems, also each have a media player (QuickTime and Windows Media Player, respectively). Because each software company ships its media player with its OS, you can count on Windows users having Windows Media Player, and Mac users having QuickTime. However, both companies also make versions of their players for the rival operating systems. Also, there are RealPlayer, Flash, and other browser plug-ins. Lastly, each playback architecture works with its own proprietary file types (for example, .wmv for Windows Media Player and .mov for QuickTime), but many plug-ins are also capable of playing back generic file types. For instance, Windows Media Player, QuickTime, and RealPlayer are all capable of playing .mpg video files and .mp3 audio files.
If this seems like a big mess, well, it can be. However, we can continue to consider ourselves lucky that we are using web video for online reviews with a small and defined audience. When preparing web video for a general audience, it is a real challenge to set all of these variables in a way that will work with most users without compromising quality. This is why many web sites end up offering the user different choices for web video.
When preparing video for online review, the task is relatively simple because you can know much more about your audience. On the other hand, the consequences of failure can be much worse when using the Web for online reviews. Consider, if a video for a general audience fails to play on a specific machine, the only harm is that a particular user misses out on some content. If a video posted for online review fails for a reviewer, it can affect the whole postproduction schedule and even affect your client's confidence in your ability to deliver.
Downloads, Streaming, and Progressive Download
Before we move into specific techniques for online reviews, it is worth defining some terms that are often confused.
- Streaming is a term that is often used incorrectly. True streaming video on the Internet actually works much like a traditional broadcast medium—the video plays simultaneously as it is being received on the client computer. This type of streaming requires special server software, and is transferred via a special protocol (Real Time Streaming Protocol, or RTSP). This is generally overkill for an online review, and not something we cover here.
- Video download is the opposite of streaming. The idea here is that an entire video program is downloaded to a local machine and stored before it can be played. Some organizations use an FTP server for this type of file transfer. (More on the FTP protocol in the sidebar, FTP and HTTP Protocols). Video downloads have some advantages for online review. Reviewers may appreciate having the file saved on their hard drive so they can easily go back to it without needing to go online.
FTP and HTTP Protocols
FTP (File Transfer Protocol) and HTTP (Hypertext Transfer Protocol) are two common transfer protocols for the Internet. A protocol is a set of rules governing communication within and between computing endpoints.
• HTTP is the protocol that allows browsers to receive web pages (hypertext documents) to be viewed in a browser.
• FTP is a common protocol for transferring files from a local computer and a server, but it is transfer only. There is nothing in the protocol that supports display (like HTTP does).
FTP transfers can be done in a few ways:
- A dedicated FTP program such as Fetch, Transmit, or Coffee Cup (there are many of these, and some are free).
- A secure web site. Many production companies have an area of their web site that uses FTP for client transfers and reviews.
- Natively in the OS. Most operating systems support FTP access to servers right in the OS.
Just remember, FTP is only about file transfer. Its only purpose is moving something to or from the server
- Progressive download is somewhat of a compromise between true streaming video and video download. The idea is that the video starts downloading and begins playing when enough of it has downloaded to play to the end without interruption. This requires the computer to make an estimate based on the download speed and the file size. The video playback is controlled by the plug-in, and the data is transferred through the common HTTP protocol. No special server software is required. (When you view a QuickTime on the Web and in the playback bar, you see a gray loading bar extend, and then you see the playhead “chase” it to the end—this is a representation of the progressive download.)
Exporting from FCP
We have discussed some of the considerations and parameters of making video files appropriate for the Web. The next two sections give detailed instructions on how to make these exports from FCP, as well as some recommended settings to use.
When exporting files from FCP for review, there are three choices under File > Export that will be particularly useful: QuickTime Movie, using QuickTime Conversion, and using Compressor. (There is more about some of the other choices in the Export menu in Chapter 13.)
Each one of these choices is a different variation on the same theme: making an export to create a new file for displaying video and audio, and controlling the codec and parameters of that export. The three tools each have a different level of robustness, control, and complexity.
QuickTime Movie
The simplest of these export features is QuickTime Movie. Because we know that Final Cut Pro is based on the QuickTime video architecture, and we know that most of FCP's native media files are QuickTime files (.mov), it stands to reason that exporting a QuickTime file should be easy, quick, and painless—and in fact, it is.
Export QuickTime Movie is not particularly useful for creating files for web review, but it is useful for creating the native QuickTime files that are commonly used in Final Cut Pro. When you choose this option, the window that you get looks a lot like a Save As window you might see in any program. This is accurate—you are saving your sequence as a new QuickTime file.
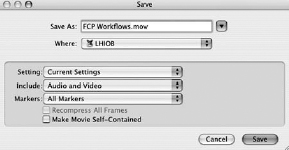
Figure 9.1 The window that you get when you choose File > Export > QuickTime Movie looks much like a familiar Save As dialogue box.
The Save window has familiar controls to name your file and place it in the proper directory on the proper drive. The pulldowns at the bottom of the window give you a small amount of control over the export you are about to make.
Settings—By default, the Settings pulldown is set to Current Settings. This means that the export that you make will have the same settings as the sequence you are exporting from. The other choices under Settings are the same as the sequence presets list. This means that what Export QuickTime is really good at is kicking out new QuickTime movies in any of the flavors that Final Cut Pro normally uses. If you are working on an HD sequence, and you want to export a DV QuickTime (fairly good quality, not as large as your HD project), Export QuickTime is a good way to go, but for web outputs, the other two choices (discussed next) will be better.
Include—A quick place to make an export of audio only or video only (Audio and Video is the default). This is handy for lots of reasons—for example, you can choose the Video Only option to give footage to a motion-graphics artist.
Markers—As discussed further in Chapter 11, this pulldown lets you include certain types of markers that can be read by other software in Final Cut Studio. You can also export all of your markers to QuickTime. This means that you will see your marker names come up in the QuickTime player as you play that part of a clip. That can be handy for reviews.
There is one more thing worth noting in this Save window, and that is the two small check boxes under the pulldown menus:
Recompress All Frames—This check box tells FCP to analyze every frame for the new file. This is recommended only as a troubleshooting measure if you are having a problem getting something to export.
Make Movie Self-Contained—This check box tells FCP to include the actual media in the new QuickTime file. If left unchecked, the new QuickTime file will be just a reference movie—in other words, a small file with instructions telling which media clips to play for the sequence exported. This makes for a small file, but it will play back only on the computer that has access to the associated media.
This can by useful for certain kinds of reviews. For example, perhaps you are working the night shift, and you want your producer, who comes in in the morning, to view your work. Because your producer doesn't know how to use FCP, you need to make things simple. You can put a reference movie on the desktop for your producer. You can even name it “Double-Click to Play.” It doesn't get any more foolproof than that!
Export Using QuickTime Conversion
As we already know, QuickTime is an architecture that can play more than its own file type. Along with .mov files, QuickTime can play .mp3, .wav, and .aiff audio files; .mpg and .mp4 video files; .jpg and .png still-image files; and many, many more.
The idea of QuickTime Conversion is that you can make an export to one of these other file types that QuickTime supports, but one that is not necessarily native to FCP. One place, besides reviews, where this comes in handy is when you need an export for a different medium—say, some still exports for the Web, or some audio exports for the radio. A number of the choices available with QuickTime Conversion are useful for web reviews also.
When you choose File > Export > Using QuickTime Conversion, the Save window that comes up looks a lot like the one we just saw using Export QuickTime Movie. The only real differences are at the bottom of the window where the pulldown menus are. The options here are different—we now have pulldown menus for Format and Use, as well as an Options button.
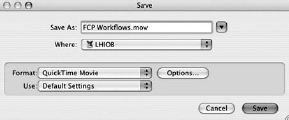
Figure 9.2 The window that you get when you choose File > Export > Using QuickTime Conversion lets you choose different options for your exported file.
By default, the Format menu is set to QuickTime. Without changing this, if you take a look at the Use menu, you see that the choices are presets based on connection speeds: Broadband High, Broadband Low, and so on.
Now take a look at the choices in the Format menu. These are a mixed bag of video and audio formats, along with some options for still images. For those of us who have used the program for years, this list is an interesting topic of discussion. The choices on it have changed a lot. For instance, for a long time, MP3 (MPEG-1 Layer 3) was on this list, and this was an easy way to make web audio directly out of FCP. However, MP3 is no longer on the list, and now you need to use other conversion software if you want to make that file type.
For other formats, this export technique has become more robust. For instance, the workflow to make Flash Video used to require additional software. Now, if you have the Flash authoring software installed on your computer, this export is available right on this menu. Other additions to the list over the years have included 3G (a mobile standard), iPod video, and recently Apple TV. We can only ponder the myriad of reasons (technical, political, and marketing) that led to the decisions on what export options to include and what to leave off.
The next important thing to realize is that what you pick in the Format menu determines the options you see in the Use menu. For instance, try changing Format to Wave (an audio format used for CDs). With Format set to Wave, pull down Use. You can see that this list has now become a selection of presets of audio sample rates and stereo/mono options. If you try different things on the Format menu, you will see that some choices come with their own set of presets, but for others, the Use menu (and also the Options button) are grayed out.
There is one more piece to this, which is the Options button. Click this, and you will get a separate Settings window. What is in this new window is dependent on what you have selected in the two pulldowns (Format and Use). The Format menu determines the options that you have in the Settings window, and the Use menu determines the presets these options are initially set to.
The process of making a QuickTime Conversion export goes like this:
- Choose your format. This should be based on the needs of your export. If you are exporting video for an online review, you probably want either QuickTime or MP4. (The QuickTime presets in QuickTime Conversion all use the H.264 codec at the time this is written. More on this codec later.)
- Choose the setting to use. Remember, these are presets that can be tweaked if necessary. It is usually a good idea to start with a preset that is close to your needs. Broadband Medium might be a good compromise between size and quality for web reviews.
- Tweak the options. If none of the presets in the Use menu are exactly what you are looking for (maybe you want a small frame size but a high bitrate), use the Options button to change the setting on your chosen preset.
QuickTime Conversion is convenient for making a wide range of file types directly out of Final Cut Pro, but to have the most robust control over exports, there is another solution.
Export Using Compressor
Compressor is part of the Final Cut Studio and is a very robust standalone compression program. When you choose Export Using Compressor, Compressor will launch with a number of different windows and controls. This can be a little intimidating to some, but Compressor follows the same principles as any compression program or exporting function; it just has more controls and choices.
When you launch Compressor from Final Cut Pro, the sequence from the Timeline will already be in the Batch window. Below the Batch window is the Settings window. From here, you can drag various settings (organized by format and function) to your sequence listed in the Batch window to apply them. Additionally, you can drag output destinations from the Settings window to apply an output destination.
Compressor also excels at various types of automation. Saving presets is one of these features. When we have a client with whom we work a lot, we will save presets that work well for their reviews. Compressor can also use Apple Script so, for example, you can automate the uploading process to an FTP server. It will even email you to confirm!
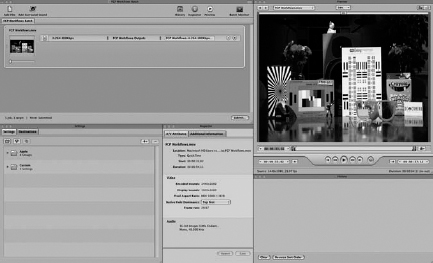
Figure 9.3 The Compressor 3 interface.
Don't think that Compressor is all about presets, though. We can create or augment existing presets by using tools that can be found in the Inspector window. We can also preview our compression settings, add markers, and add In and Out points for our compression in the Preview window. Although there is a lot more to Compressor, these choices are really not fundamentally different from the Format and Use menus we saw with QuickTime Conversion. Across the board, the process is similar, but Compressor is often much more versatile.
For a great guide to using Compressor, we recommend the Apple Pro Training Series: Compressor 3 Quick Reference Guide by Brian Gary (Peachpit Press).
Choosing a Solution
We now understand that there are variables in web video, and that communication with our reviewers is key. We understand the mechanics of making an export from FCP. So, how do we go about actually picking the codecs and settings for our online review files?
As you should realize by now, this is ultimately going to depend on your project and your reviewers, but from experience, there are some good things to try first. The following is a list of our three favorite specific solutions, including what we like them for and why.
MPEG-1—This kind of video has been around for over ten years. It creates relatively large files with relatively poor quality and little control over parameters, including size. Why, then, would we put it on this list of useful formats for web reviews? MPEG-1 does have some benefits:
- It is probably the web-video file type that will play without technical problems on the widest range of computers. Because this format has been around so long, it is recognized and playable by most video architectures.
- It encodes quickly compared to other web-video codecs.
- For early reviews such as rought cuts, it provides a good amount of detail, but small image size and poor quality discourage nitpicking.
We find that when considering these kinds of technological questions, there is a tendency to either go with the latest and greatest solution, or stick with an old workhorse. MPEG-1 is the old workhorse of web video. We still like it because we can quickly make an output, and can have confidence that any user with a web connection will be able to view it.
Now let's look at the latest and greatest.
QuickTime H.264—The H.264 codec is an MPEG-4 variant that is the latest in a long line of codecs that Apple has introduced to provide the best possible image quality at the smallest file size. The main advantage of using H.264 for online reviews is that you can provide your client with a file that approaches full broadcast size and quality on the Web. The disadvantages of H.264 include:
- It takes a LONG time to encode.
- Reviewers need to have an up-to-date version of the QuickTime software. This is free, but it may need to be downloaded and installed.
- Although H.264 makes a great size-to-quality ratio, when using it to produce large high-quality videos, those files are still very large.
Using this codec tends to be great when you have strong communications with your reviewers and they are fairly technically savvy. If they have the proper software (or can get it), and they understand that the reason for the slow download is the large size and high quality (which is to say, they realize that it is worth the wait), clients tend to be very happy with this solution for reviews.
One thing that we like to do is use MPEG-1 early in the review process. This format is quick, and it gets reviewers to focus on the content, which is what we want in the earlier stages. Later, we use H.264 to show off detail work, such as graphics. When near-final pieces need to be circulated to a wider group, we often provide both an H.264 file and an MPEG-1 file as backup to cover our bases.
Of course, it is our preference to have clients come into the studio and approve a final deliverable at its highest possible quality. We have found that when using high-quality H.264 compressions for review, clients often prefer to just do their final approval online.
Windows Media Video—Whoa! Where did that one come from? Might be one of the few times you see the W-word in this book, but Windows Media is the third format that we find particularly useful for the review process.
Why?
- These files will play on most any Windows machine, and many Mac users can play them also.
- The quality-to-size ratio for Windows Media is comparable to H.264, if not better.
- Windows Media is particularly good at playing web videos that are at full broadcast size.
- It is much quicker to encode these files than to encode H.264 files.
Of course, to encode .wmv files, you will need some more software beyond FCP or Compressor. There are several solutions available, but we happen to like the ones from Telestream (www.flip4mac.com). These are a suite of utilities that allow the Mac to get along better with Windows Media. There are several levels to the software, from a free play-only plug-in to several levels of supported encoding, including hi def.
Posting to the Web
Once you have prepared these files, putting them on the Web should not be complicated. Most of the important concepts for this are covered at the beginning of this chapter. When you place any of the file types above on an HTTP server, and link directly to it (e.g., www.yoursite.com/reviews/rough-cut.mov), this file will play on most computers. To keep things simple, this is what we most often do to post cuts for reviewers. We put the file on the server, and send an email with the link and any technical or reviewing instructions.
Of course, there are all kinds of extra things you can do on the Web. Mentioned before was a secure client web site for review. This may support commenting on cuts through the site as well. Depending on your needs, a fully implemented web system might be overkill, but you might still code a quick HTML page to keep track of different cuts. (We tend to do this for certain types of reviews, such as casting screeners. We code a quick page with the names of all of the actors who auditioned as links to the clips. That way, we can send just one link to the page in the client email.)
There are virtually unlimited variations on this theme, from one quick page to a huge investment in web-based media-management software. Apple has just recently jumped into this game with Final Cut Server.
Final Cut Server and the Review Process
You may have noticed that this new software, just on the horizon, keeps popping into lots of the chapters in this book. Indeed, Final Cut Server is likely to have an effect on many, if not all, aspects of Final Cut Pro workflows: review of footage, media management, scripting, and rough cuts (to name a few biggies).
Using Final Cut Server for the review process may be one of the most enticing promises of the new software. The real potential of Final Cut Server is not only for the review process, or any single aspect of the process that it can facilitate. The real promise is about integration. Final Cut Studio has already started to change the way we think about the process, especially finishing. In the next chapter, there is much more about the integration possible in this area. The ultimate promise of Final Cut Server is that it will bring similar integration to the entirety of the postproduction process, and more importantly, to all members of the team.
Some of these goals have been accomplished to a degree in the past with custom solutions (we look at one of these in the case study in Chapter 16). As this chapter shows, the principles are not at all new. Many of the ideas in this chapter would apply if you were reviewing a cut over a high-speed Internet connection or sitting around a Steenbeck with a bottle of Chianti.
Still, if you take the innovations of Final Cut Studio as an indication of the potential of Final Cut Server, it is an exciting prospect.
Learn more about Final Cut server by accessing two web chapters at http://booksite.focalpress.com/Osder/finalcut/.