
8 The Rough Cut
There is an old saying that carving a statue out of rock is easy: just cut away all of the rock that doesn't look good.
We teach our students to think of nonlinear editing in the same way. In both cases, the process is about refinement. When carving rock, you progress through a series of tools. You may begin with a large sledgehammer, good for knocking away large chunks of rock. When you have chipped away the largest chunks, you switch to a large but crude chisel, good for chiseling away to the next layer of detail—and so on through finer and finer tools, until you are using sandpaper and finally a polishing cloth.
Nonlinear editing is really very similar. The rough-cut phase and the techniques discussed in this chapter are like your favorite large chisel. If the process is all about eliminating what you don't want, this really starts in the shooting phase, when the shooter is selective about the footage they capture. The next major cutting of material is in the ingest phase, when you decide what, out of all of your acquired material, needs to go into Final Cut Pro for editing. The ingest stage is something like the big sledgehammer—good for eliminating big chunks of unusable stuff, but not good for detailed work.
This chapter picks up when you have all of your material nicely organized as clips in the FCP Browser, and it is time to start cutting. This is an exciting moment, because the initial goal is to string together for the first time the actual clips that will make up your program. Don't worry about the fine details and the polish when you are rough cutting. There will be time and different tools for that later. The idea at this stage is to take your statue from a blocky chunk of stone to something that begins to resemble your final piece.
Those who already have some understanding of editing in FCP will get the most from this chapter. We assume, for example, that you already know how to mark a clip and place it on the Timeline. This chapter is not a basic tutorial, but rather a collection of intermediate techniques and workflow-related concepts.
Defining the Objectives of a Rough Cut
Unfortunately, not everyone means exactly the same thing when they say “rough cut.” When you are involved in this stage of a project, it is a good idea to define the objectives for the cut, and to understand how a particular cut fits into the process and how the team will use it.
There is a world of difference between a “rough cut” that is intended for the internal team to see how the story flows, and a ”rough cut” that is intended to get the client's approval on a project. If you are a sculptor, and your benefactor comes to the studio expecting to see an almost finished statue of himself or herself, and instead sees a roughly shaped piece of rock, you might have some explaining to do.
Part of this is called managing expectations. This is particularly important when working with rough cuts, because they are often intended to focus on certain aspects of a project and to ignore others.
So, you may explain to your reviewers (clients, teammates, collaborators) that a cut is intended to focus on story, and that the mix is not done and the titles are only temporary. However, it is often hard for people to focus on what they are supposed to, so you may still get a lot of comments about how the music was too low at spots and the titles didn't look good. There is a lot more on reviews in the next chapter.
It is important to see the rough-cut stage as a larger phase of the project, a phase that in itself has some constituent subphases. Each project is unique in regard to its need for rough cuts and revisions. It is important to manage expectations for each cut along the way, but still to be prepared for comments that are out of order. It is important to realize that even though there are some gray areas in this terminology, the rough-cut phase must have a clear process to completion.
The following concepts and terms are useful in conceptualizing and defining the rough-cut phase of a workflow.
Assembly Edit
This type of edit implies the initial assembly of clips on the Timeline for any scene or project. We use this term to mean going from nothing to something. We talk about “just getting from beginning to end.” Assembly editing is something like doing the edges of the puzzle before you tackle the interior.
In most workflows, we find it very useful to assemble the Timeline as a first priority. Even if not all of the media assets are available yet, it is still a useful building block to place the material you do have on a Timeline in the proper order with gaps for what is missing.
There are also exceptions to this beginning-to-end philosophy. Sometimes you will need to take a single scene, and edit it through several phases of postproduction as a proof of concept before even beginning the rest of the piece.
First assemblies are often not pretty. Generally only the core team sees these cuts, and sometimes the cuts are too rough to be interpreted by anyone who is not familiar with the postproduction process. For those of us who are editors and producers, this is an exciting moment. In an assembly edit, we can start to really see the full potential of a piece. Sometimes this is also the moment when you get the first inkling of a problem (or a full-on disaster).
For this reason if none other, we recommend making a raw assembly cut a major milestone in most workflows.
Review and Approval Cuts
Most rough cuts are intended for some sort of specific review, and it is good to define this and communicate it to everyone working on the cut. Who is the review group for this cut? What will they be commenting on, and what have they seen previously on the piece? The next chapter is about how to facilitate the actual review process.
Sometimes a cut is meant for more than just review. It may represent completion of some aspect of the project, or even the final project itself. It is good to make it clear to everyone involved what, if anything, you are looking for in the way of approval in a cut.
Picture Lock
The point in the process where all of the shots are in place and all timings are correct is known as picture lock. This is an important technical milestone because many of the tasks in finishing (such as music composition, color correction, and mix) depend on having final timings. Therefore, once picture lock is established, many of these tasks can go forward simultaneously. If picture lock is declared and these tasks commence, and then, for any reason, there is the need to change the timing of the shots, these changes will affect the work of a lot of people.
The picture lock should be the culmination of the rough-cutting process, and a major milestone in any workflow.
Rough-Cutting Concepts
Here are a few terms that refer to common concepts used during the rough-cut stage, helping to further define the objectives of a cut and the purpose of a particular edit session.
Trimming
Adjustments to timing once an initial assembly has been created are called trimming. Later in this chapter, we have a large section on trimming techniques. Keep in mind that although assembly and trimming are two different modes of editing, we often use them together, not as wholly different phases. In other words, we inevitably do a little bit of trimming as we place shots on the Timeline, but then we often need to go back and do finer trimming later.
A-Roll / B-Roll Editing
This terminology refers to the basic structure used in most nonfiction editing. The A-roll is generally an interview, or someone on-camera saying something. B-roll means the shots that illustrate what the person in the A-roll is saying. Of course, there are lots of variations on this theme. In the news, the A-roll might include the correspondent's stand-up. On MTV, you might see A-roll placed on-screen simultaneously with B-roll using a 24-like style (or, for you old-schoolers, the Woodstock style). In fiction filmmaking, the difference is not always as clear-cut, but we still refer to beauty shots as B-roll.
Editorial Work
Editorial means storytelling. Generally you will want to focus on editorial concerns first, before moving into more aesthetic concerns, although, in editing, it would be a mistake to try to completely separate these two. One quickly comes to realize that the emotive tone you can create with “aesthetic” techniques is not really separate from the meaning of the content. Anyone who doubts the old adage that editorial technique can affect meaning has never practiced nonlinear editing.
Still, it often pays to focus on the editorial first. For instance, when cutting a piece in the a traditional A-roll/B-roll style, often we will start by stringing out all of the interview bites first. Then we'll do a second pass to add the B-roll.
Pre-Editing with Subclips and Markers
If you have been intimately involved in a project through the production and ingestion of the media, you may be sufficiently familiar with the footage at this point to just sit down and start editing. Just as often, however, you will come to a project at the rough-cut stage, with little familiarity with the source media. In this case, before you actually cut, some review of the material and some further preparation are needed.
It is important to recognize that there is some overlap in the tools you can use for various levels of review and refinement. Choices that you make during the ingest phase have a large effect on what you do during (or if you even need) the pre-editing stage. Sometimes it will be more efficient to use the Log and Capture process to break your clips up into discrete shots, but what if this is not your workflow? Sometimes it is better to capture a whole tape, and deal with breaking it up into shots with subclips and markers later.
That is the idea of pre-editing. Subclips and markers are particularly useful in workflows where:
- The editor or editors cutting the rough cut are not already familiar with the material. Pre-editing is an opportunity to review the material and make notes that will help in the editing process.
- The ingest process was done less precisely (it was more convenient to capture whole tapes than to break them up into individual clips during ingest).
- Anytime you want to make detailed notations about your clips.
Subclips
Sublclips are just what they sound like: clips that are subsections of other clips.
Creating a subclip is simple:
- Open any clip in the Viewer.
- Mark that clip with an In and an Out point.
- Choose Modify > Make Subclip.
You will observe at this point that a new clip appears in the Browser. This clip has a special icon in the Browser (Figure 8.1). The icon with rip marks denotes a subclip—as if it were torn from the middle of a larger clip, which in essence it was. You'll notice that when you create the subclip, it comes into the Browser with a name, but the name is already selected for you to change. Final Cut Pro assumes that if you are bothering to make a subclip, you probably want to name it something.
Indeed, naming subclips is a good idea. Inside Final Cut Pro, subclips operate much like other clips. The reason you are probably wanting to make them in the first place is that during ingest, you did not break down your footage into precise enough clips to be convenient to work with while editing. To stay organized, it is a good idea to carefully name your subclips and, in some cases, to organize them in bins. Subclipping is a second opportunity (after ingest, but before you start actually editing) to organize your footage in the Browser.

Figure 8.1 A new subclip in the Browser.
Here are a few final things to remember about subclips:
- A subclip references the same media file as the clip it was created from. No new or duplicate media is being created. The subclip exists inside your FCP project as a reference only.
- It is a good idea to put “pad” on your subclips. There is no reason to try to set your subclip's limits to the exact frames that you want to use. Just as with Log and Capture, it is actually better to purposely leave some pad, or handles (extra footage on either side of your subclip), for use in fine adjustments and to make transitions.
- Subclip limits can be removed. Unlike with a normal clip, if you are editing with a subclip and you reach a media limit, this is likely not a true media limit—it is just the end of what you designated in the subclip. In this case, subclips allow you to remove their limits.
This is done by selecting the subclip and going to Modify > Remove Subclip Limits. The result of removing a subclip's limits is that the clip now has access to the full length of the original media clip. You will notice in the Browser that the rip marks on the icon disappear when subclip limits are removed. However, the subclip retains the name that you gave it.
Markers
In some ways, markers are like subclips, but really, they are much more flexible. Useful for pre-editing, they can also be used for many other tasks during the editing process. (They also provide hooks to carry information to other programs.)
Markers are something like “sticky notes”—little flags that you can place on any frame of video to leave a note for yourself, for someone else, or for a piece of software. Markers can be placed on clips in the Viewer, in the Timeline, or directly onto an open Timeline (sequence). For the purposes of pre-editing, it is going to be useful to make markers on clips in the Viewer, so this is the technique we will focus on.
There are a number of ways to make markers in FCP. Here are three:
- With a menu: Mark > Markers > Add.
- With a button: Located on both the Viewer and the Canvas (Figure 8.2).
- With a keyboard shortcut: Just hit M.
The process when engaged in pre-editing, or familiarizing yourself with the footage, is:
- Open a clip in the Viewer and position your playhead on a spot that you want to use later.
- Create a marker with one of the previous methods.
- Just as with subclips, when using markers for pre-editing, it is often a good idea to name them. To name a marker, with your playhead still on the same frame as the marker, hit M again, and you will open the Edit Marker window (Figure 8.3). This window will let you name the marker, and will also provide some other features that we will describe later.


Figure 8.3 Edit Marker window.
When you make a marker in the Viewer, as described here, you will notice a couple of things:
- There is a small mark (it looks like a little house) in the scrubber bar to represent the marker. This marker is pink most of the time, but it turns yellow when the playhead is on the exact frame of the marker (Figure 8.4).
- In the Browser, the clip itself now has its own disclosure arrow, which is what we are used to seeing with bins. Twirl this arrow down—the clip itself is now functioning like a bin to hold the markers (Figure 8.5).
You can see already that markers have the powerful function of taking specific notes on your media. There are a few more marker functions that are valuable in the pre-editing stage.
If you take one of those markers as it manifests itself in the Browser, notice that you can drag the marker directly to the Timeline as if the marker were a clip. By default, editing a marker into a Timeline using this method will cause all of the media from the marker until the next marker on the clip (or, if there were no other markers, until the end of the clip) to be edited onto the Timeline.
What if you want to edit with markers, but you don't want to use all of the footage through the next marker—what if you just want a second or two? Did you notice the Duration field in the Edit Marker window where you were about to name the marker?
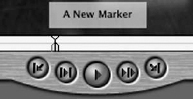
Figure 8.4 Marker on scrubber bar.

Go ahead, put in a duration and click OK. You will notice two things different about a marker with a duration:
- The marker as it appears on the scrubber bar has a “tail”—an extension that shows its length (Figure 8.6).
- In the Browser, the marker now has a value in the Duration column.
And, as intended, if you drag the marker from the Browser to the Timeline, you will get only the set duration. This technique is great when you are cutting something with a bunch of shots that are all the same length. Say you have a long clip of jungle scenes and want to cut a montage where you see each animal for one second. You could go through, putting a marker with a one-second duration on the best shot of each kind of animal—puma, monkey, snake, and so forth. Now you can use these markers with duration to quickly edit a sequence of shots, each of which is one second long. Remember, once the clips are in the Timeline, they act just like any other clips. You can change their position, duration, and so on.
For pre-editing purposes, markers do many of the same things as subclips. Depending on your needs, either one (or some of both) might be appropriate. Probably the biggest difference between the two is the sense in which a marker stays with its clip, and a subclip (for all intents and purposes) represents a clip of its own. If your initial organization of clips is pretty good, and you just want to add some notes, think about markers. On the other hand, if you want to reorganize more deeply, think about subclips. As mentioned earlier, there is no reason not to use both in the same project. (Indeed, you can even place markers on subclips if necessary).
Markers are good for pre-editing, but really, they are much more versatile than that. For some great tutorials on different ways to use markers, check out Diana Weynend's Final Cut Pro 6 from the Apple Pro Training Series. Also, in Chapter 11, there is further discussion on markers used to pass information along to other programs in Final Cut Studio.
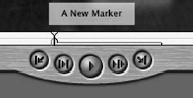
Figure 8.6 Marker with duration in the scrubber bar.
Pre-Editing and Workflows
Not every workflow requires an extensive pre-editing stage. Many workflows get a lot of this naming and organizing out of the way during ingest, but this is not always practical. Also, these tools are not strictly used at the beginning of editing, then forgotten. Sometimes you realize later on that you are going to use a certain type of shot a lot in a piece—say, the main character smiling—so you go back to put markers on all the good smile shots you can find.
Organizing Your Tracks
One mark of an experienced editor is organized use of the audio and video tracks. There are no set rules for what goes on what track, but an experienced editor tends to keep things fairly neat. Exactly how he or she organizes the tracks is dependent on the particulars of the project and on the editor's personal style.
There are different approaches to organizing audio and video tracks. All in all, it is not very complicated, but let's look at a few ideas in both audio and video.
Organizing Audio Tracks
Because of the way that audio tracks work, they are actually more important to keep organized than are video tracks on most projects. For one thing, most Timelines will have more audio tracks than video tracks. Also, it is likely that the audio tracks will need to be worked on by another operator (a mixer), and possibly outside Final Cut Pro. Making these audio handoffs is discussed in Chapter 12, but whatever the workflow is for your audio, it is going to be easier if the tracks are organized.
What do we mean by this? Basically, that you keep similar audio content together on the same track.
So, music on one track, voice-over on another, and natural sound on its own track. As you can see from Figure 8.7, it is actually a bit more complicated than that. Stereo pairs require two tracks, and the same type of audio sometimes needs to overlap in order to transition properly. It is easy to wind up with quite a few tracks pretty quickly.
Notice that in figure 8.8, the music (in stereo pairs) alternates from being on tracks 8 and 9 to being on tracks 10 and 11. If you alternate tracks in this way, the audio transitions are more clearly visible on the Timeline, and will be easier to work with. We call this style of alternating tracks “checkerboarding.” Although it means using more tracks in total, checkerboarding works well for enabling you to see the organization of audio tracks at a glance.
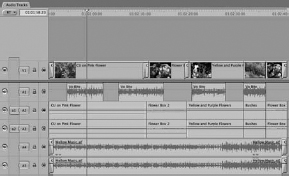
Figure 8.7 Organizing audio tracks.
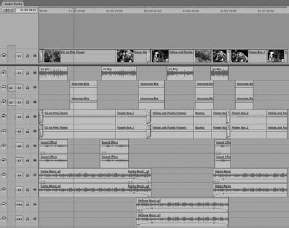
Figure 8.8 Organizing audio tracks on a complex project.
Track Selection Tools
When you are doing this sort of organizing, you will find that the Track Selection tools are often useful. And once you diligently organize your tracks, they will be even more useful, and actually will become even more powerful.
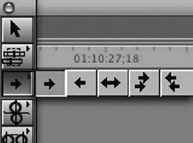
Figure 8.9 The Track Selection tools.
Each of the tools works by selecting a specific track (or tracks) in the direction (or directions) that the arrow points. So, ![]() selects one track going forward,
selects one track going forward, ![]() selects one track in both directions, and so on.
selects one track in both directions, and so on.
The keyboard shortcut for the Track Selection tools is T. Hit T once, and you will get the Select Track Forward tool, a second T will get you the Select Track Backward tool, and so on with successive T's down the line of Track Selection tools.
Admittedly, these tools are very limited in their use, but they do come in handy sometimes, especially when working with track organization.
Organizing Video Tracks
Track organization is also useful for video tracks, although because the layering order is more important with video tracks, there is a lot less leeway in how these tracks can be organized. What we mean by this is that your titling is always going to be on a track that is above your video image (or else you wouldn't see the titles!).
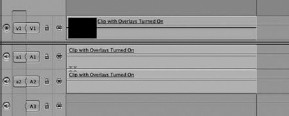
A more strategic use of video tracks is to separate A-roll and B-roll. This is a convention that works well in a number of projects, but it is a convention only, not a rule. The idea is to dedicate separate video tracks to A-roll and B-roll material. Literally placing the B-roll on top of the A-roll visually represents on the Timeline the way the B-roll “covers” the A-roll.
Notice in Figure 8.10 that the two sequences look exactly the same when played back, but the second sequence is easier to look at in the Timeline (Figure 8.11). To be very clear, we are going to repeat that: there is NO DIFFERENCE to the program in using this technique—it is purely a matter of organization and preference.
Advantages of working with A-roll and B-roll in this way include:
- The ability to “see” your piece more clearly. When you organize your Timeline like this, it becomes a more useful visual representation of your piece. For instance, you can see the overall distribution of screen time between the type of shots and how this plays out over the whole Timeline.
- The ability to more easily trim and manipulate the B-roll clips. By putting your B-Roll clips on track 2, you separate them from the A-roll clips, and leave nothing on either side of them to interfere with trimming or moving them. In effect, the result of this is that you can freely move and adjust those clips without needing to change from the Selection tool. We discuss using the other tools below, but play with this a little bit. You can see how good organization can streamline the process and ultimately benefit your creativity.
One disadvantage to this method is that it limits some trimming techniques such as ripple.
Organizing video layers is nice for simple A-roll/B-roll projects, but we see more and more projects these days that involve heavy graphics and compositing with background layers, extensive titling, and video content created from animated stills. On these kinds of complicated projects, it is even more important to keep your tracks organized.
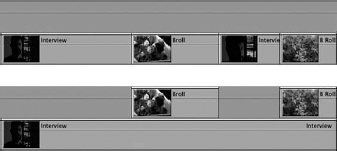
Figure 8.10 A-roll and B-roll clips are placed together on the same track (top); on the bottom, they are organized on separate tracks. The sequence that plays back is exactly the same in either case, but by organizing tracks, it is easier to see the structure of your piece on the Timeline.
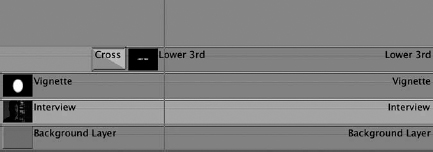
Figure 8.11 This Timeline organized not only A-roll and B-roll, but also background and overlaid graphics layers.
Customizing Your Timeline
Final Cut Pro allows you some options to customize your Timeline. Along with organizing your tracks, customizing your Timeline can help you “see” your piece on the Timeline. Many of these options are activated in the Timeline Layout pop-up (Figure 8.12).

Figure 8.12 The Timeline Layout pop-up has many helpful customizations.
There are actually many things that can be turned on or off in the Timeline, so here are some of our favorites for rough cutting:
- Show Audio Waveforms—A visual reference of the sounds in your audio clips. This is incredibly useful when editing audio. (See Figure 8.13.)
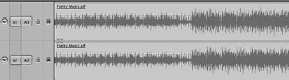
Figure 8.13 Audio waveforms on the Timeline.
- Show Duplicate Frames—This puts a colored bar on the bottom of a clip for any frames that appear more than once in the same sequence (Figure 8.14). In some projects, reusing shots is really frowned upon. When that issue comes up, this is a handy tool.
![]()
Figure 8.14 Duplicate-frame detection.
- Clip Overlays—This very useful Timeline feature is actually not on the Timeline Layout pop-up menu. It has its own button (Figure 8.15).
The clip overlays (Figure 8.16) are black lines on video tracks and pink lines on audio tracks. The black and pink overlays represent the opacity level and audio level, respectively. This feature is so useful because the clip overlays not only show you the levels, they also allow you to adjust them. This is definitely a quick way to rough mix while you are cutting, and you can even keyframe levels on the Timeline by using the Pen tool on the overlays.

Figure 8.15 The Clip Overlays button.
Assembling the Sequence
For us, the first assembly of a sequence is one of the most exciting parts of the process. It is also one of the most challenging. We have no secret potion for making original editorial and visual decisions in the edit room. Even if we did, the approach will differ for every project.
Assembling the first cut is going to be part of any workflow, but it is planned as just one task. When experienced in real life in the edit room, the first assembly can be a dramatic roller coaster for the team. The tips that follow are intended to help you focus on this crucial part of the process. A successful assembly edit is dependent largely on the work that has come before it. For this reason, it should not be a surprise that we have seen some of these themes in other places.
- Focus on getting from beginning to end. More than anything else, that is the point of the first assembly. If you cannot find the perfect B-roll shot, put in a less than perfect one, or leave a hole to address later. A lot of times, in the process of doing the first assembly, we are also becoming more intimately familiar with the footage. Often we find that perfect B-roll shot later, when we are looking for something different. This is why it is important to keep pushing forward.
- Don't be afraid to work out of order. Sometimes it is the narration that pulls you through a project; sometimes it is the music. If there is an aspect of the piece that is easy to work with, and especially if it can lend structure, by all means work with that part first. The assembly edit is like putting together a jigsaw puzzle. Just as you work on the corners and edges first, and the puzzle parts with the most recognizable details, this is a good way to approach the first assembly of your project.
- Be prepared. This means a lot of things (see Chapter 6). Important preparation for the first assembly includes being familiar with your footage, having it organized, and having a clear editing script as a guide. Simply watching and aggressively annotating your footage with markers is one of the best ways to be prepared.
Storyboard and Multicam Editing
Storyboard editing and multicam editing represent alternate ways of making an initial assembly edit in Final Cut Pro. This is why it is logical to group them together, although the processes are different. In essence, these techniques represent two completely different approaches to the initial assembly of a sequence. Another nice thing about these techniques is that if you choose to use one for your initial assembly, you can still go back and make trims and adjustments to that sequence as if you had constructed it in the traditional way.
Storyboard Editing
As with many features of Final Cut Pro, the choice to use these techniques can be driven by personal preference, or by the needs of a particular project, or (most often) by a combination of both. In the case of storyboard editing, we have found it to be generally popular with people who have experience in other creative visual roles—for example, art directors and creative directors. Perhaps this is because of the similarity of storyboard editing to traditional activities in these disciplines, such as using a light-box to view slides or (of course) using traditional storyboards. Projects (or individual scenes) that lend themselves to this style of editing include content that is very rich in visual imagery and where audio or dialogue is less important.
The basic idea behind storyboard editing is to use the thumbnails in the Browser to put your clips into a visual order, and then to use this visual arrangement in the Browser to quickly put the clips in time order in the sequence. The best way to learn how this is done is to try it. The following steps will give you the general idea. Some more tips to help you get the most from this style of editing follow.
- Start with a project that has about six clips. It is best if they are visually diverse. You should also have an empty sequence.
- Change the Browser to show large icons. This can be done with View > Browser Items > as Large Icons, or by right-clicking in the Browser.
- Arrange your clips in a grid, but allow the rows to consistently move down as they go from left to right (Figure 8.17).
The reason for the stair-step is that FCP is going to order your clips based on their position from top to bottom first, and then left to right second. So if you make a grid with perfect rows, this will be correctly read one row at a time (clips on exactly the same level will be read from left to right). However, as soon as you slip by just a little bit, and one of the clips in your row is higher than the others, that clip will be the first taken from that row.
Consequently, it is recommended that you not try to line up your storyboard in a perfect grid but rather in a stair-step pattern so that it is easier to be sure about the order of each row.
- Using a marquee (or drag) selection, select all of the clips that you have arranged, and drag these clips to the Timeline. Before you release the mouse button, notice the brown outlines that show you where the clips are going to land. You can see that all of the clips are coming together. The result is a sequence in the order of the storyboard, assembled very quickly.
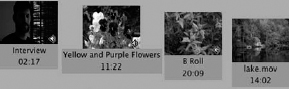
Figure 8.17 Arrange your clips in a stair-step grid to place them in order when using storyboard editing.
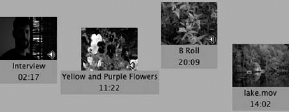
Figure 8.18 Storyboard editing bases the editing order on the height of the top edge of the thumbnail. If we edit the arrangement in this image, the clip called B-roll would be first.
You can see how storyboard editing is a completely different spin on the assembly edit. Choosing the storyboard approach has a substantial effect on the workflow and the creative process. Which is not to say that a storyboard edit needs to be totally planned ahead. An editor may decide to use storyboard editing to play with a scene that is giving him or her problems. For one thing, it allows you to try out a lot of ideas quickly.
Here are a few more ideas of ways to use storyboard editing in a workflow:
In and Out Points—In the preceding example, all of the media in each of the clips in the Browser would be edited onto the Timeline—something that is usually not desirable. But storyboard editing can also utilize the marks (In and Out points) on your clips. So, one workflow with storyboard editing is to first go through your clips, marking the sections that you want to use. Think again of the example of assembling a montage of animals in the jungle. You would first go through, marking the best shot of each type of animal. Then storyboard your montage in the Browser and drag it to the Timeline for a fairly clean first assembly.
Poster Frames—The image that appears in the thumbnail is called the poster frame. By default, the poster frame is the first frame of the clip—or the In point, if there is one. However, you can set the poster frame to be anything you want it to be. If the tiger shot that you want to use starts on the jungle, before the tiger enters, that generic jungle shot might not suit you as a poster frame for storyboard editing.
The technique for this is easy. With the clip open in the Viewer, place the playhead on the frame that you want to be the poster frame. Then do Mark > Set Poster Frame, or the keyboard shortcut Control-P.
The Scrub Tool—This tool can be found in the Tool palette, grouped with the Zoom tools (Figure 8.19). The keyboard shortcut for the Scrub Tool is HH (or Control-H), and it looks like a hand with two arrows. The Scrub Tool allows you to view the footage in a clip by dragging the tool over the thumbnail. If you haven't done this before, try this out—it's pretty cool.
The other neat trick with the Scrub Tool is that you can also use it to set the poster frame on a clip directly on the thumbnail in the Browser. Just hold the Control key before you release the mouse when you drag to scrub. Whatever frame you release on becomes the new poster frame.

Figure 8.19 Location of the Scrub Tool.
Tweak and Trim—As with any kind of assembly, don't expect the storyboard edit to be anywhere close to your final product. It is only a starting point. Once on the Timeline, the tweaking, trimming, and revisions begin. This is the heart of the process.
Multicam Editing
Like storyboard editing, multicam editing provides an alternate way to assemble your first cut of the piece. The idea of multicam editing is to work with multiple synchronized camera angles of the same event (known as “synced sources”) in a real-time way that mimics the experience of directing the broadcast of a live multicamera shoot. Multicam editing tends to work well with live events such as concerts, sports, and speeches. It is also sometimes used for scripted programs—for example, sitcoms.
The choice to use multicam editing will have something to do with the preference of the editor, but more so than other techniques, it is going to depend on the project. Only a certain type of project lends itself to this method.
Again, the best way to understand this is a bare-bones, step-by-step explanation, followed by additional methods and tips to incorporate what we have learned into professional workflows.
- To use multicam editing, you need to have synced sources. This simply will not work with just any footage. There are two ways for FCP to work with synced sources: based on timecode or based on the content of the clip, as designated by In or Out points.
- If you are using the second method (in other words, the actual timecode on your source tapes is not synchronized), the next step is to find a sync point in all of the camera angles. This is a visual or audio event that happens on all of the synced source clips. One traditional way to do this is with a clapper slate. When filming a live event, you can look for distinct moments—for example, when the house lights go down. Whatever sync point you find, mark it with an In point in each of the clips you want to use (or you can use an Out point if the event is toward the end of the clips—the house lights coming back up, for instance).
- Select all of the synchronized clips in the Browser, and create the multiclip with the menu command Modify > Make Multiclip. When you do this, you will get the Make Multiclip window. The Make Multiclip window will give you some controls over the multiclip, and also allows you to preview the clip graphically before you make it. (See Figure 8.20)
- In the Synchronizing menu, choose In Points. This means that all of the clips will sync based on the In points that you created. Now click OK.
- Your new multiclip will be in your Browser with a unique icon, and a name that changes based on the active angle—something you will see when you start to play with the multiclip. (See Figure 8.21.)
- If you open the multiclip in the viewer, you can play back all of the angles simultaneously, and start to manipulate the clip. But to really edit with the multiclip, you will need a new sequence. Go ahead and create one and edit your new multiclip into it.
- If you want to be able to cut between angles in real time during playback using the viewer, make sure you set the playhead sync pulldown (the middle pulldown in the Viewer) to Open. Now, as you play back in the Timeline the multiclip plays in sync with it. As you chose new angles in the viewer, markers are placed on the Timeline, and when you stop playback, cuts to the new angle are placed at each marker.
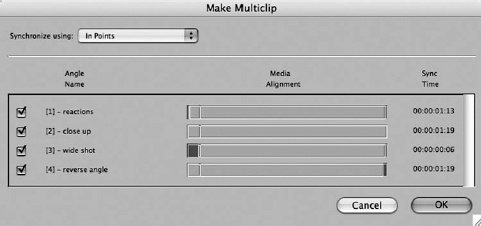
Figure 8.20 The Make Multiclip window allows you a graphical overview of your multiclip before you make it.
![]()
Figure 8.21 A new multiclip in the Browser window.
This all takes some practice, and there is a bit more to it (some of which is described later), but these steps should get you started on working with multiclips. Once you have committed to this path, there are some additional things to keep in mind when planning the details of the workflow.
Plan Ahead—Yeah, we know, that is a theme around here. When it comes to multicam editing, preparation is extremely important. Ideally, all of the shooters in the field should know that their material is going to be used in this way, and they should plan accordingly. If a visual cue such as a clapper board is used, everyone needs to shoot this together.
If timecode is going to be synchronized by another method—for example, using time of day—this needs to be set up on all of the cameras. If the program is long, there needs to be a plan for tape changes and/or media changes to stay in sync. Reel-naming conventions and metadata entered during ingest are all the more important with multicam.
Multicam editing allows a spontaneous style of editing, but that doesn't mean you don't want to plan ahead before you cut something. Say you are cutting a music video (a classic use of this technique). You probably want to spend some time just listening to the song before you start cutting, thinking about the parts of the song, it's rhythm, the different instruments and voices (literal and figurative). Then you are going to spend some time just looking at your camera angles—what are the best visual aspects of each? By the time you technically set up your multiclip, you should already be living and breathing the material.
Be Patient—Multicam editing is one of those things that take some patience to set up right. The reward is that once you have it working, this technique can make cutting quick and fun. Take your time in setting up the multiclip, and in preparing, as mentioned before. Also, when you actually start cutting in the style, don't be afraid to try different things. Part of the beauty of multicam editing (like storyboard editing) is that it makes it easy to quickly try out an idea.
Get comfortable—There are a lot of different ways to make the cuts when multicam editing. You can make your cuts with mouse clicks or with keyboard shortcuts, and FCP includes prebuilt keyboard setups and button bars to facilitate multicam editing. If you like this style of editing, it is worth doing some experimenting and customizing to figure out what works best for you.
Cut to the Beat—There is something inherently rhythmic in this style of cutting. For the music video example, that seems pretty obvious, but even if you were cutting sports, you might want to try cutting to the beat of a music track. It's not even necessary that you ultimately use the music in the piece. You might even try cutting to the beat of music that is just playing on your stereo.
Tweak and Trim—Just as with storyboard editing, multicam editing can be merely a starting point. All of the trimming techniques that follow can be done on multiclips.
Audio and Video—When working with a multiclip, you are able to switch or cut video angles separately from working on the audio angles. This is useful because frequently there is one source for good audio, and you want to use the multicam to cut the video to that audio. There are several ways to accomplish cutting video only. One simple method is to load only the video track back into your Viewer from the Timeline. When working with a multicam in the Viewer, the blue box represents the current video angle, and the green box represents the current audio angle. You will notice that if you load only the video track into the Viewer, there is only a blue box to manipulate—you'll be cutting video only.
Collapsing Multiclips—Once used to create a sequence, multiclips can be collapsed. This means that the editorial choices you made with the multiclip can be turned into standard cuts. It is not difficult to collapse a multiclip. Just select the multiclips in your sequence and then Modify > Collapse Multiclip(s). This is useful if you are finished using this feature and wish to minimize confusion in later stages of the postproduction process. For instance, your online editor has no need to work with multiclips—it's more convenient at the online stage for the Timeline to be set up in the traditional fashion. You do not need to collapse a multiclip in order to trim or adjust it, although that is recommended. It is definitely a good final step. Also, you can uncollapse the multiclip later on if needed: Modify > Uncollapse > Multiclip(s).
Trimming Techniques
The process of refining or making small adjustments to edit points on the Timeline is referred to as trimming. If we were carving our statue, the basic form has taken shape; now it is time to work into the details. At this stage, a lot comes down to timing.
It should be emphasized that assembling and trimming are not really discrete tasks. Instruction books always make them seem that way (and we have done this here: first assemble, then trim). However, the reality is that you are constantly changing between the tools in Final Cut Pro and the modes of editing. There could be some debate as to whether trimming can properly be called part of rough cutting at all. Some might call the techniques in this section fine cutting (and that's fine with us).
There are tools in FCP that are either exclusively or primarily used for trimming. Most FCP users realize quickly that one of the easiest ways to trim is with the Selection tool, simply by dragging on edit points in the Timeline. It doesn't take too long to realize that there are also limitations to that technique. In this section, we are not so concerned with the very basic sense of trimming, nor are we concerned with detailing every single trimming tool in FCP. Lots of great FCP books cover the basics. We like Focal's Easy Guide to Final Cut Pro by Rick Young. Our goal is to look at some techniques and concepts that help strengthen workflows and efficiency.
Roll or Ripple?
Any trim has one of two objectives. Do you want to make an adjustment that will affect the overall length of your sequence, or an adjustment that doesn't? In Final Cut Pro, adjustments that affect the overall length of the sequence are generally called ripple edits, and adjustments that don't are generally called roll edits. (See Figure 8.22.)
![]()
Figure 8.22 The Roll tool (left) and Ripple tool (right) on the Timeline.
Roll and ripple are tools (and in a moment we will discuss how to use them), but they are also powerful concepts. We will see throughout the rest of this section how the concepts of roll and ripple are at work even when you are not actually using the tools.
Using the tools, however, is not very complicated. They are grouped together midway down the Tool palette, and their shortcuts are R for Roll and RR for Ripple. The icons of these two tools telegraph their function nicely. Notice how the Ripple tool has one tail, but the Roll tool has two. The tails represent pieces of film (or media), and the circles represent film rolls. The Ripple tool lets out or takes in media from one side of an edit only. The difference is not made up anywhere else; thus the length of the sequence needs to change. The Roll tool conversely has two rolls and two tails, implying that both sides of an edit are adjusted simultaneously—one side losing what the other gains. This is why overall sequence length is maintained when using the Roll tool.
Notice how if you take the Ripple tool and you mouse over a cut on the Timeline, the tail will actually switch direction depending on which side of the edit point you are on. This is an indicator of which side of the edit point will be adjusted. Because the Ripple tool is the only tool that acts on only one side of an edit point in this way, this is a useful contextual indicator.
When using the Roll or the Ripple tool (as well as others), there are several indicators (we call them clues) that FCP gives you as to what the resulting edit will look like:
- The yellow box on the Timeline gives you your delta, or change value (Figure 8.23). This is a measurement in minutes, seconds, and frames of how much you will be trimming when using either the Roll or Ripple tool. When using the Ripple tool, this is also a measurement of how much the length of the Timeline will be changing.
- The brown outline on the clips in the Timeline gives an indication of what that part of the Timeline will look like once the adjustment is made.
- The Canvas shows a side-by-side preview of what the new edit is going to look like. The new Out point (of the previous clip) is on the left, and the In point (of the following clip) is on the right in the two-up view (see Figure 8.24). In the case of the Ripple tool, you will notice that one side always stays the same. This is because only one side of the edit is being adjusted. This view is particularly useful for making detailed visual comparisons between frames before committing to an exact frame of an edit.
![]()
Figure 8.23 The delta, or change value—one of several contextual clues that appear while you are doing a drag trim on the Timeline.

Figure 8.24 During a ripple or roll edit, the canvas dynamically shows you a preview of the new In and Out points.
Useful Keyboard Shortcuts
Most people who work with software agree that one of the marks of advancement in any particular program is using keyboard shortcuts. There is no doubt that Final Cut Pro falls into this category, and that the creative and flowing techniques of the rough-cut phase are particularly good shortcuts to learn.
Shortcuts are called shortcuts because they get you where you want to go quickly, and because you need to already have a good knowledge of the territory to feel comfortable using them. There are several distinct ways to use keyboard shortcuts in FCP. To gain a better understanding, it is worth discussing these here, though they apply to much more than rough cutting.
Shortcuts for Actions—The first shortcut a lot of people learn is Command-Z (Undo). Unless you always do everything right the first time, this is certainly a useful shortcut. Command-Z falls into a group of shortcuts that are both useful and easy to understand: those that cause a specific action in the software. Along with Command-Z, these include:
Command-S (Save Project)—Save early, save often. Make Command-S a habit.
Control-U (Standard Window Arrangement)—It is a great benefit that Final Cut Pro's interface can be arranged to taste, putting windows wherever they are most convenient at the moment. However, sometimes the screen just gets to looking sloppy. In that case, use Control-U for the standard window arrangement to put everything back where it belongs by default.
Command-R (Render Selection) and Option-R (Render All)—Perhaps these shortcuts become habit because they come after doing intense work, but right before taking a break. There is something satisfying about pushing back from the computer, punching Option-R, and knowing that the computer has to think while you rest your eyes or get some coffee.
Shortcuts for Transport Controls—Most FCP users learn these quickly because these shortcuts are very convenient and so much better than the other options. Just in case you have been using Final Cut Pro under a rock, the following keyboard shortcuts work for playback of video in the Viewer or Canvas (and thus also on the Timeline):
Space Bar—Play/Stop
J, K, and L for Playback Control—The L and J keys work much like the traditional shuttle control on a deck. Hitting J once will play the video, again will go to double speed, and faster still for four successive taps. L goes in reverse, which means that if you hit L when the video is stopped, it will go backward, but if you are already going at 2× speed, it will just slow down to 1× (and so on). K will always stop playback.
Standard Software Shortcuts—You'll be happy to know that many keyboard shortcuts that are standard in other programs also work in FCP, including: Command-C (Copy)
Command-X (Cut)
Command-V (Paste)—Remember, FCP will paste a copied clip or clips starting at the playhead position and on the same tracks from which the material was copied.
Command-A (Select All)
Shortcuts for Tools—As we have already seen with some tools, every tool in the Tool palette has a keyboard shortcut. Moreover, almost every grouping in the palette (a tool and all the tools that are “under” it) has a single-letter shortcut, with an additional tap of that letter going to the next tool in this group. We are not going to run through all of these shortcuts, because it is much easier to look at the tool pallet with tool tips turned on.
Using keyboard shortcuts to change tools starts to point the way toward more advanced habits and workflows. For instance, you can use the keyboard to toggle between the Selection tool (A) and the Pen tool (P) when doing fine work on key-frames.
Shortcuts to Navigate the Interface—As you start to work with Final Cut Pro more, you begin to realize the importance of the active window. The shortcuts for transport controls, for instance, can work in either the Viewer or the Canvas, depending on which one is active. To switch between windows, many FCP users would just grab the mouse and click the window they want to work on, then switch back to JKL (if that's what they were doing). However, you can also use the keyboard to navigate between the windows. The shortcuts are: Command-1 (Viewer)
Command-2 (Canvas)
Command-3 (Timeline)
Command-4 (Browser)
Using shortcuts to move between windows is nice because it helps you to link your shortcuts more. The fact that you don't have to go to the mouse to switch to controlling the Viewer means that that you can keep your hand on the keyboard. Sure, it is a small efficiency if taken once, but as you learn more shortcuts—and begin to link them together, thinking a few steps ahead—the efficiencies compound.
Shortcuts for trimming—Getting back more specifically to trimming, several shortcuts are particularly useful. With enough keyboard shortcuts at your disposal, it is possible to do almost everything you need to do in terms of trimming, without even touching the mouse. Next, there is a list of useful trimming shortcuts with explanations. Learning these, and combining and linking them with the preceding ideas, will lead to smooth keyboard trimming workflows.
I and O for Mark In and Mark Out—Marking with the keyboard is something that comes early on the learning curve because marking is an important early task in learning nonlinear editing. Also, the letter associations are very clear. Because I and O sit on the keyboard directly above J, K, and L, it is very natural to start using these shortcuts.
V to Select an Edit Point—A less known but very useful shortcut is V to select the nearest edit point on the Timeline. V selects the edit point that is closest to the current playhead and moves the playhead to that point.
![]()
Figure 8.25 A selected edit point.
![]()
Figure 8.26 Out point only selected (left); In point only selected (right).
U to Toggle Sides of the Edit—When an edit point is selected, the U key will toggle between having both sides of the edit selected, the In point only, and the Out point only. If we are really trying to do the most possible with the keyboard only, this is very useful because it means that we can switch very quickly from doing a roll or ripple edit. (Remember, anytime we are working on both sides of the edit point at the same time, this is a roll, whereas working on only one side is a ripple.)
Arrow Keys to Navigate the Timeline—The Right Arrow and Left Arrow keys are used to move the playhead a single frame in either direction. Shift with the arrow keys will move a full second in either direction. The Up Arrow and Down Arrow keys move one edit point in either direction on the Timeline. If the playhead is already on an edit point that is selected (by using V, for instance), the selection also moves with the up and down arrows.
Brackets for Nudging—You can nudge either a clip or an edit point one frame forward or backward using the bracket keys. When nudging an edit point, you will be doing a ripple edit if only one side of the edit point is selected, and you will be doing a roll edit if both sides are selected (and you can toggle between these with U).
When combined with V and U for selecting edit points, and up and down arrows for moving between edit points, using brackets starts to approach an all-keyboard trimming solution.
If you combine the Shift key with the brackets, this will give you a multiframe edit. This is a ten-frame nudge by default, but the amount of the multiframe edit can be changed in the User Preferences window. Doing so will make the change not only in the bracket shortcut, but also anyplace you are making a multiframe adjustment with a button or shortcut.
Numerical Edits—Many Timeline adjustments that can be done with a drag or a nudge can also be accomplished by typing a number that corresponds to hours, minutes, seconds, and frames. This works just by typing a number when a clip or an edit point is selected in the Timeline. (Like nudging, when a clip is selected in the Timeline, this clip will be moved numerically; when both sides of an edit point are selected in the Timeline, the edit point will be rolled based on the number typed in; and if only one side of the edit point is selected, this will be a ripple edit.
As soon as you hit the first number, you will get a dynamic pop-up on the Timeline (Figure 8.27). This indicates the type of edit you will be making, and has a field that the numbers continue to get typed into. By typing in one or two numbers, you'll be trimming (or moving if the whole clip is selected) by frames, three to four numbers, seconds and frames, and so on in this format (hh:mm:ss:ff). The neat thing is that by typing a period after a number you enter, FCP assumes you are navigating by a whole second (the period equals 00 frames). You can further control this navigation by entering a minus sign prior to typing in numbers. By doing this FCP will trim (or move) backward.
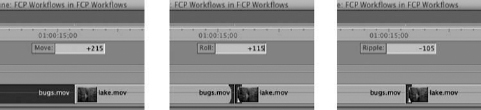
Figure 8.27 A dynamic pop-up shows you numerically what type of edit you will be making.
E to Extend—Just one more, and it may seem like a one-trick pony, but this shortcut actually comes in handy. The idea is that just hitting E will extend a selected edit point to the playhead. You can also select multiple edit points (by holding down the Command key) and extend multiple edit points to the playhead simultaneously. Of course, if there is not enough media to extend the edit, then nothing will happen.
As you move further into keyboard shortcuts, you begin to combine the keystrokes and become more fluid with them. Using keyboard shortcuts actually helps you see the steps in advance, and you find yourself thinking through things more quickly. It is not that using the keyboard instead of the mouse makes you a better editor; it is just that these two things seem to happen simultaneously.
The Trim Edit Window
This window allows you to look very closely at a single edit point and make fine adjustments as you watch a loop around that edit point. This is the most up-close way to deal with an edit point. Using the Trim Edit window is pretty straightforward. In fact, a lot of the things we have just learned about roll and ripple and keyboard shortcuts also work here.

Figure 8.28 The Trim Edit window.
To open the Trim Edit window, just double-click on any edit point in the Timeline. You need to be right on an edit point and not a clip; otherwise, the clip will open in the Viewer instead. When it first opens, the Trim Edit window looks a bit like the Viewer and Browser window—but look closely, and you will see that the controls at the bottom of the window are actually different.
There are some important things to notice in the way this window works. The two video frames represent the media on either side of the edit point, similar to what you see in the Canvas when doing a roll or ripple edit. The transport controls in the center play a loop around the edit point, rather than a single clip. The buttons in the gray area below the transport controls allow you to actually trim the edit point.
Notice that there is a green bar across the top of both video images. This is the indicator for which side of the edit is going to be trimmed, or whether both sides are going to be trimmed. When the green bar goes across both images, as it does when the Trim Edit window is first opened, this indicates that both sides of the edit will be adjusted—in other words, that a roll edit will be performed. When the green line is over only one of the video frames, this indicates that only that side of the edit will be adjusted—in other words, a ripple edit.
Next, mouse over the window, particularly in the center of the window, where the two video frames touch. Notice the mouse pointer when it is over the video frames. When it is over the right frame, the mouse pointer becomes the Ripple tool with the tail to the right. When over the left frame, it becomes the Ripple tool with the tail to the left. And when the mouse pointer is over the line between the video frames, the pointer becomes the Roll tool. Click when you see any of these pointers, and you will set the Trim Edit window to edit that side (or sides) of the edit. This is how you move the green bar, by clicking on the side of the edit that you want to ripple (or in the center, if you want to roll the edit).
If this tool is new to you, you may just want to try combining switching sides of the edit, and making single-frame and multiframe edits with the buttons without playing the loop. This is an alternate way of making these edits, but really, the beauty of the Trim Edit window is to make the adjustment on the fly, while continuously watching a loop of the edit. This is useful for making a very detailed edit that needs to be perfect.
To make edits while looping in the Trim Edit window (called dynamic trimming), the small check box (Dynamic) on the bottom of the window must be checked. Now, using JKL on the keyboard, you can to trim dynamically. Depending which side you're editing or both (the green bar), each time you hit K the edit will update. In addition the side you place the cursor on (place, not click) is the one you will preview prior to making the new edit. Combine all of this with the loop functionality of the Trim Edit window and you have one of the best ways to fine-tune an edit.
It should now be clear how ripple and role as concepts are intrinsic to the function of the Trim Edit window. You'll be glad to know that the keyboard shortcuts that we just learned for trimming also operate in this environment. So, tapping U still toggles through Ripple In Point, Ripple Out Point, and Roll. If you have the Trim Edit window open, you will see the green bar change, as well as the selected edit point on the Timeline.
Rough Cuts, Workflows, and the Future
The rough-cut stage is one area where a lot of tensions have been felt during the democratization of the medium. We can recall seeing the rolling eyes of salespeople at postproduction houses when their clients first started bringing in their own rough cuts (as well as the sad faces of the employees who were let go when these same companies failed to adapt to the changing postproduction environment). Offline editing, the old name for many of the general techniques discussed in this chapter, used to be a lucrative service for post houses to provide. This is rarely the case anymore.
From a business and technical perspective, due largely to Final Cut Pro, this work has clearly shifted to less expensive, less dedicated machines. Things have also fundamentally changed from a creative and editorial standpoint. Because so many individuals and small production companies can now do their own nonlinear editing on the desktop, the range of people who now have the opportunity of having the creative experience of actually cutting has increased tremendously.
In Chapter 6: Preparation, we made a big deal over editing scripts and paper edits. This is all part of the same theme. The creative freedom of nonlinear editing is powerful. It allows new ideas to be tried out quickly, and fosters an intense collaborative environment. If this freedom is not tempered by some knowledge of the process and workflow planning, the result will be less than professional. With great power comes great responsibility.
This all has to do with one of the central themes of this book, which is how traditional roles and processes have been changed (in both good and bad ways) by new technologies, especially FCP. There is no topic more central to this discussion than where the rough cut is done, who does it, by how many people, and how they collaborate.
Here is the kicker—we are now only at the middle of the beginning of this revolution. The ways in which “producers” and “editors” (and lots of other people, which is a big part of the point) will collaborate to create their video projects will continue to change rapidly. For instance, one of the features of Final Cut Server is that producers will be able to cut rudimentary sequences in a simple cuts-only environment outside Final Cut Pro. This is now considered part of media-management solutions. We have no doubt that in the future, people will be logging on to web sites that let them rough cut their wedding videos, and journalists will be rough cutting on handheld devices (if not color correcting, mixing, and broadcasting with them as well).
There are two additional chapters on Final Cut Server workflows on the Web at http://booksite.focalpress.com/Osder/finalcut/.