
6 Preparation
Everything that you do on a project before you actually start to ingest media into Final Cut Pro contributes to having a successful and efficient editing experience. Decisions that you make all along the way—script, location, lighting, audio recording, and shooting format—each have a part in defining what happens in post. Mistakes made in the preproduction and production phases have a way of rippling through the postproduction process, sometimes combining or compounding to make bigger headaches.
As mentioned in Chapter 2, workflows should be thought of as extending both before and after the postproduction process—before, as in preproduction and shooting; and after, in terms of compression, interactivity, and distribution concerns.
This book is about applying workflow thinking to Final Cut Pro, but part of this is FCP's extensibility—the ability to “play well with others,” as mentioned in Chapter 1. FCP's ability to play well with others also depends on others playing well with it. This chapter is about producing and preparing assets that will work well in FCP and throughout the postproduction process.
Because this is potentially a rather large topic (worthy of a whole book or two, not just one chapter), we have focused on three areas:
- Issues beginning in the preproduction and production phases that are particularly important to Final Cut Pro and postproduction; specifically, issues that often cause problems, especially for the inexperienced.
- The preparation of assets: techniques that occur between actual acquisition (shooting, recording, scanning, etc.) and ingest into Final Cut Pro.
- Organization and metadata, always a workflow concern.
The theme of the chapter is preparation. In the literal sense, this is learning things such as how to use Photoshop to create and save the best type of still-image file to use in FCP. This chapter is also about preparation writ large—learning to identify issues during earlier phases of the process, and to foresee how they will affect you in postproduction.
We hope that this chapter helps you avoid problems before they happen. There is also a fair amount here about how to fix the problems you fail to avoid.
Timecode Issues
Perhaps the most common production mistake that has ill effect on the postproduction process is broken or messed-up timecode. The technology of timecode is discussed in detail in Chapter 4: Video Standards and Formats. If you have not read Chapter 4, for now it is sufficient to understand timecode as an addressing system for video.
Each frame of a videotape or clip has (or should have) a unique timecode number. The machines we use to work with video have no way of recognizing what is on the video or audio tracks of a tape. They rely on the timecode. This means that having consistent timecode and unique reel numbers for all of your sources is going to be important for a smooth workflow. A lot of the discussion that follows is based on tape-based acquisition, and a lot of the problems are more common with subprofessional equipment. Some of the same principles can be applied to professional tape-based equipment as well as to newer tapeless cameras and devices.
There are two classic problems with timecode, and both are fairly easy to understand and avoid:
- Broken Timecode—When the timecode is discontinuous on the tape. This generally occurs when timecode resets or starts over on a source tape. So the timecode on the tape starts at 0:00:00;00, and starts counting frames. But then, at some point, for some reason, in the middle of the tape, the timecode starts over at zero. Now one tape has two frames number 0:00:00;00, 0:00:00;01, and so on. That is a problem because the timecode numbers are no longer unique. There are two frames with the same number—how can the computer tell the difference between the two?
- Nonunique Reel Names—When multiple sources have the same reel name/number in FCP. Along with continuous timecode, for this system to work, the other requirement is for each tape to have a unique name expressed in the Reel field (more on how to do this in the next chapter). If all of your tapes start with a timecode of 0:00:00;00, it is important that each tape have its own name or number—or else, again, the computer has two frames of video (this time on two different tapes) that it has no way of distinguishing between.
Though these two problems are similar in a sense, you handle them differently. The second one is easy to avoid, so let's deal with that first.
A system for naming and/or numbering your tapes should be instituted during preproduction, before the first frame is ever shot. Like many aspects of media management, the larger the project is, and the more people who are involved, the more sophisticated the organizational scheme needs to be and the more important it is that you stick to it. If you are shooting a ten-minute interview on one tape, and it is the only shoot for the project, tape naming is no big deal. On the other hand, if you have a dozen videographers covering an event for several days, a tape-naming convention is an absolute necessity.
This idea should be carried over from tapes to any tapeless shooting format. The media cards, disks, and devices (hardware) associated with tapeless acquisition should be clearly labeled, and the media files created on these devices should follow naming conventions, just like all media-management aspects of a project.
On a complex shoot, we recommend a simple and rigid system for naming tapes and storage devices. For instance, every videographer writes on the tape the following: their initials, the date, and a sequential tape number for each tape they use in the course of the project. It doesn't really matter what the system is (want to use last names instead of initials? … fine). It does matter that you start the system from the beginning and that everyone on the project adhere to it religiously.
If this system has been implemented correctly during production, then avoiding the problem in FCP is exceedingly simple. Just make the Reel field exactly match what is written on the tape. Bingo—unique reel numbers.
Of course, there are levels of complexity. What about a project with hundreds of archival tapes, maybe originally belonging to different stations with the schemes of different organizations? You may need to devise your own naming scheme, perhaps using abbreviations for the original source of the tape instead of the initials of the shooter. At any level of complexity, the same principles apply:
- Invent a simple and rigid naming system for tapes before shooting/research begins.
- Stick to this system throughout production.
- Whatever your system calls for your shooters to write on the tapes, use the exact same thing in the Reel field.
Some larger postproduction operations have gone even more sophisticated with tape identification—creating a bar-code system for all tapes in their facility, and a library database. In effect, this means that every tape in their facility has a unique number associated with it. Later in this chapter, there is more discussion about using databases for organizing assets. Also, the new Final Cut Server is an Apple product designed to facilitate these types of systems.
Now that we have tape and reel naming under control, we have to deal with the more pernicious issue of broken timecode. This causes numerous problems in post. First, let's look at some techniques for avoiding timecode breaks in the first place, and then some tricks and tips to deal with timecode breaks in post.
Every shooter should have, as a goal, avoding timecode breaks when shooting. However, the methods for achieving this goal are dependent largely on the type of equipment the shooter is using. Specifically, one of the things that set truly professional video cameras apart from their prosumer cousins is the control over timecode. Also, strategies for timecode with tapeless devices sometimes follow these principles, but they can also be quite different.
Professional cameras traditionally have very robust control over timecode. You can set precisely what number the timecode should start on, or set it to always read the time of day, or to sync multiple cameras so they all lay down the same timecode. Learning how to use these professional camera controls is outside the scope of this book, but once you master them, it should be no problem to avoid timecode breaks with your professional camera.
Prosumer cameras create their own set of problems when it comes to timecode because they do not have as extensive a set of tools for controlling timecode while shooting. Instead, the camera does some things with timecode that are not always helpful. Compounding the problem is the fact that there is no set of rules for how these cameras operate when it comes to timecode, so different cameras might do slightly different things.
The biggest problem seems to be caused by the inaccuracy of the tape mechanism in prosumer cameras. These cameras will generally take any timecode that is already started on the tape and continue with it. However, often when the camera is turned off, it will slip a few frames forward. (Some cameras will even do this when they automatically go into a “standby” mode.) When the tape slips forward, it goes to a part of the tape that has no timecode. A common result for inexperienced shooters is tapes with timecode breaks (timecode starting again from zero), as described above.
If this seems like a mess, it is. However, we already have the solution, which is that the camera will generally continue with timecode that has already been established. This feature gives us two different ways to avoid timecode breaks:
- “Blacking” tapes. The idea of blacking tapes is simply to lay down a blank signal (i.e., record onto the tape with the lens cap on and no microphone plugged in) for the length of the tape before you take it out for the shoot. The result is that you get continuous timecode from beginning to end, and most prosumer cameras will just keep this timecode.
- A method with a similar effect, but one that is somewhat less foolproof, is this: whenever you are done shooting for a moment, let the camera record an extra three to five seconds before stopping it. Then, before you start shooting again, rewind the tape just a bit so that you start recording over that little bit of pad that you left. Because you are starting recording where there is already established timecode, the timecode will continue unbroken.
The main difference between the two methods is that with the pad method, you need to remember each time you start and stop the camera, but with blacking, you do it all at the beginning and then you can forget about it.
So, by remembering these tips, you can avoid timecode breaks by practicing good shooting habits. It is inevitable that you will have to deal with this problem at some point, however, so here are a few suggestions on how to fix timecode problems:
- If the problem is really bad, you can consider dubbing to new master tapes. The idea is that you record the source tapes with the messed-up timecode onto a new tape. In this process, you ensure that the new tape has consistent timecode from beginning to end. The new tape now becomes your master, and there is no need to ever go back to the tape with the broken timecode.
- There are some techniques associated with Log and Capture that can help with timecode breaks. These are discussed in the next chapter.
- If you have to work with only source footage that has timecode breaks, it is best to try to treat each discrete timecode section of a tape as its own tape. So, when that timecode starts over in the middle of the tape, you would name the reel “Tape 1 After TC Break,” or something along those lines. Now, if you ever need to go back to that tape and find that footage, you have a good clue as to how the broken timecode has been sorted out.
Working with timecode, there are only two fundamental things to keep in mind:
- If at all possible, get good, unbroken timecode when you shoot.
- The computer is stupid. It can't look at the images, and it can't hear the audio, so all it has to go on is the timecode. Consequently, if your shooter messes up that timecode, you may have to do something inefficient or inelegant to deal with the computer's stupidity, such as dub your source tapes or have crazy reel names (for example, “Tape 1 After Break”).
Audio Issues
Problems with audio can be as bad as timecode issues in post—maybe worse. There are few things more frustrating than having an interview that looks good, with great content, but the audio is too low to be usable, or it has interference. Bad audio (whether due to mistakes made on the shoot or in post) tends to be much more distracting to a viewer than technical problems in the video would be.
This is not a book about field audio techniques, so we have limited this chapter to a few tips that you can use in the field to try to ensure good audio, as well as some ideas of how to evaluate audio and make judgment calls about it before you start editing.
Basic tips for ensuring good field audio:
- Pay attention to audio levels and quality while shooting. Sounds obvious, doesn't it? It is surprising how many newbies, and even experienced producers, allow poor audio to be recorded simply because no one is paying attention.
If at all possible, we recommend having a dedicated audio person on any shoot. In a professional environment, this person usually controls his or her own equipment—including microphones and, in some cases, a standalone audio recording device such as a hard-disk recorder.
Even if you are not using sophisticated audio equipment, it stills pays to have someone listening to headphones and watching the audio meters. Although it is not always possible with a small crew, we prefer that the crew member doing this is dedicated to audio rather than just having the person running the camera also wear the headphones.
The more attention you pay to audio during the shoot (including having someone on location who is dedicated to audio concerns), the better chance you have of avoiding audio problems.
- Isolate separate microphones to separate audio tracks. When using more than one microphone (for instance, maybe you have a lavaliere mic on your interview subject, and a high-quality shotgun mic mounted on the camera), record these signals separately so that they can be isolated in post later.
When recording audio onto videotape, this is usually accomplished by taking advantage of the two separate audio tracks on the tape (DV tapes generally record two audio tracks; some professional formats, such as DVCPRO50, actually have four). Traditionally, these two tracks can be used for stereo audio, but when shooting, you can utilize them to isolate microphones.
Normally, this is done by plugging the microphones into separate ports, and then setting the camera so that the signals remain isolated on the tracks. (These controls are slightly different on different cameras.) If you use this technique, it is important when you capture the material into FCP that you capture it as separate mono tracks, and not as stereo pairs (more on this in Chapter 7: Ingest).
If you are using more sophisticated equipment, you may be able to record more than two microphones separately. The beauty of recording the different microphones separately is that if one has a problem (say, for example, that your lavaliere mic runs out of batteries midway through a shoot, and no one notices), you have a separate backup.
- Make wise decisions on microphones. Microphones are designed differently for specific reasons. Before using a mic for any given situation, make sure it is the correct microphone or mic setup for the situation. For example, using an omnidirectional mic on a camera is going to pick up a lot more sound then using a unidirectional microphone. Similarly, using a boom mic in a noisy situation to record an interview is probably not as good a choice as using a lav.
Just as with timecode problems (like many things in this chapter), avoiding audio problems on the shoot has a lot to do with simply being aware of things that could go wrong and guarding against them. So, what to do if you have failed to avoid problems? (Or maybe you weren't even there, and a bunch of tapes with bad audio just landed on your desk … .) What can you do to deal with this situation before editing?
Unfortunately, not much.
Some audio problems can be fixed in post; others cannot. Some can be fixed only with major time and expense. Preparing for your edit is not the stage in the process to try to fix bad audio (this should come later, when you know what audio you actually need for your piece). What is worthwhile to do at this stage is to evaluate your audio to see which of these categories to put it in: usable, unusable, or usable only with additional time and/or budget.
Before starting to work with material that has problematic audio, you should first determine whether this audio is ever going to work in your final piece. If not, it might be time to plan a reshoot or ADR (automated dialogue replacement) session. If you do think that the audio is fixable, how will it be fixed, and how long will this take? It might be worth running some tests at this stage.
Another set of questions you might ask concern the tolerance your project has for audio glitches. The type of distribution the piece is going to have, along with the budget, will provide the answers to your questions. A broadcast-television piece has little tolerance for bad audio, and typically the budget will allow for fixing the problems in post or will permit reshooting. On a student film, the tolerance for mistakes is probably higher (and the budget is less).
Lastly, it is worth considering at this stage who is going to make these audio fixes, and on what equipment. Final Cut Pro contains some audio tools, but audio tweaking is not in the core of its functionality. Soundtrack Pro, part of Final Cut Studio, contains more sophisticated audio tools such as background-noise sampling. Tools that are even more robust are included in desktop audio programs such as Pro Tools. At the high end, there are dedicated audio suites that can perform the most detailed work most quickly. If you need to spend a lot of time in a dedicated audio suite, it will be expensive.
When bad audio hits your desk, it is a good idea to evaluate what level of equipment will be needed to fix it (if, indeed, the audio is fixable at all). If you are already planning to use a dedicated audio mixer, it might be a good idea to send that person a sample of the trouble audio and get an evaluation and time estimate on fixing it. Remember, if you are planning on doing audio tweaking in Final Cut Pro, some editors are better at this than others. It is not really part of the traditional editor's role to be able to do sophisticated work on audio. However, as we described in the previous chapter, roles are blurring and expanding (due largely to the availability of tools such as FCP, Soundtrack Pro, and Pro Tools). More editors are able to do basic audio tweaking these days, but this should not be assumed.
Sometimes the best thing you can do with bad audio when beginning an edit project is be honest. There are times when an editor must deliver the unpleasant news that a reshoot is needed, or that the budget is busted. All too often, the issue that prompts this call is bad audio.
Continuity Issues
Concerns that are more relevant to the fiction-film world include continuity issues. The problem is that fiction films are generally not shot in script order (neither the scenes that make up the film nor the shots that make up a particular scene).
So someone needs to worry about continuity: Is the actor's hair longer in this scene than in another scene that comes later in the chronology? In the course of a meal, is an actor's drinking glass progressing from full to empty, or is it fluctuating wildly? In the movie Fletch, there is a scene where Chevy Chase shoots a basketball. In the next shot, he is holding the basketball again, but there is no shot (indeed, not even any elapsed time) showing when he picks it back up. This is a classic continuity issue.
On a fiction-film shoot, generally there is a person whose job it is to worry about such things. This person spends most of his or her time on set making detailed notes in a continuity log. This log ultimately forms a continuity report for a given scene. As the project moves into postproduction, these responsibilities come to rest (at least partially) on the editor.
As you can imagine, good continuity work on set helps an editor's job immensely. If things were not shot with continuity in mind (for example, if the main actor were to get a radical haircut midway through shooting), there might be little that the editor could do to fix the problem.
But the editor was not on the set, so how does he or she get the continuity information? If this information is only in the form of a log, the editor must wade though this, thus slowing down the editing process, or else have an assistant on hand to constantly be looking for continuity problems.
However, there is a process where the continuity information can be imported into FCP as metadata. Using this method, this crucial continuity information is available to the editor with each clip and is generally very helpful.
Continuity information can be populated in Final Cut Pro via custom software (XML interchange), text files, and manual labor (the last being the most time consuming).
Often on fiction films, continuity information feeds into a larger database about the footage. This continuity information can then be exported as a part of an Excel log or an XML file where the comments and or log notes populate appropriate columns in Final Cut Pro. Continuity information can also be added as metadata with applications such as Final Cut Server.
Most of the time, this continuity information is applied directly inside Final Cut Pro by editing the Comment and Log Note columns. Generally an assistant editor enters this information, but, depending on the size of the facility, you might not have that luxury.
Review Screeners
One of the most important things that happens after shooting and prior to editing is that some form of screeners, or copies of the raw footage, are created. This enables various team members to view the footage, comment on it, start thinking about editorial decisions, and make decisions about further shooting. Making and distributing these screeners is a crucial part of the process.
A lot of the techniques described in this section are applicable both to screening raw footage before the editing process and to reviewing work-in-progress cuts (the topic of Chapter 9). These activities are similar in that the goal is to review material and take good notes, but different in the type of material and the purpose of the review. Chapter 9 has more hands-on instruction for making and posting web-ready video files. These techniques can also be used for screeners.
VHS Screeners
The old way of screening footage is quite simple: dub the master tape onto VHS with “burn-in” timecode windows. “Burn-in” refers to the timecode numbers being visually represented as an on-screen counter. This is useful anytime you want to take detailed notes while watching any footage or work in progress. Screeners are probably one of the only places that VHS tapes are still a little bit popular. For a long time, VHS has been a cheap and dirty way to view footage, and there is really nothing wrong with it (that is, if the person screening still has a VHS player). Of course, with the advances in technology, some new ways to view raw footage have come to the forefront.
QuickTime Screeners
We know that FCP is based on the QuickTime video architecture, and we know that QuickTime is also a consumer video format that can play with free software. It seems logical, then, that QuickTime has potential for screening purposes, and it does. The advantages in using QuickTime to screen footage include:
- Has built-in timecode that displays in the player.
- Can display markers as comments.
- Can be used on the Web, on disk, and through an internal network.
- Can have nonlinear access to clips.
Disadvantages include:
- You need to take the time and have the disk space to capture all of the material you want to screen and in many cases, compress it.
- Everyone on your team might not be comfortable yet with a digital review process if they have been doing it with tape for 20 years.
- Some people might have technical problems, such as not having the software.
Creating QuickTime outputs from Final Cut Pro is quite easy. The menu File > Export gives you three relevant choices for this sort of thing. Please skip ahead to Chapter 9 for more hands-on instruction in this area.
DVD Screeners
DVD screeners are becoming more popular. This is probably because DVD has supplanted VHS as the most ubiquitous consumer video format. Like QuickTime screeners, using an FCP system to create DVD screeners is very time consuming. There are also hardware products available that create a DVD from a tape in a “one-step” process (there is actually always more than one step involved in making a DVD, but these machines make it appear seamless to the user). Normally, we are not big fans of these all-in-one black boxes, but for the purpose of making quick DVD screeners, they can be a decent solution.
Timecode Filters
Final Cut Pro is able to add burn-in timecode to any footage by using the time-code reader filter (Effects > Video Filters > Video > Timecode Reader). This filter reads the timecode that is on the clip, and displays it right on the video. This is very similar to what professional decks do when you add burn-in timecode to VHS screeners, but this burn-in can be used in QuickTime compressions, DVD screeners—or, indeed, just to have timecode on-screen when a group is reviewing footage inside the FCP interface.
Not everyone knows about the timecode reader filter, but it comes in very handy sometimes. Unlike adding burn-in on a tape, the timecode reader filter does take some time to render. One new feature in Compressor 3 is a timecode filter that can be added onto a compression. If your review screeners are on the Web or DVD, this new feature can save you a step and some time.
Managed Media and Database Solutions for Screening Footage
Some of the newest thinking on screening footage (especially for large productions or in team environments) is to make it an integrated part of media-management systems. This frequently involves a database, and often this database supports a web application that facilitates screening footage (among other things).
There are several layers to this onion, and at this point, we are tearing off just the papery skin. This discussion of media-management considerations starts earlier in this chapter with reel naming, but it is a theme that runs throughout the book, including:
- A section later in this chapter on media management in general and how it relates to preparing for post.
- Chapter 12 is all about sharing and managing media, and contains a lot of detail on the Media Manager. This is a tool inside Final Cut Pro that is used for the large-scale manipulation (or management) of media files.
- Chapters 14 and 16 are both case studies that demonstrate innovative solutions to screening raw footage by taking advantage of Final Cut Pro.
- Final Cut Server is a new piece of software by Apple that adds a whole new set of tools for reviewing footage (and much more). This is covered in a web-only chapter because the software was not available at the time of writing.
Generally, incorporating the screening process into your greater media-management scheme has the advantages of consolidating the data and the process, and allowing efficient communication and collaboration (including online). As we said before, it is on a large project with a large team where these innovations make the biggest difference.
Logging and Transcribing
Logging and transcribing are another important part of the process (though not a whole lot of fun). For many projects, an accurate transcription (a written document of everything that is said on the tape) and a shot log (a list of everything that happens visually on the tape) are absolute necessities. It used to be that this step was done almost all of the time, but a lot of projects move forward into editing these days without this (admittedly time-consuming and tedious) step.
Maybe the reason that logging and transcribing are sometimes skipped is that with new, inexpensive edit equipment, the temptation is to say: “We can look at that footage anytime in a nonlinear way, so do we need a transcript?” The answer is that the transcript helps the producer and/or writer get a handle on the entirety of the content and find the best bites to tell the story. It also helps the editor quickly jump to the right part of a clip.
If you find yourself doubting that last statement, just try taking a piece that has two or more interviews that are each at least an hour long, and cutting that piece without a transcription. We bet you'll wish you had one!
Here are some tips if you find that the responsibility to transcribe and/or log tapes has fallen to you:
- Be detailed. If the bite looks good on paper, but in the shot the boom is in frame, note that this will have an effect on if the shot gets used. Remember that a writer might use your transcript for scriptwriting without actually looking at the footage, so he or she will need as many contextual clues as you can provide.
- Use timecode as much as possible. Every new bite should start with a timecode reference. If something happens mid-bit—the subject coughs, let's say—it doesn't hurt to put another timecode notation right where it happens. This might help the writer decide whether to use the bite, or the editor might work around the cough and make it usable.
- Note reel numbers. Many interviews span multiple tapes. In case different timecode wasn't used for each tape (tape 1 starting with hour 1, tape 2 starting with hour 2, etc.), it is important to note the reel. Nothing is more frustrating to a producer or editor than having a great bite, and even having the timecode for that bite, but not being able to find it.
Transcription and logs are most valuable for the scripting and “paper editing” process that traditionally comes next. This is another thing that sometimes gets short-changed these days. And again, this is probably a mistake.
Scripts as Workflow Documents
In the days of linear editing, it was practically a necessity to arrive at an edit session with a very detailed script. With linear editing, there was some room to make adjustments during the process, but it was limited and time consuming. Consequently, creative decisions in the editing room tended toward things that were more purely aesthetic—for example, does one B-roll shot look better than another? (And even these comparisons were time consuming.) Being prepared for the edit session meant having a script that very clearly outlined your story and how it was to unfold.
So most of the creative storytelling process actually took place before the editing began. This was by necessity, but it also provided a useful division of labor. Because it was inefficient to let editorial storytelling (or writing) bleed too much into the edit session, it was clear-cut how the job of the writer or writer/producer was different from that of the editor.
Of course, nonlinear editing—and particularly Final Cut Pro—changed this for a lot of people. Just as with transcribing and logging, the temptation now is to skip careful scripting because it is cheaper to just mess around in the editing room. In keeping with our theme, this section describes the traditional workflow for scripts and paper edits. Our intention is to help FCP users understand the constituent parts of the process as they have always existed. In this way, users can design better workflows for the new postproduction environment.
The information that follows is slanted toward nonfiction filmmaking, but inferences can certainly be made to the narrative-filmmaking world. Also, as much as anywhere else in this book, these are not hard-and-fast rules. Every project is different, and thus each one requires a slightly different approach to scripting (and to editing, and to media management … it is these differences that make your workflow).
To a workflow planner, the purpose of the script is to provide a document that is most useful at any given phase of the process to represent the objectives of the final product. In the following sections, we discuss the script techniques and script types we find particularly useful on most independent-studio projects.
Two-Column Scripts
This is a technique that is simple and works. The idea is to use one column (usually the left) for visuals, and the other (usually the right) for audio content.
That's pretty much it: separate the audio from the video so that you can simultaneously write what happens and indicate synchronization and juxtaposition between the eyes and ears. This technique is analogous to the video and audio tracks in FCP, and is symbolic of the way we think about audio/video production in general. Nearly every video or audio program incorporates the concept of tracks. The two-column format is just a convention to put this concept on paper.
Shooting Script
This is a version of the script that you create to take out into the field on the shoot. Depending on the variables of your project, the shooting script could take any form. It might be one of the two-column scripts described above, but it might also be more of a schedule format, with times and call lists for specific scenes. One of the big variables in how you format your shooting script is the degree to which you are shooting scripted or spontaneous content. With content that is more scripted, the shooting script needs to have everyone's lines (duh!). For an interview, the script might roughly outline the areas to be covered and/or the questions for the interviewer. If the producer intends to change angles at some point during the interview (for instance, to move to a tighter shot for the more emotional questions), that information would be on a good shooting script. The shooting script should telegraph the whole shooting day.
Voice-over Script
A specialized script prepared specifically for the recording session, the voice-over script contains several key features:
- A VERY clear and readable script for the talent—big, bold letters, well-spaced lines, and often ALL CAPS.
- Any unusual pronunciation explained in detail (often this is not enough, so it pays to have an expert if there are challenges in this area).
- A clear area for note taking.
One thing we like to do in creating VO scripts is to adapt the two-column script by erasing the visuals from the right column and making this a place for notes.
Editing Scripts
This is the one that matters most to the editor. Let's say I am working as an editor in a more traditional workflow. It is the start of a new project, and I know little about it in advance. I am really hoping that the producer that I am about to start working with has done a good job preparing his or her editing script.
What I don't want is for that producer to throw a bunch of tapes onto the table, then describe to me in emotive terms and wild hand gesticulations what is expected from the piece. The purpose of the editing script is (still) to make concrete, as much as possible, the intended structure of the piece. Traditionally, this was one of the most important postproduction workflow documents—and it still is.
In a lot of new postproduction workflows, the line between the producer and the editor has been blurred. The temptation is to think that if the storyteller is now the same as the person pushing the buttons, then the editing script is not as important. We think that is wrong in most cases. When roles are consolidated and the person making editorial decisions is the same as the person pushing the buttons, we think it may be even more important to create an editing script.
Another function of the editing script is to provide some level of instruction for the editor as to where to get the shots that are needed. Often this is a clear notation of time-code and tape number, and this information comes from the screeners and transcripts. When an editing script reaches a level of detail where it basically has all of the information needed to assemble a piece, this is sometimes referred to as a paper edit.
Paper Edits
In the current environment of desktop editing, paper edits are certainly not in vogue. Further advances promise to make this term seem even more archaic. There are actually two senses in which we think the concept is still valuable, and plenty of projects and workflows where it remains a useful step.
The two meanings for paper edit are related but different, and neither one is very clearly differentiated from the previous description of the editing script.
- When an editing script is very detailed, and in particular when it has complete timecode information for both A-roll and B-roll shots, it is said to be a paper edit (i.e., all the information you need for the edit, but on paper). Paper edits of this sort are particularly useful in workflows where the editor is going to be making the first assembly with little or no supervision.
- What Michael Rabiger calls “the first conceptual blueprint.” The idea here is that one of the most effective ways to structure your story is to break up its constituent parts, then write them on pieces of paper (think 3×5 cards). Then you can shuffle these cards around, trying different story-structure ideas (e.g., chronological, topical, etc.). This would usually happen before the editing script and is a classic screenwriting technique.
Sure, these methods may have largely gone out of style, and maybe we can achieve the same objectives today aided by databases and online collaborative environments (and we like these things and talk about them a lot in this book). But as Rabiger points out, sometimes there is a benefit to being on paper with your ideas, to stepping way from the technology—and, indeed, the footage—and to looking at things more purely as a storyteller. We have even seen the 3×5 card method used as a diagnostic tool for a film that had already been cut, but where the story wasn't working.
The lesson here is that just because technology is more available does not mean that it is actually helpful at absolutely every stage of a project. Recognize that the traditional steps of the process became tradition because they work. Sometimes these more traditional approaches can help the modern team step away a bit and look at things in a new (yet classic) way.
Preparing an Excel Batch List
Another variation on this theme is to use Microsoft Excel to create a batch list to be imported into Final Cut Pro. This has some clear advantages over the traditional paper edit because:
- You get all of the advantages of a spreadsheet, such as sortability and organization.
- You can save your Excel file as a tab-delimited text file, and FCP can turn it into a batch list to be captured. Other metadata, such as log notes and comments, can come along too.
The biggest rule of thumb when using an Excel batch list is to make sure that your columns match exactly the field names in the Browser window of Final Cut Pro. In other words, if you want to populate the Log Note column in FCP, you need to make sure you name the column (the first row) “Log Note.” Another thing to keep in mind is that if you want to designate dropframe timecode, use a semicolon for the last divider (HH:MM:SS;FF); if you want non-dropframe, use all colons.
For instructions on how use this file as a batch list in Final Cut Pro, see Chapter 7: Ingest.

Figure 6.1 You can use Microsoft Excel to make batch lists that can be imported directly into Final Cut Pro.
Preparing Still Images
Of course, not all of our source media start as videotapes. Many projects require that still images (of various types and from various sources) be incorporated into Final Cut Pro. This is another area where playing well with others is key.
And again, this is a topic that could really have a whole book written about it. In fact, there is a great book that focuses on just this topic: Richard Harrington's classic PhotoShop for Video, now in its third edition from Focal Press.
Rich's book goes deep into creating graphics for video—definitely outside the scope of this volume. Our purpose, rather, is to provide some concepts, terminology, and tips for preparing still images to be imported into Final Cut Pro.
Resolution and Size
Probably the most important things to be aware of when preparing images for video are resolution and image size. This can be a little tricky because FCP will allow you to work with images that are not prepared ideally for the video environment. Usually this will just slow things down because the computer needs to do more processing.
Video-format resolution is described in brief in Chapter 1, and in detail in Chapters 4 and 5. We know already that the resolution of standard-definition video is 720 by 486. When preparing still images, the resolution of your video frame is known as the raster size (as in, that photo is two times raster). This is important, because a photo or image that is the size of raster, used at 100 percent, will fill the screen entirely. However, if you want to move around on the image—what we sometimes call scan and pan, or the Ken Burns effect—you will need to prepare your image larger than raster because it is best to avoid using images at over 100 percent of their natural size.
We recommend that all images be saved at 72ppi (pixels per inch), and in RGB color. Again, Final Cut Pro will take images that are an accepted file type, but are not prepared exactly to this specification, and will allow these images to be imported. This might bog down your system, however. As we will see, frame size (pixel dimensions) is the key factor to pay attention to.
(For a quick-and-dirty, step-by-step process for preparing photos for video, please see the following sidebar, Using Photoshop to Prepare Photographs for FCP.)
File Formats
As we said with resolution, Final Cut Pro will actually allow file formats to be imported that are less than ideal. Sometimes this will have an effect on quality, or on system performance while editing, or on both.
For still photographs, an uncompressed bitmap format is preferred. TIFF and TARGA are both industry standards. Generally, a JPEG might work okay, but this format should be avoided because of compression issues. Often stock photographs are supplied at low-compression JPEG to more quickly download. This is acceptable, but not technically ideal.
Using Photoshop to Prepare Photographs for FCP
There is a lot that can be said on the topic of preparing photos for video, but this tutorial is strictly basic: a few steps that, if done in order, will help you use Photoshop to quickly prepare photographs so that they are technically suited for your needs in Final Cut Pro. Now, there are a lot more things you can do in Photoshop, and these steps could be streamlined, automated, or augmented, but this process will get the job done with minimal time and effort.
With a photograph (say, from a digital camera or a raw scan) open in Photoshop, here are the minimal steps we like to do to prepare it for video:
- Check the image size and resolution. Open the Image Size window with the menu Image > Image Size. Take note of the pixel dimensions and how they compare to the raster size of your video project. Is the image as large as, or larger than, raster? If not, you may consider trying to find a higher resolution or a larger image, or perhaps think of a creative way to use this photo so it does not take up the whole screen. (The rest of this tutorial assumes that you are working with a photo that is larger than raster. This is usually true if you acquired your photo with a digital still camera or a scanner.)
• Check the Resolution field in the Image Size window. If this is anything other than 72ppi, we recommend changing the number in the Resolution field to 72, with the Resample Image box unchecked. We are not actually adjusting the size of the photo at this time. That will come later.
- Check the color space of the image with the Image > Mode menu. There will be a check by the current working space of your photo. You want RGB for color pictures. Grayscale will also work, but definitely convert anything that is CMYK.
- Crop the photo. If the image is already close to raster size, or larger than raster but already roughly in the aspect ratio that you want to use, you may want to skip this step altogether. Otherwise, the idea with the crop is to make the image the shape that you want to use. We know that in video, the part of the image that you see will be within a frame that is your raster size, but if you want to have movement on this photo, then the crop needs to support this. In other words, if you intend to push in on a photo, it has to be cropped to the widest angle you are going to start at. If you want to pan right to left, the photo needs to be wider than it is tall, giving you the area over which to make this move. Likewise, if you intend to tilt up or down on a photo, that photo needs to be cropped higher than it is wide.
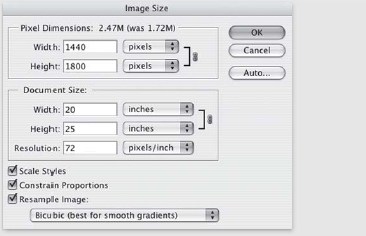
Figure 6.2 The Image Size window in Photoshop.
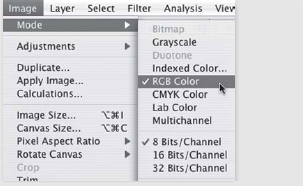
Figure 6.2 The Image Mode window in Photoshop.
• (At this point, you might do some other steps such as color correcting your photo, but this is a bare-bones tutorial.)
- Size the image (set its pixel dimensions). Now, back to Image > Image Size one last time. At this point, the image is at the correct resolution, correct color space, and correct aspect ratio, so we just need to adjust its size. Do this with the Pixel Dimension field in the top half of the window, and make sure that both the Resample Image box and the Constrain Properties box are checked. This will ensure that you do not “stretch” your image.
• To choose exactly what these numbers should be, you have to again consider your raster size and the way you plan to use the photo. Take the example of a photo used for a left-to-right pan. You have already cropped the image to the correct aspect ratio for this movement. Now, if you set the height to be a little taller than raster (say, 25 percent taller), your photo will be large enough to do what you want, and you can do the final position and the animation inside FCP.
• (One other thing that you might want to consider at this point is pixel aspect ratio, described later in this chapter.)
- Save as an uncompressed file type. At this point, all you have left to do is save the image. Accomplish this with menu File > Save As. With the Format pull-down, choose a file type that does not use any visual compression (lossless), such as TIFF or TARGA. FCP supports other still-image file types, but these are two of the best to use for photographs. Remember, on a larger project, you should have already worked out some naming conventions for images, as well as how the files should be organized on your media drive.
Bit Depth
There is a complete discussion of bit depth in Chapter 4. The same principles apply to still images as well. Just as with video, an image at a lower bit depth might look okay, but when you start to composite with it, the lower bit depth might not work as well as an image with higher bit depth.
Color Mapping
One thing about working with digital nonlinear editing systems is that the image you see on the computer's RGB monitor is not the same as the image you see on the NTSC screen. This is true for several reasons, but one is the way color is created in video (discussed in detail in Chapter 4). Because digital color is created differently in the two systems, and because your photographs exist natively in the RGB system, the colors need to be transposed. This is called color mapping.
RGB is generally represented in video as Y′UV—or, more specifically, as Y′PBPR for analog video and Y′CBCR for digital video. This conversion process is not one to one. RGB is represented as 0–255 (8 bit), with black being 0 and 255 being white—but in video color space, black is 16 and white is 235. The extra values above 0 and below 255 allow for superblack and superwhite values.
This color mapping and the relationship of video color space and RGB color are in play anytime you bring a digital still image into Final Cut Pro, but these factors are particularly important for designing graphics and images for video—and are vital to ensuring legal chroma and luma values.
Transparency and Alpha Channels
Still images that have transparent areas (think of a graphic title that needs to sit on top of a video shot) need to “carry” that transparency with them from the image-editing program to Final Cut Pro. In the video world, the most common way to save and transfer transparency information is with an alpha channel.
An alpha channel works much like a color channel (red, green, and blue), except that it carries transparency information instead of color information. Alpha channels have bit depth as well. In an image with a 1-bit alpha channel, each pixel is either on (opaque) or off (transparent). An 8-bit alpha channel supports 256 gradations of transparency.
Some types of still-image files support alpha channels, and some do not. Luckily, two of the uncompressed file formats that Final Cut Pro favors (TIFF and PSD) both support alpha. In Photoshop, you may have a choice to save with or without the alpha channel, and you can actually view and edit the alpha channel by using the Channels pallet. Once imported into FCP, there is a column in the Browser that describes the alpha channel (if any) that accompanies each piece of media (video files can have alpha channels too).
There is an awful lot more to learn about alpha channels, and about preparing still images for video generally. There is no more comprehensive resource than Photoshop for Video.
Square and Nonsquare Pixels
As described in Chapter 4, many video formats (including DV) use nonsquare pixels. The pixels in a digital still image and the native pixels in Photoshop are square. When you introduce this square-pixel material into the nonsquare-pixel environment, this can cause distortion. This was once something that motion graphics designers spent a lot of time worrying about. Today, it is still something to be aware of, but both Final Cut Pro and Photoshop have features that make this easier to deal with.
- FCP will automatically account for the difference in pixel aspect ratios when you place a still image on a Timeline that uses nonsquare pixels. FCP will automatically account for this discrepancy by “stretching” the image (or by giving it an aspect ratio in the Distort section of the Motion tab).
- Photoshop has the option of working with nonsquare pixels. You can access this with the pulldown menu Pixel Aspect Ratio when you start a new document, or with the menu Image > Pixel Aspect Ratio once a file is already begun. Be aware that the document does not really have nonsquare pixels; it just displays as if it did inside Photoshop. Then, when Final Cut Pro adjusts to account for the pixel shift, the image looks the same as it did inside Photoshop.
The long and the short of this is that this problem is less complicated than it used to be because the tools have gotten better. It is still good to be aware of square and nonsquare pixels when working with stills for video. There is much more about this in Photoshop for Video, including the traditional mathematical way that motion graphics designers have traditionally dealt with this.
Preparing Motion Graphics Files
When we talk about motion graphics files, we are talking about animated graphics that are created outside the FCP interface, and therefore need to be prepared properly for ingest. In some ways, this preparation is like preparing still-image files. We are using a different set of tools, but many of the same principles apply. In another sense, working with motion graphics is like working with video sources because the files themselves are video, and usually QuickTime.
Again, books upon books have been written about motion graphics, and this little section is not going to replace them. For books on motion graphics, and particularly After Effects, check out anything by Chris and Trish Meyers. For a great book on Motion, check out Apple Pro Training Series: Motion 3 (Peachpit Press 2007) by Damian Allen, Mark Spencer, Bryce Button, and Tony Huet .
The following is a list of concepts and terms that should help you understand this part of the workflow.
Motion Graphics Software
Just as with nonlinear editing software, there are quite a number of desktop motion graphics applications on the market. Three of the most popular are Adobe After Effects, Autodesk Combustion, and Apple Motion.
The common workflow for motion graphics involves outputting from a motion graphics program (this is analogous to Save As in PhotoShop, and the file type is usually QuickTime). Most, if not all, motion graphics programs are capable of exporting QuickTime. Motion, which is part of Final Cut Studio, also has tighter integration with Final Cut Pro; Apple calls this integration “round-tripping.” It is discussed later in this section.
Size and Quality
Generally motion graphics files should be created and exported at exactly the size of raster. There is rarely a reason to do it any other way.
When it comes to making the QuickTime file that is going to be composited, the highest possible quality is desired. The logic of this is that when compositing the motion graphics with video elements, all of the information (higher bit depth, uncompressed data) will be taken into account in the math of the composite. Or, to put it another way, working with the highest possible quality of file will just look better in the final piece. (Or at least the designer will think so!)
Transparency and Alpha Channel
Alpha channels work pretty much the same way in motion graphics files as they do in still-image files—it's just that they are in motion. If your motion graphics have portions that “show through” to video content, then you need to have an alpha channel. Including an alpha channel is usually a choice when exporting from motion graphics programs. The animation codec is valued for its ability to carry an alpha channel.
Most motion graphics programs will also allow you to export an alpha channel only. This used to be more common when a lot of compositing programs needed to deal with the alpha channel separately from the video. Today, most compositing programs deal with an included or embedded alpha channel.
If you are working with motion graphics files in FCP, and they seem to have black background associated with them, you probably have a problem with your alpha channel.
Round-tripping
With the program Motion, Apple streamlined a way to deal with incorporating motion graphics into Final Cut Pro. Called “round-tripping,” the idea is that you can move back and forth between the FCP (editing) environment and the Motion (motion graphics/animation) environment without ever needing to render QuickTime files. With round-tripping, the actual file that is imported into the Browser to create the clip used on the FCP Timeline is not a video file (.mov); it is a Motion project file (.motn). This is referred to as a Motion clip in FCP, and represents a whole different approach to integrating motion graphics.
The two benefits to this are (1) that you don't need to render in two places, and (2) that changes to your motion graphics will automatically be updated in FCP. There is a lot more on round-tripping in Chapter 11: The Power of Final Cut Studio.
Preparing Audio Files
As with other file types, Final Cut Pro also has a certain way that it likes audio files. On the whole, it is probably less complicated to prepare audio files for import than to prepare video files. This is because audio files have fewer important variables to worry about. Also, as with still-image files, FCP can work with a wide range of audio files, but it will work most efficiently if they are prepared perfectly. Generally this means two things:
- The file is saved in the AIFF or WAV file format, although many others will also work. AIFF is just an Apple standard format for audio files. Broadcast Wave Format (BWF) files are now supported, and carry timecode.
- The file has a sample rate and a bit depth that are the same as the sequence in which you are using it. Very often this is 48kHz, 16 bit. Final Cut Pro will play audio that does not match the sample rate of the sequence, but this will cause a small drop in performance—FCP needs to convert these files on the fly for playback. For an explanation of audio sample rates and bit depth, see Chapter 4.
One area that we get a lot of questions about is how to import audio from a CD and do so easily. Many people simply drag audio files from a CD to their scratch disk, but let's take a look at an easy and efficient method for importing audio from a CD using iTunes.
Unless you've been under a rock for the past few years, chances are that you've heard about iTunes. The proliferation of the iPod has, of course, popularized iTunes. What a lot of people don't realize is that iTunes can also be a powerful tool for batch converting and transferring audio from CDs for use in your project. In a few steps, you can easily import audio files from a CD into Final Cut Pro with help from iTunes:

- Insert your audio CD into your machine, and iTunes will launch.
- The CD will appear as a source on the left side of the interface. If you click on the CD, its contents will be displayed in the main part of the iTunes interface. The cool thing is that if you are connected to the Internet, iTunes can populate song names (depending on the disc).
- Next to each song on the disc, there is a check box. If the box is checked, the song will be imported; if it is unchecked, the song will not be imported. This is a way to selectively choose which files will take part in the import operation.
- Before importing, you need make sure the files are appropriate for use in FCP. In general, this means importing an AIFF at 48kHz, 16 bit. To check this, go to the File Menu > Preferences. Once the Preferences window has opened, click on the Advanced button (the cog icon).
- Next, click on the Import button in the middle of the window below the cog. There are a few things we want to change here.
- Change the Import Using pulldown to AIFF Encoder.
- Change the Setting pulldown to Custom.
- A new window pops up. Switch the Sample Rate, Sample Size, and Channels to the following: 48.000kHz, 16 bit, Stereo. Then click OK.
- You should now be back in the Import area of Advanced Preferences.
- The last thing to change/check is that the check boxes for “Automatically retrieve CD track names from the Internet” and “Use error correction when reading Audio CDs” are checked.
- iTunes by default imports to /username/Music/iTunes. It would make sense, though, to import music for use in an FCP project to your scratch disk. To do this, make sure that Advanced Preferences is still active (the cog), and then click the General button below. Here, you can choose to change your iTunes Music folder location to the same place as your FCP scratch disk. You will want to create a subfolder in your scratch disk location called Audio or something similar. Just remember, if you also use iTunes to manage music for your iPod, you'll probably want to change this back to your Music folder.
- After you have set up your preferences, click OK. Back in the main iTunes window, click the Import button in the lower right corner of the interface to import the songs you have checked.
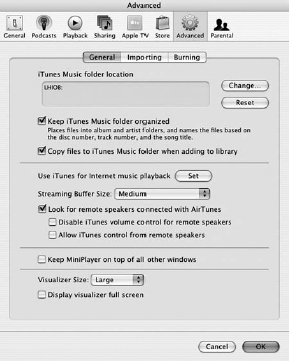
Figure 6.5 The Advanced tab in the iTunes Preferences window.

Figure 6.6 48kHz, 16 bit, Stereo settings for the AIFF Encoder.

Figure 6.7 Click here to choose iTunes folder location.
Back in Final Cut Pro, go to the File Menu > Import > Folder, and navigate to the location where you imported the music. Click on the folder, then click Choose. Congrats: you now have all your music.
Media Management Part 1
This chapter just starts to touch on a large area of concern that can be generally lumped together under the heading “Media Management.” This topic touches many aspects of using Final Cut Pro professionally, and of workflow thinking in general. Chapter 12: Sharing and Managing Media expands on the ideas in this section, and covers methods and strategies for scaling FCP to meet the needs of larger and more-complex projects and teams. Also, a number of the case studies have media-management aspects.
We would argue that “media management” is most properly defined as a loose category used to describe a certain mode of thinking that includes concerns such as:
- File-naming conventions
- Storage space and the organization of hard drives
- Duplicates and master copies
- The transfer of media from one resource to another and through the phases of a project
- Archiving of media and projects
These are concerns that are present throughout a project, and good media management is an integral part of any workflow, helping to provide the scaffolding and organizational schema for a project.
We believe that there are really only a couple of rules when it comes to media management, and almost everything else comes down to the conventions you choose for a particular project. Here are the rules:
- It is easier to stop using organizing conventions than it is to add them later. It doesn't matter so much exactly what your naming conventions are, or how you choose to organize your scratch disk. What matters is that you choose a system, and that everyone on the project sticks with it as much as possible.
- The larger the project, the more sources, and the more people who are working on it, the more important it is to have tight media management. Sometimes we talk about this media-management stuff as though, if you were to mess it up, the sky would fall. The truth is that on a very small project, with one editor and only one or two sources, media management is really no big deal. Which is to say that Final Cut Pro is smart enough that, even if you just wing it, you probably won't have a problem. If you are working on a large project—say, a two-hour historical documentary, as in the case study in Chapter 15—with hundreds of separate video and archival sources, media management is crucial to your sanity.
It is logical that the preparation for postproduction is an important stage for media management. This is the stage where many of the organizing principles of the project are set. Of course, some media assets will have their own inherent information—such as tape names and timecode, as described above. As you prepare your media (this chapter) and ingest your media into Final Cut Pro (the next chapter), you are taking this information, plus any you choose to add, and turning it into the metadata that will appear in your Browser and allow you to find and manipulate your media in FCP.
The media-management questions you should ask (and, if all goes well, answer) as you prepare for your edit include:
- What are the file-naming conventions for the project? This includes how captured video and audio will be named on the hard drive, as well as still images and graphic files. It is worth asking also how revisions to files will be named. Also, how will versions of your Final Cut Pro project be named? How will sequences and bins inside the Browser be named? This is all part of setting naming conventions, and again, it is all much more important on a bigger project.
- How are the media drives organized for this project? This includes questions such as, Do photographs have their own directory on the media drive, or are they grouped together with graphics? In networked postproduction environments (discussed in Chapter 12), you need to ask questions about logins, network organization, and permissions. See Chapter 18 for a case study of a shared-storage Xsan environment.
- What are the steps in the workflow where media needs to move from one resource to another, and how will this be accomplished? We generally call these moves handoffs, and they include a designer handing off files to an editor, as well as an offline editor handing off to an online editor and a mixer. Handoffs are always key points in workflows. The Media Manager (discussed in Chapter 12) is a powerful tool for facilitating certain kinds of handoffs.
Database Systems
We mentioned above that some large post houses incorporate a bar-code system for their tape library, and then have a database system to keep track of the tapes. The case study in Chapter 16 is about a web database of QuickTime screener clips accessed by producers and editors around the country. And in fact, the Browser is in essence a powerful database full of the metadata for an editing project.
So, on one level or another, we are always talking about databases when we are talking about media management, but the idea here is still extensibility. Just as it does in other areas, Final Cut Pro also plays nicely with other databases.
In Chapter 16, we see how XML (eXtensible Markup Language) allows media metadata to be exported along with QuickTime compressions to create web content. This sort of extensibility has been available for some time, as have digital asset management (DAM) systems—external databases that store media and metadata and make it searchable and accessible. Although some of these solutions were considered scalable, conventional wisdom remains that real DAM requires some substantial investment.
Although a robust database system, beyond just the FCP Browser, might facilitate a lot of medium-sized projects, it has only been on some of the largest FCP projects we have participated in that the investment was made in an additional DAM. However, there is a new piece of software right on the horizon that promises to bring robust database support simply and economically to all stages of the postproduction process.
Final Cut Server
Final Cut Server is a new piece of software that has been announced, but, as of this writing, has yet to hit the market. The idea is to make sophisticated database media management for all stages of a project available and fully integrated into Final Cut Pro through an inexpensive piece of software.
Billed as “media asset management and workflow automation software,” Final Cut Server could potentially integrate into and facilitate almost all of the things discussed in this chapter. Final Cut Server also touches many other aspects of workflow thinking. In particular:
- Screeners, log lists, and paper edits, as described before
- Online reviews, discussed in Chapter 9
- Sharing and managing media, discussed in Chapter 12
- The case study in Chapter 16, which was custom coded using XML, and Perl, would almost certainly be done as a Final Cut Server implementation today.
We are very excited that Apple is addressing some of the aspects of the postproduction process that really interest us—aspects that are sometimes lacking in the democratized postproduction world. At the same time—as with all evolutionary change—the goals, ideas, and concepts stay largely static, but the tools get better and more affordable. Because the software is so new, specific information did not make it into this book. Please check http://booksite.focalpress.com/Osder/finalcut/ for two exciting chapters about Final Cut Server.
Preparation and Workflows
In one sense, creating the workflow for a postproduction project is itself part of the preparation stage of that project. At the same time, workflow thinking, preparation, and long-sightedness (and let's add media management) are activities and modes of thinking that occur (or should) at many stages of a project.
This chapter, all of these concepts, and this entire book should all imply a holistic way of doing projects. The relative importance and methods of preparation on a given project depend on many variables, but most of all on the overall size and complexity of that project.
We hope that this chapter gives you many specific things to think about when moving into the postproduction phase. Moreover, preparation is an important element of workflow thinking, learning to be precise in your planning and actions and to foresee the likely consequences.