
12 Sharing and Managing Media
Recently, I mentioned to a colleague that I was working on a book about Final Cut Pro workflows.
“What's the big deal?” he said. “All I hear about is workflow this and workflow that, but you shoot, then edit, then output. So what's the big deal?”
For a moment, I bristled, but then I realized that he had a point. For many people, postproduction workflows do not need to be all that complicated, and we don't mean to make them complicated. When I recovered my composure, I gave him what I thought was a reasonable and not-too-defensive answer.
I told him that he was right, for a lot of people, especially students of the craft and those working exclusively in the DV environment. I went on to say that if it all ended there, he would be missing one of the truly revolutionary aspects of Final Cut Pro: scalability. Although the super-simple workflow is going to be adequate for a lot of prosumers, it is not a solution if you are producing 26 episodes in hi def, shooting on seven different formats, or running a television network. Final Cut Pro has been making headway into all of these areas—in fact, into all areas of postproduction, period—largely because of its scalability.
Part of working on a larger, more complicated project—or in a more sophisticated postproduction environment—is working with more people. When we introduced the concept of media management in Chapter 6, and when we discussed logging and entering metadata in Chapter 7, we mentioned that more care was needed in these areas when working with larger teams or on larger projects. The topic of this chapter is methods and strategies for managing your media to work on these more complex postproduction projects.
This is often referred to as media management or digital asset management, though both of these terms are sometimes used more broadly, referring not only to postproduction. Our focus is on concepts and techniques that are particularly useful in designing and implementing Final Cut Pro workflows. Although it is true that these methods tend to be most needed on larger projects, many of them are applicable to smaller projects and/or organizing on a small-studio level as well. In general with postproduction, it is difficult to have too much organization, but easy and dangerous to not have enough.
These topics touch many other aspects of workflows:
Preparation—The stage in which a lot of this thinking needs to be implemented
Storage and Compression—The technical aspects underpinning media management
Ingest—When most media and metadata are put into the system
Rough Cutting—When editors need access to raw but organized media
Finishing—When media may need to move to other machines or operators
The goal of this chapter is to mesh the ideas we have already discussed with advanced media-management techniques toward an understanding of workflow strategies for scaling Final Cut Pro to meet the needs of the most complex projects.
Scratch-Disk Organization
The traditional media-drive setup for nonlinear editing is a dedicated drive or drives, or a RAID attached directly to the NLE system through a high-throughput connection. Whether a single-drive or RAID solution (discussed in Chapter 5), the traditional setup has only one NLE accessing the media.
In the early days of nonlinear editing, this looked like a large RAID unit tethered to the computer by a thick SCSI cable, or sometimes the drives were inside the CPU enclosure, or in an extended enclosure. The introduction of FireWire (see Chapter 1) meant a simpler external cabling solution that had a high enough throughput to capture and play video (DV anyway). It became more common to see traditional setups that now relied on external FireWire drives.
High-speed external FireWire drives brought a lot of flexibility to media management, in the form of what we call a “sneakernet.” A bit more on that later, but first, we want to explore some strategies of organizing your media in the traditional paradigm.
We learned about scratch drives in Chapter 7, including how Final Cut Pro automatically creates folders on the scratch disk (Figure 12.1):
- A folder is created for each type of media that FCP saves to the scratch drive: capture scratch, render files, audio render files, and so on.
- Within each one of these folders, Final Cut Pro automatically creates a folder based on the name of the project.
So, any scratch disk is automatically separated into directories based on the types of media it contains. Then each one of these directories is organized by the project that created the media.
This last part is important. The second level of project-based organization that FCP does automatically on scratch drives is based on the project that originally created the media. This is important, because the organization of the scratch disk does not affect the organization of clips in FCP. You can also have two or more clips (in the same or separate projects) that reference the same media file. However, the media file that is referenced will always be in the scratch-disk directory associated with the project that created it.
Building on what we know about scratch disks, there are two approaches to media management worth discussing at this point. These are building-block concepts that can be augmented or customized. Rather than complete solutions, they are basic examples meant to get us more into the media-management mind-set.
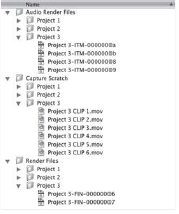
Figure 12.1 FCP automatically creates these folders on the scratch disk.
Dedicated Media Drives
Using a drive (or drives) for media and nothing but media is probably the most traditional, even the original, approach to media management. With Final Cut Pro, a good way to do this is to set the scratch disk to be the root level of a large dedicated media drive, never change it, and ideally not use the drive for anything else.
There are really two parts to this idea:
- The media drive will contain nothing but media. In and of itself, this is an organizational boon. Projects (and everything else) will be located on a different drive.
- The organizational system inherent in how FCP sets up scratch disks will be utilized fully for the organization of the drive.
This idea is both straightforward and easy to execute. Here are some of the advantages:
- It is exceedingly simple. The basic instruction for a new editor working in this system is: don't change anything.
- It is easy for anyone to go onto the media drive and find the types of files they want (at the root level) and what project they are associated with (the next level down in each directory). Because this is the traditional setup, it is probably the first place they will look.
- It is easy to expand the system. For instance, because still images are not imported through Log and Capture, FCP does not create a folder for them on the scratch disk. No problem—you can just go ahead and make that folder to keep these organized in the Finder. To stay consistent with this organizational scheme, you would make a new directory (call it “Still Images”) at the root level of the scratch drive. Then organize this directory with folders that are based on project names. Using this method, the organization of your still images (or other media assets) will work exactly the same as with the rest of your media.
- Putting the media on a separate hard drive from the project has certain technical advantages. As hard-drive speeds have increased, this has become much less of an issue.
This traditional approach works as an example of a media-management principle that we introduced earlier: having a system (any system at all) and sticking to that system are the most important things in media management. The traditional dedicated-media-drive solution might seem so simple that it is not even like organizing, but that is just fine. It still works well for a lot of shops, particularly where one system is used by a lot of different people on a lot of different projects.
Because the solution is traditional, it requires little or no instruction. It is helpful when using this method to have someone who periodically cleans up the media drive and erases old media. Because this person can see the project-named directories, this is a fairly simple task.
Project-Based Directories
A different approach to media management is creating a directory on your media drive for each project to contain all project files and assets. The big difference here is that all of the files associated with the project, including the FCP project itself, are stored at the same location.
Here is how it works:
- On the root level of your media drive (or in an area designated to you for this work), create a folder, and name it based on the name of the project.
- Save your FCP project to this directory. If you are going to have multiple project files as part of a larger project, you may want to create a subdirectory called “Project Files.” (If you are wondering why you would want multiple project files for one project, see the case study in Chapter 17.)
- Before capturing, also set your scratch disk to this directory. Once you have done this, the directory will look something like Figure 12.2.
- Proceed to capture media and work on your project. When you need to import anything at all to your project—still images, music, motion graphics—make sure to save them within the top-level project directory.
- As mentioned earlier, don't be afraid to add additional organizational folders at the first level of the project directory. You could wind up with additional folders: Photos, Music, VO, gfx, and so on.
- And just as before, remember that this stuff can be organized differently in your project(s). This is only the organization of the actual media files as they exist on the media drive.
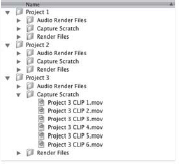
Figure 12.2 A project-based directory.
The big benefit of this method is that it keeps ALL of the files associated with a project in one place. It also allows editors and producers more organizational freedom for individual projects. (You can basically make your own rules inside the project directory, whereas, with the traditional approach, everyone needs to play the same tune.) If, at any point, you need to copy or move or delete your entire project, this is as simple as dragging and dropping the project folder.
The disadvantages of this approach include:
- May not be as effective with multiple editors, because the system needs to be explained, and there is more room for variation.
- Ignores certain conventions of the traditional approach. Although this is unlikely to cause any technical problems, it might confuse someone new coming into the project.
- May be more difficult for an administrator who is unfamiliar with the material to clean up the drives (but if everyone follows the same system, this should not be a big deal).
- Putting the project file on the same drive as the media means that if the media drive fails, you could also lose your project. Of course, any drive can fail, so you should always back up your projects anyway.
All in all, we often find this to be a good starting point on media management for many projects and setups.
Remember, scratch-disk organization is one part of the larger media-management puzzle in most workflows. The way you set up your drives needs to make sense in terms of the other decisions you make when setting up your system and your project.
The Sneakernet
In the days before FireWire, managing media in the post house could be a real pain. For instance, if one client needed to take a break from a project, but a different client needed to use the system in between, there was a real hassle over what to do with the media. (Remember that drive space was also much more expensive back then.) Even something simple, such as switching edit rooms, usually meant an overnight network transfer.
Using external FireWire drives as media drives changed all that. Now moving to a different edit system became as simple as unplugging the drive and plugging it in in a different room. (Okay, there was some sneakernetting prior to FireWire, but FireWire made it easy and ubiquitous.) This method was given the tongue-in-cheek name “sneakernet” for the technology that moved the media around the facility (the feet walking down a hallway).
Jokey though it may be, the sneakernet is a real part of the digital video revolution. We still use it ALL THE TIME. We could have called this book “Preditors on the Sneakernet,” but we also wanted some nongeeks to buy it. The case study in Chapter 14, and two of the the additional case studies on the Web, all use variations on the sneakernet principle.
The Master-Project Approach
The master-project approach to media management works well for larger projects and organizations with ongoing media-management needs. It also starts to hint at the more sophisticated solutions later in this chapter, although it can still be done with a traditional media-drive configuration and Final Cut Pro as the only necessary software.
The idea is to create a master, or archive, project into which you import all of your media into Final Cut Pro. This can be done on a project level or on a larger, multiproject or multifacility level. Several of the case studies in Part 3 use a take on this idea. In essence, you are designating an FCP project—the “master,” or “archive,” project, depending on the application—to be primarily a media database.
Creating a master project is something you will want to do only if your project has some degree of complexity, multiple pieces, a substantial amount of media, or some long-term archiving need. It might be helpful to imagine an example. Let's say we are a company that shoots a lot of political speeches, and then cuts those into a number of pieces for various clients. We can choose to keep all of those speeches in a tape library and capture them when we need them, but if we do enough of this work over a short span of time (such as an election cycle), that is going to get very inefficient.
Instead, we could manage these media by setting up a master FCP project. In this case, we might call the master project Speeches. Every time a new speech is shot, we'd ingest it into this project. We would also use a consistent system for the metadata, so it would be easy to find a speech by the politician's name, the date, or keywords based on the topic of the speech. We might want to do some bin organization as well, organizing the speeches by party, let's say.
Now, anytime a producer needs to access the political speeches, they use this Speeches FCP project like a library, searching for the material they need, and then pulling it into a different project to do their work.
We have seen this basic method used with great success in a lot of situations. We have clients who also use these same basic ideas to create a rolling archive that continues to collect evergreen material over the course of years. Although the master project is not meant for individual cuts, you can also archive sequences back to it to be recycled later. Several of our clients have built up something of a video template archive that they cost-effectively update to keep their video presentations fresh.
Working with Media on a SAN
As discussed in Chapter 5, SAN (shared area network) storage is a solution that allows multiple users to access the media simultaneously. Essentially, it is a video network. As with any network, a key feature is control over permissions and access. These are very powerful tools for organizing media, and they really move this discussion to a higher plane entirely: SAN network administration for video.
As stressed earlier, the level of complexity here can get very, very high. If you are contemplating creating an Xsan environment, strongly consider bringing in an expert to design this and get it off the ground. Best to keep this person's phone number handy after the initial installation as well, and you might even want to put them on retainer. You are probably going to have questions to ask and troubleshooting to be done.
If our biggest recommendation with SAN solutions is that you hire an expert, you have probably realized that we don't intend to provide a whole lot of instruction on setting these up. We do want to offer a few ideas to get you started thinking about media management in a SAN environment. If nothing else, this will give you a feel for just how different these setups are from your traditional media drives.
Remember, you can find technical information about SANs in Chapter 5, and the case study in Chapter 17 uses a SAN environment extensively. The following are only some basics for how to think about working with a SAN.
Organization on the Network Level
Working on a SAN provides a higher overall level of organization for machines and drives on the network. You already have an idea of what I mean if you have ever worked in a (nonvideo) network environment where you could log in with your identity on different machines on the network, and have access to the same features and files regardless of where you physically were on the network.
Setting this up requires a lot of work on the back end, but the experience to users on the network can be seamless. A good example is a large SAN developed to support the FCP labs and classrooms of a large university. In this case, a system of logins and permissions was created so that every student who accessed the network had a login that allowed them to access their own media—and no one else's. There was a system for assigning and retiring logins and disk space as the students cycled through. There were special logins for the instructors, so they could access all of their students’ media and could grade projects right from their offices.
You can see that sophisticated setups to fit particular needs are quite achievable with SAN systems. But again, setting up these systems is not simple. These solutions do not come out of a box—they take a lot of expert configuration.
Organization on the Media Level
Once you have set up this higher level of access and organization on your SAN, there is another set of questions regarding where media are stored. Combining your media organization with your network organization leads the way to powerful collaborative work environments in the SAN.
One simple benefit is that often used graphics, IDs, and stock footage can be put onto the SAN in a place that allows access for all users. Now, even if most of the media is separated based on logins and permissions, you can also have an area of media that is accessible to all.
As you might expect, organizing media on the SAN has certain things in common with strategies you would use in a traditional drive setup. However, with the SAN, there are even more possibilities and options.
There are a number of great resources for learning Xsan. They include Xsan Quick-Reference Guide, Second Edition: A Comprehensive Guide to Xsan Setup and Administration by Adam Green and Matthew Geller (Peachpit Press); Optimizing Your Final Cut Pro System: A Technical Guide to Real-World Post-Production by Sean Cullen, Matthew Geller, Charles Roberts, and Adam Wilt (Peachpit Press); and Mac OS X v10.4 System Administration Reference, Volume 2: Directory Services, Security and Networking and File Services by Schoun Regan (Peachpit Press). The Web provides some great resources as well:
- http://www.xsanity.com—a great site specifically about working with XSAN
- http://www.afp548.com—a great resource for OS X server administration
Using the Media Manager Tool
The Media Manager is a powerful but underutilized tool in Final Cut Pro. We think that probably many editors either don't know that it exists, don't know what it does, or just don't think they have any use for it. The idea behind the Media Manager is that it is a tool used for manipulating your media files by executing the decisions that you've made inside the project, as filtered by the choices you make with the tool.
Sounds a bit complicated, but if we break the Media Manager down and really understand how it works, we can unlock its power. Before we get to the technical details, however, it is important to illustrate why the Media Manager is so powerful for workflows.
You know from all of your experience with FCP that it is a nondestructive program. Media files are saved on a hard drive, and the project contains decisions for playing back those media in sequences. Basically, no matter what you do inside Final Cut Pro, the media files on your drive remain unchanged. This is what makes it a nondestructive program. The one exception is the Media Manager.
Make no mistake: the Media Manager has the power to mess with your media files as they exist on your scratch disk or anywhere else they are stored. In older versions of the software, we used to call this tool the Media Mangler, because we had such difficult experiences with it. The tool has gotten somewhat better, but it is still something to be careful with. Before you execute a media-manage (and especially before you permanently wipe out any media), always double-check that you have what you need and are doing what you intend to do. The Media Manager is less forgiving than are other parts of Final Cut Pro. There is no undo here, so you definitely want to measure twice, cut once.
Why Use the Media Manager?
Before we go any further into how to actually use the Media Manager, it is useful to mention some real-world scenarios in which we would employ this resource. The Media Manager is a flexible tool, but all of its functions have a central theme: manipulating media based on project decisions. Keeping in mind some specific instances where this resource is useful will be helpful in understanding how it works.
- You are working on a hi-def film at the studio where you are employed. It is nearing the end of the day on Friday, and the scene you are working on is not coming together. Your boss asks if you would mind taking it home to work on it over the weekend on your laptop.
It means some overtime for you, so you are game, but your laptop can't handle uncompressed hi def. You need to package up the work-in-progress sequence(s), along with any of the media you are using for the scene, and down-convert those media to a codec that will work well on your laptop, such as DVCPRO HD, DV, or OfflineRT.
- You have used your home machine to offline at DV resolution some footage that was originally shot in HD. For finishing, you wish to reconform the piece using the full-resolution HD footage. We know from Chapter 1 that one of the things that makes FCP special is resolution independence. You should be able to move from the DV to the HD environment by taking your project—no need for an EDL or other transfer medium. You just need a project containing the final sequence with clips that are offline and ready to be recaptured.
- You have a large project that is still in progress, but you have already determined that you don't need a lot of the media you originally captured. You want to keep working, but to clear drive space based on what you now know you're not going to need.
- You have captured a number of full tapes of interview material, and have then broken them up into separately named bites using subclips. Now you want to make new media files with your descriptive subclip names and, based on the subclip limits, throw out all of the excess media that contain the unusable material.
Although some of these objectives could be achieved by other means, the Media Manager is particularly useful in tasks like these that involve manipulations of media files and FCP projects based on the workflow needs of a project.
Master, Affiliate, and Independent Clips
Before we break down the different controls in the Media Manager, it would be a good idea to look at one area that causes a lot of confusion about media management: the difference between master, affiliate, and independent clips, and how they relate to the Media Manager.
Master Clip—This is what is created the first time a clip appears in the Browser. The master clip also controls the relationship of the affiliate clips to the media on disk.
Affiliate Clip—This is a clip that refers back to the master clip (and therefore back to the original media). There are two good ways to understand this relationship: (1) If you duplicate a master clip in the Browser and then rename the master, the duplicate (the affiliate) will also have its name changed; and (2) if you a bring a master clip into the sequence (creating an affiliate), and then use the Reveal Master Clip command (Shift-F), the master clip will be revealed. Here are the ways of creating an affiliate clip:
- Edit a master clip into a sequence.
- Duplicate a clip in the Browser or in a sequence (Option-drag, copy and paste).
- Drag a clip back into the Browser from the sequence (if a master is already in the Browser).
Note: you can make an affiliate clip its own master clip (Modify > Make Master Clip), therefore breaking its relationship to the original master clip and allowing you to give the clip its own name and attributes. Additionally, duplicating an affiliate clip will always create another affiliate clip, and subclips are automatically master clips when they are created.
Independent Clip—This is a clip that severs the relationship between an affiliate in the Timeline and its master. All properties of the clip are independent, and independent clips reference the media directly rather than linking back through the master clip. This means that unlike affiliate clips, any changes you make to a master do not affect an independent clip. Remember, independent clips live only in sequences. Dragging an independent clip into the Browser creates a new master clip, and the formerly independent clip becomes an affiliate of that new master.
To make an instance of a clip on the Timeline an independent clip, simply right-click on the clip and choose Make Independent Clip.
Knowledge of these clips is important in understanding what and how much media are going to be included in a media-manage operation.
Controls in the Media Manager
The Media Manager is a fairly complex tool. However, it is divided into several sections for the different kinds of controls you have when you use it. Taking these one at a time will help us understand the different ways in which the tool can be used, depending on your objectives.
You can launch the tool with File > Media Manager, but notice that this option is grayed out unless either the Timeline or the Browser is active. For now, unless otherwise noted, let's just assume that the Timeline is active. In this case, the Media Manager will be acting on the open sequence. When you choose this menu option, the Media Manager window launches (Figure 12.3).
Now let's look at each section of the tool individually. The result of the media-management action will depend on all of the settings together, so they are all related.
Summary—The top section of the Media Manager tool is itself divided into two sections: a text summary and an interactive graph. These are both considered part of the Summary section because they each offer a different way to summarize the results of the Media Manager action if taken with the current settings
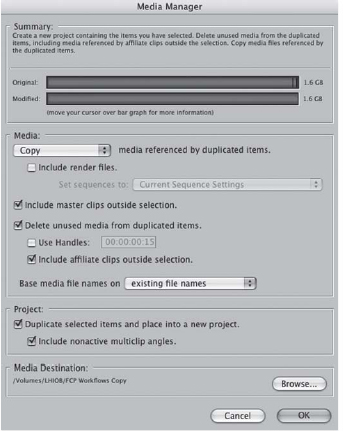
Figure 12.3 The Media Manager.
Text Summary—This is a narrative description of what will happen if you press the OK button at the bottom of the window. Let's take the Summary paragraph as it comes up when the Media Manager is in its default setting. If we break the paragraph down into parts, then we can see how this will change if we change the settings.
Create a new project containing the items you have selected. We said for this example that the Timeline would be active, and thus the “items selected” means the current sequence. So a new project will be created containing the current sequence in the Timeline.
Delete unused media from the duplicated items, including media referenced by affiliate clips outside the selection. This means that by default whatever media are not used in the current sequence will be not be included in our media-manage action. However, the affiliate clip language means that the action will include media of clips affiliated with the clips in your sequence—for example, affiliates in other sequences.
Copy media files referenced by the duplicated items. This is key. What will happen to the media that we have chosen to use in (and now to manage based on) our sequence? In this case, it will be copied to a new location.
Interactive Graph—Located directly below the text summary, the interactive graph gives both numerical data about the media-manage action indicated by the settings, and a visual representation of this action. Like the text summary, the graph will adjust depending on the settings below.
The two bars represent the amount of media referenced by the selection in the existing project, and the amount of media that will be referenced by the resulting project. The green bars represent regular media files. Sometimes you will see gray extensions to the green bars; the gray extensions represent render files.
To get numerical information, mouse over various sections of the graph. As each section of the graph is highlighted, you will see below the graphs some information regarding the amount of data, the location, and the duration of the media.
It is important to realize that the purpose of the Summary sections is to give you a conceptual preview of the result of the actions planned by the current Media Manager settings. Therefore, as you change the parameters in these other sections, you will see the Summary dynamically adjust.
Media—The choices here determine exactly what the Media Manager is going to do with your media files if you hit the OK button below. Let's take the choices here one at a time. Many decisions that you make in this section will affect the other choices available to you. All of them will change something about the preceding text summary, and some will also have an effect on the graph.
Media Pulldown Menu—This choice is key to the action that the Media Manager takes on your media. Let's take a look at what each one of the choices does.
Copy—A duplicate of the media used in the sequence will be made in a new location.
Move—The original media file referred to by the sequence will be moved to a new location. Let's pause here for a second. Remember how we said that the Media Manager can be destructive? Consider that if you use the Move function, the files that you manage will no longer be in the location where they used to be. If the original project, or any project or any person, needs to reference those files in the future, the originals will not be there. Be very careful when using Move in the Media Manager.
Recompress—This allows you to compress the indicated media files and save them in a different format for a different use. This is what you would use in the case of making a DV version of all the media used in a scene to take home.
Use Existing—This means that no files will be moved, but the new project will have references (or links) to the original media on the drive. Use Existing never increases the total amount of media, but this option can decrease the amount when used in combination with the Delete Unused Media check box described later. This is a way of removing unused media from a project, or “trimming down the fat.” Again, this is destructive because it is altering your media files as they exist on the scratch drive. When you are executing a media-manage action that will remove original media, you get a special warning—and indeed, you should be very careful with this. Consider, does anyone else use these media? Could there be references to it in any other projects? And most of all, do you have the corresponding source tapes safe and organized? To that point, this is particularly perilous in tapeless workflows where there are no source tapes—remember to archive your tapeless sources.
Create Offline—You would use this for preparing the project for an HD online, as mentioned earlier. Just as with Use Existing, no media is moved and no new media is made—but in this case, there are no links in the resulting project. All of the media is offline—perfect to start reconforming from HD tapes.
Include Render Files—This determines whether or not to use any render files that are associated with the sequence. Depending on the project, you may or may not have render files, and you may or may not want them in the media you manage. It is sometimes a good alternative to not manage the render files, and then to rerender when you get to the destination system. This option is selectable only in the Copy and Move operations.
Recompress Using—This pulldown menu is active only if you choose the Recompress option on the menu above. It is the place to set the codec that you want the new media files recompressed with. The choices here are very similar to the list of choices for native QuickTime exports and sequence-setting presets. Generally, you only want to go down in quality using this function, as in the example of taking a scene home for the weekend. To go the opposite way—from DV to HD, for example—Compressor or a hardware-standards converter is a better tool.
Include Master Clips outside Selection—This check box will choose to either include (checked) or not include (unchecked) media in master clips outside your selection. Take the following example. You are using the first 10 seconds of a 30-second clip in your sequence; however, your master clip is marked at 20 seconds. Leaving this option unchecked, only the media needed to create the 10-second clip in the sequence will be included. With this option checked, the 10 seconds plus any additional media needed to re-create the master clip as marked will be included. This option is selectable only in Copy, Recompress, and Create Offline operations.
Delete Unused Media from Duplicated Items—This setting determines whether the Media Manager will eliminate or keep portions of a clip that are not used in the sequence when the Media Manager moves, copies, or recompresses new clips. Normally, checking the button will cause the graphical summary on top to change noticeably. The Modified green bar will be 100 percent of the Original green bar above it if the box is unchecked. Check the box, and the Modified green bar will shrink substantially. The new relationship between the green bars is the ratio of the amount of media you imported into your project to the amount of media you actually used. This option is available for all operations.
Use Handles—This control allows you to eliminate unused media, but also to keep some extra media, or pad, around the media that are included. Use Handles is available only when Delete Unused Media from Duplicated Items is checked. This option can be useful if you are moving a rough cut to a different system for additional editing toward a picture lock. You are confident that all of the shots are roughly in the right places, but you want the new editing to have leeway to trim and adjust shots. This operation is available for all options.
Include Affiliate Clips outside Selection—This option when selected will include all media in affiliated clips in your selection. When deselected, those affiliated clips will not be included. For example, suppose you are using 20 seconds of a clip in one sequence, and 20 seconds of the same clip in another sequence. Even if you are managing only one of these sequences, that other affiliate and the media needed for it will be included in the media-manage function when this option is checked. This option is selectable only for Copy, Recompress, and Create Offline
Base Media File Names On—What will the new media files be called? This menu gives us two choices: existing filenames and clip names. This control is most easily understood if we think about the preceding example where we have made subclips, and now we want to make new media files based on them. In this case, you definitely want to choose clip names here. If you choose existing filenames, you are going to wind up with a bunch of clips with names such as “Scientist Interview Whole Tape 1_3.” However, if you choose clip names, the names that you gave the subclips in Final Cut Pro will be used. So you will have informative names such as “Good Bite about Global Warming,” which is much more useful. Remember, this choice has an effect only on clips that have been renamed inside the project.
Project—The Media Manager has the ability to create a new project based on the sequence you are managing. In the previous three examples, taking the scene home requires that you create a project and new media. Preparing for the HD online requires a project only (the media is recaptured from source tapes). Creating new media files based on subclips does not require a project to be created, only new media files.
The first check box simply tells the Media Manager whether to duplicate items based on the above settings, and whether or not to create a new project file. It is selectable for all operations except Create Offline. The second check box comes into play only when doing multicam editing. It allows you to also manage clips not actually used, but associated with others that are used as part of the same multiclip.
Media Destination—This lets you determine where to put the managed media.
You can see now why the Media Manager is a very powerful workflow tool. Work-flows are so concerned with how media move through the postproduction process, and this flexible tool facilitates all kinds of media moves from within the FCP interface.
Archiving Media
The final aspect of media management we have to discuss is archiving: what you do with your media when you are done with a project. Like most workflow issues, this is a question that will be answered differently for each project and each studio. The need to hold onto media in a digital format is sometimes very small. Other times, archiving may be one of the main reasons for the whole project.
There is one central question that you should ask yourself when contemplating how to archive media: What is the cost of the archiving solution (in time and money) now, compared to the expected savings (again, time and money) in the future? In other words, if you invest the time and money to archive your media, what will be the payoff of that work to projects in the future? The case study in Chapter 14 illustrates how an archiving solution can be very cost effective, even for a relatively small organization.
Saving FCP Projects and Source Tapes
We consider saving FCP project files and original source tapes to be the first level of archiving. Our logic is that in almost every professional-level project, there is rarely a reason not to save these two things.
- FCP projects are relatively small files.
- Master source tapes represent an original record of an event. The cost that goes into documenting this event (or any kind of shot) far exceeds the cost of the actual tapes, or of storing them. Of course, things are different when working with tapeless formats such as P2. Unlike tapes, tapeless formats are meant to be reused—this is why the archiving feature described in Chapter 7 is so important.
- For a well-constructed FCP project, just the project file and the source tapes should be enough to resurrect the entire project by recapturing.
- When using this method, don't forget that most projects have media assets that do not originate on videotape (photographs, graphics, music, fonts, etc.). When using this archiving technique, it is a good idea to also collect these assets, burn them to a CD or DVD, and store these discs with the original source tapes.
Retaining your final FCP projects and your source tapes is so simple that it shouldn't really count as an archiving solution. You should just do it as a matter of course.
Hard-Drive Archives
When hard-drive space was more expensive, drives were used mostly to store “live” media—the stuff we were currently working with. When a project was finished, we were likely to “blow out” the drive, or erase all of the old media, to start a new project. At this point, we would save the project file and the source tapes somewhere safe. Depending on our studio and our project, maybe there were additional steps to complete the archiving process.
What we would probably NOT want to do is leave a lot of media to sit around on a hard drive indefinitely. This would be considered a waste of expensive drive space that could be used to facilitate other current projects.
However, as drive space has gotten cheaper, leaving media on a hard drive indefinitely has become at least a partial archiving solution in many situations. We have recommended to several of our clients that they purchase a FireWire drive to keep an ongoing archive of their evergreen material. This is not necessarily everything they shoot, but good clips that can be used and reused in different pieces for a reasonably long period. Chapter 14: Money-Saving Digital Video Archive is a case study describing one such scenario. Some of the other case studies also have variations on this theme.
Archiving to a hard drive is a method that is often used in combination with some of the organization schemes mentioned before. For instance, having a hard-drive archive of raw material on an external FireWire drive means that you can bring that drive anywhere to edit (your studio, your client's office, a post house). Gotta love the sneakernet!
For long-term archiving, this is not the best solution because hard drives can go bad from sitting around too long and not spinning.
Other Media-Storage Devices
Another option, though becoming less common, is to introduce a different data-storage medium, such as DVD or DLT (digital linear tape). As drive space has gotten less expensive, these secondary data-storage systems have become less necessary. Also, a disadvantage is that using these methods means an extra step of transferring media to them—and then again, when you need to reconstitute a project, the media need to be loaded back onto a hard drive. One more inconvenience is that many units of your storage device are needed to back up a whole project (think dozens of DVDs). In this case, you need to have an additional organization strategy, perhaps even additional software, to address how the media get organized onto the archiving format.
There are a lot of disadvantages to using these alternate media-storage devices, especially when hard drives are as cheap as they are now, and saving project files and master tapes is an almost automatic baseline for archiving. Still, there are occasions where archiving media to separate storage devices can be a good solution.
Database and Web-Based Archives
We touched on databases and web-video solutions previously in the discussions on preparation (Chapter 6) and the review process (Chapter 9). Many of these ideas are also applicable to archiving solutions.
We also see another theme of evolving workflows here: integration. It is likely that if you are using a sophisticated database system to log and review your source media, this same system also facilitates the archiving process. We see that the lines between these activities are also blurring. When you archive media in a way that it is easily accessible for your next project, is this really archiving, or is it starting the preparation for your next project early?
Both. And that is a good thing—that's integration.
And Once Again … Final Cut Server
As we know already, Final Cut Server promises to be a new keystone for integrating all of these media-management and workflow activities.
Did we say in Chapter 9 that no area of postproduction workflows has more to gain from the introduction of Final Cut Server than the review process does? Well, you could definitely make the argument that the topics covered in this chapter have the most to gain.
Actually, the argument that we want to make is about integration. The future of postproduction lies in increasingly more integrated workflows—from shooting all the way to archiving. We can see this process continuously being streamlined. Tapeless cameras remove one step of the process—we no longer need to capture from tape. SAN solutions streamline larger projects further—we no longer have to move or copy media; we can access them simultaneously.
When we look at Final Cut Server, it is easy to imagine a future when cameras not only shoot without tapes, they also upload footage automatically through wireless networks. Metadata is entered in-camera or at any location on the network. Producers are viewing footage on the Web, and editors have already begun editing while the shooter is still out in the field … . In the future postproduction environment, you might not have to worry about archiving much at all—by the time you are done shooting, your network will have already taken care of it. That's integration.
Like most futuristic scenarios, (at least) two caveats apply:
- It's not going to be all integrated all the time. Sure, some workflows will always push the bleeding edge, but others will hold on to traditions. Final Cut Server is a separate piece of software, and for that reason alone, many people will continue to use FCP for archiving solutions, as discussed in most of this chapter. Final Cut Pro has always been good about supporting a wide range of workflows, from the basic to the newest and most complex. This is part of being scalable, and part of the appeal of the software, and we hope that it continues.
- Even with the most advanced technologies and workflows, many of the same principles apply. How you record your footage or how it gets ingested makes little difference to the need for good logging and clip naming. In a sense, the need for media management goes back to organizing clips of film in physical bins. Sure, technology has changed, but you still need to find the clip you are looking for.
When it comes to managing media, the rapid move toward integration and the real-world caveats both apply. Our archiving and organizational schemes will continue to grow in their complexity and level of integration, but many of the principles will remain immutable.
Please see two additional chapters on Final Cut Server workflows on the Web at http://booksite.focalpress.com/Osder/finalcut/.