
7 Ingest
A crucial step in any workflow is ingesting footage into the nonlinear editing system. Traditionally, this process has referred to solely tape-based sources. In this regard, the process was known simply as “digitizing,” and, in Final Cut Pro, as “Log and Capture.” As technology changes, these terms themselves can sometimes be misnomers.
Traditionally, the Log and Capture process has been referred to as “digitizing” because shooting formats were analog. The process of getting your footage into a nonlinear editing system was literally “digitizing” because you were making an analog, linear format into a digital, nonlinear one. Today—with digital formats such as DV, DVCPRO50, Digital Beta-cam, HDV, and HDCAM—we are only “capturing” digital information from linear sources, and putting it on a hard drive where it can be accessed nonlinearly by Final Cut Pro.
The Log part, or “logging,” refers to adding metadata (see the sidebar, Metadata), and the Capture part refers to creating digital files on a hard drive from the video on the tapes.
Although traditional tape-based ingest is still the norm for the vast majority of projects, tape has many limitations, as discussed in Chapter 4. Tapeless acquisition and postproduction are quickly developing into the standard method for working on any given project. Therefore, the traditional idea of digitizing and Log and Capture has morphed to include these tapeless formats. In addition to tape and tapeless formats, ingest also includes other files that may be needed for a project—for example, audio, images, and motion graphics. In Final Cut Pro, ingest can be broken down into four different actions:
- Log and Capture from a tape-based source.
- Log and Transfer from Panasonic's P2 format.
- Transfer from other tapeless sources—such as Sony's XDCAM and XDCAM HD, Grass Valley's Infinity, and Ikegami's Editcam—using third-party components.
- Importing other files from disk, such as audio, images, and motion graphics.
No matter the method of ingest, ideas and strategies employed at the ingest stage are integral to successfully executing workflows. Errors made at this stage have a way of rippling through the rest of a project. Choosing an incorrect codec or not paying attention to your scratch disks can make for big headaches later. It is vitally important to log properly so people involved in the project can find footage easily within Final Cut Pro.
Metadata
Metadata (the prefix meta meaning “after” or “about,” and data meaning “information”) is literally data about data. For Final Cut Pro purposes, the metadata is information such as reel number, timecode, and logging notes. The data is the video and audio itself that is being captured to the hard drive.
The ingest stage is different in different projects. In general, the larger a project and the more people who are involved, the more important it is to be organized during every stage. Remember, although in many cases we can redo or change work done in the ingest stage, it pays (literally) to be careful and diligent. The power of good ingest practices is illustrated in Part 3: Real-World Workflows, where each project utilizes a different scheme.
None of the methods of ingest that we will break down in this chapter are mutually exclusive—meaning that in any given project, there might be tape-based and tapeless sources, as well as media that are already on disk (audio, graphics, etc.), all of them needing to be used in the project. All you need to do is choose the appropriate method of ingest.
Prior to breaking down all of the methods of ingest in FCP, let's first take a look at a few topics that are common to all methods of ingest.
Scratch Disks
Scratch disks are the hard drives (or parts of hard drives) assigned to Final Cut Pro when it needs to write new files. Scratch disks can be set by going to the FCP menu and choosing System Settings (note that scratch disks can be set in other ways, such as from the Capture Settings tab in the Log and Capture window).
There are at least two very good reasons to pay attention to what is set as the scratch disk:
- In most circumstances, you want to avoid using your system drive as your scratch disks. There are several reasons for this, but the biggest is that scratch disks sometimes get large amounts of data written to them quickly, and you never want to risk filling your system drive to capacity.
- For more sophisticated media-managements techniques (discussed in Chapter 12, as well as in the case studies), you will want to know where your media files are being written to, so that you can stay organized.
When you assign a scratch disk, Final Cut Pro automatically makes a directory structure in that location. This includes new folders for Capture Scratch, as well as folders for Audio Render and Video Render files. If you assign different scratch disks for different types of files, this will change slightly.
This opens up two main approaches to scratch disks. Some users leave their scratch disk settings alone almost all of the time (usually assigning the root level of their media drive as the permanent scratch disk). The other scenario is to create a project-based directory that contains your scratch disks, as well as your projects and all related media. You can find more information and strategies for setting up scratch disks in Chapter 12: Sharing and Managing Media.
Strategies for Ingest
Every project has its own strategy for ingest. The exact strategies and controlled vocabularies used in this stage will differ depending on the specifics of the footage, the final product, and the workflow.
Some editors like to capture whole source tapes and/or cards/discs, and then break these apart into more manageable pieces of video inside Final Cut Pro. Using subclips and markers to do this is discussed in the next chapter. Other workflows require that detailed decisions are made at the time of ingest, and that consistent metadata is entered.
Here are some factors that will help you devise an ingest strategy:
Drive Space—When drive space was more expensive, it was often a major limiting factor in capturing video. In those days, it was important to make choices about what was really worth capturing, because you might not have room to capture extra. Even today, depending on the length of your project, and how much drive space you have available, drive space may still be a limiting factor.
Shooting Ratio—This refers to the amount of footage shot compared to the total running time (TRT) of the final piece. A shooting ratio of 60:1 means shooting 60 hours of footage for a 1-hour final piece (and some documentaries have shooting ratios this high). With a high shooting ratio, you are almost certainly not going to capture all of your footage, so choices will need to be made.
Roles and Responsibilities—As with many things we discuss, it is important to know who is doing what. If someone other than the editor is responsible for ingest (say, an assistant editor), then good instructions on what to ingest and how to log become very important, because the metadata (In and Out points, etc.) might be the only reference the editor has about a project when he or she begins. (Planning these “handoffs” is at the heart of workflow thinking.)
Offline/Online Workflow—Another important factor that plays into your ingest strategy is whether you are working offline, or working at the final quality for your project. There is much more about this in the case studies in Part 3. In general, one reason for an offline stage is to ingest much more video than will be in the actual project at offline quality, and then come back at a later stage and recapture at a higher quality only the video you are actually using.
Hardware—Finally, we should note that ingest can be a hardware-intensive part of the process. At a minimum, you will need to connect your machine to a FireWire device (to capture many broadcast formats, you will need a deck, a capture card, and/or tapeless media and accessories), and you may have to adjust your ingest strategy based on the access you have to hardware. For instance, if you can use a deck free at work, but do not have the time there to log footage in detail, you may want to capture whole tapes and worry about finding specific shots later.
There are many factors that go into making good strategic decisions about the ingest stage. Understanding the flexibility of the program, and designing a workflow that fits your specific project, will help make strategic ingest decisions simple and logical.
Log and Capture
The Log and Capture window is our primary interface to tape-based footage. The Log and Capture window can be opened with menu File > Log and Capture, or by pressing Command-8. If you do not have a camera or deck attached to your machine (with deck control), you may get a warning message that says: “Unable to initialize video deck. You may still log offline clips or use Capture Now.” For the full functionality of the Log and Capture window, you'll need a controllable video device.

Figure 7.1 The Log and Capture window.
Overview of the Log and Capture Window
Once opened, the Log and Capture window (Command-8 or File > Log and Capture ) operates in some ways like a standalone tool. It also has a close link to the Browser, which is where your media and your metadata will be accessible to you in the FCP interface.
The window has two distinct sides. On the left is an area used to preview your source and to mark In and Out points (where you would like the clip to start and end). On the right is an area with three tabs across the top; this area is used to set various parameters about the capture and to enter the metadata. The Log and Capture window will look a little different when capturing HDV footage using an HDV capture preset; however, functionality of options that appear is the same as the normal Log and Capture window.

Figure 7.2 The HDV Log and Capture window.

Figure 7.3 The Preview area of the Log and Capture window.
Preview Area
The first thing to notice about the Log and Capture window is the large Preview area that takes up the left side of the window. This is where you will see your source—that is, the footage on your tape.
Below this, you will usually see basic VCR-style controls. However, these will not be present if you do not have a controllable device (deck or camera) attached to your system. In its place you will see “No Communication.” On either side of the VCR controls are jog and shuttle wheels that let you quickly navigate your source and are meant to resemble the jog/shuttle wheel on professional video decks.
You can also use keyboard shortcuts to navigate to different parts of your source tape. These keyboard controls are the same as you use inside the editing application: Space bar to play, K to stop, J to reverse, and L for fast-forward. J and L work much like the shuttle control, in that hitting L multiple times makes the tape go faster with each click (up to four strokes). Also, if you are already on fast-forward, J will reduce the speed with each click—down to normal, and then into reverse.
Underneath the tape controls are two timecode boxes, each flanked by a button. These windows show your In and Out points (the beginning and end of a clip you want to capture), and initially they will say “Not Set.” The buttons are used to set these points.
Up top, there are two more timecode boxes. On the left, you see the duration of the clip. This means that if we have marked an In point at 1:00 on the source tape and an Out point at 1:30, this box would read 00:00:30;00 (hh:mm:ss;ff). The timecode box on the top right is the source timecode—this will always show the current location on the tape.
Logging Tab
Of the three tabs on the right side of the Log and Capture window, the Logging tab is where you will spend the majority of your time. It is here that you enter information about the clips you are capturing (metadata). This information will become a part of the clip as it is viewed in FCP's Browser window and will enable you to quickly find and reference your video clips.
There is a surprising amount of control available in this one tab, and the choices that you make here are important to good workflow and media-management execution. The following is a detailed description of each aspect of the Logging tab.
Log Bin—If you have not already assigned a logging bin when you open the Log and Capture window, you will notice that the gray button to the right of Log Bin will have the name of your project. What this really means is that when you log and capture a clip, it is going into the main level of your Browser.
The idea of setting the logging bin is that you can log clips directly into a specific bin in the Browser, and begin your media management from the get-go.

Figure 7.4 The Logging tab of the Log and Capture window.
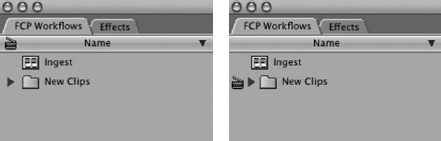
Figure 7.5 Logging bin set to main level (left); logging bin set to a bin called New Clips (right).
Notice the small clapboard icon in the Browser. This is how Final Cut Pro indicates the current logging bin. Figure 7.5 shows the logging bin set to the main level of the Browser (left), and to a new bin called New Clips (right).
The logging bin can be set in the Browser with a contextual menu (Control-click or right-click on bin) or under the File > Set Logging Bin. In the Logging tab, the button to the far right of Log Bin makes a new bin in the Browser and automatically sets this new bin as the logging bin. (You can rename this bin later.) The button with the folder icon and an up arrow provides a simple way to navigate or change the logging bin to the level directly above the current one.
Reel—This is where you enter the name of the “reel” (or tape). As a general rule, what you enter here should match the label on your actual tape. (For why this is important, see the sidebar, Why Reel Numbers Are Important.)
The small clapboard next to the reel number lets you sequentially change the reel. For example, if you enter “Tape 1” in the field and then click the clapboard, it's automatically changed to Tape 2 without needing to enter the number. Also, when you insert a new tape into the VTR, Final Cut Pro will prompt you and ask if you want to change the reel number.
Why Reel Numbers Are Important
Although it is true that logging footage and entering metadata is important, and that accuracy and detail matter on most projects, the reel numbers are particularly important.
The idea is that every source tape or device that you are capturing from should have a unique reel number that has a one-to-one link with a physical videotape or media storage device. The reason for this is straightforward: if, in the course of your workflow, or because of a drive failure, you need to recapture, how will FCP know one source tape from another? With unique reel numbers, Final Cut Pro will be able to automate this process. Without proper reel numbers, this process will be arduously done by hand.
Reel numbers are an especially important piece of metadata, because they make the connection between the media file and the original source.
Name (Description, Scene, Shot/Take, Angle)—The next four fields in the Logging tab all work together. The first thing you should notice is that Name is grayed out, not letting you enter anything. The reason for this is that the clip name is determined by the information in the other four fields and the small check boxes to the right of each field.
To see how this works, let's start by checking all of the boxes. If you enter “Waterfalls” into the Description box, “Brazil” into the Scene box, “Pan” into the Shot/Take box, and “b camera” into the Angle box, you'll notice that the name of the clip is now “Waterfalls_Brazil_Pan_b camera.”
Now, experiment with unchecking one of the boxes—say, Scene. Notice that “Brazil” has now been dropped from the Name field. So the clip name is determined by the metadata entered into the four other fields, as filtered through the check boxes that you select.
Like the reel number, you can also use the clapboards to sequentially change each parameter.
You'll notice one more big check box that says Prompt. When this box is unchecked, Final Cut Pro will take the metadata exactly as it is in the fields. When the Prompt box is checked, FCP pops up a dialogue box giving you another chance to check over and change the name and log note. This overrides the auto-naming of the clip.
Log Note—This field is used to add longer, more descriptive notes on your clip. Unlike the fields above it, the log note is never included in the clip name.
Markers—This area is used to add markers—like bookmarks—in the clip. Markers can have names, and they may be used to mark specific lines of dialogue or action in the clip. However, markers cannot be added while Final Cut Pro is actually capturing, only while previewing the tape.
All of the preceding tools are used to enter metadata; however, we have not yet seen how to actually capture the video. There are several options for this, and they are found in the row of buttons at the bottom of the Logging tab.
Log Clip—Enters the logging information into the Browser to be captured later (probably in a batch). You will notice that when you log a clip, a new icon appears in the Browser. It is a clip with a red line through it (Figure 7.6). This red line indicates that the clip is “offline”—meaning that Final Cut Pro is aware of a clip, but does not have a link to the actual video file. (This is a totally different meaning of “offline,” and has nothing to do with the quality of the video.)
Capture Clip—Captures a single clip that you have marked and logged. Using Capture Clip means capturing each clip of video immediately after logging it.
Capture Now—Captures any incoming signal and makes it into a media file. We call this “dumb capture,” but it is actually useful when you have tricky timecode situations (such as source with no timecode—for example, VHS or a satellite feed) or a device where no device control is available. You can add metadata into the Logging fields when using Capture Now, but you are not marking an exact clip or controlling a deck.
Capture Batch—Captures multiple clips that have been marked and logged. Using this button will prompt you with another window that allows you to choose exactly what to capture in the batch: Selected Clips, Offline Clips, or All Clips. In a normal logging scenario, it is the offline (logged but not captured) clips that you will want, but this pulldown can be useful at other points in the project. This window also allows you to check or change the codec you are using to capture.
Using an Excel Spreadsheet as a Batch List
As we mentioned in Chapter 6, creating a batch list is an easy way to prepare our clips for capture in Final Cut Pro. After you have created the list, it's quite easy to use in FCP.
- Go to the File Menu > Import > Batch List.
- Following the batch list, there will be a frame rate displayed. This number is based on the frame rate of your current sequence preset.
- Navigate to the location where you saved the batch list and click Choose.
- Your clips will come in as offline clips (the red slash through their names); they are now ready to be captured.
Clip Settings Tab
The Clip Settings tab (see Figure 7.6) is where you tell FCP exactly what it is supposed to capture in a given clip. Often this is a simple matter of just choosing what combination of audio and video you want.
The Clip Settings tab also has video scopes that allow you to take a look at the video signal as it is coming into the computer. If you are working with an analog capture card (and thus, again, literally digitizing), the Clip Settings tab allows some adjustment of this signal in the way it is converted to digital.
One of the most interesting aspect in the Clip Settings tab from a workflow point of view is the control of audio tracks. Final Cut Pro supports up to 24 audio tracks, although it is not often that you have this many tracks to capture. For instance, DV tapes support 4 tracks, but most people use only 2. It is more common to see 4 audio tracks utilized in a higher-end format such as DVCPRO50.
The Clip Settings tab gives you control over which audio tracks to capture and how. The small round button to the left of each track is the Capture button. If the button is green, you will be capturing this audio track; if it is grayed out, you will not.
There is one more possibility here. The button to the left of each pair of tracks is the Toggle Stereo/Mono button. When this button is light gray and showing two separate circles (left side of Figure 7.8), each audio track will be captured as a separate mono track. When dark gray, showing intersecting circles (right side of Figure 7.8), the tracks will be captured as a stereo pair.
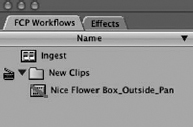
Figure 7.6 Offline clip in the Browser.
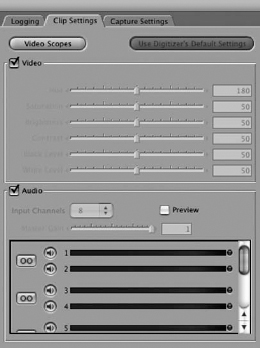
Figure 7.7 The Clip Settings tab.
![]()
Figure 7.8 Toggle set to two mono tracks (left); toggle set to stereo (right).
There are two tried-and-true examples of how this is used in the real world. The first is to use separate microphones isolated to separate tracks. With this method, if one of your microphones is distorted, you can just turn off the track during capture and use only the good mic.
Second, most broadcast master tapes have different types of audio on different tracks (i.e., voice isolated from natural sound and music). If you have a project that involves capturing from a master to reuse for something new, this is very useful. (If you don't immediately see why, think about how difficult it is to cut a voice track if it is already mixed with music.)
Thinking about how to use the audio tracks available to you on capture (and when shooting) is an important aspect of workflows. Remember, problems with audio are often more noticeable to a viewer than video problems are.
Capture Settings Tab
The Capture Settings tab (Figure 7.9) is where you tell FCP how to capture your clips. Settings here include Device Control (how FCP communicates with and controls your deck), Capture/Input (where you set the codec your clip will be captured as—much more on codecs in Chapter 5), and a button that brings up the Scratch Disks window.

Figure 7.9 The Capture Settings tab.
One important time that Final Cut Pro writes new media files is during capture. The scratch disks can be set through the rightmost tab in the Log and Capture window, and using the Scratch Disk button.
The Scratch Disks window (Figure 7.10) is reachable in other ways in Final Cut Pro. This is logical because initial captures are not the only kind of file that FCP writes. Indeed, if you look at this window, you will see that it allows you to set scratch disks not only for video and audio captures, but also for video and audio render files, the audio waveform and thumbnail images, and the automatically saved copies of a project.
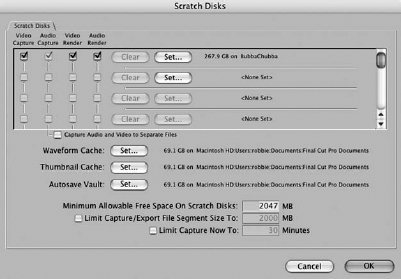
Figure 7.10 The Scratch Disks window.
Log and Transfer
As we've already discussed, the proliferation of tapeless formats over the past few years has been amazing. One of those formats, Panasonic's P2, has seen widespread acclaim for its flexibility. Cameras such as the AG-HVX200 can shoot anything from DV up to 1080i HD at various frame rates!
Apple has recognized the importance of this format and has developed the Log and Transfer window. (This feature can also be used with Sony Video Disk Units (VDUs) and AVCHD formats.) Although we can capture footage from a P2 camera as we would with the Log and Capture window, why would we? That is a linear process, and more time consuming than it should be. P2 is a tapeless format, and data is written directly to the P2 card. Because this data can be accessed nonlinearly, we can simply transfer the data from the card to our scratch disks.
The P2 cards contain data in the MXF format, which is an open-source “wrapper” for various types of video codecs. It is these MXF files that need to be “unwrapped” to ingest this type of media into FCP. There is more on MXF in Chapter 5. The beauty of the Log and Transfer window is that even though Final Cut Pro cannot use MXF files directly, it can extract the media contained inside the MXF structure.
Let's look at the process.
Mounting a P2 Card and Folders
Prior to actually using the Log and Transfer window, we need to mount the P2 card (and/or folders) to our computer to be able to read data off it. There are several methods for doing this:
- Using a Panasonic P2 card reader or store drive connected to your machine via FireWire or USB.
- Using the PCMIA card slot on a PowerBook (note that this requires a driver from Panasonic (https://eww.pavc.panasonic.co.jp/proav/support/cs/csregistp2m/ep2main/soft_e.htm). Newer MacBook Pros do not have this capability natively because they use the newer and faster ExpressCard/34 slot. However, adapters are available (see http://www.duel-systemsadapters.com/).
- Using a P2-equipped camera, such as the AG-HVX200, as a card reader connected via FireWire.
- Mounting P2 archived disk images (more on this later).
- Via a folder on a local or networked disk (more on this later).
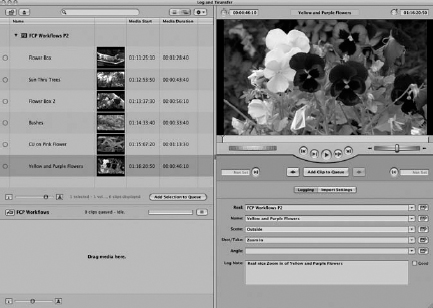
Figure 7.11 The Log and Transfer window.
Once you have mounted your P2 card or archived image or found the folder that contains the P2 file structure, it's time to ingest the media. Inside Final Cut Pro, go to the File Menu > Log and Transfer or Command-Shift-8. A new window will open up. Don't let the window scare you—it's really not that complicated. Let's break it down into its separate parts.
The Browse Area
The Browse area of the Log and Transfer window is where you can see the separate media files that are contained on P2 volumes or in folders.
The top bar of the Browse area contains a number of controls.
Add Folder Button—Opens a dialogue box to choose a folder with the valid P2 folder structure.
Eject Button—Ejects the selected folder, P2 card, or disk image. If you have a P2 card selected, this button will also unmount the card in the Finder.

Figure 7.12 The Browse area of the Log and Transfer window.
Search Box—Using this box, you can search for clip names and timecode. Unlike the search function in the Browser of Final Cut Pro, which returns items in a separate window, the search function in the Log and Transfer window simply limits which clips are displayed below.
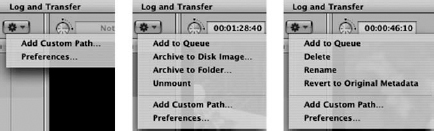
Figure 7.13 Action menu with nothing selected (left); Action menu with P2 card selected (center); Action menu with clip selected (right).
View Buttons—There are two options here: the Flat List view (the one with the parallel lines) and the Hierarchical List view (the one with stair-stepped lines). In the Flat List view, clips are listed without regard to the card or folder they are in. This view is much like the List view in the Final Cut Pro Browser, with one big difference: spanned clips are grouped together as one item. Spanned clips are clips that “span” across multiple P2 cards or have reached a file size of 4GB. In the Hierarchical List view, clips are grouped by their volume or folder.
Action Pop-up—The Action pop-up menu contents will change depending on what you have selected. With nothing selected, your options are to add a custom path (same as the Add Folder button) and preferences for the Log and Transfer window. With a P2 card selected, you can choose to add all of the clips on that volume to the Transfer Queue, to archive the contents of the card to a disk image or a folder, or to unmount the card. With a clip selected, you can choose to add that individual clip to the Transfer Queue, to delete or rename the clip, or to revert to the original metadata (more on this later).
The middle part of the Browse area contains folders and volumes you have mounted (P2 cards will mount here automatically), and will look slightly different depending on your selected view. There is one icon here to pay attention to. On the left-hand side is a circle called the media map indictor. If the clip has not been transferred, the indictor will be blank. If you have transferred only part of the clip (using In and Out points), the icon will be split in half like a pie chart. If you have transferred a clip in its entirety, the circle will be full.
The bottom of the Browse area has a slider to resize thumbnails, as well as an info section in the middle. The info section tells you how many clips you have selected, how many volumes are mounted, and how many clips are being displayed. Lastly, there is a button to add the currently selected clip(s) to the queue (more on the Transfer Queue in another section).
Archiving and Valid Folders
Before we move on to the other parts of the Log and Transfer window, let's take a look at the concepts of archiving to disk your images and folders. Prior to transferring your footage and reformatting your cards is the time to consider archiving.
Unlike tape, P2 is meant to be reused, and unlike tape, this can present some problems. If you ever lose the media (for example, deleting it from your drive), most likely you will have already formatted the P2 card for reuse. For redundancy, many workflows archive the contents of the card. Many workflows first transfer the clips (which go to your scratch disk), and then archive the original structure of the P2 card onto a different drive. Using the Log and Transfer window, we can archive the contents of the card two ways: as a disk image (.dmg) or as a folder.

Figure 7.14 A valid P2 folder.
A disk image is a .dmg file that is the same size as the card you archived, even if it's not full. If you were ever to accidentally wipe from this card the media you had transferred, you could mount the disk image and transfer the footage again.
Archiving to a folder creates a valid P2 archive folder that transfers only the contents on the card to a location of your choice. This brings up an interesting issue. Many people make archives manually by simply dragging items off a mounted P2 card onto the drive of their choice. It's okay to do this (although FCP makes it more elegant), but you must make sure that you copy the whole contents folder, not just subfolders, for Log and Transfer to recognize the items as part of a valid P2 folder. So, what is a valid P2 folder?
A valid P2 Folder contains:
Contents—The main parent folder that all subfolders live in.
Audio—As the name implies, this folder contains audio for your clips as MXF files.
Clip—Contains XML files for each clip. These XML files contain metadata and instructions about what MXF files belong to each clip.
Icon—Contains thumbnails of each clip.
Proxy—Contains low-resolution video clips for each full-resolution clip. Not all P2 cameras create these.
Video—Contains all of the video for your clips as MXF files. These files correspond to the codec you shot with—DV, DVCPRO HD, and so on.
Voice—Contains voice notes for each clip. Not all cameras support this feature.
The Preview Area
The Preview area is very similar to that of the Log and Capture window. In fact, there are only a few differences in terms of overall functionality.
Clips are loaded into the Preview area when you select them in the Browse area. So if you select a single clip in the Browse area, it's automatically loaded into the Preview area. What's neat about this is that if you select multiple clips, the Log and Transfer window will bridge them automatically for you—meaning that when you reach the end of clip 1, clip 2 will start playing.
Once a clip is loaded into the Preview area, you can set In and Out points and navigate (JKL, jog/shuttle, etc.) just as you would in the Log and Capture window.
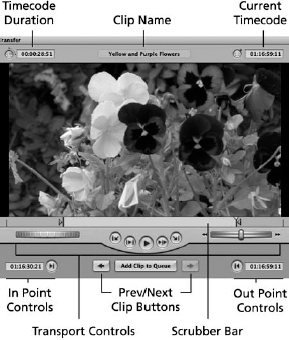
Figure 7.15 The Preview area of the Log and Transfer window.
There are, however, a number of things to be aware of:
Clip Name—You'll notice when you load a clip into the Preview area between the duration and current timecode box that the name of your clip is displayed. By default (or prior to naming it), this will display something like 000126. This number is the clip ID. Every clip will have a unique clip ID. Even if you rename the clip, this ID will come along as part of the clip. This is important if you ever need to retransfer or find offline media.
Next Clip and Previous Clip Buttons—Because we aren't dealing with a linear format such as tape, we can easily choose to navigate to the next or previous clip in the Browse area. We do this by using the Next Clip and Previous Clip buttons at the bottom of the Preview area.
Add Clip to Queue Button—Similar to the button found at the bottom of the Browse area, this will take the clip that you're working with and, based on In and Out points and logging and import settings (discussed next), add that clip to the Transfer Queue.
Audio Preview—Another difference between the Preview area and the Log and Transfer window is that in the Preview area, you can hear your audio only when you are playing at normal speed (backward or forward)—you cannot hear audio while scrubbing.
Poor Playback in Preview Window—You may get poor playback performance when previewing directly from a mounted P2 volume. The fix is to copy the card (remember to take the whole contents folder) onto a drive. Or you can also archive the volume by using the Log and Transfer window and let FCP do the work for you.
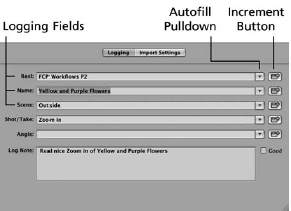
Figure 7.16 The Logging area of the Log and Transfer window.
The Logging Area
Like the Preview area, the Logging area of the Log and Transfer window is almost identical to that of the Log and Capture window. The fields are the same, but there are, of course, a few differences.
Reel and Name Fields—In the Log and Transfer window, the Reel and Name fields by default take on the name of the mounted volume and the clip ID of that clip. Keep in mind that it is very important to give proper reel names in the Log and Transfer window. There are two important reasons for reel naming:
- Spanned Clips—If you are using a spanned clip, you should try to name your reel something that is going to remind you to reconstitute the clip (from a folder or disk image) that it came from. So your reel might be named something like “MyShootA_B_C,” indicating that three cards were used.
- Reconnecting Clips—If you need to reconnect clips that have gone offline for some reason, Final Cut Pro uses the reel name you assigned—not the volume name of the P2 card—to help you search for clips.
Autofill Data—A very nice feature of the Log and Transfer window is the ability to autofill data. Every time you successfully ingest a clip, Final Cut Pro will add autofill information for each field in the Logging area. So, for example, if you ingest a clip from a reel called “Music Video,” that name will become available in the Autofill pulldown next to the Reel field so you can use it again. Using autofill in this way speeds the logging process tremendously. Note that you can always reset autofill information by going to the Action pop-up in the Browse area, choosing Preferences, and clicking the Clear Logging Autofill Cache button.
Clip Naming—Unlike in the Log and Capture window, clip names in the Logging area are not populated using other logging information such as scene, shot/take, and so on. You can type a clip name directly into the field.
The other part of the Logging area is the Clip Settings button. This button lets you adjust whether you will be transferring both video and audio, or one or the other. In addition, you can also choose which channels of audio you wish to transfer.
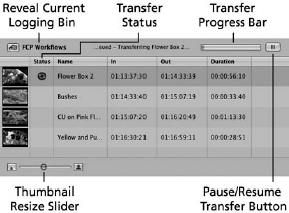
Figure 7.17 The Transfer Queue of the Log and Transfer window.
The Transfer Queue
The Transfer Queue shows the clips that are queued for ingest.
The top bar of the Transfer Queue has a button to show the current logging bin in the Browser. Unlike in the Log and Capture window, you must set the logging bin in the Browser because you cannot set it from the Log and Transfer window. In the center is a text description of the clips in the queue. To the right is a progress bar that shows the current transfer status of a clip, as well as a Pause/Resume Transfer button.
The middle part of the Transfer Queue shows the clips that are currently queued. You can reorder the clips in this list by taking the ones you want to transfer first and dragging them to the top of the list. Also note the Status column. There are three icons that can appear here, each indicating something different:
- Spinning Disc—This icon indicates that the clip is currently transferring.
- Still Disc—This icon represents a clip that has been partially transferred. Such clips will be lost if you close the Log and Transfer window or close the project with the current logging bin.
- Exclamation Point—This icon represents an error in transferring. Most often this is because the P2 volume or folder has been moved or unmounted prior to the transferring actually taking place.
Clips can be added to the Transfer Queue by clicking the Add Clip to Queue button in the Prevew area, or the Add Selection to Queue button in the Browse area, by dragging clips and volumes from the Browse area, or by dragging clips from the Browse area to the Browser.
XDCAM Ingest
Sony's XDCAM format in recent years has gone from an SD-only format (DV and IMX) to HD with XDCAM HD. Like P2, XDCAM is based on MXF as the wrapper for its media (DV, IMX, or HDV, or what Sony calls MPEG HD). As such, there is no native support for those MXF files in FCP. Unlike P2, which uses the Log and Transfer window, there is no native interface in FCP to access an XDCAM deck or folder. With a little bit of work, however, it's quite easy to work with XDCAM and XDCAM HD footage. Final Cut Pro gives us two options:

Figure 7.18 Sony XDCAM Transfer window.
- Download and install the free XDCAM Transfer Software from Sony (https://serviceplus.us.sony.biz/sony-software.aspx?model=pdzkp1. This is software to transfer and export via FireWire from an XDCAM deck or from a local directory that contains the XDCAM/XDCAM HD MXF files.
- Purchase and install Telestream's Flip4Mac MXF component for XDCAM (http://flip4mac.com/pro_xdcam.htm). This software allows for transfer and export via Gigabit Ethernet or from a local directory that contains the XDCAM/XDCAM HD MXF files. This software is very similar to the Sony software, so we will not be covering it with a full section. However, one of its advantages is the superfast transfer via Gigabit Ethernet.
Installing the XDCAM Transfer Software from Sony installs an import and export plug-in as well as the necessary File Access Mode driver for accessing an XDCAM deck. Additionally, you will need to activate PC remote mode on the camera or deck (check the manual for the camera or deck on how to do this for your specific piece of equipment). To import footage via the XDCAM Transfer plug-in, do the following:
- Go to File Menu > Import > Sony XDCAM.
- This will launch the XDCAM Transfer Software. Let's look at the main interface of the software.
Source List
On the left side of this window, you will see your sources. XDCAM and XDCAM HD discs will automatically mount in this area. Additionally, you can mount local directories by using the Add button at the bottom of the source list. You can also remove a folder (Remove button) or eject a disc (Eject button). Note that this is actually the same button—the text simply changes depending on what is selected.

Figure 7.19 The source list of the Sony XDCAM Transfer window.
Clip Image View or List View
The top center part of the window contains either the Clip Image view or the List view of all the clips from the source that you have selected. Clip information such as codec, data rate, audio information, and frame rate can be overlaid on the images or listed in List view. Note that if a proxy of the clip is not available, the clip will say, “No Image Available.”
Clip Info
The Clip Info pane, located in the bottom right corner of the window, displays a bit more information about a clip than the Clip Image view or the List view does. In this window, you can also choose which audio channels to monitor and import. Lastly, you can see subclips that you have made on the media. Creating a subclip is similar to marking a clip in the Log and Capture window. In other words, you can divide one long clip into smaller parts.
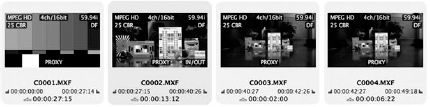
Figure 7.20 The Clip Image view in the Sony XDCAM Transfer window.
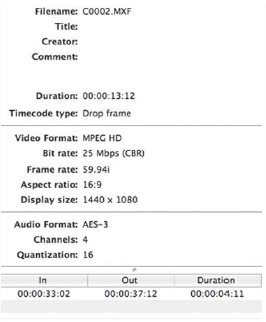
Figure 7.21 The Clip Info section of the Sony XDCAM Transfer window.
Player
The player is where you can navigate a selected clip from your Clip Image view or from List view (note that you are viewing a low-resolution proxy if available, not the full-resolution media). In the player, you can also add In and Out points to create subclips, navigate essence markers (markers in the video that the camera automatically assigns based on camera events, or you can manually add them during recording), and add clips to be imported.

Figure 7.22 The player section of the Sony XDCAM Transfer window.
Import Bar
Below the player area and the Clip Info pane, there is a pulldown to choose what FCP project you want to import the file into (the pulldown defaults to the current active project). Additionally, you can also choose not to import the files into a project, but to simply transfer the files to your selected import location (see the next section for details on import preferences).
Preferences
Because the Sony XDCAM Transfer Software is a separate application from Final Cut Pro, it has its own set of preferences. To launch these, go to File Menu > Preferences from within the XDCAM Transfer Software.
General—In the General tab of Preferences, you can choose to have imported files open up in Final Cut Pro or in another application. You can also choose to automatically add discs when mounted to the source list, and show offline discs. Additionally, you can choose your default image magnification in the Clip Image view, and also choose what channels of audio to monitor.

Figure 7.23 The General Preferences tab of the Sony XDCAM Transfer Software.
Cache—Here is where you can choose the location and size of the proxies and thumbnail cache.
Import—This is the most important tab in Preferences. Here, you can choose the import location of your media and choose whether to overwrite existing files. Unlike the Log and Capture and Log and Transfer windows, which use the scratch disks set up inside Final Cut Pro, the XDCAM Transfer Software uses this preference to choose where the media will be transferred to. It's often a wise idea to make this location the same as your Final Cut Pro scratch disks. There are also options here for how clips will be named, such as using the clip title as the filename. Lastly, you can choose to add handles to subclips and to import only monitored audio channels.
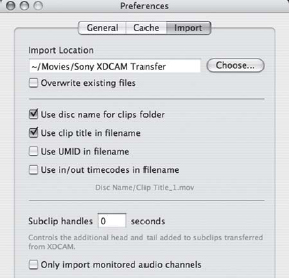
Figure 7.24 The Import Preferences tab of the Sony XDCAM Transfer Software.
XDCAM File Structure
As previously mentioned, XDCAM is based on MXF wrappers, much like P2. Although the preferred method of transferring XDCAM footage is using the XDCAM Transfer Software (or Telestream's MXF component for XDCAM), you can also transfer footage manually via the Finder to a local or remote disc, and then use the XDCAM Transfer Software to import your files from that local disc. You could do this for a variety of reasons, but one that is common in many XDCAM workflows is file backup and archiving. Just as with P2, understanding the file directory of an XDCAM disc (Sony Professional Disc) is important.
On the root level of an XDCAM disc, there are a number of XML files that refer to different metadata and instructions about clip locations and so forth. There are also four subfolders:
Clip—This directory contains the full-resolution clips wrapped as MXF files.
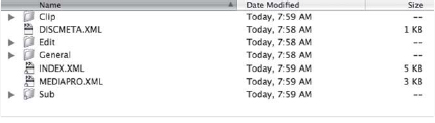
Figure 7.25 Directory structure of a Sony XDCAM disc.
Sub—The proxies of your clips (the images that you see in the player and Clip Image view) are found here.
General—This can contain other documents, such as text files, scripts, and so on (up to 500MB). Some workflows use this folder extensively for keeping these documents in one place, whereas others do not use it at all. Final Cut Pro and the XDCAM Transfer Software do not interact with this folder, so you would add or extract information from this folder manually.
Edit—EDLs from Sony's proprietary logging application are stored here. This is a Windows-only application, and is not used in most FCP workflows.
When manually backing up XDCAM discs, it is important to maintain this directory structure and also not to rename files.
File Importing
We have discussed three ways to get footage into Final Cut Pro: Log and Capture, Log and Transfer, and Sony's XDCAM Transfer Software. Frequently for a video project, you also need to use files that are already saved on a hard drive somewhere. These files include still images, graphics (animated and still), and audio files (music, narration recording, etc.). Final Cut Pro refers to this type of ingestion as importing, and it is easy to do.
In general, to import these files, go to the File Menu -> Import and choose a specific file, or choose to import files or folders. Files and entire folders can also be dragged and dropped directly into the FCP Browser from the Finder. A Finder folder dropped into the Browser becomes a bin, meaning that in the Browser, you can maintain directory structures that were created in the Finder. Technically, a file can be saved anywhere that a user has access to, and can then be imported into FCP. However, it is a good idea to have these files on your scratch disk (or on a different disk that is designated and organized for this purpose).
As discussed in the previous chapter, many file types also need some preparation to be optimized for FCP. If you try to import into FCP a file that it cannot recognize, you will get an error message. If you import a file that is recognized but not optimal, there is no message.
Next Steps
In the past few chapters, we have explored the technical aspects of video and compression and have taken a look at preparing for the edit session and ingesting media into Final Cut Pro. We are now ready to embark on the rough cut, an exciting and creative part of the process.